1
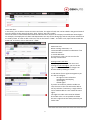
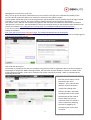
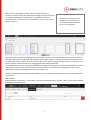
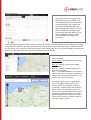
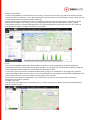
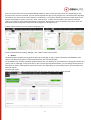
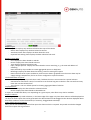
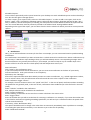
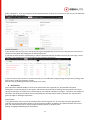
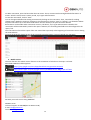
GSMauto User's Manual
Contents
General options ..................................................................................................................................................
How to start ........................................................................................................................................................
Settings ................................................................................................................................................................
Fuel cards and data import ..................................................................................................................................
Map view .............................................................................................................................................................
Reports ................................................................................................................................................................
Notifications .........................................................................................................................................................
Services ……….........................................................................................................................................................
Reservations............................................................................................................................ .............................
Mobile version ................................................................................................................................. ....................
1
1
2
4
6
8
11
12
13
14
1. General options allow to:
•
•
•
•
•
•
manage vehicles' parking information;
manage the use of a work car for private trips;
create necessary reports and send them regularly by e-mail;
create and manage areas;
add services for the car fleet and set automatic notifications;
set the rights according to the profile of an employee.
For managing your car fleet, we will equip all your vehicles with modern GPS navigation devices. Mobile data
communications are used to transmit the data, which ensures non-stop data flow and allows to monitor vehicles on
the location map.
The data that can always be monitored are speed, stopping, parking and coordinates. This allows you as an
entrepreneur to make decisions on how to manage your car fleet even more effectively.
2. How to start
GSMauto user interface is located at http://www.gsmauto.eu
In order to start using the program, we provide you with initial
username and password. The person receiving these properties
is, by default, the administrator of the company. In the future,
the administrator is authorised to add new
users/administrators and manage all rights.
It is recommended to change the password later in the menu
Settings>Personal>Change password.
On entering the program, choose preferred language. Later,
the language can be changed both on entering the program
and in the program menu Settings>Personal>Change the active
language.
If you wish the browser to remember the identification data
required for entering the program, check the box „Remember
me“. Please note that this action weakens the security of your
data.
1
3. Settings
Vehicles:
Here, you can manage the technical data of vehicles and create vehicle groups. To manage a vehicle, click on the
registration number of the vehicle. You are allowed to give the vehicle a name, determine the time of work trips and
private trips, enter leasing information, etc. Vehicle groups are especially useful in those cases in which the user is
interested to see the groups of vehicles on the map. It is recommended to create groups if the vehicles are divided
based on units or regions.
When creating a vehicle group, first, give the group a name, and then you can see the vehicles that you can add to
the group.
If you have previously set a separate sensor (e. g. a temperature detector) for a vehicle, this data can also be
displayed on the map.
If you still wish to show the created vehicle group to all users of the company, turn on the setting “Car group is
global“ in the management of vehicles groups.
Entering the reading of odometer:
You can add odometer readings under the vehicles’ management: Settings>Vehicles>Vehicle’s reg. no>Odometer.
In order generate the odometer data as correctly as possible in future reports, we recommend renewing the reading
of the odometer at least once a month. When calibrating the reading later, the time of the reading under calibration
cannot be a part of the period of any trip or joined trips. Otherwise the reading will not match in reports, and the
user is forced to delete and re-enter such reading. We recommend to calibrate readings at the beginning or the end
of a working day.
Drivers:
Here you can add, search and manage the drivers of the vehicles. Using drivers is only necessary if you wish to bind a
vehicle to a specific driver. The use of drivers also allows to change the drivers related to trips in reports and
generate driver-based statistics. This may be useful when, for example, the main driver of a vehicle is on vacation or
the vehicle is being used by another driver for other reasons.
2
Users and roles:
In this menu, you are able to create new users and roles. The rights of each user can be edited in the general view of
users by clicking on the name of the user. Then, click on "See user's rights".
The use of roles is recommended when different administration units of the company have different limited rights.
For example, the employees of Tallinn sales department can only fill out driving logs and see only those vehicles that
are used by them. In order to add a new user, click on the button "+ADD“. To create a role, open the box under the
menu and, in the box, click on the button "+ADD“.
Add a new user:
When creating usernames, it is
recommended to avoid the combination "first
name.last name"
or e-mail addresses.
If you also use roles, you can set roles for
already created users.
Settings>Users and roles
By opening the box under the menu and
moving to >info and rights, you can set the
rights related to the role. The changes can
also be saved by clicking on "Enter".
In sub-menus of user rights management you
are able to configure:
- the rights of users related to
management and display;
- report rights;
- vehicle rights.
If you do not make any vehicles visible to a
role, the users in that role will not be able to
see any vehicles. If necessary, a single vehicle
can be made visible to a user under the user's
rights.
The rights set under roles must be deleted
also under roles. It is not possible to delete
the user's rights that have been previously set
under roles.
3
Management of access with a user key:
Here, you can give a third party a limited access to our interface. This right is not a default functionality of the
account. We will create this option to an account on the basis of the specific request.
The key holder will be able to log in to the program with a generated key. The key enables to give the rights related
to display. For security reasons, the rights related to making changes cannot be given to key holders.
First, create a user, and then set the necessary rights for this user. After that select the created user and click on
"Handle user´s hash access". Set the deadline for the key and transfer the key to the third party who will be the user.
The key is as follows: http://app.gsmauto.eu/map/?login_key=bda082cbs3d3b557a4an1e42195c3943
In the case you wish to transfer only the key to view the map application, you have to embed the existing key and
transfer it as follows:
http://app.gsmauto.eu/map/embedded/?login_key=bda082cbs3d3b557a4an1e31195c3943
For example, such key may be useful in the case when a local government body wants to present on its web page the
vehicles that serve public interest.
Fuel cards and data import
The solution is provided in the case your company has previously made an agreement with us on the principles of
importing fuel receipt files. Before viewing the data, the fuel cards must be related to a vehicle or a driver in the
menu Settings>Fuel Cards. Cards can be created in the system manually by clicking "+Add" or automatically by
importing the first file.
The files of fuel stations can be
imported in the menu
"Reports". First, open the box,
and then click on the button
"Import fuel tanking data".
After the first file is imported,
we will generate in the system
automatically all fuel cards in
the file. After that you can
relate the cards to a vehicle or
driver, respectively. Relating
the cards is obligatory for
transferring the correct data
to reports.
4
After the file is uploaded, check the content of data fields and, if
necessary, select form the drop down menu the right content and ignore
unnecessary fields (select "Unspecified"). The obligatory fields are
"Purchase date", "Purchase time", "Card number", "Litres" and "Total in
original currency".
Only files in CSV format can be
uploaded. If the file format is
not accepted, please send the
file to us for inspection.
The system will remember the settings, which means that you have to set the fuel station data only once. But first,
tanking-based reports for fuel cards must be generated on your desktop. In order to generate such reports, select
the report type "Fuel card data" and, for the main data. select either "Tanking with fuel cards" or "Fuel cards". As a
result, a vehicle-/card-based report or an aggregated report will be generated.
As an additional information, the reports will display average fuel consumption, the distance travelled from the last
tanking point and the name of the fuel station. The name of the fuel station will be displayed if, at the time of
tanking, the vehicle was located in the fuel station known to us.
NB: We recommend to use the web-based solution in the case when your company uses the fuel cards of one fuelstation chain.
Address Book:
Setting contacts is necessary, if, in the future, you wish to send notifications to users. Here, you are able to add and
manage the contacts of users.
5
Settings>Personal
Here, users are able to configure their
personal settings. For example, if you
have viewing rights for the accounts of
several companies, this is where you
can choose the default account for
when the program is opened. You can
switch companies in the upper right
corner of the menu bar. Here, you can
also set a default map layer, switch
active languages and change your
password.
4. Map
In the map view the whole car fleet is seen in real time. On the left, there are vehicles you can manage, on the right,
the location of a vehicle on the map, and the direction and the status of the vehicle are shown. Vehicles are sorted
by their status. First, vehicles on the move are shown, then parking vehicles, etc. If you have already created vehicle
groups, you can select them above from the drop-down menu of vehicles.
Status meanings:
Green „arrow“- Moving vehicle and driving
direction.
Blue „P“ – Parking. Vehicle has stopped,
ignition is out.
Blue “II“ – Idle time. Vehicle’s ignition is in,
the motor is running.
Red „!“ – Possible breakdown of a device or
electric circuit. Also, the device can be out of
reach or has not sent the information on its
location for at least 15 minutes.
By configuring the function „Show labels“,
the icon is displayed with vehicle’s and
driver’s names. By choosing the function
„Clustering“, nearby vehicles are displayed
under one icon. By moving the cursor over
the icon, the list of vehicles under the icon is
displayed. The vehicles under the icon will
also be displayed on the map if you zoom in
the map. This function is the most useful if
you have a large car fleet.
6
History reconstruction:
It means the possibility to reconstruct trips on the map. In order to reconstruct a trip, choose in the map view the
vehicle you wish to reconstruct. Then, select the period of reconstruction. Click on the button “Show”. Now, you will
see the chosen trip for the chosen period on the map.
Once the data has been loaded on the map, it is possible to replay the trip. In order to do so, click on the square
button with a triangle. If you need to, you can change playback speed, pause the playback, and play it again.
In the bottom of history reconstruction page there is a graph showing those sensors (in this case "fuel") that you
have allowed in vehicle’s settings to be shown on the graph.
Areas:
This is a tool of GSMauto application which enables to locate on a map a geographical area with certain preconfigured activities performed when entering (or leaving) it. For example, you can determine to which vehicle the
area is assigned and what happens if the vehicle enters or leaves the area.
If you want to get more accurate information about what is going on in created areas, we suggest you prepare a
report containing the data of these areas. It is also recommended to set notifications of the traffic taking place in the
areas. If there are lots of areas, the creation of area groups is also possible.
You must have the rights to manage areas. If, for some reason, you do not see required areas, contact the
administrator of the user interface.
Creating a new area:
First, go to the menu Map>Areas. The easiest way is to create the area by an address. Enter the required address.
Click on „Create an area“.
7
Enter the name of the area to be created (default address). Then, choose the type of the area. Depending on the
purpose of the area to be created, you can choose between the spot or the polygon area. The information regarding
the traffic in the areas can be used in reports or notifications. To do that, choose the necessary information on the
bottom of the page in section „Use area“. Then, save the area. In order for the traffic in the areas to reach the
reports, you must set area-based notifications in the menu "Notifications" to be used within the system. Also, the
data fields related to respective areas must be configured in the reports first.
If there are lots of areas, you can create area groups, too.
Areas can be deleted by clicking „Manage” and „Delete” behind area's name.
5. Reports
The Reports Menu enables you to generate per-trip driving logs as well as reports based on consolidated or fuel
reports. The data of all reports can be exported to PDF, XLS, and CSV formats.
For immediate use, we have prepared standard reports for your desktop. If you would like to change the content of a
report, click on “Manage” in the report box. If you have the required authorization, you can change the positions of
data fields in reports, add new data, and remove data. Also, depending on your authorizations, you can delete and
add new reports.
Create a new report:
Click on "New Report". Then, narrow the options of data upon which the report is being created.
8
Report´s type:
- Trip data: Displays only the data related to the trips of the vehicle
- Sensor data: Displays only the data related to sensors
- Area based evets data: Displays the data related to areas
- Imported fuel tanking data: Displays the data related to fuel cards
Reports´s main data:
- Cars: Displays the data related to vehicles
- Drivers: Displays the data related to drivers
- Trips: Displays the data related to trips
- Input / Output periods: Displays the data related to sensor switching, e. g. the time and address of
switching.
- Data summed by days: Enables to create aggregated reports on daily basis
- Refuelings: Displays the data related to tanking. Used on creating fuel reports
- Data read from sensor inputs: Enables to present sensor data in graphical form The sensor data may be
supply voltage, temperature, fuel or an sensor configured as a special solution.
The detailed data of reports:
- Summed Input / Output periods data: Used, if additional sensors are activated as a special solution.
- Summed area events data: Used, if one wishes to see for how long was a vehicle in the area and how many
times the area was entered into.
- Trip columns: Use as a default option for showing aggregated data of vehicles.
Displayed filters:
- Vehicles: Displays the data related to selected vehicle.
- Drivers: Displays the data related to selected driver.
A report can include both filters, too. Depending on a given report, other filters may also be available.
Report's columns:
According to previously made selections, in the lower edge of the page only those data columns will be displayed on
the basis of which report data can be generated. The desired data must be dragged to the data box displayed above
data fields. Columns can be relocated and, if necessary, dragged back to desktop.
Select default period of reports:
Here, you can set the default period of the report the data on which is required. The period can also be changed
before the report data is generated.
9
Driving log management:
In traditional driving log reports user can perform the following actions, depending on configured rights:
Join trips:
We recommend to use the joining of trips in extreme cases because all joined trips will thereinafter be marked as
hidden. This function is manly used in the case when, for example, there is an unplanned stop on the route which
does not change the actual purpose of the trip.
When joining trips, first, select (mark off) those trips in the report that you wish to join. Then select from the lower
edge of the report the option “Join trips“, and, in order to confirm, click “Change selected trips“. You can join only
consecutive trips.
Adding comments:
It is possible to add single comments in the report; however, one comment can be added to all trips as well.
If the comments to be added are standardized, you can create a drop-down menu out of them, which makes it easier
to process the reports later. In order to do that, additional fields of the reports must be used. Additional fields and
the rules associated with the fields can be configured in the section of additional fields on the reports page. When an
additional field is added to the report, you can give values to this field from drop-down menu both for single and
multiple trips.
Type of trip:
In the case when all trips of the selected period are work trips or private trips, a unified trip type can be set for all
trips in the lower part of the report. A trip type for a single trip can also be set.
Confirmation of trips:
The main purpose of confirmation of trips is to produce preliminary information for an accountant, for example, who
can make calculations based on confirmed trips and archive such reports as trips confirmed by drivers.
Confirmation of trips is the last operation in filling in the log. All other operations with the report must always be
performed beforehand.
It is recommended to confirm trips under the multiple principle. First, tick all trips and then select in the log under
additional tools block “Confirm all selected rows”. Now, the statuses of all trips are “Confirmed”. The trips can be
confirmed one-by-one, too. If anything goes wrong, you can reopen the trips by marking off the trips again and
selecting “Reopen all selected rows”. A precondition for confirmation of trips is adding a respective data column,
“Trip confirmation”, to the report.
10
Scheduled reports:
You are able to periodically order reports located on your desktop to e-mails. Scheduled reports can be ordered by a
user who has the right to manage reports.
To order a report, go to report menu's sub menu "Scheduled reports". In order to add a new report, click on the
button "+ADD“. Then, complete the following options. Select the desired report, language and format (PDF / XLS /
CSV). In addition, choose the frequency of sending, the data period and e-mail address to which the reports will be
sent. The e-mail addresses must be previously entered to the address book "Settings>Address Book".
Depending on the type of the report, you can select from the list the vehicles for which you wish to receive periodic
reports.
6. Notifications
Here, you can add notifications necessary for the fleet. For example, you can create area-based or speed exceeding
notifications.
Area notifications are needed if you want to know when a vehicle entered or exited an area. Status notifications may
be necessary if a GPS device stops sending us data: you will immediately receive a corresponding message. Sensor
based notifications may primarily be necessary if, for example, you want to keep an eye on sudden drops in the
amount of fuel in the tank. Sensors include speed, fuel and temperature sensors, etc.
New notification:
Click “+ADD” in the notifications menu.
If you have already entered several notifications, you can create new notification on the basis of a previously
entered notification. Such quick selection is not compulsory.
Explanatory text "Message":
Enter all the required information about which you want to receive a notification, e.g., vehicle registration number,
area or vehicle's driver. Only the information entered here will be sent to the recipient of the notification.
Select notification trigger "Sensor”:
For example, the most common sensors are “speed” and “fuel”. In the case of speed, notifications about exceeding
the speed limit are generally used; in the case of fuel, notifications about sudden drops in the fuel level in the tank
(theft).
Select “Vehicles" included in the notification:
Also, multiple vehicles can be included in the notification.
Select “Trigger conditition”:
Allows receiving a notification in the case of an increase or decline in the sensor value.
Enter “Trigger value”:
Enter the number that you will set as the limit for receiving a notification. For example, if you enter the number 120
in this field for notifications regarding exceeding speed limits, we will send you a notification when the speed of the
vehicle exceeds 120 km/h.
If necessary, select “Notification delay”:
This option should be used if a change in the value does not necessarily immediately mean a problem. For example,
if exceeding the speed limit momentarily is not relevant to you in the case of speeding.
Select “Notification method”:
11
Notifications can be received by e-mail or SMS.
Select “Recipients”:
Enter the recipients of the notification here. If there are no message recipients in our list yet, you can create them by
clicking “Add new contact”.
The notifications are sent by email or SMS.
NB: The notifications module generates notifications in real time according to the occurred events. Sending an SMS
may be subject to a fee!
7. Services
The services module enables to set necessary services for vehicles, along with deadlines for the works. You can also
set notifications for upcoming service works here.
You can add several different services to a vehicle, for example, based on kilometres, odometer readings, or dates.
New service:
Click “+ADD” in the services module menu.
First, enter the name of the service. The name will be displayed in services view as the title of the service. Then,
choose the vehicle you wish to enter the service for.
Select "Interval´s type":
- Mileage: the time of the next service is calculated on the basis of kilometres travelled;
- Odometer value: the time of the next service is calculated on the basis of the odometer reading;
- Date: the time of the next service is calculated on the basis of the deadline of the entered service;
- Engine (work hours): the time of the next service is calculated on the basis of entered work hours.
Select “Service interval”:
If you have previously selected the type of service interval, enter in the field of service interval the following
information:
- “Mileage”, enter the run until the next service;
- „Odometer value“, enter the reading of odometer;
- „Date“, select from calendar the final date of service;
- „Engine (work hours)“, enter the standard hours of the service interval.
Select “Notification threshold“:
- Depending on the type of the service, in the drop-down menu you can choose how many kilometres/days
prior the notification will be sent.
Notification text:
Enter all the required information about which you want to receive a notification. For example, the registration
number of a vehicle, a driver or the contents of the service. Only the information entered here will be sent to the
recipient of the notification.
Select “Notification delivery method”: Notifications can be received by e-mail or SMS.
12
Select „Recipients”: Enter the recipients of the notification here. If there are no contacts in the list, you can add them
by clicking "Add new contact".
Services overview:
In the services overview you can track the upcoming service graphically. If the service is overdue, the service line is
shown red. The yellow line designates the upcoming service.
If you wish to mark services as performed, or add to a performed service another service of the same type, click on
the green "tick" behind the service and perform the necessary procedures.
If you do not have any contacts in our data base yet, you can add them during entering the services by clicking "Add
new contact" under the recipients section.
NB: The services module generates notifications once a day.
8. Reservations
The reservations module enables to reserve the vehicles that are in general use. The detailed reservation
information is now sent directly to the report, which means that the person making reservation does not have to
specify the purposes of his/her trips in the driving log. The module is based on the rights. Therefore, the visibility of
this menu may depend on whether the service provider has activated the module or whether the user has been
given the right to "Manage reservations".
General view:
In the general view, users can see the vehicles he/she has the right to see. If a user has previously grouped the
vehicles, the same groups will be shown in the reservations module. By default, the calendar displays the current
date. The calendar view can be easily changed to display weekly or monthly view.
Adding, changing and deleting new reservations:
13
To add a reservation, open the box under the main menu. There, continue with entering detailed information. It
means: Vehicle's name, Driver's name, Period, Trip's type and Comments.
To save the reservation, click on "Save".
You can change and delete the existing reservation by clicking on the reservation. Then, a window for making
changes opens. Make the necessary changes in the reservation or click on "Save" or "Delete". It is allowed to delete
only the reservations up to this date. Reservations that are already in the past cannot be deleted.
Reservations can be made within 15-minute accuracy. The Driver, Trip's type and Comments related to the
reservation will be automatically saved in the report. However, the according data fields must be configured in the
report, first.
The reservation will reach the report if the user started the trip exactly at the beginning of reservation time or during
the reserved time.
To leave the program, always log out of the system by using the button "Log out" behind you username.
9. Mobile version
The main function the mobile version features is the movement of vehicles on the map in real time.
Download GSMauto mobile app here:
https://play.google.com/store/apps/details?id=com.gsmvalve.autovalve
https://itunes.apple.com/ee/app/gsmauto.eu/id728307070?mt=8&ign-mpt=uo%3D4
We wish you much success using GSMauto!
GSMauto team
Technical support: 6 518 188(Mon-Fr 08:00–17:00)
E-mail: [email protected]
Internet: www.gsmauto.eu
14