1
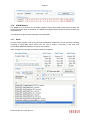
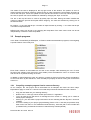
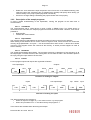
Firefly X10 - Quick Start Guide
Document No. 80-17424 Issue 5
HEBER LTD
th
Current Issue :-
Issue 5 – 8 March 2005
Previous Issues :-
Issue 4 – 29 September 2004
th
Issue 3 – 10 August 2004
th
Issue 2 – 5 August 2004
th
Issue 1 – 15 December 2003
th
©HEBER Ltd. 2005. This document and the information contained therein is the intellectual property of
HEBER Ltd and must not be disclosed to a third party without consent. Copies may be made only if
they are in full and unmodified.
Document No. 80-17424 5
HEBER LTD
Belvedere Mill
Chalford
Stroud
Gloucestershire
GL6 8NT
England
Tel: +44 (0) 1453 886000
Fax: +44 (0) 1453 885013
Email: [email protected]
http://www.heber.co.uk
Document No. 80-17424 5
Page i
CONTENTS
1
NEW IN THIS RELEASE ...................................................................................................... 1
2
INSTALLING THE SOFTWARE........................................................................................... 1
2.1
WINDOWS 2000 AND WINDOWS XP ......................................................................................... 1
2.1.1 Installation ........................................................................................................................ 1
2.1.2 File name: fflyusb.inf......................................................................................................... 1
2.1.3 File name: fflyldr.sys ......................................................................................................... 1
2.1.4 File name: fflyio.sys .......................................................................................................... 2
2.1.5 File name: fflyusb.dll ......................................................................................................... 2
2.1.6 File name: fflyusb.lib ......................................................................................................... 2
2.1.7 File name: fflyusb.h........................................................................................................... 3
2.1.8 File name: unlockio.lib ...................................................................................................... 3
2.1.9 File name: unlockio.h........................................................................................................ 3
2.1.10 Development Kit Uninstall................................................................................................. 3
2.2
LINUX INSTALLATION ................................................................................................................ 4
2.2.1 Extracting the Development Kit ........................................................................................ 4
2.2.2 Making the X10 Kernel Driver........................................................................................... 4
2.2.3 Starting the X10 driver ...................................................................................................... 4
3
DEMONSTRATION PROGRAMS ........................................................................................ 6
3.1
DIAGNOSTIC SOFTWARE .......................................................................................................... 6
3.1.1 CcTalk .............................................................................................................................. 7
3.1.2 Input and Output Test ....................................................................................................... 8
3.1.3 Real-Time clock ................................................................................................................ 9
3.1.4 Serial Ports ....................................................................................................................... 9
3.1.5 EEPROM Memory ............................................................................................................ 9
3.1.6 SRAM Memory ............................................................................................................... 10
3.1.7 Reels .............................................................................................................................. 10
3.2
SAMPLE PROGRAMS .............................................................................................................. 11
3.2.1 Compiling a sample program from its current directory .................................................. 11
3.2.2 Description of the sample programs ............................................................................... 12
4
ENUMERATION ................................................................................................................. 14
5
CONNECTING DEVICES TO THE FIREFLY X10 BOARD................................................ 15
5.1
P2, I/O 1.............................................................................................................................. 16
5.2
P3, I/O 2.............................................................................................................................. 17
2
5.3
P4, HI /CCTALK CHANNELS A & B ......................................................................................... 18
5.3.1 Boards from issue 6 onwards (56-16325-6) ................................................................... 18
5.4
P6, I/O 3.............................................................................................................................. 19
5.5
P7, AUDIO IN ........................................................................................................................ 19
Document No. 80-17424 Issue 5
Page ii
LIST OF TABLES
Table 1 - Table of Connectors.............................................................................................................. 15
Table 2 – P2, I/O 1 Connector ............................................................................................................. 16
Table 3 – P3, I/O 2 Connector ............................................................................................................. 17
2
Table 4 - P4, HI /cctalk Channels A & B .............................................................................................. 18
Table 5 – P6, I/O 3 Connector ............................................................................................................. 19
Table 6 – P7, Audio-In Connector ........................................................................................................ 19
Document No. 80-17424 Issue 5
Page iii
This page intentionally left blank.
Document No. 80-17424 Issue 5
Page 1
1 NEW IN THIS RELEASE
This covers new features in Issue 24 of the Windows X10 drivers and Issue 11 of the Linux X10
drivers:
-
During initialisation the X10 now attempts to automatically detect the currently fitted EEPROM.
The X10 can differentiate between the following devices: 24LC01, 24LC02, 24LC04, 24LC08,
24LC16, 24LC32, 24LC64, 24LC128, 24LC256 and 24LC512.
A new function has been added to the X10 API called CheckEEPROM( ). This detects the
currently fitted EEPROM.
2 INSTALLING THE SOFTWARE
2.1
Windows 2000 and Windows XP
2.1.1
Installation
Once the development kit has been installed onto your computer using the set-up program provided
on the CD, the actual USB device drivers must be installed. This can happen in one of two ways:
1. The Firefly X10 drivers have never been installed onto your PC before, therefore the drivers will be
installed for the first time.
2. You have a previous version of the drivers installed, in which case they must be upgraded.
Before attempting to install the drivers, please ensure that the Firefly X10 board is unplugged.
Following are the instructions for both install methods:
FIRST TIME INSTALLATION
•
•
•
Plug in the Firefly X10 USB Board.
A "Found New Hardware" dialog box should appear.
When asked to specify the drivers’ location, point it to the driver directory inside the development
kit directory.
DRIVER UPGRADE INSTALLATION
•
•
•
Go to the Start Menu: Programs>Heber>Firefly X10
Click on "Update X10 USB Driver"
The drivers will now automatically upgrade.
For information only, the files distributed with the device are (in the order in which they are used):
2.1.2
File name: fflyusb.inf
This is a set-up information file that tells Windows how to install files for drivers and register them.
(Location %systemroot%\inf).
2.1.3
File name: fflyldr.sys
This file is the Windows device driver that installs the firmware onto the Anchor device. (Location
%systemroot%\system32\drivers). It is loaded briefly during the first enumeration phase after the USB
device has been detected.
Document No. 80-17424 Issue 5
Page 2
2.1.4
File name: fflyio.sys
This file is the Windows device
%systemroot%\system32\drivers).
2.1.5
driver
used
when
the
device
is
running.
(Location
File name: fflyusb.dll
This DLL provides the API defined in fflyusb.h. This will be executed when any program using the
Firefly X10 is running.
2.1.6
File name: fflyusb.lib
This file is the LIB that is used to provide an API (application interface) for the Firefly X10 USB IO
Board. This is the file that provides users with access to the Firefly X10 USB functions.
This file must be linked into your project in order to use the API.
Document No. 80-17424 Issue 5
Page 3
2.1.7
File name: fflyusb.h
This file is the C Header file which enables applications (API calls) to access the DLL functions
correctly.
This header file includes 3 other header files:
1. x10err.h: This defines Firefly X10 error codes.
2. x10serl.h: This defines constants relating to Firefly X10 serial communications.
3. x10io.h: This defines constants relating to Firefly X10 input/output.
These files tell what functions are available to the developers, and how they should be called. You
must include it in your program file.
2.1.8
File name: unlockio.lib
This module provides advanced security features that will prevent other people running your game
code. The complexities of this procedure are hidden to you.
This library file must be linked into your project in order to use it and to benefit from these security
features.
2.1.9
File name: unlockio.h
This file is the C Header file that enables you to benefit from the security features described above (in
unlockio.lib).
When the X10 is first plugged in and initialised it is in a locked state and is not functional. Before the
X10 can be used it must first be unlocked. The unlockio library provides two functions to achieve this:
BOOL UnlockX10( FireFlyUSB * FireFly );
This function unlocks the X10 and is used in all provided demonstration programs. It returns TRUE if
no problems were encountered during the unlock process and FALSE otherwise. If the X10 was
previously unlocked then this function will simply return.
BOOL UnlockX10Recheck( FireFlyUSB * FireFly );
This function is provided as an alternative to UnlockX10(). The UnlockX10Recheck() function differs
from UnlockX10() in that it always attempts to unlock the X10. If the X10 was previously unlocked and
UnlockX10Recheck() is called (using the incorrect unlockio library) then the unlock process will fail and
the X10 will re-lock itself.
A final function is provided in the unlockio library:
BOOL VerifyX10UnlockLibrary( FireFlyUSB * FireFly );
This function ensures that the unlockio library is correctly linked to the fitted X10. It does not attempt to
unlock or re-lock the X10. The function returns TRUE if the unlockio library matches and FALSE
otherwise.
You must include unlockio.h in your program file.
2.1.10 Development Kit Uninstall
In order to uninstall the software follow these steps:
•
•
•
•
Start Menu>Control Panel>Add/Remove Programs.
Select “Firefly X10 Development Kit”
Click Remove.
When asked to confirm, click Yes.
Document No. 80-17424 Issue 5
Page 4
The software will now be removed from your system.
2.2
Linux Installation
2.2.1
Extracting the Development Kit
First find a suitable location to install the development kit (/usr/src/x10 is recommended). Create the
required directory and then unzip the supplied X10 tar archive:
•
•
•
•
cd /usr/src
mkdir x10
cd x10
tar –xzf fflyusb.tar.gz
For the remainder of this guide it will be assumed that the development kit is placed in directory
/usr/src/x10.
2.2.2
Making the X10 Kernel Driver
Due to the many variations of Linux kernel builds, it is impossible to supply pre-compiled versions of
the X10 kernel driver. It is therefore necessary for the end-user to manually build the X10 kernel
driver.
The process for building the X10 kernel driver differs slightly depending on the version of the Linux
kernel you are using. The X10 drivers have been tested on kernel versions 2.4.18 and above – early
versions of the Linux kernel are not supported, although they should work.
2.2.2.1
Building under Linux kernel version 2.4.*
To build the X10 driver under a 2.4.* Linux kernel, please follow these instructions:
•
•
cd /usr/src/x10/driver
make
The X10 kernel driver has now been created, and is called “X10.o”.
2.2.2.2
Building under Linux kernel version 2.6.*
Rather than providing a full makefile, the makefile for the required target kernel is used instead. This
means that a full configured and built set of kernel sources is required to make the X10 driver. For a
good introduction to the changes required to port modules to the 2.6 kernel see
http://lwn.net/Articles/21823/.
The 2.6 makefile is called Makefile (the upper case ‘M’ is important) and is called via the kernel
makefile. To build the X10 driver under a 2.6.* Linux kernel, please follow these instructions:
•
•
cd /usr/src/x10/driver
make –C /usr/src/linux SUBDIRS=`pwd` modules
Please note that under version 2.6.* of the Linux kernel, modules have the extension ‘.ko’ instead of
‘.o’. Therefore the X10 kernel driver is called ‘X10.ko’. Please remember this when starting the driver
using ‘insmod’.
2.2.3
Starting the X10 driver
Document No. 80-17424 Issue 5
Page 5
Two batch files have been created and are located in the directory /usr/src/x10/driver: x10init (which
initialises the X10 driver) and x10remove (which closes the X10 driver). In order to execute these
batch files you must be logged in as root. Please remember that before running ‘x10remove’ to unplug
all connected X10 boards.
The batch files have been written to work with version 2.4.* of the Linux kernel. If you want to use
them under version 2.6.* then you need to manually edit the batch files to change all references of
‘X10.o’ to ‘X10.ko’.
Once the X10 driver is loaded and the X10 is plugged in, it takes a couple of seconds for the X10 to
download the required code and initialise. In order to check that the X10 is ready to go you can look at
the kernel log by using the command ‘dmesg’. One of the last entries should read “Firefly X10 Board
ready.”
Document No. 80-17424 Issue 5
Page 6
3
DEMONSTRATION PROGRAMS
A number of demonstration programs are supplied with the development kit. They give examples of
how to use the API calls described in the software user manual.
Within the “bin” directory is an executable diagnostic program named X10Diag.exe as well as a XML
script entitled cctalk_4_1. This executable will allow you to test each area of the Firefly X10’s
functionality. Even though the code is not provided, users can have an idea of the range of opportunity
offered by the board. Please note that this program is currently only available under Windows, and has
not yet been ported to Linux.
When ready to write software for the board, the user should to refer to the “sample” directory where all
functionality is independently described. Source code demonstrating how to use some of the functions
(described in the software user manual) is provided. These samples can be executed directly or
recompiled and modified as required by user. The sample software is identical for both Windows and
Linux versions.
3.1
Diagnostic Software
To start running this program, it is advised to first check that the power is on, then unplug the USB
cable and plug it back in. When the Firefly X10 appears in Device Manager the demonstration
program can be run.
When first clicking on X10DIAG.exe, the “About” tab is displayed and shows the status of the
connection as well as the version of the libraries provided.
Document No. 80-17424 Issue 5
Page 7
At anytime while running the program, if USB connection is lost, clicking “Re-initialise” should restore
the USB connection between the firefly X10 board and Windows operating system.
At the top of the display, a user will be able to navigate from one X10 function test to another by
clicking on the specific tab:
3.1.1
CcTalk
This part of the diagnostic program allows the user to communicate with a coin acceptor or
any other cctalk device connected to the X10 board.
When selecting a command from the output window and clicking “Host>>>Device” button,
the corresponding line of the XML script is executed.
Document No. 80-17424 Issue 5
Page 8
3.1.2
Input and Output Test
The first time the “input/output” tab is clicked, the program reinitializes all the output lamps to 0 (no
1
light) and updates all the inputs to the status of the switches on the board.
Moving the cursor over any of the “output lamps” radio button will change the status of the output lamp
on the board. If the output lamp was off it will turn on. The status of the radio button will be updated at
the same time.
When switching an input on the board, the status of the “Input Switches” check box will be updated on
the screen.
When switching a dip on the board, the status of the “Dip Switches” check box will be updated on the
screen.
Switching a link I/O on the board will lead to the change of the status of the” linked input” check box on
the screen (but not the output radio button which should be linked to it). Moving the cursor over any of
the output linked lamps radio button on the screen will change the status of the output lamp on the
board as well as the check box related to the status of the input linked to it on the screen.
If changing the lamp brightness at this stage:
+the lower the value, the slower the flickering of the “linked Input Switches” check box on the
screen and the lower the brightness of the lamps on the board.
+the higher the value, the faster the flickering of the “linked Input Switches” check box (up to
continuous light) and the higher the brightness of the lamps on the board.
Auxiliary outputs working as regular outputs.
1
Each time this tab will be clicked, it should reinitialize the status of the output to ‘0’, on the board as
well as on the screen. If the reel tab was clicked in a previous test, only some of the outputs will be
reinitialized on the board as the other one are sharing their status with the reels. This number depends
on the number of reels configured.
Document No. 80-17424 Issue 5
Page 9
3.1.3
Real-Time clock
This part of the diagnostic software presents basic communication between the PIC security
microcontroller and windows. Using this tab, you will be able to access the real time clock provided by
the PIC, reset its internal clock and verify that if the X10 board is powered off the battery backed
feature of the board will keep the clock up to date.
3.1.4
Serial Ports
Click on the “Serial Port” tab on the diagnostic suite. The serial port window will be shown:-
Clicking on “send” button will send “Hello, world!” on the serial channel. If HyperTerminal has been set
to the correct communication speed, the same message will be displayed on the screen.
The user can send a string from the X10’s port A (a 9-W-D type connector) or from port B which allows
TTL communication.
The user can also modify the string to send by changing the ASCII value directly from the output
window.
3.1.5
EEPROM Memory
The EEPROM on the X10 board can be used to store data at anytime. The EEPROM is also used for
security settings (see part regarding Enumeration for details) and as a result BYTE 0 to 7 cannot be
overwritten or read. When first accessing the EEPROM from the tab menu, the start address of the
memory is set to 0x0000 and should display 256 bytes. As a result the X10 board returns an error
saying that the memory is out of range and displays random data into the memory view.
When setting a correct start address and a correct number of bytes to read which will not exceed the
memory range (EEPROM = 512 bytes --- Can be accessed from 0x8 to 0x1FF Î last byte to be
written is 0x1FE) the memory view will be displayed as follow when clicking “Update View” button and
no message will be displayed in the “Log” part.
Document No. 80-17424 Issue 5
Page 10
3.1.6
SRAM Memory
The SRAM is, as for the PIC microcontroller, battery backed. All the data stored into this memory will
be saved on power down of the board. The SRAM is 32 kBytes battery backed and does not have any
restricted areas.
This part of the program works identically to the EEPROM.
3.1.7
Reels
This part of the program is set up to work with STARPOINT 20RM reels. As reel devices are working
according to ramp table which varies from one reel to another, connecting a reel other than
STARPOINT 20RM will probably not spin the reel properly.
When clicking on the reel tab, the following window will appear:
Document No. 80-17424 Issue 5
Page 11
The status of the reels is displayed in the top right corner of the window. The position is set to a
random position and will be used as a reference later in order to display the new position according to
how far the reel spins. It does not update from the optical index sensor on the reel). When spinning all
the reels, a specific reel can be disabled or enabled by changing the “Spin” check box.
The box in the top left corner is used to physically spin the reels. Moving the slider modified the
number of steps the spin will accomplish before stopping. The reels are activated by clicking one of
the buttons below.
By clicking “+1” the reels will all spin 1*number of steps forward. By clicking “-1” the reels will all spin
1*number of steps backward.
Different spin ramps can be set up by changing the ramp table of the reels. All the reels can be set
independently or share the same ramp table.
3.2
Sample programs
In the folder c:\heber\firefly X10\Samples, 10 folders contains demonstration programs, each targeting
a specific feature of the Firefly X10
Each folder contains an executable file as well as the sample code illustrating the use of some
functions (see software user manual for more details). Each executable file runs in a console mode
and can be run by double clicking on file.exe.
In addition to these folders an extra “lib” directory contains a proper exit function which will identify if
an error was return by the USB driver, close the USB port properly as well as closing the console from
Visual C++.
3.2.1
Compiling a sample program from its current directory
As an example, the reel project will be described but all samples will follow the same steps.
Explanations apply to Visual C++ version 6 but similar steps should be followed for other versions.
•
•
•
•
•
Copy the reel folder into your working directory.
Double click on “reels.cpp” which should open Visual C++ application.
Trying to build the file will lead to a message box from visual c++ asking you to create an
active project workspace.
Clicking on “yes” will create a project and return an error advising that file "fflyusb.h" cannot be
included.
Access the setting of your project (project\setting). Select “C/C++” tab and pre-processor drop
down menu from there. In the additional include directory, insert the path of X10 include files
(C:\heber\FireFly X10\include as well as C:\heber\FireFly X10\samples\lib)
Document No. 80-17424 Issue 5
Page 12
•
Select the “Link” tab and the input drop down menu from there. In the additional library path,
insert the path of the X10 library files. (C:\heber\FireFly X10\lib) and specify which library you
need to identify in the project option (fflyusb.lib unlockio.lib)
Press ok to change settings. Rebuilding the project should now work properly.
•
3.2.2
Description of the sample programs
To have a better understanding of this explanation, running the program at the same time is
recommended.
3.2.2.1 Cctalkdemo
The communication with a cctalk device is using a buffer in SRAM. Even if no CCtalk device is
connected to the X10 board, the sample program can erase the receive buffer. However, it will not be
possible to:
• Read a buffer
• Initialise the communication.
3.2.2.2 Eepromdemo
The program requires a start address as well as a number of bytes to read from this address.
When setting a start address and a correct number of bytes to read, ensure that will not exceed the
memory range (EEPROM = 512 bytes --- Can be accessed from 0x8 to 0x1FF => last bit to be written
is 0x1FE). The program returns the contents of the memory. A similar process happens in order to
write to memory.
3.2.2.3 Fadedemo
The sample demonstrates lamp fading. The programs executes a caterpillar by first switching on all
the output lights, one after the other, then turning them off one after the other. The animation speed is
set up by using the input switches IP16 to IP23.
3.2.2.4 Iodemo
For this program inputs and outputs are organised as follows:
Link Input/Output
OP7
OP0
LSB
Outputs
OP8
OP15
LSB
MSB
MSB
0
OP23
OP16
LSB
1
OP24
OP31
LSB
MSB
2
MSB
3
Direction of reading for outputs
Link Input/Output
Inputs
IP7
IP0
LSB
MSB
IP8
IP15
LSB
0
MSB
1
IP16
IP23
LSB
MSB
2
Direction of reading for inputs
The status reported by the program is:
• When an output is on (light on) => the value is set to 1 by the program.
• When an input switch is on => the value read by the program is 1.
Three menus are available when launching the sample:
Document No. 80-17424 Issue 5
Dip
switch
Input
1
8
LSB
MSB
SW
Page 13
•
•
•
“T” will test the general X10 input reading and output writing. When it is started, each time a
user presses one of the keys of the program, the status of the inputs is updated on the screen
and the next output is lit.
“P” will send a 150 ms pulse to all outputs, one after the other each time a key is pressed.
“U” will read the inputs all together.
3.2.2.5
Paralleldemo
This demonstrates the X10 functionality to drive parallel devices (e.g. coin hoppers). There are two
modes of operation:
•
•
Press ‘P’ to test input pulse reading.
Press ‘H’ to test parallel hopper coin release.
3.2.2.6 Reels
This sample demonstrates basic functionality of the reels. When “C” is pressed, the program spins the
first reel forward, the second backward and the third forward. If “C” is pressed again it reverses it.
3.2.2.7 Serialdemo
Serialdemo first demonstrates how to set up the serial channel. Then the program will execute two
main tasks. It is best to use a program such as HyperTerminal to monitor the results.
1) Send and receive simple character. When a single character is typed on the console, it is
displayed on HyperTerminal. When single character is typed on HyperTerminal, it is received
on the console. To exit this functionality, “c” needs to be pressed on the console.
2) It allows the user to send and receive multiple characters at once. When on the console, each
time a key is pressed, the program sends a string into HyperTerminal. When on
HyperTerminal, user can press multiple keys. The next time user will press a key; all the
characters transmitted by HyperTerminal will be displayed.
3.2.2.8
SPIdemo
This sample demonstrates communication with a Starpoint Electronic Counter (SEC) device using the
SPI protocol.
The sample sets the text “HEBER” on the SEC device, in addition to a number that increments every
time you press a key. The sample displays the output from the SEC device using four hexadecimal
bytes.
3.2.2.9
Sramdemo
Sramdemo accesses the 256 first bytes of the SRAM memory. The memory can be erased, read or
filled with data.
3.2.2.10 Timedemo
This introduces basic communication with the PIC microcontroller. When pressing any key, the user
will be able to access the real time clock provided by the PIC.
3.2.2.11 InpMuxDemo
This demonstrates input multiplexing on the X10. There are four channels (corresponding to outputs
12 – 15) each containing 24 inputs (corresponding to inputs 0 - 23). The X10 internally multiplexes
these inputs and outputs together to provide 96 inputs.
Document No. 80-17424 Issue 5
Page 14
4 ENUMERATION
This section is provided for interest. It may help to understand how the Firefly X10 USB device
interacts with Windows. Note, however, that it is not necessary to understand it in order to use a Firefly
X10 USB device.
When the Firefly X10 USB is detected on the USB port, Windows carries out the following sequence of
events:
•
A process is started called “Enumeration” in which it interrogates the Firefly X10 USB device to
find out what it is and what device driver must be loaded. The Firefly X10 USB will identify itself
using data stored in the EEPROM device (U4). This data will enable Windows to find the driver,
which will be the file fflyldr.sys. At this stage, the process is under control of the 8051 built-in USB
core, and the 8051 (U1) is not running any user program code.
As stated above, the Firefly X10 USB device identifies itself to Windows. It does this through built-in
descriptor data, apart from 6 bytes that are supplied from the EEPROM (U4). These bytes reside at
the following addresses in EEPROM:
1.
2.
3.
4.
5.
6.
0x01 Vendor ID (LSB)
0x02 Vendor ID (MSB)
0x03 Product ID (LSB)
0x04 Product ID (MSB)
0x05 Device ID (LSB)
0x06 Device ID (MSB)
EEPROM address 0x00 must always contain 0xB0. This code tells the Anchor/Cypress chip that it
must obtain software from the PC and load it into the code memory before the 8051 core can run.
Note, however, that Windows requires the Vendor ID and Product ID to identify the device driver
that is required.
•
Fflyldr.sys is the device driver that will be identified as being required and it will be loaded. It
downloads software to the 8051 code memory space. Once it has downloaded the software to the
8051, its function is complete and it has no other use. It then allows the 8051 to run this
downloaded code.
•
The first thing that the 8051 does when it runs the downloaded code is to disconnect itself
(electrically) from the USB. This is so that Windows thinks that it has been unplugged, causing
Windows to remove the device driver that it had loaded (fflyldr.sys).
•
After a short delay, the 8051 reconnects itself (electrically) to the USB bus and Windows carries
out the “Enumeration” process again on this “new” USB device. This time, the interrogation
process is controlled by the 8051, which identifies itself differently, causing Windows to identify a
different device driver to be identified as the one to be loaded. The driver loaded this time is
fflyio.sys. This provides the device driver that the API (application interface) functions in fflyusb.dll
require. The API functions are described in detail in the document x10-soft_user_manual.doc.
•
When the device identifies itself to Windows this time, the Vendor ID, Product ID and Device ID
are supplied by the 8051 code, not the EEPROM. Again, it is only the Vendor ID and Product ID
that control which driver is loaded.
Document No. 80-17424 Issue 5
Page 15
5 CONNECTING DEVICES TO THE FIREFLY X10 BOARD
The board is fitted with the following connectors:
Table 1 - Table of Connectors
Ident
P1A
P2
P3
P4
P5
P6
P7
Type
USB Type B
34W Header
50W Header
20W Header
4W AMP
16W Header
3.5mm Stereo Jack Socket
And organised as follow on the board
Document No. 80-17424 Issue 5
Function
USB (connectors in parallel)
I/O 1
I/O 2
2
HI /cctalk Channels A & B
+12V Power in. (Hard Disk style connector)
I/O 3
Audio In
Page 16
5.1
P2, I/O 1
This is a 34w Header.
Table 2 – P2, I/O 1 Connector
Reference:
Type:
Description:
P2
34W Header
I/O 1
Open Drain Output OP0/Input IP16
Open Drain Output OP2/Input IP18
Open Drain Output OP4/Input IP20
Open Drain Output OP6/Input IP22
Open Drain Output OP8
Open Drain Output OP10
Open Drain Output OP12
Open Drain Output OP14
Input IP0
Input IP2
Input IP4
+12V Current Sensed
Ground (0V)
Loudspeaker (left)+
Loudspeaker (left)Ground (0V)
Left Audio Line In
Document No. 80-17424 Issue 5
1
3
5
7
9
11
13
15
17
19
21
23
25
27
29
31
33
2
4
6
8
10
12
14
16
18
20
22
24
26
28
30
32
34
Open Drain Output OP1/Input IP17
Open Drain Output OP3/Input IP19
Open Drain Output OP5/Input IP21
Open Drain Output OP7/Input IP23
Open Drain Output OP9
Open Drain Output OP11
Open Drain Output OP13
Open Drain Output OP15
Input IP1
Input IP3
Input IP5
+12V Power
Ground (0V)
Loudspeaker (right)+
Loudspeaker (right)Ground (0V)
Right Audio Line In
Page 17
5.2
P3, I/O 2
This is a 50w Header. It may be fitted with a ribbon cable assembly to jump to a 50W 'D' Type on an
I/O panel.
The high current outputs should use all three connections if the load will draw a high current.
Otherwise, only one of the connections needs to be made. Similarly, sufficient ground connections
should be used to meet the maximum load current expected.
Table 3 – P3, I/O 2 Connector
Reference:
Type:
Description:
P3
50W Header
I/O 2
Open Drain Output OP16
Open Drain Output OP18
Open Drain Output OP20
Open Drain Output OP22
Open Drain Output OP24
Open Drain Output OP26
High Current Output OP28
High Current Output OP29
High Current Output OP29
High Current Output OP30
High Current Output OP31
High Current Output OP31
Input IP6
Input IP8
Input IP10
Input IP12
Input IP14
+12V
+12V
Ground (0V)
Ground (0V)
Ground (0V)
Security Switch SW1-4 common
Security Switch SW 1
Security Switch SW 3
Document No. 80-17424 Issue 5
1
3
5
7
9
11
13
15
17
19
21
23
25
27
29
31
33
35
37
39
41
43
45
47
49
2
4
6
8
10
12
14
16
18
20
22
24
26
28
30
32
34
36
38
40
42
44
46
48
50
Open Drain Output OP17
Open Drain Output OP19
Open Drain Output OP21
Open Drain Output OP23
Open Drain Output OP25
Open Drain Output OP27
High Current Output OP28
High Current Output OP28
High Current Output OP29
High Current Output OP30
High Current Output OP30
High Current Output OP31
Input IP7
Input IP9
Input IP11
Input IP13
Input IP15
+12V
+12V
Ground (0V)
Ground (0V)
Ground (0V)
Ground (0V)
Security Switch SW 2
Security Switch SW 4
Page 18
5.3
P4, HI2/cctalk Channels A & B
This connector provides 2 HII/cctalk interface channels. It may be fitted with a 20W IDC header and
the 20W ribbon split to provide 2 Industry Standard 10W Connections.
2
Table 4 - P4, HI /cctalk Channels A & B
Reference:
Type:
Description:
P4
20W Header
2
HI /cctalk Channels A & B
HII/cctalk
CHANNEL A
HII/cctalk
CHANNEL B
5.3.1
DATA Channel A
1
2
Ground (0V)
BUSY Channel A
3
4
Ground (0V)
RESET Channel A
(*Output OP8)
+12V Power
5
6
7
8
Ground (0V)
Ground (0V)
9
10
+12V Power
DATA Channel B
11
12
Ground (0V)
BUSY Channel B
13
14
Ground (0V)
RESET Channel B
(*Output OP9)
+12V Power
15
16
17
18
Ground (0V)
Ground (0V)
19
20
+12V Power
HII/cctalk
CHANNEL A
HII/cctalk
CHANNEL B
Boards from issue 6 onwards (56-16325-6)
Note that the cctalk receiver is configured for +5V operation. If the interface is operating at +12V
levels, then R32 should be removed and fitted in R33 position instead. If this is not done, the cctalk
interface will work but with slightly reduced noise immunity and will be pulled up to 5V by the Firefly
X10. This is unlikely to cause any problems.
Document No. 80-17424 Issue 5
Page 19
5.4
P6, I/O 3
This is a 16w Header.
Table 5 – P6, I/O 3 Connector
Reference:
Type:
Description:
P6
16W Header
I/O 3
Ground (0V)
Serial RS232 Input RXD A
Serial RS232 Input CTS A
* Serial TTL Input RXD B
* +12V output
Auxiliary CMOS Output AUX0
Auxiliary CMOS Output AUX2
Auxiliary CMOS Output AUX4
1
3
5
7
9
11
13
15
2
4
6
8
10
12
14
16
Ground (0V)
Serial RS232 Output TXD A
Serial RS232 Output RTS A
* Serial TTL Output TXD B
* -12V output
Auxiliary CMOS Output AUX1
Auxiliary CMOS Output AUX3
Auxiliary CMOS Output AUX5
+12V and –12V outputs are only available if a +12V source has been connected to P5. However
RS232 signal levels are generated on the Firefly X10 board and it is not necessary to connect a +12V
power source to use RS232 signals. The +12V and –12V outputs are intended for use by a BACTA
port.
5.5
P7, Audio In
This is 3.5mm stereo jack Socket. It duplicates the Audio Line In signals on Pins 33 & 34 of Connector
P2 to allow connection to Firefly 700 via a standard jack-Jack lead.
The jack ground connections must be connected at both ends of the cable to obtain lowest
background (digital) noise.
Table 6 – P7, Audio-In Connector
Reference:
Type:
Description:
P7
3.5mm stereo jack Socket
Audio In
Document No. 80-17424 Issue 5