1
Pogamut - Manual
Pogamut - Manual
Table of Contents
1. Introduction ................................................................................................................... 1
2. Requirements ................................................................................................................. 2
Pogamut platform software requirements (for All-In-One installer version): ........................... 2
Pogamut platform hardware requirements ....................................................................... 2
Unreal Tournament 2004 requirements ........................................................................... 2
Recommended workplace setup .................................................................................... 3
I. Beginner ........................................................................................................................ 4
3. Quick install guide .................................................................................................. 6
Pogamut: Quick install using installer .................................................................... 6
Introduction ............................................................................................... 6
Preparation ................................................................................................ 6
Installation ................................................................................................ 6
What next? ........................................................................................................ 7
4. Working with NetBeans IDE (Simple mode) ................................................................ 8
Introduction ....................................................................................................... 8
Before you start using Pogamut ............................................................................ 8
Opening a new project ........................................................................................ 8
Controls of the simple mode ................................................................................ 8
Switching between Simple and Advanced mode ....................................................... 9
5. Additional resources .............................................................................................. 10
II. Advanced user ............................................................................................................. 11
6. Using the SVN version .......................................................................................... 15
Introduction ..................................................................................................... 15
Preparation ...................................................................................................... 15
Installation ....................................................................................................... 15
7. Installing UT2004 ................................................................................................. 16
What is UT2004 ............................................................................................... 16
Installing retail version of UT2004 ....................................................................... 16
Installing standalone dedicated server ................................................................... 16
What is UT2004 dedicated server ? .............................................................. 16
Getting UT2004 dedicated server ................................................................. 17
Installing UT2004 dedicated server .............................................................. 17
Installing Gamebots 2004 ................................................................................... 17
What is Gamebots 2004 ............................................................................. 18
Getting Gamebots 2004 ............................................................................. 18
Installing Gamebots 2004 ........................................................................... 18
Conclusion ....................................................................................................... 18
8. Configuring and running server ............................................................................... 19
Intro ............................................................................................................... 19
Running .......................................................................................................... 19
Using mutators ......................................................................................... 19
Setting up the server ......................................................................................... 20
9. Working with NetBeans IDE (Advanced mode) .......................................................... 22
Introduction ..................................................................................................... 22
Creating a new project ....................................................................................... 22
Working with files ............................................................................................ 23
Connecting to UT2004 ....................................................................................... 24
Control server .................................................................................................. 25
Build, Run and Debug ....................................................................................... 26
Remote control panel ......................................................................................... 27
Logs ............................................................................................................... 28
iv
Pogamut - Manual
Introspection ....................................................................................................
10. Architecture ........................................................................................................
Introduction .....................................................................................................
Gamebots 2004 ................................................................................................
Parser .............................................................................................................
Remote parser ..........................................................................................
Local parser .............................................................................................
Mediator ..........................................................................................................
Client ..............................................................................................................
IDE ................................................................................................................
11. Parser ................................................................................................................
Introduction .....................................................................................................
Remote parser ..................................................................................................
Using Remote parser .................................................................................
Local parser .....................................................................................................
Using Local parser ....................................................................................
12. Client package ....................................................................................................
Introduction .....................................................................................................
Agent class ......................................................................................................
AgentBody class ...............................................................................................
Initialization, Configuration and Respawn .....................................................
Message listeners ......................................................................................
Movement commands ................................................................................
Path searches and Reach checks ..................................................................
Traces and AutoTraces ..............................................................................
Shooting and weapons ...............................................................................
Items ......................................................................................................
In-game messages .....................................................................................
Recording ................................................................................................
System commands ....................................................................................
AgentMemory class ...........................................................................................
State of agent ...........................................................................................
Zone changes ...........................................................................................
Sensory information ..................................................................................
Traces .....................................................................................................
Short-term memory ...................................................................................
Long-term memory ...................................................................................
Inventory information ................................................................................
Score ......................................................................................................
Kills .......................................................................................................
GameMap class ................................................................................................
Navigation ...............................................................................................
Nearest ....................................................................................................
A* ..........................................................................................................
GetPath ...................................................................................................
RunAlong the path ....................................................................................
Others .....................................................................................................
13. Three kinds of agents ...........................................................................................
Introduction .....................................................................................................
Java Bot ..........................................................................................................
Scripted Bot .....................................................................................................
What scripting languages can I use? .............................................................
POSH Bot .......................................................................................................
14. How to create an agent .........................................................................................
v
29
30
30
30
31
31
31
31
31
32
33
33
33
33
33
34
35
35
35
36
36
37
38
39
40
40
41
41
42
42
42
42
43
43
45
45
46
46
47
47
47
47
48
48
48
49
49
50
50
50
50
50
50
52
Pogamut - Manual
Introduction .....................................................................................................
Choosing a model .............................................................................................
What kind of an agent ? .....................................................................................
Starting a project ..............................................................................................
Looking around, moving around ..........................................................................
Know where you are going ................................................................................
Weapons ablazing .............................................................................................
Looking for ... ..................................................................................................
Listeners: reacting to environment .......................................................................
Logs and Messages ...........................................................................................
Introspection ....................................................................................................
15. Example .............................................................................................................
Introduction .....................................................................................................
First decisions: agent type and model ...................................................................
What should agent do ? .....................................................................................
doLogic method - heart of the agent .....................................................................
Weapon selection ..............................................................................................
Engaging the enemy ..........................................................................................
Cease the fire ...................................................................................................
When shot at, turn around ..................................................................................
Chasing the enemy ............................................................................................
Evade obstacles ................................................................................................
Take what you see ............................................................................................
Seek healing when wounded ...............................................................................
Collect items ....................................................................................................
Introspection and playing the virtual puppeteer .......................................................
Conclusion .......................................................................................................
16. Experiments ........................................................................................................
Introduction .....................................................................................................
Principle of the Drools (greatly simplified) ............................................................
Drools file .......................................................................................................
Rules ..............................................................................................................
Things to do in the rules ....................................................................................
Automatically inserted facts ................................................................................
Miscellaneous info ............................................................................................
vi
52
52
53
53
53
55
56
58
60
60
62
63
63
63
63
64
65
66
68
68
69
69
70
72
72
73
74
75
75
75
75
75
76
77
77
List of Figures
4.1. Simple mode panel ....................................................................................................... 9
9.1. Pogamut project types ................................................................................................. 22
9.2. Projects tab ................................................................................................................ 23
9.3. Files tab .................................................................................................................... 23
9.4. Runtime tab, with server properties ................................................................................ 24
9.5. Server control window ................................................................................................. 25
9.6. Remote control window ............................................................................................... 27
9.7. Log listing ................................................................................................................. 28
9.8. Introspection .............................................................................................................. 29
10.1. Architecture overview ................................................................................................ 30
vii
List of Examples
14.1. Example: Choosing a model .......................................................................................
14.2. Make agent follow anyone he sees ...............................................................................
14.3. Running towards a NavPoint, not necessarily reachable ....................................................
14.4. Selecting the best weapon and shooting target ................................................................
14.5. Knowing he is being shot ...........................................................................................
14.6. Agent initialization using getKnownWeapons .................................................................
14.7. Run and evade walls - using autoTrace .........................................................................
14.8. Sending messages to communication channel .................................................................
14.9. Receiving the messages, replying .................................................................................
16.1. Drools rule example ..................................................................................................
viii
53
54
56
57
58
58
60
61
61
76
Chapter 1. Introduction
Pogamut is a project aimed at prototyping virtual beings (called agents). It is a platform designed to
facilitate creation and debugging of these beings. The principal part is IDE. It is a NetBeans plugin
that enables user to code a logic of the agent and then debug it and run it in the virtual environment.
Pogamut is using Unreal Tournament 2004 [http://en.wikipedia.org/wiki/Unreal_Tournament_2004] as
an environment for agents. IDE creates agent in the environment, controls it and enables on-the-fly
debug, parameter view and modification. User can also confirm agent's behaviour visually or enter the
environment with his avatar and interact with agents.
This document is a user manual for Pogamut.
First chapters is this introduction, and list of platform requirements.
The rest of the book is divided into two parts: Beginner part explains the basics - installation, opening and
running of sample projects. Advanced user part contains description of all the features of the platform,
instructions how to use them, and examples. It is intended for users with more in-depth interest in agent
programming.
Beginnersection contain following chapters: Chapter 3, Quick install guide contains brief guide on
platform installation. Chapter 4, Working with NetBeans IDE (Simple mode) describes simple mode, best
suitable for beginners. Final chapter contains tips and links to other useful resources.
The Advanced user section makes the rest of the book:
First three chapters deal with installation of the platform and getting it to work. Chapter 6, Using the SVN
version explains how to get, compile and run a source code from the SVN repository. Those users who
need more detailed instructions on UT2004 should consult Chapter 7, Installing UT2004 (installation of
UT2004)and Chapter 8, Configuring and running server (configuration of UT2004).
Following chapter describe the IDE and instruct user on how to work with it. Chapter 9, Working with
NetBeans IDE (Advanced mode) detail full spectre of Pogamut features.
Some details on workings of the platform are given. Chapter 10, Architecture offers a short overview of
the platform architecture, while Chapter 11, Parser details one of the parts - the parser. Users seeking more
detailed information on workings of the platform are advised to look in the programmer documentation.
Chapters that follow help users to build their own agents. Chapter 13, Three kinds of agents explains what
kinds of agents can be built using the platform and what differences are between them. Chapter 12, Client
package contains the list of functions and methods offered by the Client package and how to use them.
Chapter 14, How to create an agent focuses on different parts of agent creation and offers advice and
examples. Chapter 15, Example is tutorial of the usual kind - description of building the agent, accompanied
by the commented pieces of code.
Chapter 16, Experiments describes the module Experiment - platform's connection to Drools 4 engine. It
enables to design rule-driven experiments.
1
Chapter 2. Requirements
Pogamut platform software requirements (for
All-In-One installer version):
Minimal:
• WindowsXP SP2 (theoretically any operating system capable of running Java Virtual Machine 1.6)
• TCP/IP access to Unreal Tournament 2004 game server
Recommended:
• WindowsXP SP2
• Unreal Tournament 2004
Pogamut platform hardware requirements
Minimal:
• 1GHz CPU
• 512MB RAM
• 500MB HDD space REQUIRED
Recommended:
• 2GHz CPU
• 2GB RAM
• 500MB HDD space REQUIRED
• Internet access
Unreal Tournament 2004 requirements
OS: Windows 98/Me/2000/XP
Processor: Pentium III or AMD Athlon 1.0 GHz processor (Pentium® or AMD 1.2GHz or greater
recommended)
Memory: 128MB RAM (256MB RAM or greater recommended)
Harddisk: 5.5GB HDD space REQUIRED
Sound Card: Windows® compatible sound card
Graphics card: 32 MB video card required (64 MB NVIDIA or ATI hardware T&L card recommended)
2
Requirements
Recommended workplace setup
One PC with Unreal Tournament 2004 and dedicated server. This PC provides virtual world for agents
(dedicated server) as well as visualisation of this world for a developer (UT2004). Second PC with
Netbeans IDE and Pogamut plugin could be used for development of agents. Both computers must be
linked with TCP/IP connection.
3
Part I. Beginner
Table of Contents
3. Quick install guide .......................................................................................................... 6
Pogamut: Quick install using installer ............................................................................ 6
Introduction ....................................................................................................... 6
Preparation ........................................................................................................ 6
Installation ........................................................................................................ 6
What next? ................................................................................................................ 7
4. Working with NetBeans IDE (Simple mode) ........................................................................ 8
Introduction ............................................................................................................... 8
Before you start using Pogamut .................................................................................... 8
Opening a new project ................................................................................................ 8
Controls of the simple mode ........................................................................................ 8
Switching between Simple and Advanced mode ............................................................... 9
5. Additional resources ...................................................................................................... 10
5
Chapter 3. Quick install guide
Pogamut: Quick install using installer
Introduction
Following instructions will guide you trough installation and configuration of Pogamut. The guide is
made in simplest form possible, making some instructions rather sketchy. If you think you need more
detailed instructions on any of steps, consult appropriate chapter of Pogamut: Install tutorial. [http://
artemis.ms.mff.cuni.cz/pogamut/tiki-index.php?page=How+to]
Preparation
You will need these:
• Unreal Tournament 2004 - commercially available at a game retail store
• NetBeans IDE + JAVA 1.6 - can be downloaded from NetBeans webpage [http://www.netbeans.info/
downloads/index.php]
Note
full (160MB) version of installer includes installation of NetBeans and Java 1.6.
• Pogamut installer - see section Download [http://artemis.ms.mff.cuni.cz/pogamut/tiki-index.php?
page=Download] on project webpage [http://artemis.ms.mff.cuni.cz/pogamut] .
Installation
Please follow these steps:
• Install Unreal Tournament 2004
Follow installation instructions. In case of any difficulties, consult UT2004 manual.
Note that UT2004 will try to connect to the internet. That is a normal behaviour. However, it is not
necessary for operation, so if you aren't connected to the internet, it won't prevent you from running
UT2004.
• Install NetBeans IDE
Warning
If you already have JDK 1.5 installed, It may be necessary to manually set NetBeans to use
1.6. To do so, start NetBeans and open Tools/Java Platform Manager. If 1.5 is selected, select
1.6 instead.
• Install Pogamut
Setup will lead you through installation. Installer will automatically install plug-in into NetBeans,
Gamebots into UT2004, shortcuts (like .bat file for running dedicated server) and will create required
directory structure for projects.
6
Quick install guide
Plug-in will be installed during next run of NetBeans?.
That's all, Pogamut is now installed and ready.
What next?
You will probably want to try running some example bots and get a feel of the environment. Instructions
to do so can be found in following chapters, or on the project webpage [http://artemis.ms.mff.cuni.cz/
pogamut/tiki-index.php?page=How+to].
7
Chapter 4. Working with NetBeans IDE
(Simple mode)
Introduction
In this chapter the Simple mode of Pogamut platform will be described. Simple mode doesn't offer many
features, but it is very easy to master and enables the use of Pogamut platform even for absolute beginners.
Before you start using Pogamut
First you must start a UT2004 server. Simplest way to do so is the icon, added by the installer into the
Windows Start menu. Select "Start/Programs/Pogamut/Start UT2004 server". If you do
not do this, you won't be able to launch any agents.
Opening a new project
To start a new project, select "File / New Project" from the menu. For the start, t you are probably
interested in samle Pogamut agents. Therefore select "Sample / Pogamut" category from the list
of categories.
On the next page, select a name of your project. You may also specify where the project folder will be
located, if the default location is not appropriate.
There is a checkbox, labeled "Open project in the simple mode (advisable for beginners)". Be sure to
check it.
Click "Finish".
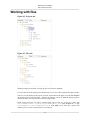
Controls of the simple mode
Controls of the simple mode are very basic. Most of the IDE windows and panels are hidden. Only Projects
panel, Pogamut simple view panel and edit window are visible
Projects panel is laced in the top left corner of the IDE. It enables you to browse your opened projects.
Double-clicking on any part of the project will open it for editation (in the edit window, on the right).
All the remaining controls of the simple mode are placed on the Pogamut simple view panel. See Figure 4.1,
“Simple mode panel”.
First you need to fill in the server URI. That is the address of the UT2004 server you will be using. If the
server URI is not set or the server isn't running, you cannot start any bots.
Note
If you run the server on the same computer as the IDE, use "ut://localhost" (without
quotation marks) as the URI.
8
Working with NetBeans
IDE (Simple mode)
Figure 4.1. Simple mode panel
Start bot and terminate bot buttons are self-explanatory.
Buttons on the lower part of the panel (arrows, Run and Walk) are used to control the bot directly. Bot
can't be controlled unless it is running.
Pause logic disables the code used to drive the bot. The bot effectively stops taking actions. Most useful
if you want to control the bot manually and the logic would interfere with it. Another click on the button
reactivates the bot's logic.
Switch to advanced view does just that - terminates Simple mode and opens the windows of Advanced
mode. More on that in the next section.
Switching between Simple and Advanced
mode
When you want to enable the more advanced features of IDE, you can switch to the Advanced mode. To
to so, simply click the "Switch to advanced view" button on the Pogamut simple view panel.
If you later want to return back to the Simple mode, open the Window menu of NetBeans and selecting
"Switch to the simple mode" option (marked by smiling face icon).
9
Chapter 5. Additional resources
Project Pogamut maintain the website http://artemis.ms.mff.cuni.cz/pogamut/. There you can find more
tutorials, video guides, documentation, forum and links to other things of interest. It is also the place to
ask questions or report bugs.
10
Part II. Advanced user
Table of Contents
6. Using the SVN version ..................................................................................................
Introduction .............................................................................................................
Preparation ..............................................................................................................
Installation ...............................................................................................................
7. Installing UT2004 .........................................................................................................
What is UT2004 .......................................................................................................
Installing retail version of UT2004 ..............................................................................
Installing standalone dedicated server ...........................................................................
What is UT2004 dedicated server ? ......................................................................
Getting UT2004 dedicated server .........................................................................
Installing UT2004 dedicated server ......................................................................
Installing Gamebots 2004 ...........................................................................................
What is Gamebots 2004 .....................................................................................
Getting Gamebots 2004 .....................................................................................
Installing Gamebots 2004 ...................................................................................
Conclusion ...............................................................................................................
8. Configuring and running server .......................................................................................
Intro .......................................................................................................................
Running ..................................................................................................................
Using mutators .................................................................................................
Setting up the server .................................................................................................
9. Working with NetBeans IDE (Advanced mode) ..................................................................
Introduction .............................................................................................................
Creating a new project ...............................................................................................
Working with files ....................................................................................................
Connecting to UT2004 ..............................................................................................
Control server ..........................................................................................................
Build, Run and Debug ...............................................................................................
Remote control panel .................................................................................................
Logs .......................................................................................................................
Introspection ............................................................................................................
10. Architecture ................................................................................................................
Introduction .............................................................................................................
Gamebots 2004 ........................................................................................................
Parser .....................................................................................................................
Remote parser ..................................................................................................
Local parser .....................................................................................................
Mediator ..................................................................................................................
Client ......................................................................................................................
IDE ........................................................................................................................
11. Parser ........................................................................................................................
Introduction .............................................................................................................
Remote parser ..........................................................................................................
Using Remote parser .........................................................................................
Local parser .............................................................................................................
Using Local parser ............................................................................................
12. Client package ............................................................................................................
Introduction .............................................................................................................
Agent class ..............................................................................................................
AgentBody class .......................................................................................................
Initialization, Configuration and Respawn .............................................................
12
15
15
15
15
16
16
16
16
16
17
17
17
18
18
18
18
19
19
19
19
20
22
22
22
23
24
25
26
27
28
29
30
30
30
31
31
31
31
31
32
33
33
33
33
33
34
35
35
35
36
36
Advanced user
Message listeners ..............................................................................................
Movement commands ........................................................................................
Path searches and Reach checks ..........................................................................
Traces and AutoTraces ......................................................................................
Shooting and weapons .......................................................................................
Items ..............................................................................................................
In-game messages .............................................................................................
Recording ........................................................................................................
System commands ............................................................................................
AgentMemory class ...................................................................................................
State of agent ...................................................................................................
Zone changes ...................................................................................................
Sensory information ..........................................................................................
Traces .............................................................................................................
Short-term memory ...........................................................................................
Long-term memory ...........................................................................................
Inventory information ........................................................................................
Score ..............................................................................................................
Kills ...............................................................................................................
GameMap class ........................................................................................................
Navigation .......................................................................................................
Nearest ............................................................................................................
A* ..................................................................................................................
GetPath ...........................................................................................................
RunAlong the path ............................................................................................
Others .............................................................................................................
13. Three kinds of agents ...................................................................................................
Introduction .............................................................................................................
Java Bot ..................................................................................................................
Scripted Bot .............................................................................................................
What scripting languages can I use? .....................................................................
POSH Bot ...............................................................................................................
14. How to create an agent .................................................................................................
Introduction .............................................................................................................
Choosing a model .....................................................................................................
What kind of an agent ? .............................................................................................
Starting a project ......................................................................................................
Looking around, moving around ..................................................................................
Know where you are going ........................................................................................
Weapons ablazing .....................................................................................................
Looking for ... ..........................................................................................................
Listeners: reacting to environment ...............................................................................
Logs and Messages ...................................................................................................
Introspection ............................................................................................................
15. Example .....................................................................................................................
Introduction .............................................................................................................
First decisions: agent type and model ...........................................................................
What should agent do ? .............................................................................................
doLogic method - heart of the agent .............................................................................
Weapon selection ......................................................................................................
Engaging the enemy ..................................................................................................
Cease the fire ...........................................................................................................
When shot at, turn around ..........................................................................................
Chasing the enemy ....................................................................................................
13
37
38
39
40
40
41
41
42
42
42
42
43
43
45
45
46
46
47
47
47
47
48
48
48
49
49
50
50
50
50
50
50
52
52
52
53
53
53
55
56
58
60
60
62
63
63
63
63
64
65
66
68
68
69
Advanced user
Evade obstacles ........................................................................................................
Take what you see ....................................................................................................
Seek healing when wounded .......................................................................................
Collect items ............................................................................................................
Introspection and playing the virtual puppeteer ...............................................................
Conclusion ...............................................................................................................
16. Experiments ................................................................................................................
Introduction .............................................................................................................
Principle of the Drools (greatly simplified) ....................................................................
Drools file ...............................................................................................................
Rules ......................................................................................................................
Things to do in the rules ............................................................................................
Automatically inserted facts ........................................................................................
Miscellaneous info ....................................................................................................
14
69
70
72
72
73
74
75
75
75
75
75
76
77
77
Chapter 6. Using the SVN version
Introduction
This chapter explains, how to obtain, compile and run the latest version of Pogamut from the project
repository. If
Please note that, despite our best efforts, this version may not be stable. In some cases, it may not even
compile. If you want a version working without problems, please use the installer with latest stable release.
Familiarity with SVN is presumed. If you lack this knowledge, tutorials are easy to find on the internet.
Preparation
You will need these:
• SVN Client
• Unreal Tournament 2004 with Gamebots 2004
• NetBeans IDE + JAVA 1.6
Instruction how to install these are at the start of the beginner section.
• Pogamut source code - can be downloaded from SVN repository [svn://artemis.ms.mff.cuni.cz/
pogamut].
When you have all these, proceed to next section.
Installation
Please follow these steps:
• Check out Pogamut code
• Build the platform
With NetBeans, first open the project PogamutCore prom PogamutNBPluginSuite directory. Perform
a build.
Then open and build PogamutNBPluginSuite project from the root directory of the SVN.
• Run the platform
Now run the compiled project. Another instance of NetBeans is started, this one with newest version
of Pogamut plugin.
That's all, Pogamut is now installed and ready.
15
Chapter 7. Installing UT2004
What is UT2004
Unreal Tournament 2004 is a FPS (First-person Shooter) game. But thanks to some of its features, it
can also be used as a environment for virtual agents, providing necessary rules, physics and graphical
representation. At the present time it is the only environment supported by Pogamut project.
UT2004 comes in two versions: retail and standalone dedicated server.
Retail version is commercial distribution, containing both client and server.
Standalone dedicated server contains server only. This version is free.
While Pogamut can work with any of the versions, there are some difficulties in working with server only.
Main problem is that you are unable to look at the environment. Without visual feedback, your possibilities
will be severely limited.
Following two sections contain instructions for installing the two versions. You only need one of them.
Installing retail version of UT2004
Follow standard installation procedure. If you encounter any difficulties, consult UT2004 manual.
Note
UT2004 will try to connect to the internet. That is normal behaviour. If you do not want it to
connect, you have to make a small change in the configuration:
Find section [IpDrv.MasterServerUplink] in the configuration file UT2004/
System/UT2004.ini (in the installation directory of UT2004).
Value DoUplink change to False
Value UplinkToGamespy change to False
Value SendStats change to False
Installing standalone dedicated server
What is UT2004 dedicated server ?
Dedicated server is an application used to run UT2004 server, usually on computer that doesn't have normal
UT2004 installation. Main reason is that UT2004 needs a lot of system resources - running server and
client on one computer may prove difficult.
You can use Pogamut with dedicated server only, but you will not be able to visually monitor the
environment - your only feedback would be status messages from your bots.
Note
If you already have installed retail version of UT2004, it is pointless to install dedicated server
- your software already has all capabilities you need.
16
Installing UT2004
Getting UT2004 dedicated server
Dedicated server package is free to download. Check one of following addresses:
• http://downloads.unrealadmin.org/UT2004/Server/
• http://www.3dgamers.com/games/unrealtourn2k4/downloads/
• Google [http://www.google.cz/search?q=ut2004+dedicated+server+download] for: "ut2004 dedicated
server download" and go on from there
New versions appear from time to time - just pick the latest.
Installing UT2004 dedicated server
Installing files
UT2004 dedicated server distribution file is a .zip archive. Just unpack the contents into desired folder. Be
sure to preserve subfolder structure (this is usually automatic).
Obtaining dedicated server CD-Key
If you have a retail version of UT2004, CD-Key comes with it. In that case, use the one you already have.
Otherwise, visit the following page: http://unreal.epicgames.com/ut2004server/cdkey.php and follow
instructions there.
Warning
If you are using a Windows computer and you already have a CD-Key, DO NOT attempt to install
a new one. It would overwrite the old one, forcing you to reinstall UT2004.
This service may be unreliable or experience temporary downtime. If you are unable to obtain CD-Key, it
is possible to setup your server to run without it. The only lost functionality is connection to Unreal Master
server (that is not necessary for Pogamut).
If you don't have CD-Key
To setup your server to run without CD-Key, open file /System/UT2004.ini (found where you
unpacked your server files). Perform following changes:
Find section [IpDrv.MasterServerUplink]
Value DoUplink change to False
Value UplinkToGamespy change to False
Value SendStats change to False
After this, your server should run without need for CD-Key.
Installing Gamebots 2004
If you installed Pogamut using the installer, your Gamebots2004 is already installed.
17
Installing UT2004
If you used the SVN version, or need to install Gamebots2004 manually for some other reason, here are
the instructions.
What is Gamebots 2004
It is a utility that allows bots in UT2004 to be controlled by outside application. It is inspired by old
Gamebots project [http://www.planetunreal.com/gamebots/]. For more information about the version used
by Pogamut, look at corresponding chapter of this tutorial.
Getting Gamebots 2004
Download file Gamebots2004.zip [http://artemis.ms.mff.cuni.cz/pogamut/files/Gamebots-070816.zip]
from Pogamut webpage [http://artemis.ms.mff.cuni.cz/pogamut/tiki-index.php?page=Download].
Installing Gamebots 2004
Extract the contents of root level of Gamebots2004.zip into directory "UT2004/system" (only the files
in top level. Contents of the directories are source code, not necessary for the platform). Exact location of
the directory depend on where you installed UT2004 in one of previous steps.
Conclusion
Following instructions in this chapter, you now have UT2004 with Gamebots 2004 installed.
In the next chapter, we will see how to setup and run UT2004 server.
18
Chapter 8. Configuring and running
server
Intro
Following instructions in previous chapter, you should have a UT2004 server with correct Gamebots
version.
In this chapter there are instructions to run it and change its configuration.
Running
UT2004 server with Gamebots needs to be run from the console. We will use the ucc utility that can be
found in the /System/ subdirectory of your UT2004 installation.
To run the server, start console and cd into the UT2004/System/ directory. Then use following syntax:
ucc server mapname?game=BotAPI.gametype
MapName
Name of the map you want to run. It's the same as name of the map file, without the .ut2
suffix. You can see all the map files in UT2004/Maps/ directory.
GameType
Type of the game started. Select one of the following:
BotDeathMatch
BotTeamGame
BotCTFGame
BotDoubleDomGame
BotBombingRunGame
For example, to start the server with game BotDeathMatch on the map DM-Junkyard, the command will
look like this:
ucc server DM-Junkyard?game=BotAPI.BotDeathMatch
Using mutators
Mutators are program segments that modify some details of the game. If you want to use a mutator, first you
must have it installed. Then just add ?mutator=Package.MutatorName to the starting command,
replacing MutatorName with actual name of the mutator and Package with name of the package. If you
want to use more than one mutator, write all the Package.MutatorName pairs, separated by commas.
Pogamut has two mutators you might find useful. One is named PathMarker and it marks waypoints on
the map, so you can see them. Another is GBHUD mutator and it makes UT2004 display additional useful
information. This information can be very useful when debugging the bot.
Example: when starting the server (same game and map as in previous example) with PathMarker mutator
added, use following command:
ucc server DM-Junkyard?game=BotAPI.BotDeathMatch?mutator=BotAPI.PathMarker
19
Configuring and running server
Setting up the server
Pogamut will work with default server settings. If that is not an option, here are some instructions on server
configuration. They are limited on settings most relevant to running Pogamut and its specific game types,
as configuration of UT2004 server can be very complex and beyond scope of this manual.
Server settings can be changed by editing one of the configuration files. For purposes of using Pogamut, the
only important one is BotAPI.ini, where settings for Pogamut game types are. If you want more information
on UT2004 server configuration, look up http://www.ruination.eclipse.co.uk/unrealtech/serverguide.htm
or Google.
Some settings influence any game, some only a specific game type. Global settings can be
found in section [Engine.GameInfo] of the BotAPI.ini , game-specific settings are in sections
[BotAPI.gametype] (for list of the game types, see previous section).
Here are explanations of some of the options. Not all of them are available for every game type.
MaxLives
The maximum lives a player has on the level. (0 means there is not limit).
TimeLimit
How long in minutes each game will last. If set to 0, game is not limited
by time.
GoalScore
The amount of goals to be scored before a winner is automatically
declared. 0 goals = goes to time limit before a winner is declared.
bPlayersMustBeReady
If set to True, players must confirm ready for game to start.
bForceRespawn
If set to True, player respawns instantly
bWeaponStay
If set to True, makes any weapons on the map always there and able to
be picked up.
NetWait
time to wait for players in netgames with bNetReady (typically team
games)
bAdjustSkill
If set to true, skill level of native UT bots (not the Pogamut-controlled
ones) will adjust according the skills of the players.
bAllowTrans
If set to False, use of Translocator is disabled.
SpawnProtectionTime
How long in seconds a player who joins the game either from start or
from reinforcement they get of being completely protected from taking
damage.
bAllowWeaponThrowing
If set to True, weapons can be thrown (discarded).
ResetTimeDelay
Delay between rounds.
FriendlyFireScale
How much damage a shot will do to a team mate in terms 0 = 0% and 1.0
= 100% or full damage for the weapon type.
MaxTeamSize
Maximal size of the team.
bAllowNonTeamChat
If set to False, communication between teams is disabled.
TimeToScore
How long in seconds the domination points must be held for before a
point is won.
20
Configuring and running server
TimeDisabled
How long in seconds the domination points are disabled after a point is
scored.
If you want to return to the default configuration, simply re-download Gamebots2004 pack and use original
BotAPI.ini.
21
Chapter 9. Working with NetBeans IDE
(Advanced mode)
Introduction
In this chapter you can find instructions for various operations with NetBeans IDE with Pogamut plugin, in
the advanced mode. This means full range of features will be available to the user. Although we presume
the user is familiar with some programming environment, even very basic operations are covered (briefly).
For users already familiar with NetBeans, some parts of this chapter may seem trivial. Such person should
focus on sections describing features added by Pogamut plugin. This means mainly sections 4, 5, 7, 8 and
9, although operations described in section 6 may differ from their usual meaning.
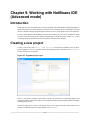
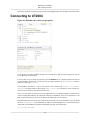
Creating a new project
To start a new project, select "File / New Project" from the menu. NetBeans offers you many
project templates, but you are probably interested in Pogamut projects. Therefore select "Pogamut"
category from the list of categories.
Figure 9.1. Pogamut project types
There are four project templates: Three kinds of agents (as described in corresponding chapter) and
experiment template. The last one enables you to design experiments using the Pogamut platform (a chapter
describing these follows).
On the next page, select a name of your project. You may also specify where the project folder will be
located, if the default location is not appropriate. Click "Finish".
22
Working with NetBeans
IDE (Advanced mode)
Working with files
Figure 9.2. Projects tab
Figure 9.3. Files tab
Working with projects and files is exactly the same as in the basic NetBeans.
To work with a file in the opened project, double-click on its icon. It will be opened in the editor window.
There are two tabs displaying the project's structure, both located on the upper left of the IDE. Projects
tab displays project's logical structure - organized in packages, classes, etc. Files tab displays project's
directory and files. You can use both to access the project's files.
When creating the agent, you will be working mainly with its class file. To access it, either open
ProjectName/Source package/ProjectName/Main.java under Projects tab or open
ProjectName/src/ProjectName/Main.java under Files tab. In either case, replace both
instances of ProjectName with actual name of your project.
23
Working with NetBeans
IDE (Advanced mode)
Apart from organization of files into projects and syntax highlight, IDE can be used like normal text editor.
Connecting to UT2004
Figure 9.4. Runtime tab, with server properties
To run agents, you need to establish connection to UT 2004 server. IDE will connect agents for you, but
server data must be entered first.
To enter a new server or change its properties, open the Runtime tab. It is usually located in the top-left
corner of the IDE. Alternatively, you can open it by selecting command "Window/Runtime" from top
menu bar or pressing "Ctrl+5".
On the Runtime tab there is a list of various items, one of them being "Unreal Tournament
Servers". By right-clicking it and selecting "Add server", you can add new server to IDE's list.
All of the servers in the list are shown below this icon.
The server's icon shows its status. Green arrow indicates the server is running and IDE is connected to it.
Yellow warning mark indicates the connection could not be established - the server is either down, or its
URI was entered incorrectly (or not at all). Red circle indicates the server is paused.
By right-clicking any server in the list, a menu is shown offering you various operations. First you should
set server "Properties"; most importantly, its URL. If you are running the server on the same machine
as IDE and your GameBots have default configuration, the URL will be following:
ut://localhost:3000
24
Working with NetBeans
IDE (Advanced mode)
Note
If you are running server on a different machine, replace localhost with its URL.
If your Gamebots are set to run on different port, replace 3000 with number of the port you are
using.
You can also delete server from the list or disconnect all bots (agents) currently on this server.
Note that one of the servers in the list is printed in bold. This is main server and IDE will connect all
newly run bots to it. To select other server as main, right-click it and select "Set Main Server"
from the menu.
Once some bots are running, their icons appears below the server they are connected to. By right-clicking
it, you can open their menu and issue some commands. They are explained in sections 8 and 9.
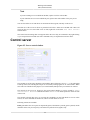
Control server
Figure 9.5. Server control window
The UT2004 server has many parameters and variables. Most of them are set in its .ini file and loaded
at start-up. Some, like current game map or list of currently running agents are set at the runtime. While
some tools are available for this purpose (see Unreal manual), IDE provides you with one for comfort.
The controls of the server are located on the ServerControl Window. It can be opened by "Open
ServerControl Window" command from menu "Window". Its default position is on the left side
of the screen.
The currently selected main server is receiving the commands (you can find details on servers in this
section). To issue commands to another one, select it as main in the server list.
Following controls are available:
Pause game makes the server pause or unpause the game (if the button is pressed, game is paused). In the
checkbox on the side you can specify if all entities are paused or bots (agents) only.
25
Working with NetBeans
IDE (Advanced mode)
Change map is pretty self-explanatory. Before clicking the button, select one of the maps from the listbox.
Note that changing map makes server restart, so it can take some time. The new map is ready when the
IDE finishes reconnecting (the look of this window changes until it is done).
Record game enables you to make a record of happenings on the server. The record will be saved to file
of specified name. First click starts the recording. You can see the button is pressed and you no longer can
change name of the file. Second click stops recording and performs the save.
Speed of game dial control corresponding parameter of the server. For details, see chapter on server
configuration.
The rest of controls affects only one agent at time.
Chosen bot list contains all the agents on the server. Select the one you want to control.
AutoTrace, Invulnerable Manual spawn, Show debug, Show focal points and Draw trace lines enable
or disable their respective properties on target agent. For details of those properties, see documentation
of the Client package.
Respawn makes agent respawn on the selected spot of the map.
Add item gives item of the specified name to the selected agent.
Kick disconnects selected agent from the server.
Build, Run and Debug
You can Build agent by right-clicking its project name on Projects tab and selecting "Build project".
You can Run agent by right-clicking its project name on Projects tab and selecting "Run project".
Alternatively, currently selected main project can be run by clicking the Run Main Project icon (green
arrow with yellow pages) or pressing F6. Project can be selected as main by right-clicking it and selecting
appropriate command.
Warning
In the context menu for projects, there are commands "Debug project" and "Test
project". These commands do not work when used on pogamut agent projects. Please, do
not use them.
26
Working with NetBeans
IDE (Advanced mode)
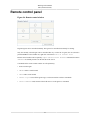
Remote control panel
Figure 9.6. Remote control window
Pogamut agents can be controlled manually. The agent to be controlled must already be running.
Only the currently selected agent can be controlled this way. On the list of agents, the one selected is
printed in bold. To select another one, right-click it and choose "Set as Default bot".
Remote control window can be opened by "Open RemoteControl Window" command from menu
"Window". Its default position is on the left side of the screen.
Commands on the remote control window are self-explanatory:
• arrows turn the agent
• "Walk" makes it walk forward
• "Run" makes it run forward
• "Pause logic" turns off the agent's logic, so it doesn't interfere with user commands.
• "Send command" sends contents of the field next to it to the agent as a command
27
Working with NetBeans
IDE (Advanced mode)
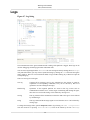
Logs
Figure 9.7. Log listing
The communication of the agent with IDE and the working of the platform is logged. These logs can be
used for debugging, monitoring agent status and similar tasks.
You can access log listings from the "Runtime" tab. For each agent currently running, there is a "Logs"
icon printed beneath it (you may need to expand the listing by clicking the "+" icon beside the agent's
name). Under it, there are icons for different kinds of logs. Double-clicking any of them will open the
corresponding log.
There are four logs for each agent.
User log
Contains all log messages sent by user command (see this section of guide for
explanation of corresponding commands). They can be filtered by their level
(parameter set when sending the message).
Platform log
Operations of the Pogamut platform are stored in this log. Events such as
communication with the server, various stages of initializing and running the agent,
these can be viewed on this listing. Can be filtered by message level.
Out log
This log contains all the commands sent from the IDE to the agent. Can be filtered
by command type.
In log
This log contains all the messages agent received from the server. Can be filtered by
message type.
To change the messages filter, open the Properties window (by selecting "Window / Properties"
from the menu bar or pressing "Ctrl+Shift+7"). Click on the button by the line "Message
28
Working with NetBeans
IDE (Advanced mode)
filter". The filtering window for selected log will appear; from there you can select message types
and levels you want to display.
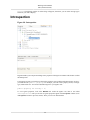
Introspection
Figure 9.8. Introspection
Pogamut enables you to inspect and change some properties of the agent at a runtime. This feature is called
the Introspection.
To introspect an agent, you first have to declare the properties as accessible trough introspection. To do so,
you mark them as "public @PogProp". For example, you want to have property healthy of integer
type, initialized at zero. You need to add following line to your agent's code:
public @PogProp int healthy = 0;
To view agent's properties, look at the Runtime tab. Under the agent's icon, there is one called
"Introspection". After you click on it, agent's properties appear in the Properties window (more
on Properties window in previous section). There you can view and edit them.
29
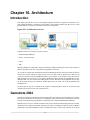
Chapter 10. Architecture
Introduction
This chapter presents the overview of the Pogamut platform architecture. Pogamut is divided into a few
parts and documentation is available for each of them so this document contains only the overview of the
platform and covers the basics of interaction between its components.
Figure 10.1. Architecture overview
Pogamut consists of a few parts (see picture above):
• GameBots2004 (GB2004)
• Parser – remote and local
• Client
• IDE
Basically GB2004 are making the UT2004 environment available for third parties while Client consists of
libraries and APIs for the user of the platform (programmer of the bot).
As you can see in the picture communication between GB2004 and Client is based on TCP/IP. We assume
that user may need to run the bot which requires a lot of system resources. Because the UT2004 is not
very keen to system resources and GB2004 produces a lot of traffic, we've decided to create the Client as
light-weighted as it can be. Hence we've created a middleware Parser which is parsing GB2004 messages,
translates them into Java objects and sending them to Client. With this kind of approach the user may
run the UT2004 and Parser on a different machine then the one on which is he or she programming and
running the bot.
Of course the user may run everything on one computer (using local parser), but he or she will soon find
out that multi-core processor is not so stupid to have.
Gamebots 2004
Pogamut is using Unreal Tournament 2004 (UT2004) as the environment for virtual beings (bots). UT2004
provides an UnrealScript as an interface to UnrealEngine which runs the whole environment. Therefore
first part of the platform is programmed in UnrealScript and is named GameBots2004 (GB2004).
GB2004 acts as server (over TCP/IP). It defines a text protocol which client must implement to successfully
run the bot in the UT2004 environment. This protocol consists of commands (sent from Client to GB2004)
and messages (sent from GB2004 to Client). Commands are used to control each of the bots or the whole
30
Architecture
server. Messages serve to acknowledge the command, transmit information about events (asynchronous
messages) or about state of the game (synchronous messages - these are sent periodically in batches).
When client connects to the GB2004 it immediately sends 'HELLO' to the client. Client should reply
with 'READY'. GB2004 sends information about the game and the map which the UT2004 is running.
NavPoints and items which the map consists of is included as well. After that the GB2004 waits for
the clients' message 'INIT'. After receiving 'INIT' command from client, GB2004 spawns the bot inside
UT2004 and starts sending information messages about the vicinity of the bot. It also accepts commands
for the bot. For more details about the protocol see GameBots2004 API.
For informations about implementation of the GameBots2004 see GameBots2004 v0.1 documentation.
Parser
Package cz.cuni.pogamut.Parser
Parser stands between client (libraries and API for users of the platform). Its main purpose is to translate
text messages to Java objects and realize delta compression of the messages (to save the traffic).
Remote parser
GB2004 produces a lot of data/sec (20kb/s on average) the parser is able to cut down the traffic between it
and client with delta compression (7kb/s on average). Therefore parser is meant to run on the same machine
as UT2004 while the Client can be run on the different machine. In this case we talk about Remote Parser.
Remote parser creates two threads for each bot (Client). First thread handles the communication from
GB2004 to the Client (messages for the bot), second one handles the communication from the bot (Client)
to the GB2004 (commands to the bot in UT2004).
Local parser
There is an option to run the parser as a local one (Local Parser). The Local Parser is used for translating
the GB2004 messages into Java objects in this case. Even though the parser is run as local, it still produces
delta messages which wastes the time unnecessarily and will be changed in the future.
As remote parser it also creates two threads to govern the communication between GB2004 and the Client.
Mediator
Mediator can be viewed glue between parser and client or as a messenger delivering messages from parser
to client and vice versa. It wraps threads that are waiting for the message from one side to be delivered to
the other side. It is used by the Client either for the Local Parser or Remote Parser (see chapter Parser).
The Mediator has also some knowledge about the GameBots2004 protocol. It recognizes the end of the
communication (when MapFinished or Disconnected message arrives) and correctly terminates itself at
the end.
Client
Package cz.cuni.pogamut.Client
Client consists of libraries and APIs which is used for development of the bots. The core responsibility
of Client is to take care about the communication between agent’s logic and the Unreal Tournament 2004
31
Architecture
server. That, concerning the Pogamut architecture, means to take care about the communication between
Parser and agent’s decision making algorithm. The Client also uses the received information to build a
world model for each agent, piecing together known game map, current inventory of the agent, and memory
of past events. These structures are updated with any new information from the environment that agent
receives. User programming the agent's logic can easily access information from these structures, without
need to sort trough received messages himself.
Client therefore provides services to agent’s logic, list of them follows:
• Communication with the Parser – receiving messages and sending commands
• Map representation – providing navigation information
• Agent’s memory – providing memory of past events to the agent’s logic
• Inventory – providing inventory handling – like switching to proper weapon in certain situation
• Access for logic – easy access to all those services
IDE
NetBeans plugin.
For implementing IDE we've chosen the NetBeans platform. Aside from running the bots, IDE keeps
information about bot state and handles connection to the server, message logging and filtering. For more
details see IDE documentation.
32
Chapter 11. Parser
Introduction
Parser is a module of Pogamut. It is a middleware between GameBots 2004 and Client. Its purpose is to
simplify handling messages from GameBots and to lower network bandwidth. Simplification is done by
translating messages from ASCII format (sent by GameBots) to Java objects. The objects are then sent
to Client (another module of Pogamut2, where AI is). Parser is lowering bandwidth by transmitting only
informations that has changed (like position, visibility etc).
Parser comes in two variants: Remote and Local. As the names suggest, remote parser is an external
application, usually running on different machine than Client. Local parser is embedded in the Client.
Remote parser
UT2004 consumes a lot of system resources. If your computer can't handle running UT2004, NetBeans and
all your bots' logic, you might consider splitting the load - running UT2004 server on different machine.
In that case, you will want to use Remote parser - GB2004 produces a lot of data/sec (20kb/s on average)
and the parser is able to cut down the traffic between itself and client with delta compression (7kb/s on
average). Therefore parser is meant to run on the same machine as UT2004 while the Client can be run
on the different machine.
Remote parser creates two threads for each bot (Client). First thread handles the communication from
GB2004 to the Client (messages for the bot), second one handles the communication from the bot (Client)
to the GB2004 (commands to the bot in UT2004).
Using Remote parser
If Parser is already running as standalone program, use
Agent.connectToRemoteParser(URI uri)
uri is address and port of standalone Parser (by default, Parser listen at port 4321). Standalone Parser can be
launched using parser.bat with compulsory parameter of address of UT2004 server (GameBots included)
and optional parameter of port, where parser will wait for connections from Client. Address of UT server
doesn't have to include port, in such case port 3000 will be used. If Parser port is omitted, port 4321 will
be used.
parser.bat ut://artemis.ms.mff.cuni.cz 4321
The command above will run Parser that will listen to connections from Client at port 4321 and will connect
to UT2004 at artemis.ms.mff.cuni.cz, port 3000.
Local parser
If you are running server on the same machine as Client, it is easier for you to use Parser embedded in
the Client. This variant is called Local parser. Even though the parser is run as local, it still produces delta
messages which wastes the time unnecessarily and will be changed in the future. As remote parser it also
creates two threads to govern the communication between GB2004 and the Client.
33
Parser
Using Local parser
If you want to use parser embedded in Client, use function
Agent.connectToLocalParser(URI uri)
which will run parser as separate thread and take care of everything. Uri is address and port of GameBots
running in Unreal Tournament 2004 server - GameBots run by default at port 3000. Example of uri of
GameBots:
ut://artemis.ms.mff.cuni.cz:3000
34
Chapter 12. Client package
Introduction
This chapter describes the Client package.
You as the user will be using the Client package for two purposes: managing connection and
communication with the server, and controlling your agent behaviour. The first part is of no concern, since
Client and IDE perform these automatically. If you are interested in technical details, read architecture
overview and programmer's documentation.
On the other hand, the rest is something you need to master. This chapter is intended to help you with
this. It contains description of the Agent class and its various components you will use to gain information
from the environment and to control your agent.
Agent class
This is basic class that wraps Client package interface.
When you create a new agent, you create it as a descendant of the Agent class. In addition to whatever
data and logic you want to add, you also need to redefine some of following methods. They are called at
various stages of the agent's life cycle (as described below).
prePrepareAgent()
This method is run when starting the agent, before connecting to the server.
Best suited for initializing logic, setting agent's parameters, hooking message
listeners (see bellow) etc.
postPrepareAgent()
This method is run after connecting to the server. At the time of running,
information regarding game type, map and such is available. If agent's
strategy is dependent upon these (or agent may not be supposed to run under
certain circumstances), decisions are to be made in this method.
doLogic()
Agent's main method. It is called repeatedly during the run of the agent. The
entire agent's logic, decision-making and everything else concerning agent's
run should be placed here. While it is not mandatory to redefine any of these
methods, agent with original (empty) doLogic makes a very little sense.
Note
Although this method may contain a command loop (running
indefinitely on single call), this is not recommended. Certain
operations take place between calls of doLogic and while
they aren't absolutely vital, some functions (e.g. remote agent
termination) are dependent on them and may not work. Therefore,
unless you know what you are doing, do not make doLogic an
infinite loop and rely on periodic recall of the method by the engine.
shutDownAgent()
Called after the agent is shut down (not when the agent is killed - that may
happen many times during the run of the agent). Best suited for cleanup
routines or sending final reports (if such thing is necessary - agent may send
data during its run).
Following sections describe components of the Agent class.
35
Client package
AgentBody contains commands sent to agent, as well as tools to react to incoming messages.
AgentMemory manages information received, enables access to agent's state, memory and perceptions of
the environment.
GameMap provides simple navigation information and pathfinding.
AgentBody class
AgentBody is wrapping up communication with parser and execution of commands it receives messages;
some of them are compressed and AgentBody provides their completion according to recent messages
stored in KnownObjects. Commands are available using methods of AgentBody like RunTo(navPoint).
AgentBody is also hiding difference between Remote and Local Parser.
Usage: The methods of this class will be used from within methods of the parent Agent class (mainly
doLogic). You can use its field body to access it. For example, if you want to make agent jump, you will
use following line:
this.body.jump();
The methods are explained below.
Initialization, Configuration and Respawn
There are some parameters of the agent that need to be set and some features that may or may not be
enabled. While some are self-explanatory, others may need a bit of details. See the following list:
autoTrace - Start / stop autoTracing.
invulnerable - Makes agent invulnerable from any threat.
manualSpawn - Start / stop automatic spawn of agent after death - when enabled, you must spawn agent
manually.
name - Name of the agent - could be changed to express some additional info about agent (e.g. state, role
in the team, mood etc.). Facilitates visual observation, debugging and presentation.
visionTime - A frequency of synchronous batches. May range from 0.1 to 2, meaning from 10 per second
to 1 per two seconds.
Init methods are called at the beginning. A few variants exist, different in what parameters they set.
Depending on the variant, you can specify agent's name and team, location and orientation on respawn,
and whether it will respawn automatically. If manual respawn is desirable, you can use so-called function.
Configure methods enable or disable various features (described in the list above) during the run of the
agent. Depending on the variant, you can set them one by one or all at once.
init(java.lang.String name)
Parameterized init - sets name of the agent.
init(java.lang.String name, Triple location)
Parameterized init - sets name and location where the agent will spawn.
init(java.lang.String name, int team, Triple location)
Parameterized init - sets name, agent's team and location where it will spawn.
init(java.lang.String name, int team, boolean manualSpawn, Triple location, Triple rotation)
Parameterized init - sets name, team, location and rotation where the bot will spawn.
configure(boolean autoTrace, boolean manualSpawn, java.lang.String name, boolean invulnerable,
double visionTime)
36
Client package
Configure agent.
configureAutoTrace(boolean autoTrace)
Enable / disable autoTrace.
configureAutoTrace(boolean autoTrace)
Enable / disable autoTrace.
configureInvulnerable(boolean invulnerable)
Enable / disable invulnerable.
configureManualSpawn(boolean manualSpawn)
Enable / disable manualSpawn.
configureName(java.lang.String name)
Set agent's name.
configureVisionTime(double visionTime)
Configure visionTime.
respawn(Triple location, Triple rotation)
Respawn the agent on a specified place with specified rotation.
Message listeners
Listeners are a feature of Pogamut that enable agent logic to react to incoming messages in asynchronous
manner. They represent a piece of code that is executed every time a message is received by the client.
Note
If you are familiar with the concept of events and event handlers, you can see that Listeners are
Pogamut equivalent of this concept.
Pogamut enables you to register listeners for all received messages or for certain type of messages (see
programmer documentation for list of message types). You can also register a listener for sent commands.
addRcvMsgListener( RcvMsgListener listener)
Adds listener for all messages received by AgentBody from the Parser.
addRcvMsgListener( RcvMsgListener listener, java.util.Collection<MessageType> types)
Takes a collection of types (collection must be filled by Integers) and adds a listener to all specified types.
addSendCmdListener( SendCmdListener listener)
Adds listener for all commands sent by AgentBody.
addTypedRcvMsgListener( RcvMsgListener listener, MessageType type)
Adds a listener to the specified type of message. Common use: when you want to listen for messages of
certain type only(for instance BOT_KILLED messages).
removeRcvMsgListener( RcvMsgListener listener)
Removes a listener for received messages.
removeSendCmdListener( SendCmdListener listener)
Removes a listener for sent commands.
removeTypedRcvMsgListener( RcvMsgListener listener, int type)
37
Client package
Removes listener for received messages of specified type (note, type is not a part of listener and must be
specified separately).
A listener is any class implementing RcvMsgListener or SendCmdListener interface. Both consist of
one method: receiveMessage. This method is started whenever corresponding message or command is
received. To get message data from the parameter, use e.getMessage() method.
receiveMessage(RcvMsgEvent e)
Method of a listener for incoming messages.
receiveMessage(SendCmdEvent e)
Method of a listener for sent commands.
Movement commands
This set of methods is related to agent movement - walking, running, jumping etc.
contMove(float speed)
Continuously move agent in the direction he is faced. Similar to moveContinuous(), except the speed
can be specified.
jump()
Makes agent jump. Useful as a reflex action when hitting the wall; sometimes agent encounters obstacles
which could be jumped over (like girders etc.)
move(double speed, Triple location1, Triple location2)
Makes the agent move between two locations. It should result in smoother move when following the path.
The recommended use is: when the agent follows some path (to the item for instance), do not move him
by runTo but use this method and supply it with the next two locations.
moveAlongNavPoints(double speed, NavPoint nav1, NavPoint nav2)
Makes the agent move between two NavPoints. It should result in smoother move when following the
path. The recommended use is: when the agent follows some path (to the item for instance), do not move
him by runTo but use this method and supply it with the next two NavPoints.
moveContinuous()
Continuously move agent in the direction he is faced.
moveInch()
Sends INCH command to the agent, which makes it move forward a little bit. May be useful when stuck
(or similar situations).
runToLocation(Triple location)
Makes agent run to the specified location.
runToNavPoint(NavPoint target)
Makes agent run to the specified NavPoint.
runToTarget(Item target)
Makes agent run to the specified Item.
runToTarget(MessageObject target)
Makes agent run to the specified target, which could be anything with UnrealID
runToTarget(Player target)
Makes agent run to the specified Player.
generalRunToLocation(Triple location)
38
Client package
Makes agent run to specified location. Sets his speed to 800 and his acceleration to 600.
setCrouch(boolean crouch)
Makes agent crouched (if parameter is True) or uncrouched (if parameter is False).
setRun()
Makes agent run when moving.
setWalk()
Makes agent walk when moving (being slower)
stop()
Stops the movement of the agent.
strafeToLocation(Triple whereToGo, Triple whereToStrafeTo)
Makes the agent move towards a destination while facing another point/object. Parameter whereToGo is
location the agent is running to, whereToStrafeTo is the location agent should be facing.
strafeToTarget(MessageObject target, Triple whereToGo)
Makes the agent move towards a destination while facing another point/object. Parameter whereToGo is
location the agent is running to, tTarget is the object agent should be facing.
turn(int pitch, int yaw, int roll)
Changes agent's heading in three specified directions: pitch, yaw and roll.
turnHorizontal(int amount)
Changes agent's pitch.
turnToLocation(Triple location)
Makes the agent turn to specified location.
turnToTarget(MessageObject target)
Makes the agent face specified target (e.g. another actor - player).
turnVertical(int amount)
Changes agent's yaw.
Path searches and Reach checks
Pogamut provides access to Unreal's pathfinding engine. Use following methods to request a search for a
path or check whether certain location or object can be reached. These queries are identified by ID. Their
results may be obtained trough corresponding methods of GameMap.
getPath(Triple location, int ID)
Requests a path from agent's location to specified location.
getPathToLocation(int ID, Triple location)
Requests a path from agent's location to specified location.
getPathToNavPoint(int ID, NavPoint navPoint)
Requests a path from agent's location to specified NavPoint.
requestReachcheckLocation(int ID, Triple to, Triple from)
Requests a check whether location specified in parameter to is reachable from location from.
requestReachcheckTargetFrom(int ID, MessageObject target, Triple from)
Requests a check whether target object is reachable from specified location.
39
Client package
Traces and AutoTraces
Traces are one of the means agent can use to obtain information from the environment (others can be
accessed via AgentMemory class). A trace can be described as a simulated ray casted from certain location
(usually agent's position) in specified direction. Agent then receives information describing what has the
ray hit and its properties. It has many possibilities of use; for example, to know if certain Player can be
shot at, if certain object is visible, what is in front of the agent, etc.
Two kinds of tracing are available: regular trace returns what was hit by the trace ray. FastTrace doesn't
have this possibility - it only tells whether the ray hit anything. On the other side, it is faster.
Aside from manually invoked traces, it is also possible to "attach" rays to agent's body. These rays have
fixed length and their orientation is relative to agent's heading. Trace of these rays is performed periodically
and the Client is updated on the results. This feature is called AutoTrace.
Following methods are used to initiate manual traces and setup AutoTracing. Results can be obtained by
methods in Trace section of AgentMemory. Remember to set each ray ID unique - otherwise you will have
problems discerning which rays produce different results.
addRayToAutoTrace(int ID, Triple direction, java.lang.Double length, boolean fastTrace, boolean
traceActors)
Adds ray to AutoTrace. Direction is relative to agent's orientation: (1,0,0) is straight ahead, (0,1,0) is left
and (0,0,1) is up. If you want to change the settings of the ray, just add it again with the same ID. The
original ray will be replaced.
fastTrace(int id, Triple to)
Emits ray from agent's position directed to a specified location. Returns a boolean telling if something
was hit.
fastTrace(int id, Triple from, Triple to)
Emits ray directed to a specified location. Returns a boolean telling if something was hit.
removeAllRaysFromAutoTrace()
Removes all autoTrace rays from the agent.
removeRayFromAutoTrace(int ID)
Removes the ray of specified id from the array of auto trace rays.
restartAutoTraceRays()
Removes all AutoTrace rays and replaces them with default set: one straight ahead (length 250) and one
45° to either side (length 200).
trace(int id, Triple to, boolean traceActors)
Emits ray from agent's position directed to a specified location. Returns a message containing the first
actor it hits in that direction. TraceActors should be true if we want to take players into account (Only
level geometry is taken into account otherwise).
trace(int id, Triple from, Triple to, boolean traceActors)
Emits ray from specified place directed to a specified location. Returns a message containing the first actor
it hits in that direction. TraceActors should be true if we want to take players into account (Only level
geometry is taken into account otherwise).
Shooting and weapons
Following methods are used to use and handle agent's weapons.
40
Client package
changeToBestWeapon()
Changes agent's weapon to the best one he has.
changeWeapon(AddWeapon newWeapon)
Changes agent's weapon to specified one. Note that the method doesn't check whether he has it so it is
recommended to be used with the AgentInventory methods
shoot(Player target)
Agent starts to shoot at specified Player. Target is optional, if it is provided the server provides aim
correction.
shoot(Triple location)
Agent starts to shoot at specified location. This method is without aim correction
shootAlternate(Player target)
Agent starts to shoot at specified Player using alternate fire mode. Target is optional, if it is provided server
provides aim correction.
shootAlternate(Triple location)
Agent starts to shoot at specified location using alternate fire mode. This method is without aim correction
stopShoot()
Agent stops shooting.
throwWeapon()
Throws away the weapon the agent is currently carrying. Could be used for an exchange of weapons
between agents, as well as for trade and other applications.
Items
These methods serve to add items to agent's inventory and to handle Item objects.
addInventory(java.lang.String inventoryClass)
Adds item of specified inventoryClass to agent's inventory. Example of class: 'xWeapons.FlakCannon'.
processAddItem(AddItem newMessage)
Parses the name of the item from class, then exploits information from database stored in ItemCathegories
and uses those to create proper Item object. New message is then returned and fired as an event, so you
can register listener for ADD_WEAPON, etc.
processItem(Item newMessage)
Parses the name of the item from class, then exploits information from database stored in ItemCathegories
and uses those to create proper Item object. New message is then returned and fired as an event, so you
can register listener for WEAPON, etc.
In-game messages
Agents can "speak" with other entities in the environment, by sending text messages. Some of them can
be perceived by all, some are limited only to agent's team-mates.
sendGlobalMessage(java.lang.String text)
Sends message to the game global communication channel.
sendPrivateMessage(java.lang.String text)
Sends message to the game team communication channel.
41
Client package
Recording
Unreal is able to make recording of the game. Pogamut enables you to access this function by following
methods.
startRecording(java.lang.String fileName)
Start the recording. It will be saved to the file with specified name. The file will be located at the same
machine as the server of the game. If using remote server, you will have to use FTP or similar service
to obtain the record.
stopRecording()
Stop the current recording.
System commands
Various system commands that don't fit anywhere else.
pauseTheGame()
Pauses the game. All agents are paused, spectators and human players are not.
ping()
Sends a ping (connection test) to the server.
unpauseTheGame()
Unpauses the game.
AgentMemory class
This class is used to gather information about state of the agent and surrounding environment, both current
and remembered. You can use its methods to learn many parameters of the agent (health and armor are
examples of these), interpret sensory information from surroundings, access agent's short-term and longterm memory or browse its inventory.
Usage: as with AgentBody, methods of this class will be used from within methods of the agent class.
You can use its field memory to access it. For example, if you want to know agent's health, you will use
following line:
this.memory.getHealth();
The methods are explained below.
State of agent
These methods retrieve information about state of the agent.
getAgentAmmo()
How much ammo for the current weapon agent has.
getAgentArmor()
Current armor value of the agent.
getAgentHealth()
Current health value of the agent.
getAgentID()
Agent's unreal ID number.
getAgentIsMoving()
True if Agent is moving; false otherwise.
42
Client package
getAgentLocation()
Location of the agent.
getAgentName()
Name of the agent.
getAgentRotation()
Rotation of the agent.
getAgentTeam()
Number of the team the agent is on.
getAgentUnrealID()
Agent's unreal ID string.
getAgentVelocity()
Vector of agent velocity.
getCurrentWeapon()
Weapon currently in use.
getIsBeingDamaged()
True if the agent is being damaged.
getIsBumpingToAnotherActor()
True if the agent is bumping to another object.
getIsColliding()
True if the agent is colliding with the wall.
getIsFalling()
True if the agent is falling.
getIsFlagStolen()
True if the team's flag is stolen.
getIsHoldingFlag()
True if the agent is holding the flag.
getIsMoving()
True if the agent is moving.
getIsProjectileComming()
True if there is a projectile coming at the agent.
getIsShooting()
True if the agent is shooting.
Zone changes
When agent moves from one zone to another, message is sent to the Client. By using following methods,
you can learn of this happening or access the information contained in the message.
getBotZoneChanged()
Returns message with information that agent changed zone. Contains
ID of the new terrain.
getIsBotChangedZone()
True if agent has changed zone.
Sensory information
Following methods enable you to access sensory information from the agent, enabling you to learn what
agent sees and hears.
There is a large number of methods regarding what the agent sees. Most of them are variants of few basic
types. Therefore it is futile to list them all - only the basic types are listed, with notes on different variants.
getHearNoise()
True if agent hears a noise.
getHearPickUp()
True if agent hears a sound of item pickup.
getSeeAmmo()
Returns the first ammo pack the agent sees.
43
Client package
Variants (return a first seen object of corresponding type):
getSeeArmor(), getSeeDomPoint(), getSeeEnemy(), getSeeExtra(),
getSeeFriend(), getSeeHealth(), getSeeItem(), getSeeMover(),
getSeeNavPoint(), getSeePlayer(), getSeeWeapon()
getSeeAmmos()
Returns a list of all ammo packs agent sees.
Variants (return a list of all objects seen of corresponding type):
getSeeArmors(), getSeeExtras(), getSeeHealths(), getSeeItems(),
getSeeMovers(),
getSeeNavPoints(),
getSeePlayers(),
getSeeWeapons()
getSeeAnyAmmo()
True if agent sees any ammo.
Variants (true if agent sees any object of corresponding type):
getSeeAnyArmor(), getSeeAnyDomPoint(), getSeeAnyEnemy(),
getSeeAnyExtra(),
getSeeAnyFriend(),
getSeeAnyHealth(),
getSeeAnyItem(),
getSeeAnyMover(),
getSeeAnyNavPoint(),
getSeeAnyPlayer(), getSeeAnyWeapon(),
getSeeAnyReachableAmmo()
True if agent sees any ammo reachable from his position.
Variants (true if agent sees any object of corresponding type,
reachable from his position):
getSeeAnyReachableArmor(),
getSeeAnyReachableExtra(),
getSeeAnyReachableHealth(),
getSeeAnyReachableItem(),
getSeeAnyReachableNavPoint(), getSeeAnyReachableWeapon(),
getSeeReachableAmmo()
Returns the first ammo pack the agent sees, reachable from his
position.
Variants (return a first seen object of corresponding type, reachable
from agent's position):
getSeeReachableArmor(),
getSeeReachableHealth(),
getSeeReachableNavPoint(), getSeeReachableWeapon()
getSeeReachableAmmos()
Returns a list of all ammo packs agent sees, reachable from his
position.
Variants (return a list of all objects seen of corresponding type,
reachable from agent's position):
getSeeReachableNavPoints(), getSeeReachableWeapons(),
getSeeItem(int itemID)
Returns item of specified ID if the agent sees it.
Variants (return object of corresponding type and specified ID, if
the agent sees it):
getSeeMover(int moverID), getSeeNavPoint(int navPointID),
getSeePlayer(int playerID)
44
Client package
Tip
Confused by the lot of getSee... functions? They are many but there is a system. You have to
know what are you looking for.
There are following object types to look for: Armor, DomPoint, Enemy, Extra, Friend, Health,
Item, Mover, NavPoint, Player, Weapon. If you do not know what they are, check out programmer
documentation. In following schema, I will use [Object] to denote object type of your choosing.
Are you interested in the first object agent sees? Use getSee[Object]() method.
Are you interested in all seen objects of the type? Use getSee[Object]s() method.
Are you interested to know if agent sees any such object at all? Use getSeeAny[Object]() method.
You may be interested only in objects that can be reached from agent's position. In that case use
Reachable[Object] instead of [Object].
If you know ID of the object you are looking for, you can use getSeeItem(ID), getSeeMover(ID),
getSeeNavPoint(ID) or getSeePlayer(ID).
Example:
You want to know if agent sees any health pack he can reach.
We will use method getSeeAnyReachableHealth()
Not all variants of getSee... function make sense. Those that do not are not implemented. Look
at the list above to see if any given variant exists.
Traces
Information on what traces are and how to perform them are in this section. Following methods enable
you to get trace results.
getFastTraceResult(int id)
Returns result of FastTrace with given ID.
getAutoTraceByID(int ID)
Returns data from auto trace with specified ID.
getAutoTraceIDs()
Returns IDs of all auto traces assigned to the agent.
getAutoTraces()
Returns all auto trace results in current batch.
getTraceResult(int id)
Returns result of Trace with given ID.
Short-term memory
The agent has a short-term memory, remembering all objects he has seen in the past two seconds (they
aren't forgotten then - see the next section). Using the following methods, you can obtain list of any class
of objects that the agent has seen. The parameter specify how many message batches into the past you
want to look (number of batches per second depends on Gamebots configuration).
seenAmmos(int time)
Returns list of seen ammo packages.
seenArmors(int time)
Returns list of seen armor packages.
seenHealths(int time)
Returns list of seen health packages.
45
Client package
seenItems(int time)
Returns list of seen items.
seenMovers(int time)
Returns list of seen movers.
seenNavPoints(int time)
Returns list of seen navpoints.
seenPlayers(int time)
Returns list of seen players.
seenWeapons(int time)
Returns list of seen weapons.
Long-term memory
Agent also has a long-term memory, which enables it to remember position of items, players and navpoints.
Following methods give access to such information. You can use it, for example, to determine a position
of desired weapon and make agent go pick it up.
getKnownAmmos()
Returns a list of known ammo packs.
getKnownArmors()
Returns a list of known armor packs.
getKnownHealths()
Returns a list of known health packs.
getKnownSpecials()
Returns a list of known special items.
getKnownWeapons()
Returns a list of known weapons.
knownNavPoints()
Returns a list of known navpoints.
knownPlayers()
Returns a list of known players.
lastPlayerPosition(int ID)
Returns last known position of player with specified ID.
Inventory information
Agent may accumulate a number of items, mostly weapons. Following methods enable you not only know
what the agent has, but also quickly assess what of its weapons are functional and select weapon according
to situation.
getAllWeapons()
Returns a list of all weapons agent possess.
getAnyWeapon()
Returns first loaded weapon in the inventory.
getBetterWeapon(Triple from,
Triple to)
Of all weapons agent has, method returns the most suitable one for
distance between specified points.
getCopyOfAllWeapons()
Returns copy of all weapons from inventory - both loaded and
unloaded.
getMeleeWeapon()
Returns a melee weapon. If there is not a single one, returns null.
getRangedWeapon()
Returns a ranged weapon. If there is not a single one, returns null.
hasAnyLoadedWeapon()
True if agent has any weapon with corresponding ammo.
hasLoadedWeapon()
True if agent has ammo for the weapon he has currently in hand.
46
Client package
hasWeaponOfType(ItemType type)
True if agent has a weapon of specified type.
isAmmoSuitable(Ammo ammo)
True if specified ammo is suitable for any of agent's weapons.
numberOfLoadedWeapons()
How many weapons with corresponding ammo agent has.
numberOfWeapons()
How many weapons agent has.
Score
Scores of all players are accessible by following methods (the actual score value may have different
interpretation depending on the game type). Not all of them make sense in every game type (for example,
TeamScores are not present in games that don't have teams ).
getAgentScore()
Score of the agent.
getAgentTeamScore()
Score of the agent's team.
allPlayersScores()
Scores of all players, in HashMap indexed by ID
getOpposingTeamScore()
Score of the opposing team.
opposingTeamScores()
Scores of opposing teams, in HashMap indexed by ID
getPlayerScore(int ID)
Score of the player with given ID
Kills
When one agent kills another, a message is sent to both of them. By these methods, you can learn its
contents.
getWasKilledBy()
Returns ID of the bot that killed the agent. 0 if it's unknown.
getWhoAgentKilled()
Returns ID of the bot killed by the agent.
GameMap class
GameMap class provides simple navigation information: nearest navigation point, path to specified object,
etc. It also integrates AStar algorithm and uses it to answer requests for path. This option is valid only for
paths to NavPoints and Items, paths to players are solved using Gamebots API.
Usage: as with AgentBody, methods of this class will be used from within methods of the agent class.
You can use its field gameMap to access it. For example, if you want to know nearest NavPoint, you
will use following line:
this.gameMap.nearestNavPoint(from);
The methods are explained below.
Navigation
safeRunToLocation(Triple location)
Safely navigates the agent to the chosen location (could be anywhere).
47
Client package
safeRunToPlayer(Player plr)
Safely navigates the agent to the player (could be anywhere).
Nearest
These methods allow you to find nearest health pack, item or navigation point. They use repeated calling
of AStar algorithm with restricted iterations, so they can be inefficient and may find nothing.
nearestHealth(int strength, int numberOfHealths)
Returns list of closest health packs of specified strength (or greater). In numberOfHealths state how many
closest health packs are to be found.
nearestItems(MessageType type, int numberOfItems)
Returns list of closest health packs of specified type. In numberOfItems state how many closest items are
to be found.
nearestNavPoint(Triple from)
Returns NavPoint nearest from specified point.
nearestNavPoint(Triple from, int minDistance)
Returns NavPoint nearest from specified point, counting only those exceeding minimum distance.
A*
These methods control use of the AStar algorithm. They find path from agent's current position to specified
NavPoint.
getNavPointsAStar(AStarResult result)
This auxiliary method converts AStarResult to ArrayList of NavPoints which is then used as path in
runAlongItemsInTheMap.
getPathAStar(NavPoint toWhat)
Returns path from agent's current position to the 'toWhat' or null if path doesn't exist.
getPathAStar(NavPoint toWhat, int maxNumOfIterations)
Returns path from agent's current position to the 'toWhat' or null if path isn't found in specified number
of iterations.
GetPath
These methods provide access to UT2004 server's pathfinding algorithm. They enable you to send request
for pathfinding and means to obtain resulting information.
getPathOfID(int ID)
Method for obtaining the path returned by GB due to the GETPATH request sent through
sendGetPath(navPoint, pathID).
sendGetPathToLocation(int ID, Triple toWhat)
This method sends GETPATH query to GameBots. You have to provide PathID under which the path will
be returned by GB and stored in GameMap instance.
sendGetPathToNavPoint(NavPoint toWhat)
This method sends GETPATH query to GameBots. The PathID under which the path will be returned by
GB is the same as the ID of the NavPoint.
48
Client package
RunAlong the path
Following methods enable you to make agent run along a path - that is, list of NavPoints. Such path is
mostly obtained as a result of pathfinding algorithm (see previous two sections).
Paths the agent has are stored in path manager. It takes care of storage, initializing, preparing and restarting
of the path data structures for runAlongPath.
The sequence of calls is following: first you need to obtain the path (by any of getPathToLocation
method), then you call checkPath() to know whether the path is ready - e.g. properly initialized. If not, call
preparePath() (that will initialize the path) and after that, you can call runAlongPath with no problems.
pathmanager.checkPath(PathTypes type, java.lang.Object target)
Returns true if the Path is initialized.
pathmanager.preparePath(PathTypes type, java.lang.Object target, boolean useAStar)
Initializes the path according to the PathType and according to useAStar
pathmanager.getPathToLocation(Triple location)
Obtains path to specified location. Keeps returning null until path is received.
runAlongPath()
Makes agent smoothly follow initialized path. Returns true if running OK, false if finished or unable to
reach next NavPoint.
runAroundItemsInTheMap( java.util.ArrayList<Item> itemsToRunAround, boolean AStar)
This method periodically visits locations of specified items. If at any time agent cannot reach currently
chased Item, next one is selected from the list.
Others
restartMap()
Method which restarts GameMap instance - reinitializes necessary variables.
stuckCheck()
Check if bot is stuck - if it is attempting too many times to reach some location and is not progressing.
49
Chapter 13. Three kinds of agents
Introduction
Pogamut platform can accommodate three kinds of agents: Java Bot, Scripted Bot and POSH Bot. All of
them look exactly the same on the game server; only difference is what language and tools are used to
write agent's logic.
Java Bot
This is a basic variant. The agent and all its logic are written in Java and included in a Java class (descendant
of Agent class). Functions of the Pogamut platform are accessed trough Client package - mostly Agent
class and its various components.
Thanks to the fact all the agent's code is in Java, standard debugging tools present in NetBeans IDE can
be used on this type of agent.
Scripted Bot
Pogamut platform can run agents written in some scripting languages. While the agent itself is still a Java
class, all the important methods (e.g. doLogic(), prePrepareAgent and postPrepareAgent; see Agent
class description) are imported from a script file. The script has access to the functions of the Pogamut
platform, as corresponding objects are exported trough Java Scripting API.
Following objects are exported to the scripting environment: agent, body (reference to Agent.Body),
memory (Agent.Memory), map (Agent.GameMap) and log (Agent.Log).
While NetBeans IDE offers no support for scripting languages by itself, there are plugins available for
some of them. Pogamut platform includes a syntax highlighting plugin for Python.
What scripting languages can I use?
In theory, any scripting language accessible trough Java scripting API. Additional requirements are the
ability to work with objects (to be able to use exported Client package) and procedures (because Pogamut
uses procedures defined in the script). Also note you must have corresponding Scripting Engine installed
on your machine.
However, the only scripting language that is supported "out of the box" is Python. It has been tested,
examples are provided and its Scripting Engine is part of the Installation package. Other languages may
require some fine-tuning of the environment to work correctly. Also some features (e.g. Introspection)
need to be slightly modified to work with any particular language.
POSH Bot
This type of agent uses some external tool for logic processing - mostly some kind of AI language.
At the present time, the only language supported this way is SPOSH, a strict implementation of POSH. It is
a language to define reactive behaviour of an agent, using BOD (Behaviour-Oriented Design) philosophy.
You can find more on POSH webpage [http://www.cs.bath.ac.uk/~jjb/web/posh.html], or on the page
describing SPOSH implementation [http://www.cs.bath.ac.uk/~jjb/web/BOD/sposh.html].
50
Three kinds of agents
Agents can be programmed using SPOSH plan and SPOSH actions and sensory primitives are defined
using Java or script code. Example of this kind of setup are JavaSPOSH bot and PogamutPoshBot projects
(the later has primitives written in Python).
51
Chapter 14. How to create an agent
Introduction
In this chapter, we will present detailed instructions on creating an agent. Guide starts with simplest
concepts and gradually shows new features of Pogamut platform.
The guide will present general concepts as well as use of various features, and examples will be provided
for each part. Due to this fact, most examples are only pieces of code, not complete agents or methods.
Although it should be easy to integrate them in your agent, they can't be run alone. Also, examples may
at times be inconsistent with each other. For more focused (and extensive) example, see the next chapter.
There you can find code of the complete agent, with commentaries and explanations.
Choosing a model
The first question you have to ask yourself when creating an agent is: "What should my agent do?" Of
course, you may toy with the engine and try out its various functions, but it will be much easier with a
clear goal in mind. Unfortunately, it is one of the problems this guide can't help you with.
Whether you have answer to the previous question or not, there is another: "How?". This one is just as
important, and you can do nothing without answering it. There are many models that can be used for
agent's decision making: if-then rules, finite-state machines, neural networks, and many, many more. Even
short summary of these is beyond the scope of this guide. Furthermore, it is not necessary. The features
of Pogamut platform are used the same way, regardless of employed model. And if you are familiar with
your chosen decision-making algorithm (or have its code in Java available), you should have no problem
implementing it to drive your agent.
We will make one exception and present details of the finite-state model of the agent. It's because all of
the examples in this guide were made using this model (some reasons for that are written in the following
example).
Finite-state agent (agent using the finite-state model) can be in several states. You can imagine
these as modes of operation - in each of them, agent behaves differently and reacts differently. The
behaviour, defined for each state, usually contains conditions when agent should switch to another
state. For example, agent in state "Pursuit" chases enemy and attempts to shoot it. When agent find
himself without ammunition, he switches state to "Resupply", which makes him run around, picking
up items.
Usually the agent is designed so the behaviour associated with each state is very simple and complex
behaviour is gained by designing states and elaborate switching conditions.
In our examples, a method is assigned to each state. Naming convention is simple: method for state
XY is stateXY(). The agent's primary method, doLogic, contains if-then rules that run appropriate
state... method. Current state of the agent is usually determined from agent's conditions (whether it
sees enemy, is shooting, is being hit, etc.). The state... methods either contain commands describing
behaviour in the state, if-then rules to select another state, or combination thereof.
52
How to create an agent
Example 14.1. Example: Choosing a model
Our example bot have a very simple purpose: to show off most of the features of Pogamut platform. It
will have many functions, most of them fairly useless or illogical. Their purpose is to show how such a
thing can be done.
For a decision-making model, we will select a finite-state machine. Why? It's very simple to implement,
the code is mostly self-explanatory and adding new functions isn't too difficult.
What kind of an agent ?
The three kinds of agents were described in previous chapter in detail. Basically you have to decide what
language you want to write your agent in. You can use Java, some scripting languages or POSH. For
purposes of this guide, we will assume you are using Java. If you are familiar with your chosen language,
there should be no problem getting the same results as following the guide.
The basic variant of agent written in Java is called Pogamut Java Bot.
Starting a project
After starting NetBeans, select File / New Project. From the selection of project templates, choose
the "Pogamut Java Bot" template from "Pogamut" category. On the next page, select a name of
your project. Click "Finish".
That's all, project started. If you want, you can start a server and try running the agent. It won't do anything,
of course. But you can connect to the server and see that it has joined the game and is standing there. Not
so useful now, but later you can watch your agent's actions this way.
Looking around, moving around
Let's try adding some functionality to our agent. We will start with vision. There is a lot of methods for
gathering sensory information, but they can be easily summarized. You can ask if you see certain object,
get first seen object of certain kind or get all seen objects of certain kind. Alternately, you can look for a
specific object (if you know its ID). These objects can be players, enemy agents, weapons, items and others.
Agent not only perceives the environment, it also has plenty of information about itself. The list of
methods can be found in corresponding section of Client package documentation. For now, the only ones
of interest are getAgentLocation, getAgentRotation, getIsMoving and getIsColliding. Their names are
self-explanatory.
Next is movement. A summary of commands concerning agent's movement can be found here(There are
also others, but leave that to the next section).
Agent can turn, run forward, crouch and jump. It can also turn towards something and run to something.
(Running to places that can't be accessed directly and/or are out of sight is handled differently. More on
that in next section).
What can we do with this limited array of functions? Quite a lot. We can, for example:
53
How to create an agent
Example 14.2. Make agent follow anyone he sees
protected void doLogic() {
try {
Thread.sleep(200);
} catch (InterruptedException e) {
this.log.severe("Agent was ruthlessly interrupted when sleeping!");
e.printStackTrace();
}
if (!this.memory.hasSelf()) {return;}
// Decision-making RULES:
// 1) are you standing next to anyone? -> stop and turn towards him
if (this.memory.getIsBumpingToAnotherActor())
{ this.stateWatch(); return; }
// 2) do you see anyone? -> follow him (go to his location)
if (this.getSeeAnyPlayer()){ this.stateFollow(); return; }
// 3) else, turn around
this.stateTurnAround();
}
// following procedures are behaviours for the states.
protected void stateWatch() {
this.body.stop();
this.body.turnToTarget(this.memory.getSeePlayer());
}
protected void stateFollow() {
this.body.runToTarget(getSeePlayer());
}
protected void stateTurnAround() {
this.body.turnHorizontal(80);
// sleep a bit more than usually so the turn can be finished
try {
Thread.sleep(250);
} catch (InterruptedException e) {
this.log.severe("Agent was ruthlessly interrupted when sleeping!");
e.printStackTrace();
}
}
As we can see, the code is really simple (maybe except the waiting part at the beginning of doLogic
method, but that is already present in newly created Agent). Few rules are added to the doLogic method,
each switching to one of the state... methods under certain condition. Note that with mere seven lines
of code (not counting commentaries and function headers) we made some useful behaviour - with small
modification, this could be used to pursue enemies!
54
How to create an agent
Know where you are going
In previous section we have shown you how to move and reach objects in the immediate vicinity. That
will probably not be enough. In this section we will explain finer points of navigation.
First, there are two methods that can be used to easily navigate around the map, without need to consider
anything else. safeRunToLocation will guide agent to the specified location, while safeRunToPlayer
makes the agent chase target player. Both take care of pathfinding, obstacles and everything else.
If you want to do some navigation yourself, the thing that needs to be explained is NavPoint, short for
navigation point. These are marks placed throughout the entire level. Agents can see them, while players
usually cannot (if you want to see them, start server with PathMarker mutator). Each neighbouring two
can be easily reached from each other. Therefore, series of NavPoints where each two consecutive are
neighbouring denotes a path the agent can walk with ease.
You can use NavPoints for simple navigation, looking for ones in right direction and running to them (by
methods shown in previous section). However, NavPoints are more useful in pathfinding. You can request
a path to any known object or location with methods of GameMap class. Your request will be sent to server
and answered later. That is the reason you should save ID of request, so you can pair it with the correct
answer. Alternately, you can use A* methods that compute path on the IDE. Either way, you will be given
the path to the target as a series of NavPoints.
When you receive the path, you can make the agent walk along it. That can be done manually by taking
path's points one by one and using runToNavPoint (or better yet, moveAlongNavPoints). But there is a
simpler solution. GameMap class offers you methods that take list of navpoints as a parameter and make
agent walk along so defined path.
The sequence of calls is following: first you need to obtain the path (by any of getPathToLocation
method), then you call checkPath() to know whether the path is ready - e.g. properly initialized. If not, call
preparePath() (that will initialize the path) and after that, you can call runAlongPath with no problems.
Remember that these commands only initiate the run-along behaviour. It will take the agent some time
before he reaches his destination. Meanwhile, his logic is running and he may make other decisions.
Command runAlongThePath should be used periodically while agent is en route. While it is on its way,
runAlongThePath returns true. It returns false when finished or next NavPoint is inaccessible.
55
How to create an agent
Example 14.3. Running towards a NavPoint, not necessarily reachable
protected doLogic() {
// some commands are already present
if (this.memory.getIsMoving()) this.gameMap.runAlongPath();
// more commands
}
protected boolean getThere(NavPoint n) {
Path myPath = getPathAStar(n);
if (myPath == null) return false;
initializeRunAlongPath(myPath);
Boolean result = runAlongPath();
return result;
}
protected void getThereAgain() {
restartPathToRunAlong();
runAlongPath();
}
In this example there are two methods. The first, getThere , takes NavPoint as a parameter. It calculates
path to the NavPoint and makes agent run along this path. True is returned if all goes well. Otherwise, false
is returned and agent does nothing. The other method, getThereAgain, would be used if agent's path were
interrupted. The line in doLogic method ensures the agent continues along the path if he is following one
(we presume that agent in this example doesn't move except when following path. In more complicated
agent, the condition should be revised).
Weapons ablazing
The environment inhabited by Pogamut agents is a shooting game. It is no surprise that shooting each
other and being hit makes significant part of agent's interactions. In this section you can find how to make
your agent combat-capable.
First thing you need is a weapon. Every agent is equipped with some at the start and can find more in
the environment. The Inventory section of AgentMemory documentation contains methods that give all
sorts of information regarding agent's current inventory. Particularly interesting is getBetterWeapon that
takes two points as a parameter and returns the best of agent's weapons for attacks from one to other. If
you want to change the weapon agent is holding, use changeWeapon or changeToBestWeapon method
of AgentBody.
Next thing you need is a target. If you aren't picky, it is best to use some of the sensory functions mentioned
in previous sections. getSeeEnemy works especially well here.
When agent has usable weapon and target, the actual shooting is very easy. Method shoot makes the agent
open fire on selected target (player or location).You can use shootAlternate instead if you want the agent
to use secondary fire mode. Either way, agent will shoot until told to stop by stopShoot method.
When the bullets start flying, there are some things agent should keep in mind. Methods that give agent's
status contain information on its health and armor, as well as whether is it shooting or being shot at.
56
How to create an agent
Sometimes, agent is able to detect projectile before is hit. getIsProjectileComming() can be used to handle
this situation and try to dodge, for example.
When agent kills or is killed by another agent, you can obtain its ID by getWhoAgentKilled or
getWasKilledBy methods. This can be used for gloating, or for something useful (like keeping track of
what agents are most dangerous). Note that in some cases, identity of other party is unknown. Zero is
returned instead.
Example 14.4. Selecting the best weapon and shooting target
This example makes agent shoot enemy when it sees one, and stop shooting once it vanishes from the sight.
protected void doLogic() {
// other commands
// if shooting and see nothing, stop
if ((this.memory.isShooting()) and (!this.memory.getSeeAnyEnemy())
this.body.stopShoot();
// if not shooting and see enemy, attack
if ((!this.memory.isShooting()) and (this.memory.getSeeAnyEnemy())
this.stateAttack();
// other commands
}
protected void stateAttack() {
Player target = this.memory.getSeeEnemy();
if (target == null) return;
this.body.changeToBestWeapon();
this.body.shoot(target);
}
57
How to create an agent
Example 14.5. Knowing he is being shot
This example makes agent report his health and armor whenever hit. It also reports if it registers a projectile
coming. (Commands for sending messages are explained later in this chapter)
protected void doLogic() {
// other commands
// report being hit
if (this.memory.getIsBeingDamaged()) {
this.body.sendGlobalMessage("Ouch! I have only "
+ this.memory.getAgentHealth() +
" health and " + this.memory.getAgentArmor() + " armor left");
}
// report projectile
if (this.memory.getIsProjectileComming()) {
this.body.sendGlobalMessage("Missile incoming !");
}
// other commands
}
Looking for ...
Besides the basic sensory primitives, the agent has other methods to orient in the environment.
First is memory. Similar to real beings, agents poses two kinds of memory: short-term and long-term.
Agent's short-term memory is short indeed. It stores events no older than two seconds. But in the world
of virtual beings (and especially in the world of shooting games), two seconds is pretty long time. On the
other hand, long-term memory of the agent reaches to the point of agent's creation. Given enough time and
exploration, agent's long-term memory could encompass all the objects on the game map.
So what does the agent remember? Perceived objects and their locations. You can request a list of Ammos,
Weapons, Health packs, Players and other objects. seen... methods reach to short-term memory (containing
last two seconds) and getKnown... methods do the same with long-term memory. For complete list, look
in short-term memory and long-term memory sections of the Client documentation. One of the methods
deserves a special mention: lastPlayerPosition returns last known position of certain player. This is very
useful when agent is following another player and doesn't want to lose him whenever its target walks
around the corner.
Example 14.6. Agent initialization using getKnownWeapons
protected void postPrepareAgent() throws PogamutException {
this.itemsToRunAround = new ArrayList<Item>();
for ( Item item : this.memory.getKnownWeapons())
this.itemsToRunAround.add(item);
}
This code snippet is used in the AdvancedBot example to initialize bot. It is a nice demonstration of
getKnownWeapons method. All the known weapon positions are placed in field itemsToRunAround
and then the agent seek these places whenever it needs a weapon. Note that the code is in
postPrepareAgent method, so it is run as soon as the agent connects to the server.
58
How to create an agent
Aside from memory, the agent has one more sensory capability. It is the ability to cast trace rays. These are
simulated rays that are cast from specified position and return information on what they hit, be it object,
player or part of the level geometry.
Trace rays can be cast by calling a method, or agent can be set to cast a few rays automatically. Manually
started rays are cast using trace or fastTrace methods. You must specify target location. If starting location
is not given, agent's position is supplied by default. You must also supply Id, that will be used to match
results with your query. Choose it so you don't confuse results of different traces. For trace method, you
can specify that you want to ignore actors and trace only level geometry. fastTrace is faster, but more
limited trace method - it tells the ray has hit something, but can't tell you what it was. For complete list of
the methods and their parameters, see trace section of AgentBody (under Client documentation).
Result of traces are obtained by getTraceResult or getFastTraceResult methods of AgentMemory. You
need to provide Id of the trace you want the result for. More details in corresponding section of the manual.
Methods for obtaining results of AutoTrace (see next paragraph) are also there.
The ability of agents to have a few "permanent" trace rays is called AutoTrace. If agent has AutoTrace
enabled (see configuration methods), it will cast assigned rays periodically and provide the results.
You can add rays with addRayToAutoTrace, remove them with removeRayFromAutoTrace or
removeAllRaysFromAutoTrace. When changing parameters of the ray, just add the new one, with same
Id. The old ray will be rewritten.
When adding a new ray, you need to specify ray Id, length and direction. Direction is relative to agent
( (1,0,0) is straight ahead, (0,1,0) is right and (0,0,1) is up ). You also specify whenever to use FastTrace
and if you want to ignore actors.
There is also a default set of AutoTrace rays: one in front of the agent, ant two at the angle of 45° to the
left and right. You can assign them to the agent by using restartAutoTraceRays.
Results of the AutoTrace commands are obtained by getAutoTrace... methods. Details are in previously
mentioned section.
Note that trace rays are computationally expensive and extensive use of this feature may tax server
resources.
59
How to create an agent
Example 14.7. Run and evade walls - using autoTrace
protected void doLogic() {
traceRun = false;
traces = this.memory.getAutoTraces();
for (AutoTraceRay trace : traces) {
if (trace.result) {
this.body.runToLocation(Triple.add(
this.memory.getAgentLocation(),
Triple.multiplyByNumber(trace.hitNormal, 100.0)));
traceRun = true;
}
}
if (!traceRun) { // no hit from auto traces
body.moveContinuous();
}
}
This was the code used in previous versions of KheperaLike example. Agent runs forward. When one of the
trace rays hit something, agent moves away from that (it runs in the direction of hitNormal - perpendicular
to the object hit by the traceRay, in the location of the hit. For more elegant and reliable solution to the
same problem, see the actual version of the KheperaLike example (code is much nicer, but also longer).
Listeners: reacting to environment
The information gained from the agent can be prompted by sensory and state methods. However, you
may want to react to new information asynchronously. That means installing a piece of code that is run
whenever certain conditions arise, regardless of state of the agent's main program.
Note
Listeners are advanced feature, requiring certain knowledge of Java. If you do not know what
interface is or what does mean when a class implements interface, do not waste your time reading
this section. You can get similar results by using techniques detailed earlier.
For this purpose Pogamut contain listeners. Listener is a class that implements
either RcvMsgListener [http://artemis.ms.mff.cuni.cz/pogamut/files/javadoc/cz/cuni/pogamut/Client/
RcvMsgListener.html] or SendCmdListener [http://artemis.ms.mff.cuni.cz/pogamut/files/javadoc/cz/
cuni/pogamut/Client/SendCmdListener.html] interface. Once you have such a class, you need to register it
as a listener by addRcvMsgListener or addSendCmdListener, depending on whether you want to react
to received messages (information from environment) or sent commands (agent actions).
Listeners can be unregistered by removeRcvMsgListener or removeSendCmdListener method. Details
of methods can be found in Listeners section of Client documentation.
Aside from normal listeners, there are also Typed listeners, that react to only specified message type. They
are handled by addTyped ... and removeTyped... methods - details in previously mentioned section.
Logs and Messages
While it is not vital, the ability to send information to the IDE and other players may come handy. In this
section, we will show you how to do both.
60
How to create an agent
In UT2004, players can communicate with each other by sending text messages. Some of them can
be perceived by all, some are limited only to agent's team-mates. These messages can be sent by
using sendGlobalMessage and sendPrivateMessage methods. Following example demonstrates their
use nicely. To receive the messages, register a listener for message types GLOBAL_CHAT and
TEAM_CHAT.
Example 14.8. Sending messages to communication channel
this.body.sendGlobalMessage("Everyone will receive this message");
this.body.sendPrivateMessage("Only teammates can receive this message.");
Example 14.9. Receiving the messages, replying
This example is very simple. When agent receives a message on global channel, a log entry is produced
containing text of the message (logs are explained next).
// this line is needed to initialize the listener
body.addTypedRcvMsgListener(ChatListener, MessageType.GLOBAL_CHAT);
// this class could handle the messages.
// It should be contained in Agent class
protected class ChatListener implements RcvMsgListener{
public void receiveMessage(RcvMsgEvent e) {
MessageObject temp = e.getMessage();
this.log.info("He said that "+((GlobalChat) temp).toString);
}
}
The ability to send information to user is even more useful. Agents can send log messages to the IDE.
These messages contain a line of text and have indication of level - how severe they are. The message
levels are listed below:
• SEVERE (highest value)
• WARNING
• INFO
• CONFIG
• FINE
• FINER
• FINEST (lowest value)
For each of the levels, there exists a method that send a message of corresponding level to the IDE, where
it is logged. These methods take text of the message (string) as a parameter and each is named the same
as the level. For example, if you want to send message with level WARNING, use following:
this.log.warning("This is log message with level WARNING being sent");
For instructions on viewing and browsing log messages, see corresponding section of chapter on IDE.
Class Logger offers many more possibilities. If you want to know more about them, read documentation
on class Logger (available on the internet [http://java.sun.com/j2se/1.4.2/docs/api/java/util/logging/
Logger.html]).
61
How to create an agent
Introspection
Pogamut enables you to inspect and change some properties of the agent at a runtime. This feature is called
the Introspection.
To mark the property as introspectable, it must be public. You also have to add @PogProp after the public
tag. Any property can be marked so.
For example, you want to have property healthy of integer type, initialized at zero. You need to add
following line to your agent's code:
public @PogProp int healthy = 0;
For instructions on viewing and editing introspected properties, see corresponding section of chapter on
IDE.
62
Chapter 15. Example
Introduction
This chapter contains extensive example of agent creation. It describes making of the most advanced
of the example agent - the Hunter. From the starting idea to the final line of code, all the steps are
shown and explained. Many techniques from the previous chapter are demonstrated in practice. The text
is accompanied by code snippets and commentaries to illustrate issue at hand.
As stated earlier, you can see the complete agent as example 04 - Hunter. To open it, start NetBeans IDE
and select "New Project ..." from the "File" menu of the NetBeans (or press Ctrl+Shift+N).
Then from the folder "Samples/Pogamut" choose "04 - Hunter".
First decisions: agent type and model
Before creating an agent, we need to decide what type of the agent we want (see Chapter 13, Three kinds
of agents to learn about different agent types). We chose to make a JavaBot agent, because it is the base
variant and therefore the best one to demonstrate capabilities of the platform.
For the same reason we adopted a finite-state model. There is also another reason - the behaviours in the
individual states are mostly independent, so even half-made agent can be run and will exhibit some sort
of action (the code needs to be grammatically correct for the agent to compile. When some parts of the
agent are done, I will tell you what is needed to run it).
What should agent do ?
With basics decided, it is time to start thinking what we want the agent to do. Let's say, for example, that
we want our agent to:
• chase enemies and shoot them
• return fire when shot at
• rearm according to the situation
• take items it sees
• seek healthpacks when hurt
• collect items around map when it has nothing better to do
Looks easy enough, but when presenting these behaviours to computer, we encounter some difficulties.
For example, there is priority: when the agent can do more things at once, which of them he should
select? According to the state model, each situation has one correct answer, so we must somehow establish
priorities. Also, we must specify the situations in terms of sensory primitives that Pogamut understands
(tutorial on sensory and move commands is in previous chapter). We do not need to specify actions just
yet - most probably each will contain many commands, so we just create a name for the action (and for
the state agent will be) and leave it for later.
After some thought, we come up with following description:
1. if you see enemy, rearm to the best suited weapon and engage it.
2. if you are being shot at, return fire
63
Example
3. if the enemy is running, chase it
4. if you see item, take it
5. if you are hurt, go take health pack
6. collect items
Priority is given by the order - once agent select an action, no more states will be tested. So no test is
necessary for action 6, as if agent had anything better to do, program would never reach that point.
We could try to build agent using these rules, but after a few tries we would find some more problems. For
example, agent would shoot even when the enemy is already dead , his attention span would be nonexistent
and he is prone to chasing enemy even when unarmed. To solve these, more rules would be added. Also,
some rules are redundant: if agent is shot at, we only need to turn towards the enemy, as its normal
behaviour (e.g. see enemy -> attack) will take over. So after more thinking, we arrive at this set of rules:
1. if you see enemy and have better weapon, rearm
2. if you see enemy and have a loaded weapon, engage him
3. if you are shooting, stop it
4. if you are shot at, look around
5. if you have enemy to pursue and a loaded weapon, go to his last known position
6. if you are going somewhere and bump into something, evade the obstacle
7. if you see any useful item you can reach, go take it
8. if your health is low, go take a health pack
9. collect items
You can see we use the implicit priority: rule 3 may look nonsensical, before we take into account that
it comes into action when the agent is shooting AND he doesn't see any enemy (else the rule 2 would
take over).
you can also see the rule 5 need some kind of variable storage, to remember the enemy (rule 6 doesn't need
it, because agent is always going somewhere). We will add following lines to the agent's class:
/** last enemy which disappeared from agent's view */
private Player lastEnemy = null;
doLogic method - heart of the agent
Now we are prepared to write some actual code. The doLogic method of the agent is called whenever the
agent should take an action. We will place our rules here. First list each rule as a comment, then place a
code bellow it. Look at the following code:
protected void doLogic() {
// IF-THEN RULES:
// 1) see enemy and has better weapon? -> switch to better weapon
if (this.memory.getSeeAnyEnemy() && this.hasBetterWeapon())
{ this.stateChangeToBetterWeapon(); return; }
64
Example
// 2) do you see enemy? -> go to PURSUE (start shooting)
if (this.memory.getSeeAnyEnemy() && this.memory.hasAnyLoadedWeapon())
{ this.stateEngage(); return; }
this.enemy = null;
// 3) are you shooting? -> go to STOP_SHOOTING
//
(stop shooting, you've lost your target)
if (this.memory.isShooting()) { this.stateStopShooting(); return; }
// 4) are you being shot? -> turn around - try to find your enemy
if (this.memory.isBeingDamaged()) { this.stateHit(); return; }
// 5) have you got enemy to pursue? -> go to the last enemy position
if ((this.lastEnemy != null) && (this.memory.hasAnyLoadedWeapon()))
{ this.stateGoAtLastEnemyPosition(); return; }
// 6) are you walking?
-> go to WALKING
(check WAL)
if (this.memory.isColliding()) { this.stateWalking(); return; }
// 7) do you see item?
-> go to GRAB_ITEM
//
(pick the most suitable item and run for)
if (this.seeAnyReachableItemAndWantIt())
{ this.stateSeeItem(); return; }
// 8) are you hurt?
-> get yourself some medKit
if (this.memory.getAgentHealth() < this.healthLevel &&
this.canRunAlongMedKit())
{ this.stateMedKit(); return; }
// 9) run around items
this.stateRunAroundItems();
return;
}
If you have read the previous chapters, you should recognize the sensory methods (like getSeeAnyEnemy).
The methods in bold are new they represent actions we want our bot to take or conditions he could be in.
Pogamut platform doesn't offer these functions, so we need to build them from available methods.
Also notice the "return;" command after each rule. It is there to stop the program after it has selected
one rule, to enforce priority. Without it, all the rules would we evaluated.
Now we have the doLogic method done, we need to declare and define all the methods in bold. We can
start where we want, so let's start from the top.
Weapon selection
First rule needs two methods: hasBetterWeapon and stateChangeToBetterWeapon. Let's first think of
what we need each to do.
The hasBetterWeapon method should decide whether the agent has better weapon available. Because
Pogamut has a getBetterWeapon method built in, this should be easy. Note that which weapon is better is
dependent on enemy location - certain weapons are best suited for long ranges, while other work at close.
protected boolean hasBetterWeapon() {
if (memory.getAgentLocation()==null || memory.getSeeEnemy()==null ||
65
Example
memory.getSeeEnemy().location==null)
return false;
AddWeapon weapon = memory.getBetterWeapon(memory.getAgentLocation(),
memory.getSeeEnemy().location);
if (weapon == null)
return false;
else
return true;
}
First line is checking if all needed to call getBetterWeapon is in place. As you can see, the method is
really simple - only checking if getBetterWeapon returns anything.
Note
All the newly declared methods are protected. They are always called from within the agent's
class, therefore they do not need to be public. You should always make the methods accessible
only where they need to be.
The other method should change to the better weapon. We will also send a log message to notify user what
we have decided. The code is also very simple:
protected void stateChangeToBetterWeapon() {
this.log.log(Level.INFO, "Decision is: CHANGE WEAPON");
AddWeapon weapon = memory.getBetterWeapon(memory.getAgentLocation(),
memory.getSeeEnemy().location);
body.changeWeapon(weapon);
}
Engaging the enemy
The deceptively simple name stateEngage hides a very complex behaviour. It is so because there are many
things that could happen when engaging the enemy and we need to watch them all. For this purpose, the
code of this method will be divided in a few parts with explanations inserted between them.
First problem is, there may be many enemies present. We have to select one of them, else the agent would
be paralysed with indecision. You may remember we declared variable lastEnemy earlier. Now we will
declare another one:
/** the enemy we're fixed at. If null no enemy is engaged. */
private Player enemy = null;
Why do we need two? The variable enemy holds the enemy we are currently fighting. When no one is
in sight, enemy = null. Meanwhile, lastEnemy holds info about the enemy we have lost, for the purposes
of pursuit.
So how do we handle the enemy selection? Bit by bit. First of all, if we have selected the enemy earlier
and agent still sees it, we will stick to it. Agent should renew its information and keep its target. If it sees
its target no more, it should stop shooting and save the target as lost (into lastEnemy variable).
protected void stateEngage() {
this.log.log(Level.INFO, "Decision is: ENGAGE");
// 1) if have enemyID - checks whether the same enemy is visible
// if not, drop ID (and stop shooting)
66
Example
if (this.enemy != null){
// refresh information about the enemy
this.enemy = this.memory.getSeePlayer(this.enemy.ID);
if (this.enemy == null){
if (this.memory.isShooting())
// stop shooting, we've lost target
this.body.stopShoot();
return;
}
if (!this.memory.getSeeAnyEnemy()) {
this.lastEnemy = enemy;
this.enemy = null;
return;
}
}
If we haven't selected the target (or lost it in previous code snippet), let's select another. Stop shooting
if none is available.
// 2) if doesn't have enemy - pick one of the enemy for pursuing
if (this.enemy == null){
this.enemy = this.memory.getSeeEnemy();
if (this.enemy == null){
this.body.stop();
this.body.stopShoot();
return;
}
}
If agent runs out of bullets, it should switch to another weapon. The hasLoadedWeapon method returns
false when the agent ran out of ammo. If the agent has no loaded weapon, it won't rearm, of course.
No special consideration is necessary, however. In the next iteration of the program, agent simply won't
engage the enemy.
Extra test is there to eliminate the possibility of agent selecting another weapon that uses the same ammo.
Such weapon would be, of course, useless.
AddWeapon weapon = null;
// 3) if out of ammo - switch to another weapon
if ((!this.memory.hasLoadedWeapon()) &&
this.memory.hasAnyLoadedWeapon()) {
weapon = this.memory.getAnyWeapon();
if ((weapon != null) && ((memory.getCurrentWeapon() == null) ||
((memory.getCurrentWeapon() != null) &&
(!weapon.weaponType.equals(
memory.getCurrentWeapon().weaponType))))) {
this.body.changeWeapon(weapon);
}
}
If the enemy is in the range of the weapon, agent should start shooting at it. It should also turn to face the
enemy. If it didn't do that, the enemy should just hide behind the agent.
// 4) if not shooting at enemyID - start shooting
double distance=(Triple.distanceInSpace(this.memory.getAgentLocation(),
67
Example
this.enemy.location));
if (this.memory.getCurrentWeapon() != null &&
this.memory.getCurrentWeapon().maxDist > distance) {
platformLog.info("Would like to shoot at enemy!!!");
if (!this.memory.isShooting())
this.body.shoot(this.enemy);
else
this.body.turnToTarget(this.enemy);
// to turn to enemy - shoot will not turn to enemy during shooting
}
Just to spice things up a little, we will make the agent run closer to the enemy if it "feels" the enemy is
too far. Being too far is decided by a random number.
// 5) if enemy is far - run to him
int decentDistance = Math.round(this.random.nextFloat() * 800) + 200;
if (this.memory.getAgentLocation() != null && this.enemy != null &&
this.enemy.location != null &&
Triple.distanceInSpace(this.memory.getAgentLocation(),
this.enemy.location) < decentDistance){
if (this.memory.isMoving()){
this.body.stop();
}
} else {
this.body.runToTarget(enemy);
this.jumped = false;
}
}
As you see, there is a lot of things to consider when you make agent engage the enemy. On the other side,
we require highly complex and robust behaviour. If you were less thorough, you could get some results
with lot less code. But preparing against every eventuality may be difficult, hence the complex code.
Cease the fire
If there is no enemy present and the agent is shooting, he should stop wasting the ammo. As a courtesy to
the user, message about this decision should also be sent. The code is downright trivial:
protected void stateStopShooting() {
this.log.log(Level.INFO, "Decision is: STOP_SHOOTING");
this.body.stopShoot();
}
When shot at, turn around
If the agent is hit by enemy fire, it should turn around to face its foe. We have opted for a simpler variant: the
agent starts turning around, hoping the enemy comes in sight eventually. The number in the method is the
turning angle. Greater angle means faster turning, but it cannot be too big, or the agent could miss the foe.
protected void stateHit() {
this.log.log(Level.INFO, "Decision is: HIT");
this.body.turnHorizontal(55);
}
68
Example
Chasing the enemy
If agent has chosen the enemy but can't see it, pursuit is in order. That is the aim of the
stateGoAtLastEnemyPosition method. The enemy probably just walked around the corner, so walking
to its last known location should bring it in the sight again.
protected void stateGoAtLastEnemyPosition() {
this.log.log(Level.INFO, "Decision is: PURSUE");
if(!this.gameMap.safeRunToLocation(lastEnemy.location)) {
// unable to reach the choosen item
log.info("Ended at the enemy possition or failed");
previousChoosenItem = choosenItem;
lastEnemy = null;
}
return;
}
safeRunToLocation is used to reach last enemy known location. The line marked in bold may not make
sense now, but you will understand when you read the section about collecting items.
Evade obstacles
When the agent is walking, he may hit an obstacle or another player. These situations should be detected
and solved somehow. For that purpose we have created the stateWalking.
Many obstacles are low, so agent should try to jump over them. However, it should jump only when
standing on the ground and when he is still colliding with the obstacle - otherwise the results would look
silly. To do so, agent needs to remember if he is jumping. We add this variable:
/** prevent bot from continuous jumping - he will jump only once */
private boolean jumped;
When the agent collides with another actor, we will just stop him. Either the other actor moves away, or
it is the enemy - in which case another behaviour takes over in the next iteration.
The agent can also fall. There is not much we can do, but to demonstrate corresponding functions, we let
the agent send some messages into the communication channel.
protected void stateWalking() {
this.log.log(Level.INFO, "Decision is: WALKING");
if (this.memory.isColliding())
if (!this.jumped){
this.body.doubleJump();
this.jumped = true;
} else {
this.body.stop();
this.jumped = false;
}
if (this.memory.isFalling()){
this.body.sendGlobalMessage("I am flying like a bird:D!");
this.log.info("I'm flying like an angel to the sky ... ");
}
if (this.memory.isBumpingToAnotherActor()){
69
Example
this.body.stop();
}
Take what you see
We have decided the agent should pick up any item it can see and reach, if another behaviour doesn't
prevent it. Now we need to define following methods:
Method seeAnyReachableItemAndWantIt looks if there are any reachable items. If so, we need to select
the best one. We will make chooseItem to do that - see below. Note that we need two variables to keep
necessary information. We keep the last item bot was trying to get but couldn't, so it doesn't try to get it
again. It would get stuck otherwise.
/** choosen item for the state seeItem */
protected Item choosenItem = null;
/**
* Stores last unreachable item
* This setting should prevent bot from stucks.
*/
protected Item previousChoosenItem = null;
private boolean seeAnyReachableItemAndWantIt() {
if (this.memory.getSeeAnyReachableItem()){
choosenItem = chooseItem();
if (choosenItem != null) {
this.log.info("NEW ITEM CHOSEN: " + choosenItem);
this.log.info("LAST CHOOSEN ITEM: " + previousChoosenItem);
}
} else {
choosenItem = null;
}
if ((choosenItem!=null) && (!choosenItem.equals(previousChoosenItem)))
return true;
else
return false;
}
We decided to make agent select items very carefully. We will give it priorities for various items, as defined
in the chooseItem method. First it should take weapons, then armor if no weapon is available. Health is
taken only if the agent is wounded and ammo is the lowest priority (and only for the weapons agent has).
Some health items are boostable, i.e. can be taken to raise health above maximum. Agent will take these
even when not wounded.
private Item chooseItem() {
// 1) choose weapon - choose the type he is lacking (melee/ranged)
if (this.memory.getSeeAnyReachableWeapon())
return chooseWeapon();
// 2) choose armor
if (this.memory.getSeeAnyReachableArmor())
return this.memory.getSeeReachableArmor();
// 3) choose health - if the health is bellow normal maximum
70
Example
if (this.memory.getSeeAnyReachableHealth()) {
Health health = this.memory.getSeeReachableHealth();
if (this.memory.getAgentHealth() < 100)
return health;
if (health.boostable) // if the health item is boostable, grab it
return health;
}
// 4) choose ammo - if it is suitable for possessed weapons
if ((this.memory.getSeeAnyReachableAmmo()) &&
(this.memory.isAmmoSuitable(this.memory.getSeeReachableAmmo())))
return this.memory.getSeeReachableAmmo();
// 5) ignore the item
return null;
}
As you can see, agent tries to choose its weapons too. If it is unarmed, it takes anything. Otherwise is
takes the types it is lacking.
private Weapon chooseWeapon() {
ArrayList<Weapon> weapons = memory.getSeeReachableWeapons();
for (Weapon weapon:weapons) {
// 0) has no weapon in hands
if (this.memory.getCurrentWeapon() == null)
return weapon;
// 1) weapon is ranged, bot has melee
if ((this.memory.getCurrentWeapon().melee) && !weapon.isMelee() &&
!this.memory.hasWeaponOfType(weapon.weaponType)){
return weapon;
}
// 2) weapon is melee, bot has ranged
if (!this.memory.getCurrentWeapon().melee && weapon.isMelee() &&
!this.memory.hasWeaponOfType(weapon.weaponType)){
return weapon;
}
}
Weapon chosen = this.memory.getSeeReachableWeapon();
if (!this.memory.hasWeaponOfType(chosen.weaponType)){
return chosen;
}
return null;
}
When suitable item is selected, stateSeeItem is called and bot runs for its prize. When unable to reach
it (as determined by the safeRunToLocation method), the item is stored to not seek it again and the run
for the item is stopped. If the bot would hit an obstacle on its way to the item, it would try to jump over
it. We will stop his jumping, just in case.
protected void stateSeeItem() {
if(!this.gameMap.safeRunToLocation(choosenItem.location)) {
// unable to reach the choosen item
log.info("unable to REACH the choosen item");
previousChoosenItem = choosenItem;
choosenItem = null;
}
this.jumped = false;
71
Example
}
Seek healing when wounded
First we need to decide when the agent is considered wounded. For this purpose, we add following variable.
If agent's health drops below stated value, he is considered wounded and will try to find health.
/** how low the health level should be to start collecting health */
public int healthLevel = 90;
When the agent seeks the health packs (medkits), it needs to determine whether there are any available
and make a list of them. getNearestHealth takes care of that, but some special cases need to be taken care
of. If no health packs are available, the search is aborted (so the agent doesn't obtain empty list of health
packs). Also is a health pack is too close, it should be ignored - if it can be reached, other behaviour will
pick it up; otherwise it would only make agent stuck.
protected boolean canRunAlongMedKit() {
if (this.choosenMedKits == null) {
this.choosenMedKits = this.gameMap.nearestHealth(4, 8);
return false;
}
// no medkits to run to around the agent - see nearestHealth
if (choosenMedKits.isEmpty() || choosenMedKits.size() > 2)
return false;
// bot is too close to the object - possibly standing at the only one
if (Triple.distanceInSpace(choosenMedKits.get(0).location,
memory.getAgentLocation()) < 40) {
// there are many - remove the first one - seeItem has highest
// priority, so bot should pick up the item anyway and otherwise
// will not get stucked at the inventory spot of the item
if (choosenMedKits.size() > 2)
choosenMedKits.remove(0);
else
this.choosenItem = null;
return false;
}
return true;
}
When the available health packs (medkits) are decided, bot will use standard method
runAroundItemsInTheMap to collect them:
protected void stateMedKit() {
this.log.log(Level.INFO, "Decision is: RUN_MED_KITS");
this.gameMap.runAroundItemsInTheMap(choosenMedKits, this.useAStar);
}
Collect items
When agent has nothing better to do, it should collect items on the map. If such situation arises,
stateRunAroundItems is called. We will use standard method runAroundItemsInTheMap to perform
the collecting.
72
Example
protected void stateRunAroundItems() {
this.log.log(Level.INFO, "Decision is: RUN_AROUND_ITEMS");
this.gameMap.runAroundItemsInTheMap(itemsToRunAround, useAStar);
}
However, we need to establish the list of items to collect somehow. It needs to be established only once,
so we add a variable and initialize it when the agent joins the game. To do so, we place the code in the
postPrepareAgent method:
/** is used to store shuffled list of weapons bot runs around */
private ArrayList<Item> itemsToRunAround = null;
protected void postPrepareAgent(){
this.itemsToRunAround = new ArrayList<Item>();
for ( Item item : this.memory.getKnownWeapons())
this.itemsToRunAround.add(item);
for ( Item item : this.memory.getKnownArmors())
this.itemsToRunAround.add(item);
Collections.shuffle(itemsToRunAround);
}
As you can see, the method simply takes list of all known Weapons and Armors and add it to one list, that
is shuffled afterwards. We shuffle it so the agent collects the items at random and not in order.
Introspection and playing the virtual puppeteer
All the behaviours are finished, but we will add one more feature to the agent. We want to be able to use
Introspection to control agent's behaviour and change it at the run-time. To do so, we define following
variables:
@PogProp
@PogProp
@PogProp
@PogProp
@PogProp
@PogProp
@PogProp
public
public
public
public
public
public
public
boolean useAStar = false;
boolean shouldEngage = true;
boolean shouldPursue = true;
boolean shouldRearm = true;
boolean shouldCollectItems = true;
boolean shouldCollectHealth = true;
int healthLevel = 90;
The @PogProp indicates variables accessible by the introspection. Now we can (trough Introspection) set
whether the agent uses built-in A* algorithm and how much damage will make it seek health (remember,
we used this variable earlier). But how about more control of the behaviour? The other variables will do
that. We can use them to switch agent's behaviours on and off. To do so, we need to modify doLogic, so
that agent will (for example) engage enemy only if the variable shouldEngage is set to true. When all these
switches are built in, the doLogic will look like this:
protected void doLogic() {
// IF-THEN RULES:
// 1) see enemy and has better weapon? -> switch to better weapon
if (this.shouldRearm && this.memory.getSeeAnyEnemy() &&
this.hasBetterWeapon()) { this.stateChangeToBetterWeapon(); return; }
// 2) do you see enemy? -> go to PURSUE (start shooting)
if (this.shouldEngage && this.memory.getSeeAnyEnemy() &&
73
Example
this.memory.hasAnyLoadedWeapon()) { this.stateEngage(); return; }
this.enemy = null;
// 3) are you shooting? -> go to STOP_SHOOTING
//
(stop shooting, you've lost your target)
if (this.memory.isShooting()) { this.stateStopShooting(); return; }
// 4) are you being shot? -> turn around - try to find your enemy
if (this.memory.isBeingDamaged()) { this.stateHit(); return; }
// 5) have you got enemy to pursue? -> go to the last enemy position
if ((this.lastEnemy != null) && (this.shouldPursue) &&
(this.memory.hasAnyLoadedWeapon()))
{ this.stateGoAtLastEnemyPosition(); return; }
// 6) are you walking?
-> go to WALKING
(check WAL)
if (this.memory.isColliding()) { this.stateWalking(); return; }
// 7) do you see item?
-> go to GRAB_ITEM
//
(pick the most suitable item and run for)
if (this.shouldCollectItems && this.seeAnyReachableItemAndWantIt())
{ this.stateSeeItem(); return; }
// 8) are you hurt?
-> get yourself some medKit
if (this.memory.getAgentHealth() < this.healthLevel &&
this.canRunAlongMedKit())
{ this.stateMedKit(); return; }
// 9) run around items
this.stateRunAroundItems();
return;
}
Conclusion
That concludes the tutorial. Agent has all the behaviours we wanted it to have and is ready to run.
You can see the complete code in the example 04 - Hunter. To open it, start NetBeans IDE and select
"New Project ..." from the "File" menu of the NetBeans (or press Ctrl+Shift+N). Then from
the folder "Samples/Pogamut" choose "04 - Hunter".
74
Chapter 16. Experiments
Introduction
Pogamut platform enables you to design Experiments - scripts in Drools language that are used to control
the run of the platform. It can be used to design scenarios and run them automatically, for example to
perform a test series without need of human overview.
This chapter is not meant as a tutorial of the Drools language, that is beyond scope of this book. It is
meant to give a very basic introduction and focus on the "points of contact" between the platform and
the Drools engine.
Those interested in extensive use of this feature are recommended to seek out a full-fledged Drools tutorial.
Principle of the Drools (greatly simplified)
Drools engine is rule-based: each scenario (called Experiment) is defined by a few rules. These are pieces
of code that are run in certain situations, as a reaction to certain events, etc.
The engine keeps a list of facts, things that are considered true at the moment. These facts can be objects
of any type. The rules can add or remove facts from the list, by using insert and remove methods (see
below). Some facts are established automatically.
Each rule has a section, listing facts that it needs to run. All the rules are periodically matched against the
list of facts; those that match are triggered and their code run. Note that there is no guarantee which rule will
be triggered first. If you need such precision, read about parameter saliance in the Drools documentation.
Drools file
The Experiment project consists of two files. You can see them both on the Projects tab.
Drools file, the one with suffix .drl, contains a description of the experiment. It begins with imports and
declarations of global variables (do not edit any of these; you may need to add your own, bu leave the
original alone). The rest of the file are rule descriptions. Note that you are required to mark this file as a
'Main file' (context menu, Set Main) to run the project.
The other file contains parameters that are imported into Drools as facts.
Rules
The main part of the experiment consists of various rules. All the rules have the same syntax. See the
following example:
75
Experiments
Example 16.1. Drools rule example
rule "Hello World"
no-loop true
when
m : Message( status == Message.HELLO )
then
log.info(message);
m.setMessage( "Goodbye cruel world" );
m.setStatus( Message.GOODBYE );
update( m );
end
Rule definition starts with name, followed by parameters (optional). In this case, only parameter is no-loop.
When set to true, the rule will be triggered only once and not again, until the triggering conditions change.
Next part is the block introduced by when. It contains a list of the facts that need to be present to trigger the
rule. Each fact has a type, and in the parentheses are further conditions it must fulfill. In the example above,
the rule will only be triggered when there is a fact of type Message, whose status is Message.HELLO.
Note
There is one special rule, called startup rule. It is triggered at the beginning of the experiment
and may contain initialization instructions and such. Such a rule contains following in the whensection
experimentStartup : ExperimentStartup ( startup == true )
The last part is the actual code of the rule. It is introduced by then and closed with end, marking the end
of the rule. Inside are the commands to perform when the rule is triggered. These are normal Java code,
with some special features described in following sections.
Things to do in the rules
As stated before, the code in the rules is written in Java. There are, however, some commands and some
objects of special interest.
You may want to change the list of known facts. Insert( fact ) method adds a new fact, remove( fact )
removes it from the list. update( fact ) inserts any changes made to an object into the fact list, updating
its data.
You will certainly want to start agents in the experiment, in the initialization or later. You need to do
following things:
• Agent project has to be in the Pogamut folder (it is the default place to save projects)
• Agent code must have been built (done if you tried to run it and it didn't fail)
• Agent class has to be included. Write line as this in the imports section of the .drl file.
import hunter.Main;
Of course, replace hunter with the package name of your bot (seen in the Projects tab)
• To actually start a bot, you have to create the object and then use utWorld.Connect.
76
Experiments
Agent hunter = new hunter.Main();
String joeName = utWorld.connectBot(hunter, "Joe");
As before, hunter is the package name. "Joe" is name given to the bot. Note that you would like to store
the return value of utWorld.connectBot() as it returns you a real name of the bot (a suffix '_num') will
be added to the desired name.
The experiment has its own log, accessible from IDE. To send messages to this log, use the log object.
Its methods are the same as for Java logger:
log.info("Log message is sent");
When you want the experiment to stop itself, use experiment.experimentEnd() method.
Automatically inserted facts
There are some facts that are inserted to the Drools engine automatically.
• AgentMemory - Whenever the bot is connected to the UT2004 environment through
utWorld.connectBot() as shown in previous section, the AgentMemory class of the bot is inserted to
the Drools engine as a fact, allowing you to create rules that matches it's attributes (location of the bot
and such)
• Parameter - every parameter as specified in 'Important files - Parameters' are added as facts
• ExperimentStartup - this fact will help you to create rule that can set up the UT2004 environment
Miscellaneous info
Look at the example Experiment. Many things are more evident in the code than in the explanation. The
example experiment is also heavily documented and it explains the structure of the file.
Error messages the Drools gives are a bit confusing. To know what is wrong, read only the first one. Most
of it won't make sense, but you will be able to discern which rule contains error, and the description of
the error (at the end) will tell you what it is.
The Experiment locks the server it runs on, preventing another agents to be run. Occasionally when the
experiment is incorrectly terminated, this lock may stay on the server. In such case, delete the server from
the list and add it anew.
77