1
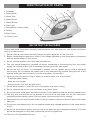
USER'S MANUAL
Dear Customer,
Congratulations! Thank you for buying this KORYO appliance. Your new Steam Iron has been designed for
your convenience. We are sure you will get many years of trouble free service from this appliance.
Before commissioning this device please read this user manual carefully. Please retain this user manual,
warranty certificate, sales receipt and if possible carton with the inner packaging.
CONTENTS
Identification of parts.. .......................................................................3
Important safeguards........................................................................3
Use the instruction manual for future reference. . ................................4
Choice of water. . ...............................................................................4
How to fill in water............................................................................4
Temperature control setting...............................................................4
Setting the temperature . . ..................................................................5
Spraying...........................................................................................5
Steam ironing...................................................................................5
Burst of steam..................................................................................5
Dry ironing........................................................................................5
Care and cleaning.............................................................................6
Storage . . ...........................................................................................6
Safety protective cut-out...................................................................6
E-waste disposal. . .............................................................................6
Warranty ..........................................................................................7
2
IDENTIFICATION OF PARTS
1. Soleplate
2. Spray Mouth
5
3. Water Tank
8
6
9
10
7
4
4. Spray Button
3
5. Steam Button
6. Pilot Light
2
7. Temperature Control Knob
8. Handle
1
9. Back Cover
10. Swivel Cord
IMPORTANT SAFEGUARDS
Please read these instructions carefully and familiarise your self with your new steam iron before
using it for the first time.
1. Please read all instructions carefully before using the appliance for the first time.
2. Before connecting the appliance, check if the voltage indicated on the rating plate corresponds
with the mains voltage in your home.
3. Do not use the appliance for other than intended use.
4. The iron should always be switched off before connecting or disconnecting from the power
supply. Do not pull by the cord to disconnect the plug from the wall socket.
5. Do not use the iron when it is damaged in anyway. Do not operate the iron with a damaged
cord or plug. Do not replace the power cord or any other parts by yourself. Bring the iron to the
nearest authorised service facility or to the shop where you bought it.
6. When you have finished ironing or when you want to leave it for a short while:
- Press the steam control
- Keep the iron upright
- Disconnect the iron from the wall outlet
7. Do not allow children to touch the iron or the power cord when ironing.
8. Do not immerse the iron or cord into water or any other liquid.
9. Do not touch hot metal parts, hot water or steam. These parts become hot and may cause burns.
10.The plug and cord should not be allowed to touch the hot sole plate. Let the iron cool down
completely before taking it away. Roll the power cord round the iron for storage.
11.Disconnect the iron from the wall outlet for filling in water or when you want to remove the water
after use.
12.To avoid an overloaded circuit, do not operate another high voltage appliance in the same electric
circuit.
13.Never use an extension power cord set that is not approved by a competent authority. The cord
should be arranged in a way that it cannot be pulled or tripped over.
14.The iron is for household use only.
3
Notes:
● Some parts of the iron have been slightly greased and as a result the iron may smoke slightly
when switched on for the first time. It will not happen again after a few uses.
● Before using for the first time, remove any protective films or stickers from the soleplate and the
cabinet.
● Then clean the soleplate with a soft cloth.
When using the iron for the first time, test it on an old piece of fabric to ensure that the soleplate
and water tank are completely clean.
CHOICE OF WATER
● This iron can be used with normal tap water.
● If the water is particularly hard, it is advisable to use distilled or demineralised water.
● Do not use chemically descaled water or any other liquids for refilling.
HOW TO FILL IN WATER
● Unplug the iron from the wall outlet.
● Remove the spray knob and fill in water through the inlet
- Fill up the maximum level “MAX” of the water tank.
● Put the spray knob back to the iron and ensure that it is secured firmly.
Important : Remove the water after use.
TEMPERATURE CONTROL SETTING
● Always check first to see whether a label with instruction is attached to the article to be ironed.
Follow these instructions in all cases.
● If the ironing instructions are missing, then the label below may help you.
● First you should sort the laundry, Use wool with wool, Cotton with cotton etc. Start ironing the
fabrics requiring the lowest temperature and progress to the higher ones. Because the iron heats
up quicker than it cools down.
● If the fabric consist of various kinds of fibres (Eg. Cotton with polyester) you must always select
the lowest ironing temperature of the composition of those fibres.
LABEL
KIND OF TEXTILE
FIBRE MATERIAL
Synthetic
Acrylic, Modacryt, Polypropylene,
Polyurethane
Synthetic
Acetate
Triacetate
Synthetic
Cupro, Polyamide (Nylon), Polyester,
Modal, Viscose (Rayon)
Silk
Silk
Wool
Wool
Cotton
Cotton
Linen
Linen
4
SETTING THE TEMPERATURE
● Insert the plug in the wall socket and let the iron be kept upright.
● Turn the temperature control knob to the correct temperature
● The correct temperature will be reached when the pilot light has turned off. The pilot light will be
on and off from time to time indicating that the selected temperature is being maintained.
SPRAYING
This function can be used any time and it does not effect the ironing temperature.
● Fill water into the iron as described in “HOW TO FILL IN WATER”.
● Aim the nozzle to the garment.
● Press the spray knob
STEAM IRONING
This function can be used only at higher ironing temperature
●●
●●● or MAX for maximum steam
for moderate steam
● Fill water into the iron as described in “HOW TO FILL IN WATER”.
● Stand the iron on its rear side
● Connect the iron to a suitable mains supply outlet.
● Turn the temperature control to the “●●”,“●●●” or “MAX” setting.
● The pilot light turns off when the temperature is reached. The iron is ready for use.
● Turn the steam knob to the required position, steam starts coming out from the holes in the
soleplate.
Notice : With conventional steam ironing, water may leak from the soleplate if a too low temperature
has been select, if this happens, turn the temperature control to the advice position. Steam will
recommence as soon as appropriate temperature has been reached.
BURST OF STEAM
This function provides an extra amount of steam to remove stubborn wrinkles.
● Fill the iron with water as described in “HOW TO FILL IN WATER”.
● Turn the temperature control to the position “MAX”
● The pilot light turns off when the required temperature is reached.
● The iron is ready for use.
● Press the steam control knob
● Steam will penetrate into the garment removing the wrinkles.
● Wait a few seconds before pressing the steam control knob again when there are stubborn
wrinkles.
Usually all wrinkles can be removed within three pressings.
DRY IRONING
● Connect the iron to a suitable mains supply outlet.
● Ensure that the steam control knob is in down position
● Select the setting on the temperature control)
● When the pilot light turns off, the requirement temperature is reached. The iron is ready for use.
5
CARE AND CLEANING
1. Disconnect the iron from the wall outlet and let it cool down completely.
2. Deposits and other residues on the soleplate can be removed with a rough cloth soaked in
vinegar / water solution.
3. The casting may be wiped with a damp cloth and then polished with a dry one.
4. Never use any abrasives to clean the soleplate.
5. Keep the soleplate smooth; avoid hard contact with metal objects.
STORAGE
● Turn the temperature control to “MIN” and set the steam control knob to position down
● Disconnect the iron from the wall outlet.
● Pour any remaining water out of the water tank.
● Keep the iron upright and let it cool down completely.
● The power cord can be wound around the iron
● Always store the iron in an upright position.
SAFETY PROTECTIVE CUT-OUT
In the unlikely event of the thermostat failing, the protection cut-out will operate to prevent the iron
overheating. Then the iron should be taken to the nearest authorised service facility.
E-WASTE DISPOSAL
This symbol on the product or on the container indicates that this product cannot be eliminated
with the general waste. The user is responsible for eliminating this kind of waste by throwing them
away at a “recycling point” specifically for electrical and electronic waste. Selective collection
and electrical equipment recycling contribute to preserve natural resources and warrant waste
recycling to protect environment and health. In order to receive further information about
electrical and electronic waste collecting and recycling, contact your Local Council, the service
of household waste or the establishment where the product was acquired.
6
WARRANTY
This product comes with a warranty of 12 months from the date of purchase as specified on the warranty card. This
is against all defective material or workmanship. In the event of a defect, Future Retail Limited or KORYO Authorized
Service Centre undertakes to repair the set, free of charge, during the warranty period.
In the event of a defect developing in the product, contact KORYO Customer Care or KORYO Authorized Service
Centre and provide information about the defect, the model number and serial number of the product.
THIS WARRANTY IS VOID IF
1. The completely filled warranty card is not presented to the authorised personnel at the time of servicing of the
product.
2. The product is not operated according to the instructions given in the user manual.
3. Defects are caused by improper or reckless use.
4. Modifications or alterations have been made to the product or if the product has been tampered with,in any
manner whatsoever.
5. Repairs to the product are carried out by anyone other than an authorised company representative.
6. For defects other than faulty parts or workmanship such as damage due to lightning, abnormal voltage, spillages,
dust, accidental damage, etc.
7. The serial number is deleted or altered.
8. Used for any non–domestic purpose.
OTHER TERMS AND CONDITIONS
1. Repairs or replacement will be carried out either by a Future Retail Limited authorised customer care centre or
by a representative.
2. All expenses incurred in collecting the unit(s) or part(s) thereof from the Customer Service Centre, as well as any
other expenses and incidentals will be borne by the customer.
3. Whilst the company will make every effort to carry out repairs at the earliest, it is made expressly clear that the
company is under no obligation to do so in a specified period of time.
4. The company or its authorised customer centre reserves the right to retain any part(s) or component(s) replaced
at its discretion, in the event of a defect being noticed in the equipment during the warranty
WARRANTY CARD
THIS CARD IS VALID ONLY IF IT IS FILLED IN COMPLETELY,
SIGNED AND STAMPED BY THE DEALER ON DATE OF PURCHASE
MODEL NO
: CUSTOMER NAME
:
SERIAL NO
:
ADDRESS:
PHONE NO
: RESIDENCE
INVOICE/CASH BILL NO
:
DATE OF PURCHASE
:
CUSTOMER SIGNATURE
:
:
OFFICE
:
DEALER’S STAMP
* For service request kindly contact Customer Care Centre at : 1800-425-7722, 080-26577722
* Please mail in queries to [email protected]
7
Also Available
Convection MW Ovens
Slow Juicer
Split Air Conditioner
Grill MW Ovens
Juicer Mixer Grinder
Window Air Conditioner
Oven Toaster Grill
Mixer Grinder
Storage Water Heater
Pop up Toasters
Juice Extractor
Instant Water Heater
Sandwich Maker
Food Steamer
Immersion Heater
Induction cooker
Chopper
Room Heaters
Electric cooker
Steam Iron
Vaccum Cleaner
Electric Kettle
Dry Iron
FATL
Coffee/Tea Makers
Ceiling Fans
SATL
Hand Blender
TPW Fan
Emergency Light
Hair Dryer
Stabilizer
Imported by:
Future Retail Limited
Tower C, 9th Floor, 247 Park, L.B.S. Marg, Vikhroli (West),
Mumbai - 400 083, Maharashtra, India.