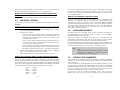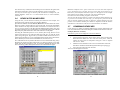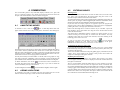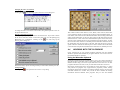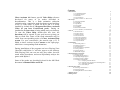
1
Contents
Chess Assistant 10 features special Video Help reference
developed for many of its modes described in
documentation. This is a flash animation collection
explaining why a particular mode has been created and how
to use it. Video Help is stored on DVD and it is being
installed by default into C:\Program files\Chess Assistant
Video (if you have Professional pack). During an
installation, the Intro icon is being added onto your desktop.
To start the Video Help, double-click this icon; the
Intro.htm will be opened in your web browser giving you
links to flash files. Some of the flash animations may be
called from corresponding topics of Chess Assistant Help
system. For your convenience, the asterisk sign (“*”) is
added to those sections in the Content on the right page,
which have corresponding flash animations
During installation of the programs an icon «Playing Zone
ChessOK with Rybka 3» will also appear on the desktop.
With Playing Zone one can not only play online, but also
watch online broadcasts, and most importantly analyze the
games with Rybka 3.
Some of the modes are described in detail in the MS Word
document in Manual folder on DVD.
1. Introduction
1.1. System Requirements
1.2. Technical Support
1.3. Installation
1.4. Copy Protection
1.5. Chess Assistant 10 – What’s new?
2. First Steps
2.1. Opening a Database
2.2. List Mode *
2.3. Split Mode *
2.4. View Mode *
2.5. Test Mode
2.6. Demonstration Mode
2.7. Active Window, Current Dataset *
3. Search
3.1. Header Search *
3.2. Position Search *
3.3. Material Search *
3.4. Advanced Search
3.5. Search for Comments *
3.6. Search for Maneuvers *
3.7. Combining Searches *
3.8. Composite Search
4. Commenting
4.1. Annotating Moves *
4.2. Adding Variations *
4.3. Entering Moves
4.4. Working with the Clipboard *
4.5. Saving a Game *
4.6. Inserting Games *
4.7 Multimedia Support
5. Playing Engines and Analysis
5.1. Playing Engines
5.2. Linking Playing Engines *
5.3. Adjusting Playing Engines
5.4. Playing Against an Engine
5.5. Analyzing with Engines *
5.5.1. Analyzing in Infinite Mode *
5.5.2. Analyzing a Set of Positions in the Background *
5.5.3. Searching for Blunders *
5.5.4. Game Analysis
6. Entering New Games
6.1. Entering a Game Header *
6.2. Entering Notation
6.3. Editing Headers in the List Mode
7. Deleting Games
8. Editing Games
1
3
3
3
3
5
5
5
5
7
8
8
11
14
15
15
15
18
20
21
21
22
23
24
26
26
26
27
29
30
31
31
32
32
32
34
36
37
38
41
41
43
46
46
48
48
48
49
9. Sets of Games
9.1. Selecting Games
9.2. Classifying Games and Positions
9.2.1 Standard Classes
9.2.2 Windows Explorer Style Classifier
9.3. Operations with Datasets *
10. The Opening table Mode
11 Operations with Databases
11.1 Creating a New Base *
11.2 Copying a Base *
11.3. Joining Several Bases
11.4. Deleting a Base
11.5. Converting Bases from Other Formats
11.6. Compressing a Base
11.7. Resorting a Base *
11.8. Searching for Duplicates *
11.9. Updating from the Internet
11.10 Repairing a Base
11.11 Packing and E-mailing a Base
12. Libraries *
13. Chess Trees
13.1. Operating a Tree *
13.2. Database with Master Evaluations
13.3. UserBook
13.4. CAP Data
13.5. Different Types of Trees
13.6. Adjusting the Trees
13.7. Constructing the Trees
13.8. Opening Book
14. Opening Preparation
14.1 Opening Report *
14.2. Search for Novelties *
14.3. Automatic Opening Commenting *
14.4. Automatic Preparation for Your Games
15. Gathering Statistics
16. Players Encyclopedia
17. Printing *
17.1 What can be printed
17.2 Page setup
17.3 Print options
17.4 Print Preview
17.5 Exporting
18. The Playing zone chessOK with Rybka 3
18.1 Quick start
19. Test Opening Mode
20. Miscellaneous Options
2
49
49
50
50
51
53
55
70
70
70
71
72
72
73
73
73
73
74
75
75
76
77
81
81
82
82
83
84
84
87
87
88
88
88
88
89
91
91
91
92
94
94
95
96
106
111
1. INTRODUCTION
This manual uses the following conventions:
Menu commands are written as follows: Base | Open (the command Open from the Base
menu). Screen messages are written in Italics. Keys are shown as, for example, [Alt].
Clicking with the left button of the mouse is referred to as “clicking” and
clicking with the right button of the mouse as “right-clicking”. You can also use
the CHESS ASSISTANT help file at any time. Press [F1] to open the help file.
1.1
SYSTEM REQUIREMENTS
To use CHESS ASSISTANT 10, you will need the following:
Essential: IBM-compatible PC, 128 MB memory (RAM), Hard Disk (1 GB of
free disk space), VGA graphics, Windows 2000/NT/XP/Vista, DVDROM drive, Microsoft-compatible mouse.
Recommended: IBM-compatible PC, 512 MB or more RAM, 10 GB of free
disk space for the databases and trees, Super VGA graphics with 16
bit colors and 1024x768 screen mode, DVD drive.
1.2
TECHNICAL SUPPORT
Please refer to the CHESS ASSISTANT documentation and help system before
contacting technical support. Chess Assistant 10 users can obtain on-line support
via the Internet. To use this feature, select Help | Online command in Chess
Assistant’s main menu. You can also register over the Internet, filling the
registration form during installation of the program. Otherwise, you should mail
your registration data to the addresses given below.
Mail:
Convekta Ltd. PO Box 302 c/o IPS Suite 2, Global House,
Royle Road, Colnbrook, SL3 0YA, Berkshire, UK
CONVEKTA technical support is available as follows: [email protected]
CONVEKTA provides unlimited technical support. Technical support is available only
to registered users (CONVEKTA technical support policies are subject to change
without notice).
1.3
INSTALLATION
CHESS ASSISTANT program files must be installed onto the hard disk. The
program cannot be started from the DVD. Follow this procedure to install CHESS
ASSISTANT on a standalone computer:
•
If you have an earlier version of CHESS ASSISTANT installed, make sure
that it is not running. Close all the other WINDOWS applications.
•
Insert DVD into your DVD-ROM drive.
•
The installation will start automatically (if you have not enabled the
Autorun option, Select Run from the Start menu. Select Browse, and
3
select the DVD-ROM drive. Double-click on SETUP.EXE. The SETUP
program will start)
•
Read the License Agreement.
•
Type in your Name and Company (optionally).
Type in your Product serial number that is given on the front page of
•
you user manual.
Select Installation Directory. CHESS ASSISTANT is installed in the
•
‘C:\PROGRAM FILES\CHESS ASSISTANT 10…’ directory by default.
However, before the files are copied you have the option to change the
path.
Chess Assistant 10 comes in three packages that differ in their volume and
possibilities they offer to user – Starter pack or Professional pack or Mega pack.
All the options of the Starter pack are enabled by default. If you wish you may
either remove some of the options, or add extra features from the Professional
pack or Mega pack.
Starter pack offers you:
DVD Chess Assistant 10
Program files and folders – 100 Mb
GURU database with 1 050 000 games with pre-built tree – 290 Mb
Opening Encyclopedia 2008 – 50 Mb
Direct tree – 210 Mb
Demo versions and folders
Game Service 2008-2010: 2,500 games free available every week via the
Internet.
Professional pack offers you:
Chess Assistant 10 Starter pack +
DVD Chess Assistant 10
Chess Assistant 10 database with 4 000 000 games (July 1, 2008)
HUGEBASE with pre-built tree – 770 Mb
Chess Assistant 10 database with 4 000 000 games (Jult 1, 2008)
HUGEBASE in PGN format – 2000 Mb
Players encyclopedia and photographs – over 350 Mb
Direct tree – 559 Mb
MegaCAP data – 223 Mb
A correspondence games database with pre-built tree – 80 Mb
A correspondence games database in PGN format – 223 Mb
Video Help – 99 Mb
Mega pack offers you:
Chess Assistant 10 Professional pack +
DVD with Nalimov Endgame Tablebases (all 3-4-5 pieces)
2 DVD with Nalimov Endgame Tablebases (6 pieces select)
Commented Game Service 2008-2010
4
Although the Nalimov DVD is included into the Mega pack, it is installed
independently of Chess Assistant using its own installation program.
After successful installation you will be prompted to run CHESS ASSISTANT.
1.4
COPY PROTECTION
The number of times CHESS ASSISTANT can be installed from the original DVD is
unlimited. You can back up all the CHESS ASSISTANT files onto any hard disk of
your computer, pack/unpack files etc. However, you cannot transfer these files to
another computer.
If you upgrade your computer and change its configuration, you will get an error
message (Error 501). In this case you will have to reinstall the program from the
DVD. Therefore keep the original DVD available.
1.5
CHESS ASSISTANT 10 – WHAT’S NEW?
CHESS ASSISTANT 10 incorporates all the features of its predecessor, CHESS
ASSISTANT, and more, including:
New releases of built-in playing programs: Rybka 3.
•
Huge database of 4,000,000 games (by July 1, 2008); 36,000
•
commented games (Professional pack).
This new mode helps the chess players to check their knowledge of opening and
also points out the inaccuracies and the mistakes and provides recommendations
on their elimination.
The Playing zone ChessOK with Rybka 3 and Game Service 2008-2010:
•
2,500 games free available every week via the Internet.
2. FIRST STEPS
Start CHESS ASSISTANT. A light narrow bar can be seen on the left. This is the object bar. It
displays all the open objects, chess game bases and windows. At the moment the object bar
contains a line with the program name. It will also contain a GURU line (Starter pack) or a
HugeBase line if you installed the HUGEBASE (Professional pack).
icon or pressing the [Ctrl] [C]
You can hide the object bar by clicking on the
key combination. To make the object bar visible once more, just click on this
icon or press [Ctrl] [C] again.
2.1
OPENING A DATABASE
Select Base | Open in the main menu, or click on the
icon, or press the
[Ctrl] [O] key combination. The Select base to open dialog box will appear.
Select the folder with the necessary base in the Look in text box.
To select ELITE, choose the ‘C\PROGRAM FILES\CHESS ASSISTANT 10\BASES’
folder. The name of the selected base is displayed in the window below. You
may wish to see the bases of a certain format only. To do this, choose the data
5
format in the drop-down list in the Base type text box. To display the bases in all
formats, select All bases. Click on Elite and it will appear in the Base name text
line with a short commentary at the bottom
Press Select or double-click on the base icon when the options have all been set.
A window with the contents of ELITE will appear. If this list window does not
appear, enable the check box Open list when opening a base in the Tools |
Options | General menu.
Tip:
Right-clicking (clicking with the right mouse button)
on an object produces a menu of operations specific to
this object. This is known as the local menu. Most
commands are available from the local menus.
The program remembers all the bases and windows open from the moment you
exit and restores them when you start the program again. However, if you want
to close the base, select the Base | Close command or access the local menu.
2.2
LIST MODE
You can open a list of the current set of games in three different ways:
•
•
•
Look at the object bar. The word Elite (5031) appears showing the base is open,
and another line, List (5031), is now hanging from it indicating that a list
window is open. All the open windows are displayed on the object bar next to
the corresponding bases so you can easily understand which base the window
refers to. The red letters RO to the left of Elite indicate that this base is Read only
and cannot be altered.
The Read only check box can also be found in the local menu, which can be
accessed in two ways:
1) By right-clicking on the database name in the toolbar;
2) By clicking on the
icon.
6
With the Dataset | List command from the main menu
By pressing [F5]
By selecting the Open list command in the local menu.
The lines in this list are the game headers, and the current game is highlighted
with a blue frame. Use the arrow keys, the green arrows on the toolbar, or the
mouse to move along the list. You can also jump to the desired game by entering
its number on the keyboard.
Sometimes you can see small letters next to the numbers.
a stands for games supplied with at least one annotation or diagram;
v stands for games supplied with at least one variation;
c stands for commented games with both text annotations (and/or diagrams) and
variations;
p stands for games started from a specific position.
7
Look at the Order of fields in list section. The Selected window shows the displayed
columns. If there is a column you don’t want to see, move it to the Not selected
window. In order to do this, click on the unnecessary item in the Selected window and
button. If you would like to hide all the items, press the
press the
The
and
button.
Pressing [F2].
•
The View mode presents a chessboard, game header, the notation, a fragment of
Tree and the Game progress diagram. (You can modify the window just as in the
List mode: selecting This window’s properties in the local menu).
buttons will do the opposite. To change the order of columns, click
on one or several items and move them with the
and
buttons.
In the General, Chessboard settings, Field options, Chess notation and Start notation
from sections you can set many different options to modify the list accordingly.
In the Background type drop-down list you can choose between Black and white,
Color, Wood and Marble and From File
When you open a new list, its appearance will depend on the options set in the
Tools | Options | List window. To copy the options you have set for the active
window to the other lists, press the Copy to global options button.
You can quickly enter some value for a header field to all the current dataset
games. To do this, mark this column by clicking on the column header, select
Tools | Fill in the local menu, and the Fill pattern window will appear. Click on
the Source line, then on the button with 3 dots on the right, and the Select from
library … of base … window will appear. Select the necessary value that will be
copied into the Fill pattern window, and press OK.
To resort a dataset list, select the Tools | Sort command in the local menu, and
the Select the sort order for … window will appear. Resort the dataset according
to the procedure described in Section 11.2 Copying a Base.
2.3
SPLIT MODE
You can move along the list and at the same time replay games and annotations on
the chessboard. To do this, select the Mode | Split command in the local menu or
press the [Shift] [F5] key combination. This will divide the list window into two parts.
2.4
To replay moves and annotations use the arrow keys or two button bars below
the chessboard. The buttons are similar to videocassette recorder controls.
VIEW MODE
To access a single game, use the View mode. There are two ways of switching
from the list to the View mode:
1.
2.
Click on the
icon or press [F4] key. Click on it again if you want to
return to the list.
Opening a new window for the View mode. There are five ways to
accomplish this:
•
By selecting the Dataset | View command in the main menu;
•
•
•
Clicking on the
icon;
Double-clicking on the required game in the list;
Pressing [Enter];
8
In the upper row (from left to right): In the lower row (from left to right):
Jumps to the starting position
Jumps into the variation
Steps back a half-move
Goes to the upper level
Deletes the latest half-move
Goes to the next variation
Steps forward a half-move
Shows the list of games from huge
base
Jumps to the end position
The View section in the toolbar includes three buttons (from left to right):
9
Begins replaying the game
2.5
TEST MODE
When viewing notation of the game, Test mode is available. Click Test tab on
the toolbar:
Starts next games automatically
Adjusts the replaying speed
Press this button if you want to stop auto-replaying.
When you replay a game, the linked Tree can be seen below the game notation, showing
you a detailed report on the current position with full statistics, evaluations, previously
analyzed lines, and annotations. See Chapter 13 Chess Trees for details. Clicking on the
tree window with the right mouse button produces the following local menu:
All these operations refer to the tree and will not affect the game. See Section
13.2 Database with Master Evaluations for more information.
You can move along the tree double-clicking on moves in it or pressing the [→]
key. If you double-click on a move, which differs from the move played in the
investigated game, the position on the chessboard will remain the same. If this
additional information is unnecessary, and you don’t want to see the moves from
the Tree, just disable the Show moves from tree option in the local menu or press
the [Shift] [Ctrl] [C] key combination.
The Game progress section in the bottom part of the window presents a graph
that shows the changing evaluation, allowing one to easily locate blunders. This
data was produced by the CHESS ANALYSIS PROJECT (see Section 13.4 CAP Data
for details).
To go to the next game, press [F8] or click on the
the previous game, press [F7] or click on the
Before you start testing, you must adjust the parameters of this mode in the Test
mode dialog box.
icon on the toolbar. To return to
or
and
Demonstration mode
. Click Test mode button (Demonstration mode is
described in the next section); this will display Test mode dialog box.
Another way to activate this mode is selecting the Test mode item in the notation
local menu (or press the [Ctrl] [Enter] key combination):
icon. You can also jump to the first or
to the last game of the current set by clicking on the
10
As you can see, this tab contains only two buttons – Test mode
icon correspondingly.
11
This feature allows setting up and modifying the parameters of the tests to be
automatically presented as you go from game to game in a database. There are a
large number of criteria that can be selected for determining which moves
constitute a solution to a test. This timesaving approach means that the user does
not have to construct each test by hand.
In the Test conditions section of this dialog you can select which “good” and/or
“bad” moves will constitute a solution. You will have to make the moves that
match the criteria selected in the Prefer move section, and not to make the moves
that match the criteria selected in the Avoid move section. The two lower check
boxes offer you the most often used cases (!!, !, !?, ¹ and ??, ?, ?!
correspondingly).
If you wish to find evaluations, annotations, or particular combinations of marks,
press the Advanced button.
The Use regular expressions check box lets advanced users set more
complicated criteria.
The Side for test mode pane allows choosing the side (or a group of players) you
will “play”. The upper button turns the Test mode Off.
The Show hint pane defines a way in which the program will give you various
hints. If you start with a wrong move, the program displays all comments to the
quiz move. If your second suggestion is wrong, it shows a piece that is to move.
The time given for one exercise is set on the Timer pane.
The Maximum variant depth box enables you to define, whether the test will
include the variations to the game, or not. The default value given is 0, which
means that only the moves from the game’s main text will be taken into account
for the test. Setting this value to 1 includes the variation of 1st level, 2 – includes
the sub-variation of the 2nd level, etc.
If you have chosen Any color in the Side for test mode section, all moves become
invisible. Try to guess the moves by yourself, making them with the mouse. If
you have guessed right, the program makes this move on the board; otherwise it
opens the New move message window, offering you to select one of the three
options: Keep on guessing, Make the game move, or Insert suggestion as a
variation.
After you have set all the parameters of the test and pressed OK button, the test
starts. The program displays several moves from the game automatically, then
stops and hides the remaining part of notation.
The test procedure itself assumes entering the moves on the chessboard. A
correct continuation entered discloses the remaining part of notation up to the
next test in the selected game (if any), while a wrong continuation produces the
following message window below the chessboard:
12
As we can see, the user is prompted here to enter another move, and some
additional information is given, which may facilitate finding the solution:
the piece to move and evaluation of the correct move. Side to move is marked by a
colored triangle in the upper right part of this window (Black in the given case). This
message will reappear after each unsuccessful try until you find the solution, which
displays the hidden part of notation. There can be several tests in one selected game.
You can switch off the hint information in the Test mode dialog box.
Quite a different situation arises when you have set the Maximum variant depth
parameter other than 0, and entered a move from an embedded variation. In this
case program replays this variation automatically and displays the following
message:
Pressing the Further button causes the program to exit the variation returning to
the main line and to continue in Test mode until the next text occurs within the
same game.
13
A similar situation arises when you have successfully finished the test. By
pressing the Stop button, you quit the Test mode. To resume testing, you must
click the Test button on the toolbar again.
After you have completed with a single game, you may switch immediately to
the next game in a given sub-set by clicking
button, or by pressing [F8] key
(click
button or press [F7] key to switch to the previous game). Thus you
can undergo a series of tests while not leaving the Test mode.
To quit the Test mode, click Test button on the toolbar. Note that selecting the Test
mode item in the notation local menu (or pressing [Ctrl]+[Enter] key shortcut) does
not stop the Test mode but displays the Test mode dialog box instead.
2.6
DEMONSTRATION MODE
The Demonstration mode, or simply Demo mode resembles the Test mode with only
one slight difference. Open a game from a list and press Demo button on the toolbar.
This operation hides the part of notation immediately after the cursor (similarly to the
Test mode). Thus the user is prompted to enter a move on the chessboard.
However, in contrast to the Test mode, entering a wrong move – the one that did
not happened either in the game, or in some variation to this game – calls the
New move dialog box.
2.7
ACTIVE WINDOW, CURRENT DATASET
At any time you can open several bases and several windows with different sets in different
modes. To make a window active, click anywhere on it or click on its icon on the object
bar. If a window is hidden under the other windows use the icon in the object bar on the
left. The current active window will be highlighted on the object bar. You can also select
Windows in the main menu and mark the line with the necessary window with a tick. Like
many other Windows based programs, Chess Assistant allows you to switch between
windows within the program with the [Ctrl] [F6] key combination.
Many operations in Chess Assistant use the notion of “current set”. If an active
window contains a list with a set of games this set is the “current set”. If a base’s
name is highlighted on the object bar then the entire base is in fact the “current set”.
In View mode the current set is the one from which the View mode has been called.
The program always remembers where a game is called from. This information is
displayed on the object bar as # N1/N2, with N2 standing for the amount of games in
the original set and N1 for the current game number in this set.
3. SEARCH
There are seven types of search in CHESS ASSISTANT: Header, Position, Material,
Advanced, For Comments, For Maneuvers and the Composite search; all these
types of search may be combined.
3.1
HEADER SEARCH
This type of search is based on “header” information, such as the players’ names,
result, year, place, opening name, ECO index, etc. Let’s find, for example, all the
non-drawn games played between Karpov and Kasparov. Open the ELITE database.
Select Search | Header in the main menu. (You can also click on the small down
Here you can select one of the three proposed actions: Keep on guessing, Make
the game move and Insert suggestion as a variation. We recommend you to
select Keep on guessing for a while.
Similarly to the Test mode, you can navigate in the list of a subset of games selected
and
for the Demo mode by pressing [F7] and [F8] keys, or by pressing
buttons on the toolbar. Anytime you can leave the Demo mode either by un-pressing
the Demo button, or by selecting the Demonstration mode item in the notation’s local
menu.
The Demo mode may be used for memorizing particular variations and sub-variations
(See more detailed description of Demo mode in the Word document on your DVD).
14
icon on the toolbar and select Header search in the drop-down
arrow next to the
list). The Search dialog box appears, with the header fields listed on the left. The
Criteria and Details columns are empty. The White field is highlighted. To avoid
spelling mistakes, use the list in the upper right-hand corner of the window.
Begin with typing the name. When you type the letter K, the list automatically scrolls
to this letter. Type two more letters, A and R, and Karpov Anatoly (RUS) will be
highlighted in the list. Click on this item or hit the [Insert] key and it will appear in the
White field. If you have made a mistake, press the Clear markers button.
Go to the Black field and repeat the procedure with Kasparov’s name. In this
example it doesn’t matter which of the two champions played with the white
pieces, so mark the Ignore colors check box with a tick.
15
Go to the Result field, and mark both 1:0 and 0:1. The selected values will
appear in the Result field, while the number of chosen items (2 in our example)
is displayed in the Details column. Leave the other header fields undefined.
If you want to have the current dataset list replaced with the results of the search
select the Old set option in the Put results in section. To preserve the window
with the current dataset and put the search results into a new list, select New set.
For the purpose of our example, please mark the New set section.
The options have all been set now and the screen will appear as it is shown in the
picture above. Press the Search button and you will get the game Kasparov –
Karpov, 1:0, Las Palmas, 1996.
Description of the header fields
White: A player with the white pieces.
Black: A player with the black pieces.
If the Ignore colors check box is marked with a tick the program will find all the
games played between the players independently of who played as White or
Black. If the Ignore colors check box is Off the only games found will be those
in which the player set in the White field played as White and the player set in
the Black field played as Black.
If you want to find all the games played by a certain player as White, enter their name
to the White field and leave the Black field undefined. If you are searching for all the
games of a certain player (with either _ black or white pieces) then enter their name in
either the White or the Black field, leave the other fields undefined, and mark the
Ignore colors check box with a tick.
Result: Possible values are: 1:0, 0:1, 1/2:1/2, or an evaluation.
? stands for an unknown result.
16
To choose an evaluation instead of a result, choose the necessary evaluation as
represented by the Chess Informant symbols in the Evaluations section.
ECO: Opening index according to the Chess Informant classification. Select the
way of setting it in the Enter new value text box:
as a single value – type on the keyboard in the Index text line.
as a range
– indicate the first and last value of a range.
by name
– select from the drop-down list.
Site:
The city where a tournament took place.
Date:
The year and month (optionally) when a tournament was
held. This criterion can be set as a single year, a range of
years, a single date or a range of dates. The number of
months is shown in the Details column.
Event:
The type of competition (match, interzonal, championship etc.).
Round:
The number of a round.
Annotator:
The author of the game annotations.
Remark:
There are three ways to set this criterion: a whole remark
(Exact), a part of a remark (Substring) or its beginning
(Prefix). Select the setting in the Type text box and type the
criterion on the keyboard in the Value/Pattern window.
Source:
The source of the game record.
White ELO/Black ELO: Ratings of players.
Moves:
Number of moves in the game.
Possible values for the White, Black, Site, Event, Annotator and Source fields are
stored in the library. You can type them in the Find text box.
Setting criteria for the ECO, Date, Round and Moves fields
1. Specify the range in the Enter new value section. Enter the first value in the
From text box and the last value in the Up to text box. If several intersecting
ranges are selected they will automatically be joined.
2. Press Add.
All the chosen values can be seen in the Values window. The first of them is
shown in the Criteria column and the number of chosen values is displayed in
the Details column.
To exclude a value from the Values section, highlight it and press Delete.
Setting criteria for the values stored in the library
Games are stored as game headers, consisting of several fields and notations. _
Names of players are stored in a special file called a library. Besides the players’
names the library stores possible values for some other header fields (Site, Event,
Annotator and Source). Every base has its own library. This concept of libraries
greatly increases search speed and allows one to avoid mistakes in names with
difficult spellings.
17
If you don’t remember a spelling, press the Mark button, enter a fragment of the
name in the Value/Pattern text box and select Substring in the Type window. If
you are sure that the entered fragment is the name’s beginning then set the Prefix
type. If you have entered the complete name, select Exact and then press the
Search button (This button refers to the search through the library list, so don’t
confuse it with the search in a set of games!).
The elements found will be marked in the list. To see them all select Show marked.
Press this button (which is now called Show all) to return to the library list.
Besides the chess pieces, there are some other symbols on the palette. You can
put them on the board too. Their meaning is as follows:
Any white piece
Any black piece
Any piece of any color or an empty square
Empty square
To delete all the entered criteria, press the Clear markers button.
Sign of negation
To remove a criterion, press Unmark. A dialog box similar to the one produced by the
Mark button will appear. Enter the criterion (or its fragment) that is to be removed,
press Search, and the chosen elements of the library list become unmarked.
Negation of a piece means that this piece cannot stand on
this square.
Searching: through an entire database or a set of games?
You can start searching in any mode: List, Split, or View. The Search dialog box
will give you the choice of either searching through an entire database or through
the current dataset. Choose between Set and Whole base in the Search in section.
To select an entire database to be used as the dataset in this operation, select Dataset |
Reset or press [F6]. The old set will be erased and a base list will appear in the
window. Before you start searching make sure the current set is the right one.
3.2
POSITION SEARCH
The positional search function looks for a specific position, a partial position, or
a structure.
Select the Search | Position command in the main menu. (You can also click on
the small down arrow next to the
icon on the toolbar and select Position
search in the drop-down list).
In the Search dialog box there is a chessboard with the starting position where
you can set up the position you want to search for.
Suppose you are interested in the Alekhine Defense. Drag the white pawn to e4 and the
black knight to f6, then indicate whose move it is in the Position search options section.
Partially defined positions
You can search for a fragment of a position or for a pawn structure. To set a
partial position, use the piece palette just below the chessboard.
Clear the board with the [Ctrl] [C] key combination. Take the pieces from the palette
and set up a position on the chessboard. To set a piece on the board, first click on the
piece icon on the palette. The mouse pointer will turn into the piece icon. Now click
on the square (or squares) on the board where you want to put the piece, and return to
the palette and repeat this procedure with the other pieces until the necessary position
is set up. When this is done click on the arrow on the palette.
18
Negation of an empty square means that any piece may stand
on this square but it can’t be empty.
Negation of the white question mark means any black piece
or an empty square.
Negation of the black question mark means any white piece
or an empty square.
Negation of the doubled question mark stands for negation of
pawns of any color.
You can search for several pieces on the same square. To do this, put the first piece
on the necessary square. Then choose another piece from the palette, press the [Ctrl]
key and while holding it down, drop the new piece onto the same square. Any
number of pieces may be put on one square though only three of them will be
displayed. To see them all, click on the arrow on the palette and then on the square.
Tip:
CHESS ASSISTANT allows you to perform every type of search
(except the header search) in several bases simultaneously. To do
this, make sure the required bases are open, then while in the Search
dialog box, click on the small button with 3 dots above the Help
button. The Select bases to search in window will appear. Select the
bases you want to search through and perform the search. The
results will be given for each base in separate windows.
Another way of entering a position
Imagine that while replaying a game in the View mode, you see an interesting
position and want to find other games in which this position occurred. How can
this be done quickly?
Right-click on the notation and select Search for current position in the local
menu. The Search window will appear with the current position. Naturally, the
19
search will be executed through the current dataset, so if you want to search for
this position in another set you will have to save it in a special file.
Search for horizontally and /or vertically symmetrical
positions
This type of search is examined in detail in the manual document on your DVD.
3.3
MATERIAL SEARCH
The material search function looks for games within certain material restrictions.
Example:
Find all the endgames with rook, bishop and two pawns (or less) vs. rook, knight
and two pawns (or less) in the ELITE database.
Load the ELITE database. Select Search | Material. There are two
•
boxes on the right: Black and White.
•
Set the limits for White.
Enter 0 over the question mark to the left of the white pawn icon.
To do this, click on the rectangle to the left of the white pawn icon
and either type 0 on the keyboard or select it by clicking on the
small up and down arrows.
Enter 2 over the question mark to the right of the white pawn icon.
Enter From 0 To 0 for the white knights and queens and From 1
To 1 for the white bishops and rooks.
The line with the large white question mark instead of a piece is to
set a range for the total number of White’s pieces on the board. In
this example it doesn’t matter so leave ? on both the left and right.
•
Set the limits for Black using the same procedure as above. Enable the
Ignore colors option and set Side to move: Either.
•
Make sure that Whole base is selected in the Search in section.
Search for positions with a certain material advantage
This type of search allows you to find games in which one of the opponents had an
extra pawn (piece, exchange, etc.). While in the Search | Position and material
window, set the difference in number of pawns, knights, bishops, rooks, and queens
in the Imbalance box on the right. The line with the large white question mark instead
of a piece is to set a range for the total amount of White’s extra material on the board.
It is calculated on the assumption that the value of the pieces is as follows:
Queen
Rook
Bishop
Knight
Pawn
= 9 points
= 5 points
= 3 points
= 3 points
= 1 point
20
You can also set the limits for Total number of pieces and indicate for how long
this material imbalance continued in the Imbalance time (moves) box. If the
Imbalance time is indicated as 0, then the material imbalance set above may last
for any number of moves.
Search for bishops of opposite colors
This type of search may turn out very useful in some middlegames and
especially in the endgames. Bishops of opposite colors can be specified in the
Search dialog window, which appears after selecting the Search | Material
command in the main menu. Select Of opposite colors in the Bishops drop-down
list, and the number of bishops will automatically be set to 1 for both Black and
White. Search for games with bishops of opposite colors in the ELITE database
will produce a list of 1126 games.
3.4
ADVANCED SEARCH
The Advanced search is a material search in which the material restrictions are
set independently for two different groups of squares. Call the Search |
Advanced command in the main menu.
There are two markers, red and blue. The current color is indicated below the
chessboard. To define the first area, click on all the squares you want to include,
then set the material restrictions for the selected area as described above.
To set the material restrictions for another group of squares, click on the Blue marker
tab. Like wise define another area and set the corresponding material restrictions. An
example of this kind of search is given in Section 3.7 Combining Searches.
Tip:
Position, Material and Advanced searches can also be
performed in variations by enabling Search in
variations in the Search dialog box.
3.5
SEARCH FOR COMMENTS
You can search for commented games by selecting the Search | Comments
command in the main menu, and then specifying the type of comments in the
Search dialog box.
You can search for any textual fragments of game annotations (naturally, as with
all other searches, in several bases simultaneously). To do this, select the Search
| Comments command in the main menu, enable the Annotation criteria option
in the Search dialog, click on the Set annotations button, and then specify the
necessary text annotations in the Set search parameters window.
You can even search for several text fragments at once: just type them in
different lines of the Set search parameters window. In this case the program
21
will search for any of them, thus the resulting list will include all the games with
annotations containing at least one of the fragments you have searched for.
You may also use this type of search to pick out instructive examples for your
training databases: search for !! to find excellent moves; to collect blunders,
search for ??.
3.6
SEARCH FOR MANEUVERS
Using this tool, you can search for common piece maneuvers. For example, let’s
find all the games with the Greek gift in the Elite database.
Open the ELITE database and select Search | Maneuvers in the main menu. The Search
dialog box appears, with the Maneuvers pane on the right. Click on the small button
with 3 dots above the Help button and make sure that ELITE is selected in the Select
bases to search in window. To fill the board with doubled question marks, press [Ctrl]
[Q]. Put the white bishop on b1, the black king on g8 and the black pawn on h7 with the
help of the piece palette. When this is done click on the arrow on the palette.
Then drag the white bishop from b1 to h7, and the yellow string ¤b1-h7/§ will
appear in the Maneuvers list. Drag the black king from g8 to h7, and the second
yellow string will appear: ¢g8-h7/¤. If you made a mistake and need to remove a
maneuver from the Maneuvers list, just highlight it and press the Delete button below
the list. Should you wish to remove all the maneuvers, click on Clear list.
Now, when both moves are present in the Maneuvers list, look at the first string. It says
that before the sacrifice the white bishop stood on b1, though it could be on any other
square along the b1-h7 diagonal as well. To correct this, highlight the first line, then
click on the Change button and adjust the Details in the window that will appear.
22
Mark the Undefined source square with a tick. You can also select Captured
pieces, Promotion pieces, Set delay between previous and current maneuver (in
half-moves), and Undefined destination square. For the purpose of our example
these options are not needed, so press OK. The screen should appear.
Press Search to start searching. 22 games will be found.
You can save the current position as a criterion for position search with the Copy
to position criteria button; and conversely, you can import a position from the
Search | Position window to the Search | Maneuver window with the Copy from
position criteria button. Naturally, this feature is important if both the Position
and Maneuvers check boxes in the Criteria included section are enabled.
3.7
COMBINING SEARCHES
CHESS ASSISTANT is capable of combining different types of search. Select them in the
Criteria included section of the Search dialog box, and then set the criteria for each one.
Example (Material + Position):
Find all the typical Sicilian endgames in the ELITE database.
•
Call Search | Material.
•
Set the material restrictions. There mustn’t be any queens on the board.
Both Black and White have two rooks and seven pawns, while the
number of minor pieces is unimportant. Set Ignore colors to Off and
Side to move: Either.
Mark the Position check box in the Criteria included section with a tick,
•
then fill the chessboard with doubled question marks (press [Ctrl] [Q]).
•
Set up the typical Sicilian pawn structure.
The screen should appear as follows:
23
•
3.8
•
Press the Search button.
COMPOSITE SEARCH
The Composite type of search is based on several chess criteria. You can find the
complete list of these criteria (or conditions) in the Condition dialog box that appears
after you have selected the Search | Composite search item from the main menu:
In this dialog box, you can see the chessboard in the right hand part of it, which is used
to schematically display the selected search conditions. The Side drop-down list allows
you to define which side the selected condition refers to. The Quantity spinner boxes
(From and To) allow you to set the number of pieces; you can use them when selecting
some kind of material condition. The Characteristic text line below displays the
description of the selected criteria of search.
As you may see, the conditions of search are displayed as a hierarchical structure in
the left window of this dialog. They are grouped into nine sections:
•
Material – this group of conditions include criteria referring to various
alignments of forces like an extra exchange or a piece, two bishops
against bishop and knight, etc.;
•
King’s position – the king’s position can certainly be a decisive factor in
any stage of the chess game. Using this choice, you can easily find
games based on the positioning of the king, like the castled king, or the
king in the center, or the king on a corner square of the board;
Queen – here you can set the search conditions to search for the queen’s
position and circumstances: queen on a central square, queen attacked by
an enemy piece, a pinned queen, mobile or not mobile queen etc.;
•
Rooks – this group of conditions refers to the number and positions of
the rooks. Note that when selecting any criteria from this group you can
define the number of rooks with the Quantity spinner boxes. The position
of the rook(s) relatively to open files, possibility of their maneuver along
the rank, mobility of the rook(s), etc. are included;
•
Bishops – along with criteria common to any piece (the mobility, the
condition of being pinned or attacked, etc.) we can find here the
conditions specific for the bishop – the presence of bishops of opposite
color on the board, two bishops on the board, the color of bishop same or
different from the color of a particular corner square etc.;
•
Knights – this group includes some ‘knight-specific’ criteria like the
knight’s position within the extended center (c3-f3-f6-c6), on the rim of
the board, being restricted in its mobility or positioned on the enemy’s
third rank .
•
Pawn structure – various pawn structures can also have specific
positional criteria. Here we find passed pawn(s), isolated pawn(s), the
mobile pawn center, backward pawn(s) or doubled pawn(s), etc.
•
Control over lines – this group includes criteria specific to the rook and
queen play on the opened and semi-opened files, the possibility of
invading the enemy camp with the major pieces, full or partial control
over the seventh rank, etc. Control of the major diagonals with a bishop
is also included.
•
Controlling the center and periphery – this group includes the complex
positional criteria referring to the alignment of forces on a specified
region of the board, as well as the balance of attack/defense on a
particular square.
Clicking the icon with the cross (plus sign) unfolds the group and displays its content. At
any time you can view the complete list of the search conditions by unfolding the group.
Actually, these complex conditions represent some predefined templates for the search,
which will assist you in forming your search request. This makes the Composite search a
powerful tool for finding a variety of complex positional factors, which define the course
of the struggle on the board. You can find examples of the Composite search in manual
document on your DVD.
25
24
4. COMMENTING
You can annotate games in any mode that displays notation (View, Split, and
Tree). To comment a game in View mode, just click on the Comments tab in the
left part of the toolbar and the Comments toolbar will appear.
4.1
ANNOTATING MOVES.
To annotate a move, click on the
icon. A small drop-down menu will
appear. Select Annotate move and you will get the Annotations editor dialog box.
4.3
ENTERING MOVES
Entering moves
All moves are entered with the mouse. In order to make a move, move the cursor
to a piece, press and hold down the mouse button, drag the cursor to the
destination square and then release the mouse button.
To speed up the entering of moves the program suggests a destination square when you
choose a piece. If you agree with this suggestion just release the mouse button. If not,
drag the cursor to the necessary destination square and release the button.
If you first click on an empty square or an opponent’s piece, the program will
suggest a piece to move there and highlight it. If the wrong piece is highlighted,
just drag the cursor to the right piece and release the button.
Please note that illegal moves cannot be entered. If you “touched” a piece but
then decided to move with another one, drag the cursor off the board area and
release the mouse button.
The entered move immediately appears in notation in square brackets. As you
continue entering new moves they are inserted into the notation. You may
comment on the same move with several variations, each time returning to the
branching point to enter a new one.
As soon as you start a new variation for a move, the
icon will become
highlighted. Clicking on it will return you to the main body of the game.
(Definitions of other icons are given in Section 2.4 View Mode).
The Informant-style symbols may be used in short comments. Highlight Short Before
if you want to insert a symbol before the current move or Short After to insert one
after, then click on the appropriate symbol. You can also press the Evaluation tab and
select the necessary evaluation. For explanations of the Standard Classes and User
Folders tabs see Section 9.2 Classifying Games and Positions.
You may also insert any text in the notation. To do this, click on Long Before or Long
After and type the text commentary in the text window. Use the Introduction and
Afterword tabs to insert annotations before the first and after the last move of the game.
To delete annotations, click on the
icon and select Delete annotations in
the small drop-down menu. Press the [Delete] key if you want to delete the
current commentary directly in the notation.
To insert a diagram, click on the
4.2
icon, and to delete a diagram, click on it again.
ADDING VARIATIONS
To comment a move with a variation, place the cursor before the move in the
notation window and just play out the variation on the chessboard.
26
Commenting the last move in the game
If you place the cursor after the last move and enter a new one, it will be added
to the main body of the game. To avoid this, press [Ctrl] and only then enter your
variations to the last move.
There is also another method. Press the [Ctrl] [Shift] [z] key combination, and an
“empty” move will be added to the notation. Then put the cursor before the
empty move and begin entering the variation.
Replacing the entered move
Press the [Ctrl] key while entering a new variation. The Changing move dialog
box will appear. Existing variations are displayed on the left. Use the buttons on
the right to control them.
The New variation button inserts the entered move as a new variation. If you select
Insert and check moves, the new move will replace the old one, with all the next
moves being checked and the illegal ones being deleted. For example, if you had been
entering a game and accidentally moved the wrong rook to a square (i.e. ¦ad1 as
opposed to ¦fd1), this would overwrite the old move with the correction and verify
that the moves after it were still possible. The Replace button will overwrite the old
move with the new one and delete all the following moves.
27
Changing the order of variations
Clicking on the
icon will bring up the Variations control dialog box.
To change the order of variations in the window, drag and drop them or click on
the up and down arrows.
Deleting a fragment of notation
Pressing the [Backspace] key deletes the last entered move. If you want to delete
all the moves from the current one until the game end, press the [Shift] [Ctrl]
[Backspace] key combination. Clicking on the
Deleting moves dialog box.
icon will bring up the
This window contains 5 tabs: Markers, Lines, Blocks, Chars and Text, these allow
you to control the placing of various groups of objects on the chessboard squares. To
set a marker, click on the color box and select the marker. Then, clicking on the board
square sets the marker there. To set a line, click on the Line tab, then on the color box
and select the line. Click on the source and destination squares on the board. Every
successive click continues the line; to stop it, double-click on the last square. To place
the text on the board, click the Text tab and press the Add button. Select the area on
the chessboard: click the first square of the area, then drag the mouse to the last
square of the area. Enter the text in the Input text marker window. Choose the desired
color in the Color drop-down list and the font size in the Size box, and then press OK.
4.4
WORKING WITH THE CLIPBOARD
Chess Assistant has its own internal clipboard, different from the standard
Windows clipboard and intended only for game notations. You can now also use
the standard Windows clipboard.
Using the WINDOWS clipboard
Select the necessary options according to what you want to delete and then press OK.
Setting markers
Clicking on the
icon opens the Color markers setup dialog.
28
Operations with the WINDOWS clipboard allow you to copy games and analysis
from the INTERNET and other sources, and to paste them to a CHESS ASSISTANT
database. With its help you can also export data from CHESS ASSISTANT to other
programs and last but not least, it lets you share data inside Chess ASSISTANT.
Most chess programs have their own format for storing chess data, i.e. games
and positions. If programs only supported their proprietary format, sharing
information among them would be exceedingly difficult which is why the PGN
and EPD formats were created. They are the de facto standard for sharing
information between different chess programs. They are also the standard
29
formats for posting games and analysis on the Internet. The *.PGN and *.EPD files
are text files which can be edited manually with a text processor. They can also
be produced by chess programs, which support these formats. Chess Assistant
documentation on DVD includes the detailed description of the following
clipboard operations:
–
importing game(s) from PGN format to CHESS ASSISTANT;
–
exporting a game from CHESS ASSISTANT to PGN format;
–
exporting multiple games from CHESS ASSISTANT to PGN format;
–
importing board position(s) in EPD format to CHESS ASSISTANT;
–
exporting a board position from CHESS ASSISTANT to EPD format;
–
copying multiple games from one CHESS ASSISTANT database to another.
Using the internal Chess Assistant clipboard
Open the window with the game you want to copy and place the cursor before
the half-move starting from which the notation must be copied. Click on the
accidentally damage the database. If the game has been changed then the
program will warn you and ask your confirmation to save changes. To restore a
game, select Edit | Restore game in the main menu or click on the
4.6
icon.
INSERTING GAMES
You can insert other games as new lines with the help of the “drag and drop”
technique. The program itself determines where these games must be inserted.
Inserting one game
Open two different windows with two different games. Take one of these games
(move the mouse pointer to its notation panel and press the left button) and drag
to another (move the mouse to another notation and release the button). The
Game drag & drop options dialog box will appear.
icon in the Games section on the toolbar and then select Copy to clipboard
in the drop-down list. The number 1 will appear next to that icon. This indicates
that the clipboard contains one notation. Repeat this procedure with the other
icon shows the number
games you want to copy. The digit to the left of the
of games contained in the CHESS ASSISTANT clipboard.
Switch to the window where you wish to copy a notation from the clipboard and
click on the
icon. The Insert game or variation from the clipboard dialog
box will appear. In the List of variations in clipboard panel you can see the
contents of the clipboard. Choose the necessary game notation.
If you now press the Overwrite button the notation from the clipboard will
replace the current notation. If you select Join the program will search through
the current notation for the first clipboard position. If the search is a success, the
clipboard notation will be inserted into the current notation as a variation.
If you want to clear the CHESS ASSISTANT clipboard, click on the
Clear clipboard from the drop-down list.
4.5
and select
SAVING A GAME
To save changes in a game, select Edit | Save game in the main menu or click on the
icon, or press the [Ctrl] [S] key combination. This command is accessible when the
current base is not Read only, otherwise you can save changes to the clipboard. When
you close the View game window or switch to another game, the Confirm window will
appear, asking you: Game is modified. Save changes to clipboard?
If the current base is not Read only then the game will be saved to disk. Note that
if the ELITE base was not Read only and you have changed and saved a game
then you would have to restore ELITE from your DVD. Don’t be afraid if you
30
Specify how many half-moves must be joined and how they must be inserted.
This depends on the check boxes Join only if current game position exists in
game to be joined and Start from last equal position. If the second check box is
On then the dragged game will be inserted into the motionless in any case
rewrite. If the program fails to find common positions, it will insert the dragged
game into the motionless as a variation to the first move.
Inserting several games
Two objects are displayed on the screen, a notation and a list. You want to insert
several games from the list into the notation. Highlight the required games and
select them in the list (see Section 9.1 Selecting Games for detailed description
of this procedure). Drag them from the list to the notation. This will bring up the
Game drag & drop options dialog box. Proceed as described above.
4.7 MULTIMEDIA SUPPORT
When annotating games in View mode, you can add the multimedia annotations
(images, video and audio) to the moves. See description of this mode in manual
document on DVD.
31