Transcript
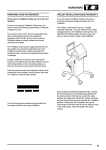
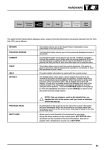
HARDWARE
CONFIGURATION
This illustration shows the screen that TestBook
gives you in response to touching the Configuration
button.The buttons on this screen are as follows :
NOTE: the non-active (faded) buttons are
for future applications.
COLUMN 1
QWERTY
Touch this button to change between the conventional keyboard
layout - (known as QWERTY after its first six letters) - or a keyboard
based on alphabetical order. Choose whichever you find easiest to
use. This keyboard will appear automatically on screen whenever
TestBook requires you to input information, such as a VIN.
Size
This "slider" control varies the size of the touch-sensitive area within
each button on the screen. (For example, if you have very large
fingers, you may find it helpful to reduce this size to avoid overlapping
onto the adjacent buttons).
Sound
On or off.
Set Logging Level
TestBook activities can be recorded, or logged, at different levels of
detail.This is pre-set at minimum to avoid filling the memory, which
would slow down the operation of TestBook.
COLUMN 2
Enter Date and Time
TestBook needs to know the current date and time. If it is incorrect,
this is where it is adjusted. Do not, however, make adjustments
without first consulting the Help Desk; it is easy to damage the
age-protected software !
Set Configuration Password
An option to install security codes to prevent unauthorised re-setting
of TestBook configurations.
Align Touch
If the screen cursor doesn’t align with the area you touch, this facility
allows re-calibration to correct this.
35