Transcript
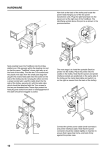
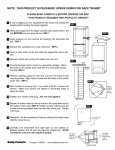
HARDWARE
PREPARING A SITE FOR TESTBOOK
TROLLEY INSTALLATION GUIDE (TESTBOOK 1)
(If you have a TestBook trolley, go on to the next
section).
If you are using a TestBook Trolley, this gives a
convenient, purpose-designed location for your
TestBook.
If you are not using a TestBook Trolley, then you
need to meet the following requirements in siting the
TestBook for use :
The surface must be firm, flat and reasonably level (this is particularly important for satisfactory
operation of the CD disc drive), and any risks of
TestBook falling or being knocked over should
obviously be avoided.
The Trolley is delivered to you as a virtually
complete assembly - you only need to fit the Cable
management bar, the TestBook and its printer, two
additional CD caddy holders plus the mains cord
and you will be ready to begin using TestBook.
The TestBook mains power supply transformer unit
also needs to be securely positioned near to the
TestBook and the power cables protected from
workshop traffic, to prevent accidental disconnection
or damage.
Position TestBook so that you have convenient
access to the cable ports (and with sufficient room to
avoid sharp bends on the connecting cables), as
well as to the touch screen and the CD disc drive.
Take the power lead from the separate mains power
transformer unit and plug it into the power input port
on TestBook, marked by the symbol:
You can then plug the transformer feed cable into
the mains socket to start using TestBook.
Start by fitting the Cable Management Bar. Unwrap
the two fixing screws in the plastic bag attached to
the trolley handle. Hold the bar so that the cable
notches are uppermost, behind the trolley, and slide
the free ends into the grooves beneath the TestBook
platform. Holding the bar in position, line up the
screw holes in the free ends of the bar with the holes
in the trolley body, insert and tighten the fixing
screws.
9