Transcript
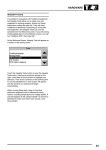
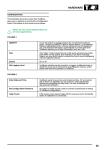
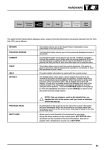
HARDWARE
How to Interpret the Results of the TestBook
Integrity Test
A series of diagnostics will be run to test the integrity
of TestBook hardware. A result will appear after
each test is finished. The tests are described as
follows:
Testing CD Drive
This test attempts to read from the compact disc that is currently in
the drive. If the CD can be read, the message "PASSED" will appear.
If "Fail or No CD Found" appears, this may be caused by one of the
following conditions.
• There is no CD in the drive (press the eject button to make sure).
• The CD is upside down in the caddy. (The label side should be
facing outwards).
• The CD is dirty or scratched. (see "CD Cleaning Procedure").
• The CD is defective. (Try using another CD. If it works, replace the
defective CD).
• OR, the drive may be malfunctioning. Check all the above and
retry the test.
Testing LAN Card
For units containing a correctly operating LAN card, the message
"Present" will appear.
Some units do not have a LAN Card, so that message is "Not
Present". This does not indicate an error if your unit does not include
the LAN card.
The LAN (Local Area Network) facility is intended for potential future
developments in dealership systems, and is not currently in use.
Checking for Parallel Device
This test will verify the connection to a printer. In many cases, no
printer will be connected and the message off-line or "Not Connected"
will appear. This is the normal message for a TestBook without a
printer. If a printer is present, properly plugged into TestBook,
powered OFF and On- Line, then the message "connected" will
appear.
If you have a printer plugged into TestBook, and the message "Off
Line or Not Connected" appears, check the following:
• Is the printer On-Line? The light on the printer labelled "On-Line"
should be lit. If not, press the On - Line button (on the printer).
• If the printer does not become on - line, try resetting the printer by
turning it OFF and then back ON. Touch BLACK or WHITE to
TEST LCD DISPLAY.
• If an error code appears on the printer, see the User’s Manual that
came with the printer for an explanation of the message.
• Check the cable between TestBook and the printer to make sure it
is plugged in securely.
• Check the Configuration Module to make sure TestBook is set up
to use the printer. The configuration screen is reached by touching
Configuration at the Welcome screen. See "Set Printer/Paper" in
the TestBook Configuration Section of details.
Touch BLACK or WHITE to
TEST LCD DISPLAY
After the above tests are complete, two new buttons will appear on
the control panel. These buttons, labelled Black and White, test that
the LCD screen is able to display all black or all white. When touched,
a solid black screen or a solid white screen will appear for a few
seconds and then go away.
BLACK- Displays a solid black screen
WHITE- Displays a solid white screen
If service appears necessary after repeating the test, contact the Testbook Help Desk to verify the problem.
44