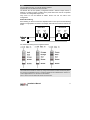
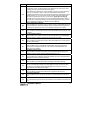
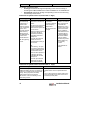
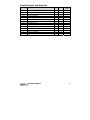
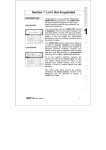
1
Installation Manual Important Notice This manual is delivered subject to the following conditions and restrictions: ✦ This manual contains proprietary information belonging to Rokonet Electronics Ltd. Such information is supplied solely for the purpose of assisting explicitly and properly authorized users of the system. ✦ No part of its contents may be used for any other purpose, disclosed to any person or firm or reproduced by any means, electronic or mechanical, without the express prior written permission of Rokonet Electronics Ltd. ✦ The text and graphics are for the purpose of illustration and reference only. The specifications on which they are based are subject to change without notice. ✦ Information in this document is subject to change without notice. Corporate and individual names and data used in examples herein are fictitious unless otherwise noted. Copyright 2003 Rokonet Electronics Ltd. All rights reserved. ii Installation Manual Customer Information TELEPHONE CONNECTION (Ref.: FCC Part 68) 1. This equipment, Alarm Control Panel, brand named Orbit-14 (RP214MA0000A), complies with Part 68 of the FCC Rules and the requirements adopted by the ACTA. On the bottom panel of this equipment is a label that contains among other information, a product identifier in the format US:RKEAL10BRP214MA. If requested, this number must be provided to the telephone company. 2. This equipment is designed to be connected to the telephone network using a terminal block, which is Part 68 compliant and properly installed RJ31X connector. See Installation Instructions for details. 3. The REN is used to determine the number of devices that may be connected to a telephone line. Excessive RENs on a telephone line may result in the devices not ringing in response to an incoming call. In most but not all areas, the sum of RENs should not exceed five (5.0). To be certain of the number of devices that may be connected to a line, as determined by the total RENs, contact the local telephone company. The REN of alarm system is part of the product identifier that has the format US:RKEAL10BRP214MA. 4. If the Alarm Control Panel causes harm to the telephone network, the telephone company will notify you in advance that temporary discontinuance of service may be required. If advance notice is not practical, you will be notified as soon as possible. Also, you will be advised of your right to file a compliant with the FCC if it is necessary. 5. The telephone company may make changes in its facilities, equipment, operations or procedures that could affect the operation of the equipment. If this happens the telephone company will provide advance notice in order for you to make necessary modifications to maintain uninterrupted service. 6. If trouble is experienced with the Alarm Control Panel, for repair or warranty information please contact Rokonet Industries USA Inc 2822 NW 79th Ave. Miami, Florida 33122 USA, phone number 305 592 3820, URL: [email protected]. If the equipment is causing harm to the telephone network, the telephone company may request to disconnect the equipment until the problem is resolved. 7. The control panel installation is described in the Installation Manual. Connection to telephone company provided coin service is prohibited. Connection to party lines service is subject to state tariffs. 8. Alarm Control Panel must be able to seize the telephone line and place a call in an emergency situation. It must be able to do this even if other equipment (telephone, answering system, computer modem, etc.) already has the telephone line in use. To do so, the alarm control panel must be connected to a properly installed RJ31X jack that is electrically in series with and ahead of all other equipment attached to the same telephone line. Proper installation is depicted in the figure below. If you have any questions concerning these instructions, you should consult your telephone company or a qualified installer about installing the RJ31X jack and Alarm Control Panel for you. Installation Manual iii RJ-31X Jack Network Service Provider's Facilities Alarm Dialing Equipment Unused RJ-11 Jack Computer Telephone Line Telephone Network Demarcation Point Fax Machine Telephone Unused RJ-11 Jack Answering System Telephone Customer Premises Equipment and Wiring RADIO FREQUENCY INTERFERENCE (Ref.: FCC Part 15, Para. 15.105) This equipment has been tested and found to comply with the limits for a Class B digital device pursuant to Part 15 of the FCC Rules. These limits are designed to provide reasonable protection against harmful interference in a residential installation. This equipment generates, uses, and can radiate radio frequency energy and, if not installed and used in accordance with the instructions, may cause harmful interference to radio communications. However, there is no guarantee that interference will not occur in a particular installation. If this equipment does cause harmful interference to radio or television reception, which can be determined by turning the equipment off and on, the user is encouraged to try to correct the interference by one or more of the following measures: 1. Reorient or relocate the receiving antenna. 2. Increase the separation between the equipment and the receiver. 3. Connect the equipment into an outlet on a circuit different from that to which the receiver is connected. 4. Consult the dealer or an experienced Radio/TV technician for help. CHANGES OR MODIFICATIONS (Ref.: FCC Part 15, Para. 15.21 and 15.27) Changes or modifications to this unit not expressly approved by Rokonet, Ltd., could void the user's authority to operate the equipment. iv Installation Manual CE Declaration of Conformity We, the undersigned, ROKONET ELECTRONICS LTD. RISHON LEZION, HACHOMA ST. 14 ISRAEL PHONE: (972) 3 9616555 FAX: (972) 3 9616584 Certify and declare under our sole responsibility that the following equipment: Brand Type Product Description Orbit -14 RP214MC0000A Control Panel with wired accessories (including cables) was tested to and conforms with the requirements included in following standards: Standard 5/1999/EC Article EN 60950:00 EN 301 489-3 v.1.2.1 EN 50130-4:95+A1 (98) TBR21:98+ETSI EG 201 121 v.1.1.3 Note 1: Full Orbit 14 system. Note 2: Main unit (additionally). 3(1)(a) 3(1)(b) 3(1)(b) / Note 1 1 1 2 and therefore complies with the requirements and provisions of the Council Directive 1999/5/EC of the European Parliament and of the council of 9 march 1999 on Radio equipment and Telecommunications Terminal Equipment and the mutual recognition of their conformity and Annex III (Conformity Assessment procedure referred to in article 10(4)). 20 February 2003 David Kartoun CTO Installation Manual v vi Installation Manual TABLE OF CONTENTS Introduction to the ORBIT-14 3 Main Features 3 Technical Data 5 Installation 7 Before You Begin 7 Mounting the Control Panel 7 Wiring the Main Panel Connecting to Ground (Earth) Telephone Line Connection Connecting AC Power Zone Connections Wiring Auxiliary Devices Bell Tamper Box Tamper Utility Output Connections Connecting the J4 Connector Keypad Connection Connecting the J3 SIG IN Connector (Signal in Voice Mail) Installer Programming 8 8 10 10 10 12 12 12 13 14 15 15 16 The Keypad 16 Restoring Factory Defaults to the ORBIT-14 16 Introduction to Programming Programming Your ORBIT-14 Viewing the Contents of a Location Locations Whose Contents Occupy More Than One Digit Audible Tones and Error Beeps Programming Installer Parameters Programming Time Out Programming Tutorial 16 17 17 18 18 18 19 19 Programming Locations: 21 General System Parameters: Locations 000-005 21 System Codes: Locations 006-010 22 System Time Definitions: Locations 011-016 23 Installation Manual 1 Zone Types and Sounds: Locations 017-030 24 Zone Response Time & Group Masking: Locations 031-044 27 Zone Termination & Tamper Sound: Location 045 27 Utility Outputs: Locations 046-051 28 Communication Parameters: Locations 052-055 Dialler Control 1: Location 052 Dialler Control 2: Location 053 Central Station Pulsed Protocols: Location 054 Automatic Central Station Protocols: Location 055 32 32 34 34 36 Upload/Download Rings: Location 056 37 Swinger Shutdown Limit: Location 057 37 System Controls: Locations 059-060 38 Sub Installer Restriction Level: Location 061 41 Communicator Reporting Codes: Locations 062-168 Reporting Codes for Alarm Events Restore Codes Other Reporting Codes Trouble Reports and Restorals 42 42 42 43 45 Appendix 1: Installer Programming Worksheet 46 Appendix 2: Contact ID & SIA Report Codes for Orbit-14 48 Appendix 3: Summary of User’s Commands 50 2 Installation Manual Introduction to the ORBIT-14 The ORBIT-14 is a fully featured security system, providing solutions for alerting and reporting premises alarm signals. The ORBIT-14 addresses the needs of many homes, offices, and small businesses. Its operation is designed around microprocessor and EEPROM (Electrically Erasable Programmable Read-Only Memory) technology, which stores the system’s operating program and its programmable parameters, without the need for a source of power. System programming may be performed from any ORBIT-14 keypad, or from an LCD Programming Keypad designed specifically for this purpose. Remote and local system programming is also possible through the use of Rokonet’s Upload/Download software. Main Features Zones • 14 Programmable Intrusion Zones • 12 zones on main board using zone doubling. • 2 zones on keypad • 3 Keypad Emergency Zones (Panic, Fire, Special Emergency) Alarm Sounder Output • Programmable Bell/Siren or Loudspeaker Output • Capacity: 900 mA (maximum) Auxiliary Output for Peripheral Devices • Capacity 600 mA MAX from all AUX terminals Built-In Digital Communicator • For Central Station communications (two phone numbers), Upload/Download functions and follow-me functions Keypads • Up to five LED/LCD keypads can be connected Utility Outputs • 1 relay output 3A • 1 transistor-driven (open-collector) 500 mA triggered output • 1 transistor-driven (open-collector) 70 mA triggered output • Expandable to six outputs Security Codes • 2 Installer Codes • 1 Master (User) Code • 19 Codes (all may be used as duress code) Installation Manual 3 Periodic Testing • Daily test report to central station Optional Peripherals • Four relay-output expansion modules • Voice Module Event Log • Event log of 250 events Tamper Protection • Box Tamper input (NC) • Bell Tamper input (using 2.21 KΩ resistor) • Keypad Tamper (Wall & cover) Automatic Arming • Daily automatic arming Orbit 14 Main Panel Types: P/N Description RP214MA0000A Orbit 14 Main Panel. Telephone impedance 600Ω. Complies with FCC Part 68 regulation. RP214MB0000A Orbit 14 Main Panel. Telephone impedance 900Ω. RP214MC0000A Orbit 14 Main Panel. Complies with the TBR21: 98+ETSI EG 201 121 v.1.1.3 regulation. RP214MZ0000A Orbit 14 Main Panel. Complies with the local Czech telephony system requirements. 4 Installation Manual Technical Data Main Panel Input power Rechargeable standby battery Auxiliary Power Bell/LS Sounder output Programmable outputs Cabinet Dimensions: Weight Main Board (dimensions / weight): Fuses 16.5 V AC 40 VA via transformer 12 V 7 A-Hours 12 V DC 600 mA maximum 12 V DC 900 mA maximum 1 X Relay output 3A 1 X Open collector Active pull down 500 mA maximum 1 X Open collector Active pull down 70 mA maximum 296.2 X 262.3 X 87.5 mm ( 11.66 X 10.32 X 3.44”) 2.4 kg ( 5.29lb) 96 X 185 mm (3.77 X 7.28 “) 0.23Kg (0.51 lb) F1: Battery Power 3.15 A AUX Automatic fuse Bell Automatic fuse Keypads Current consumption: Control panel connections: Dimensions: Weight: 6 / 8-Zone Keypad 18 mA typical, 30 mA maximum 4-wire up to 300 ft (100 m) from panel 110X130X25 mm (4.33 X 5.11 X 1“) 0.19 kg (0.42 lb) 14-Zone Keypad 18 mA typical, 37 mA maximum 4 -wire up to 300 ft (100 m) from panel 110X130X25 mm (4.33 X5.11X 1“) 0.19 kg (0.42 lb) LCD Keypad 75mA maximum 4 -wire up to 300 ft (100 m) from panel 162 X 122 X 30 mm (6.37 X 4.8 X 1.18“) 0.25kg (0.55 lb) Utility Output Expansion Module Current consumption: Control panel connections: Contacts: Dimensions: Weight: Relay row 10mA typical, 50mA max 4-wire up to 300 ft (100m) from panel 1 relay 3A, 3 relays 0.5 A, 24 V DC 53X85 mm (2.1X3.35“) 80 gr (0.18 lb) Expansion Voice Module Input Power: 12 V DC Current consumption: 6 mA, typical / 26 mA maximum Dimensions: 66 X 66 X 18 mm (2.59 X 2.59 X 0.70“) Weight: 20.44 gr (lb) NOTES: For proper operation it is recommended to connect the voice module at least 20 cm from the main panel. Installation Manual 5 Max. Run Length from Panel to Keypad Wire AWG Ø (mm) 19 0.9 20 0.8 22 0.6 Meter Feet 200 660 166 547 100 330 Length Bell Loudspeaker Wiring Table (Distance in Feet) AWG Ø mm 18 19 20 22 1 0.9 0.8 0.6 Max. Current mA Feet Meter Feet Meter Feet Meter Feet Meter 100 780 238 625 190 495 151 310 95 300 260 79 208 64 165 50 103 32 650 120 37 96 30 76 23 48 15 Detectors Distance in Feet AWG Ø mm Max. Current mA 6 18 19 20 22 24 1 0.9 0.8 0.6 0.5 Feet Meter Feet Meter Feet Meter Feet Meter Feet Meter 20 3920 1195 3100 945 2460 750 2460 472 1550 296 30 2600 793 2060 628 1640 500 1640 314 1030 197 40 1960 597 1550 472 1230 375 1230 236 775 148 Installation Manual Installation Before You Begin Be sure the actual work is performed by experienced personnel, licensed to carry out security system installations and capable of implementing all applicable requirements of the National Fire Protection Association (NFPA-70 and NFPA-74), as well as any federal, state, and local codes – along with any safety guidelines and regulations which might apply. Mounting the Control Panel 1. Mount the ORBIT-14’s metal cabinet at a protected dry location, near a source of unswitched AC Power, a good ground, and access to telephone service. Use the proper hardware (e.g., anchors, toggle bolts), as required, to insure a suitable mounting. 2. Thread all electrical wiring through a convenient hole in the metal cabinet. To prevent potential damage, be sure that live AC power is NOT present and that the Standby Battery is NOT connected. (Refer to page 8). Your wiring may include any and all of the following: • Connections to Hardwired Zones • Connections to devices requiring Uninterrupted Auxiliary Power (e.g., PIRs, Glass Break Detectors) • Connections to Smoke Detectors requiring Reset table Power • Connections to any External Sounders 3. Have a Standby Battery ready (typically 12 VDC, 7 AH), but do not connect it at this time. 4. If using a Key-switch, use a momentary key-switch. The receiver (if used) must give a pulse output and not on/off. Safety Warnings • • • When the panel is powered, mains voltage is present on the main PCB. To prevent risk of electric shock, disconnect all power (AC transformer and battery) and phone cord before servicing. On no account should mains power be connected to the PCB other than the main terminal block. For AC mains connection, a readily accessible disconnect device shall be incorporated in the building installation wiring. • For continued protection against risk of fire, replace fuses only with fuses of the same type and rating There is a risk of explosion if the battery is replaced by an incorrect battery type. Dispose of used batteries according to the instructions. (The control panel is designed to work with a 12 volt, 7 Amp-hour sealed lead battery as a back up for the primary power supply.) Installation Manual 7 • • Do not short the terminals of the transformer together. This causes the internal fuse to blow. The transformer must be connected to a 230 VAC 24-hour outlet, which must be controlled by an approved over-current protection device. The control is designed with reverse polarity protection on the battery charging circuit; however, prolonged improper connection of the battery to the control panel results in damage. Power should remain disconnected until all connections have been made and checked for accuracy. Wiring the Main Panel Connecting to Ground (Earth) Connect the metal box and the door of the metal box to mains earth (ground), as shown in the diagrams below. Refer also to What Makes a Good Ground, page 9. IMPORTANT: Connecting to ground must be performed according to the applicable local or national electrical codes. 8 Installation Manual Grounding the Metal Box What Makes a Good Ground? Grounding provides a degree of protection against lightning and induced transients for any piece of electronic equipment that may, due to lightning or static discharge, experience permanent or general malfunctions. The ideal ground is considered to be a unified earth ground in which an 8-foot copper-clad rod, located close to the existing power and telephone ground rods, is sunk several feet into the earth. Appropriate hardware and clamps are then used to electrically connect each of these rods together and then to the ground terminal of the device to be protected. Installation Manual 9 It may be possible to use an existing electrical ground on the premises if one is close enough to the Main Panel. Ideally, that ground can be obtained at the metal service panel where the incoming electrical power originates. When connecting the ground wire, use a solid 14-gauge wire [or larger (numerically lower) size] connected between the ORBIT-14’s GND terminal and an acceptable electrical ground connection. Keep this wire as short as possible and do not run it in conduit, coil it, bend it sharply, or run it alongside other wiring. If you must bend it or change its direction, it should have a radius of at least 8 inches at the point from which it is bent. If in doubt, you may want to enlist the help of a licensed electrician. Telephone Line Connection These lines are typically derived from an installed RJ31X jack. To connect telephone lines: 1. Connect the incoming telephone line to the Main Panel's LINE terminals. 2. Connect any telephone on the premises to the SET terminals. Connecting AC Power Connect the 230V AC to the mains fuse input terminal block (via 16.5VAC 40VA transformer) and fasten the AC cord to the metal box using adjustable clamps. NOTES: DO NOT apply main power at this time. Be sure to connect the live wire of the AC power through the AC fuse. Do not plug in the transformer at this time. Zone Connections Connect each zone to the appropriate zone terminal and its related COM terminal. Each pair of zones shares a COM terminal. The following diagram illustrates the various possible zone connections: 10 Installation Manual NOTES: For zones defined as EOL, use 2.21 KΩ resistors (supplied). By default all zones are defined as EOL termination. The Double End Of Line (DOEL) configuration allows a detector tamper switch, if violated, to register a tamper condition at the panel without the need for a separate connection to a designated tamper zone. Only zones 1-6 can be defined as DEOL. Zones 9-14 are not valid in this configuration. Double Zone Wiring Zone doubling is used to connect two separate zones on one input. Use the following diagram for appropriate connection. The tamper alarm will be the same for both of the zones. Zone No.1 Tamper N.C. To Panel Zone Input Alarm N.C. 3.32K Zone No.9 Tamper N.C. Alarm N.C. 2.21K 5.62K For double zone wiring use the supplied resistors. NOTES: The location of the resistors is crucial. Any change in the resistors' location will adversely affect the correct zone identification. Zones 1-6 must be applied with the 3.32KΩ resistor. Zones 9-14 must be applied with the 2.21 KΩ and 5.62 KΩ resistors. Zones 7 and 8 cannot be defined as double zone termination. Installation Manual 11 Wiring Auxiliary Devices Use the Auxiliary Power AUX (+) COM (-) terminals to power PIRs, glass-break detectors (4-wire types), smoke detectors, audio switches, photoelectric systems and/or any device that requires a 12V DC power supply. NOTES: The total power from the AUX terminals should not exceed 600mA. To connect a 4-wire smoke detector or devices that require resetting after an alarm condition, connect the Auxiliary power AUX and UO terminals (refer to page 8 for smoke detector wiring). Remember to define the UO as Switched Auxiliary (refer to page 31). In addition, when connecting a 4-wire smoke detector observe the wiring guidelines of the local requirements applicable to smoke detectors. To prevent a possible drop in voltage due to current requirements and distances involved, make sure to use the appropriate wire gauge. If the auxiliary outputs are overloaded (exceed 600mA) and are shut down, you must disconnect all loads from the outputs for a period of at least 10 seconds before you reconnect any load to the auxiliary outputs. Bell Tamper The bell tamper is a tamper input that is terminated by an EOL resistor (2.21 KΩ). If the line is cut or shorted, the alarm is turned on. Connect the bell tamper to the BELL TMP and COM terminals on the main panel. Box Tamper The box tamper is a tamper input (NC - normally closed) for the metal box, which protects both sides of the box. This means that if the box is opened or removed from the wall, the tamper opens and turns on the alarm. Connect the box tamper to the BOX TMP and COM terminals on the main panel. NOTE: For Bell and Box tamper supervision, connect the tamper switches before applying the main power to the system. 12 Installation Manual Utility Output Connections The ORBIT-14 main panel includes three Utility Outputs on board: 1 relay 3Amps, 1 500mA transistor and 1 open collector 70 mA transistor which can be used for switching an external device on or off or reset a “latched” smoke detector(s). Once the Utility Output (UO) is activated the device will be connected between AUX (+12V) and ground (0V). Wiring the external Utility Outputs: UO1: Refer to the J4 connector instructions, described below. UO2-UO6: Connect the positive connection of the device to AUX (+) and the negative connection to the UO's (-) terminals. NOTES: When activated the Utility Output is switched to the Negative Polarity. When the UO is used to reset a “latched” smoke detector(s), the 12V power to the smoke detector is supplied via the UO (see page 8). The UO should be defined as AUX switch (see page 31). Connecting the Utility Output Expansion Module If more than three UOs are required, a Utility Output Expansion module is available. The UOs on the expansion module comprise four relays; three relays that allow maximum current of 500 MA each, and one relay that allows maximum current of 3A. When the Utility Output Expansion Module is employed, UO3 on the Main Board (the UO3/ECL terminal) is no longer available. UO1 on the Utility Output expansion module becomes UO3 in the system. To connect the Utility Output expansion module, connect the terminals as follows: Panel UO Expansion Module terminals ORBIT-14 Main BUS BUS TERMINALS AUX RED COM BLK ECL YEL DAT GRN AUX COM UO3 DAT RED BLK ECL GRN NOTE: In order to use the Utility Output Expansion, you have to define the utility module in location 059 (see page 38) Installation Manual 13 Connecting the J4 Connector The J4 connector (jumper) determines the UO1 connection (behaviour), which is normally used for an external siren connection, as follows: 14 • Positive (POS): When the J4 connector is placed on POS, the C terminal on UO1 receives 13.8V. • Negative (NEG): When the J4 connector is placed on NEG, the C terminal on UO1 receives COM. • Single pin: If the J4 connector is placed only on 1 pin, the UO1 acts as a dry contact. Installation Manual Keypad Connection The ORBIT-14 can support up to five keypads. Each keypad consists of five wires and three terminal blocks (for the connection of zones 7 and 8). NOTE: The three terminal blocks are not applicable in a 6-LED keypad. 1. 2. Connect four wires (Red, Black, Yellow, Green) from the keypad to the appropriate terminals on the main panel, according to the wire colours. Each keypad has an additional white wire for the connection of a panic button. To connect the panic button, use the white wire as (+) and the black wire as (-). NOTE: The maximum distance between the panic button and the keypad is 30 meters. 3. Connecting zones 7 and 8: Zones 7 and 8, which are located on the keypads (except for the 6-LED keypad), are end-of-line supervised. If more than one keypad is connected to the system and zones 7 or 8 are used, the same zones in the other keypads must be shorted. Each zone can be used only once, in one of the keypads. NOTE: The short of a parallel zone must be done before powering the system. Connecting the J3 SIG IN Connector (Signal in Voice Mail) The J3 SIG IN voice connector enables the transfer of audio data between the Voice module and the phone line. For further instruction on the voice module, refer to the “Voice Module” documentation supplied with the product. Installation Manual 15 Installer Programming The Keypad The ORBIT-14 can support up to five keypads, with a choice of four styles (LCD, 6LED, 8-LED and 14-LED types), from which virtually all features may be accessed. In addition to the functions it provides for the user, each of the keypads can be used by an installer to program the system parameters. An attempt to enter an incorrect series of keystrokes will result in three error beeps. All program location values (data) are displayed by zone indicators on the keypad’s LEDs. Restoring Factory Defaults to the ORBIT-14 1. 2. 3. 4. 5. 6. Your ORBIT-14 and at least one LED Keypad should already be wired together and/or physically installed. Remove all power from the Printed Circuit. Place the ORBIT-14’s J1 (DEFAULT) jumper over both corresponding pins. (Refer to page 8). Reapply power (AC and/or Standby Battery) to the PC Board. After a short beep is heard, remove the J1 jumper. The ORBIT-14’s default settings are now restored. Check that the POWER LED is flashing. Depending on the state of the system, the READY LED and the Zone LEDs may or may not be lit. Introduction to Programming First, check that the panel’s J1 (DEFAULT) jumper is NOT covering both pins on the PC Board. The ORBIT-14 stores information in 168 programming locations. The data stored in any location is represented by numbers and/or letters. Some locations require just one digit, while most require two. Others may require several more digits (e.g. those used to store phone numbers and account numbers). It is not necessary to enter data into all categories. Many locations have been factoryprogrammed with default parameters. NOTE: Power can be removed from the ORBIT-14, as its memory does not require a source of power to retain its information. 16 Installation Manual Programming Your ORBIT-14 Programming Methods Local LED or LCD keypads ORBIT Programmer Easy programming of the control panel parameters with menu driven LCD display. The programmer can store up to 10 ORBIT-14 programming sets and copy them directly to the panel. Local ORBIT UD* Local Up/Load Windows version from a personal computer. Remote ORBIT UD* Remote U/D Windows version from a personal computer. Requirements The keypad must be wired to the ORBIT-14 panel. Power must be applied to the ORBIT-14. The programmer will be connected to and receive its power from the panel. P/N: RP214PR00XXA* *: XX represents the programmer language interface. The software must be installed and an ORBIT UD Adaptor cable is connected between the panel and the computer. P/N for the local adapters: RP214LU0000A: Local Bus Adapter. RP214USB000A: USB/RS232 Bus Adapter. The software and applicable modem with configured access to a telephone line must be installed. * Compatible with Windows 95/98/2000 XP. (P/N RP128UD0000A) Viewing the Contents of a Location It is often necessary to check the data stored in a memory location to ensure that it is correct. If improper data is found, it must be corrected in order to obtain the desired system response. The data in a location can either be a number (from 0-9) or a letter (from A-F), taking advantage of the hexadecimal numbering system. For our purposes, the characters A through F will be referred to as hexadecimal digits. Whenever the Installer Programming mode is active, the first four Zone LEDs on the keypad (1-4) are used to reveal each digit in a selected location. By adding up the values assigned to the lit LEDs, the contents of any location can be determined. See the table below. Installation Manual 17 ZONE LEDs ZONE LEDs Digit 4 3 2 1 Digit 4 3 2 1 0 OFF OFF OFF 1 OFF OFF OFF OFF 8 ON OFF OFF OFF ON 9 ON OFF OFF ON 2 OFF OFF ON 3 OFF OFF ON OFF A ON OFF ON OFF ON B ON OFF ON ON 4 OFF ON 5 OFF ON OFF OFF C ON ON OFF OFF OFF ON D ON ON OFF ON 6 OFF 7 OFF ON ON OFF E ON ON ON OFF ON ON ON F ON ON ON ON Example A: If Zone 4-ON, Zone 3-OFF, Zone 2-OFF, and Zone 1 ON, then the digit equals 9. Example B: If Zone 4-ON, Zone 3-OFF, Zone 2-ON, and Zone 1 - ON, then the digit equals 8. Locations Whose Contents Occupy More Than One Digit When a location contains more than one digit, they cannot be viewed simultaneously. As soon as a location is accessed, the first digit is displayed automatically. Additional digits (if they exist) can be displayed by pressing the following keys on the LED keypads.: Used to display the next digit in a location containing at least two digits. For example, if 5-6-7-8 is stored in a location, the “5” is displayed first; when you press , the “6” will be displayed. Continue this process to display the entire contents of the chosen location. Error beeps will be emitted if you attempt to display nonexistent digits. Used to move backwards among the digits stored in a location containing at least two digits. Error beeps will be emitted if you attempt to display non-existent digits. Audible Tones and Error Beeps To confirm an operation, a single, long beep will be heard. However, any improper use of the keypad resulting in an error or an unacceptable response will produce three rapid beeps. If heard, repeat the operation or exit the programming mode and try again. Programming Installer Parameters 1. 2. 18 To enter the Installer programming mode: Press the 4-digit Installer code followed by # (factory default 0 2 1 4) To move to a new location: Press the 3-digit location code followed by ARM. Installation Manual 3. To enter data into the location: Press data digits (0 - 9 digits including hexadecimal A-F) followed by #. Using your LED keypad, you can enter the hexadecimal digits A – F as follows: To Enter A B C D E F 4. Press [STAY] + [1] [STAY] + [2] [STAY] + [3] [STAY] + [4] [STAY] + [5] [STAY] + [6] To exit programming mode: Press the 4-digit installer code followed by ARM. Programming Time Out If after 10 minutes during the programming time, no entry is made to a keypad that has been used for the programming operations, it will produce an audible reminder, consisting of several beeps in rapid succession. Pressing on any key will stop the beeping and return to the programming mode. Programming Tutorial To help acquaint you with some programming basics, a short tutorial has been prepared. It involves changing the Installer Code from the factory default of 0-2-1-4 to a sequence of your own choosing. If you can master this operation, subsequent programming should be easy. 1 2 3 4 Operation Action Comments Enter the Installer Programming mode Access the current Installer Code (stored in location “008”) Enter a unique Installer Code (for this tutorial, use 3-0-5-7) Store the data you have entered Enter the factory default Installer Code (0-2-1-4); followed by #. Press [0], [0,[8], [ARM]. A long beep will sound, confirming successful entry into Installer Programming. No confirming beep will sound. Enter [3], [0], [5], [7]. No confirming beep will sound. Press [#]. A long beep will sound confirming that data has been properly stored. If a wrong number of digits entered three (error) beeps will sound after pressing #. Installation Manual 19 5 6 7 20 Operation Action Check the data stored in Location “008” •The first digit of the stored data is displayed. •Observe the Zone LEDs. •Press [STAY] [STAY] to advance to the next digit. •Once all four digits have been displayed, attempts to view an additional digit will result in three (error) beeps. •If desired, press [STAY] and [ARM] to move backwards. Go to another location of your choice Exit programming Press the desired 3-digit location and [ARM]. Comments Press keys Displayed Zone LEDs lit Value none 1st digit 2, 1 3 STAY STAY 2nd digit none 0 STAY STAY 3rd digit 3,1 5 STAY STAY 4th digit 3,2,1 7 Press [ARM] alone to go to the next sequential location. Enter your Installer Code A long beep will confirm your actions. and press [ARM]. (Only in the LED keypad) Installation Manual Programming Locations: General System Parameters: Locations 000-005 Location: 000 Default Enable: Def: 00 To enable or disable the option of resetting the system to the factory defaults. 00 55 Enable the option of resetting the system to the factory defaults by shorting the default jumper on the PC board during power-up. Disable the option of resetting the system to the factory defaults by using the default jumper. Location: 001 MS Lock: Def: 000000 MS Lock is a security function used in conjunction with Rokonet's Upload/Download software. It provides greater proprietary security when viewing Central Station parameters. The 6-digit code that will be stored in the panel must also be entered into the corresponding account profile created for the installation in the Upload/Download software. If there is no match between the MS Lock Code defined in the Main Panel and the MS Lock Code defined in the Upload/Download software, the Installer will not have permission to change the following Central Station parameters from the Upload/Download software: Installer Code, MS phone numbers, the MS Lock Code, and the Default Enable jumper. It is NOT necessary to change the MS Lock default value within Installer Programming; instead, the procedure may be performed from the Upload/Download Software and then downloaded to the ORBIT-14. Location: 002 Phone Number: Primary Central Station (Central Station 1) The first Central Station phone number. Up to 32 alphanumeric characters can be defined as the phone number. To enter or replace the phone number required to reach the primary Central Station, include all access digits (e.g., 0 to 9) and the area code. If required, include the following special functions to achieve the effect listed in the table: FUNCTION Stop dialling and wait for a new dial tone SEQUENCE RESULTS [STAY], [1] A Wait a fixed period before continuing [STAY], [2] B Switch from Pulse to Tone (or from Tone to Pulse) [STAY], [3] C Send the DTMF ✱ character [STAY], [✱ ] ✱ Send the DTMF # character [STAY], [#] # When your entry is complete, press [#] to store it. To delete an existing phone number, simply press the [#] key without any other digit or character. Installation Manual 21 Location: 003 Phone Number: Secondary Central Station (Central Station 2) The second Central Station phone number. The definition is the same as in Location 002. Location: 004 Callback UD Phone Number This is a number to which the alarm company computer, equipped with the U/D software, will be connected and to which the ORBIT-14 will call back. This provides more security for U/D operations. When a call is made from a computer, using U/D software, to the ORBIT-14 panel, the system will hang-up and call back using this UD phone number. Up to 32 digits can be entered into the U/D phone number. Include all the digits and functions as in Location 002. To delete an existing phone number, press #. Location: 005 Account Number Default: 0000 The system’s Central Station Account Number. The ORBIT-14 accepts hexadecimal account numbers (those using 0 through 9 and A through F); use the key combinations below (in LED keypads only) to enter hexadecimal digits “A” through “F”: Hex digit Press Hex digit Press A B C [STAY], 1 [STAY], 2 [STAY], 3 D E F [STAY], 4 [STAY], 5 [STAY], 6 NOTE: Use the “0” digit only to define account numbers with less than four digits. For example, for account number 123, enter 0123. In this case the ORBIT-14 will not send the “0” digit to the Central Station. To use an account number with “0” digit, for example “1207”, use the “A” digit instead of “0” digit. For example, for account number 1207, enter 12A7. The sequence of buttons will be: [1][2][STAY][1][7] System Codes: Locations 006-010 Location: 006 Access Code Default: 5678 Provides data security during Upload/Download operations. This Access Code must subsequently be entered into the corresponding account profile in the Upload/Download software. For successful communication, the Access Code must be the same for the both the Upload/Download software and the Main Panel. Location: 007 Remote ID Code Default: 0001 An ID Code that serves as an extension of the Access Code, described in the procedure above. The ID code provides data security during Upload/Download operations. This Remote ID Code must subsequently be entered into the corresponding account profile in the Upload/Download software. For successful communication, the ID Code must be the same for both the Upload/Download software and the Main Panel. 22 Installation Manual Location: 008 Installer Code I Default: 0214 The installer code is a 4-digit code used by alarm company personnel authorized to modify the system’s parameters. It is recommended to change the “factory default” Installer Code to one of your own choice. Location: 009 Installer Code II Default: 1214 A 4-digit code that identifies a technician sent by the installation company to carry out restricted tasks. Using this code, the sub-installer can access only those programming locations associated with the authority level defined in location 061(refer to page 41). Location: 010 Master Code Default: 1234 A 4-digit code used by the system's owner or chief user. The Master Code provides the following special privileges: • To enter, modify, and delete the remaining all User Codes • To set the system's internal clock • To perform certain system functions and tests NOTE: The Master Code cannot be seen by the installer through the zone LEDs on the keypad. System Time Definitions: Locations 011-016 Location: 011 Exit Delay Default: 030 Establishes the system’s Exit Delay (the interval, in seconds, between entering a User Code at the keypad and when the system actually arms). Enter the number of seconds (between 001 and 255). Location: 012 Entry Delay Default: 060 Establishes the system’s Entry Delay (in an armed system, the interval, in seconds, between the moment an entry door is opened and an alarm is triggered). Enter the number of seconds (between 001 and 255). Location: 013 Bell Cutoff Time Default: 04 Sets the interval that the system’s external sounder(s) will operate during an alarm before it shuts off automatically. Enter the number of minutes (between 01 and 90). NOTE: The keypad’s buzzer operation is not affected by the Bell Cutoff time definition. Installation Manual 23 Location: 014 Bell delay Default: 00 The time delay before the keypad sounder and the external sounder operates after the onset of an alarm. Enter the number of minutes (between 00 and 90). Periodic Test: Locations 015-016 The Periodic Test menu enables you to set the time period that the ORBIT-14 will automatically call the Central Station or Upload/Download phone numbers in order to check the phone line connection and the unit’s digital communicator. NOTE: The Periodic Test cannot occur if the value of the Start Periodic Time or Periodic Test interval is set to zero. Location: 015 Start Periodic Test Default: 0000 Sets the start time of the periodic test. The chosen time is expressed in 24-hour format. Examples: 8:30 AM = 0830, 4:30 PM = 16:30. NOTE: If desired, you can disable the test transmission capability by entering the default (0000). Entering the installation mode after the indicated time will defer the test transmission until the indicated periodic test time on the following day. Location: 016 Periodic Test Interval Default: 00 Sets the interval for periodic test reporting. Enter two digits between 00 and 99 hours. NOTE: If desired, you can disable the test transmission capability by entering the default 00 as the periodic test interval. Zone Types and Sounds: Locations 017-030 Locations 017 through 030 are identical and correspond to Zones 1 through 14. Each of these locations contains two digits. • First digit: Contains the number used to represent the Type of Zone desired. • Second digit: Contains the number used to represent the sound produced when in alarm. Locations: 017-030 st 1 Digit 0 1 24 Zone 1-14: (1st Digit): Zone Type Zone Type and Comments Not Used All unused zones should be given this designation. It is also used to disable a zone. 24-Hour Usually assigned to protect non-movable glass, fixed skylights or cabinets for shock detection systems. A violation of such a zone will always cause an instant intrusion alarm, regardless of the system’s armed/disarmed state. Installation Manual Locations: 017-030 2 3 4 5 6 7 8 9 Zone 1-14: (1st Digit): Zone Type Day Zone Usually assigned to an infrequently used door, such as an emergency door or a movable skylight. Used to alert the system user if a violation occurs during the disarmed period (trouble by day; burglary at night), as follows: • With the system armed (either AWAY or Group), the zone acts as an instant zone. A violation of this zone after the system is armed or during the Exit Delay time period causes an immediate intrusion alarm. • With the system disarmed, a violation of this zone attempts to alert the user by causing the POWER LEDs on all keypads to flash rapidly. This directs the user to view the system's TROUBLE indications. Instant (Intrusion) Usually intended for non-exit/entry doors, window protection, shock detection, and motion detectors. Causes an immediate intrusion alarm if violated when the system is armed or during the Exit Delay time period (Only in IMQ definition). Exit /Entry Delay If violated, a zone with this designation will not cause an intrusion alarm during the Entry and Exit Delay periods. Exit (OPEN)/Entry Such a zone behaves as described above in Entry/Exit Delay, except that if faulted at the time the system is armed, it will be bypassed and NOT prevents system arming. To avoid an intrusion alarm, however, the zone must be secured before the expiration of the Exit Delay period (Location 11). Entry Follower Usually assigned to motion detectors and to interior doors protecting the area between the entry door and the keypad. This zone will cause an immediate intrusion alarm when violated unless an Entry/Exit zone was violated first. In such a case, an Entry Follower zone(s) will remain bypassed until the end of the Entry Delay period. Fire Zone Intended for smoke or other types of fire detectors. If violated, will cause an immediate fire alarm. A short in the zone wiring will cause a fire alarm. A fault in the wiring to the zone will cause a Fire Trouble (fire LED blinks). A fire zone cannot be disabled or bypassed. Panic Zone Used for external panic buttons and wireless panic transmitters. If violated an immediate panic alarm will be announced. Pulsed Key-switch Zone - Instant If desired an external SPST spring - loaded, normally open, momentary type key switch can be added for system arming and disarming. The key switch permits an instant arm and disarming of the system after tripping. Pulsed Key-switch Zone - Delayed A B This zone behaves similar to the Pulsed Key-switch Zone - Instant, described above, except that an exit delay will follow the arming of the system. Latch-Key-switch Zone – Instant: If desired for system arming/disarming, connect an external SPST latching type (non-momentary) key-switch to any zone terminals, given this designation. Installation Manual 25 Locations: 017-030 C Latch-Key-switch Zone – Delayed: This zone behaves similar to the Latched Keyswitch Zone - Instant, described above, except that an exit delay will follow the arming of the system. Locations: 017-030 nd 2 Digit 0 1 2 3 4 5 6,7 8 9 A B C 26 Zone 1-14: (1st Digit): Zone Type Zone 1-14: (2nd Digit): Zone Sound Zone Sound and Comments Silent A violation during the armed period will produce no sound. The resulting alarm can still be reported to the Central Station. Bell only (Continuous) Activates the external bell sounders to annunciate steadily without breaks in the sound cadence for the duration of the Bell Timeout period, or until the system is disarmed. Bell only (Pulses) Activates the external bell sounders to produce a pulsed (or staggered) annunciation for the duration of the Bell Timeout period, or until the system is disarmed. This sound is usually recommended for fire alarm annunciation. Buzzer Only Activates each keypad's internal buzzer to beep rapidly. Bell + Buzzer Activates the bell sounders (consciously) and the keypads' buzzers simultaneously. Bell When Armed / Buzzer When Disarmed Related to 24H zones. If an alarm occurs in disarm mode, the keypad’s buzzer will be activated. If an alarm occurs in arm mode, the external Bell will be activated. Not Applicable Silent: Chime on Disarm Same as the Silent option, described above, except that when in Disarm mode the keypad’s buzzer makes one momentary sounds (Door Chime) whenever the zone is violated. Bell only (Continuous): Chime on Disarm Same as the Bell only (Continuous) option, described above, except that when in Disarm mode the keypad’s buzzer makes one momentary sounds (Door Chime) whenever the zone is violated. Bell only (Pulses): Chime on Disarm Same as the Bell only (Pulses) option, described above, except that when in Disarm mode the keypad’s buzzer makes one momentary sounds (Door Chime) whenever the zone is violated. Buzzer Only: Chime on Disarm Same as the Buzzer Only option, described above, except that when in Disarm mode the keypad’s buzzer makes a momentary sound (Door Chime) whenever the zone is violated. Bell + Buzzer: Chime on Disarm Same as the Bell + Buzzer option, described above, except that when in Disarm mode the keypad’s buzzer makes a momentary sound (Door Chime) whenever the zone is violated. Installation Manual Zone Type and Sound Default: Zone/s Location/s Z1 017 Z2 018 Z3 – Z6 019 - 022 Z7-Z8 023 - 024 Z9 – Z14 025-030 Type (5) (6) (3) (0) (3) Sound (1) (1) (1) (0) (1) Zone Response Time & Group Masking: Locations 031-044 Locations 031 through 044 are identical and are corresponding to zones 1 through 14. Each of these locations contains two digits: • First digit: Contains the number used to represent the zones loop response that sets the minimum time for which a zone violation will trigger an alarm. • Second digit: Contains the number used to represent to which group/s the zone will be assigned. Locations 031-044 Zone loop response + Group masking: st 1 Digit 0 Loop response 400 ms (Default) 1 2 nd 10 ms Digit Group masking 0 None (Default) 1 2 3 4 5 6 7 A B A+B C A+C B+C A+B+C Zone Termination & Tamper Sound: Location 045 • First Digit: Determines the zone terminations. (NO – Normally Open, NC – Normally Closed, EOL – End of Line, DEOL – Double End Of Line, DZ – Double Zone). An explanation can be found on page 11. Default: EOL. Installation Manual 27 NOTE: The termination of zones 7 and 8 is always EOL. Only zones 1-6 can be defined as DEOL. In this configuration zones 9-14 are not valid. Second Digit: Sets the sound(s) produced by a tamper violation (Zone, Bell, Box, Keypad). The available sounds are: Silent, Bell only – Continuous, Buzzer only, Bell + Buzzer, and Bell in Arm/ Buzzer in Disarm. • st 1 Digit 0 (Default) 1 2 3 4 2 nd Digit 0 1 2 3 4 (Default) Zone Termination EOL NC NO DEOL DZ Tamper Sound Silent Bell Only Buzzer Only Bell + Buzzer Bell in Arm / Buzzer in Disarm Utility Outputs: Locations 046-051 The ORBIT-14 main panel includes three Utility Outputs (1 3Amps relay, 1 500 mA transistor and 1 open collector 70 mA transistor). These outputs help operate external devices in response to a number of system activities related to alarms, zones, any general system event or the actions of a particular user. A total of six Utility Outputs are available when the utility module expansion module is connected. You can choose the event that will trigger a selected Utility Output (UO), as well as the manner in which the output will be applied. NOTE: In order to use the Utility Output Expansion you need to define the module in location 059 on page 38. If the Utility Output Expansion Module is used, UO3 on the main board is no longer available. The 1st UO on the expansion module will be referred to as UO3 in the system. Digit 00 01 28 Event and Result Not Active UO offers no response to any system activity Arm Follow (Latch) UO is activated when the system is armed. The activation occurs after the expiration of the exit/delay period. The UO remains active (latched) while the system is armed. When disarming the system the UO deactivates (unlatches). Installation Manual Digit 02 03 04 05 06 07 08 Event and Result Arm Follow (Pulse) UO is activated when the system is armed. The activation occurs after the expiration of the exit/delay period. The UO is activated for several seconds (pulse), after which is deactivated. Alarm Follow (Latched – Restore on Bell Time out) UO is immediately activated when the system goes into any type of alarm (i.e., intrusion, fire, keypad-initiated panic). UO deactivates at after the system’s bell “times out”. Alarm Follow (Latched - Restore on user Disarm) UO is immediately activated when the system goes into any type of alarm (i.e. intrusion, fire, keypad-initiated panic). UO remains active (latched) for the duration of the alarm-even after the system’s bell “times out” UO is deactivated when the system is disarmed. Alarm Follow (Pulse) UO is immediately activated for several seconds and then deactivated whenever the system goes into any type of alarm (i.e., intrusion, fire, keypad-initiated panic). Zone 1 Alarm Follow (Latched) UO is immediately activated when an alarm occurs on Zone 1. UO remains active (latched) for the duration of the alarm - even after the system sounder "times out". UO is deactivated when Zone 1 goes into normal condition. Zone 1 Alarm Follow (Pulsed) UO is immediately activated for several seconds (pulsed) and then deactivated whenever Zone 1 goes into alarm. Zone 2 Alarm Follow (Latched) 09 Zone 2 Alarm Follow (Pulsed) 0A Zone 3 Alarm Follow (Latched) 0B Zone 3 Alarm Follow (Pulsed) 0C Zone 4 Alarm Follow (Latched) 0D Zone 4 Alarm Follow (Pulsed) 0E Zone 5 Alarm Follow (Latched) 0F Zone 5 Alarm Follow (Pulsed) 10 Zone 6 Alarm Follow (Latched) 11 Zone 6 Alarm Follow (Pulsed) 12 Zone 7 Alarm Follow (Latched) 13 Zone 7 Alarm Follow (Pulsed) 14 Zone 8 Alarm Follow (Latched) 15 Zone 8 Alarm Follow (Pulsed) 16 Zone 9 Alarm Follow (Latched) 17 Zone 9 Alarm Follow (Pulsed) 18 Zone 10 Alarm Follow (Latched) 19 Zone 10 Alarm Follow (Pulsed) 1A Zone 11 Alarm Follow (Latched) 1B Zone 11 Alarm Follow (Pulsed) 1C Zone 12 Alarm Follow (Latched) Installation Manual 29 Digit 1D 1E Zone 13 Alarm Follow (Latched) 1F Zone 13Alarm Follow (Pulsed) 20 Zone 14 Alarm Follow (Latched) 21 Zone 14 Alarm Follow (Pulsed) 22 23 24 25 26 27 28 29 30 Event and Result Zone 12 Alarm Follow (Pulsed) Panic Follow (Latched) UO is activated immediately when a PANIC alarm is triggered by a violation of a zone, defined as Panic, or by pressing the keypad’s [1] and [2] keys simultaneously for two seconds. UO is deactivated when the system is disarmed. Panic Follow (Pulse) UO is activated for several seconds when a PANIC alarm is triggered by a violation of a zone, defined as Panic, or by pressing the keypad’s [1] and [2] keys simultaneously for two seconds. Special Emergency Keying Follow (Latched) UO is activated immediately when pressing the keypad’s [7] and [8] keys simultaneously for two seconds. UO is deactivated when the system is disarmed. Special Emergency Keying Follow (Pulsed) UO is activated for several seconds when pressing the keypad’s [7] and [8] keys simultaneously for two seconds. Fire Keying Follow (Latched) UO is activated immediately when a Fire alarm is triggered by a violation of zone 5, defined as Fire, or by pressing the keypad’s [4] and [5] keys simultaneously for two seconds. UO is deactivated when the system is disarmed. Fire Keying Follow (Pulse) UO is activated when a Fire alarm is triggered by a violation of zone 5, defined as Fire, or by pressing the keypad’s [4] and [5] keys simultaneously for two seconds. User Activated (Toggle) UO may be activated by the user through the entry of [*]+[2]+[User Code]+[X], where X refers to the Utility Output number. The first entry of the above sequence activates the UO and causes it to latch in the opposite of its current state. The system briefly lights the Zone LED corresponding to the selected UO and produces a single confirming beep. Subsequent entries toggle the response between ON and OFF. User Activated (Pulse) UO may be activated by the user through the entry of [*]+[2]+[User Code]+[X], where X refers to the Utility Output number. The entry activates the UO for several seconds (pulse). The system briefly lights the Zone LED corresponding to the selected UO and produces a single confirming beep. Subsequent entries repeat this pattern. Installation Manual Digit 2A 2B 2C 2D 2E 2F 30 31 32 33 34 35 36 Event and Result AUX POWER Switch (Fire) Until triggered, UO is normally activated and is designed to be a part of the circuit supplying power to the smoke detector(s); see page 8. After a Fire Alarm is disarmed, it may be necessary to reset any smoke detector(s), which may be “latched” in alarm. A “latched” smoke detector will cause the keyboard’s Fire LED to remain lit, even though the panel may be disarmed. To reset a Smoke Detector, a “UO” used in this manner must be momentarily deactivated. This action is performed by the user, who must enter [*]+[2]+[User Code]+[X], where [X] refers to the UO number in the circuit providing Smoke Detector power. If this is not done, it will be impossible to arm the panel. Please advise your customer of this contingency, as stated in the ORBIT-14’s User's Manual. Duress Code Follow (Latched) UO is activated when any duress code is entered. The UO is deactivated either when arming the system or disarming the system due to an alarm that was activated from the emergency keypad keys, 24-hour zone violation or tamper zone violation. Duress Code Follow (Pulse) UO is activated for several seconds (and is then deactivated) when any duress code is entered. AC Loss Follow (Latched) UO is activated due to a lack of power from the commercial AC. UO is deactivated when the system is operating properly from commercial (AC) power. AC Loss Follow (Pulse) UO is activated for several seconds (and is then deactivated) due to a lack of power from the commercial AC. Low Battery Follow (Latched) UO is activated when the rechargeable standby battery has insufficient reserve capacity and the voltage decreases to 11.5V. The UO is deactivated when the battery is in good condition. Low Battery Follow (Pulse) UO is activated for several seconds when the rechargeable standby battery has insufficient reserve capacity and the voltage decreases to 11.5V. Phone line trouble (Latched) UO is activated when a telephone line fault is detected. The UO is deactivated after the telephone line fault has been corrected. Phone line trouble (Pulsed) UO is activated for several seconds when a telephone line fault is detected. Voice Module Enable The UO is activated after FM phone number dialling has been made due to alarm and causes to a repeatedly pre-recorded message announcement. The UO is deactivated after the FM period termination. Chime Follow (Pulse) UO is activated for several seconds whenever a keypad sounds its chime. Bell Follow Latched NO UO is activated whenever the bell is activated. UO is deactivated at the bell cut-off time. Bell Follow Latched NC UO is deactivated whenever the bell is activated. UO is activated at the bell cut-off time. Installation Manual 31 Digit 37 38 39 3A Event and Result Ready Follow NO (Latched) UO is activated whenever the system is in the ready state. Ready follow NO (Pulsed) UO is activated for several seconds whenever the system is in the ready state. Ready follow, NC (latched) UO is deactivated whenever the system is in the ready state. Ready follow, NC (Pulsed) UO is deactivated for several seconds whenever the system is in the ready state. Utility Outputs Default: Utility Output Location UO1 046 UO2 047 UO3 – UO6 048 - 051 Type 04 03 00 Communication Parameters: Locations 052-055 Locations 052 to 055 allow you to define the manner in which the ORBIT-14 communicates with the Central Station when it reports alarms, restorals, troubles, openings/closings, and tests. Locations 054 and 055 allow you define the communication format as defined by the Central Station (CS). Dialler Control 1: Location 052 • • First digit: Determines the number corresponding to the Dialling Method, Duty Cycle and Central Station retries. Second digit: Determines the number corresponding to the Redial Wait, Answering Machine Override and Stop Follow Me authorization. Comments on Dialler Control 1: (Location 052: 1st Digit) Dialling Method Duty Cycle MS Retries Used to select the dialling method, Pulsed or DTMF. When selecting the dialling method, your choice must be compatible with the type of phone service available at the protected premises. For pulse dialling, choose the proper dialling duty cycle. The number of times the ORBIT-14 redials the Central Station after failing to establish a successful communication. 67/33%: Typically used in European telephone systems. 61/39%: Typically used in USA telephone systems. For pulse dialling method 2 option are available: 10 PPS (Pulse Per Second) or 20 PPS. 32 Installation Manual Comments on Dialler Control 1: (Location 052: 2nd Digit) Redial Wait Answering Machine Override Follow Me Enable The number of seconds between attempts at redialling the same phone number when it is busy or unresponsive. Applies to both the MS Retries and FM Retries parameters. Yes: The Answering Machine Override is enabled, as follows: Yes: Enables Follow Me communication. In addition to reporting to the Central Station, the ORBIT-14 has a Follow-Me feature, in which a standard phone call is made to a designated phone number, reporting a system event. The Follow Me can Within one minute, the convey a series of tones software calls again. The representing an alarm; it can ORBIT-14 is programmed to send numeric or alphanumeric pick up this second call on the data to a page to display a first ring, thus bypassing any specific event; or it can send interaction with the answering pre-recorded voice messages machine. using the voice module. The Upload/Download software at the alarm company calls the account. The software hangs up after one ring by the U/D operator. NOTE: This feature is used to prevent interference from an answering machine with remote Upload/Download operations. No: The Answering Machine Override is disabled, and communication takes place in the standard manner. Location: 052 st 1 Digit 0 1 9 8 (Default) 5 D 3 B 7 F Location: 052 2 nd Digit No: Disables Follow Me communication. NOTE: If both MS phones and FM phones are defined, the system will first call the MS phones and then the FM phones. Dialler Controls 1: (1st Digit): Dialling Method DTMF Pulse @ 20 pps Pulse @ 20 pps DTMF Pulse @ 20 pps Pulse @ 20 pps Pulse @ 10 pps Pulse @ 10 pps Pulse @ 10 pps Pulse @ 10 pps Duty Cycle N/A 67/33 67/33 N/A 61/39 61/39 67/33 67/33 61/39 61/39 MS Retries 3 3 8 8 3 8 3 8 3 8 Dialler Controls 1: (2nd Digit): Redial Wait Answering Machine Follow Me Enable 0 Immediate No No 1 20 No No 2 30 No No Installation Manual 33 Location: 052 2 nd Digit 3 4 5 6 7 8 9 A B C D Dialler Controls 1: (2nd Digit): Redial Wait 60 Immediate 20 30 60 Immediate 20 30 60 Immediate 20 Answering Machine No Yes Yes Yes Yes No No No No Yes Yes Follow Me Enable No No No No No Yes Yes Yes Yes Yes Yes E (Default) 30 Yes Yes F 60 Yes Yes Dialler Control 2: Location 053 • • First digit: Not applicable, Always “0” Second digit: Determines whether: 1. The ORBIT-14 is connected to a telephone and if the line is supervised. If the telephone line is cut for more than four minutes, supervision causes phone line trouble. 2. The dialler waits for a dial tone before it starts dialling. Location: 053 2 nd Digit Dialler Controls 2: (2nd Digit): Wait for Dial Tone Telephone Connection and Supervision 0 No No 1 No Yes 2 3 (Default) Yes No Yes Yes Central Station Pulsed Protocols: Location 054 The code format of the central station protocols is based on the following information. • First digit: Determines the number corresponding to the desired combination of: Kissoff/Handshake Freq / Message Validation / Extended-Non-Extended Format. • Second digit: Determines the number (or letter) corresponding to the desired combination of: Dialling Rate / Intrepidity Time / Data Frequency. NOTE: The pulsed protocol definition is only applicable if the value “00”, which represents a “Pulsed Protocol” format, is entered in location 55. 34 Installation Manual Location: 054 Pulsed CS Protocols: (1st Digit): st 1 Digit Format Kissoff/Handshake Freq Message Validation 0 (Default) Non-Extended 1400 Hz Dual Round Compare 1 Non-Extended 2300 Hz Dual Round Compare 2 Non-Extended 1400 Hz Parity 3 Non-Extended 2300 Hz Parity 4 Extended 1400 Hz Dual Round Compare 5 Extended 2300 Hz Dual Round Compare 6 Extended 1400 Hz Parity 7 Extended 2300 Hz Parity Location: 054 Pulsed CS Protocols: (2nd Digit): 2 nd Digit Data Rate Interdigit Time Data Frequency 0 (Default) 40 pulses/sec 390 ms 1800 Hz 1 33 pulses/sec 390 ms 1800 Hz 2 20 pulses/sec 390 ms 1800 Hz 3 10 pulses/sec 390 ms 1800 Hz 4 40 pulses/sec 650 ms 1800 Hz 5 33 pulses/sec 650 ms 1800 Hz 6 20 pulses/sec 650 ms 1800 Hz 7 10 pulses/sec 650 ms 1800 Hz 8 40 pulses/sec 390 ms 1900 Hz 9 33 pulses/sec 390 ms 1900 Hz A 20 pulses/sec 390 ms 1900 Hz B 10 pulses/sec 390 ms 1900 Hz C 40 pulses/sec 650 ms 1900 Hz D 33 pulses/sec 650 ms 1900 Hz E 20 pulses/sec 650 ms 1900 Hz F 10 pulses/sec 650 ms 1900 Hz Central Station Pulsed Protocols Communication Formats Refer to the information in the table below and enter a 2-digit format code corresponding to the pulsed communication protocol required by the central station receiver associated with the MS telephone number. Installation Manual 35 PPS (pulses /sec) Kissoff/ Handshake Validation InterDigit Time Code Format 10 1400Hz Dual round 650 0F 10 1400Hz Dual round 650 4F Radionics/DCI/ Franklin slow 10 2300 Hz Dual round 650 17 Silent Knight Fast 20 1400 Hz Dual round 650 0E Silent Knight Fast Extended 20 1400 Hz Dual round 650 4E Sescoa/Franklin/Vertix/ fast 20 2300Hz Dual round 650 16 20 2300Hz Dual round 650 56 Format Name Silent Knight/ ADEMCO Slow Silent Knight/ ADEMCO Slow Extended Sescoa/Franklin/Vertix/DCI Extended DCI Universal high speed 20 2300Hz Dual round 390 12 Radionics 20 1400 Hz Dual round 390 02 Radionics 20 2300Hz Dual round 390 12 Radionics Extended 20 1400 Hz Dual round 390 42 Radionics Extended 20 2300Hz Dual round 390 52 Radionics 40 1400 Hz Dual round 390 00 Radionics 40 2300Hz Dual round 390 10 Radionics Extended 40 1400 Hz Dual round 390 40 Radionics Extended 40 2300Hz Dual round 390 50 Radionics 40 1400 Hz Parity 390 20 Radionics 40 2300Hz Parity 390 30 Radionics Extended 40 1400 Hz Parity 390 60 Radionics Extended 40 2300Hz Parity 390 70 For example, enter 0F in location 054 to use ADEMCO Slow. Automatic Central Station Protocols: Location 055 When selecting any of the formats, all the reporting codes will be automatically applied to the locations of the reporting codes. To change a code, enter a new code (according to the type of event – see page 48) to the corresponding location. When selecting the Pulsed Protocol, the default for all the reported codes will be “00” and any other code should be entered manually. To remove a particular reporting code from any of the seven Protocols, enter “00” into the corresponding location. IMPORTANT: Choose the code format only after defining the zone parameters. Changing a zone type after selecting the code format WILL NOT change the zone’s reporting code and a faulty report will be sent to the central station. 36 Installation Manual Location: 055 Automatic CS Protocols: Digit Format Name 00 (Default) Pulsed Protocol 01 Contact ID Inter digit Time Data Frequency NA NA Remarks No Open/Close reports) 02 Contact ID Domestic NA NA 03 SIA (Level 1) 390 ms 1800 Hz No Open/Close reports) 04 SIA - Domestic 390 ms 1800 Hz 05 Ademco 4/2 Express South Africa NA NA Special values for the South African market. 06 Ademco 4/2 Express NA NA - Upload/Download Rings: Location 056 Location 056 sets the number of rings that the ORBIT-14 will wait before automatically answering an incoming call. If such a call was initiated by the alarm company’s Upload/Download software, a process begins which allows a Remote Programming session to take place. Location: 056 Number of Rings Default: 08 Choose a number of rings greater than that which the customer will normally wait to answer an incoming call. Enter the number of rings (between 00-15). NOTE: If an Answering Machine is in use and so programmed, entries made in this location will be nd ignored (see Location 052 / 2 Digit). 00 indicates an immediate connection without any rings. Swinger Shutdown Limit: Location 057 Location: 057 Swinger Shutdown Limit Default: 00 A swinger is a repeated violation of the same zone, often resulting in a nuisance alarm, and usually due to a malfunction, an environmental problem, or the incorrect installation of a detector or sensor. This parameter specifies the number of violations of the same zone reported during a single armed period, before the zone is automatically bypassed. Range: 00-15 times. NOTE: Enter 00 to disable the swinger shutdown. Location: 058 Not Applicable Installation Manual 37 System Controls: Locations 059-060 Locations 059-060 allow you to specify some additional parameters, which determine how the ORBIT-14 will operate. Location: 059 System Control 1 Default: 53 The location contains two digits: • First digit: Determines the digit corresponding to the choices involving Quick Arm / Quick Bypass / Bypass Enable / Loudspeaker / Bell-Siren. • Second digit: Determines the digit corresponding to the use of Silent Panic / Bell Squawk on Arming / UO Expander/ Voice Module. st Comments on System Control 1 (Location 059: 1 Digit) Quick Arm Quick Bypass Bypass Enable Loudspeaker/Bell-Siren Yes: Eliminates the need to enter a User Code when arming to the Away or Group modes. No: A valid User Code is required for arming in AWAY or Group modes. Yes: Eliminates the need for a valid User Code when bypassing zones. Yes: Permits zone bypassing by authorized system users after entering a valid User Code. Loudspeaker: If the external sounder(s) is NOT equipped with a built-in sound driver; doing so causes the ORBIT-14 to produce an oscillating frequency for the device. No: Qualified users must enter a valid User Code to bypass zones. No: Zone bypassing is NOT permitted. Bell/Siren: If the external sounder(s) is a bell or a buzzer or equipped with a built-in electronic sound driver. Comments on System Control 1 (Location 059: 2nd Digit) Silent Panic Bell Squawk on Arming UO Extender Voice Module Yes: The panic alarm will be INAUDIBLE at the External Sounder and invisible on the keypad. Yes: Bell Squawk on Arming will produce a brief confirmation “chirp” from the system’s external sounder(s) once the system is armed and the Exit Delay expires. Yes: Voice messages will be sent. No: The panic alarm will be AUDIBLE at the External Sounder and visual on the keypad. 38 No: No confirmation chirp from the system external sounders when arming the system. Yes: A Utility Output Expansion Module is installed. The maximum number of Utility Outputs in the system is 6. No: Tones will be used to represent an active alarm. No: A Utility Output expansion module is not installed. The maximum number of Utility Outputs in the system is 3. Installation Manual Location: 059 System Controls 1: (1st Digit): st 1 Digit Loudspeaker/BellSiren Bypass Enable Quick Bypass Quick Arm 0 Bell-Siren No No No 1 Bell-Siren No No Yes 2 Bell-Siren No Yes No 3 Bell-Siren No Yes Yes 4 Bell-Siren Yes No No 5 Default Bell-Siren Yes No Yes 6 Bell-Siren Yes Yes No 7 Bell-Siren Yes Yes Yes 8 Loudspeaker No No No 9 Loudspeaker No No Yes A Loudspeaker No Yes No B Loudspeaker No Yes Yes C Loudspeaker Yes No No D Loudspeaker Yes No Yes E Loudspeaker Yes Yes No F Loudspeaker Yes Yes Yes Silent Panic Location: 059 System Controls 1: (2nd Digit): 2 nd Digit Voice Module UO Extender 0 1 2 Disabled Disabled Disabled No No No Bell Squawk on Arm No No Yes 3 (Default) Disabled No Yes Yes 4 5 6 7 8 9 A B C D E F Disabled Disabled Disabled Disabled Enabled Enabled Enabled Enabled Enabled Enabled Enabled Enabled Yes Yes Yes Yes No No No No Yes Yes Yes Yes No No Yes Yes No No Yes Yes No No Yes Yes No Yes No Yes No Yes No Yes No Yes No Yes Installation Manual No Yes No 39 Location: 060 System Control 2 Default: 11 The location contains two digits: • First digit: Determines the digit corresponding to the choices involving 3minute bypass / IMQ Installation bit / Czech installation bit / UL installation bit. • Second digit: Determines the digit corresponding to the use of Auto arming Pre-Warning / Alarm restore. Comments on System Control 2 (Location 060: 1st Digit) 3 Minute Bypass IMQ Installation Czech installation Yes: All zones will be automatically bypassed for 3 minutes when power is restored to an “unpowered” system. This prevents potential false alarms by allowing time for the stabilization of motion and/or smoke detectors. Yes: Causes the following parameters to function as follows: •An open zone during Auto Arming will activate an alarm and the system will not be armed. •UO Arm Follow (Pulsed or Latched). UO will be activated immediately, regardless of the Exit Delay time. •AC loss report and UO follow AC loss are activated after a delay of 30 minutes. Yes: The ORBIT-14 is installed in accordance with the Czech telephony requirements. No: No bypassing occurs. UL installation Yes: The ORBIT-14 is installed in accordance with UL requirements for a Residential Installation (UL 1641). Operation of the unit’s No: No features are Digital Communicator changed. must be modified to disable features which are inappropriate for UL listed installations. This feature disables the use of Upload/ Download and permits a status display only when remotely accessed. No: •Auto Arming – An open zone during auto-arming will be bypassed and the system will be armed. •UO arm follow (Pulsed or Latched). UO will be activated after the Exit Delay time. •AC loss report and UO follow AC loss will be activated immediately. No: No features are disabled. Comments on System Control 2 (Location 060: 2nd Digit) Arm Pre-Warning Alarm Restore Yes: When the system is Auto Armed, an audible Exit Delay (warning) countdown will commence 4 minutes prior to the automatic arming. During this period, Exit Delay beeps will be heard in the keypads. No: There is no Arm Pre-Warning for the Auto Arming feature. Yes: The system will send an alarm restore after the audible alarm “times out” (BTO=Bell Time Out). No: The system will send an alarm restore when the zone responsible for the alarm returns to its non-violated (secured) state. 40 Installation Manual Location: 060 st 1 Digit 0 st System Controls 2: (1 Digit): UL installation Czech installation No No 1 (Default) 2 3 4 5 6 7 8 9 A B C D E F 2 No No No No Yes No No No No No No Yes Yes Yes Yes Yes Yes Yes Yes No No Yes Yes Yes Yes No No No No Yes Yes Yes Yes Yes Yes No No Yes Yes No No Yes Yes No No Yes Yes No Yes No Yes No Yes No Yes No Yes No Yes No Yes System Controls 2: (2 nd 3 Minute Bypass No nd Location: 060 IMQ Installation Digit Digit): Alarm Restore Auto Arm Pre-Warning 0 BTO No 1 (Default) BTO Yes 2 Zone Restore NO 3 Zone Restore Yes Sub Installer Restriction Level: Location 061 The Sub Installer can be defined with two different authority levels. Each level restricts him from programming different locations in the ORBIT-14. Location: 061 Sub Installer Restriction Level Digit Default: 01 Description Low: The Sub installer is unable to modify the following locations: 000-008, 00 056-058,061 High: Use this option for greater restriction of the sub installer programming 01 (Default) options. The Sub installer is unable to modify the following locations: 000-008, 046-058, 061-161. Installation Manual 41 Communicator Reporting Codes: Locations 062-168 Locations 062 -168 enable you to program the codes that will be transmitted by the ORBIT-14 to the Central Station. To prevent the corresponding event from being reported, use a “double-zero” (00, the default) in the location. Reporting Codes for Alarm Events Location Description Digits Default 062 063 Zone 1 Alarm Reporting code Zone 2 Alarm Reporting code 2 2 00 00 064 065 066 067 068 069 070 Zone 3 Alarm Reporting code Zone 4 Alarm Reporting code Zone 5 Alarm Reporting code Zone 6 Alarm Reporting code Zone 7 Alarm Reporting code Zone 8 Alarm Reporting code Zone 9 Alarm Reporting code 2 2 2 2 2 2 2 00 00 00 00 00 00 00 071 072 073 074 075 076 077 Zone 10 Alarm Reporting code Zone 11 Alarm Reporting code Zone 12 Alarm Reporting code Zone 13 Alarm Reporting code Zone 14 Alarm Reporting code Keypad Fire Alarms Reporting code Keypad Panic Reporting code 2 2 2 2 2 2 2 00 00 00 00 00 00 00 078 079 080 081 082 083 Keypad Special Emergency Reporting code Tamper Alarm in zone 1 / 9 Tamper Alarm in zone 2 / 10 Tamper Alarm in zone 3 / 11 Tamper Alarm in zone 4 / 12 Tamper Alarm in zone 5 / 13 2 2 2 2 2 2 00 00 00 00 00 00 084 085 Tamper Alarm in zone 6 / 14 General tamper alarm (Box / Bell /Keypad) 2 2 00 00 Report Code Restore Codes An ORBIT-14 Restoral Report informs the Central Station that the external sounder’s operation, initially triggered by the respective alarm condition, has either “timed out” or been silenced by the act of system disarming. Be sure to check with Central Station personnel if restorals are permitted and, if so, what codes are required. 42 Installation Manual Reporting Codes for Restore Alarm Events Location Description Digits Default 086 087 Zone 1 Restoral Code Zone 2 Restoral Code 2 2 00 00 088 089 090 091 092 093 Zone 3 Restoral Code Zone 4 Restoral Code Zone 5 Restoral Code Zone 6 Restoral Code Zone 7 Restoral Code Zone 8 Restoral Code 2 2 2 2 2 2 00 00 00 00 00 00 094 095 096 097 098 099 100 Zone 9 Restoral Code Zone 10 Restoral Code Zone 11 Restoral Code Zone 12 Restoral Code Zone 13 Restoral Code Zone 14 Restoral Code Keypad Fire Restoral Code 2 2 2 2 2 2 2 00 00 00 00 00 00 00 101 102 103 104 105 106 107 Keypad Panic Restoral Code Keypad Special Emergency Restoral Code Restore tamper from zones 1 / 9 Restore tamper from zones 2 / 10 Restore tamper from zones 3 / 11 Restore tamper from zones 4 / 12 Restore tamper from zones 5 / 13 2 2 2 2 2 2 2 00 00 00 00 00 00 00 108 109 Restore tamper from zones 6 / 14 General tamper restore (Box / Bell / Keypad) 2 2 00 00 Report Code Other Reporting Codes Location Description 110 111 112 113 114 115 116 117 118 119 Report code used when the system’s periodic central station (CS) test transmission take place User 0 arm (the “Master” Code, “Quick Arm”, “Keyswitch” Arm or Remote arming) User 1 arm Reporting code User 2 arm Reporting code User 3 arm Reporting code User 4 arm Reporting code User 5 arm Reporting code User 6 arm Reporting code User 7 arm Reporting code User 8 arm Reporting code Installation Manual Digits Default 2 00 2 00 2 2 2 2 2 2 2 2 00 00 00 00 00 00 00 00 Report Code 43 Location Description 120 121 122 123 124 125 126 127 128 129 130 131 132 133 134 135 136 137 138 139 140 141 142 143 144 145 146 147 148 149 150 151 152 153 154 44 User 9 arm Reporting code User 10 arm Reporting code User 11 arm Reporting code User 12 arm Reporting code User 13 arm Reporting code User 14 arm Reporting code User 15 arm Reporting code User 16 arm Reporting code User 17 arm Reporting code User 18 arm Reporting code User 19 arm Reporting code Forced arm Reporting code (when the system is armed with a bypassed zone) Group/s arming Reporting code Auto arm reporting code User 0, disarm Reporting code by master code, quick arm, key-switch or remote arming. User 1 disarm Reporting code User 2 disarm Reporting code User 3 disarm Reporting code User 4 disarm Reporting code User 5 disarm Reporting code User 6 disarm Reporting code User 7 disarm Reporting code User 8 disarm Reporting code User 9 disarm Reporting code User 10 disarm Reporting code User 11 disarm Reporting code User 12 disarm Reporting code User 13 disarm Reporting code User 14 disarm Reporting code User 15 disarm Reporting code User 16 disarm Reporting code User 17 disarm Reporting code User 18 disarm Reporting code User 19 disarm Reporting code Duress Disarm Digits Default 2 2 2 2 2 2 2 2 2 2 2 00 00 00 00 00 00 00 00 00 00 00 2 00 2 2 00 00 2 00 2 2 2 2 2 2 2 2 2 2 2 2 2 2 2 2 2 2 2 2 00 00 00 00 00 00 00 00 00 00 00 00 00 00 00 00 00 00 00 00 Report Code Installation Manual Trouble Reports and Restorals Location Description 155 156 157 158 159 160 161 162 163 164 165 166 167 168 Low Battery Reporting code Loss of AC Power (for at least 15 min) Fire zone trouble Bell Loop Interrupted Clock not set Phone line cut Day zone trouble Low Battery restore Loss of AC Power restore Fire zone trouble Restore Bell Loop Restore Clock not set restore Phone line cut Restore Day zone trouble Restore Installation Manual Digits Default 2 2 2 2 2 2 2 2 2 2 2 2 2 2 Report Code 00 00 00 00 00 00 00 00 00 00 00 00 00 00 45 Appendix 1: Installer Programming Worksheet Customer _____________________________________ Address ______________________________________ City _________________ State _________ Zip _______ Customer Phone No: ( ) _________________________ Comments: ___________________________________ Loca- Description tion 000 001 002 Entry Location Description Zone 12: Loop R. + Level Zone 13: Loop R. + Level Zone 14: Loop R. + Level Zone termination + tamper sound Utility Output 1 type Utility Output 2 type Utility Output 3 type Utility Output 4 type Utility Output 5 type Utility Output 6 type Dialler Control 1 Dialler Control 2 MS Pulsed protocol MS Auto protocol U/D Rings Swinger Shut down NA System Control 1 System Control 2 Sub Installer level Zone 1 Alarm Zone 2 Alarm Zone 3 Alarm Zone 4 Alarm Zone 5 Alarm Zone 6 Alarm Zone 7 Alarm Zone 8 Alarm Zone 9 Alarm Zone 10 Alarm Zone 11 Alarm Zone 12 Alarm Zone 13 Alarm Zone 14 Alarm Keypad Fire Alarm Keypad Panic Alarm Keypad Special Alarm Tamper zone 1 / 9 Tamper zone 2 / 10 Tamper zone 3 / 11 Tamper zone 4 / 12 Tamper zone 5 / 13 Default Disable MS LOCK Phone No. CS 1 See below 042 043 044 003 Phone No. CS 2 See below 045 004 005 006 007 008 009 010 011 012 013 014 015 016 017 018 019 020 021 022 023 024 025 026 027 028 029 030 031 032 033 034 035 036 037 038 039 040 041 UD Call back Account No. Access Code Remote ID Code Installer Code 1 Installer Code 2 Master Code Exit Delay Entry Delay Bell Cutoff Time Bell Delay Periodic test time Periodic test interval Zone 1: type + sound Zone 2: type + sound Zone 3: type + sound Zone 4: type + sound Zone 5: type + sound Zone 6: type + sound Zone 7: type + sound Zone 8: type + sound Zone 9: type + sound Zone 10: type + sound Zone 11: type + sound Zone 12: type + sound Zone 13: type + sound Zone 14: type + sound Zone 1: Loop R. + Level Zone 2: Loop R. + Level Zone 3: Loop R. + Level Zone 4: Loop R. + Level Zone 5: Loop R. + Level Zone 6: Loop R. + Level Zone 7: Loop R. + Level Zone 8: Loop R. + Level Zone 9: Loop R. + Level Zone 10: Loop R. + Level Zone 11: Loop R. + Level See below 046 047 048 049 050 051 052 053 054 055 056 057 058 059 060 061 062 063 064 065 066 067 068 069 070 071 072 073 074 075 076 077 078 079 080 081 082 083 46 Central Station Account No: ___________ Date of Installation: __________________ Installer(s): ________________________ Comments: ________________________ __________________________________ Entry Installation Manual Location 084 085 086 087 088 089 090 091 092 093 094 095 096 097 098 099 100 101 102 103 104 105 106 107 108 109 110 111 112 113 114 115 116 117 118 119 120 121 122 123 124 125 126 Description Entry Tamper zone 6 / 14 Tamper Box / Bell / KP Zone 1 Restore Zone 2 Restore Zone 3 Restore Zone 4 Restore Zone 5 Restore Zone 6 Restore Zone 7 Restore Zone 8 Restore Zone 9 Restore Zone 10 Restore Zone 11 Restore Zone 12 Restore Zone 13 Restore Zone 14 Restore Keypad Fire Restore Keypad Panic Restore Keypad Special Restore Tamp. zone 1/ 9 restore Tamp. zone 2/10 restore Tamp. zone 3/11 restore Tamp. zone 4/12 restore Tamp. zone 5/13 restore Tamp. zone 6 /14 restore Tamp. Box /Bell /Keypad restore Periodic Time Test User 0 arm User 1 arm User 2 arm User 3 arm User 4 arm User 5 arm User 6 arm User 7 arm User 8 arm User 9 arm User 10 arm User 11 arm User 12 arm User 13 arm User 14 arm User 15 arm Location Description 02 MS Phone 1 03 MS Phone 2 04 UD Call back Location 127 128 129 130 131 132 133 134 135 136 137 138 139 140 141 142 143 144 145 146 147 148 149 150 151 Description User 16 arm User 17 arm User 18 arm User 19 arm Forced Arm Level arming Auto Arm User 0 Disarm User 1 Disarm User 2 Disarm User 3 Disarm User 4 Disarm User 5 Disarm User 6 Disarm User 7 Disarm User 8 Disarm User 9 Disarm User 10 Disarm User 11 Disarm User 12 Disarm User 13 Disarm User 14 Disarm User 15 Disarm User 16 Disarm User 17 Disarm 152 User 18 Disarm 153 154 155 156 157 158 159 160 161 162 163 164 165 166 166 167 168 User 19 Disarm Duress Disarm Low Battery AC Loss Fire Trouble Bell Loop trouble Clock not set Phone line cut trouble Day zone trouble Low Battery restore AC Loss restore Fire Trouble restore Bell Loop trouble restore Clock not set restore Clock not set restore Phone line cut restore Day zone restore Entry Phone Number (32 Digit max) Installation Manual 47 Appendix 2: Contact ID & SIA Report Codes for Orbit-14 Event Reporting Format Contact ID SIA (Level 1) Zones Alarms/Disarm Program Digit Code Program Digit Code Exit/Entry Alarm Exit/Entry Restore Burglary Zone Alarm Burglary Zone Restore 24 Hour Zone Alarm 01 01 03 03 05 134 134 130 130 133 01 02 03 04 05 BA BH BA BH BA 24 Hour Zone Restore Tamper Zone Alarm Tamper Zone Restore Smoke Zone Alarm/Restore Combustion Zone Alarm/Restore Water Flow Zone Alarm/Restore Heat Zone Alarm 05 07 07 09 1A 11 12 133 137 137 111 112 113 114 06 07 08 BH TA TR 11 12 WA KA Heat Zone Restore Duct Zone Alarm/Restore Flame Zone Alarm/Restore Panic Zone Alarm Restore Silent Alarm Audible Alarm 12 14 15 114 116 117 13 KH 16 17 122 123 Perimeter Zone Alarm/Restore Interior Zone Alarm/Restore Day/Night Zone Alarm/Restore Outdoor Zone Alarm/Restore General Alarm/Restore Sensor Tamper Alarm Sensor Tamper Restore 18 19 2A 21 22 23 23 131 132 135 136 140 144 144 18 NL 23 24 TA TR 24 Hour Non Burg Alarm/Restore Gas Detected Alarm Gas Detected Restore Refrigeration Zone Alarm/Restore Loss of Heat Alarm/Restore Water Leakage Alarm Water Leakage Restore 24 25 25 27 28 29 29 150 151 151 152 153 154 154 25 26 GA GH 29 3A WA WH Foil Break Alarm/Restore Low Battled Gas level Alarm/Restore High Temperature Alarm/Restore 31 32 33 155 157 158 33 DA 48 Installation Manual Event Reporting Zones Alarms/Disarm Contact ID SIA (Level 1) Program Digit Code Program Digit Low Temperature Alarm/Restore 34 159 34 Code DA Loss of Air Flow 35 161 35 DB Special Emergency Key Alarm Special Emergency Key Restore Fire Zone Alarm Fire Zone Restore Fire Key Alarm 4A 4A 42 42 44 100 100 110 110 115 4A 41 42 43 44 MA MH FA FH FA Fire Key Restore Panic Key Alarm Panic Key Restore Duress Alarm Duress Restore 44 46 46 48 48 115 120 120 121 121 45 46 47 48 49 FH PA PH HA HH AC Trouble AC Restore Low Battery Trouble 5A 5A 52 301 301 302 5A 51 52 AT AR YT Low Battery Restore Main Bell Trouble Main Bell Restore Fire Trouble Fire Restore Clock Not Set Clock Set 52 54 54 56 56 00 00 302 321 321 373 373 - 53 54 55 56 57 00 00 YR YA YH FT FJ - Phone Line Trouble Phone Line Restore Day Zone Trouble Day Zone Restore 58 58 5C 5C 351 351 156 156 58 59 5C 5D LT LR UT UJ User Arm User Disarm Quick Arm/Disarm - User 0 Forced Arm Periodic Test 6A 6A 62 63 64 401 401 408 574 602 6A 61 6A 63 64 CL OP CL CF RP Auto Arm 65 403 65 CA Special Troubles O/C Access Installation Manual 49 Appendix 3: Summary of User’s Commands Function System Arming Group Arming System Disarming Duress Disarming Silencing an Alarm Bypassing / Unbypassing a Zone Quick Bypassing Zone Reset Smoke Detector(s) Utility Output Operation Display Troubles Display Memory Setting/Changing a User Code Setting User Authority Level Set Date Set Time Set Auto Arm Time Set Follow-Me Phone No. 1 Set Follow-Me Phone No. 2 Set Follow-Me Phone No. 3 Set Follow-Me Phone No. 4 Erase Follow-Me Phone No. Maintenance: On/Off Buzzer On/Off Door Chime On/Off Audible Kiss-Off Get Event From Event Logger (Only from LCD Keypad) Test System Trouble Table 50 Procedure [User Code] + [Arm] [User Code] + [Stay] + [Group #: 1,2, 3, 0=All Groups] [User Code] [Duress Code] [User Code] [ ✱ ] + [ 1 ] + [User Code ] + [ 2-digit zone number to be bypassed / unbypassed] [ ✱ ] + [ 1 ] + [ 2-digit zone number to be bypassed / unbypassed] [ ✱ ] + [ 2 ] + [User Code ] + [Smoke Output No.] [ ✱ ] + [ 2 ] + [User Code ] + [ Utility Output No. ] [✱]+[3] [✱]+[4] [ ✱ ] + [ 5 ] + [1] + [Master Code] + [ 2-digit User No. to be set/changed] + [New Code] [ ✱ ] + [ 5 ] + [2] + [Master Code] + [2-digit User Number to be set/changed] + [Authority Level No.] 0 = User, 1 = User Un-Bypass, 2 = Maid, 3 = Service [ ✱ ] + [ 6 ] + [ 1 ] + [Master Code] + [MM] [DD] [YY] [ ✱ ] + [ 6 ] + [ 2 ] + [Master Code] + [HH] [MM] [ ✱ ] + [ 6 ] + [ 3 ] + [Master Code] + [HH] [MM] [ ✱ ] + [ 7 ] + [ 1 ] + [Master Code] + Phone No. + [#] [ ✱ ] + [ 7 ] + [ 2 ] + [Master Code] + Phone No. + [#] [ ✱ ] + [ 7 ] + [ 3 ] + [Master Code] + Phone No. + [#] [ ✱ ] + [ 7 ] + [ 4 ] + [Master Code] + Phone No. + [#] [ ✱ ] + [ 7 ] + [ 1 / 2 / 3 / 4 ] + [Master Code] + [#] [ ✱ ] + [ 8 ] + [Master Code] + [ 1 ] [ ✱ ] + [ 8 ] + [Master Code] + [ 2 ] [ ✱ ] + [ 8 ] + [Master Code] + [ 3 ] [ ✱ ] + [ 9 ] + [Master Code] [ ✱ ] + [ 0 ] + [Master Code] LED 1 2 3 4 5 6 7 8 Trouble Low Battery AC Power Loss Clock Not Set Communication Trouble Bell Loop Trouble Phone line cut General Tamper (Bell/ Box/ Keypad) Day Zone Trouble Installation Manual Notes Notes Rokonet Limited Warranty Rokonet Electronics, Ltd. and its subsidiaries and affiliates ("Seller") warrants its products to be free from defects in materials and workmanship under normal use for 12 months from the date of production. Because Seller does not install or connect the product and because the product may be used in conjunction with products not manufactured by the Seller, Seller cannot guarantee the performance of the security system which uses this product. Seller's obligation and liability under this warranty is expressly limited to repairing and replacing, at Seller's option, within a reasonable time after the date of delivery, any product not meeting the specifications. Seller makes no other warranty, expressed or implied, and makes no warranty of merchantability or of fitness for any particular purpose. In no case shall seller be liable for any consequential or incidental damages for breach of this or any other warranty, expressed or implied, or upon any other basis of liability whatsoever. Seller's obligation under this warranty shall not include any transportation charges or costs of installation or any liability for direct, indirect, or consequential damages or delay. Seller does not represent that its product may not be compromised or circumvented; that the product will prevent any persona; injury or property loss by burglary, robbery, fire or otherwise; or that the product will in all cases provide adequate warning or protection. Buyer understands that a properly installed and maintained alarm may only reduce the risk of burglary, robbery or fire without warning, but is not insurance or a guaranty that such will not occur or that there will be no personal injury or property loss as a result. Consequently seller shall have no liability for any personal injury, property damage or loss based on a claim that the product fails to give warning. However, if seller is held liable, whether directly or indirectly, for any loss or damage arising from under this limited warranty or otherwise, regardless of cause or origin, sellers maximum liability shall not exceed the purchase price of the product, which shall be complete and exclusive remedy against seller. No employee or representative of Seller is authorized to change this warranty in any way or grant any other warranty. WARNING: This product should be tested at least once a week. Contacting Rokonet Rokonet Electronics Ltd. is committed to customer service and product support. You can contact us through our website (www.rokonet.com) or at the following telephone and fax numbers: USA Tel: +1 (305) 592-3820 Fax: +1 (305) 592-3825 United Kingdom Tel: +44 (1527) 576-765 Fax: +44 (1527) 576-816 Italy Tel: +39 (02) 392-5354 Fax: +39 (02) 392-5131 Israel Tel: +972 (3) 9616555 Fax: +972 (3) 9616584 Brazil Tel: +55 (21) 2496-3544 Fax: +55 (21) 2496-3547 Thailand Tel: +66 (0) 38723736 Mob: 06 8361823 Fax: +66 (0) 38723736 © ROKONET ELECTRONICS LTD. 04/03 5IN214IM