1
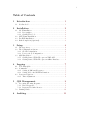
Galosh User’s Manual
Michael Clarke
Copyright (C) 2010, 2011, 2012 Michael Clarke.
i
Table of Contents
1
Introduction . . . . . . . . . . . . . . . . . . . . . . . . . . . . . . . . . . . . . 1
1.1
2
Get Involved! . . . . . . . . . . . . . . . . . . . . . . . . . . . . . . . . . . . . . . . . . . . . . . . . . . 1
Installation . . . . . . . . . . . . . . . . . . . . . . . . . . . . . . . . . . . . . . 2
2.1
OS X Installation . . . . . . . . . . . . . . . . . . . . . . . . . . . . . . . . . . . . . . . . . . . . . .
2.1.1 Prerequisites . . . . . . . . . . . . . . . . . . . . . . . . . . . . . . . . . . . . . . . . . . . . . .
2.1.2 Getting The Code . . . . . . . . . . . . . . . . . . . . . . . . . . . . . . . . . . . . . . . . .
2.2 GNU/Linux Installation . . . . . . . . . . . . . . . . . . . . . . . . . . . . . . . . . . . . . . . .
2.3 FreeBSD Installation . . . . . . . . . . . . . . . . . . . . . . . . . . . . . . . . . . . . . . . . . . .
2.4 Bash Completion (Optional). . . . . . . . . . . . . . . . . . . . . . . . . . . . . . . . . . . .
3
Setup . . . . . . . . . . . . . . . . . . . . . . . . . . . . . . . . . . . . . . . . . . . . 4
3.1
3.2
The Repository . . . . . . . . . . . . . . . . . . . . . . . . . . . . . . . . . . . . . . . . . . . . . . . .
The Configuration System . . . . . . . . . . . . . . . . . . . . . . . . . . . . . . . . . . . . . .
3.2.1 Global Configuration . . . . . . . . . . . . . . . . . . . . . . . . . . . . . . . . . . . . . .
3.2.2 Per-repository Configuration . . . . . . . . . . . . . . . . . . . . . . . . . . . . . . .
3.3 QRZ Integration . . . . . . . . . . . . . . . . . . . . . . . . . . . . . . . . . . . . . . . . . . . . . . .
3.3.1 Getting Started With The qrz.com XML API . . . . . . . . . . . . . .
3.3.2 Getting Started With The qrz.com Offline Database . . . . . . .
4
4
4
4
5
5
5
6
Logging . . . . . . . . . . . . . . . . . . . . . . . . . . . . . . . . . . . . . . . . . . 7
4.1
4.2
Your First QSO . . . . . . . . . . . . . . . . . . . . . . . . . . . . . . . . . . . . . . . . . . . . . . . .
Commands . . . . . . . . . . . . . . . . . . . . . . . . . . . . . . . . . . . . . . . . . . . . . . . . . . . . .
4.2.1 Setting A Different Frequency . . . . . . . . . . . . . . . . . . . . . . . . . . . . .
4.2.2 Setting Mode And IOTA Information . . . . . . . . . . . . . . . . . . . . . .
4.3 Lesser-used Options . . . . . . . . . . . . . . . . . . . . . . . . . . . . . . . . . . . . . . . . . . . .
4.3.1 Time Adjustment . . . . . . . . . . . . . . . . . . . . . . . . . . . . . . . . . . . . . . . . .
5
2
2
2
2
2
2
7
7
7
7
8
8
QSL Management. . . . . . . . . . . . . . . . . . . . . . . . . . . . . . . 9
5.1
Processing Incoming Requests . . . . . . . . . . . . . . . . . . . . . . . . . . . . . . . . . . 9
5.1.1 Direct Requests . . . . . . . . . . . . . . . . . . . . . . . . . . . . . . . . . . . . . . . . . . . 9
5.1.2 Requests Via Other Routes . . . . . . . . . . . . . . . . . . . . . . . . . . . . . . . . 9
5.2 Printing Cards . . . . . . . . . . . . . . . . . . . . . . . . . . . . . . . . . . . . . . . . . . . . . . . . 10
6
Auditing. . . . . . . . . . . . . . . . . . . . . . . . . . . . . . . . . . . . . . . . 11
Chapter 1: Introduction
1
1 Introduction
Galosh is a suite of related utilities to ease the lives of amateur radio operators. Currently,
Galosh provides applications to manage your log and deal with the QSLing process. As
time goes on, the suite will be expanded to support an increasing range of activities within
the hobby.
Galosh has a strong focus on efficient offline operation, and is aimed at users who are
comfortable with, and prefer to work using, the command-line. The suite is designed to
be user-modifiable at every level, and you are encouraged to tinker and make Galosh do
what you want. The full source-code is, of course, available, but beyond that, individual
applications offer a hook system called mixins. This allows you to attach your own code to
applications and modify their behaviour.
1.1 Get Involved!
Want to get involved? Galosh is mostly written in Common Lisp, with a bit of Perl
in places. Code, documentation, and some graphical design work are all required,
as are suggestions of different use-cases. To get started, fork the project on Github
(http://github.com/clarkema/galosh), where you can also open issues or feature
requests. Alternatively, e-mail the author at [email protected].
Chapter 2: Installation
2
2 Installation
At this stage in its development, Galosh is not intended to be installed as such, but run
directly from a git checkout.
2.1 OS X Installation
2.1.1 Prerequisites
1. Xcode (Apple’s developer tools). Install from the App Store.
2. Homebrew, from http://mxcl.github.com/homebrew/
2.1.2 Getting The Code
Once the prerequisites are in place, open a Terminal window, make a new directory for
Galosh, and use git to get a copy of the Galosh code. Once you have downloaded the code,
run Galosh’s setup script to install all of its other dependencies.
$
$
$
$
$
mkdir $HOME/git
cd $HOME/git
git clone git://github.com/clarkema/galosh.git
cd galosh
./setup
Now the dependencies are installed, ensure that the main galosh script is in your PATH.
You can do this either by adding ‘$HOME/git/galosh’ to your PATH, or by symlinking the
galosh command into a directory that is already in your PATH.
Finally, Galosh makes use of various sources of data from the Internet. Once galosh is in
your PATH, the final step is to download the most recent versions of these data:1
$ galosh update
2.2 GNU/Linux Installation
TODO
2.3 FreeBSD Installation
TODO
2.4 Bash Completion (Optional)
Adding Bash completion support is fully optional, but offers you the convenience of being
able to tab-complete Galosh command-names and options within your shell. For example,
with completion enabled, you can simply type galosh and press tab twice to get a list of
all available Galosh commands.
Galosh provides a Bash completion file in ‘contrib/galosh-bash-completion’. To have
completion work for you, this file needs to be sourced, one way or another, when bash
starts. There are many ways of achieving this. One possibility is to make a directory such
1
This includes things like entity resolution data from Club Log, and is saved under $HOME/.galosh
Chapter 2: Installation
3
as ‘$HOME/local/etc/bash_completion.d’ to hold your personal Bash completion files,
and then add something like this to your ‘.bashrc’:
#####################
# Enable completion if possible
#####################
if [ -f /etc/bash_completion ]; then
. /etc/bash_completion
LOCAL_COMPLETION_DIR=$HOME/local/etc/bash_completion.d
if [ -d $LOCAL_COMPLETION_DIR -a -r $LOCAL_COMPLETION_DIR -a \
-x $LOCAL_COMPLETION_DIR ]; then
for i in $LOCAL_COMPLETION_DIR/*; do
[[ ${i##*/} != @(*~|*.bak|*.swp|\#*\#|*.dpkg*|.rpm*) ]] &&
[ \( -f $i -o -h $i \) -a -r $i ] && . $i
done
fi
unset LOCAL_COMPLETION_DIR
unset i
fi
With this in place, symlink ‘contrib/galosh-bash-completion’ into
‘$HOME/local/etc/bash_completion.d’. Next time you restart your shell, you should have
completion of galosh commands.
Chapter 3: Setup
4
3 Setup
Galosh is designed to be as flexible as possible and is configurable on many levels. Unfortunately, the cost of this rich configurability is that is can sometimes be difficult to know
where and how to make changes. This chapter gives an overview of Galosh’s configuration
options and then walks you through the process of getting up and running with a basic
setup.
3.1 The Repository
Galosh is a suite of separate but related commands. As such, many of the Galosh commands
might need access to shared data; from configuration up to your full QSO log. However,
you might well want to maintain multiple logs for different purposes; perhaps an ‘everyday’
log and a ‘contest’ log, or a distinct log for a special event station. It would be inconvenient
if dealing with different logs, different rigs, or different configuration for any other purpose
entailed passing explicit details to every Galosh command you wanted to run. To avoid
this, Galosh uses the concept of repositories, in a similar fashion to version control systems
like git, upon which Galosh is in many ways modelled.
Most uses of Galosh require you to be in a repository.
A repository is nothing more than a special directory in the file system that contains configuration files, your log, and other related information. To create one, simply create a new
directory, change into it, and run galosh init.
$ mkdir log
$ cd log
$ galosh init
We can explore the new repository with tree:
$ tree -a
.
‘-- .galosh
|-- config
|-- log.db
‘-- tmp
‘.galosh/log.db’ is the new (currently empty) SQLite database which will contain your
logs. ‘.galosh/tmp’ is used for temporary files created in the course of running various
commands such as galosh journal, and can be ignored. Finally, ‘.galosh/config’ is the
configuration file for this repository.
3.2 The Configuration System
3.2.1 Global Configuration
Galosh will read its global configuration from ‘$HOME/.galosh/config’. Any configuration
options that you would like to apply to all (or nearly all) of your repositories, such as your
callsign, you should set in this file. The configuration file uses an INI-style format, with
section headers in square brackets on a line of their own. Options are specified one per line,
with an equals sign between the name and value, and no whitespace at the start of the line.
To start with, edit your global configuration file to specify your name and call.
Chapter 3: Setup
5
[user]
name = Mike Clarke
call = VP8DMH
Configuration options are often referred to in the rest of the documentation in dotted form.
An option written in dotted form is written on a single line, with a period between the
section and option names. For example, we might refer to the call option above by saying
“Set user.call to your callsign.”
3.2.2 Per-repository Configuration
Notice I said above that you should use the global configuration file for any options that
you would like to apply to nearly all of your repositories. Each repository also has its own
configuration file at ‘.galosh/config’. This file follows exactly the same format as the
global file and allows you to override individual options on a per-repository basis.
3.3 QRZ Integration
Galosh includes several facilities to help you discover more about the stations you’re working.
This aids in accurate logging, as well as helping you spot stations that are useful for awards
you’re working towards, and being of general interest.
All of the current lookup features rely on callsign data from qrz.com. qrz.com offers two
forms of access to its database: an XML API for online lookup, and a downloadable database
for offline searches. Each has advantages and disadvantages.
The online lookup is always up-to-date with the latest data, and offers far more information
than the offline database. However, if you don’t have the luxury of an always-on Internet
connection, it’s of no use. Even if you do have an always-on connection, a high latency
connection such as a satellite link can introduce an unacceptable delay into the lookup
process.
The offline database requires you to download data files from qrz.com and import them
using galosh import-qrz-db, but once the data are imported you can perform lookups
much more quickly, and without an Internet connection. The disadvantage is that the
offline database provides far less information for each callsign; essentially just name and
postal address, along with some license metadata. In particular, the offline database doesn’t
contain location (latitude and longitude, or grid) or IOTA information.
Galosh supports both qrz.com’s XML API and its downloadable database. To get started
with either of these, you’ll need a subscription from qrz.com.
3.3.1 Getting Started With The qrz.com XML API
If you don’t already have an XML subscriber account with qrz.com, go to http://www.
qrz.com/XML/index.html and sign up. Once you have your username and password, you’ll
need to configure Galosh (see Section 3.2 [Configuration], page 4). Add the following to
your configuration file:
[qrz]
user = yourcall
password = yourpassword
Once Galosh is configured with your account details, perform a test QRZ lookup from the
command-line:
Chapter 3: Setup
6
$ galosh qrz vp8dmh
CLARKE, Mike
Rothera Research Station
Adelaide Island
ANTARCTICA
Lat/Long: -67.566667 -68.133333
Grid: FC52wk
IOTA: AN-001
QSL Via: VIA G0VGS
QSL Methods: eQSL
3.3.2 Getting Started With The qrz.com Offline Database
If you don’t already have a database download account with qrz.com, go to http://www.
qrz.com/pd/ and sign up. Once you’ve signed up, download and unpack the archive described as ‘Single database file callbkc.dat, with index - sorted by callsign’. In the unpacked
files, you should see ‘callbkc.dat’ and ‘country.dat’. These contain the raw callsign and
country data. For them to be useful to Galosh they must first be imported, using galosh
import-qrz-db.
$ galosh import-qrz-db callbkc.dat country.dat
Once the import is complete, perform a test QRZ lookup from the command-line:
$ galosh qrz --offline vp8dmh
CLARKE, Mike
Rothera Research Station
Adelaide Island
ANTARCTICA
As can clearly be seen from the output, less information is available when running offline.
However, comparing online and offline lookups under time demonstrates another difference:
$ time galosh qrz vp8dmh > /dev/null
real
user
sys
0m6.816s
0m0.660s
0m0.788s
$ time galosh qrz --offline vp8dmh > /dev/null
real
user
sys
0m1.237s
0m0.552s
0m0.556s
On the satellite connection I was using when I wrote this, there is a 5.5-second difference
in response time.
Chapter 4: Logging
7
4 Logging
QSO logging under Galosh is provided by the log command. Once you have initialized
a repository with galosh init, QSO logging under Galosh is intended to be as fast as
possible; allowing efficient logging under busy run conditions while also offering sufficient
flexibility to allow the operator to enter additional information for a QSO as required.
4.1 Your First QSO
To get started, run galosh log within your repository directory. Once the logger has started
simply type in a callsign and hit ENTER twice. A QSO will be added to the log using all of
the default information: 59 both ways on 14260kHz.
Normally, anything you type in the logger is taken as the start of a log entry. The first
word is taken as the callsign you are logging, and is automatically converted to upper-case
as you type. The second and third words are optional and represent the received and sent
signal reports respectively. A mode-specific default is used if they are omitted. If only a
single digit is entered for either signal report it is taken as ‘5x’ in phone modes or ‘5x9’ in
tone modes.
Examples
M0PRL
M0PRL 4 1
M0PRL 23
M0PRL 46 32
59
54
23
46
both ways in phone modes; 599 in tone modes.
by 59, or 549 by 599.
by 59
by 32
4.2 Commands
If you start a new entry with a colon, your entry will be interpreted as a command rather
than a log entry. Command mode allows you to set information such as your frequency and
mode, and to quit the application.
4.2.1 Setting A Different Frequency
Galosh does not currently get frequency information directly from your radio; when you
want to log on a new frequency, you must tell the logger manually. To do this, type:
:set qrg 7125.5
Note that the frequency is in kHz. You can also set the TX and RX frequencies individually
if you are working split:
:set qrg-tx 14260
:set qrg-rx 14265
4.2.2 Setting Mode And IOTA Information
Mode and IOTA information can be changed in much the same way as the frequency:
:set mode SSB
:set mode CW
:set iota AN-001
Chapter 4: Logging
8
4.3 Lesser-used Options
4.3.1 Time Adjustment
Galosh will log using your computer’s idea of UTC. Should this be wrong, ideally it should be
corrected at the operating system level. However, in some cases that might not be possible,
and so Galosh provides the core.time_fudge option. This allows you to specify an integer
number of seconds to be added to the operating system’s idea of UTC. For example, to log
a time of 3 hours earlier than would otherwise be the case set core.time_fudge to -10800.
Chapter 5: QSL Management
9
5 QSL Management
Making and logging QSOs is all very well, but it’s only really the first half of the story.
Whether you are working towards DXCC, have an interest in islands or have just returned
from your latest expedition; the next stage is dealing with QSL cards.
In this chapter we will consider various facets of QSL management, and how to deal with
them using Galosh’s qsl command.
5.1 Processing Incoming Requests
So you’ve just returned from your latest exotic destination. The airline has finally found
your luggage, and you’ve unpacked and are facing the twin realities of going back to work
and being deluged beneath a flood of incoming QSL cards. In fact, the first batch have
already arrived...
5.1.1 Direct Requests
We’ll start by dealing with direct requests.
Run galosh qsl within your repository directory. As you start typing a callsign, Galosh
will show possible completions at the top of the screen. Once you have typed the full
callsign, hit Enter and you will be presented with a list of QSOs made with that station,
most recent first. Select a QSO by typing the number in the first column and hitting enter
again.
You should now be looking at the QSO detail screen. This screen displays the basic QSO
details at the top and QSL tracking information at the bottom. The middle section contains
information useful for award-tracking. The first column in the middle section is information
about your station; copied into the log from your configuration at the time of the QSO.
The second column contains the same information for the other station; generally this will
just be the DXCC entity calculated from the other station’s callsign along with any other
information you entered at the time of the QSO. If you have set up qrz.com XML API
access (see Section 3.3.1 [Getting Started With The qrz.com XML API], page 5) there will
be a third column showing information about the other station downloaded from qrz.com.
Assuming the QSL request is good, you can now process it in just a few keystrokes. Hit r to
record that you have received a direct QSL for this contact, and t to record that you have
queued a card to be sent. v will merge details about the other station from the qrz.com
column into the local database. a combines the effects of r, t, and v.
Once you’ve processed the card, hit Esc to move back through the list of contacts and start
again with the next card.
At the end of your QSLing session you will have accumulated a list of QSOs in the database
which are marked as “QSL queued for sending”; i.e., you have prepared a QSL card for
the contact but have not yet posted it. Once you have posted the batch of cards, run
galosh qsl mark-sent to tell Galosh that you have actually sent the cards.
5.1.2 Requests Via Other Routes
galosh qsl shows the current QSL route at the top-left of the screen: the default is ‘D’ for
direct. Generally it’s anticipated that incoming cards will be dealt with in batches from a
single source; so you’ll have a batch of direct cards, or a batch of cards from the bureau,
Chapter 5: QSL Management
10
etc. With that in mind, you can specify the route to use for a particular QSLing session
with the ‘--route’ command-line option. This option accepts ‘D’ for direct, ‘B’ for bureau,
‘E’ for electronic, or ‘M’ for manager.
You can also change the current route from within galosh qsl by entering :set route FOO,
where FOO is one of D, B, E, or M.
5.2 Printing Cards
The functionality in this section depends on you having a working TeX Live installation.
The Galosh setup script does not install TeX Live automatically, as it is large, complex, and
not everyone will need it. To install it yourself, visit http://www.tug.org/texlive and
follow the instructions there. Once you have got to the stage of being able to run pdflatex,
you’re ready to proceed.
Chapter 6: Auditing
11
6 Auditing
A complete and accurate log is invaluable when applying for awards. Running galosh
audit regularly can help you complete missing information as well as identify and correct
inconsistencies as you go along. This in turn can help you avoid the situation of chasing
that final state for WAS when you unknowingly worked a station there years ago...
To get started, simply run galosh audit within your repository. It will scan your log for
problems and print a note for each; but won’t actually make any changes to your log. To
have galosh audit automatically fix everything that it can, pass it the ‘--commit’ option.
For full details of everything that galosh audit checks for, see its manpage.