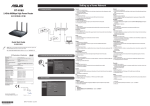
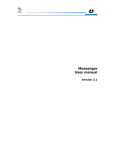
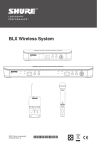
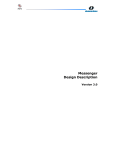
1
PSZ 19:16 (Pind. 1/07)
UNIVERSITI TEKNOLOGI MALAYSIA
DECLARATION OF THESIS / UNDERGRADUATE PROJECT PAPER AND
COPYRIGHT
Author’s full name :
ABDUL HANNAN BIN MOHD ZAHID
Date of birth
:
OCTOBER 28TH 1988
Title
:
MULTIPLE SENSED DEVICE FOR DEAF PEOPLE
Academic Session :
2011/2012
I declare that this thesis is classified as :
CONFIDENTIAL
(Contains confidential information under the
Official Secret Act 1972)*
RESTRICTED
(Contains restricted information as specified by
the organisation where research was done)*
OPEN ACCESS
I agree that my thesis to be published as online
open access (full text)
I acknowledged that Universiti Teknologi Malaysia reserves the right as follows:
1. The thesis is the property of Universiti Teknologi Malaysia.
2. The Library of Universiti Teknologi Malaysia has the right to make copies
for the purpose of research only.
3. The Library has the right to make copies of the thesis for academic
exchange.
Certified by :
SIGNATURE
881028-56-6421
(NEW IC NO. /PASSPORT NO.)
Date : 29th JUNE 2012
NOTES :
*
SIGNATURE OF SUPERVISOR
EN. MOHAMAD SHUKRI BIN ABDUL MANAF
NAME OF SUPERVISOR
Date : 29th JUNE 2012
If the thesis is CONFIDENTIAL or RESTRICTED, please attach with the
letter from the organisation with period and reasons for
confidentiality or restriction.
ii
“I hereby declare that I have read this thesis and in my opinion this thesis
is sufficient in term of scope and quality for award of the degree of
Bachelor of Engineering (Electrical – Control and Instrumentation)”
Signature:
Name of supervisor: Encik Mohamad Shukri bin Abdul Manaf
Date:
iii
MULTIPLE SENSED DEVICE FOR DEAF PEOPLE
ABDUL HANNAN BIN MOHD ZAHID
A thesis submitted in fulfillment of the requirement for
the award of the degree of Bachelor of Engineering
(Electrical – Control and Instrumentation)
Faculty of Electrical Engineering
Universiti Teknologi Malaysia
JUNE2012
iv
I declare that this thesis entitled “ Multiple Sensed Device for Deaf People” is the
result of my own research except as cite in the reference. The thesis has not been
accepted for any degree and is not currently submitted in candidature of any degree.
Signature
:
Name
: ABDUL HANNAN MOHD ZAHID
Date
:
v
Specially dedicate to
My beloved family, lecturers and friends who have guided and inspired me through
my journey of education. Also to thank their support, beliefs and motivation.
vi
ACKNOWLEDGEMENT
I would like to take this opportunity to express my greatest appreciation to
my supervisor of this project, En Mohamad Shukri bin Abdul Manaf. I would like to
thank him for his supervision, guidance and support during this project. Besides that,
I would also like to thank my parents and family for giving me their support and
encouragement throughout this project. Last but not least, also to my friends and
those that have given me their support directly or indirectly.
vii
ABSTRACT
A new method to help people with hearing problem to notify some of the
changes in their surrounding by using sensors placed on certain area that will trigger
a device attached to the person’s body. In this project we are using multiple sensors
placed on certain spots in an area in order to detect any changes. For example the
entrance door, a condenser microphone is attached to the door to detect knocks on
the door. These knocks will trigger the RF transmitter. An RF receiver in the
receiving device that is attached to the user will trigger a motor and vibrates hence
alerting the user about the knocks. As a conclusion, the device can be an alternative
for people with hearing impair to notice any changes that occur at allocated spots in
an area.
viii
ABSTRAK
Satu kaedah baru untuk membantu individu yang mempunyai masalah
pendengaran untuk mendengar perubahan yang berlaku di sekeliling mereka dengan
menggunakan beberapa sensor yang diletakkan di kawasan tertentu yang akan
mengaktifkan satu peranti yang melekat pada badan pengguna. Projek ini akan
menggunakan pelbagai sensor yang diletakkan pada tempat-tempat tertentu di
sesuatu kawasan untuk mengesan sebarang perubahan. Sebagai contoh pintu dia
mana satu mikrofon akan dilekatkan pada pintu untuk mengesan ketuakan pada
pintu. Ketukan ini akan mengaktifkan pemancar RF. Penerima RF dalam peranti
penerima yang berada di badan pengguna akan mengaktifkan motor dan
menghasilkan getaran yang seterusnya akan memberi istarat kepada pengguna
bahawa ada ketukan di pintu. Sebagai kesimpulan, peranti ini boleh menjadi satu
alternatif bagi individu yang mempunyai masalah pendengeran untuk lebih peka
dengan apa-apa perubahan yang berlaku di tempat-tempat yang diperuntukkan dalam
sesuatu kawasan.
ix
TABLE OF CONTENTS
CHAPTER
1
2
TITLE
PAGE
DECLARATION
iv
DEDICATION
v
ACKNOWLEDGEMENTS
vi
ABSTRACT
vii
ABSTRAK
viii
TABLE OF CONTENTS
ix
LIST OF TABLES
xii
LIST OF FIGURES
xiii
LIST OF SYMBOLS AND ABBREVIATIONS
xv
INTRODUCTION
1
1.1
Project Background
1
1.1.1
Deaf People
1
1.1.2
Deaf People’s Alertness
1
1.2
Problem Statement
2
1.3
Project Objectives
2
1.4
Project Scope
2
1.5
Aim of This Report
3
LITERATURE REVIEW
4
x
2.1
Current Reliable Product to Help Deaf People
4
2.1.1
Hearing Aid
4
2.1.1.1
The Application of Hearing Aid
4
2.1.1.2
Styles of Hearing Aids
5
2.1.1.2.1
Behind-the-ear (BTE)
6
2.1.1.2.2
In-the-ear (ITE)
6
2.1.1.2.3
Canal
7
2.1.2
3
Sonic Boom Alarm Clock (Model SB1000ss)
8
2.1.2.1
Overview SB100ss
8
2.1.2.2
Setting up the SB1000ss
9
2.1.2.3
Feature
9
2.1.2.4
Using the Alarm
10
RESEARCH METHODOLOGY
12
3.1
Concept of this project
12
3.2
Flow Chart
13
3.2.1
Hardware development
14
3.2.1.1
Hardware structure
14
3.2.1.1.1
Triggering circuits
14
3.2.1.1.2
Receiver device
16
3.2.1.2
Electronic components
17
3.2.1.2.1
17
Triggering circuits
3.2.1.2.1.1
RF transmitter
17
3.2.1.2.1.2
BC140 transistor
18
3.2.1.2.1.3
Encoder PT2262
18
3.2.1.2.1.4
Condenser
20
Microphone
3.2.1.2.2
Receiver device
20
3.2.1.2.2.1
RF receiver
20
3.2.1.2.2.2
Decoder PT2272-L4
21
3.2.1.2.2.3
Imbalance rotor DC
23
motor
xi
3.2.2
4
5
Calibration and troubleshoot
23
3.2.2.1
Calibration
23
3.2.2.2
Troubleshoot
24
RESULT AND DISCUSSION
25
4.1
Microphone sensitivity
25
4.2
Volume input
27
4.3
Outputs
28
4.3.1
LED indicators
28
4.3.2
Vibrator
29
CONCLUSION
30
5.1
Conclusion
30
5.2
Weaknesses of project
31
5.3
Suggestions for future improvement
31
REFERENCES
33
APPENDICES
APPENDIX A
34
APPENDIX B
35
xii
LIST OF TABLES
TABLES NO.
TITLE
PAGE
3-1
RF module specifications data
17
3-2
PT2262 pin description
18
3-3
Technical specifications of RF_RX_315
20
3-4
Pin description of decoder PT2272-L4
21
4-1
Output of the vibrator for each condition
28
A-1
FYP 1 Gant Chart
34
A-2
FYP 2 Gant Chart
34
xiii
LIST OF FIGURES
FIGURES NO.
2.1
TITLE
Two types of BTE style hearing aid (a) Classic
PAGE
6
BTE (b) “Mini” BTE
2.2
In-the-ear
6
2.3
Two types of canal style hearing aid (a) In-the-
7
canal (ITC) (b) Completely-in-canal (CIC)
2.4
The Sonic Boom Alarm Clock Model SB1000ss
8
2.5
Setting up the SB1000ss
9
2.6
Super Shaker™ Bed Vibrator - SS12VW
10
3.1
Multiple Sensed Device for Deaf People in action
11
3.2
Work Flow Chart
12
3.3
Triggering circuit using microphone
14
3.4
Triggering circuit using 3.5mm male audio jack
14
3.5
Triggering circuit using simple push button
14
3.6
Receiver device that will be attached to the user’s
15
body
3.7
Completed receiver device
15
3.8
The RF_TX_315MHz Type2 RF transmitter.
16
3.9
The BC140 transistor
17
3.10
(a) The PT2262 (b) The pin configuration
18
3.11
Condenser Microphone
19
3.12
The RF_RX_315Mhz
19
3.13
(a) PT2272-L4 (b) Pin configuration
20
3.14
Small imbalance rotor DC motor
22
4.1
Schematic circuit used on triggering circuit with
25
xiv
microphone
4.2
(a) How the triggering circuit with microphone is
25
attached on surface (b) Placement of the
microphone
4.3
Triggering circuit with microphone in action. (a)
(b) Placement of the mi
26
Knocking on the surface the microphone is
attached. (b) LED turns from OFF to ON when
triggered by knocks
4.4
Schematic circuit used on triggering circuit with
26
3.5mm male audio jack
4.5
Connecting the triggering circuit with 3.5mm male
27
audio jack to an electronic device
4.6
LED turns from OFF to ON when triggered by
27
electrical signal from the audio output of device
4.7
LED indicators lit up according to which
28
triggering circuit is sending signal. From left,
triggering circuit with microphone, triggering
circuit with 3.5mm male audio jack, and simple
push button
4.8
(a) Vibrator at OFF (b) Vibrator at ON
28
B.1
Connection for PT2272-L4
35
B.2
Connection for PT2262
35
xv
LIST OF SYMBOLS AND ABBREVIATIONS
BTE
Behind-the-ear
CIC
Completely-in-canal
DC
Direct Current
Hz
Hertz
ITC
In-the-canal
ITE
In-the-ear
LED
Light Emitting Diode
Mic
Microphone
RF
Radio Frequency
CHAPTER 1
INTRODUCTION
1.1
1.1.1
Project Background
Deaf People
The term Deaf with the capital “D” and deaf brings two different meaning.
The term Deaf with the capital “D” refers to the community or culture of the deaf
people while the term deaf refers to the symptom itself where deaf can be define as
audiologic lack of hearing[1].
The membership of the deaf people community is not entirely populated by a
deaf person. A person with normal hearing may have the membership. This may be
due to they are the children of a deaf person and they learn the sign language as one
of their primary language since a child. A deaf person also may not have the
membership of a deaf community due to them still communicating verbally.
1.1.2
Deaf People’s Alertness
Due to the lack of hearing ability, deaf people are less aware of the changes
in their surrounding that they can’t see such as the ringing of a door bell and phones.
To make up for this disadvantage that they are having, this project of inventing a
2
multiple sensed device for deaf people will take advantage of their skin and touch
receptor to sense vibration that will trigger on these sounds or changes that will be
detected by sensors.
1.2
Problem Statement
In this modern world we are living, few ways have been invented to help deaf
people to overcome their hearing weakness. Even though there are already several
reliable devices to help them, these devices still have their own weaknesses such as
the hearing aid can’t solve all level of deafness and some found it uncomfortable to
wear.
1.3
Project Objectives
There are several objectives for this project, which are:
1) To create a device that has multiple sensors placed around an area.
2) To assist deaf people using this device to gain more awareness of their
surroundings.
1.4
Project Scope
1) In the designing process, three parts will be focused on:
i) The sensors.
ii) Transmitting the signal from the sensors to the receiving device.
iii) The receiving device that will alert the user upon receiving signal from
the sensors.
2) Will be focusing on implementing only three inputs.
i) Temperature sensor
3
ii) Sound sensor
3) The device will be created to work in a small area such as a room.
1.5
Aim of This Report
The aim of this report is to make the reader understands the purpose of this
project, how it will be achieved and how it will help improve everyday lives of deaf
people.
CHAPTER 2
LITERATURE REVIEW
In this chapter the review of other product that has been used to help deaf
people today is covered in order to give an understanding to reader on how deafness
can be overcome with the help of electronic devices.
2.1
2.1.1
Current Reliable Product to Help Deaf People
Hearing Aid
A hearing aid is a small electronic device that has three basic parts; the
microphone, amplifier, and speaker. The hearing aid basically helps a deaf people by
making sounds louder for the deaf person.
2.1.1.1 The Application of Hearing Aid
The three basic parts of hearing aid has their own important role in order to
help the deaf person. Hearing loss is caused by the lack of functioning small sensory
cells in the inner ear called hair cells. The more hair cells damaged in the inner ear,
the more severe the hearing loss is.
5
Hearing aids are worn inside or behind the ear depend on the style of the
hearing aid.
The first basic part of the hearing aid which is the microphone is also the first
process of how the hearing aid functions. The microphone acts as a sensor of the deaf
person’s surrounding. It detects surrounding sound and noises and sends it to the
second basic part of the hearing aid, the amplifier.
The amplifier functions like its name suggested, amplifying the sound and
noises picked up by the microphone. The more hair cells in the inner ear are
damaged, the more the amplifier needs to amplify the sound and noises for that
person.
The amplified sound and noises will then sent to the hair cells using a
speaker. These remaining hair cells will detect the louder noise produced and send
the signal to the deaf person.
2.1.1.2 Styles of Hearing Aids
As mentioned before, hearing aids are worn inside or behind of the ear. The
way that hearing aids are worn differs based on its design and style. There are three
basic styles of hearing aids.
6
2.1.1.2.1 Behind-the-ear (BTE)
Figure 2.1 Two types of BTE style hearing aid (a) Classic BTE (b) “Mini” BTE
Figure 2.1 Two types of BTE style hearing aid (a) Classic BTE (b) “Mini”
BTE shows two styles of BTE that we have today. These BTE are made of hard
plastic case and as the name suggested, are worn behind the ear with an ear mold that
fits inside the ear connected. The small electronic parts of the hearing aid are encased
inside a small case attached behind the ear. BTE are suitable for people with mild to
profound hearing loss.
2.1.1.2.2 In-the-ear (ITE)
Figure 2.2 In-the-ear
7
Figure 2.2 In-the-ear shows the ITE hearing aid style. This hearing aid fits
completely inside the ear of the wearer. The electronic parts also encased inside a
hard plastic case. The ITE may also have an added feature called the telecoil.
Telecoil is a small magnetic coil functions to detect signal through circuits
instead of the microphone of the hearing aid. This is very useful to help the deaf
person with telephone conversation for example. The ITE are not recommended for
children due to the children’s ear is still in the growing stage.
2.1.1.2.3 Canal
Figure 2.3 Two types of canal style hearing aid (a) In-the-canal (ITC) (b)
Completely-in-canal (CIC)
The canal style is very small and fits inside the wearer’s ear as shown in
Figure 2.3 Two types of canal style hearing aid (a) In-the-canal (ITC) (b)
Completely-in-canal (CIC). The CIC style is well hidden inside the wearer’s ear due
to its small size.
Both CIC and ITC are only suitable for person with mild to moderate severe
hearing loss. This is because the small size has limited its battery capacity to supply a
louder volume on the speaker. This style also not recommended for children due to
children’s ear is still in a growing stage.
8
2.1.2
Sonic Boom Alarm Clock (Model SB1000ss)
2.1.2.1 Overview SB1000ss
The SB1000ss is a specially designed alarm clock to help the deaf to wake up
from the bed. It is designed so it can be used to all levels of severe of hearing impair.
Like a normal alarm clock, it has all the normal features to show the time and let the
user to set the alarm as they please. What makes it different is the SB1000ss has
three significant extra features to help the deaf which are an extra-loud alarm system,
a lamp connection port and a vibrator connection port. Figure 2.1 shows the
SB1000ss.
Figure 2.4 The Sonic Boom Alarm Clock Model SB1000ss
9
2.1.2.2 Setting up the SB1000ss
Figure 2.5 Setting up the SB1000ss
Figure 2.5 shows how the SB1000ss is set up in a bedroom. The SB100ss is
connected with the bedside lamp and a vibrator which was placed under the bed
sheet. The bedside lamp instead of connected directly to the power source, it is
connected to the SB1000ss. The SB100ss is then connected directly to the home
plug. The SB1000ss also has a 9V battery backup supply in order to retain the time
and alarm settings in case of power failure[2].
2.1.2.3 Feature
As mentioned before, the SB1000ss has three significant features that will
help the deaf. The first one is the extra-loud alarm system which is 113dB louder
than normal sound. This sound can also be adjusted by the user in terms of its tone
and volume. This function is suitable for a person who has minimal hearing
impairment.
The second feature which is the vibrator is suitable for those who have a
more severe hearing impairment. The vibrator, a Super Shaker Bed Vibrator model
SS12VW which also can be purchased separately used 12V of power supply. Figure
2.6 shows the SS12VW. Its power supply cord will be connected to the SB1000ss.
There are two options the user can choose on how the user wants the SS12VW
10
vibrates. The first setting called STEADY means the vibrator will have a constant
vibration when the alarm goes off. The second setting called PULSE will make the
vibrator vibrates on and off when the alarm goes off. The user can freely choose
between these two setting which is the most effective to wake them up[3].
Figure 2.6 Super Shaker™ Bed Vibrator - SS12VW
The third feature is the ability to control the bed side lamp. The bedside lamp
AC outlet will be connected to the SB1000ss. To use this feature, user must first
ensure that the switch of the lamp is in the ON position. When the alarm goes off, it
will automatically give supply to the lamp and turning it on. User can also manually
turn on the lamp by pressing the large yellow LAMP button on the front of the
SB1000ss.
2.1.2.4 Using the Alarm
The SB1000ss has several waking options. These options will determine how
the SB1000ss will react upon the alarm goes off. Like all the other alarm clock, the
SB1000ss will require the user to set the clock and the alarm first. Then, the waking
options can be set. The options are:
1) Audio alarm only
2) Flashing Light (with Audio On or Off)
3) Vibrator (with Audio On or Off)
4) Flashing light and Vibrator (with Audio On or Off)
11
Other than having the function of triggering the alarm using timer, the
SB1000ss can also trigger its alarm using optional transmitters sold separately by the
manufacturer. These optional transmitters for example are:
1) DS 700 Doorbell Signaler
2) TR 75 Telephone Signaler
3) BC 400 Baby Cry Signaler
CHAPTER 3
RESEARCH METHODOLOGY
This chapter discusses the concept of this project as the methodology used to
design and fabricate the hardware structure, and electronic circuit.
3.1
Concept of this project
The purpose of this project is to help deaf people to be more aware of their
surroundings by taking advantage of their skin and touch receptor.
The term multiple sensed used in the project title is realized by placing three
circuits at different places in a small area. These circuits will be triggered using
sound, signals or manually. By triggering these circuits, RF signal will be transmitted
to an RF receiver attached to the user’s body and trigger a vibration to alert the user.
Figure 3.1 Multiple Sensed Device for Deaf People in action
13
A situation example can be described based on Figure 3.1 Multiple Sensed
Device for Deaf People in action. One of the circuit sensors is attached to the door as
shown. The circuit is equipped with a microphone to detect any sound made on the
door. Whenever sound is detected, it will trigger the RF transmitter and transmit RF
signal. This RF signal will then picked up by a receiver attached to the user’s wrist
and vibrates alerting the user.
3.2
Flow Chart
Figure 3.2 shows the work flow chart of this project. Basically a work flow
chart is how the project will be done shown step by step.
Figure 3.2 Work Flow Chart
The literature review on available relevant products is already covered in
CHAPTER 2 of this thesis. In this chapter, discussion on the next steps will be
covered.
14
3.2.1
Hardware development
This sub topic explains the hardware structure of the triggering circuit and the
receiver circuit.
3.2.1.1 Hardware structure
3.2.1.1.1 Triggering circuit
There are three triggering circuit that were used in this project. All three are
triggered differently.
Figure 3.3 is one of the three triggering circuits that used a microphone to
detect input. This circuit can be used to detect any sound made in the surrounding.
This is the circuit that can be used to have the same effect as the example explained
earlier in sub-topic 3.1.
Another triggering circuit is shown in Figure 3.4. This circuit is using a
3.5mm male audio jack to detect any input. This circuit can be equipped on a
computer or any electronic device such as phones to detect any sound signal.
Unlike the others, the triggering circuit shown in Figure 3.5 is manually
activated using a simple push button. This circuit is useful for anyone in the area
wants to get attention from the deaf person. This circuit can also be implemented on
a house doorbell system.
15
Figure 3.3 Triggering circuit using microphone.
Figure 3.4 Triggering circuit using 3.5mm male audio jack
Figure 3.5 Triggering circuit using simple push button
16
3.2.1.1.2 Receiver device
Figure 3.6 Receiver device that will be attached to the user’s body
The receiver device is the one that will be attached to the user’s body. It is
equipped with a small imbalanced DC motor to generate vibration in order to alert
the user that is wearing it.
Figure 3.6 shows the receiver device in two parts. These two parts will then
be connected using jumper wires and four PCB stands shown in Figure 3.7.
Figure 3.7 Completed receiver device
17
3.2.1.2 Electronic components
This sub-topic discusses the main electronic components used in this project.
3.2.1.2.1 Triggering circuits
3.2.1.2.1.1 RF transmitter (RF_TX_315MHz Type2)
Figure 3.8 The RF_TX_315MHz Type2 RF transmitter.
The RF_TX_315MHz Type2 is an RF transmitter produced by Cytron. Can
be operated at 3V to 12V, this transmitter transmits 315MHz radio frequency at less
or equal 10Kbps transfer rate and 25mW transmitting power if powered using 12V
supply[4].
Using this RF module, the triggering circuits can send the triggered signal to
the receiver device wirelessly.
18
No.
1.
2.
3.
4.
5.
6.
7.
8.
9.
Specifications
Operating Voltage
Operating Current
Oscillator
Frequency
Frequency error
Modulation
Transfer Rate
Transmitting power
Antenna Length
RF Transmitter Module
3V to 12V
Max ≤ 40mA (12V). Min ≤ 9mA (3V)
SAW (Surface Acoustic Wave) oscillator
315MHz ~ 433.92MHz
± 150kHz (max)
ASK/OOK
≤10Kbps
25mW (315MHz @ 12V)
24cm (315MHz). 18cm (433.92MHz)
Table 3-1 RF module specifications data.
3.2.1.2.1.2 BC140 transistor
Figure 3.9 The BC140 transistor
Although it is a common electronic component, the BC140 plays a big role in
the triggering circuit. This NPN silicon transistor acts as a switch that activates the
triggering circuits when an input is detected[5].
3.2.1.2.1.3 Encoder PT2262
The encoder PT2262 is a remote control encoder utilizing CMOS
Technology[6]. Its pair, the decoder PT2272 is equipped on the receiving device to
decode which triggering circuit is activated. Some of the features of this encoder are:
1. Low power consumption
2. Up to 6 data pins
3. Operates at Vcc = 4 ~ 15V
19
Figure 3.10 (a) The PT2262 (b) The pin configuration
Pin Name
I/O
A0 ~ A5
I
A6/D5, A7/D4
A8/D3 ~
A11/D0
I
/TE
I
OSC1
O
OSC2
I
DOUT
O
Vcc
Vss
-
Description
Code Address Pin Nos.0 ~ 5
These six tri-state pins are detected by PT2262
to determine the encoded waveform bit 0 ~ bit 5.
Each pin can be set to “0”, “1” or “f” (floating).
Code Address Pin Nos.6 ~ 11/Data Pin Nos.5 ~
0. These six tri-state pins are detected by
PT2262 to determine the encoded waveform bit
6 ~ bit 11.
When these pins are used as address pins, they
can be set to “0”, “1”, or “f” (floating).
When these pins are used as data pins, they can
be set only to “0” or “1”.
Transmission Enable.
Active Low Signal. PT2262 outputs the encoded
waveform to DOUT when this pin is pulled to
low.
A resistor connected
Oscillator Pin No. 1 between these two pins
determines the
Oscillator Pin No. 2 fundamental frequency of
the PT2262.
Data Output Pin.
The encoded waveform is serially outputted to
this pin. When PT2262 is not transmitting,
DOUT outputs low (Vss) voltage
Positive Power Supply
Negative Power Supply
Table 3-2 PT2262 pin description
Pin No.
1~6
7, 8
10 ~ 13
14
15
16
17
18
9
20
3.2.1.2.1.4 Condenser Microphone
Figure 3.11 Condenser Microphone
A small microphone used to detect any surrounding sound. This microphone
is equipped to one of the triggering circuit.
3.2.1.2.2 Receiver device
3.2.1.2.2.1 RF receiver (RF_RX_315Mhz)
Figure 3.12 The RF_RX_315Mhz
The RF_RX_315Mhz is an RF receiver. It detects any RF signal transmitted
via the RF_TX_315MHz Type2 from any of the triggering circuits. Like its pair, this
receiver also produced by Cytron. The RF_RX_315Mhz is operated at 5.0V ± 0.5V
21
using monolithic super heterodyne receiving operating principle. More of its
technical specifications can be known by referring
No.
1.
2.
3.
4.
5.
6.
7.
8.
9.
10.
Specifications
Operating Voltage
Operating Current
Operating Principle
Modulation
Frequency
Bandwidth
Sensitivity
Rate
Data output
Antenna Length
RF Receiver
5.0V ± 0.5V
≤5.5mA @ 5.0V
Monolithic super heterodyne receiving
OOK/ASK
315MHz, 433.92MHz
2MHz
-100dBm
< 9.6Kbps (315MHz @ -95dBm)
TTL
24cm
Table 3-3 Technical specifications of RF_RX_315
3.2.1.2.2.2 Decoder PT2272-L4
Figure 3.13 (a) PT2272-L4 (b) Pin configuration
The remote control decoder PT2272-L4 uses the same CMOS technology as
the encoder PT2262[7]. These two encoder and decoder will be paired with each
other in order to determine which triggering circuit is sending signal to the receiver
device.
22
Pin Name
A0 ~ A5
I/O
I
Desciption
Code Address Pin Nos. 0 ~ 5.
These six tri-state pins are detected by PT2272 to
determine the encoded waveform bit 0 ~ bit 5. Each pin
can be set to “0”, “1”, or “f” (floating).
Pin No.
1~6
Code Address Pin Nos. 6 ~ 11/Data Pin Nos. 5 ~ 0.
These six pins are used as higher address input bits or
data output pins depending on the version (type) of
PT2272 used.
When used as address inputs, these pins are tri-state input
pins and each pin can be set to “0”, “1”, or “f” (floating).
When used as output pins, these pins are driven to VCC
if (1) the address decoded from the waveform that was
received matches the address setting at the address input
pins, and (2) the corresponding data bits received is a “1”
bit. Otherwise, they are driven to VSS.
A6/D5 ~
A11/D0
I/O
DIN
I
Data Input Pin.
The encoded waveform received is serially fed to
PT2272 at this pin.
OSC 1
I
Oscillator Pin No. 1
OSC 2
O
Oscillator Pin No. 2
VT
O
VCC
VSS
-
A resistor connected between
these two pins determines the
fundamental frequency of
PT2272.
Valid Transmission.
Active High Signal. VT in high state signifies that
PT2272 receives valid transmission waveform
Positive Power Supply
Negative Power Supply
Table 3-4 Pin description of decoder PT2272-L4
14
15
16
17
18
9
23
3.2.1.2.2.3 Imbalance rotor DC motor
Figure 3.14
Small imbalance rotor DC motor
The imbalance rotor DC motor is a common mechanism used to generate
vibration in mobile phones. The DC motor used is small and can be operated low
voltage.
The motor needs to be placed as close as possible to the circuit board in order
to get the most of the vibration it created when it spins.
3.2.2
Calibration and troubleshoot
Calibration and troubleshoot the hardware is to ensure that the hardware is working
as intended.
3.2.2.1 Calibration
The sensitivity of the triggering circuits needs to be calibrated in order for
them to be able to easily detect signals that they need to. For example, if the
triggering circuit using microphone is assigned to detect door knocks, the sensitivity
of the circuit needs to be adjusted so that it will be easy to be triggered by door
knocks but not too sensitive so that the circuit won’t be triggered by other sound
made at the door’s surrounding.
24
The same thing also applied to the triggering circuit using 3.5mm male audio
jack. The sensitivity of this circuit also needs to be calibrated so that only a specific
sound at a specific volume will be detected to trigger the circuit.
The calibration for both of these triggering circuits can be made by changing
the value of resistor that is used for biasing one of the amplifying transistors in the
circuits. The bigger the value of the resistor is, the less sensitive it gets.
3.2.2.2 Troubleshoot
In the troubleshoot process, the circuits will be tested whether they are
functioning as intended or not.
The troubleshoot process begins by testing the triggering circuit whether the
input signal is able to trigger the circuit or not. Troubleshoot will commence if the
input signal does not triggered the circuit.
The next step of this process is to check whether the RF signal transmitted by
the triggering circuit is received by the RF receiver at the receiving device or not.
While at it, the data received at the receiver also was checked whether or not it
matches the data sent by the triggering circuit.
The final step of this process is to test the receiving device. The test is
successful if the vibrator and LED indicator at the receiving device can be triggered
using RF signal sent by the triggering circuit or not.
Chapter 4
RESULT AND DISCUSSION
The objective of this project is to create a device that can help the deaf people
to gain more awareness of what they can’t see in a small area. In order to find out
whether or not the objective is achieved, several experiments on how the device
performed was done to observe the response of the device.
4.1
Microphone sensitivity
This experiment was conducted in order to ensure the triggering circuit with
microphone was calibrated to have the sensitivity needed to be triggered by simple
knocks on where the circuit will be attached.
Based on Figure 4.1, resistor R1 was adjusted in order to calibrate the
sensitivity of the circuit. After few try and error adjustments, the value of R1 needed
was found to be 270kΩ in order to get the necessary sensitivity.
26
Figure 4.1 Schematic circuit used on triggering circuit with microphone
Figure 4.2 (a) How the triggering circuit with microphone is attached on surface
(b) Placement of the microphone
27
Figure 4.3 Triggering circuit with microphone in action. (a) Knocking on the
surface the microphone is attached. (b) LED turns from OFF to ON when
triggered by knocks
4.2
Volume input
Figure 4.4 Schematic circuit used on triggering circuit with 3.5mm male audio
jack
Another triggering circuit that needs to be calibrated in order to have the
sensitivity needed is the triggering circuit with 3.5mm male audio jack. The same
circuit shown in Figure 4.1 was used to create this triggering circuit.
28
The voltage output of the audio jack of a device is not absolutely zero even
when no sound was made. There’s noise output that needs to be compensate so that
the triggering circuit does not triggers needlessly.
After a few try and error adjustments, the value of R1 needed was found to be
47kΩ for this triggering circuit making the circuit to look like shown in Figure 4.4.
Figure 4.5 Connecting the triggering circuit with 3.5mm male audio jack to an
electronic device
Figure 4.6 LED turns from OFF to ON when triggered by electrical signal from
the audio output of device
4.3
4.3.1
Outputs
LED indicators
In order to know which of the triggering circuit is triggered, each of the
triggering circuit has its own LED indicator assigned to each of them placed on the
receiver device. Whenever a triggering circuit is triggered, a specific LED will lit up
to show the user from where the signal came from.
29
Figure 4.7 LED indicators lit up according to which triggering circuit is sending
signal. From left, triggering circuit with microphone, triggering circuit with
3.5mm male audio jack, and simple push button
4.3.2
Vibrator
The vibrator is actually the most crucial output part of this project. The
vibrator will be used to alert the user whenever a triggering circuit is triggered. There
are no specific outputs of the vibrator for each triggering circuit. Hence, the
condition of the vibrator is only two which are,
Condition
No signal received
Signal received
Output
OFF
ON
Table 4-1 Output of the vibrator for each condition
Figure 4.8 (a) Vibrator at OFF (b) Vibrator at ON
CHAPTER 5
CONCLUSION
This chapter concludes the research and development of this multiple sensed
device for deaf people project. Some of the weakness of this project and how to
improve it is also included in this chapter.
5.1
Conclusion
The objective of this project is to help deaf people to gain more awareness of
their surroundings. The scope of this project is to cover only a small area such as an
apartment or a small room. There are already effective devices to help a deaf person
not only to gain awareness but also to help them hear like normal people does. But,
to certain deaf people, they are not very comfortable with the existing device such as
the hearing aid. Hence, this multiple sensed device for deaf people can act as an
alternative for these people. After various tests and experiments, the multiple sensed
device for deaf people is not only achieved its objective to help deaf person to gain
more awareness of their surroundings, but also comfortable to wear to most people
with wristwatch. Hence, it can be an alternative to help deaf people to be more aware
of their surroundings.
31
5.2
Weaknesses of Project
There are a few weaknesses the final product has. The main weakness that
anyone can see instantly is that the size of the receiving device is quite large. This
makes it not that comfortable to wear and is not mobile enough for the user to wear.
One of the main concern while designing the circuit is the amount of RF signal that
will be sent by the same frequency during the exhibition. Hence the big circuit design
by implementing switches to set the address of the decoder and encoder to ensure
that no signal from other RF transmitter will trigger the receiving device.
Other weakness is the power of the vibrator. The motor used is actually the
same motor used by mobile phone to generate vibration. The weak power of the
vibrator may be caused by the weak power provided by the battery source and how
the circuit board the vibrator attached to has absorbed the vibration making it less
powerful.
5.3
Suggestions for Future Improvement
One of the main future improvements that can be made is to design a smaller
and compact circuit for the receiving device to make it more comfortable and mobile
for the user. This can be achieved by redesign the circuit by removing the switches
used to set the addressing of the decoder. Also, the usage of Printed Circuit Board to
make the circuit will help improve the size of the circuit. The receiving device should
be as small as the conventional wrist watch we have today.
More functions can be added to the receiving device such as an alarm that can
be set to trigger the receiving device. The user can set at what time the receiving
device will be triggered. When the time comes, the vibrator will be triggered. Think
of this as an alarm watch feature for deaf people.
32
Another future improvement that can be made is to integrate this system to a
mobile phone. Nowadays, programs for mobile phones can be written easily. The
idea is to write a program that will trigger the vibrator of the mobile phone whenever
one of the triggering circuits detects any changes in the surrounding. Instead of using
RF, in this application, Bluetooth signal will be used.
REFERENCES
[1]
S. Barnett, "Clinical and cultural issues in caring for deaf people," FAMILY
MEDICINE-KANSAS CITY-, vol. 31, pp. 17-22, 1999.
[2]
S. Alert, "Alarm Clock with Super Shaker - SB1000ss [online]."
[3]
S. Alert, "Sonic Boom Alarm Clock Model SB 1000 Instruction Manual."
[4]
C. Technologies, "RF Transmitter Module: User's Manual," vol. V1.1, p. 8,
November 2008 2008.
[5]
M. E. LTD., "BC140, BC141 datasheet."
[6]
P. T. Corp., "Remote Control Encoder PT2262 Datasheet," September 2008
2008.
[7]
P. T. Corp, "Remote Control Decoder PT2272 Datasheet," June 2008 2008.
34
APPENDICES
APPENDIX A
Gant chart
Table A-1 FYP 1 Gant Chart
Table A-2 FYP 2 Gantt Chart
35
APPENDIX B
Schematic circuit diagram
Figure B.1 Connection for PT2272-L4
Figure B.2 Connection for PT2262