1
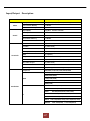
C2Touch Digital Information Display Contents Important safety Instructions . Specifications -------------------------------------------------Page 2, 3 System Specifications---------------------------Page 21, LCD Panel Specifications------------------------Page 21, Safety Precautions Ratings of Environment --------------------------------------------Page 4, 5, 6, 7 Input / Output ---------------------- Page 21 Description------------------- Page 22 Instructions Mechanical Layout Package contents---------------------------------Page 8 SET -----------------------------------------------Page 9 R OSD Key / In Output Terminal------------------Page 10 --------------------------------------------------Page 23 Remote Control ---------------------------------------------------Page 11 Connection Connecting a Computer--------------------------Page 12 Adjusting the LCD Display Picture Menus------------------------------------Page 13 Sound Menus-------------------------------------Page 14 Time Menus---------------------------------------Page 16 Input Menus--------------------------------------Page 18 Setup Menus------------------------------------- Page 19 Language------------------------------------------Page 19 1 Important Safety Instructions 1. Read these instructions. 2. Keep these instructions. 3. Heed all warnings. 4. Follow all instructions. 5. Do not use this apparatus near water. 6. Clean only with dry cloth. 7. Do not block any ventilation openings. Install in accordance with the manufacturer’s instructions. 8. Do not install near any heat sources such as radiators, heat registers, stoves, or other apparatus (including amplifiers) that produce heat. 9. Do not defeat the safety purpose of the polarized or grounding-type plug. A polarized plug has two blades with one wider than the other. A grounding type plug has two blades and a third grounding prong. The wide blade or the third prong are provided for your safety. If the provided plug does not fit into your outlet, consult an electrician for replacement of the obsolete outlet. 10. Protect the power cord from being walked on or pinched particularly at plugs, convenience receptacles, and the point where they exit from the apparatus 11. Only use attachments/accessories specified by the manufacturer. 12. Use only with the cart, stand, tripod, bracket, or table specified by the manufacturer, or sold with the apparatus. When a cart is used, use caution when moving the cart/apparatus combination to avoid injury from tip-over. 13. Unplug this apparatus during lightning storms or when unused for long periods of time. 14. Refer all servicing to qualified service personnel. Servicing is required when the apparatus has been damaged in any way, such as power-supply cord or plug is damaged, liquid has been spilled or objects have fallen into the apparatus, the apparatus has been exposed to rain or moisture, does not operate normally, or has been dropped. 15. Do not expose this apparatus to dripping or splashing and ensure that no objects filled with liquids, such as vases, are placed on the apparatus. 16. To completely disconnect this apparatus from the AC Mains, disconnect the power supply cord plug from the AC receptacle. 17. The mains plug of the power supply cord shall remain readily operable. 18. An apparatus with CLASS I construction shall be connected to a Mains socket outlet with a protective earthing connection. Note: Prolonged use of headphones at a high volume may cause health damage on your ears. 2 The lightning flash with arrowhead symbol within an equilateral triangle, is intended to alert the user to the presence of uninsulated "dangerous voltage" within the product's enclosure that may be of sufficient magnitude to constitute a risk of electric shock to persons. The exclamation point within an equilateral triangle is intended to alert the user to the presence of important operating and maintenance (servicing) instructions in the literature accompanying the product. WARNING: To reduce the risk of fire or electric shock, do not expose this apparatus to rain or moisture. (Applicable in the European Union and other European countries with separate collection systems) This marking shown on the product or its literature, indicates that it should not be disposed with other household waste at the end of its working life. To prevent possible harm to the environment or damage to health from uncontrolled waste disposal, please separate this from other types of waste and recycle it responsibly to promote the sustainable reuse of material resources. Household users should contact either the retailer where they purchased this product, or their local government office, for details of where and how they can take this item for environmentally safe recycling. Business users should contact their supplier and check the terms and conditions of the purchase contract. This product should not be mixed with other commercial wastes for disposal The up contents not to notify can be changed. 3 Safety Precautions Note The color and appearance of the product may vary depending on the model, and the product specifications are subject to change without prior notice for reasons of performance enhancement. Please read the following safety instructions as they are designed to prevent damage to property and harm to the user. Warning / Caution Failure to follow directions noted by this symbol could result in bodily harm or damage to the equipment. Notational Conventions Prohibited Important to read and understand at all times Do not disassemble Disconnect the plug from the outlet Do not touch Ground to prevent an electric shock Power When not used for an extended period of time, set your computer to DPM. If using a screen saver, set it to active screen mode. The images here are for reference only, and are not applicable in all cases (or countries). Do not use a damaged or loose plug. This may cause electric shock or fire. Do not pull the plug out by the wire or touch the plug with wet hands. This may cause electric shock or fire. 4 Use only a properly grounded plug and receptacle. An improper ground may cause electric shock or equipment damage. Insert the power plug firmly so that it does not come loose. A bad connection may cause fire. Do not excessively bend the plug and wire, or place heavy objects upon them, as this could cause damage. This may cause electric shock or fire. Do not connect too many extension cords or plugs into one outlet. This may cause fire. Do not disconnect the power cord while using the LCD Display. A surge may be caused by the separation and may damage the LCD Display. Do not use the power cord when the connector or plug is dusty. If the connector or plug of the power cord is dusty, clean it with a dry cloth. Using the power cord with a dusty plug or connector may cause electric shock or fire. To disconnect the apparatus from the mains, the plug must be pulled out from the mains socket, therefore the mains plug shall be readily operable. This may cause electric shock or fire. 5 Installation Failure to do so may cause serious damage to your LCD Display. Do not drop the LCD Display when moving it. This may cause damage to the product or the person carrying it. Keep any flammable objects such as candles, insecticides or cigarettes away from the product. Otherwise, this may cause fire. Keep any heating devices away from the power cable. A melted coating may cause electric shock or fire. Put down the LCD Display carefully. Failing to do so may damage the LCD Display. Do not place the LCD Display face down. This may damage the TFT-LCD surface. The installation of the bracket must be done by a qualified professional. Installing the bracket by unqualified personnel may result in injury. Always use the mounting device specified in the owner's manual. When installing the product, make sure to keep it away from the wall (more than 10 cm / 4 inches) for ventilation purposes. Poor ventilation may cause an increase in the internal temperature of the product, resulting in a shortened component life and degraded performance. Do not spray water or detergent directly onto the LCD Display. This may cause damage, electric shock or fire. 6 Clean When cleaning the LCD Display case or the surface of the TFT-LCD screen, wipe with a slightly moistened, soft fabric. Keep the product away from places exposed to oil, smoke or moisture; do not install inside a vehicle. This may cause a malfunction, electric shock or fire. In particular, avoid operating the LCD Display near water or outdoors Where the LCD Display could be exposed to snow or rain. Others When removing batteries from the remote control, be careful that They are not swallowed by children. keep the batteries out of children's reach. If the batteries are swallowed, see a doctor immediately. When replacing batteries, place the batteries in the correct +/polarity position as indicated on the battery holder. The incorrect polarity may cause a battery to break or leak and may cause Fire, injury, or contamination (damage). Use only specified standard batteries. Do not use new and used batteries together. This may cause a battery to break or leak and may cause fire, injury, or contamination (damage). The batteries (and rechargeable batteries) is not ordinary refuse and must be returned for recycling purposes. The customer is responsible for returning. The used or rechargeable batteries for recycling purposes as the consumer. The customer can return used or rechargeable batteries to a nearby public recycling center or to a store selling the same type of the battery or rechargeable battery. 7 Introduction Package Contents Note • Please make sure the following items are included with your LCD Display. If any items are missing, contact your dealer. Contact a local dealer to buy optional items. Components List DID User Manual & Driver Windows7 CD Remote Controller PC Drivers CD 8 Battery(CR-2025x1) 3V Power plug SET Power Menu Source VolVol+ ▲ ▼ 9 1. DISPLAY & TOUCH (TOUCH -- ADID-4645PT) 2. COOLING FAN 3, SPEAKER (8W X 2CH) 4, DOOR HANDLE 5, POWER SWITCH 6. POWER INPUT (AC100-240V~ ,50/60Hz) 7. ROLLER & STOPPER 8. IR RECEIVER 9. LAN PORT 9 8 OSD Key OSD KEY is located on the inside of the door. (See 12page) 1) POWER Turns the LCD Display & PC On/Off. 2) MENU Opens the on-screen menu and exits from the menu or closes the adjustment menu. 3) SOURCE (INPUT) Switches from PC mode to Video mode. Changing the source is only allowed for external devices that are connected to the LCD Display at the time. 4~5) Vol-/Vol+( LEFT/ RIGHT) Moves from one menu item to another horizontally or adjusts selected menu values. adjusts the audio volume. 6~7) ▲ /▼(UP/DOWN) Moves from one menu item to another vertically or adjusts selected menu values. 10 Remote Control How to insert battery. Insert the battery into proper polarities. IR receiver in the middle of the back of the product (the speaker) is located. (See 9page) 11 Connection Connecting a Computer Connected PC to HDMI1 AD Board Terminal Name Relay Board AD Board 1. Connect the power cord for your LCD Display to the power port on the back of the LCD Display. Turn on the power switch. 2. The HDMI 1 connector on the AD Board. (Connected PC to HDMI 1) Connect the HDMI Cable to the HDMI port on the computer. PC must be to be controlled in conjunction with AD BOARD HDMI 1 PORT Connect to the PC. 3. Using the USB (TOUCH) connector on the PC USB terminal. 12 Adjusting the LCD Display PICTURE MENUS ◆ Press [MENU] Button. OSD Main MENU will be shown. ◆ Enter the PICTURE MENU Press ▲/▼Button to move the PICTURE Menu, Press the ENTER Button. ◆ Adjustment CSM(Color Status Mode) Press ▲/▼Button to move the CSM, Press ENTER Button. Press ▲/▼Button to move the Cool, Normal, Warm, User, Press ENTER Button. ◆ Custom adjustment CSM Press ▲/▼Button to move the R/G/B, Press ENTER Button. Press ◁/▷ Button to adjust R/G/B rate. 13 ◆ Picture Select mode Press ◁ or Menu Button to move up to upper MENU. Press ▲/▼Button to move the PSM(Picture Status Mode), ENTER Buttons. Press▲/▼Button to select Dynamic/Standard/Mild/Game/User, Press ENTER . User is already setting value of Contrast & Brightness. ◆ Adjust Backlight Press ◁ or Menu Button to move up to upper MENU. Press ▲/▼Button to move to the Backlight, Press ENTER Button. Back light is related to power consumption. Press ◁/▷ Button to adjust the Contrast rate. After finish, Press [Exit] Button to exit the OSD MENU. SOUND MENUS ◆ Press [MENU] Button. OSD Main MENU will be shown. ◆ Enter the Sound MENU Press ▲/▼ Button to move up to the SOUND Menu, Press ENTER Button. 14 ◆ Select Sound Effect Press ▲/▼Button to move up to the SSM(Sound Status Mode) Menu, Press ENTER Button. Press ▲/▼Button to select Flat/Music/Movie/Speech/User, Press ENTER Button. User is already setting value of Equalizer. ◆ Sound Balance Press ◁ or Menu Button to move up to upper MENU. Press ▲/▼Button to select the Balance Menu, Press ENTER Button. Press ◁/▷ Button to adjust the Left/Right Balance rate. ◆ Adjust Equalizer Press ◁ or Menu Button to move up to upper MENU. Press ▲/▼Button to select the Equalizer Menu, Press ENTER Button. Press ▲/▼Button to select the 0.1/0.5/1.0/5.0/10kHz, Press ENTER Button. Press ◁/▷ Button to adjust the Equalizer frequence. AVL mode is not supported. After finish the adjustment, Press [Exit] Button to exit of the OSD MENU. 15 TIME MENUS Setup System and time On/OFF. ◆ Press [MENU] Button. OSD Main MENU will be shown. ◆ Enter the TIME MENU Press ▲/▼Button to move up to TIME Menu, Press ENTER Button. ◆ Setup System Time Press ▲/▼Button to move up to the Clock Menu, Press ENTER Button. Auto mode is not supported. Press ▲/▼Button to select Manual, Press ENTER Button. Press ▲/▼Button to adjust the time, Press ENTER Button. ◆ Setup System OFF Time Press ◁ or Menu Button to move up to upper MENU. Press ▲/▼Button to select Off Time, Press ENTER Button. Press ▲/▼Button to select Off, Press ENTER Button. Press ▲/▼Button to adjust the Off Time, Press ENTER Button. 16 ◆ Setup System ON Time Press ◁ or Menu Button to move up to upper MENU. Press ▲/▼Button to select On Time, Press ENTER Button. Press ▲/▼Button to move up to the PR, Press ENTER Button. Press ▲/▼Button to adjust On Time, Press ENTER Button. ◆ Setup Auto Sleep If setting mode of ON, The screen is the function of sleep after passing 5min when no input signal. Press ◁ or Menu Button to move up to upper MENU. Press ▲/▼Button to move up to the Auto Sleep, Press ENTER Button. Press ▲/▼Button to select Off, Press ENTER Button. After finish the adjustment, Press [Exit] Button to exit of the OSD MENU. 17 INPUT MENU ◆ Press [MENU] Button. OSD Main MENU will show. ◆ Enter the Input MENU Press ▲/▼Button to move up to Input, Press ENTER Button. ◆ Input source select Press ▲/▼Button to select SCART/AV/ S-VIEDO/COMPONENT/PC/HDMI1/HDMI2/HDMI3, Press ENTER Button. ◆ Select Screen ratio Press ◁ or Menu Button to move up to upper MENU. Press ▲/▼Button to select ARC(Auto Ratio Control), Press ENTER Button. Press ▲/▼Button to select AUTO/16:9/14:9/4:3/Zoom1/Zoom2/Spectacle , Press ENTER Button. After finish the adjustment, Press [Exit] Button to exit of the OSD MENU. 18 SETUP MENUS ◆ Press [MENU] Button. OSD Main MENU will be shown. ◆ Enter SETUP MENU Press ▲/▼Button to move up to the SETUP, Press ENTER Button. ◆ Change OSD Language Press ▲/▼Button to select Language, Press ENTER Button. ◆ Setup Reset Press ◁ or Menu Button to move up to upper MENU. Press ▲/ ▼Button to select Reset, Press ENTER Button. Press ▲/▼Button to select On, Off, Press ENTER Button. 19 ◆ Setup PC Control Press ▲/▼Button to move up to the PC Control Menu, Press ENTER Button. Press ▲/▼Button to change each item, Press ENTER Button, Press ◀/▶Button to adjust values. If you want to auto adjust, just select Auto Adjust and press enter. ◆ SETUP WXGA Press ◁ or Menu Button to move up to upper MENU. Press ▲/▼Button to select the WXGA Menu, Press ENTER Button. Press ▲/▼Button to select resolution, Press ENTER Button. After finish the adjustment, Press [Exit] Button to exit of the OSD MENU. 20 Specifications System Specifications MODEL Detection method Touch tool / Reaction ADID-4645PT ADID-4645P IR Touch sensor system - Hand or other solid object, - 50m/s(min) Supported OS Windows XP / Vista / 7 Windows XP / Vista / 7 Effective screen size(mm) 1018.08(H) x572.67(W) 1018.08(H) x572.67(W) Overall dimensions (mm) 700(W)X2000(H)X480(D) 700(W)X2000(H)X480(D) Weight Approx. 85Kg Approx. 85Kg LCD Panel Specification Items 46” LCD Display Size (Diagonal) 46Inch (16:9) Response Time 8ms(Typ G to G) Pixel Pitch (mm) 0.53(H) x 0.53(V) mm Resolution 1920 x 1080 (WUXGA) Colors 16.7M Colors Brightness(Typ) 450cd/㎡ , CCFT BACKLIGHT Contrast Ratio 4000:1 View Angle(Typ) Hor. 178 , Ver. 178 Surface Treatment Hard coating, Haze44% Panel Size(Typ)mm 1083(H) x 627(W) x 57.5(D) Item / Model ADID-4645PT/ ADID-4645P CPU I5 2500 RAM DDR3 1066 2G HDD 2.5” 500G PC OS Power Supply WINDOWS 7 DC 12V 8.33A , Home Prem ADAPTER AC100-240V, 50/60Hz Ratings of Environment Item / Model ADID-4645PT/ ADID-4645P Storage Temperature -20℃ ~+60℃ Operating Temperature 0℃ ~+35℃ Power Supply Voltage AC100-240V, 50/60Hz Power Consumption 150~300W 21 Input/Output Description Items Video Sound Terminals Specifications Display Format Auto/16:9/14:9/4:3/ZOOM1/ZOOM2/Spectacle Picture Status Memory 5 Modes Color Status Memory 4 Modes Output(RMS) EQ Max. Sound System Stereo Equalizer 5 Bands Sound Status Memory 5 Modes Balance Yes 8W X 2 Channels PC-RGB 1 ( D-SUB 15P) PC-Audio 1 ( Ø3.5 JACK ) Full-Scart or RCA-AV 1 ( SCART 21P ) CVBS Input/Audio L/R 1 ( RCA JACK ) SPDIF 1 ( Optical ) Component Video/Audio 1 ( Y-Pb-Pr RCA JACK ) HDMI 3 ( HDMI 1.3/HDCP1.1/DVI1.0 Compatible ) EXT, Audio Output 1 ( Ø3.5 JACK ) RS232C 1 ( D-SUB 9P ) Software Update Yes(Through D-SUB With Jig-Board) Component 480i/480P/576I/576P/720P/1080I/1080P 1080P(50HZ/60HZ) 1080i(50HZ/60HZ) HDMI 720P(50HZ/60HZ) 576P(50HZ) 480P(60HZ) Resolution PC DOS 720*400(70HZ) VGA 640*480(60HZ/72HZ/75HZ) SVGA 800*600(56HZ/60HZ/72HZ/75HZ) XGA 1024*768(60HZ/70HZ/75HZ) SXGA 1280*1024(60HZ) WXGA 1280*768(60HZ/75HZ),1360*768(60HZ/75HZ) WSXGA 22 1600*1200(60HZ) , 1920*1080(60HZ) Mechanical Layout 23