1
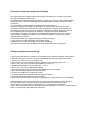
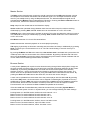
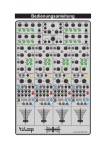
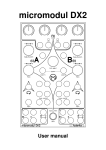
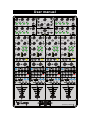
User manual
Dry/Wet
Param 1
Param 2
Param 3
Btn 2
Preset
Snap
Quant
On/Off
1
2
Reset
3
Btn 1
4
On/Off
Param 2
Param 1
2
Reset
3
Btn 1
4
Btn 2
Vol
Master
1
Tap
A
Mid high
FX 1
Filter
High
Key
Mid high
Select
B
FX 1
PFL level
Right
Load
Left
Monitor
Crossfader
Left
PFL level
Right
Load
Loop ctrl
In
Out
Fine
Panel-
Mode-
Type
Store
2
Map
Mode+
6
7
Hot cues
Master
4
3
Panel+
Shift
Bwd
Cue
Play
>B
Bend
Fwd
Out
Fine
Type
Store
2
>C
>D
3
EQ
Reset
7
Shift
Left
Phase meter
Param 3
Btn 2
Preset
Cue
Play
>A
Fwd
Bend
>C
>D
Filter
Key
Mid high
D
FX 4
PFL level
Right
Load
Monitor
Key
FX 1
FX 2
FX 3
FX 4
Low
EQ
Gain
Left
PFL level
Right
Load
Monitor
Crossfader
Seek
Scratch
Pitch
In
Out
Fine
Panel-
Mode-
Type
Store
2
1
6
Hot cues
Sync
Loop
4
3
Map
Mode+
7
Shift
Phase meter
Bwd
In
Out
Fine
Panel-
Mode-
Type
Store
Fwd
>B
Sync
>D
Loop
4
Map
Mode+
7
Hot cues
Master
Cup
3
2
1
Panel+
Bend
BwdMoveFwd
Size +
Res
Loop ctrl
5
Cue
>A
Active Size -
Delete
8
Play
Pan
BwdMoveFwd
Size +
Res
Loop ctrl
Master
Cup
4
Pan
5
Bwd
Btn 1
High
Pitch
Panel+
8
3
Filter
Gain
Active Size -
Delete
Hot cues
Sync
Loop
4
Map
Mode+
6
Param 2
FX 2
Low
BwdMoveFwd
In
Master
Cup
Size +
Res
Mode-
5
8
2
Crossfader
Panel-
Panel+
Preset
Mid low
Seek
Scratch
Loop ctrl
1
Btn 2
4
Snapshot
Pan
Delete
Phase meter
midi
Loop
Btn 1
Snapshot
C
FX 3
Pitch
Active Size -
BwdMoveFwd
Size +
Res
3
Param 1
On/Off
FX 1
Monitor
Pan
Sync
Mid high
Gain
Seek
Scratch
Pitch
Active Size -
5
Key
Crossfader
Seek
Scratch
1
High
FX 4
Low
EQ
Reset
FX 4
Filter
FX 2
FX 3
Gain
2
Mid low
FX 4
Low
1
System
Mid low
FX 3
Param 3
Tree
Favorites
Prev
Next
Browser
FX 2
Mid low
On/Off
Dry/Wet
Get monitor state
Preview
Play
Load
Preset
Snapshot
High
Param 2
FX 2
Param 3
FX 3
EQ
Mix
Snapshot
Dry/Wet
Param 1
Cruise
CD Mode
FX 1
1
Dry/Wet
LFO Res
Main
Shift
Delete
8 6
Phase meter
Bwd
Cue
Play
>A
Bend
Fwd
Cup
>B
powered by faderfox
>C
Provision of guarantee and product liability
The seller warrants for faultless material and proper manufacture for a period of 24 months
from the date of sale to the end user.
Excluded from the stated guarantee are defects on parts as the result of normal wear-and-tear.
These parts are mostly faders (sliding guides), potentiometers, encoders, buttons and USB
connection.
Also excluded from the guarantee are damages that are the result of :
incorrect or inappropriate handling, excessive force, mechanical or chemical influences,
incorrectly connecting the instrument with other instruments, incorrect or inappropriate use.
The warranty is void if the instrument is opened or changed. In addition, there is no warranty
for individual parts and components (in particular, semiconductors) and disposables/
consumables. The seller is not liable for consequential damages which are not the result of
criminal intent or negligence on his part. The following conditions must be met in order to
claim the warranty services:
• Instrument is either in its original packaging or similar packaging.
• Copy of the invoice with the serial number clearly visible.
• Meaningful error report or description of the error is attached.
The buyer assumes all costs and dangers of return shipments to the manufacturer
Safety precautions and servicing
• Instrument's intended use is based on the functions and procedures contained in this manual
• Read all instructions for use as well as all enclosed literature before using the instrument
• Use only in closed rooms (not for outdoor use)
• Never use in a moist or humid environment (laundry rooms, swimming pools, etc, …)
• Not for use in the vicinity of heat sources (radiators, ovens, etc, …)
• Operational temperature is in the range of 0° - + 40° C
• Not for use in the vicinity of flammable material
• The instrument should not be in direct or prolonged contact with sunlight
• Dusty environmental conditions should be avoided
• Connect only USB ports of computers or hubs
• No foreign objects are permitted inside the instrument casing
• No liquids should get inside the instrument casing
• Never let the instrument fall to the ground (casing and/or control elements may be damaged)
If the instrument must be opened (for example, to remove foreign objects from the casing or
for other repairs), this may only be done by qualified personnel. Guarantee is void for
defects that occur if the instrument was opened by an unauthorised or unqualified
person. Use a soft towel or brush to clean the instrument. Please do not use any cleaning liquids or
water, so you avoid any damages to the instrument.
Introduction
Thank you for buying the 4midiloop-controller. It is the first controller which allows an entire and
simultaneous control over four decks and four effect-slots in Traktor Pro.
This ability is achieved by over 600 electronic components. Only166 keys and almost the same
number of Leds allow simultaneous control over nearly all of the operations in Traktor Pro as well as
indicating all the important visual feedback signals of the controller’s software.
Each device has a control for every function, which makes operating a mix of four decks most
enjoyable.
The Controller attracts, not only by ergonomics and functionality but also with its revolutionary stylish
light-aluminium body.
4midiloop is great new hardware for ambitious DJ’s, created to provide excitement and inspiration for
many years to come.
Features
Hardware specifications
• 47 Potentiometer FX, Master, EQ
• 9 Encoder Browser, Seek / Scratch, Pitch
• Rubber knobs for best tactile feeling
• 152 Led’s different colors to display various informations
• 166 Push buttons in different colors, double functions with shiftbutton
• 5 Fader Eclectic Breaks - Pro X Fade Linefader, Crossfader
• USB bus powering Power supply via USB- Bus / consumption less than 300mA
• USB interface class compliant / no driver necessary
Software specifications
• Special controller for DJ Software (optimised for Native Instruments, Traktor Pro)
• Setup Files for Traktor Pro in current Version 1.2.4 or higher
• Indication of each relevant state by feedback data from software
• System mode for different basic settings (fader curves, etc.)
Dimensions
• Dimensions 11.41“ (290 mm) x 2.36“ (60 mm) x 17.7“ (450 mm)
• Weight 3.6kg
System requirements
• Windows Windows® XP (SP3, 32 bit), Vista (SP1, 32 bit, 64 bit), Windows 7 (32 bit, 64 bit), Pentium
IV or Athlon 1.4 GHz (SSE1), 1 GB RAM
• Mac Mac OS® X 10.5, Mac OS® X 10.6, Intel®Core™ Duo 1.66 GHz, 1 GB RAM
• General Monitor with 1024 x 768 screen resolution, USB 2.0
Case
• CNC shaped case Aluminium from Swiss aircraft industry (Avional)
• Compact and ergonomic
• Eloxalprint scratch proof layout, clearly designed
Setup Files
• 4midiloop Traktor.zip all files are suitable for Windows or Mac
Getting started
• Connect the controller with the USB cable before you start the Traktor software.
• Blinking System Led indicates that the controller is not yet recognized by the computer.
• The controller is recognized by the computer as '4midiloop' or 'USB audio device'.
• Import the Setup File '4midiloopV01.tsi' by clicking the add- button in Traktors Preferences /
Controller Manager and don’t forget to activate the midi- in and midi- out ports for that device.
• Define your basic settings (fader curves, Led brightness etc.) in System Mode. You will find the
description under Functions (Browser Sektion).
• Push Get Monitor State (Cd Mode and Tab button at the same time) to synchronize all Led’s with the
Traktor Software.
• Note: With the Windows operating system there may be audio dropouts (crackling) at high CPU
utilization. Increasing the latency and / or switching the level and phase meters off, reduces audio
dropouts. Native Instruments is aware of the problem and will fix it soon.
Functions
Shift functions
All double operations on the deck-sections can be accessed by pressing the red Shift-Buttons
simultaneously in the respective decks.
To retrieve double functions in the FX-, or the Master- and Browser sections, any of the 4 Shift
buttons may be used.
FX Section
The effects section of 4midiloop consists of four potentiometers and five buttons per deck. All
parameters of four Traktor effect units may be simultaneously adjusted here.
Using the 'Chained' mode, three effects per slot can be controlled simultaneously. Pushing the FX
buttons 2, 3 or 4, switches FX1, FX2 or FX3 on/off. The buttons 1 to 4 of the effects section are
programmed to give direct access to four of your favorite effect presets. Hold Preset button to select
presets by buttons 1 to 4 (Led is blinking), turn the potentiometers Param1, 2 or 3 to select FX types.
FX types will be stored in device by releasing Preset button.
In the 'Advanced' mode, a maximum of one effect can be activated per slot. Using the Preset button,
your favourite effects can be chosen.
Hold Preset button to select presets by buttons 1 to 4 (Led is lit), turn the potentiometers Dry / Wet to
select FX types. FX types will be stored in device by releasing Preset button.
By using the Shift and Preset button, a Snapshot can be made, which saves the current effect
settings as a default.
Master Section
The Main volume potentiometer controls the overall output level and the Mix potentiometer controls
the headphone mix between the Master and the Monitor signal. You can adjust the Monitor Output
level for your headphones by using the Vol potentiometer. The desired headphone signal can be
activated with the Monitor button underneath the EQ section. Pushing the Shift and Monitor button at
the same time, switches the advanced deck panel on or off.
Snap snaps into the closest beat of the Waveform display.
Quant enables the quantised change between both Hotcues and/or loops for real-time remixing.
Additionally by pressing Shift, the PFL Level Led’s can be switched on or off in PFL mode.
CD Mode plays a short stutter loop if the Deck is paused. This action simulates the cueing occurrence
of a traditional DJ CD player. Additionally by pressing Shift, the PFL Level Led’s can be switched on
or off in AFL mode.
LFO Reset resets the LFO for all LFO based effects.
Cruise activates the automatic playback of an entire playlist (Autoplay).
Tab tapping rhythmically on this button manually sets the master clock tempo. Additionally by pressing
Shift, midi clock sync can be switched on or off. The Tab Led is blinking, if the midi clock sync is
switched on.
By pushing CD Mode and Tab at the same time, Get monitor state is activated and synchronises the
4midiloop Led’s with the current status of the Traktor Software. By pushing CD Mode and Tab at the
same time (2 seconds), Get monitor state is activated and synchronises the Traktor Software with the
current status of the 4midiloop potentiometers and faders.
Browser Section
A rotary button (Select) with a push function allows browsing through folder and playlists. Simply turn
the push encoder to find the track you want and push to expand the browser window to fill the screen.
Additionally, by activating the Shift button, the folder list can be scrolled (Tree: track collection,
playlists, itunes etc.), which can be opened and closed by pushing the browser rotary button. The
chosen track can be uploaded to the deck by using the Load button underneath the EQ section. By
pushing the Shift and Load button at the same time, the deck size can be changed.
A track can be uploaded from the browser list to the preview player with Preview Load. By pressing
the Preview Play button, the chosen tracks can be stopped or started again (if pushed once more).
Additionally by pressing Shift, the track moves backwards. If Shift and Preview Load are pushed at
the same time, the track moves forwards. Favorites provide direct access to Playlists or folders.
Favourite tracks can be selected via Prev or Next and uploaded to the browser.
If Preview Load and Favorites Prev are pushed at the same time (2 seconds), System Mode is
activated and the System Led is lit. In System Mode, you can manage following four basic settings:
Pushing button 1 in the FX1 section, defines the midi channels 1 to 4.
Button 2 in the FX1 section defines the midi channels 5 to 8.
Button 3 in the FX1 section defines the midi channels 9 to 12.
Button 4 in the FX1 section defines the midi channels 13 to 16.
Pushing button 1 in the FX2 section, defines „linear“ line fader curves.
Button 2 in the FX2 section defines „rapid“ line fader curves.
Button 3 in the FX2 section defines „switch“ line fader curves.
Pushing button 1 in the FX3 section, defines the Led brightness 1 (dark).
Button 2 in the FX3 section defines the Led brightness 2.
Button 3 in the FX3 section defines the Led brightness 3.
Button 4 in the FX3 section defines the Led brightness 4 (bright).
Pushing button 1 in the FX4 section, defines „linear“ cross fader curve.
Button 2 in the FX4 section defines „rapid“ cross fader curve.
Button 3 in the FX4 section defines „switch“ cross fader curve.
Push the Preview Load and Favorites Prev buttons for about 2 seconds to leave the System Mode.
The System Led is off. Get Monitor state must be activated again.
Blinking System Led indicates, that the 4midiloop controller is not yet recognized by the computer.
EQ Section
In the Xone-setting, the equalizer is a 4-band-EQ and can adjust the frequency content of the track
being played. Pressing the buttons next to the knobs switches the corresponding frequencies on or off
(Kill-function). The PFL Level Led’s display the pre-fader level of the deck’s signal in PFL mode (Pre
Fader Level). In AFL mode (After Fader Mode) the Led’s display the after-fader level of the deck’s
signal. The deck level can be adjusted with the Gain knob.
If the effect assign buttons FX1, 2, 3 or 4 are pressed, the corresponding deck to control slot 1,2,3 or
4 will be allocated.
The Filter potentiometer provides control over the bipolar channel filter. The filter can be activated by
pushing the button next to the knob. The centre position remains neutral. By turning the filter knob left,
it results in a low-pass filter and to the right, a high-pass filter.
The Key Lock potentiometer controls the track’s musical key. Turning it to the right, raises the key,
turning it to the left, lowers the key. The Key Lock can be activated by pressing the button next to the
knob.
Crossfader Section
The Deck assign buttons assigns the desired decks left or right to the crossfader. The led for the
assigned deck flashes. You define which decks are audible on the left and right position of the
crossfader. A deck that is not assigned to one side of the crossfaderis only controlled by the channel
fader.
If Shift and Crossfader Left are pushed at the same time, the waveform display in the deck window
decreases. If additionally the Left Led flashes, the waveform display decreases the minimum. If Shift
and Crossfader Right are pushed at the same time, the waveform display increases. If additionally the
left Led flashes, the waveform display increases the maximum.
Seek / Scratch and Pitch Section
The Seek / Scratch encoders are used for coils in the decks. The track will be forwarded to the end by
turning the encoders clockwise, for rewinding back to the start, anti-clockwise. Push and turn the
encoder at the same time, scratches in the decks.
The Pitch encoders slow down or speed up the tempo of the track. The Pitch encoders offer the same
functionality as a pitch fader on any standard DJ turntable or pitchable CD player. To adjust the tempo
faster in steps, turn the encoder clockwise. To adjust the tempo slower, turn the encoder
anticlockwise. Push and turn the Pitch encoder at the same time, changes the tempo in small steps.
Additionally by pressing Shift, the Pan knob is controlled. With the Pan knob you can control the
balance between the left and right stereo channels for each deck individually.
Loop ctrl Section
To activate / deactivate a loop push the Active button. The Led indicates activation or deactivation of
a loop. Press the Size +/- Button to obtain higher or lower value of the loop length. Press the Size +
and Size – button at the same time, it will reset the loop lenght to one loop. The Res Led is lit.
Push the Shift and Active button, the loop is only active when the track runs in a loop.
The active loop with the chosen length of the track is moved back by pressing Move Bwd. Move Fwd
on the contrary, moves the active loop forward.
Loop or Fine can be activated by pressing the Shift button in the loop mode. If Loop is activated, the
loop will be moved a full Loop length. If Fine is activated, the loop can be moved in small
displacements.
Push the Shift and Size- button (In) to set the start point of the loop. Push the Shift and Size+ button
(Out) to set the end point of the loop. The track will begin to loop between these two points and the
Active Led flashes. To stop looping, press the Active button.
Hotcue Section
The hotcue section has eight Hotcue buttons numbered from 1 to 8. In Traktor, you can assign any
stored Cue Point or Loop to one of the 8 Hotcue buttons. This allows for instant access to your most
important Cue Points and Loops. Using stored Cue Points, you can mark specific positions in your
tracks; e.g. beginning vocals, instrumentals or breaks. Storing a Cue Point instantly maps it to the
next available Hotcue.
Further functions can be regulated by pressing the Shift button and the eight hotcue buttons:
With Panel +/- you can switch on the Move, Cue or Grid panel.
With Mode +/- you can switch in Move panel on BeatJump, Loop, Loop in or Loop out.
With Store you can store cue points, and with Delete you can delete it.
If you want to change the assignment; push the assigned Hotcue button, then push the Map and then
on the new Hotcue button.
With Type you’ll define the cue point type ( Cue, Fade in, Fade Out, Load, Grid or Loop).
Transport Section
Push the Play button to start or stop playback. The Led indicates activation or deactivation of Play, at
track end warning the Play Led is blinking.
The Cue button has multiple functions depending on the playback state of the track. On a paused
deck, pushing Cue sets a new current cue Point at the current play position. In Snap mode this cue
point will snap to the beat nearest the play position. Pushing Cue during playback jumps the current
play position back to the previously set current cue point and stops playback.
The Cup button behaves similarly to Cue, but stops playback as long as it is held down. On a paused
deck, pressing Cup sets a current cue point and starts playback when upon releasing the button.
Clicking Cup during playback jumps the current play position back to the current cue point and pauses
playback. Release the button to resume playback.
Push the Shift and >A,B,C,D button to load a running track in to another deck where it will run
synchronously.
Push the Sync button, to automatically match the tempo and the phase of the playing track to:
the master deck or the master clock, if no deck is selected as master deck. The Sync button can be
left permanently on. However, sometimes a deck cannot be synced at the moment, then the Sync
button on the screen will be appear half-lit.
The Master Deck gives the target tempo to which other decks can sync. In Auto mode Traktor will
automatically select the Master Deck depending on which track has the longest uninterrupted
playtime. In Manual mode the master deck can be selected by pessing the Master button on the
desired deck.
The Phase meter is a visual reference for syncing tracks. It shows you if a track is in or out of sync
with the Master Deck or the Master Clock. If two tracks’ Phases are synced, the meter will stay in the
middle. If one track’s phase is shifted backward, a green or red led will appear left of the center
marker. If a track’s phase is shifted forward, a green or red led will appear right of the center marker.
The Pitch Bend buttons are used if two tracks are playing at the same tempo, but their phase is
slightly shifted. This is similar to nudging a record to slow down or speed up as the tracks go slightly
out of sync. Press the Bwd button to slightly slow down the track and the Fwd button to speed it up.
By pushing the Shift and Pitch Bend Bwd button at the same time, the Phase Meter is switched off.
Pushing the Shift and Pitch Bend Fwd button, the Phase Meter is switched on.
Fader Section
The Channel Faders adjust the channel volume. The Crossfader enables transitions between decks
by dragging it from one side to the other. For the line faders and cross fader, there are three different
curves (Linear, Rapid, Switch) available which can be set in the system mode.
Extensions
All the controls in Traktor Pro may be assigned to new functions, which are accessed in the
Preferences/Controller-Manager.
Particulars are given in the Traktor Pro manual.
Since many shift functions of the controller remain unassigned, the following extensions are
suggested:
•
•
•
•
•
EQ- potentiometers
FX- potentiometers
Potentiometers in the Master-section
Green buttons in FX- and EQ- sections
Grey buttons in EQ- sections
As long as Leds are allocated to buttons, they may be controlled by the same Midi- commands as
those for the buttons.
For information about the numbers of the particular Midi- commands, first check the included list of the
corresponding functions.