1
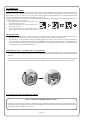
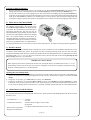
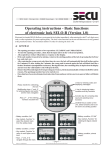
Operating instructions - Basic functions
of electronic lock SELO-C (Version 1.0)
Fully redundant electronic lock model SELO-C allows you to open the lock after entering the valid 7- or 8-digit secret code. The
maximum number of codes for clearing the lock is 10.
A) GENERAL
-
-
The opening procedure consists of two operations: CLEARING and UNBLOCKING.
To start the opening procedure, check that the input unit is in the vertical end position.
All accepted key strokes will produce a response on the display.
If the code number is keyed in by mistake, return to the starting position of the lock by pressing the On/Enter key, and start
over.
After entering the wrong secret code three times in a row, the lock will automatically block all further entries for 5 minutes.
If, after waiting for 5 minutes, the wrong code is entered again, the lock will block itself for a further 20 minutes
(manipulation resistance). During this time, the remaining delay is depicted on the display and not even the valid number
code will open the lock.
If more than 30 seconds lapse between pressing any two keys, the lock automatically switches itself off for safety reasons.
The opening procedure has to be started over.
Once data have been stored (numerical codes, time frame and user entries), not even a power failure will delete them.
The lock is of fully redundant design. This means that all electrical components which are crucial to the proper functioning
of the lock come in pairs. In the unlikely event of the primary system breaking down, the lock can, therefore, always be
opened undamaged using the secondary or backup system.
3 lines for entering codes and
displaying messages
Rotary handle for unblocking
the lock
Multifunction keys „1“ and „2“
for entering figures and words,
and for menu navigation
1 line for displaying battery
condition and key functions
Multifunction keys „2“ , „4“, „5“,
„6" and „8“ for moving the cursor
and entering the code
Function key for correcting data
input and selecting menu
functions
Keys „0“ - „9“ for entering
numbers and plain text
On/Enter-key to switch on the
unit, select functions and to set
the lock to its starting position
- Battery condition „full“
- Battery condition „2/3 full"
- Key marked „Function“ to select
the desired menu from the
setting mode
- Key marked „Function“ for
deleting the figure entered last
- Battery condition „1/3 full"
- Key marked „Function“ to return
to next higher menu level
- Battery condition „almost empty"
- Keys „1“ and „2“ to navigate
through the menu
-- page 1 -Subject to modifications
SELO-C-Standard-Betriebsanleitung-englisch.p65
Date: 12.06
B) OPERATION
Code entering procedure
The procedure by which individual code entries are made is cursor-controlled. Before entering a figure, one of the 10 numbers on the
display will show up as a blinking black rectangle. The lock selects the space for the first figure at random. To move the cursor, use
direction keys “2” (up), “4” (left), “6” (right), “8” (down). When, at the end of the movement, the cursor blinks in the position of
the figure to be entered, complete entering of the figure by pressing “5”.
The following example shows one possibility of entering the figure 2 when the random starting position of the blinking black cursor
rectangle happens to be on the figure 6:
1. Press cursor direction key “4” once to move the cursor
to the left from the 6 to the 5.
2. Press cursor direction key “2” once to move the cursor
up from the 5 to the 2.
3. Press code entering key “5” once to complete selecting the figure 2 as one of the figures of the secret code.
Clearing the lock
1.
2.
3.
Press On/Enter. When the lock is ready for operation, you will be asked to enter the code eight seconds after the status of the
opening counter is displayed. You can abort the opening counter indication by pressing any number key.
Now enter the 7- or 8-digit numerical code (factory setting: administrator code 1 2 3 4 5 6 7). Each successfully entered figure
will be confirmed by a star appearing underneath the word CODE:. After entering the last digit, the code is validated by the lock.
If the lock is able to match the entry with a previously programmed code, it will prompt the operator for five seconds to turn the
round input unit and to start unblocking the lock.
Unblocking the lock - relocking and securing the lock
1. To unblock the lock during the five second readiness for opening, turn the round input unit clockwise through a half turn from
its end position. Please note that the input unit can be turned a quarter turn at any time, but that this distance is not enough to unblock
the lock.
2. If the input unit is turned back to its starting position in anti-clockwise direction after the five-second ready-for-opening period,
the lock will return to the blocked position and can only be unblocked after renewed clearing and re-entry of a valid code.
C) CHANGING THE NUMERICAL CODE
TEST – TO BE PERFORMED WITHOUT FAIL!!
For safety reasons, only reprogram the lock with the safe door open and blocked in the open position. Only after you are absolutely
certain that the lock has been reprogrammed successfully and that the lock can be electrically cleared and mechanically unblocked
using the new settings, should the door be closed.
-- page 2 --
Enter the setting mode to change one of the codes
ONLY CHANGE THE LOCK SETTINGS WITH THE SAFE DOOR OPEN AND BLOCKED. DO NOT MAKE UP
NUMBER CODE OF PERSONAL DATES (i.e. no wedding anniversaries, birthdays etc.)
1.
2.
Press On/Enter key. When the lock is ready for operation, the welcoming phrase on the display is followed after eight
seconds by a message prompting the operator to enter a valid code. The black rectangular cursor symbol will blink
in the position of the first random figure of the code entry range and the capital letter “M” appears above the Function
key.
By pressing the Function key, the menus of the setting mode appear. In this mode, the symbols above keys “1” and
“2” serve as operating symbols to navigate through the menu (up or down). The first menu to appear is Code change.
Use keys “1” and “2” to activate the other options on the menu.
Changing the administrator code (factory setting 1 2 3 4 5 6 7)
1.
2.
3.
4.
5.
As soon as you enter the setting mode, the cursor will automatically go to Code change. To select, press the On/Enter
key.
Next, the administrator and the various users are depicted on the display with the administrator in first place. To select
the administrator, press On/Enter.
The lock will now ask you to enter the old code used thus far by displaying the word CODE.O:. Key-in the old code
(when taking the lock into operation the first time, enter the factory setting 1 2 3 4 5 6 7) and confirm with the On/
Enter key.
Next, the lock prompts the operator to enter the new code by displaying the word CODE.N:. Key-in the new code
and confirm by pressing On/ Enter. As a safety feature, the lock prompts the operator to enter the new code a second
time by displaying the word CODE.R:. Confirm once more by pressing the On/Enter key.
The lock confirms the successful change of the administrator code by means of the message Code change
completed!; if the operation was not successful, the message will read Code change error!. You can leave the active
menu field in the setting mode by pressing the Function key whenever you see the symbol “<“ above the key. After
leaving the setting mode, the lock is again ready for clearing. The operator is prompted to enter a valid secret code.
Changing an existing user code
1.
2.
3.
4.
5.
As soon as you enter the setting mode, the cursor will automatically go to Code change. To select, press the On/Enter
key.
Next, the administrator and the various users are depicted on the display with the administrator in first place. In the
setting mode, the symbols above keys “1” and “2” serve as operating symbols to navigate through the menue (up
or down). Using keys “1” und “2”, go to the user whose code is to be changed. Select the desired user by pessing
On/Enter.
The lock now prompts the operator to key-in the user’s old code far by displaying the word CODE.O:. Enter old code
and confirm by pressing On/Enter.
Next, the lock prompts the operator to key-in the user’s new code far by displaying the word CODE.N:. Enter new
code and confirm by pressing On/ Enter. As a safety measure, the lock prompts the operator to enter the new code
a second time far by displaying the word CODE.R:. Enter code and confirm once more by pressing the On/Enter
key.
The lock confirms the successful change of the user code by means of the message Code change completed!; if the
operation was not successful, the message will read Code change error!. You can leave the active menue field in
the setting mode by pressing the Function key whenever you see the symbol “<“ above the key. After leaving the
setting mode, the lock is again ready for clearing. The operator is prompted to enter a valid secret code.
D) CHANGING THE LANGUAGE
Entering the setting mode to change the language setting
1.
2.
Press On/Enter key. When the lock is ready for operation, the welcoming phrase on the display is followed after eight
seconds by a message prompting the operator to enter a valid code. The black rectangular cursor symbol will blink
in the position of the first random figure of the code entry range and the capital letter “M” appears above the Function
key.
By pressing the Function key, the menue of the setting mode appears. In this mode, keys “1” and “2” serve as
operating symbols for menue navigation (up or down). The first menue to appear is Code change. Use the same keys
“1” and “2” to address the other options on the menue.
-- page 3 -SELO-C-Standard-Betriebsanleitung-englisch.p65
Selecting a different language
1.
2.
Having entered the setting mode, use keys “1” and “2” to go to the field Language/Sprache in the menue (factory
setting when the lock is installed the first time is German (deutsch). Select by pressing the On/Enter key.
Use keys “1” and “2” to go to the language of your choice. Select the new language by pressing the On/Enter key.
From now on, all messages will appear in the language of your choice. To leave the present menue field in the setting
mode, press the Function key whenever you see the symbol “<“ above the key. After leaving the setting mode, the
lock is again ready for clearing. The operator is prompted to enter a valid secret code in the language of their choice.
E) REPLACING THE BATTERIES
As soon as the symbol depicting the battery condition indicates „almost empty“, the operator is also
warned Please replace batteries! each time the lock
is operated. We recommend you heed the advice
and change the batteries! The lock can only be
unblocked a further, approximately, 50 times. Please
note that none of the number codes can be changed
until a set of fresh batteries has been fitted. To
change the batteries, lift off the cover of the battery
compartment with the tip of a screwdriver. Fit three
leak-proof, type Mignon LR6, AA, alkaline batteries, paying attention to the correct polarity. Dispose of the old batteries in accordance with anti-pollution legislation!
F) BACKUP MODE
The advantage of the fully redundant design is that the lock can be switched over from standard to backup mode in case
of a failure of the standard lock system. To open the lock after switching to backup mode, enter the code previously
assigned in the backup mode. However, until the system administrator has changed the factory-set administrator code for
the backup mode, i.e. 1 2 3 4 5 6 7, to the secret code of his choice, the lock will send out the warning Backup cde still
factory setting whenever it is switched on.
IMPORTANT SAFETY ISSUE !
When preparing the lock for operation for the first time, change the factory-set administrator code 1 2 3 4 5 6 7
of the backup system to the secret code of your choice. Failing this, the lock can be opened by anybody knowing
the factory setting whenever it is in backup mode.
Opening the lock backup mode
1. Press On/Enter. Next, press Function key to enter the menu of the setting mode. Above the “1” and “2” keys you
will see the symbols for navigating through the menu (up or down). The first item to appear is the menu for Code
change.
2. Using keys “1” and “2”, go to Mode select. To select, press On/Enter.
3. Using keys “1” and “2”, go to sub-item Reserve mode. To select, press On/Enter. Using the Function key, return
to the point where you are requested to enter a code. After keying in any code entered in the backup mode, the lock
is now ready for opening (the next time the lock is started up normally will automatically be in the standard mode).
G) ADDITIONAL LOCK SETTINGS
For detailed information about the additional lock functions, please check the CD-ROM supplied with the lock. These
functions cover:
- Time functions----------------- Administrator functions
- Read out list of operations
- Display lock information
Set time
Set date
Define number of digits of secret codes
Reorganize
Assignment and administration of user codes
-- page 4 --