1
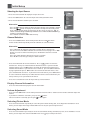
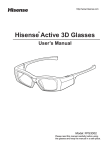
T39 series User’s manual Please read this manual carefully before operating your TV set and retain it for further reference. Model Number: HL46T39PZLN3D Part Number: ES-G112207 Http://www.hisense.com.au 2 3 Contents Hisense Warranty Contents Hisense Declaration Important safety precautions 2 4 5 6 Getting Started Other Information 9 Trouble shooting 9 Specifications 10 11 12 Accessories Installing the Stand Front View and Controls Rear View and Jacks Connection Instructions Network Function How to Enter the Network Main Menu Interface How to Enter the Yahoo Interface How to Modify the Password How to Use the Opera Browser function Using the Remote Control Installing Batteries in the Remote Control 15 15 Remote Control Operation Range 16 The Remote Control Panel Watching TV Turning the TV on for the First Time Selecting the Input Source Channel Selection Display Channel Information Volume Adjustment Selecting Picture Mode Selecting Sound Mode PVR Selecting the Aspect Ratio Freezing a Picture Setting the Sleep Timer Audio Function(ATV Mode) EPG(DTV Mode) Time Shift 17 18 18 18 18 18 18 19 19 19 19 19 19 19 Changing the TV Settings Tuning Menu Picture Menu & 3D function Sound Menu Screen Menu Settings Menu Lock Menu 20 21 23 24 25 28 More Settings PC Setting Network Connection DLNA settings Media Share Settings 29 30 33 34 Digital Media Play Enjoy Video Files Enjoy Music Files Browse the Pictures Browse the Text Files 35 38 39 39 All the pictures in the manual is just for reference. There may be some difference between the picture and the real, please see the real. 4 40 41 41 42 45 46 Hisense Declaration Any content or service accessed through this device, while only intended for individual non-commercial use, shall be the property of the applicable third party and subject to protection by regulations and laws on copyright, patent, trademark and other intellectual property rights. No part of such content or service may be modified, duplicated, published, uploaded, distributed, translated, marketed, or used to make and distribute products derived from it without the prior permission of the content owner or service provider. You acknowledge and agree explicitly that you will solely bear the risk associated with the use of this device, and further you will solely bear any risk related to satisfactory quality, performance and accuracy for any content or service accessed through this device. To the maximum extent permitted by applicable law㧘this device and any third party's content or service is provided as it is without any guarantee, express or implied. Hisense hereby declare explicitly that Hisense shall not be held liable for any guarantee and conditions, express or implied, related to this device and any content or service, including but not limited to warranty on marketability, satisfactory quality, fitness for a particular purpose, accuracy, quiet use and nonviolation of any third party’s rights; to the maximum extent permitted by applicable law, Hisense gives no guarantee on the accuracy, validity, timeliness, legitimacy and completeness of any content or service provided through this device, or the fitness of such device, content or service for your particular requirement, or the protection from interruption or error during operation of such device, content or service; to the maximum extent permitted by applicable law, in any case, including fault or neglect, Hisense shall not be held liable for legal actions or indemnity obligation arising from any consequence as a result of or related to any information loaded in this device or use of such device, content or service by you or any third party . Any content or service provided as it is together with this device shall be the property of the applicable third party, therefore Hisense gives no declaration or warranty on modification, suspension, cancellation, termination or abortion thereof, and shall not be held liable for legal actions or indemnity obligation arising thereof . Hisense reserves the rights to restrict the use or access of certain content or service. As the content or service are transmitted through third party’s network and transmission facilities, Hisense undertakes no customer service thereof or the obligation for such customer service. 5 Important safety precautions This symbol alerts user about the presence of a dangerous voltage not isolated inside the product which can be sufficiently powerful to constitute a risk of electrocution. ATTENTION RISK OF SHOCK ELECTRIC Do not open the back cover In no case the user is allowed to operate inside the TV set.Only a qualified technician is entitled to operate. This symbol alerts user about the presence of important operating instructions and maintenance in the document enclosed in the package. Disposal of Used Electrical & Electronic Equipment Packaging and electrical goods should be recycled appropriately, and not treated as household waste. Please dispose of this equipment at your applicable collection point for the recycling of electrical & electronic equipment waste. By ensuring the correct disposal of this product, you will help prevent potentially hazardous to the environment and to human health, which could otherwise be caused by unsuitable waste handling of this product. The recycling of materials will help conserve natural resources. Please do not therefore dispose of your old electrical and electronic equipment with your household waste. For more detailed information about recycling of this product, please contact your local city office, your household waste disposal service or the shop where you purchased the product. 6 Important safety precautions Please read the following safeguards for your TV and retain for future reference. Always follow all warnings and instructions marked on the television. 1. A note about safety and operating instructions Read and follow all safety and operating instructions, and retain them safely for future reference. 2. Heed Warnings Adhere to all warnings on the appliance and in the operating instructions. 3. Cleaning Unplug the TV from the wall outlet before cleaning. Do not use liquid, abrasive, or aerosol cleaners. Cleaners can permanently damage the cabinet and screen. Use a lightly dampened cloth for cleaning. 4. Wall Bracket Wall brackets are not supplied with this product. After market brackets may be available to purchase locally. Please refer to the specification page for dimensions. 5. Water and Moisture Avoid dripping or splashing of liquids onto the product. Objects filled with liquids, such as vases, should not be placed on the product. 6. Setting Do not place this TV on an unstable cart, stand or table. Placing the TV on an unstable base can cause the TV to fall, resulting in serious personal injuries as well as damage to the TV. Use only a cart, stand, bracket or table recommended by the manufacturer or salesperson. 7. Ventilation Slots and openings in the cabinet are provided for ventilation, to ensure reliable operation of the TV and to protect it from overheating. Do not cover the ventilation openings in the cabinet and never place the set in a confined space such as built-in cabinet unless proper ventilation is provided. Leave a minimum 10cm gap all around the unit. 8. Power Source This TV should be operated only from the type of power source indicated on the marking label. If you are not sure of the type of power supplied to your home, consult your appliance dealer or local power company. 9. Grounding or Polarization This TV is equipped with a polarized alternating current line plug. This plug will fit into the power outlet only one way. This is a safety feature. If you are unable to insert the plug fully into the outlet, try reversing the plug. If the plug should still fail to fit, contact your electrician to replace your obsolete outlet. Do not defeat the safety purpose of the polarized plug. A warning that an apparatus with CLASSⅠconstruction must be connected to a MAINS socket outlet with a protective earthing connection. 10. Power-Cord Protection Power- supply cords should be routed so that they are not likely to be walked on or pinched by items placed upon or against them, paying particular attention to cords at plug, wall outlets, and the point where they exit from the TV. MAIN plug is used as the disconnect device, the disconnect device shall remain readily operable. 11. Lightning For added protection for this TV during a lightning storm, or when it is left unattended and unused for long periods of time, unplug it from the wall outlet and disconnect the antenna or cable system. This will prevent damage to the TV due to lightning or power-line surge. 12. Power Lines An outside antenna system should not be located in the vicinity of overhead power lines or other electric light or power circuits, or where it can fall into such power lines or circuits. Where installing an outside antenna system, extreme care should be taken to keep from touching such power lines or circuits as contact with them might be fatal. 13 Overloading Do not overload wall outlets and extension cords as this can result in a risk of fire or electric shock. 14.Object and Liquid Entry Never push objects of any kind into this TV through openings as they may touch dangerous voltage points or shortout parts that could result in fire or electric shock. Never spill liquid of any kind on or into the TV. 7 Important safety precautions 15.Outdoor Antenna Grounding If an outside antenna or cable system is connected to the TV, be sure the antenna or cable system is grounded so as to provide some protection against voltage surges and built-up static charges. Section 810 of the National Electric Code, ANSI/NFPA No. 70-1984,provides information with respect to proper grounding of the mast and supporting structure, grounding of the lead in wire to an antenna discharge unit, connection to grounding electrodes, and requirements for the grounding electrode. 16.Servicing Do not attempt to service this TV yourself as opening or removing covers may expose you to dangerous voltage or other hazards. Refer all servicing to qualified service personnel. 17.Damage Requiring Service Unplug the TV from the wall outlet and refer servicing to qualified service personnel under the following conditions: (a) When the power - supply cord or plug is damaged. (b) If liquid has been spilled, or objects have fallen into the TV. (c) If the TV has been exposed to rain or water. (d) If the TV does not operate normally by following the operating instructions. Adjust only those controls that are covered by the operating instructions as an improper adjustment of other controls may result in damage and will often require extensive work by a qualified technician to restore the TV to its normal operation. (e) If the TV has been dropped or the cabinet has been damaged. (f) When the TV exhibits a distinct change in performance - the indicates a need for service. 18.Replacement Parts When replacement parts are required, be sure the service technician has used replacement parts specified by the manufacturer or have the same characteristics as the original part. Unauthorized substitutions may result in fire, electric shock or other hazards. 19.Safety Check Upon completion of any service or repair to the TV, ask the service technician to perform safety checks to determine that the TV is in safe operating condition. 20.Heat The product should be situated away from heat sources such as radiators, heat registers, stoves, or other products (Including amplifiers) that produce heat. 21 If a television is not positioned in a sufficiently stable location, it can be potentially hazardous due to falling. Many injuries, particularly to children, can be avoided by taking simple precautions such as: ● Using cabinets or stands recommended by the manufacturer of the television. ● Only using furniture that can safely support the television. ● Ensuring the television is not overhanging the edge of the supporting furniture. ● Not placing the television on tall furniture (for example, cupboards or bookcases) without anchoring both the furniture and the television to a suitable support. ● Not standing the televisions on cloth or other materials placed between the television and supporting furniture. ● Educating children about the dangers of climbing on furniture to reach the television or its controls. ● Viewing TV using the 3D function Important health and safety information for 3D pictures.Read and understand the following safety information before using the TV’s 3D functon. - Some viewers may experience discomfort while viewing 3D TV such as dizziness,nausea and headaches.If you experience any such symptom,stop viewing 3D TV,remove 3D Active Glasses and rest. - Watching 3D images for an extended period fo time may cause eye strain.If you feel eye strain,stop viewing 3D TV,remove your 3D Active Glasses and rest. - Do not use the 3D Active Glasses for other purposes (such as general eyeglasses,sunglasses,protective goggles,etc.) - Do not use the 3D function or 3D Active Glasses while walking or moving around.Using the 3D function or 3D Active Glasses while moving around may result in injuries due to running into objects,tripping,and/or falling. 8 Getting Started Accessories Accessories following items are included: User’s Manual User’s Manual Remote Control B ox(3D glasses with USB cable ) AV IN AAA Batteries x 2 Screws x 4 Winding YPBPR AUDIO Installing the Base Stand The LCD display is very fragile, and must be protected at all times when removing the base standBe sure that no hard or sharp object, or anything that could scratch or damage the LCD displaycomes into contact with itDO NOT exert pressure on the front of the TV at any time because the screen could crack such as a thick piece of foam 9 Getting Started Front View and Controls 1 4 3 2 5 6 7 9 8 Item Description 1 IR (Infrared Receiver) Receives IR signals from the remote control. Do not put anything near the sensor, as its function may be affected. 2 POWER LED Illuminates blue when the TV is in standby mode and flashes for a few seconds when you turn on/off the TV. 3 POWER ON/OFF Turn the TV power ON or OFF. 4 MENU Displays the OSD (on screen display) menu. 5 SOURCE Toggle between all the input sources. In the OSD menu, use this button as you would use the OK button on the remote control. 6 VOL Adjust the volume. Select sub-menu and adjust setting in OSD menus. 7 CH Change the channels. Select items of OSD menu. Turn the TV standby ON or OFF. 8 9 3D emitter 3D spectacle synchronized signal transmission window. Note:fast power or standby off and on may bring abnormal display on panel. Restart can make it normal. Interval of 15s between off and on is recommended. 10 Getting Started Rear View and Jacks 11 WOOF 7 5 8 1 4 6 10 9 2 7 3 INTERNET Item 1 AV IN 2 Description 1.MAIN CABL E Connect the mains cable to the mains socket. 2.HDMI1/2/3/4 HDMI High Definition Multimedia Interface provides an uncompressed, all digital audio video interface between this TV and any HDMI-device, such as a settop box, bluray disc player, and A V receiver 3.VGA and AUDIO Connect to a PC or other devices with a VGA interface. 4.ANT Connect to the aerial socket on the wall with the RF coaxial cable. 5.OPTICAL Connect to an external digital audio device. 6.YPBPR and AUDIO Connect to a DVD player, Digital Set-Top-Box, or other A/V devices with component(YPBPR) video and audio output jacks. 7.USB1/2 Allows the insertion of a USB storage device to play video, audio, photo and text files and charging of the 3D glasses via USB cable provided. 8.HEADPHONE Connect earphones for private listening. 9.AV IN Connect to the composite video and audio(L/R) output jacks on external video devices. 10.LAN YouGcanGsetGupGyourGTVGsoGthatGitGcanGaccessGtheGInternetGthroughGyourGlocalGareaGnetworkG OLANPGusingGaGwiredGorGwireless connectionU 11. WOOF Connect external bass box. 11 Getting Started Connection instructions Not all A/V devices have the ability to connect to a TV, please refer to the user’s manual of your A/V device for compatibility and connections procedure. When connecting any external A/V device, do not connect the mains cable to the mains socket until all other connections are complete. Best Video Performance Separate audio connection required Connector Type HDMI (480i/480p/576i/576p/720p/1080i/1080p) VGA No Yes PCAUDIO YPBPR Video (480i/480p/576i/576p/720p/1080i/1080p) Yes Composite Video Yes AV IN YPBPR and Audio and VIDEO are connected by headphone-RCA changing cable. Connecting an A/V Device with Composite Cable AV IN VCR AV Cable (not included) Red (R) Red (R) White (L) White (L) Yellow (VIDEO) DVD Player / Recorder Yellow (VIDEO) Video Camera Set-top Box Satellite Receiver Equipment with A/V jacks 1. Use the audio and video cables to connect the external A/V device’s composite video/audio jacks to the Tv’s jacks. (Video = yellow, Audio Left = white, and Audio Right = red) 2. Plug the connected devices into the mains socket before switching on the TV. 3. Select the corresponding source from the TV. Connecting a USB Device You can either use the USB connection cord or directly insert the USB into the USBport at the side of the TV. 12 Getting Started Connecting an A/V Device with Component (YPbPr) Cable AUDIO Red (R) Audio Cable (not included) Red (R) White (L) White (L) Pr Pr COMPONENT OUT VCR R Blu-ray Player / DVD Player / Recorder YPBPR L Pb YPBPR Cable (not included) Y Pb Y Pr Pb Video Camera Set-top Box Y Satellite Receiver Equipment with component jacks 1. Use a component cable to connect the external A/V device’s component output jacks to the TV’s YPbPr jacks. Use an audio cable to connect the external A/V device’s component audio jacks to the TV’s AUDIO(L/R) jacks. 2. Plug the connected devices into the mains socket before switching on the TV. 3. Select the corresponding source from the TV. Connecting an A/V Device with HDMI Cable HDMI -Supports digital connections between HDMI - enabled AV devices such as (PVRs, DVD, BluRay, HDDVD, AV receivers and digital devices.). -Some devices such as a PVR or DVD players require a HDMI signal to be set to output in the device's settings.---Please consult your device user manual for instructions. What is HDMI? - HDMI, or high-definition multimedia interface, is a next-generation interface that enables the transmission of digital audio and video signals using a single cable without compression. -“Multimedia interface” is a more accurate name for it especially because it allows multiple channels of digital audio (5.1 channels).The difference between HDMI and DVI is that the HDMI device is smaller in size, has the HDCP (High Bandwidth Digital Copy Protection) coding feature installed, and supports multi - channel digital audio. HDMI Cable (not included) DVD Player /Recorder Set-top Box Equipment with hdmi jacks 1. Use a HDMI cable to connect the A/V device’s HDMI output jack to the TV’s HDMI jack. 2. Plug the connected devices into the mains socket before switching on the TV. 3. Select the corresponding source from the TV. The HDMI connector provides both video and audio signals, it’s not necessary to connect the audio cable. Connecting a headphone Headphones can be connected to the headphone output on your set. (While the headphone is connected, the sound from the built-in speakers will be disabled. ) HEADPHONE 13 Getting Started Connecting a PC with VGA Cable Audio Cable (not included) VGA Cable (not included) PC 1. Use a VGA cable to connect the PC’s VGA output jack to the TV’s VGA jack. Use an audio cable to connect the PC’s audio output jacks to TV’s PC AUDIO jack. 2. Plug the connected devices into the mains socket before switching on the TV. 3. Select the corresponding source from the TV. Primarily this unit is intended for use as an LCD TV. If you want to use it as a monitor, please contact the manufacturer of the PC Video/Graphic's card for further support. Perfect compatibility is not warranted. Connecting an Audio Receiver with Optical Cable Optical Cable (not included) 1. Use a optical cable to connect the A/V device’s OPTICAL jack to the TV’s OPTICAL jack. 2. Plug the connected devices into the mains socket before switching on the TV. 3. Select the corresponding source from the TV. Connecting the Aerial Connect one end of the RF coaxial cable to the aerial socket on the wall and the other end of the cable to the ANT socket on the TV. OR Ω RF coaxial cable (not included) Do not connect the TV to the mains supply until you have completed all the connections. 14 Remote Control Installing Batteries in the Remote Control 1. Slide the back cover to open the battery compartment of the remote control. 2. Insert two AAA size batteries. Make sure to match the (+) and ( - ) ends of the batteries with the (+) and ( - ) ends indicated in the battery compartment. 3. Close the battery compartment cover. + - + 1. Dispose of your batteries in a designated disposal area. Do not throw the batteries into fire. 2. Do not mix battery types or combine used batteries with new ones. 3. Remove depleted batteries immediately to prevent battery acid from leaking into the battery compartment. 4. If you do not intend to use the remote control for a long time, remove the batteries. 5. The effective range of remote control is suggested in the figure below. Remote Control Operation Range Point the remote control at the TV no more than 8 metres from the remote control sensor on the TV and within 60° in front of the TV and 30° in the vertical angle. The operating distance may vary depending on the brightness of the room. 15° 8M 15° 30° 30° 8M 15 Remote Control Remote Control Panel 1. Switch the TV between on and standby mode. 2. Select among the different input signal sources. 3. Select sound mode. 4. To freeze a picture on screen. 5. Select picture mode. 6. 3D function on/off. 1 2 3 4 5 6 7. Select a program/Input the numbers for special function. 8. Return to the last viewed program in TV mode or as the back key in Yahoo! Widgets application. 7 9. Display the EPG(Electronic Program Guide).(DTV mode) 10. Buttons for special features refer the instructions. 11. Display the OSD (On Screen Display)menu. 12. Exit the OSD menu. 8 13. ▲/▼/◄/► :Up/Down/Left/Right OK: Confirm the selection in the OSD menu. 9 10 Display a list of channels saved in TV tuner memory. 14. Enter the special features of Yahoo . 15. Enter the network main menu. 11 16. Display the favorite channel list. 13 12 17. Adjust the volume. 18. Select a channel. 14 19. Mute and restore your TV sound. 16 15 20. A shortcut to switch to DMP mode directly. 21. Allows you to watch the screens in various format. 17 18 19 20 22 21 22. Display the present screen information such as the current channel and the input source. 23. ◄◄/►►: Use to advance or reverse playback rapidly. ► װ: Play / Pause: Press to start playback or pause. ■ stop: Press to stop the playback. / : To skip to the beginning of the previous or 23 next chapter/track/photo. 24. Start video recorder in DTV mode. 25. Switch between different audio, only applicable when the TV program has the feature. (ATV mode) 26. In DTV mode, display/close the subtitle which is broadcast with the program. 24 26 28 30 In ATV mode, close/display the subtitle which is broadcast with the program when Analog Subtitle in SETTINGS menu is On, not available when Analog Subtitle in SETTINGS menu is Off, display/close the subtitle in mute mode only when Analog Subtitle in SETTINGS menu is Mute. 27. Set the TV sleep timer. 28. Time shift of images on USB devices. 29. Adjust the character size of the teletext. 30. Enter the Teletext mode. 31. Mix Teletext with TV pictures. 16 25 27 29 31 Initial Setup Turning the TV On for the First Time 1. Connect the mains cable to the mains socket after you have completed all the connections. 2. Switch on the POWER ON/OFF at the bottom of the TV. Then the TV switches to on mode. Always disconnect the TV from the mains socket when not in use for a long period of time. To completely disconnect the mains power, please remove the mains plug from the mains socket or switch off the POWER ON/OFF switch. To mains socket 3. The first time you turn the TV on, it will go straight into the Setup Wizard -1 menu. Setup Wizard -1 Please set the local time zone for your TV set: NSW/ACT VIC QLD SA WA TAS NT 4. Press ̵/̷ buttons to select the local time zone where you operate the TV and press OK to confirm. Select Then press button to enter the Setup Wizard-2 menu. Or you can press Exit button to exit the wizard. In Wizard-2, press ̵/̷ buttons to select Home Mode or Shop Mode. Press button to enter next step or press button to return previous step. Next EXIT Exit Setup Wizard -2 Please select your mode Home Mode Shop Mode Select` Home Modes` when installing this TV in your home Select ̷ Back 6. Press ̵/̷ enter the next wizard and the TV will start to search the programs automatically. Next EXIT Exit EXIT Exit Setup Wizard - 3 Channel Installation: Scan Skip Scan Back 7 All available TV channels are stored. This display shows the progress of the tuning and the number of channels. If you want to cancel the scan , please press Exit button. Select Next Setup Wizard - 4 Channel Installation: Status: Scanning... ATV Program Installed: 4 DTV Program Installed: 3 EXIT Setup Wizard - 5 8. After scan, the wizard will display congratulations and then you can press OK button to exit the wizard. Congratulations!! Completed Initial Setup. Please press [OK] to exit the wizard. Back 17 Cancel Initial Setup Selecting the Input Source Source TV AV Component VGA HDMI HDMI HDMI HDMI DMP 1. Press the Source button to display the input source list. 2. Press the ̵/̷ buttons to select the input source that you want to view. 3. Press the OK button to confirm your selection. Alternative - Press the button to switch to yahoo interface directly if the network is normal. - Press the button to display the disclaimer and operate according to the menu remote until the main menu displays on the screen, then press / t o switch to Yahoo! Widgets/DMP/Opera Browser/User Manual/Network Setting/ TV Menu selection interface. - Press Media to switch to DMP mode directly. Channel Selection s 0ress the CH̵/̷ buttons on the front panel of the TV or CH /V buttons on the remote control repeatedly or the 0~9 buttons to select channels. Alternative Select Enter Menu Exit OK Channel List - All 1. 2. 3. 901 902 903 904 OK - Press OK button to display the Channel List when there is no menu on the screen. Press Red/Green buttons to turn to the last /next page. Press ̵/̷ buttons to select a channel and then press OK button to view the selected channel. Press the Yellow button to display the list type selection. Press ̵/̷ to select the type and press OK to confirm. uttons to select the s 0ress the FAV button to view the Favorites. Press / favourite list. Then press Yellow button to Add the channel. If you want to add another channel, press CH /V buttons to switch to the channel and then press Yellow button to add it. If you want to erase a channel, press Red/Green buttons to page up/down and press ̵/̷Gbuttons to select the channel on the list, then press Yellow button to erase it. If you want to view a channels, press ̵/̷ buttons to select a channel and then press OK button to view the selected channel if you have previous preset your favourite channels. Dt29 1080i Dt29 576i Dt29 576p a b c d Select Enter Select List MENU Page up/down Exit Channel List Selection All Digital Radio Analogue Favourites 1 Channel 1 Favourites 4 Add/Erase Favourites 2 Page up/down s 0ress the Last button to return to the previously viewed channel. Display Channel Information s 0ress the Info button to display the current information. Volume Adjustment s 0ress the VOL̵/̷ buttons on the front panel of the TV or the VOL+/- buttons on the remote control to adjust the volume. s )f you want to switch the sound off , just press the button. You can restore the sound by pressing the button again. Selecting Picture Mode s 0ress the Picture button repeatedly to select the picture mode among Soft, User, Bright and Standard. In User mode, you can adjust the image in PICTURE menu to suit your personal preferences. Selecting Sound Mode s 0ress the Sound button repeatedly to select the sound mode among Standard, Speech, User and Music. In User mode, you can adjust the sound in SOUND menu to suit your personal preferences. 18 Initial Setup PVR • The function is to be used in DTV source only. The format of disk must be FAT32 or NTFS. Press the PVR button to record the program that is live. Press [■] button to stop record and a *.pvr file will be saved. The files can be played in DMP. We recommend you use a dedicated USB storage device for recording live TV. Please note that Hisense will not assume any responsibility for any lost data and cannot guarantee perfect compatibility with all mass storage devices. Selecting the Aspect Ratio • Press the Zoom button to change the screen aspect ratio . Freezing a Picture • Press Still button to freeze current viewing picture and press again to return to normal. Setting the Sleep Timer • Press the Sleep button repeatedly to set the time period before the TV turns off automatically. To cancel the sleep time, press the Sleep button repeatedly until Off appears. Audio Function(ATV mode) • Press the AudioI/II button to select the sound if the TV program has the features. EPG(DTV mode) • Press EPG to display channel information on program guide list. Press Red / Green to switch to the previous/next day. Press Yellow button to display the information of the program. Press ▲/▼ to select the channels and press OK to confirm. Press ◄/► to select the time period. Press Blue to display the Schedule List. 1. Press ▲/▼ to select the options. 2. Press ◄/► to adjust them. Input the date and time: Press ◄/► to move to the position you want to set and then press 0~9 to input the numbers. Schedule type: you can select between Remind and Record. Repeat type: You can select among Once, Daily and Weekly. If Weekly is selected, you can press ▲/▼/◄/► to select the days in the following lines and press OK to confirm. 3. Press ◄/► to select Add and press OK to confirm. Tuesday, 21-July-2004 10:00:00 21/07/2004 A A A 1 NINE Digital 2 Dt29 576i 3 Dt29 576p 901 a 902 b 903 c 21:30 22:30 20 To 1 20 To 1 LB LB Nine ... Nine ... LB 22:30 - 23:15 Tue, 21-Jul Written and performed by... Prev day Next day View detail Schedule List Schedule List Channel number NINE Digital Start date Start time Stop time Schedule type Repeat type 3 2006/07/01 03:00 06:00 Remind Weekly Sunday Monday Tuesday Thursday Friday Saturday Add Select Wednesday Cancel EXIT Exit Time Shift Firstly, you must make sure to insert a USB disk and its storage capacity is no less than 2G. Press T.shift to display the menu of setting USB disk for timeshift. Then you can press ▲/▼ to select Auto/Manual and press ►/OK to confirm. 30 13:00 13:30 1X Press T.shift to display the menu on the right. Play/Pause FR FF Stop Press ►II button to play/pause. Press button to reverse and press button to advance playback rapidly. Press ■ to exit the function. To have better performance, you may be reminded to format the USB disk. ►II 19 Changing the TV Settings Tuning Menu 1. Press Menu button and then press ̵/̷ buttons to select TUNING menu. TUNING Manual Scan Auto Scan Channel Edit Signal Information 3. Press ̵/̷Gbutton to select the item in the menu. to enter the submenu. Turn in local television services. OK 5. Press Menu button once to return to the previous menu. Enter Select MENU Exit 6. Press Menu button repeatedly to exit the menu. Manual Scan Press ̵/̷Gbuttons to select it and press OK to enter the submenu. If lock has been set in Lock menu, a pop-up screen will be displayed to ask you to input the password. Press ̵/̷ ATV Manual or DTV Manual. Manual Scan Search Type Channel Number Channel Name Colour System Sound System Frequency Start Search Press ̵/̷ buttons to se to adjust the setting. Ch an n el N u m b er : Display the channel number. So u n d S y s t em (f o r ATV o n l y ):B. ATV Manual A1 a Auto B/G 48.25MHz Adjust Select MENU Back Auto Scan Use this to automatically search and store all available channels. Press ̵/̷Gbutton to select it and press OK to start to search. Channel Edit Allows you to edit the TV programs. Press ̵/̷Gbutton to select the programs you want to edit. Rename: Press the Green button to display the Rename menu. press Yellow button to switch between capital and lowercase. Press ̵/̷ / buttons to select the characters and press OK to input . If you want to delete the character , please press Red button. Then press Green button to save the new name. Skip: Press the Yellow button to skip the selected channel and press again to undo it. Channel Edit 1 2 3 901 902 903 904 Dt29 1080i Dt29 576i Dt29 576p a b c d DTV DTV ATV ATV ATV ATV Skip Rename Select 20 DTV MENU Back Skip Changing the TV Settings Picture Menu 1. Press Menu button and then press menu. 3. Press / / buttons to select PICTURE button to select the item in the menu. PICTURE Brightness Contrast Saturation Sharpness Backlight Advanced Settings 3D Adjust image to suit personal preferences. to enter the submenu. 5. Press Menu button once to return to the previous menu. 6. Press Menu button repeatedly to exit the menu. OK Brightness Enter Select 50 50 50 10 MENU Exit Increase or decrease the amount of white in the picture.(for User mode) Contrast Adjusts the difference between light and dark levels in the picture.(for User mode) Saturation Adjusts the color intensity. Sharpness Ajusts the level of crispness in the edges between light and dark areas of the picture. Backlight Adjusts backlight to suit light conditions in the room. PICTURE Backlight Mode to select Manual/ Optical Sensor/Adaptive Back Light. Backlight Mode Backlight Adjust Manual 50 Backlight Adjust(only available when Backlight Mode is Manual): Press ̵̷ Adjust backlight mode Alternative Select MENU Exit Advanced Settings Specialized features settings Watching 3D movies Please note that you need to hook up a 3D DVD player to view 3D content from this TV. First charge your 3D glasses via USB cable provided, connecting to the USB ports on the back of the TV allow 4 hours to charge. Press the 3D button on the TV remote the arrow right to switch on or off. ( Also check the external device instructions for 3D viewing). PICTURE On or others 3D format. When watching 2D video,please set up 3D switch as Off. 3D Mode L-R Switch Depth of Field Protrusion Distance to TV 3D-to-2D 3D Mode 3D SWITCH. Select the 3D input format. 3D Mode Off Left-Right 16 16 10 Off Select Operation Off 2D-to-3D Turns the 3D function off. Convert a 2D image to 3D. Side-by-Side One format of 3D signal: L/R images combine as one frame side by side. Top-and-Bottom Another format of 3D signal: L/R images combine as one frame by top and bottom. 21 MENU Exit Changing the TV Settings L-R Switch In SG(Shutter Glasses) 3D Mode, the left-eye and right-eye of glasses switch on in turns according to the 3D image sync from TV. Some 3D image sync may not be accordant to 3D content, so that 3D effect is not available. Please adjust L-R switch to get correct 3D sync signal. Depth of Field Adjust local depth in 2D-to-3D mode. This function is only activated when the 3D Mode is 2D-to-3D. Protrusion Global depth, adjust global shift of L-Eye and R-Eye. Normally the default value no need to be changed. Distance to TV Adjust the visual distance between the 3D image and screen. This function is only activated when the 3D Mode is 2D-to-3D. 3D-to-2D Displays the L or R image only, convert the 3D image to 2D image. This function is only activated when the original signal of TV is 3D image. If there is any obstacle between the emitter and 3D Active Glasses, the proper 3D effect may not be obtained. When 3D video is watched under the fluorescent lamp(50-60Hz) or tri-band fluorescent tube,there may be slight screen flicker,so please adjust the illumination downward or switch off the light. Some image functions may not be applicable under 3D mode,such as E.S/Zoom key is not applicable under 3D mode. In order to fully enjoy this feature, you must purchase a pair of Hisense 3D Active Glasses(FPS3D02) to view 3D video. Hisense Active Glasses are sold separately. For more detailed purchasing information, contact the retailer where you purchased this TV. 22 Subwoofer Internal Speaker or External Speaker. Subwoofer Boost bass. Press buttons to select Internal Subwoofer, External Subwoofer or Off. Bass Boost Adjusts the effect of bass. 3 Internal Speaker External Subwoofer Changing the TV Settings Screen Menu 1. Press Menu button and then press ▲/▼ buttons to select SCREEN menu. 2. Press ►/OK button to enter the menu. 3. Press ▲/▼ button to select the item in the menu. SCREEN H Position V Position Phase Clock Auto Adjust 0 0 0 0 0 Image positioning and PC settings. OK 4. Press ◄/► button to adjust the selected item. 5. Press Menu button once to return to the previous menu. 6. Press Menu button repeatedly to exit the menu. H Position Adjusts the horizontal position of the image, V Position Adjusts the vertical position of the image. Phase Adjusts the VGA phase to match the PC(VGA mode only) Clock Adjusts the VGA clock to match the PC clock(VGA mode only) Auto Adjust Allows you to synchronize input signal automatically (VGA mode only) Display Mode Allows you to select Full or Zoom (HDMI mode only) When Zoom selected, the other options can be set. 24 Enter Select MENU Exit Changing the TV Settings Settings Menu 1. Press Menu button and then press ▲/▼ buttons to select SETTINGS menu. SETTINGS 2. Press ►/OK button to enter the menu. 3. Press ▲/▼ button to select the item in the menu. 4. Press ◄/► button to adjust the selected item or press OK button to enter the submenu. Blue Screen OSD Setting Time Setup Setup Wizard Subtitle Network Advanced Features Set optional controls. OK Off Off Enter Select MENU Exit 5. Press Menu button once to return to the previous menu. 6. Press Menu button repeatedly to exit the menu. Blue Screen (for TV mode) Allows the blue background to turn On/Off during no signal conditions. OSD Setting Allows you to set the OSD transparency and time out. Transparency: Allows you to set the transparency of on-screen menu. Time Out: Allows you to select the display time of the on-screen menu. Time Setup Allows you to set the clock, date and time. Country Region: Allows you to select the local time zone according to your region. Time: Press OK button to enter the submenu. Then press ▲/▼ to select the following options and press ◄/► to set. a. Auto Synchronization - Allows to adjust the date and time manually when it is set to Off. Select On to output the time information from digital signal(DTV) b. Power On Timer - When On, Allows you to set the time when the TV turns on automatically. c. Power Off Timer - When On, Allows you to set the time when the TV turns off automatically. SETTINGS Auto Synchronization Off Date 2010/07/01 Time 00:00:00 Power On Timer On Time 00:00:00 Power Off Timer On Time 00:00:00 Obtain date and time from broadcaster. How to set the date and the time Press ◄/► to move the cursor to the position you want to set and then press 0~9 buttons to set. Sleep Timer: Press ◄/► to set the time period before the TV turns off automatically. Setup Wizard Allows you to set the Setup Wizard On/Off the next time when you turn on the TV. Subtitle Allows you to adjust the subtitle status. Press OK to enter the submenu. Then press ▲/▼ to select the following options and press ◄/► to adjust. Analog Subtitle(for ATV mode): You can select Mute, Off and On. Subtitle Type: You can select Normal and Hearing Impaired. 25 Select MENU Back Changing the TV Settings Settings Menu Network Press OK to enter the submenu. Then press ̵/̷ to select the following options. Configuration: a. Internet Connection- Select On or Off. When off selected, the following options can not be available. b. Interface - Allows you to select connection type: Wireless and Ethernet. c. Wireless Setting - Allows you to set wireless connection. Press OK to enter the submenu and press ̵/̷ to Wireless Setting select among Scan, Manual and Auto, then press ►. SSID Security If Scan is selected, Press OK to confirm. The network test1 None test2 S1 available will appear on the screen. test3 S2 Press ̵/̷ to select one and press ►/OK to confirm. test4 S3 If the Security is None, you can connect the network directly. Previo... Otherwise, you should input the password first. Press OK to display the character keyboard. Press ̵/̷ to select the character and press OK to confirm. (Aa: Switch between capital letter and lowercase. Space: Select to leave space. : Select to delete the character you have input. ) Then press ̷V◄V► to select OK and press OK to confirm. d. Information - Press OK to display network configuration information. e. IP Setting - Allows you to set IP address, subnet mask, gateway and DNS. Press OK to enter the submenu and press ̵/̷ to select the options. Address Type: Press ◄/► to set the address Type : Manual, Auto. How to input the following options Press / to move the cursor to the position you want to set. Then press 0~9 to input the numbers and you can press ̵ once to delete one number or press ̷ to delete all the selected number. If you have set one option successfully, Press Menu to exit the option and press ̵/̷ to select the next options you want to set. f. Connection Test - Press OK button to test network status. A J S 1 . B C K L T U 2 3 - Aa OK D M V 4 MENU Back SETTINGS Address Type IP Address Subnet Mask Default Gateway Primary DNS Secondary DNS Network Upgrade: Press OK to check the process and it will prompt you to upgrade the software. 26 Next E F G H I N O P Q R WX Y Z 0 5 6 7 8 9 Space <= Cancel Applications: Network application. Press OK button to enter the submenu. Press ◄/► to set On or Off. Select Signal 75 56 45 10 Manual 176. 16. 0. 0 255. 255. 255. 255 172. 16. 0. 0 172. 16. 2. 2 0. 0. 0. 0 0-9 Input Delete MENU Back Changing the TV Settings Settings Menu Advanced Features Press OK button to display the feature of the TV. Time Shift Mode Allows you to adjust the time shift function On or Off. When Off is selected, the T.shift on the remote control are not available. Version Info Press OK to enter the submenu to view the software version information. Yahoo Version Info Press OK to enter the submenu to view the yahoo version information. Restore Factory Settings Press OK to restore all TV settings to factory default. Restore Yahoo Settings Press OK to restore all yahoo settings to factory default. 27 Master Reset Reset TV set. After reset, all channels and image settings will be erased and you need perform a tuning Auto-scan. 28 More Settings PC Setting Set the PC Software properly to match one of the below options. Supported VGA Modes: VGA____ (640×480 60Hz) SVGA___ (800×600 60Hz) XGA____ (1024×768 60Hz) SXGA___ (1280×1024 60Hz) Note: Your PC/Notebook may not be able to display some of these resolutions. Take Windows XP as an example, and the Windows system display setting is as illustrated: 1. Right click anywhere on your display, select 'Properties'. 2. Find the Settings tab on the dialogue box, set the screen Resolution. 3. See above details about the resolutions supported by this unit. 4. Click OK to exit. Please note: Primarily this unit is intended for use as an LCD TV. If compatibility is a problem when using this unit as a monitor, please contact the manufacturer of the PC Video/Graphic's card for further support. Perfect compatibility is not warranted. 29 More Sett ings Network Connection You can set up your TV so that it can access the Internet through your local area network (LAN) using a ethernet or wireless connection. Connecting to a Wired Network You can attach your TV to your LAN using cable in thr ee ways: ttach your TV to your LAN by connecting the LAN port on the back of your TV to an exter nal modem using a Cat 5 cable. See the diagram below. Stand Rear Panel The Modem Port on the Wall External Modem (ADSL / VDSL / Cable TV) Modem Cable LAN Cable to an external modem. Use Cat 5 cable for the connection. See the diagram below. The Modem Port on the Wall Stand Rear Panel External Modem (ADSL / VDSL / Cable TV) Modem Cable LAN Cable IP Sharer (having DHCP server) LAN Cable Depending on how your network is configured, you may be able to attach your TV to your LAN by connecting the LAN port on the back of your TV directly to a network wall outlet using a Cat 5 cable. See the diagram below. Note that the wall outlet is attached to a modem or router elsewhere in your house. Stand Rear Panel The LAN Port on the Wall LAN Cable If you have a Dynamic Network, you should use an ADSL modem or router that supports Dynamic Host Configuration Protocol (DHCP). Modems and routers that support DHCP automatically provide the IP address, subnet mask, gateway, and DNS values your TV needs to access the Internet so you don’t have to enter them manually. Most home networks are Dynamic Networks. Some networks require a Static IP address. If your network requires a Static IP address, you must enter the IP address, subnet mask, gateway, and DNS values manually on your TV’s Cable Setup Screen when you set up the network connection. To get the IP address, subnet mask, gateway, and DNS values, contact your Internet Service Provider (ISP). If you have a Windows computer, you can also get these values through your computer. Yo u can use ADSL modems that support DHCP if your network requires a Static IP address. ADSL modems that support DHCP also let you use Static IP addresses. 30 More Settings Network Setup (Auto) Use the Automatic Network Setup when connecting your TV to a network that supports DHCP. To set up your Tv’s cable network connection automatically, follow these steps: How to set up automatically 1. Connect your TV to your LAN as described in the previous section. 2. Turn on your TV, operate according to the description in the SETTING menu until the Network screen appears. 3. On the Network screen, select Configuration and press OK button to enter the submenu. 4. Set Internet Connection to On and Interface to Ethernet. 5. Select IP Setting and press OK to enter it. 6. Set Address Type to Auto. 7. Auto acquires and enters the needed internet values automatically. 8. If the Network function has not acquired the network connection values, go to the manual for directions. SETTINGS Address Type IP Address Subnet Mask Default Gateway Primary DNS Secondary DNS Auto 176. 16. 0. 0 255. 255. 255. 255 172. 16. 0. 0 172. 16. 2. 2 0. 0. 0. 0 Select MENU Back Network Setup (Manual) Use the Automatic Network Setup when connecting your TV to a network that requires a Static IP address. Getting the Network Connection Values To get the network connection values on most windows computers, follow these steps: 1. Right click the Network icon on the bottom right of the screen 2. In the pop-up menu that appears, click Status. 3. On the dialog that appears, click the Support tab. 4. On the Support tab, click the Details button. The network connection values are displayed. How to set up manually To set up your Tv’s cable network connection manually, follow these steps: 1. Follow Steps 1 through 5 in the “How to set up automatically” procedure. 2. Set Address Type to Manual. 3. Press ▲/▼ to select IP Address and press ◄/► to move the cursor to the entry field. Then press 0~9 buttons to enter the numbers. 4. Press Menu to exit IP Address and press ▲/▼ to select the next options to enter the numbers. 5. When done, press Menu to return to the previous menu . 6. Select Connection Test to check the internet connectivity. SETTINGS Address Type IP Address Subnet Mask Default Gateway Primary DNS Secondary DNS Manual 176. 16. 0. 0 255. 255. 255. 255 172. 16. 0. 0 172. 16. 2. 2 0. 0. 0. 0 0-9 31 Input Delete MENU Back More Settings Connecting to a Wireless Network To connect your TV to your network wirelessly, you need a wireless router or modem and the Wireless LAN Adapter recommended by Hisense , which you connect to your TV’s side panel USB jack. See the illustration below. Stand Side Panel The LAN Port on the Wall USB2 OPTICAL USB1 Wireless IP Sharer (AP having DHCP Server) Wireless LAN Adapter LAN Cable It is necessary to connect the Wireless LAN Adapter to the USB 2 port. Hisense's recommended Wireless LAN Adapter supports the IEEE 802.11A/B/G and N communication protocols. Hisense recommends using IEEE 802.11N. When you play the video over a IEEE 802.11B/G connection, the video may not play smoothly. ▪ You must use the Hisense’s recommended USB Wireless LAN Adapter. ▪ Only USB2 supports wireless LAN Adapter. ▪ Yo u must use the Hisense's recommended Wireless LAN Adapter to use a wireless network. ▪ To use a wireless network, your TV must be connected to a wireless IP sharer. If the wireless IP sharer supports DHCP, your TV can use a DHCP or static IP address to connect to the wireless network. ▪ Select a channel for the wireless IP sharer that is not currently being used. If the channel set for the wireless IP sharer is currently being used by another device nearby, this will result in interference and communication failure. ▪ If you apply a security system other than the systems listed below, it will not work with the TV. ▪ If Pure High-throughput (Greenfield) 802.11N mode is selected and the Encryption type is set to WEP, TKIP or TKIP-AES (WPS2Mixed) for your AP, Hisense TVs will not support a connection in compliance with new Wi-Fi certification specifications. ▪ If your AP supports WPS (Wi-Fi Protected Setup), you can connect to the network via PBC (Push Button Configuration) or PIN (Personal Identification Number). WPS will automatically configure the SSID and WPA key in either mode. ▪ If your router, modem, or device isn’t certified, it may not connect to the TV . ▪ Connection Methods: You can setup the wireless network connection three ways. -Scan -Manual -Auto ▪ The Hisense's recommended Wireless LAN Adapter may not be recognized or work properly when connecting via a USB hub or via a USB extension cable . 32 More Settings DLNA Settings Computer, TV and other digital devices can be connected via DLNA and they can share files with each other. You can use the TV set as a DLNA DMP device to enjoy movies, pictures, musics and other multimedia materials in your computer through DLNA connection. DLNA Setting needs to be set on TV and computer Respectively. The Network setup on the TV ’s screen: SETTINGS Network setup: 1. Turn on your TV, operate according to the description in the SETTING menu until the Network screen appears. 2. On the Network screen, select Configuration and press OK button to enter the submenu. 3. Set Internet Connection to On and Interface to Ethernet. 4. Select IP Setting and press OK to enter it. 5. Set Address Type to Auto. 6. Auto acquires and enters the needed internet values automatically. 7. If the Network function has not acquired the network connection values, go to the manual for directions. 8. If set Address Type to Manual, enter IP Setting . Then press ▲/▼ to select IP Address and press ◄/► to move the cursor to the entry field. Then press 0~9 buttons to enter the numbers. 9. Press Menu to exit IP Address and press ▲/▼ to select the next options to enter the numbers. 10. When done, press Menu to return to the previous menu . 11. Select Connection Test to check the internet connectivity. If the test is not successful, please check Whether the configuration is correct. If the test is successful, operate as the following instructions. Address Type IP Address Subnet Mask Default Gateway Primary DNS Secondary DNS Auto 176. 16. 0. 0 255. 255. 255. 255 172. 16. 0. 0 172. 16. 2. 2 0. 0. 0. 0 0-9 Input Delete MENU Back SETTINGS Address Type IP Address Subnet Mask Default Gateway Primary DNS Secondary DNS Manual 176. 16. 0. 0 255. 255. 255. 255 172. 16. 0. 0 172. 16. 2. 2 0. 0. 0. 0 0-9 Input Delete MENU Back MENU Back Set DLNA to On: 1. On the Network screen, select Applications and press OK to enter the submenu. 2. Press ◄/► to set DLNA to On. SETTINGS DLNA On Set DLNA on or off. Select 33 More Settings Media Share Settings in computer If your computer can not support DLNA, you need install the software that supports DLNA such as TVersity and Windows Media Player11. It is recommended to select Windows Media Player11 to set and the setup is more simple. Setting to share files with Windows Media Player11 in computer. 1. Start the Windows Media Player11. 2. Click “Library” and then “Add to Library...”. 3. The “Add To Library” will pop up on the screen. Click “Add”. 4. Select a folder and click OK button. 5. Click “Close” to close the dialog. 34 More Settings Setting to share files 1. Click “Library” and move the cursor to select “Media Sharing...” 2. Click the box before “Share my media” to select it. 3. An equipment icon will appear on the white area if the DLNA Settings has been correctly set. Select the sign and then click “Allow”. Then the TV can directly access the shared files in the computer. 35 More Settings View the shared files on TV DMP C:\ Information All 1. Press Media button to enter the DMP mode directly. Return F1 F2 F3 Video 2. The DMP menu appears on the screen as follow . Then you can view the shared folders. 01/01 Music Picture You can see more operation of DMP in the next chapter. Book Select OK Enter Exit Return Media Type Page Up/Down Digital Media Play Please note that Hisense will not assume any responsibility for any lost data and cannot guarantee perfect compatibility with all mass storage devices.Be sure to insert the USB disk or mobile hard disk with standard USB2.0 port. ▪ Press Media button to enter the main menu (If you want to exit DMP, DMP C: you can press Source button to switch to other sources) Information All ▪ Press Red button to switch the media type. Return F1 F2 F3 Video ▪ Press Yellow/Blue to turn to the previous/next page. .txt Music 1. Press ▲/▼/◄/► to select the folder/file you want to open and then press OK to enter/play the folder/file. 2. Press Exit to return to the previous directory. .mp3 01/01 .png Picture Book Enjoy Video Files Select 1. Press Red button to switch to All or Video. 2. Press ▲/▼/◄/► to select the video you want to view. 3. Press OK to play the video. 4. Press ■/Exit to exit the video and return to the previous directory. 5. Press Info button to display/exit the video control bar. 6. Press ◄/► to select the function icon and then press OK to confirm. Blood.. OK Enter Exit Return Media Type Page Up/Down 1 ► ► II I◄ ◄I ►► ►► 2 3 4 5 6 ■ 00:00:36/00:20:01 7 8 9 10 11 Function of icons: 1) The progress bar when playing. 2) Play/Pause. You can press ►II directly to play/pause when there is no control bar on the screen. 3) Play the previous video. You can press directly to achieve the function when no control bar display on the screen. 4) Play the next video. You can press to achieve the function when no control bar display on the screen. 5) Fast backward. Then press OK to select the backward speed. You can press ◄◄ to achieve the function. 6) Fast forward. Then press OK to select the forward speed. You can press ►► to achieve the function. 7) Select time to play 1. Press ◄/► to select the position you want to set. 2. Press 0~9 to set the time and press ▲/▼/◄/► to adjust it. 3. Press OK to confirm and the video will to play at the time you have set. 8) Play list 1. Press Yellow/Blue button to page and press ▲/▼ to select the video. 2. Press OK to confirm. And press Exit to exit the menu. Option Set 9) Options 1. Press ▲/▼ to select the options in the menu. 2. Press ◄/► to select the settings. 3. Press OK to confirm. 10) Program info Allows you to view the program information. 11) Stop playback Repeat Once Picture Mode User Subtitle Selection NO AUDIO I I/I Select OK Enter Exit Exit You can press Zoom button to change the aspect ratio( Normal , Full Screen , Original Size ) while playing the video. 36 Digital Media Play The list of compatible video format: File Extension .avi Sti Container AVI * .wmv ASF *. ask * .mp4 MP4 *.mov *.mkv MKV Support or Not Video Decoder Resolution Frame/Sec Divx 3.11 1920X1080 30 Support Divx 4.x 1920X1080 30 Support Divx 5.1 1920X1080 30 Support MPEG1 1920X1080 30 Support MPEG2 MP@HL 768X576 30 Support H.264 BP LV 4.0 (*2) 1920X1080 30 Support H.264 MP LV 4.0 1920X1080 30 Support H.264 HP LV 4.0 1920X1080 30 Support MPEG-4 SP@HL 3.0 1920X1080 30 Support MPEG-4 ASP@HL 4.0 (*1) 1920X1080 30 Support MPEG-4 ASP@HL 4.0 1920X1080 30 Support Motion JPEG 320X240 30 Support Window Media Video V9 1920X1080 30 Not Support Window Media Video V8 1920X1080 30 Not Support Window Media Video V7 1920X1080 30 Not Support VC-1 1920X1080 30 Not Support H.264 BP LV 4.0 (*2) 1920X1080 30 Support H.264 MP LV 4.0 1920X1080 30 Support H.264 HP LV 4.0 1920X1080 30 Support MPEG-4 SP@HL 3.0 1920X1080 30 Support MPEG-4 ASP@HL 4.0 (*1) 1920X1080 30 Support Motion JPEG (*.mov only) 320X240 H.264 BP LV 4.0 (*2) 1920X1080 30 Support H.264 MP LV 4.0 1920X1080 30 Support H.264 HP LV 4.0 1920X1080 30 Support MPEG-4 SP@HL 3.0 1920X1080 30 Support MPEG-4 ASP@HL 4.0 (*1) 1920X1080 30 Support Motion JPEG 1920X1080 30 Support Window Media Video V9 1920X1080 30 Not Support Window Media Video V8 1920X1080 30 Not Support Window Media Video V7 1920X1080 30 Not Support VC-1 1920X1080 30 Not Support Support * .mpg PS MP EG1 768X576 30 Support *.mpeg Program MPEG 2 MP@HL 1920X1080 30 Support 37 Digital Media Play Sti File Extension Container Others(ts) TS (Transport Stream) RM *.rm *.FLV FLV Support or Not Video Decoder Resolution Frame/Sec MPEG2 MP@HL 1920X1080 30 Support H.264 BP LV 4.0 (*2) 1920X1080 30 Support H.264 MP LV 4.0 1920X1080 30 Support H.264 HP LV 4.0 1920X1080 30 Support RV 8(rv30) 768X576 30 Not Support RV 9(rv40) 1920X1080 30 Not Support TB 10(rv40) 1920X1080 30 Not Support PCM 1920X1080 30 Support MP3(MPEG1 Layer3) 1920X1080 30 Support MPEG4 AAC-LC(H 264) 1920X1080 30 Support MPEG4 HE-AAC(H 264) 1920X1080 30 Not Support For MPEG4 ASP profile,B-VOP and 4MV are supported GMC is supported but only one point is allowed. For H.264 BP profile,No support for FMO,ASO& redundant slice. Enjoy Music Files DMP C: Information All Return 1. Press Red button to switch to All or Music. / t o select the music you want to view. 2. Press 3. Press OK to play the music. F1 F2 F3 a3.mp3 a4.mp3 Video a3.mp3 a1.mp3 Music a2.mp3 00:04:13 01/01 Picture Book Select 4.All the music is listed on the left. Press ̵/̷ to select the music and o mark it. You can press Yellow/Blue to turn to the pres previous/next page. -Press Green button to select the Mode:Mark/All/Single. OK Enter Exit Return Media Type Page Up/Down Current Playing: a3.mp3 a1.mp3 a2.mp3 Mode: None Status: Play a3.mp3 00:00:24/00:04:13 Title: a3 Artist: Album: Genre: Other Year: Duration:00:04:13 Next: a4.mp3 5. Press Exit to exit the music playback interface. 01/01 Mode 38 Page Up/Down Select Mark II Play/Pause Exit Return Digital Media Play Browse the Pictures 1. Press Red button to switch to All or Picture. 2. Press ▲/▼/◄/► to select the picture you want to view. 3. Press OK to browse the picture. 4. Press ■/Exit to exit the picture and return to the previous directory. DMP C: Information All Return F1 a1.jpg a2.jpg F2 F3 Video a3.jpg Music a3.jpg a4.jpg 640:480 01/04 Picture Book Select When browsing the pictures 1. Press Info button to display/exit the picture control bar. 2. Press ◄/► to select the function icon and then press OK to confirm. Enter OK Exit I◄ ◄I Return II Media Type Page Up/Down ■ 1 2 3 4 5 6 7 8 9 10 1) Browse the previous picture. You can press directly to achieve the function when no control bar displays on the screen. 2) Browse the next picture. You can press directly to achieve the function when no control bar displays on the screen. 3) Allows the picture to rotate 90 degrees clockwise. 4) Allows the picture to rotate 90 degrees anticlockwise. 5) Play/pause. You can press OK directly when no control bar on the screen. 6) Stop browsing the picture. You can press ■ directly when no control bar on the screen. 7) Zoom in the picture. 8) Zoom out the picture. 9) Option Set. Press ▲/▼ to select the options and press ◄/► to set them. Speed - Allows you to browse the picture at different speed. Option Set Effect - Allows you to set how the picture appears on the screen. Fast Speed Background Music - Allows you to enjoy the music when browsing the pictures if it is None Effect set On. On Background Music 10) Picture info. Allows you to view the picture information. Enter Browse the Text Files DMP 1. Press Red button to switch to All or Book. 2. Press ▲/▼/◄/► to select the text you want to view. 3. Press OK to confirm. 4. Press ■/Exit to exit it and return to the previous directory. C: Information All Return F1 F2 a2.txt a3.txt F3 Video a3.txt a1.txt Music a4.txt 01/01 Picture Book Select 39 OK Enter Exit Return Media Type Page Up/Down Digital Media Play When browsing the text files When no tool bar appears on the screen, you can press ̵/̷ to move the text lines up/down. Press Info to display/exit the tool bar. Press ◄/► to select the corresponding icons and then press OK to confirm. .txt II I 1 2 I ̰ 3 4 1) Stop/resume automatic page 2) View the previous page. 3) View the next page. 4) Stop browsing. 5) Allows you to select page to view. 1. Press 0~9 buttons to input the page or press ̵/̷ to adjust it. 2. Press ◄/► to select Enter and press OK to confirm. 1/26 Status:Play 5 Goto Page Enter 0000 Network Function How to enter the network main menu interface The Network setup must be correct. Then you can use the function. 1. Press HICAST@ button to display the Disclaimer. Disclaimer Welcome to Hisense Any content and service accessed through this device, while only intended for individual noncommercial use, shall be the property of the applicable third party and subject to protection by regulations and laws on copyright, patent, trademark and other intellectual property rights. No part of such content and service may be modified, duplicated, published, uploaded, distributed, translated, marketed, or used to make and distribute products derived from it without the prior permission of the content owner or service provider. 2. Press ̵V̷Gto page up/page down to view the content . Press Red button to cancel. Press Yellow button to exit it. Press Green button to agree and enter the Welcome to Hisense menu. Name: Password: Auto Login: You acknowledge and agree explicitly that you will solely bear the risk associated with the use of this device, and further you will solely bear any risk In this menu: s If you have the name and the password, input them and press Green button to confirm to login. Agree Cancel Page Up/Down Exit Login Register Skip Exit How to input the numbers and characters 1. Press OK button to display the keyboard. 2. Press to select Mode on the keyboard and press OK to select between abc123 and ABC!@#. 3. Press ̵/̷/◄/► to move the cursor to the characters you want to select and then press OK to confirm. If you want to delete one character, move the cursor to backspace key and press OK to confirm. If you want to delete all characters, move the cursor to Clr key and press OK to confirm. Welcome to Hisense 4. Move the cursor to Enter key and press OK to confirm if you have completed the input. s If you want to enter it directly without register next time, press ̵/̷ to select Auto Login and then press OK to confirm. s If you want to skip this step, just press Blue button to enter the network main menu interface. s If you do not have the name and the password, press Red button to enter the register menu. 1). Press ̵/̷Gto select the items of register information . Register Information Name: * Only numbers(0~9)and characters(a~z,A~Z)accepted Password: * Confirm Password: * Email: Note: Items with * are required Submit 40 Up/Down Back Network Function 2). Input the numbers and characters. You can refer to the instructions for How to input the numbers and characters above. Welcome to Hisense Congratulations Only numbers(0~9) and characters(a~z,A~Z) can be accepted. Items with * are required. Register successful! Please Enter Menu Login 3). Press Red button to return to the previous menu or you can press Green button to submit after you have input all the items. And the congratulations interface will display on the screen. 4). Press Menu button to enter the login interface. then input the name and password to enter the network main menu interface. - Press ◄/► to select the options. - Press OK to enter the options. The network main menu interface: Press OK to launch Yahoo! Connected TV. How to enter the Yahoo interface After entering the network main menu interface(according to How to enter the network main menu interface), Press ◄/► to select the Yahoo icon and press OK to enter it. Alternative -You can press button to enter the interface directly. How to modify the password Network Setting After entering the network main menu interface(according to How to enter the network main menu interface), Press ◄/► to select the Network Setting icon and press OK to enter it. Welcome to Hisense Modify Information Auto Login: OFF Name: * Only numbers(0~9)and characters(a~z,A~Z)accepted Modify Information: Old Password: * Network Reset: New Password: * Auto Login: Press ◄/► to select ON/OFF. Confirm Password: Modify Information: Press ► to enter the Modify Information menu. Input the name and password listed in the menu.(according to How to input the numbers and characters ) Note: Items with * are required Select You need login again after changing the password. 4 Exit Back Submit Up/Down Back Network Function How to use the Opera Browser function The function of the buttons on the remote control ▲/▼/◄/►: Press these buttons to move the cursor on the screen as the mouse of the computer. Menu: Press the button to display/cancel the keyboard on the screen. OK: Press the button to confirm the selection. Press the button twice to search the new website. How to enter the Opera Browser The Network setup must be correct. Then you can use the network. After entering the network main menu interface(according to How to enter the network main menu interface), Press ◄/► to select the Opera Browser icon and press OK to enter it. Press OK to launch Opera Browser. The function of the buttons on the screen: Then the default interface will appears on the screen. There are some function icons on the bottom of the screen: Address bar : Move the cursor to the icon and press OK to return to the default interface. : Move the cursor to the icon and press OK to return to the previous viewed web page. : Move the cursor to the icon and press OK to go forward to the previous viewed web pages. : Move the cursor to the icon and press OK to refresh the current page. : Move the cursor to the icon and press OK to enter the favorite folder : Move the cursor to the icon and press OK to add the website to the favorite folder. Address bar: Input the website you want to view. : Move the cursor to the icon and press OK to search the website. : Move the cursor to the icon and press OK to close the page. How to Input the New Address 1. Press ▲/▼/◄/► to move the cursor to the address bar and press OK to confirm. 2. Press Menu to display the keyboard. There are some shortcuts on the bottom of the keyboard so that you can input part of the address often used directly. Other keys are used as the keyboard of your computer. ` 1 2 3 4 5 6 7 8 9 0 - = Back Tab q w e r t y u I o p [ ] \ Caps L a s d f g h j k l ; ‘ Enter z x c v b n m , . / Space Shift http:// www. .com .org .gov .net Reset Shortcuts 3. Press ▲/▼/◄/► to move the cursor to the characters you want to select and then press OK to confirm. If you want to delete one character, move the cursor to Back key and press OK to confirm. Or if you want to re-enter all the characters, move the cursor to Reset key and press OK to confirm. 4. Move the cursor to Enter key and press OK to confirm if you have completed the address input. Then the new address will appear on the address bar. 5. Move the cursor to the address bar and press OK twice to enter the website. Or move the cursor to the and press OK to search. There is only recommend to open the English website. 4 Network Function How to Add a Bookmark If you want to find the often viewed website from the favorite folder, you can follow the steps to add it to the folder. 1. Firstly, input the address on the address bar and enter it. 2. Press ▲/▼/◄/► to move the cursor to the The menu will pop up on the screen Add a bookmark Are you sure to add it? and press OK to confirm. Name: HISENSE URL: Http://www.hisense.com.au/ Folder: Root folder Add 3. Press ▲/▼/◄/► to move the cursor to the icon marked with dashed box on the right screen. Then press OK to confirm to display all the folders. 4. Press ▲/▼ to select the folder you want to add the bookmark to. And press OK to confirm. 5. Move the cursor to the Add button and then press OK to confirm. If you do not want to add the book mark, move the cursor to the Cancel button and press OK to confirm. Cancel Add a bookmark Are you sure to add it? Name: HISENSE URL: Http://www.hisense.com.au/ Folder: Root folder Root folder Opera Software GOGI SDK Opera Technology How to Add a Folder You can add a folder to the favorite as follows: 1. Move the cursor to the up on the screen. icon and press OK to confirm. The menu will pop Add a folder Close bookmark manager Opera Software 2. Move the cursor to Add a folder button and press OK to confirm. A pop-up menu appears on the screen. 3. Move the cursor to Name bar and press OK to confirm. Follow the steps 2~4 in “How to Input the New Address” to input the name. GOGI SDK Add a folder Opera Technology Are you sure to add it? HISENSE Name: Yahoo! Add Cancel http://www.hisense.com.au/ 4. Move the cursor to Add button and press OK to confirm and the new folder has been added. How to Edit/Delete a Folder/Bookmark 1. Move the cursor to the up on the screen. icon and press OK to confirm. The menu will pop Add a folder Close bookmark manager Opera Software GOGI SDK 2. Move the cursor to the folder /bookmark directly and there will be two icons on the right of it. Move the cursor to one of the icons and press OK to display a pop-up menu. Edit this bookmark Are you sure to edit it? Opera Technology HISENSE Yahoo! Name: HISENSE URL: http://www.hisense.com.au/help/warranty Edit Cancel : Edit button - Move the cursor to the Name/URL bar and press OK to confirm. Follow the steps 2~4 in “How to Input the New Address” to edit it. - Move the cursor to Edit button , then press OK to confirm and the foler/bookmark will be saved as editing just now. http://www.hisense.com.au/ Add a folder : Delete button Close bookmark manager Opera Software - Move the cursor to the Delete button and press OK to confirm. Then the folder/ bookmark will be deleted from the favorite folder. GOGI SDK HISENSE There is only Name bar on the pop-up menu for folder. Delete this bookmark Are you sure to delete it? Opera Technology Yahoo! Name: HISENSE URL: http://www.hisense.com.au/help/warranty Delete Cancel http://www.hisense.com.au/ 4 Network Function How to select the Website from the favorite folder 1. Move the cursor to the up on the screen. icon and press OK to confirm. The menu will pop Add a folder Close bookmark manager Opera Software 2. Move the cursor to the icon before the folder name and press OK to confirm. The websites in the folder will appear in the following lines. 3. Move the cursor to the website you want to view and press OK to confirm. If the website is in the root folder, you can select it directly . And do not need operate as step 2. GOGI SDK Opera Technology HISENSE Yahoo! http://www.hisense.com.au/ How to exit the manager Move the cursor to the Close bookmark manager icon and press OK to confirm. 4 Trouble Shooting If you feel there's an issue with the TV, try switching it off and restarting it. You can also try the below troubleshooting. If problems still occur please contact our Hisense Contact centre on 1800 447 367. Symptom Remedy No sound or picture 1. Check if the power line is in the outlet and if it has electricity. 2. Check if you have pressed Power button on the TV or Power button on the remote control. 3. Check the setting of picture brightness and contrast. 4. Check the volume. The picture is normal but there is no sound 1. Check the volume. 2. Check if Mute mode is set. No picture and white or black picture 1. Adjust Picture Setting. 2. Check Color System. The sound and picture are interfered 1. Try to find the appliance affecting TV set, and move it far away from the TV set. 2. Try to insert the power plug of the TV set into another outlet. Unclear picture or picture with snow 1. Check the direction, position and connection of your antenna. 2. Adjust the direction of your antenna or reset or fine tune the channel. The remote control does not work 1. Change the batteries in the remote control. 2. Clean the upper side of the remote control(radiating window) 3. Check the contacting points of the batteries. 4. Check if there is obstruction between the remote control and the monitor. 5. Check if the batteries are correctly installed. H/V strip or the picture shaking Check if there is interfering source nearby, such as appliance or electric tools. The TV cabinet makes a “Clicking” sound Thise happens due to room temperature change causing the television cabinet to expand or contract. This is nomal,and shouldn’t cause alarm. The DMP function not working Images,music and video files which were modified and or damaged by computer virus’ or corrupted by disk data may affect proper play. Check the USB devices for corruption. The PVR is not working Check the format of the drive and change to FAT32. Check if connected correctly. Switch the TV off and reconnect the HDD with TV in off position then try again. The 3D function isn’t working Make sure you have set your 3D to on (press 3D) on remote. Check the DVD player instructions for more advise. 4 Specifications Features , appearance and specifications are subject to change without notice. HL46TPZLN3D Model Name Dimension (WXHXD)(mm) Weight(kg) Without stand 1127.4×715.2 ×40.5 With stand 1127.4×770.4×308 18.5 Without stand With stand 21 LCD Panel Minimum size( diagonal) 46 inches Screen resolution 1920x1080 Audio power 8W+8W Power consumption 120W Power supply 220̚240V 50/60Hz Receiving systems RF PAL B, DVB-T AV PAL, NTSC Environmental conditions Temperature 5°C~ 35°C Humidity 20%-80% RH, Atmospheric pressure 86kPa-106kPa 480P Component Input VGA Input HDMI Mounting hole dimensions 1080I/60Hz 576I 576P 1080P/50Hz 720P/60Hz 1080I/50Hz 1080P/60Hz VGA 640×480/60Hz SVGA XGA SXGA(1280×1024) 1024×768/60Hz 800×600/60Hz RGB/60Hz 640×480,800×600,1024×768 YUV/50Hz 576I,576P,720P 1080I 1080P Y UV/60Hz 480I,480P,720P,1080I,1080P 400mm×400mm 4 Http://www.hisense.com.au