1
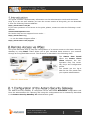
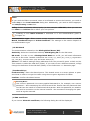
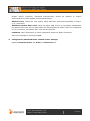
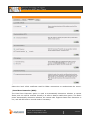
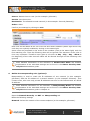
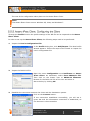
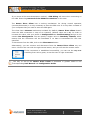
1.
Introduction ........................................................................ 2
2.
Remote Access via IPSec .................................................... 2
2.1.
Configuration of the Astaro Security Gateway .................... 2
2.2.
Configuration of the Remote Client ....................................13
2.2.1.
Astaro User Portal: Getting Software and Certificates........13
2.2.2.
Astaro IPsec Client: Configuring the Client ........................14
This document may not be copied or distributed by any means, electronically
or mechanically, in whole or in part, for any reason, without the express
written permission of Astaro GmbH & Co. KG.
© 2011 Astaro GmbH & Co. KG. All rights reserved. An der RaumFabrik 33a,
76227 Karlsruhe, Germany, http://www.astaro.com
Astaro Security Gateway and WebAdmin are trademarks of Astaro.
All further trademarks are the property of their respective owners.
No guarantee is given for the correctness of the information contained in this
document.
This guide contains complementary information on the Administration Guide and the Online
Help. If you are not sure whether you have the current version of this guide, you can download
it from the following Internet address:
http://www.astaro.com/kb
If you have questions or find errors in the guide, please, contact us under the following e-mail
address:
[email protected]
For further help use our support-forum under ...
http://www.astaro.org
... or use the Astaro Support offers …
http://www.astaro.com/support
This guide describes step by step the configuration of a remote access to the Astaro Security
Gateway by using IPSec. IPSec allows you to give individual hosts access to your network
through an encrypted IPSec tunnel. The structure is described in the following chart.
The Astaro User Portal
offers the Astaro IPsec
Client software, the configuration files, the necessary keys and configuration
guides.
You should get the log-in
data for the user portal from
your system administrator.
The Astaro Security Gateway is configured via the web based WebAdmin configuration tool
from the administration PC. Opening and using this configuration tool is extensively described
in the Astaro Security Gateway V7 administration guide.
© 2011 Astaro GmbH & Co. KG.
Subject to change without notice.
2 of 15
1.
Define the user account for the remote host:
Open the Users >> Users page.
Define a new user account for the remote client. With remote access via IPSec this user
account is necessary for accessing the Astaro User Portal and for VPN.
Make the following settings:
Username: Enter a specific user name (e.g., gforeman). In doing so remember that the
remote user will need this username later to log in to the Astaro User Portal.
Real Name: Enter the full name of the remote user (e.g., George Foreman).
Email address: Enter the e-mail address of the user. When you specify an e-mail address, an X.509 certificate for this user will be generated automatically while creating the
user account, using the e-mail address as the certificate's VPN ID. The certificate will be
displayed on the Remote Access >> Certificate Management >> Certificates tab.
Authentication: With the Local authentication method the following two entry menus will
be displayed for the definition of the password.
Password: Enter the password for the user. In doing so remember that also the remote
user will need this password later to log in to the Astaro User Portal.
Repeat: Confirm the password.
Use static remote access IP: Each remote access user can be assigned to a specific IP
address. The assigned IP address must not originate from the IP address pool. During the
dial-up the address is automatically assigned to the host. Enter the static IP address in the
RAS address box.
© 2011 Astaro GmbH & Co. KG.
Subject to change without notice.
3 of 15
Comment (optional): Enter a description or additional information on the user.
Save your settings by clicking on Save.
More detailed information on the configuration of a User Account and detailed
explanations of the individual settings can be found in the Astaro Security Gateway V8 administration guide.
2.
Configure the IPSec remote access:
Open the Remote Access >> IPSec page.
On the Connections tab, click New IPSec remote access rule.
The Add IPSec remote access rule dialog box opens.
More detailed information on the configuration of a IPSec Remote Access and detailed explanations of the individual settings can be found in the Astaro Security
Gateway V8 administration guide.
Name: Enter a descriptive name for this connection.
Interface: Select the network interface to use for IPSec access.
Local networks: Select the local networks that should be reachable to the client.
© 2011 Astaro GmbH & Co. KG.
Subject to change without notice.
4 of 15
Note:
If you wish the IPSec-connected users to be allowed to access the Internet, you need to
select Any in the Local networks dialog box. Additionally, you need to define appropriate Masquerading or NAT rules.
Policy: Select an already defined policy (in this example: AES-256). Now you can use
the IPSec >> Policies tab to define your own policies.
Creating of own IPSec Policies is described in in the administration guide in
Chapter xx.
Authentication type: IPSec remote access supports authentication based on CA DN
Match, Preshared Keys and X.509 Certificate. The settings in this section depend on
the authentication type:
| CA DN Match
The authentication is based on the Distinguished Name (DN).
Authority: Select the Certificate Authority VPN Signing CA for the VPN users.
DN mask: In order to use a Distinguished Name as an ID, you will need information
from the X.509 index. Possible indications are Country (C), State (ST), Local (L), Organization
(O), Unit (OU), Common Name (CN) and E-Mail Address (E).
IP Pool: The default settings assign addresses from the private IP space 10.242.4.x/24.
This network is called the VPN Pool (IPSec). If you wish to use a different network, simply
change the definition of the VPN Pool (IPSec) on the Definitions >> Networks page.
| Preshared Keys
Preshared Key: Enter the shared secret. This shared secret is a secure phrase or password that is used to encrypt the traffic using the encryption algorithm for IPSec.
Confirm: Confirm the shared secret.
Security Note:
Use a secure password! Your name spelled backwards is, for example, not a secure
password – while something like xfT35!4z would be. Ensure that this password does
not fall into the hands of unauthorized third parties. With this password, an attacker
can build a connection to the internal network. We recommend changing this password at regular intervals.
| X.509 Certificate
If you choose X.509 CA certificate, the following dialog box will be displayed.
© 2011 Astaro GmbH & Co. KG.
Subject to change without notice.
5 of 15
Enable XAUTH (optional): Extended authentication should be enabled to require
authentication of users against configured backends.
Allowed users: Select the user object, which had been created automatically in step 1
(e.g., gforeman).
Automatic packet filter rules: Once the IPSec VPN tunnel is successfully established,
the packet filter rules for the data traffic will automatically be added. After the completion
of the connection, the packet filter rules will be removed.
Comment: Add a description or other information about the IPSec connection.
Save your settings by clicking on Save.
3.
Configure the advanced IPSec remote access settings:
Open the Remote Access >> IPSec >> Advanced tab.
© 2011 Astaro GmbH & Co. KG.
Subject to change without notice.
6 of 15
| Local X509 certificate
Select the local X.509 certificate used for IPSec connections to authenticate the server.
| Dead Peer Detection (DPD)
The Dead Peer Detection option is used to automatically determine whether a remote
IPSec peer can still be reached. Usually it is safe to always enable this option. The IPSec
peers automatically determine whether the remote side supports Dead Peer Detection or
not, and will fall back to normal mode if necessary.
© 2011 Astaro GmbH & Co. KG.
Subject to change without notice.
7 of 15
| NAT Traversal (NAT-T)
Use NAT traversal: Select this option to enable that IPSec traffic can pass upstream
systems which use Network Address Translation (NAT).
NAT
traversal
keepalive:
Define
the
keepalive
interval
for
NAT
traversal.
| CRL handling
Automatic fetching: There might be situations, in which the provider of a certificate
attempts to revoke the confirmation awarded with still valid certificates, for example if it
has become known that the receiver of the certificate fraudulently obtained it by using
wrong data (name, etc.) or because an attacker has got hold of the private key, which is
part of the certified public key. For this purpose, so-called Certificate Revocation Lists
or CRLs are used. They normally contain the serial numbers of those certificates of a
certifying instance, that have been held invalid before their expiration.
The Automatic Fetching option automatically requests the CRL through the URL defined
in the partner certificate via HTTP, Anonymous FTP or LDAP Version 3. On request, the CRL
can be downloaded, saved and updated, once the validity period has expired.
Strict policy: Any partner certificate without a corresponding CRL will be rejected.
| Preshared Key Probing
Enable probing of preshared keys: Activate this option if you want to use different preshared keys (PSKs) for your IPSec connections in respond-only mode. This option applies
to L2TP-over-IPSec, IPSec remote access and IPSec site-to-site connections with a
respond-only remote gateway.
© 2011 Astaro GmbH & Co. KG.
Subject to change without notice.
8 of 15
4.
Configure the advanced remote access settings:
Open the Remote Access >> Advanced page.
This page allows you to define name servers (DNS and WINS) and the name service
domain, which should be assigned to hosts during the connection establishment.
5.
Define the packet filter rule:
Only for authentication based on X.509 certificate, you needn’t define this packet filter
rule if you have enabled the Automatic packet filter rule function during the
configuration of the IPSec remote access in step 2.
Open the Network Security >> Packet Filter >> Rules tab.
After clicking on the New rule button the dialog box for new rules will appear. Create a
new rule for the access to the local internal network.
© 2011 Astaro GmbH & Co. KG.
Subject to change without notice.
9 of 15
Source: Remote host or user (in this example: gforeman).
Service: Set the service.
Destination: The allowed internal network (in this example: Internal (Network)).
Action: Allow.
Confirm your settings by clicking on Save.
New rules will be added at the end of the list and remain disabled (status light shows red)
until they are explicitly enabled by clicking on the status light.
Active rules are processed in the order of the numbers (next to the status light) until the
first matching rule. Then the following rules will be ignored! The sequence of the rules is
thus very important. Therefore never place a rule such as Any – Any – Any – Allow at
the beginning of the rules since all traffic will be allowed through and the following rules
ignored!
More detailed information on the definition of Packet Filter Rules and detailed
explanations of the individual settings can be found in the Astaro Security Gateway V8 administration guide.
6.
Define the masquerading rule (optional):
Masquerading is used to mask the IP addresses of one network (in this example:
gforeman) with the IP address of a second network (in this example: External). Thus
remote users, who have only private IP addresses can surf on the Internet with an official
IP address.
More detailed information on the definition of Masquerading Rules and detailed
explanations of the individual settings can be found in the Astaro Security Gateway V8 administration guide in Chapter xx.
Open the Network Security >> NAT >> Masquerading tab.
Make the following settings:
Network: Select the network of the remote endpoint (in this example: gforeman).
© 2011 Astaro GmbH & Co. KG.
Subject to change without notice.
10 of 15
Interface: Select the interface that shall be used to mask the clients. (in this example:
External).
Use Address: If the interface you selected has more than one IP address assigned, you
can define here which IP address is to be used for masquerading.
Confirm your settings by clicking on Save.
New masquerading rules will be added at the end of the list and remain disabled (status
light shows red) until they are explicitly enabled by clicking on the status light.
7.
Activate the proxies (optional):
If the remote employees shall access URL services via the remote access you may configure the required proxies on the Astaro Security Gateway – this would be the DNS and
HTTP proxy for example.
More detailed information on the configuration of Proxies and detailed explanations
of the individual settings can be found in the Astaro Security Gateway V8 administration guide.
8.
Activate the User Portal for the remote access user:
Open the Management >> User Portal >> Global tab.
Network: Select the networks which are allowed to access the User Portal (in this
example: Any or gforeman).
More detailed information on the configuration of the User Portal and detailed
explanations of the individual settings can be found in the Astaro Security
Gateway V8 administration guide.
© 2011 Astaro GmbH & Co. KG.
Subject to change without notice.
11 of 15
After configuring the VPN server (headquarters) you must configure the road warrior.
Depending on the security policy of your organization and the requirements of your network,
you might have to make additional settings.
© 2011 Astaro GmbH & Co. KG.
Subject to change without notice.
12 of 15
The Astaro User Portal is available for the remote access user. You can use this portal to
download guides and tools for the configuration of your client. Especially for the IPSec remote
access based on authentication with X.509 certificate, the user portal offers the Astaro IPsec
Client software, the configuration files, and necessary keys. You should get the following log-in
data for the Astaro User Portal from your system administrator: IP address, user name and
password.
1.
Start your Browser and open the Astaro User Portal:
Start your browser and enter the management address of the Astaro User Portal as
follows: https://IP address (example: https://218.93.117.220).
A security notice will appear.
Accept the security notice by clicking OK (Mozilla Firefox) or Yes (Internet Explorer).
2.
Log in to the Astaro UserPortal:
Username: Your username, which you received from the administrator.
Password: Your password, which you received from the administrator.
Please note that passwords are case-sensitive! Click Login.
3.
Download the tools needed for setting up your IPSec connection:
The Remote Access tab will contain the executable client software, a configuration file,
and keys for your client. Download all files and store them in a location of your choice.
Note that you need all of these files later on when installing and configuring the Astaro
IPsec Client.
Close the Astaro User Portal session by clicking on Log out.
© 2011 Astaro GmbH & Co. KG.
Subject to change without notice.
13 of 15
The rest of the configuration takes place on the Astaro IPsec Client.
Note:
The Astaro IPsec Client runs on Windows XP, Vista, and Windows 7.
Through the Profile function the profile settings of the INI file can be imported to the Astaro
IPsec Client.
In order to set up the Astaro IPsec Client, the following steps need to be performed:
1.
Import the User’s Configuration File.
In the Profile dialog box, click Add/Import. The New Profile
Wizard appears. Follow the steps of the wizard to import the
user’s configuration file.
2.
Import the PKCS#12 file.
Open the menu Configuration >> Certificates on Astaro
IPsec Client. As Certificate, select from PKCS#12 File.
Then click on the button next to PKCS#12 Filename.
Browse for the PKCS#12 file of the user and select it.
Store the key by clicking OK.
3.
Establish the connection between the client and the destination system.
Click on the Connect button.
If the connection establishes successfully, you will see a
green bar and the information connection is established, as
can be seen in the screenshot.
© 2011 Astaro GmbH & Co. KG.
Subject to change without notice.
14 of 15
If you chose X.509 as authentication method, a PIN dialog will show when connecting to
the VPN. Enter the password of the PKCS#12 container in this case.
The Astaro IPsec Client has a caching mechanism. So during normal operation
(connect/disconnect) it is only necessary to enter the PIN once. It is only after a restart of
your computer that you need to enter the PIN again.
The client has a timeout mechanism included. By default, Astaro IPsec Client doesn’t
close the VPN connection in case of an inactivity (default value set to 0). In order to
increase this value, edit your profile in Configuration >> Profile Settings and go to the
section Line Management. You can specify a higher value in Inactivity Timeout, which
means that the connection will be terminated if no data is transmitted for the time
specified.
To disconnect from the VPN, click on the Disconnect button.
Alternatively, you can connect and disconnect from the Astaro IPsec Client tray icon
menu. Click on the icon with the right mouse button, and you will see the context menu.
If the connection is established successfully, you can see the tray icon
switching from red to green, as can be seen in right screenshot.
The way to set-up the Astaro IPsec Client is described in greater detail in the
corresponding User Manual and Configuration Guide.
© 2011 Astaro GmbH & Co. KG.
Subject to change without notice.
15 of 15