1
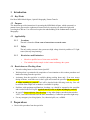
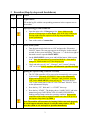
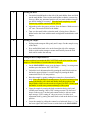
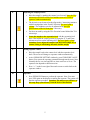
MJB4 Mask Aligner Operating
Procedure
Effective Date: 07/12/2012
Author(s): Jiong Hua
Phone: 402-472-3773
Email: [email protected]
1
1 Introduction
1.1 Key Words
Karl Suss MJB4 Mask Aligner, Optical Lithography, Pattern Transfer
1.2 Purpose
This document provides instructions for operating the MJB4 Mask Aligner, which can transfer a
pattern from a glass mask to a photoresist coated wafer by exposing it to ultraviolet light with
wavelength of 400 nm. Use of this tool requires the understanding of the fundamentals of optical
lithography.
1.3 Applicability
1.3.1
Locations
The tool is located at Clean room of nanoscience research center.
1.3.2
Safety
The only safety concern is the system uses high voltage electricity and has a UV light
source (mercury lamp housing).
1.3.3
Restrictions and Limitations
•
Must be a qualified user of clean room and MJB4.
•
The imitation for the sample is that it must not damage the system.
1.4 Restrictions on Working Alone
•
Normal working hours are from 8am to 6pm M-F.
•
Working alone is permitted with completion of an orientation to this written procedure and
hands-on training from the specialist.
•
Assistance from the specialist is available during working hours only. If an error occurs
during off-hours, record the error in the Logfile and contact the specialist. Do not try to fix
or adjust anything by yourself. Tool will be checked in the following work day. User will
be notified when sample left in chamber is available for pickup.
•
Problems with equipment malfunctions, breakage, etc. should be reported to the specialist
and recorded in the tool Logfile. Again do not try to fix or adjust anything by yourself.
•
In case of a lamp explosion, lamp breakage or any other danger, turn the main switch to
“OFF”, leave the room and close the door immediately. Contact the specialist right away.
•
For any emergency involving injuries, fire, chemical spills, etc., call 911.
2 Preparations
•
Receive this procedure from the specialist.
2
3 Execution (Step-by-step work breakdown)
Step #
1.
Alerts
Action
Logfile entries:
Fill out the log file with the corresponding parameters in the computer next to
the machine.
2.
3.
4.
Open operating gas and vacuum line:
•
Open the main valve of Nitrogen gas line. Notes: Make sure the
pressure of Nitrogen gas is about 40 psi. Turn on the lamp without gas
flowing might cause the explosion of the Hg lamp and damage the
system permanently.
•
Turn on the switch of vacuum line.
Power on the system:
•
Turn the main switch clockwise to “ON” and press the “Electronics
ON/OFF” button. The start page appears in the display. It takes about 5
seconds for the system initializing. Then press “=>” on the lower right of
the touch screen to open the MAIN MENU.
•
On the MAIN MENU screen, press and hold the button “Maskvacuum
is on”. Note: the button has to be pressed and hold for ~10sec until it
changes to “Maskvacuum is off” after beeping once.
•
Check and make sure all “Air”, “Nitrogen”, and “Vacuum” showing
“OK” on screen. If NOT, stop here and inform the specialist for help!
Igniting the exposure lamp (Controller CIC1200):
•
The CIC1200 controller will be powered on automatically once system
is powered on. Wait until “STAND BY” show on the alphanumeric
display and make sure all “Air”, “Nitrogen”, and “Vacuum” showing
“OK” on the MAIN MENU screen (see step 3). Then press the key
“ON” in the control panel of the CIC1200. Wait until “READY” show
on the alphanumeric display.
•
Press the key “CP”. Wait until “=>>START” shows up.
•
Press the key “START”. The display shows “LAMP COLD” and in the
annunciator group FAILURE the LED of LAMP LIFE/POWER is
flashing until the lamp reaches the operating condition. Wait until the
completion of the warm up sequence and the real value of the power of
the exposure lamp shows up (350W ).
Note: The machine will warn users by beeping if it does not work properly.
In case it happens when the lamp is on, turn the main switch to “OFF”,
leave the system as it is and report to specialist immediately.
3
5.
6.
7.
Loading the mask:
•
Loosen the knurled knobs on the side of the mask holder frame and slide
out the mask holder. Turn over the mask holder so that the vacuum ring
faces up. (Blow any unwanted particles off your mask with the nitrogen
gun before loading if necessary.) Place the mask completely over the
vacuum ring with the emulsion/chrome side up.
•
Adjust the mask to the proper position. Press the button “Maskvacuum is
off” once. The mask will stick to the holder.
•
Turn over the mask holder so that the mask is facing down. Slide the
holder back to the frame with the mask and tight the knurled knobs with
fingers.
Loading the sample:
•
Pulling out the transport slide gently until it stops. Put the sample on top
of the chuck.
•
Press and hold the hand valve on the front right side of the transport
slide to switch on the transport vacuum and carefully insert the slide
back until it reaches the end stop.
Setting the mask sample thickness:
In order to achieve best result, the WEC SETTING needs to be reset for a new
sample or if the thickness of masks/substrates is changes.
•
On the MAIN MENU screen, press the button “Setting” to setting menu
and then press the button “WEC SETTING”.
•
Unlock the level adjustment knob by putting the small black switch on
the knob to upper position. Lower the sample by turning the knob
counterclockwise to ‘10’mm position.
•
Raise the sample by gently pushing the contact lever forward until it
stops. Note: this should be a smooth process. If you feel resistance when
pushing the handle, pull it back and double check the position of the
sample holder. Make sure the marks are aligned. Do NOT violently push
the handle. It could cause permanent damage of the system.
•
Upper the sample by turning the knob counterclockwise slowly and
carefully until message “Move WEC setting two turn CW down now”
shows on the screen. Turn the knob counterclockwise with two turns
until message “WEC setting ok” shows on screen. Lock the level
adjustment knob by putting the small black switch on the knob to lower
position.
•
Lower the sample by pulling the contact lever backward. Press “=>” on
the lower right of the touch screen to switch back to the MAIN MENU.
4
8.
9.
10.
Adjusting the sample position:
•
Raise the sample by pushing the contact lever forward. Note: the TSA
microscope will lower to focus level and the screen will switch to
exposure window automatically.
•
The objectives can be moved to the align masks / interesting structures
with the manipulator in the X and Y direction (The travel path is
±40mm). The brightness can also be adjusted using the right
potentiometer on the left front plate if necessary.
•
Do focus on mask by using the TSA Z motion located behind the TSA
microscope.
•
Lower the sample to the separation level with the separation level
knob. Then adjust the sample position by using the X, Y and Theta
micrometer screws on the adjusting table (The travel path is ±5mm).
Attention: Never adjust the sample if the mask and sample are in
contact! Doing so will damage the mask and the sample.
Setting exposure values:
•
Raise the sample back to the contact level with the separation level
knob. The screen will change to exposure window automatically.
•
Active EXPOSURE SETTING window by press EXPOSURE VALUE
button. You can set the exposure parameters through touch screen. Note:
Normally the Pre vac time and Full vac time can be set as 10 sec. The
exposure time depends on different resists.
•
Press “=>” on the lower right of the touch screen to switch back to the
exposure window.
Exposure:
•
Press EXPOSURE button to perform the exposure. Note: You must
press YES again on the display to confirm the exposure. The system will
start the exposure procedure. Attention: The microscope will move at
this step. Keep yourself away from the front of the machine.
5
11.
12.
Unloading the sample and the mask:
•
Wait until the exposure procedure finishes and message “unload sample”
appears on the screen.
•
Lower the sample by pulling the contact lever backward. Note: the TSA
microscope will be lift up from focus level and the touch screen will
switch to MAIN MENU window automatically.
•
Pulling out the transport slide as far as it can go. Take off the sample
from the chuck. If you need to expose another sample with same type of
substrate, repeat from STEP 8. If you need to change the mask or
different type of substrate, repeat from STEP 7 (WEC setting).
Otherwise follow the next steps.
•
Carefully slide the sample holder back until it reaches the end stop.
•
Loosen the knurled knobs on the side of the mask holder frame and slide
out the mask holder. Turn over the mask holder so that the mask side
faces up.
•
Press and hold the button “Maskvacuum is on” to release the mask from
holder. Note: the button has to be press and hold for ~10sec until it
changes to “Maskvacuum is off” after beeping once.
•
Take the mask off from the mask holder, slide the holder back to the
frame and tight the knurled knobs with fingers. Note: mask has to be
unloaded before switching off the machine.
Switch off Procedures:
•
Press “<=” button at the lower left corner of the touch screen to return
back to the start page.
•
Press the electronics ON/OFF button to switch off the machine. Note: a
cool down procedure will activate at this time. It will take 10 minutes to
finish. The machine will be totally shut down automatically after this
procedure. DO NOT turn off the power supply and gas supply during
this period. It could damage the system permanently.
•
Switch off the pump line and Nitrogen gas.
13.
Finish the logfile, clean up all samples, pens, and notebooks from the area.
End
End of Procedure
6
4 Post-Performance
4.1 Recordkeeping
Completely fill out the logfile.
4.2 Feedback
Report any unusual or problematic behavior of the setup by contacting the specialist.
5 References
5.1 Technical References
• MJB4 mask aligner User Manual
6 User Access Level
Normal User – Requires specialist to be present
Expert User – Does not require specialist to be present
7