1
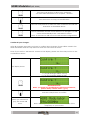
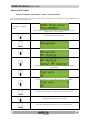
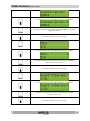
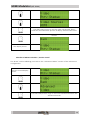
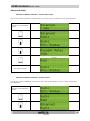
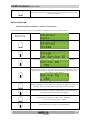
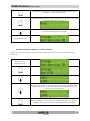
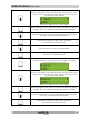
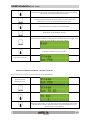
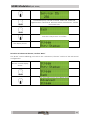
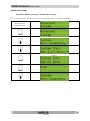
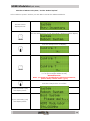
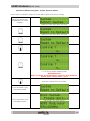
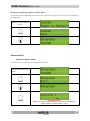
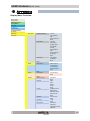
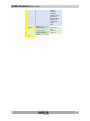
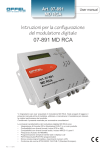
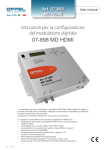
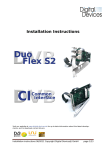
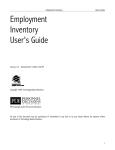
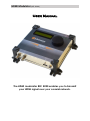
HDMI Modulator (REF. 8200) User Manual The HDMI modulator REF. 8200 enables you to transmit your HDMI signal over your coaxial network. HDMI Modulator (REF. 8200) Index 1. 2. 3. 4. 6. 7. Features Connections Basic Configuration Advanced Configuration - Advanced RF Output - Advanced Video - Advanced Audio - Advanced Stream - Advanced System Technical Specification Appendix : Display Menu Overview 2 3 4 9 10 14 16 17 28 32 33 Features Some features of the HDMI Modulator are: - 1 HDMI input, capable of receiving all standard resolutions. 1 RF Input, to by-pass terrestrial or cable signals. 1 RF Output, where the HDMI signal is added to the signals from the RF Input. Perfect picture quality thanks to a MER, comparable to premium headend equipment. Easiest menu structure on the market with the Johansson rotary button and display. Lowest power consumption. 2 HDMI Modulator (REF. 8200) Connections 1. Display. 2. Rotary / Push button. 3. ‘Power’ indicator LED. 4. ‘Status’ indicator LED. 5. ‘Lock’ indicator LED. 6. Earth connection. 7. Power Supply socket. 8. HDMI socket. 9. RF IN F-connector. 10. RF OUT F-connector. 3 HDMI Modulator (REF. 8200) - Connect the Power Adapter to the Power supply socket (7), see connection possibilities on previous page. Connect an earthing wire to the appropriate clamp (6). Connect a Blu-Ray player, DVD player, a satellite receiver or any other video source with HDMI output (8). Connect your TV to the RF output connector (10). Optionally, you can insert an existing coaxial distribution to the F-connector (9). This will result in a combination of the HDMI modulated signal and the existing coaxial distribution on the RF output connector (10). Indicators: - ‘Power’ LED : indication of DC power presence ‘Status’ LED : indication that the product is ready ‘Lock’ LED : indication that video has been detected and locked on the HDMI input Basic Configuration In this part we will make the BASIC CONFIGURATION to start using the HDMI Modulator. In most cases, this will be sufficient to configure the product. Only in special cases, where detailed settings have to be set, you will need to use the advanced configuration. The basic configuration includes the following adjustable screens (default settings between brackets): - Selection of Country Selection of Frequency Selection of Output Level Selection of Channel Number Selection of Channel Name Confirmation of selections. (France) (E36 (594MHz)) (80dBµV) (199) (Modulator) To start the HDMI Modulator connect the power supply adapter to the Power Supply Socket (7), see page 3 for connections. The display will show: After about 30s the display will show the next screen: The frequency shown can be another one. This frequency is just shown as an example. 4 HDMI Modulator (REF. 8200) Push the rotary button to enter the basic configuration Note: when you are stranded on the “Confirm ?” screen, turn the rotary button to “n” (no) and push the rotary button to confirm. Push the rotary button again to scroll through the different screens. When rotating the rotary button you scroll through the adjustable screens. Selection of Country. Choose your country where you want to use the HDMI Modulator. You can choose between the following countries: France, Germany, UK, Austria, Czech, Denmark, Finland, Italy, Spain, Sweden, Switzerland, Australia, Belgium, Netherlands. This will set some of the advanced parameters automatically. When you are on this screen, Push the rotary button to enter the basic configuration The next screen shows: Push the rotary button to edit your country selection. When in edit mode, a star appears in the top right corner of the display: Turn the rotary button to select your country. Push the rotary button to confirm your selection. A new screen appears. Note: if you still want to change the selected country, turn the rotary button counter-clockwise to enter the Country screen again. 5 HDMI Modulator (REF. 8200) Selection of Frequency. After selecting the country, a new screen appears, to make a selection of the frequency of your choice. The display shows: Push the rotary button to edit your frequency selection. When in edit mode, a star appears in the top right corner of the display: Turn the rotary button to select your frequency. The frequency range is from E05 (177.5 MHz) to E69 (858 MHz). Note: this range is depending on your country setting. Push the rotary button to confirm your selection. Note: if you still want change the frequency, turn the rotary button counter-clockwise to enter the frequency screen again. Selection of Output Level. After selecting the frequency, a new screen appears, to make a selection of the output level of your choice. The display shows: Push the rotary button to edit your output level selection. When in edit mode, a star appears in the top right corner of the display: Turn the rotary button to select your output level. The output level range is from 75 to 90 dBµV, in steps of 1 dB. Push the rotary button to confirm your selection. Note: if you still want to change the output level, turn the rotary button counter-clockwise to enter the output level screen again. 6 HDMI Modulator (REF. 8200) Selection of Channel Number. After selecting the output level, a new screen appears, to make a selection of channel number of your choice. This is also the so called LCN( Logical Channel Number). The display shows: Push the rotary button to edit your channel number. When in edit mode, a star appears in the top right corner of the display: Turn the rotary button to select your channel number. You can chose between channel number 0000 and 1023. Push the rotary button to confirm your selection. Note: if you still want change the channel number, turn the rotary button counter-clockwise to enter the channel number screen again. Selection of Channel Name. After selecting the channel number, a new screen appears, to make a selection of channel name of your choice. This channel name will appear on your TV screen when zapping. The display shows: Push the rotary button to edit your channel name. When in edit mode, a star appears in the top right corner of the display and a cursor appears under the first character of the second row of the display: When turning the rotary button you select the character you want to change. Note: if you turn the rotary button clockwise, the cursor moves to the right. When turned completely to the right, you appear automatically to a new screen, which show “Advanced”. If this happens, turn the rotary button counter-clockwise to choose the “Channel Name” display again. Push the rotary button to edit the character which is situated above the cursor. This character starts to blink. 7 HDMI Modulator (REF. 8200) Turn the rotary button to select your character. You can select between a-z, A-Z, space, - and 0-9. Push the button to stop your modification. Turn the rotary button to select the next character and edit the character as described above. When you have the channel name of your choice, turn the rotary button clockwise and the cursor will move to the right. You will come automatically in the “Advanced” screen. Note: at this time we will not use the advanced configurations. Confirm all your changes. After all changes are made you have to confirm these changes. These will be saved in the HDMI Modulator and are only effective after the start screen is shown. Note: if you see the “Advanced” screen on the display, please turn the rotary button to the confirmation screen. or The display shows: Y = yes (all changes will be saved) n = no (no changes will be saved). Turn the rotary button to make your selection (yes or no). IMPORTANT NOTE : When you made any modification in whatever parameter, please always confirm with a y (yes) Push the rotary button to confirm. When you choosed n (no), the screen will show: Note: the frequency shown here can be different of the frequency of your choice. 8 HDMI Modulator (REF. 8200) When you choosed y (yes), the screen will show: Followed by the screen as mentioned below: Note: the frequency shown here can be different of the frequency of your choice. The basic configuration is done. If you want to change any of the above settings, please repeat the steps as mentioned above, in the “Basic Configuration” part. Advanced Configuration In this part we will make the ADVANCED CONFIGURATION of the HDMI Modulator. This will however not be needed in most installation. The advanced configuration includes the following screens: - Advanced RF Output, Setup RF Output (with 4 adjustable parameters) Rtrv status (read out of 9 parameters) Advanced (with 2 adjustable parameters) Back - Advanced Video, Rtrv Status (read out of 4 parameters) Back - Advanced Audio, Rtrv Status (read out of 1 parameter) Back - Advanced Stream, Set service ID Set PID Set NIT Set PDS Set TS ID Rtrv Status (read out of 13 parameters) Back - Advanced system, Rtrv Inventory Reboot System Reset to Default Back Advanced Exit, - 9 HDMI Modulator (REF. 8200) Advanced RF Output Selection of Advanced RF Output / Section “Setup RF Output” In the “Setup RF Output” section you can edit 4 parameters: the carrier, the constellation, the FEC and the Guard Interval. Normally the display shows: Note: the frequency shown here can be different of the frequency of your choice. Push the rotary button, and turn the rotary button until you see Push the rotary button. The display shows: Push the button. The display shows: Under the “Setup RF Output” section we can change 4 parameters. Push the rotary button. The display will show the 1st parameter: Push the rotary button again to edit the carrier, a star appears in the top right corner of the display: The carrier is 2K or 8K. Turn the rotary button to select the carrier: 2K or 8K. Push the rotary button to confirm. Turn the rotary button to select the 2nd parameter: 10 HDMI Modulator (REF. 8200) Push the rotary button to edit the constellation, a star appears in the top right corner of the display: Turn the rotary button to select the constellation : QAM16, QAM64 or QPSK. Push the rotary button to confirm. Turn the rotary button to select the 3rd parameter: Push the rotary button again to edit the FEC, a star appears in the top right corner of the display: Turn the rotary button to select 5 of the FEC possibilities: 5/6, 3/4, 2/3, 1/2 or 7/8, Push the rotary button to confirm. Turn the rotary button to select the 4th parameter: Push the rotary button again to edit the Guard Interval, a star appears in the top right corner of the display: Turn the rotary button to select the Guard Interval: 1/32, 1/4, 1/8, 1/16 Push the rotary button to confirm. 11 HDMI Modulator (REF. 8200) Turn the rotary button to go back to the “Setup RF Output” screen: Push the rotary button to confirm. The display shows: Selection of Advanced RF Output / Section “Rtrv Status” In the “Rtrv Status” (Retrieve Status) section you can read out 9 parameters: Country, Frequency, Output Level, Bandwidth, Carrier, Constellation, FEC, Guard Interval and RF Output. Normally the display shows: Turn the rotary button to see Push the rotary button. The display shows: Turn the rotary button to see the other parameters, like Frequency, Output Level, Bandwidth, Carrier, Constellation, FEC, Guard Interval and RF Output. Turn the rotary button to go back to the “Rtrv Status” screen: Push the rotary button to confirm. The display shows: 12 HDMI Modulator (REF. 8200) Selection of Advanced RF Output / Section “Advanced” In the “Advanced” section you can edit 2 parameters: the Frequency Offset and the RF Output mode. Normaly the display shows: Turn the rotary button to see Push the rotary button. The display shows the 1st parameter: Push the rotary button again to edit the Frequency Offset, a star appears in the top right corner of the display: Turn the rotary button to select the Frequency Offset mode: No Offset, -500K, -375K, -250K, -125K, +125K, +250K, +375K or +500K (K = kHz). Push the rotary button to confirm. Turn the rotary button to see the 2nd parameter: Push the rotary button again to edit the RF Output, a star appears in the top right corner of the display: Turn the rotary button or enable or disable the RF Output. Push the rotary button to confirm. Turn the rotary button to go back to the “Advanced” screen: 13 HDMI Modulator (REF. 8200) Push the rotary button to confirm. The display shows: Selection of Advanced RF Output / Section “Back” The “Back” section will bring you back to the “Advanced RF Output” section of the advanced configuration. Normally the display shows: Turn the rotary button to see Push the rotary button. The display shows: Turn the rotary button to go to the next advanced section: the Advanced Video. Advanced Video Selection of Advanced Video / Section “Rtrv Video” In the “Rtrv Video” (Retrieve Video) section you can read 4 parameters: Video source, In resolution, Encoder Rate and Encoder Status. The parameters are automatically detected. The last viewed display shows: Turn the rotary button to see 14 HDMI Modulator (REF. 8200) Push the rotary button. The display shows: Push the rotary button again to see the first parameter: Turn the rotary button to see the other parameters, like In resolution, Encoder Rate (shown as Mbps) and Encoder Status. Turn the rotary button to go back to the “Video Rtrv Status” screen: The display shows: Selection of Advanced Video / Section “Back” The “Back” section will bring you back to the “Advanced Video” section of the advanced configuration. The last viewed display shows: Turn the rotary button to see Push the rotary button. The display shows: Turn the rotary button to go to the next advanced section: the Advanced Audio. 15 HDMI Modulator (REF. 8200) Advanced Audio Selection of Advanced audio / Section “Rtrv Audio” In the “Rtrv Audio” (Retrieve Audio) section you can read 1 parameter: the encoder Rate. The last viewed display shows: Turn the rotary button to see Push the rotary button. The display shows: Push the rotary button again to see the encoder Rate: Turn the rotary button to go back to the “Audio Rtrv Status” screen: The display shows: Selection of Advanced Audio / Section “Back” The “Back” section will bring you back to the “Advanced Audio” section of the advanced configuration. The last viewed display shows: Turn the rotary button to see Push the rotary button. The display shows: 16 HDMI Modulator (REF. 8200) Turn the rotary button to go to the next advanced section: the Advanced Stream. Advanced Stream Selection of Advanced Stream / Section “Set Service ID” In the “Set Service ID” section you will give a specific number for the Service ID. The last screen displayed was: Turn the rotary button to see the Advanced / Stream display: Push the rotary button to display: Push the rotary button again to see the Service ID display: Push the rotary button again to edit the Service ID. When in edit mode, a star appears in the top right corner of the display and a cursor appears under the first character of the second row of the display: There are 5 digits that you can change. When turning the rotary button you select the digit you want to change. The cursor indicates which digit will be changed. Push the rotary button to edit the digit which is situated above the cursor. This character starts to blink. Turn the rotary button to select your character. You can select between 0 and 9. Push the button to stop your modification. 17 HDMI Modulator (REF. 8200) Turn the rotary button to select the next digit and edit the character as described above. When you have the Service ID of your choice, turn the rotary button clockwise and the cursor will move to the right. You come automatically in the next screen: Push the rotary button to confirm. The display shows: Selection of Advanced Stream / Section “Set PID” In the “Set PID” section you can edit 4 parameters: the PMT, the PCR, the Video and the Audio IDs. The last screen displayed was: Turn the rotary button to see the Stream / Set PID display: Push the rotary button to display: Push the rotary button again to edit the PMT. When in edit mode, a star appears in the top right corner of the display and a cursor appears under the first character of the second row of the display: There are 4 digits that you can change. When turning the rotary button you select the digit you want to change. The cursor indicates which digit will be changed. 18 HDMI Modulator (REF. 8200) Push the rotary button to edit the digit which is situated above the cursor. This character starts to blink. Turn the rotary button to select your character. You can select between 0 and 9. Push the button to stop your modification. Turn the rotary button to select the next digit and edit the character as described above. When you have the PMT of your choice, turn the rotary button clockwise and the cursor will move to the right. You come automatically in the next screen: Push the rotary button again to edit the PCR. When in edit mode, a star appears in the top right corner of the display and a cursor appears under the first character of the second row of the display: There are 4 digits that you can change. When turning the rotary button you select the digit you want to change. The cursor indicates which digit will be changed. Push the rotary button to edit the digit which is situated above the cursor. This character starts to blink. Turn the rotary button to select your character. You can select between 0 and 9. Push the button to stop your modification. Turn the rotary button to select the next digit and edit the character as described above. When you have the PCR of your choice, turn the rotary button clockwise and the cursor will move to the right. You come automatically in the next screen: 19 HDMI Modulator (REF. 8200) Push the rotary button again to edit the Video. When in edit mode, a star appears in the top right corner of the display and a cursor appears under the first character of the second row of the display: There are 4 digits that you can change. When turning the rotary button you select the digit you want to change. The cursor indicates which digit will be changed. Push the rotary button to edit the digit which is situated above the cursor. This character starts to blink. Turn the rotary button to select your character. You can select between 0 and 9. Push the button to stop your modification. Turn the rotary button to select the next digit and edit the character as described above. When you have the Video of your choice, turn the rotary button clockwise and the cursor will move to the right. You come automatically in the next screen: Push the rotary button again to edit the Audio. When in edit mode, a star appears in the top right corner of the display and a cursor appears under the first character of the second row of the display: There are 4 digits that you can change. When turning the rotary button you select the digit you want to change. The cursor indicates which digit will be changed. Push the rotary button to edit the digit which is situated above the cursor. This character starts to blink. Turn the rotary button to select your character. You can select between 0 and 9. 20 HDMI Modulator (REF. 8200) Push the button to stop your modification. Turn the rotary button to select the next digit and edit the character as described above. When you have the audio of your choice, turn the rotary button clockwise and the cursor will move to the right. You come automatically in the next screen: Push the rotary button to confirm. The display shows: Selection of Advanced Stream / Section “Set NIT” In the “Set NIT” section you can edit 4 parameters: the OrgNetwork ID, the Network ID, the Network Name and the Network Ver. The last screen displayed was: Turn the rotary button to see the Stream / Set NIT display: Push the rotary button to display: Push the rotary button again to edit the OrgNetwork ID. When in edit mode, a star appears in the top right corner of the display and a cursor appears under the first character of the second row of the display: There are 5 digits that you can change. When turning the rotary button you select the digit you want to change. The cursor indicates which digit will be changed. 21 HDMI Modulator (REF. 8200) Push the rotary button to edit the digit which is situated above the cursor. This character starts to blink. Turn the rotary button to select your character. You can select between 0 and 9. Push the button to stop your modification. Turn the rotary button to select the next digit and edit the character as described above. When you have the OrgNetwork ID of your choice, turn the rotary button clockwise and the cursor will move to the right. You come automatically in the next screen: Push the rotary button again to edit the Network ID. When in edit mode, a star appears in the top right corner of the display and a cursor appears under the first character of the second row of the display: There are 5 digits that you can change. When turning the rotary button you select the digit you want to change. The cursor indicates which digit will be changed. Push the rotary button to edit the digit which is situated above the cursor. This character starts to blink. Turn the rotary button to select your character. You can select between 0 and 9. Push the button to stop your modification. Turn the rotary button to select the next digit and edit the character as described above. When you have the Network ID of your choice, turn the rotary button clockwise and the cursor will move to the right. You come automatically in the next screen: 22 HDMI Modulator (REF. 8200) Push the rotary button again to edit the Network Name. When in edit mode, a star appears in the top right corner of the display and a cursor appears under the first character of the second row of the display: When turning the rotary button you select the digit you want to change. The cursor indicates which digit will be changed. Push the rotary button to edit the digit which is situated above the cursor. This character starts to blink. Turn the rotary button to select your character. You can select between a-z, A-Z, space, - and 0-9. Push the button to stop your modification. Turn the rotary button to select the next digit and edit the character as described above. When you have the Network Name of your choice, turn the rotary button clockwise and the cursor will move to the right. You come automatically in the next screen: Push the rotary button again to edit the Network Ver. When in edit mode, a star appears in the top right corner of the display and a cursor appears under the first character of the second row of the display: There are 2 digits that you can change. When turning the rotary button you select the digit you want to change. The cursor indicates which digit will be changed. Push the rotary button to edit the digit which is situated above the cursor. This character starts to blink. Turn the rotary button to select your character. You can select between 0 and 9. 23 HDMI Modulator (REF. 8200) Push the button to stop your modification. Turn the rotary button to select the next digit and edit the character as described above. When you have the Network Ver of your choice, turn the rotary button clockwise and the cursor will move to the right. You come automatically in the next screen: Push the rotary button to confirm. The display shows: Selection of Advanced Stream / Section “Set PDS” In the “Set PDS” section you can edit the Private Data parameter. The last screen displayed was: Turn the rotary button to see the Stream / Set PDS display: Push the rotary button to display: Push the rotary button again to edit the Private Data. When in edit mode, a star appears in the top right corner of the display and a cursor appears under the first character of the second row of the display: There are 8 digits that you can change. When turning the rotary button you select the digit you want to change. The cursor indicates which digit will be changed. 24 HDMI Modulator (REF. 8200) Push the rotary button to edit the digit which is situated above the cursor. This character starts to blink. Turn the rotary button to select your character. You can select between 0 and 9 and A-F. This means the character you see is a hexadecimal character. Push the button to stop your modification. Turn the rotary button to select the next digit and edit the character as described above. When you have the Private Data ID of your choice, turn the rotary button clockwise and the cursor will move to the right. You come automatically in the next screen: Push the rotary button to confirm. The display shows: Selection of Advanced Stream / Section “Set TS ID” In the “Set TS ID” section you can edit the TS ID parameter. The last screen displayed was: Turn the rotary button to see the Stream / Set TS ID display: Push the rotary button to display: Push the rotary button again to edit the TS ID. When in edit mode, a star appears in the top right corner of the display and a cursor appears under the first character of the second row of the display: 25 HDMI Modulator (REF. 8200) There are 5 digits that you can change. When turning the rotary button you select the digit you want to change. The cursor indicates which digit will be changed. Push the rotary button to edit the digit which is situated above the cursor. This character starts to blink. Turn the rotary button to select your character. You can select between 0 and 9. Push the button to stop your modification. Turn the rotary button to select the next digit and edit the character as described above. When you have the TS ID of your choice, turn the rotary button clockwise and the cursor will move to the right. You come automatically in the next screen: Push the rotary button to confirm. The display shows: Selection of Advanced Stream / Section “Rtrv Status” In the “Rtrv Status” (Retrieve Status) section you can read 13 parameters: Service ID, CH Name, CH Number(LCN), PMT PID, PCR PID, Video PID, Audio PID, OrgNetwork ID, Network ID, Network Name, Network Ver., Private Data and TS ID. The last screen displayed was: Turn the rotary button to see 26 HDMI Modulator (REF. 8200) Push the rotary button. The display shows: Turn the rotary button to see the other parameters, like CH Name, CH Number(LCN), PMT PID, PCR PID, Video PID, Audio PID, OrgNetwork ID, Network ID, Network Name, Network Ver., Private Data and TS ID. Turn the rotary button to go back to the “Rtrv Status” screen: Push the rotary button to confirm. The display shows: Selection of Advanced Stream / Section “Back” The “Back” section will bring you back to the “Advanced / Stream” section of the advanced configuration. The last viewed display shows: Turn the rotary button to see Push the rotary button. The display shows: 27 HDMI Modulator (REF. 8200) Advanced System Selection of Advanced system / Section “Rtrv Inventory” In the “Rtrv Inventory” section you can read the system info of the HDMI Modulator. The last screen displayed was: Turn the rotary button to see the Advanced / system display: Push the rotary button to display: Push the rotary button again to see the Systsem Info display: Turn the rotary button again and you will see another System Info display: Turn the rotary button again until you see the ‘back’ screen: Push the rotary button to display: 28 HDMI Modulator (REF. 8200) Selection of Advanced system / Section “Reboot System” In the “Reboot system” section you are able to restart the HDMI Modulator. The last screen displayed was: Turn the rotary button to see the Stream / Reboot system display: Push the rotary button to display: Turn the rotary button to make your selection (yes or no). or Y = yes (all changes will be saved) n = no (no changes will be saved). IMPORTANT NOTE : When you made any modification in whatever parameter, please always confirm with a y (yes) Push the rotary button to confirm. If you choosed n (no) the display shows: If you choosed y (yes) the display shows: Followed by the next screen: 29 HDMI Modulator (REF. 8200) Selection of Advanced system / Section “Reset to default” In the “Reset to Default” section you are able to reset the factory settings. When no reboot was established the screen displays: Follow the next steps after the note. Turn the rotary button to see the Advanced / system display: Follow the next steps after the note. Turn the rotary button to see the System / Reset to default display: Push the rotary button to display: Turn the rotary button to make your selection (yes or no). or Y = yes (all changes will be saved) n = no (no changes will be saved). IMPORTANT NOTE : When you made any modification in whatever what parameter, please always confirm with a y (yes) Push the rotary button to confirm. If you choosed n (no) the display shows: If you choosed y (yes) the display shows: Followed by the next screen: 30 HDMI Modulator (REF. 8200) Selection of Advanced System / Section “Back” The “Back” section will bring you back to the “Advanced / System” section of the advanced configuration. The last viewed display shows: Turn the rotary button to see Push the rotary button. The display shows: Advanced Exit Selection of Advanced Exit In this section you will leave the Advanced section. The last viewed display shows: Turn the rotary button to see Push the rotary button. The display shows: Turn the rotary button to make your selection (yes or no). IMPORTANT NOTE : When you made any modification in whatever parameter, please always confirm with a y (yes) 31 HDMI Modulator (REF. 8200) Push the rotary button to confirm. The display shows: followed by the next screen: Technical Specifications HDMI input Video resolution Video encoding Audio encoding Connector type - 576i up to 1080p H264/AVC MPEG1 layer II HDMI type A MHz dB 5 – 1002 2 RF input Frequency Loss to RF output RF output (= RF input signal + HDMI modulated transponder) Modulated channel frequency MHz Output level MER dBµV dB 170-230 / 470-862 (channel plan: E5-E12 / E21-E69) 75-90 (adjustable) Typ. 40 MHz 2K/8K up to 18 Mbit/s QPSK / 16QAM / 64QAM 1/2 up to 7/8 1/4 up to 1/32 7-8 Basic configuration - Advanced configuration - Country | Output channel frequency | Output level | LCN | Channel name RF frequency offset | SID | PMT, VPID, APID, PCR | NIT, ONID | PDS | TS ID DVB-T settings Modulation Constellation FEC Guard interval Channel bandwidth Configuration Power & dimensions, etc... Power - Dimensions, weight, EAN code Accessories - Input voltage: 12VDC Consumption: 5W Typ. (7W max.) Jack Ø 2.1 mm. 180 x 175 x 65 mm. | 1 kg. | 2082000000011 12 V power adapter | 1.5m HDMI cable 32 HDMI Modulator (REF. 8200) Appendix Display Menu Overview. Boot system Please wait HDMI Modulator 594.000MHz Country: Frequency: Output Level: CH Number(LCN): CH Name: Advanced Confirm? RF Output Setup RF Output Rtrv Status Advanced Video Back Rtrv Status Audio Back Rtrv Status Stream Back Set Service ID Set PID Set NIT Set PDS Set TS ID Rtrv Status Carrier: Constellation: FEC: Guard Interval: Back Country: Frequency: Output Level: Bandwidth: Carrier: Constellation: FEC: Guard Interval: RF Output: Back Freq Offset: RF Output: Back Video Source: In Resolution: Encoder Rate: Encoder Status: Back Encoder Rate: Back Service ID Back PMT: PCR: Video: Audio: Back OrgNetwork ID: Network ID: Network Name: Network Ver: Back Private Data: Back TS ID: Back Service ID: CH Name: CH Number(LCN): PMT PID: 33 HDMI Modulator (REF. 8200) PCR PID: Video PID: Audio PID: OrgNetwork ID: Network ID: Network Name: Network Ver: Private Data: TS ID: Back System Back Rtrv Invetory Reboot system Reset to Default Back System Info: Back Confirm ? Confirm ? Exit 34 HDMI Modulator (REF. 8200) 35 HDMI Modulator (REF. 8200) UNITRONGROUP Frankrijklaan 27 8970 Poperinge Belgium T. +32 (0) 57 33 33 63 F. +32 (0) 57 33 45 24 [email protected] www.johansson.be 02/15 36