1
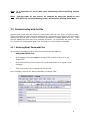
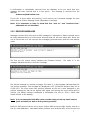
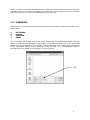
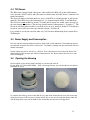
KILO
Iridium Satellite Beacon with GPS location
User Manual
Version 1.2
February 2012
Xeos Technologies Inc.
2 Bluewater Rd.
Bedford, Nova Scotia, Canada
B4B 1G7
(902) 444-7650
www.xeostech.com
0
SHIPPED FROM:
Xeos Technologies Inc.
2 Bluewater Rd.
Bedford, Nova Scotia
Canada
B4B 1G7
How to contact us:
Email:
Phone:
Fax:
http://
[email protected]
902-444-7650
902-444-7651
www.xeostech.com
1
Contents
1
2
3
General Description ................................................................................................................ 3
Theory of Operation ................................................................................................................ 3
Operating Instructions ............................................................................................................. 4
3.1 Setting up your Iridium Account ...................................................................................... 4
3.2 On/Off Modes and Testing ............................................................................................... 5
3.3 Communicating with the Kilo .......................................................................................... 6
3.3.1
Attaching Email Command Files .............................................................................. 6
3.3.2
RECEIVED MESSAGES ......................................................................................... 7
3.3.3
COMMANDS ........................................................................................................... 8
3.4 Tilt Sensor ...................................................................................................................... 12
3.5 Power Supply and Consumption .................................................................................... 12
3.6 Opening the Housing...................................................................................................... 12
3.7 Replacement of Batteries ............................................................................................... 13
3.8 Field Installation ............................................................................................................. 16
Appendix A - Technical Specification ........................................................................................ 17
2
1 General Description
The Kilo Surface/Subsurface iridium satellite mooring location beacon continuously monitors
for unplanned or accidental release of subsurface instrument moorings. Kilo makes use of
the bi-directional, global, real time Iridium satellite Short Burst Data (SBD) network in
combination with GPS position location. Kilo’s sleek tubular design allows it to be easily
retrofitted into subsurface flotation such as syntactic foam.
Inside the Kilo is a stainless steel chamber, 9602 Iridium satellite Short Burst Data core
radio transceiver, a specialized low power Xeos digital controller with GPS, Iridium antenna,
GPS antenna, and water sense circuitry specially designed to measure changes in
capacitance.
Kilo is intended for both surface and subsurface deployments. Xeos Technologies Inc. (Xeos)
manufactures other specific products for either surface, or subsurface applications.
See www.xeostech.com for details or call (902) 444-7650.
2 Theory of Operation
The Kilo is intended for instantly and accurately locating and recovering high value, free
drifting assets at sea. After being activated, the Kilo is submerged (to a maximum depth of
1000 meters), where it enters an ‘Underwater Mode’. Here, it monitors the capacitance that
the water surrounding the Kilo creates for up to 1 Year. Shortly after reaching the surface,
the Kilo can then report its GPS location for 90 days.
Once it reaches the surface, the Kilo will enter an ‘Alarm Mode’ and send 3 consecutive
messages to the iridium satellite. The first message is an iridium check. The second
message is a Surfaced message. The third message contains the GPS position. The Kilo will
transmit a position message every 10 minutes for 1 hour. After the 1 hour ‘Alarm Mode’, the
Kilo will enter a ‘Surface Mode’ or ‘Normal Mode’, where it will transmit its position based on
the timing settings.
Operators can communicate with the surfaced Kilo via Iridium using email commands.
Status information can be obtained, including the health of the GPS system and battery
voltage. Timings are settable and should be changed within the first hour of power-up or
surfacing. The default timings are 3 hours, thus the user will have to wait 3 hours for the
Kilo to receive any command messages once it has entered ‘Normal Mode’.
The surfaced Kilo will continue to send position messages based on the timings, until it is
manually turned off, the battery pack drops below the minimum voltage requirement of 7v,
or the Kilo is re-submerged.
3
3 Operating Instructions
3.1 Setting up your Iridium Account
Kilo makes use of the Iridium satellite system’s (www.iridium.com) Short Burst Data (SBD)
service for the 9602 transceiver. This service is a global, two-way, real-time,
email-based data delivery service that has a maximum outbound (from beacon) message
size of 340 bytes and a maximum inbound (to beacon) message size of 270 bytes.
Kilo end users must set up an approved data delivery account with their preferred service
provider. This can only be done once Xeos has provided the user with an International
Mobile Equipment Identity (IMEI) number. Each 9602 has a unique IMEI number that must
be registered with the preferred service provider. For a list of service providers in your area
please contact Iridium for recommendations.
Each IMEI number is capable of being associated with up to five (5) unique email addresses.
This may vary between service providers. When registering your IMEI number, please
provide the service provider with a temporary Xeos testing account email address.
This account is: [email protected]
This temporary email testing account can be deleted or replaced at any time after delivery
of the Kilo.
Once the SBD account has been activated, please contact your Xeos
representative and confirm this.
Kilo makes use of a simple and robust, text-based email protocol. Any email application can
be used to send and receive messages to the Kilo. Command files are found on the Xeos
Technologies website (www.xeostech.com), or can be emailed directly by contacting
[email protected] . Once downloaded to the PC, unzip the file, which contains four (4)
command files that have “.sbd” extensions used to communicate with the Kilo. You are now
ready to test the Kilo beacon and prepare it for deployment.
4
3.2 On/Off Modes and Testing
The Kilo beacon is turned ON and OFF through the use of an external magnet near an
internal magnetic reed switch, and operation can be identified by viewing the LED through
the top of the Kilo
To turn the Kilo ON, begin swiping the magnet quickly up and down at the location of the
reed switch. The reed switch is located directly behind the Xeos Technologies Logo.
Note:
if the initial color of the LED is Green that means that the Kilo is already in
the on position.
Swipe magnet
here at location
of reed switch
ON/OFF
Magnetic
Switch
Red LED
= OFF
A flashing green LED indicates the device is in the process of powering up, continue to swipe
the magnet until you see a solid green LED. A solid green LED indicates that the device is
powered and operational.
Green LED
= ON
Note: It is important that the beacon has a good view of the sky during any test,
so it is necessary to test the beacon outside of a building.
To turn the Kilo OFF, repeat the above procedure with the magnet and watch the LED
change from green to red. A red flashing LED indicates the device is powering down,
continue to swipe the magnet until you see a solid red LED. A solid red LED indicates that
the device is turned OFF.
At any time the magnet can be placed against the location of the reed switch once to see
which mode the beacon is currently in. A red LED indicates the device is turned OFF. A
green LED indicates the device is turned ON.
5
Note:
It is important to let all LEDs stop illuminating before initiating another
action.
Note:
Cycling power for any reason, for example by using the switch to turn
OFF/ON or by removing battery power, will start the Startup Alarm Mode.
3.3 Communicating with the Kilo
Special email commands are used to communicate with the Kilo when it is above water.
These commands are sent as email attachments. Commands can configure the Kilo before
deployment and can also be used to remotely reconfigure or update status with Kilo. There
are four attachment files that serve separate functions. All commands are given “over the
air” and the Kilo must have a good view of the sky to receive these commands.
3.3.1 Attaching Email Command Files
All command messages must be sent to the following email address:
[email protected]
•
All messages must have only the unique IMEI number of the Kilo in the
Subject line.
•
All command files must be sent to Kilo as an attachment to a regular email
message.
•
Text in the body of the message will be ignored.
Your message is sent to the Iridium Gateway in Arizona, USA:
6
A confirmation is immediately returned from the Gateway to let you know that your
message has been received and is in the queue. This message is received from the
address:
[email protected]
If your Kilo is above water and working, it will receive your command message the next
time it does an Iridium Message Check (dependant on timings).
Note: It is important to keep in mind that the “sent to” and “received from”
addresses are not the same.
3.3.2 RECEIVED MESSAGES
Messages received from Kilo such as GPS messages or responses to Status requests arrive
as email attachments to all of the email accounts that the Kilo was setup with. When the
unit is first turned on it will send out two messages (pictured below) and will enter startup
mode.
The first you will receive simply indicates the Firmware Version.
message indicates that this is a version message.
The letter ‘V’ in the
The Second message is a position message. The letter ‘P’ in the message indicates that this
is a position message. Time and date are displayed in UTC (05311209 would be May 31st at
12:09 UTC). The most recent GPS position obtained by the Kilo is also displayed in the
position message as well as the highest GPS signal level during the most recent GPS fix
(snrMx). The battery voltage is displayed in hundredths of a volt (ie. If BV = 2850, that
means 28.50V on the battery).
Note: It is recommended that Kilo users consider using a back-up email service
(such as Gmail) as well as their primary provider.
Each Kilo IMEI account can be set up by an Iridium SBD service provider usually with up to
five (5) email addresses. Web-based email providers such as Gmail offer a free service and
7
plenty of memory storage to act as a backup in case your primary address is not accessible.
Web-based services are also not subject to commercial or government mail server firewalls
that may, at times, prevent email attachments from arriving.
3.3.3 COMMANDS
There are four commands that are sent to the Kilo over the Iridium network when the Kilo is
above water:
1.
2.
3.
4.
SETTIMING
STATUS
POSITION
RESET
The commands are always sent as an email attachment. Command attachment files can
easily be created using Notepad. Simply open a new Notepad and type in the command
exactly how it is displayed in this manual. Save the Notepad with a name that corresponds
to the command. Save the file’s extension name as ‘.sbd’. It is recommended that all
command files are saved in one location for ease of access.
Save as ‘.sbd’
8
3.3.3.1 SETTIMING
The set timing command ($SetTiming) is used to set one timer parameter in Kilo, the
Iridium check and GPS acquisition. The timing value is stored in minutes. The set timing file
should be set up like the file below. The default timing settings are 180 minutes (3 hours).
180 = IRD Check interval is the number of minutes between Kilo’s message checks, and
GPS transmissions. The Kilo will wake up and check for messages (new instructions) at the
Iridium Gateway based on this setting.
These values are the default settings. When power is cycled on the beacon, the unit will
return to these settings. Users can change these settings by opening the “set timing.sbd”
file, changing the individual numbers (within the limits), then emailing the altered file to the
Kilo as an attachment.
Timer Limit: 10 to 1440 minutes (24hrs)
Values set outside the limit will be ignored.
The Setup command can be sent to the Iridium gateway at any time and will take effect as
soon as the Kilo wakes up and connects with the Iridium Gateway.
Once the Kilo receives a SetTiming command, it will change the timing configuration and
send back a status message, indicating the new timing configurations.
9
3.3.3.2 STATUS
The status command ($scm) is used to retrieve Kilo’s current settings and beacon status.
There is no need to configure this message. The Status command message file should look
like the one below.
The ‘answer’ to a status request is a returned email attachment similar to this:
The example above contains the following information:
•
08271305
This is the date and time (UTC) in MMDDhhmm (M=Month, D=
Day, h= hour, m=min). This will be the date and time of the
most recent GPS fix.
•
S
This means the message is a ‘Status Message’
•
gps=3Hrs
Checks the GPS position every 3 hours (this is the default).
•
ird=3Hrs
Checks the Iridium Gateway every 3 hours (default). This is
when the unit receives commands and sends messages.
•
lat=44.72571
Indicates GPS latitude position of unit, according to most recent
GPS fix, and is expressed in decimal degrees.
•
lon=-63.70707
Indicates GPS longitude position of unit, according to most
recent GPS fix, and is expressed in decimal degrees.
There are two cases in which the user will receive a status message. If timings are changed,
the user will receive a status message, and if the manual command for a status message is
received from the user.
10
3.3.3.3 POSITION
The position command ($GetPos) file is a request for an immediate GPS location, which is
answered by the Kilo on its next Mail Message Check. The position command message
should look like the one below.
Once the Kilo has received a get position command, it will return a position message, like
the one below.
3.3.3.4 RESET
The reset command ($ResetNow) does a full software reset of the Kilo. This effectively will
power OFF and ON the beacon. The unit will return to its default values of 3h. It will also
start the above-water Alarm Mode. This command should only be used on the advice
of Xeos Technologies Inc. The reset command file should look like the one below.
11
3.4 Tilt Sensor
The Kilo comes equipped with a tilt sensor, when enabled, the Kilo will go into a hibernation
state, when the device is tilted, and will return to a normal state when the device is returned to its
normal orientation.
The tilt axis defaults to the horizontal axis, that is, if the Kilo is standing upright, it will operate
normally. If the Kilo crosses the horizontal axis, i.e. orientated upside down , it will hibernate.
The tilt sensor is not enabled by default. To enable the tilt sensor one would send a message, in
the same format shown above. The message should contain (without quotes) “ $switch t 1 ”. The
tilt sensor will then remain enabled, even if the device is reset, until it is disabled. To disable the
tilt sensor, one would send a message with the contents “ $switch t 0 ”.
It is possible to use the tilt sensor on other axis (Y,Z) for more information please contact Xeos
Technologies.
3.5 Power Supply and Consumption
The Kilo has an internal battery enclosure that holds 12 AA batteries. The batteries should
be replaced whenever the Kilo is recovered. The battery voltage can be monitored with the
Status command.
Typical sleep current for the Kilo is <200µA. This is the amount of current the device will
draw between GPS checks and Iridium transmissions. The device has a life time of 1 Year
while submerged.
3.6 Opening the Housing
At the bottom of the Kilo’s acetyl housing is a screw-cap with an
O-ring (568-137 70A DURO BUNA). After removing the cap, you will be able to see where
the black O-ring is
To replace the O-Ring, remove the Old O-ring, and clean all dirt away from the screw-cap.
Apply a thin layer of O-ring lube (Parker Super ‘O’) to the new O-ring and gently slide the
new O-Ring down over the threads of the screw-cap and into the O-ring groove.
12
Note: It is very important to be aware of where the O-ring is sitting on the
screw cap. If the O-ring is not sitting perfectly in the O-ring groove, there
will not be a perfect seal and could cause fatal damage to the unit.
3.7 Replacement of Batteries
After removing the screw-cap, you will be able to see a green, circular circuit board sitting
loosely inside the main body of the Kilo. Remove this board by turning the Kilo right side up
and letting the board fall onto a table or your hand.
After the Circuit board is removed, you will see a black battery pack with 6 slots that will
hold 2 AA batteries each. (12 batteries in total)
13
Button
Spring
Firmware update USB port
Drop the batteries into the Main body of the Kilo. At the bottom of each slot, there is either
a “spring” or a “button.”
For the slots with buttons, drop the batteries with the negative facing UP.
For the slots with springs, drop the batteries with the positive Facing UP
This is how the batteries should look when they are all inserted
Slot with button
Slot with spring
Firmware update USB port
14
Once the batteries have been inserted, place the green circular circuit board back on top of
the batteries with the springs and buttons of the board touching the batteries. Hand tighten
the screw-cap back on until there is no space between the main body of the Kilo and the
screw cap.
The Kilo is now ready for testing, and/or deployment.
NOTE: If the batteries are low, or if some of the batteries have been inserted
incorrectly, the Kilo will sound a quick intermittent beep and flash the red
LED at the top for 5 minutes, or until the batteries have been corrected or
replaced.
NOTE: The USB port located in the center of the triangle at the top of the battery
pack is used for firmware updates
15
3.8 Field Installation
The Kilo is intended for use on marine flotation devices. It is important that the top of the
Kilo is located as high above the surface of the water as possible. Both the Iridium and GPS
antennas are located at the top of the unit. It is recommended that users install Kilo on a
mast or superstructure at the top of their surface buoy or flotation device.
Care should be taken when installing to avoid putting metal bands close to the top of the
unit where the antennas are located.
16
Appendix A - Technical Specification
Mechanical:
Material:
Outside Housing: Derlin Case
Inside Chassis: stainless steel
Dimensions:
11.31” Long x 2.87” Diameter (287.5mm x 72.9mm)
Weight:
2.75 kg (Air), 1.55 kg (Water)
O-rings:
Bottom screw-plug: 568-137 70A DURO BUNA
O-Ring Lube: Parker Super ‘O’
17
Electrical:
Power Supply
Battery Supply:
Voltage:
Capacity:
Life expectancy:
12 Alkaline AA cells (user replaceable)
+18 volts nominal
2.0 Amp Hours
1 Year Subsurface followed by 90 days of outbound/inbound
surface messages
Electronics
Iridium Transceiver:
Digital Controller:
GPS Receiver:
9602
Xeos IRDC-3
48 channel SiRFstarIV, GSD4e GPS chip
Environmental
Operating Temperature:
-30° C to +60° C (-22° F to +140° F)
18
Warranty, Support and Limited Liability
Xeos Technologies Inc. warranties the Kilo Beacon to be free of defects in material or
manufacturing for a period of one year following delivery. Liability is limited to repair or
replacement of the defective part and will be done free of charge.
LIMITED WARRANTY: Xeos Technologies Inc. warrants that the product will perform
substantially in accordance with the accompanying written materials for a period of
one year from the date of receipt.
CUSTOMER REMEDIES: Xeos Technologies Inc. entire liability and your exclusive remedy
shall be at Xeos Technologies Inc. option, either (a) return of the price paid or (b) repair or
replacement of the product that does not meet Xeos Technologies Inc. Limited Warranty
and that is returned to Xeos Technologies Inc. with a copy of your receipt. This Limited
Warranty is void if failure of the product has resulted from accident, abuse, or
misapplication. Any replacement product will be warranted for the remainder of
the original warranty period or ninety (90) days, whichever is longer.
NO OTHER WARRANTIES: Xeos Technologies Inc. disclaims all other warranties, either
express or implied, including but not limited to implied warranties of merchantability and
fitness for a particular purpose, with respect to the product or the accompanying written
materials. This limited warranty gives you specific legal rights. You may have others,
which vary from state to state.
NO LIABILITY FOR CONSEQUENTIAL DAMAGES: In no event shall Xeos Technologies Inc. or
its suppliers be liable for any damages whatsoever (including, without limitation, damages
for loss of equipment, for loss of business profits, business interruption, loss of business
information, or other pecuniary loss) arising out of the use of or inability to use this
Xeos Technologies Inc. product, even if Xeos Technologies Inc. has been advised of the
possibility of such damages.
19