1
CLOCK77/PCI
CLOCK77/USB
CLOCK77/ISA
© QUANCOM Informationssysteme GmbH
Copyright © QUANCOM Informationssysteme GmbH
All specification in this manual was arranged after careful check, and it is not considered as any warranty of
product properties. QUANCOM shall not be responsible for any errors or
omissions contained in this user’s manual, and reserves the right to make changes without notice. Passing on
and duplication of this manual and the utilisation of its contents as well as the software belonging to the product
are permitted only with written permission by QUANCOM.
Wesseling, April 2009
Version 4.3.1
CLOCK77/PCI CLOCK77/USB CLOCK77/ISA
Index
ChapterI
Overview
1
1
Introduction
....................................................................................................................................1
2
Our experience
....................................................................................................................................1
is your profit
3
Customer....................................................................................................................................1
Communication
4
Changes....................................................................................................................................1
in this manual and software updates
5
Scope of....................................................................................................................................1
supply
ChapterII
Installation procedures
3
1
System requirements
....................................................................................................................................3
2
Safety precautions
....................................................................................................................................3
3
Installation
....................................................................................................................................4
of the DCF-Clock interface board
4
Connecting
....................................................................................................................................5
the USB- Module
ChapterIII Technical hardware description
6
1
Product Information
....................................................................................................................................6
2
How the CLOCK77
....................................................................................................................................7
works
3
Steps of installation
....................................................................................................................................7
( only for Clock77 / ISA )
4
CLOCK77/PCI-Express
....................................................................................................................................8
Board overview
...........................................................................................................................................................8
Connector of...........................................................................................................................................................9
the CLOCK77/PCI-Express
LED Description
...........................................................................................................................................................9
5
CLOCK77/PCI
....................................................................................................................................10
(Rev. 4.x)
Board overview
...........................................................................................................................................................10
Connector to
the CLOCK77 receiver-module
...........................................................................................................................................................11
LED Description
...........................................................................................................................................................12
6
CLOCK77/USB
....................................................................................................................................13
USB Receiver
Module
...........................................................................................................................................................13
7
CLOCK77/PCI
....................................................................................................................................14
(Rev. 3.x)
Board overview
...........................................................................................................................................................14
Connector to
the CLOCK77 receiver-module
...........................................................................................................................................................15
Jumper settings
for cards power supply
...........................................................................................................................................................15
LED Description
...........................................................................................................................................................16
8
CLOCK77/PCI
....................................................................................................................................17
Card (Rev. 2.x)
Board overview
...........................................................................................................................................................17
Connector to
the CLOCK77 receiver-module
...........................................................................................................................................................18
9
CLOCK77/ISA
....................................................................................................................................19
Card
Board overview
...........................................................................................................................................................19
JP1: Address
jumper for I/O connection in the PC
...........................................................................................................................................................20
D-Sub 9 socket
of CLOCK77/ISA, CLOCK77/PCI
...........................................................................................................................................................20
ChapterIV Installing drivers and software for the QUANCOM CLOCK77 21
1
Installing
....................................................................................................................................21
the CLOCK77/USB
2
Installing
....................................................................................................................................23
the CLOCK77/PCI
© QUANCOM Informationssysteme GmbH
Inhalt
3
Installing
....................................................................................................................................25
the CLOCK77/ISA
4
Installing
....................................................................................................................................27
the CLOCK77/PCI for Windows NT 4
5
Installing
....................................................................................................................................28
the CLOCK77/ISA for Windows NT 4
ChapterV
Software
29
1
Antenna....................................................................................................................................29
adjustment for the reception of time signals
2
The monitor
....................................................................................................................................30
program (only Microsoft Windows)
ChapterVI The Windows 3.1x / DOS Programm
1
Switch for
....................................................................................................................................32
the DOS program CLOCK77.EXE
ChapterVII Annex
1
31
33
When is....................................................................................................................................33
the time set?
The length of
my antenna cable is not sufficient
...........................................................................................................................................................33
Attitudes of...........................................................................................................................................................33
the time
ID' s in the event
announcement under Windows XP/2000/NT
...........................................................................................................................................................34
Windows XP/2000/NT:
Distribution of the time in a Windows network
...........................................................................................................................................................34
Windows XP/2000/NT:
Event minutes are overfilled by a large number of inputs
...........................................................................................................................................................34
Windows XP/2000/NT:
Error message No.: 2140
...........................................................................................................................................................35
I cannot install
the CLOCK77 under Windows 2000
...........................................................................................................................................................35
Windows ME/98/95:
Error message “queue was emptied (Code1)”/no receipt
...........................................................................................................................................................35
Possible problems
under DOS
...........................................................................................................................................................36
2
Customer
....................................................................................................................................37
Communication and Help
3
Technical
....................................................................................................................................39
support form
4
Hardware
....................................................................................................................................40
and Software configuration form
5
Dokumentations
....................................................................................................................................41
Formular
6
Trademarks
....................................................................................................................................43
© QUANCOM Informationssysteme GmbH
CLOCK77/PCI CLOCK77/USB CLOCK77/ISA
1.
Overview
1.1
Introduction
Congratulations to your new QUANCOM DCF77 clock-receiver. You’ve chosen a product
whose attributes and functions are showing the state-of-the art.
1.2
Our experience is your profit
We from QUANCOM are specialists in development of hard- and software. QUANCOM has
grown to become one of the leading suppliers of measuring and automation technology to
industry. At our design centres QUANCOM has developed an impressive range of products.
1.3
Customer Communication
QUANCOM wants to receive your comments on our products and manuals. We are also
interested in the applications you developed with our products, and we want to help if you
have problems with them. To make it easy for you to contact us, this manual contains
comment and configuration forms for you to complete. These forms are in chapter ”
Documentation Comment Form” at the end of this manual.
1.4
Changes in this manual and software updates
QUANCOM - products are distinguished by their constant further development. You can see
all the actual information of the changes in the README-file on the installation disk or CD.
You can always get more information and free software updates on our internet website
www.quancom.de
1.5
Scope of supply
· QUANCOM Clock77 (PCI-Card / USB Module)
· QUANCOM Clock-Receiver (only by CLOCK77/PCI)
· QUANCOM Clock CD
Contents on the CD:
© QUANCOM Informationssysteme GmbH
1
2
Overview
· Driver/ Software for the various operating systems
· Manual
If a component is missing please contact your dealer. QUANCOM reserves the right to
change the extent of delivery without a preliminary announcement.
© QUANCOM Informationssysteme GmbH
CLOCK77/PCI CLOCK77/USB CLOCK77/ISA
2.
Installation procedures
2.1
System requirements
· Personal computer: The QUANCOM cards run with all
current Intel and AMD systems
· Bus: Your computer must have the corresponding bus.
(PCI / USB)
In chapter “Technical hardware description” you’ll find more informations about the System
requirements.
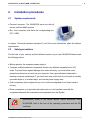
2.2
Safety precautions
For the sake of your security and the faultless function of your new QUANCOM board mind
the following advice:
· Before opening the computer please unplug it.
· Computer motherboards and components contain very delicate integrated circuit (IC)
chips. To protect them against damage from static electricity, you must follow some
precautions whenever you work on your computer. Use a grounded wrist strap before
handling computer components. If you don’t have one, touch both of your hands to a safely
grounded object or to a metal object, such as the power supply case.
· Hold components by the edges and try not to touch the integrated circuit chips, leads or
circuitry.
· Place components on a grounded anti-static pad or on the bag that came with the
component whenever the components are separated from the System.
Modifications, made to the device without explicit permission from
QUANCOM, lead to the loss of the operating permission and the CE
certificate.
© QUANCOM Informationssysteme GmbH
3
4
Installation procedures
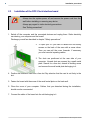
2.3
Installation of the DCF-Clock interface board
Always turn the system power off and remove the power cord from the
wall before installing or removing any device.
Always pay regard to static electricity precautions.
See “Safety precautions”
1. Switch off the computer and the connected devices and unplug them. Static electricity
can destroy your computer and the board!
Discharge yourself as described in chapter ”Safety precautions”.
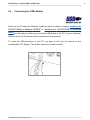
2. To open your PC you have to detach the four safety
screws on the back of the case with a screw driver.
Then you can pull the cover forwards. If necessary
you must remove impeding cables.
3. The slots are positioned at the rear side of your
computer. Unused slots are covered by a small metal
plate. Search for a free slot, detach its holding screw
and remove the small metal plate belonging to it.
4. Position the extension card into a free slot Pay attention that the card is set firmly in the
slot.
5. Fasten the board with the screw of the small metal plate on the back wall.
6. Close the cover of your computer. Cables, that you detached during the installation,
should now be reconnected.
7. Connect the cable of the board into the slot belonging to it.
© QUANCOM Informationssysteme GmbH
CLOCK77/PCI CLOCK77/USB CLOCK77/ISA
2.4
Connecting the USB- Module
Switch on the PC and start Windows. Install the driver as shown in chapter “Installing the
CLOCK77/USB for Windows XP/2000” or ”Installing the CLOCK77/USB for Windows
ME/98 and after that you safely can connect the USB-Module to the PC. If you do otherwise,
Windows won’t find the drivers and the module won’t work properly.
To locate the USB-connectors of your PC you have to look into the manual of your
motherboard or PC-System. The location varies from model to model.
© QUANCOM Informationssysteme GmbH
5
6
Installation procedures
3.
Technical hardware description
3.1
Product Information
With the CLOCK77 we developed a new product for the PC which can be attached easily to
every computer and provides the atomic exact time-of-day. The deviation is approx. one
second in 300,000 years.
The
data
from
the
receiver
of
the
CLOCK77
is
processed
by
a
Windows
XP/2000/NT/ME/98/95 background task. There is also a DOS-TSR (Terminate and Stay
Resistant) background program for Windows 3.1x and Dos which processes data from the
CLOCK77 (except the CLOCK77/USB which depends on support of USB through the
Operating System).
After the complete clock code is received, the software adjusts the PC clock to the received
atomic exact time and date value. This means that in the future, the user can ignore the
often reoccurring and disturbing deviations of the PC clock completely. Once connected with
the PC and installed, even the annoying conversion of summer to winter time belongs to the
past. Thanks to the signals from the German Mainflingen, CLOCK77 accomplishes this
function independently.
The receiver module is delivered with one lead, approx. 5m, and a D-SUB plug connector or
USB-connector. All necessary signals and power supply for the module are supplied by the
interface.
The cable of the CLOCK77/PCI + CLOCK77/ISA of receiver can be extended on up to 20m.
For distances more largely we offer an additional CLOCK AMPLIFIER, with which you can
attach the receiver up to 100m far away from the CLOCK77 to 20m.
CLOCK77
is
available
in
three
versions:
CLOCK77/USB,
CLOCK77/PCI
and
CLOCK77/ISA. The modules are attached to the PC-Interface-board or to the
USB-connector. All CLOCK77-systems are delivered with driver-support for Windows XP /
2000 / NT / ME / 98 / 95 and DOS / Windows 3.x. For all other Operating systems a sample
© QUANCOM Informationssysteme GmbH
CLOCK77/PCI CLOCK77/USB CLOCK77/ISA
source-code shows the access to the Interface and the CLOCK77. (Except for
CLOCK77/USB which is only supported by Windows XP / 2000 / ME / 98)
3.2
How the CLOCK77 works
After calling up the software CLOCK77, the antenna system receives signals from the
transmitter in Mainflingen. On a certain signal (synchronisation label) the software detects,
that the data for the current time-of-day is now being transmitted. These datas consist of
short and long low-signals and are transmitted for one minute. Afterwards the software
resets the new time-of-day and if necessary the new date on the PC.
3.3
Steps of installation ( only for Clock77 / ISA )
Set the desired port address on the CLOCK77/ISA (see in Chapter ”The CLOCK77 ISA
board”). Switch your PC off, remove the screws, remove the cover and put the slot card into
a free slot. Replace the cover of your computer and fasten the screws. Fasten the receiver to
the socket of the slot card and turn your computer on.
Then start the system and install the software.
© QUANCOM Informationssysteme GmbH
7
8
Technical hardware description
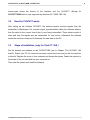
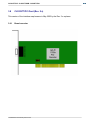
3.4
CLOCK77/PCI-Express
3.4.1
Board overview
© QUANCOM Informationssysteme GmbH
CLOCK77/PCI CLOCK77/USB CLOCK77/ISA
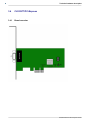
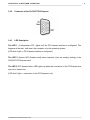
3.4.2
Connector of the CLOCK77/PCI-Express
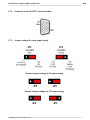
3.4.3
LED Description
The LED 1 ( Configuration LED ) lights until the PCI Express interface is configured. This
happens at the start, until reset the computer or by the operating system.
(LED didn´t light => PCI-Express interface is configured.)
The LED 2 (Access LED) flashes briefly when requests (such as reading, writing) to the
CLOCK77/PCI-Express card.
The LED 3 (PCI-Express failure LED) lights up when the connection to the PCI-Express bus
can not be carried out.
(LED didn´t light => connection to the PCI-Express is ok.)
© QUANCOM Informationssysteme GmbH
9
10
Technical hardware description
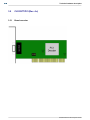
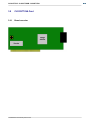
3.5
CLOCK77/PCI (Rev. 4.x)
3.5.1
Board overview
© QUANCOM Informationssysteme GmbH
CLOCK77/PCI CLOCK77/USB CLOCK77/ISA
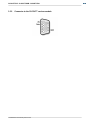
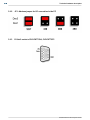
3.5.2
Connector to the CLOCK77 receiver-module
© QUANCOM Informationssysteme GmbH
11
12
Technical hardware description
3.5.3
LED Description
Die LED 1 ( Konfigurations- LED ) lights until the Clock77/PCI interface is configured. This
happens at the start, until reset the computer or by the operating system.
Die LED 2 ( Access LED ) flashes briefly when requests (such as reading, writing) to the
CLOCK77/PCI Card.
© QUANCOM Informationssysteme GmbH
CLOCK77/PCI CLOCK77/USB CLOCK77/ISA
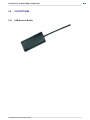
3.6
CLOCK77/USB
3.6.1
USB Receiver Module
© QUANCOM Informationssysteme GmbH
13
14
Technical hardware description
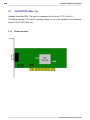
3.7
CLOCK77/PCI (Rev. 3.x)
Available since May 2003. The card is comparable with the clock 77 PCI ( Rev.2.x )
The attitude between 3,3V and 5V operating voltage is new. It was replaced in the meantime
by the CLOCK77/PCI (Rev.4.x.).
3.7.1
Board overview
© QUANCOM Informationssysteme GmbH
CLOCK77/PCI CLOCK77/USB CLOCK77/ISA
3.7.2
Connector to the CLOCK77 receiver-module
3.7.3
Jumper settings for cards power supply
Semple Jumper settings for 5V power supply
Semple Jumper settings for 3,3V power supply
© QUANCOM Informationssysteme GmbH
15
16
Technical hardware description
3.7.4
LED Description
Die LED 1 ( Konfigurations- LED ) lights until the Clock77/PCI interface is configured. This
happens at the start, until reset the computer or by the operating system.
Die LED 2 ( Access LED ) flashes briefly when requests (such as reading, writing) to the
CLOCK77/PCI Card.
© QUANCOM Informationssysteme GmbH
CLOCK77/PCI CLOCK77/USB CLOCK77/ISA
3.8
CLOCK77/PCI Card (Rev. 2.x)
This version of the interface map became in May 2003 by the Rev. 3.x replaces.
3.8.1
Board overview
© QUANCOM Informationssysteme GmbH
17
18
Technical hardware description
3.8.2
Connector to the CLOCK77 receiver-module
© QUANCOM Informationssysteme GmbH
CLOCK77/PCI CLOCK77/USB CLOCK77/ISA
3.9
CLOCK77/ISA Card
3.9.1
Board overview
© QUANCOM Informationssysteme GmbH
19
20
Technical hardware description
3.9.2
JP1: Address jumper for I/O connection in the PC
3.9.3
D-Sub 9 socket of CLOCK77/ISA, CLOCK77/PCI
© QUANCOM Informationssysteme GmbH
CLOCK77/PCI CLOCK77/USB CLOCK77/ISA
4.
Installing drivers and software for the QUANCOM
CLOCK77
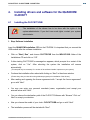
4.1
Installing the CLOCK77/USB
The installation of the drivers has to be done with the rights of the
system-administrator. If you don’t own such rights, contact your system
administrator.
1. Step: Software Installation
Insert the QUANCOM Installation- CD into the CD-ROM. It is important that you connect the
USB-module after the software installation.
·
Click on ”Start | Run”, and choose CLK77D.EXE from the WIN-XP-2000 folder of the
Installations-CD and click on “OK”.
·
If after starting CLK77D.EXE a message-box appears, which prompts for a restart of the
system, click on “Yes”. After rebooting the system the installation will resume
automatically.
(This step will only be necessary if no version of the software-installer is present on your system)
·
Continue the installation after reboot with clicking on “Next” in the shown window.
(Please obey, that you close all running windows-programs prior installation of the drivers.)
·
After reading and agreeing the license agreement with “I accept the license agreement”
go on with “Next”.
·
You may now enter your personal user-data (name; organisation) and accept your
entered values with “Next”.
·
You can choose the destination path of the CLOCK77-Software with “Browse”. Click on “
Next” to accept your decision.
·
Now you choose the model of your clock: CLOCK77/USB and go on with “Next”.
·
The installation-process will be started with “Next”.
© QUANCOM Informationssysteme GmbH
21
22
Installing drivers and software for the QUANCOM CLOCK77
·
After the files were copied and the drivers registered, the installation will be closed with “
Finish”.
·
You now may connect the CLOCK77/USB to a free USB- connector and reboot your
system to ensure that all drivers are loaded properly.
© QUANCOM Informationssysteme GmbH
CLOCK77/PCI CLOCK77/USB CLOCK77/ISA
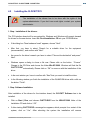
4.2
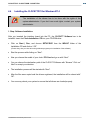
Installing the CLOCK77/PCI
The installation of the drivers has to be done with the rights of the
system-administrator. If you don’t own such rights, contact your system
administrator.
1. Step : installation of the drivers:
The PCI-Interface board will be recognized by Windows and Windows will prompt demand
for drivers for the new device. Insert the Clock-Installation- CD into your CD-ROM-drive.
·
If the dialog box "New hardware found" appears, choose "Next".
·
After that, you have to select "Search for a suitable driver for the equipment
(recommended)”, and confirm with "Next”.
·
As source for the driver’s search you have to select "Choose the destination" and press "
Next".
·
Windows opens a dialog to chose a file now. Please click on the button “Choose”.
Change to the CD-Drive and choose the folder Win-XP-2000. Windows will find the file
CLK77PCI.INF automatically. Please click on “OK” to move on with the installation of the
driver.
·
In the next window you have to confirm with ”Next” that you want to install the driver.
·
In the following window you finish the installation of the QUANCOM driver with a click on
the button ”Finish”.
1. Step: Software Installation:
After installation of the drivers for the interface board, the CLOCK77 Software has to be
installed.
·
Click on Start | Run, and choose CLK77D.EXE from the WIN-XP-2000 folder of the
Installation-CD and click on “OK”.
·
If after starting CLK77D.EXE a message-box appears, which prompts for a restart of the
system, click on “Yes”. After rebooting the system the installation will resume
© QUANCOM Informationssysteme GmbH
23
24
Installing drivers and software for the QUANCOM CLOCK77
automatically.
(This step will only be necessary if no version of the software-installer is present on your system)
·
Continue the installation after reboot with clicking on “Next” in the shown window.
(Please obey, that you close all running windows-programs prior installation of the drivers.)
·
After reading and agreeing the license agreement with “I accept the license agreement”
go on with “Next”.
·
You may now enter your personal user-data (name; organisation) and accept your
entered values with “Next”.
·
You can choose the destination path of the CLOCK77-Software with “Browse”. Click on “
Next” to accept your decision.
·
Now you choose the model of your clock: CLOCK77/PCI and go on with “Next”.
·
The installation-process will be started with “Next”.
·
After the files were copied and the drivers registered, the installation will be closed with “
Finish”.
·
You now may reboot your system to ensure that all drivers are loaded properly.
© QUANCOM Informationssysteme GmbH
CLOCK77/PCI CLOCK77/USB CLOCK77/ISA
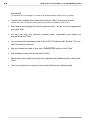
4.3
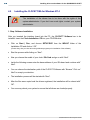
Installing the CLOCK77/ISA
The installation of the drivers has to be done with the rights of the
system-administrator. If you don’t own such rights, contact your system
administrator.
1. Step : installation of the drivers:
To install the drivers of the ISA-card insert the Clock-Installation- CD into your
CD-ROM-drive and click on ”Start | Settings | Control Panel”.
·
Double-click on “Hardware”
·
Choose ”Next”
·
Now choose ”Add a new device” and click on ”Next”.
·
In the following window chose ”No, select device from list” and go on with ”Next”.
·
From the shown list chose ”other devices” and click on ”Next”.
·
Now click on “Disk” and then on “Browse”
·
Now choose CLK77ISA.INF from the folder WIN-XP-2000 on the Installation-CD and
continue with “Open”.
·
Commit the following Window with “OK”.
·
Now choose “CLOCK77/ISA” and click on “Next”.
·
The drivers for the interface-board will be installed after you click on ”Next”.
·
After the files were copied and the drivers registered, the installation will be closed with “
Finish”.
·
You now may reboot your system to ensure that all drivers are loaded properly.
1. Step: Software Installation:
© QUANCOM Informationssysteme GmbH
25
26
Installing drivers and software for the QUANCOM CLOCK77
After installation of the drivers for the interface board, the CLOCK77 Software has to be
installed.
·
Click on Start | Run, and choose CLK77D.EXE from the WIN-XP-2000 folder of the
Installations-CD and click on “OK”.
·
If after starting CLK77D.EXE a message-box appears, which prompts for a restart of the
system, click on “Yes”. After rebooting the system the installation will resume
automatically.
(This step will only be necessary if no version of the software-installer is present on your system)
·
Continue the installation after reboot with clicking on “Next” in the shown window.
(Please obey, that you close all running windows-programs prior installation of the drivers.)
·
After reading and agreeing the license agreement with “I accept the license agreement”
go on with “Next”.
·
You may now enter your personal user-data (name; organisation) and accept your
entered values with “Next”.
·
You can choose the destination path of the CLOCK77-Software with “Browse”. Click on “
Next” to accept your decision.
·
Now you choose the model of your clock: CLOCK77/ISA and go on with “Next”.
·
The installation-process will be started with “Next”.
·
After the files were copied and the drivers registered, the installation will be closed with “
Finish”.
·
You now may reboot your system to ensure that all drivers are loaded properly.
© QUANCOM Informationssysteme GmbH
CLOCK77/PCI CLOCK77/USB CLOCK77/ISA
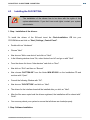
4.4
Installing the CLOCK77/PCI for Windows NT 4
The installation of the drivers has to be done with the rights of the
system-administrator. If you don’t own such rights, contact your system
administrator.
1. Step: Software Installation:
After you inserted the interface board into the PC, the CLOCK77 Software has to be
installed. Insert the Clock-Installation- CD into your CD-ROM-drive.
·
Click on Start | Run, and choose SETUP.EXE from the WIN-NT folder of the
Installation-CD and click on “OK”.
(Please obey, that you close all running windows-programs prior installation of the software.)
·
Start the process with clicking on ”Next”.
·
Now you choose the model of your clock: PCI-Card and go on with “Next”.
·
You can choose the destination path of the CLOCK77-Software with “Browse”. Click on “
Next” to accept your decision.
·
The installation-process will be started with “Next”.
·
After the files were copied and the drivers registered, the installation will be closed with “
OK”.
·
You now may reboot your system to ensure that all drivers are loaded properly.
© QUANCOM Informationssysteme GmbH
27
28
Installing drivers and software for the QUANCOM CLOCK77
4.5
Installing the CLOCK77/ISA for Windows NT 4
The installation of the drivers has to be done with the rights of the
system-administrator. If you don’t own such rights, contact your system
administrator.
1. Step: Software Installation:
After you inserted the interface board into the PC, the CLOCK77 Software has to be
installed. Insert the Clock-Installation- CD into your CD-ROM-drive.
·
Click on Start | Run, and choose SETUP.EXE from the WIN-NT folder of the
Installation-CD and click on “OK”.
(Please obey, that you close all running windows-programs prior installation of the software.)
·
Start the process with clicking on ”Next”.
·
Now you choose the model of your clock: ISA-Card and go on with “Next”.
·
Inside the following screen enter the base-address of your ISA-board and continue with ”
Next”.
·
You can choose the destination path of the CLOCK77-Software with “Browse”. Click on “
Next” to accept your decision.
·
The installation-process will be started with “Next”.
·
After the files were copied and the drivers registered, the installation will be closed with “
OK”.
·
You now may reboot your system to ensure that all drivers are loaded properly.
© QUANCOM Informationssysteme GmbH
CLOCK77/PCI CLOCK77/USB CLOCK77/ISA
5.
Software
5.1
Antenna adjustment for the reception of time signals
So that the CLOCK77/USB, CLOCK77/PCI or CLOCK77/ISA card can receive a time signal
to be analysed, the antenna must be properly aligned.
Please start the CLOCK77 monitor program. This program displays the arriving signals as
lines. Green lines mean that the signal is Ok, red lines, on the other hand, mean the signal is
weak, bad or disturbed. The antenna should be aligned so that only green lines are
displayed for several minutes. If no lines are displayed, then the reception of the time is not
possible.
In this case it is necessary to correct the position of the antenna. In particular
radiation-loaded computer environments disturb the perfect reception of the
time-of-day. For this reason you should position the antenna as for as possible from
disturbing computers or other disturbing devices. The time-of-day will be reset, as soon as
the time is received correctly three times. Thereby it is excluded that a false time-of-day is
appointed due to reception errors.
© QUANCOM Informationssysteme GmbH
29
30
Software
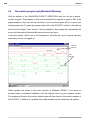
5.2
The monitor program (only Microsoft Windows)
With the delivery of the QUANCOM CLOCK77 USB/PCI/ISA card you will get a special
monitor program. This program is able to show whether the reception is good or bad. If the
signal reception is bad, you will see red lines on your monitor program and if it is good, you
will see green lines. To open the program right click on the CLOCK77 symbol in the task bar
and choose the option ”open monitor”. During installation, the program will automatically be
moved into the startup folder and will start every time you log on.
A service program, which runs in the background, refreshes the time in regular intervals,
even when you are not logged on.
schlechter
Empfang
rote Linie
guter
Empfang
grüne Linie
These updates are shown in the event protocol of Windows 2000/NT. If you have no
reception after a successful installation, hold the antenna close to your computer monitor.
The antenna will receive the monitor radiation and will show lines on the monitor program of
the CLOCK77. In addition it is possible that a bad reception can be caused by the weather.
© QUANCOM Informationssysteme GmbH
CLOCK77/PCI CLOCK77/USB CLOCK77/ISA
6.
31
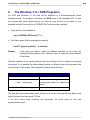
The Windows 3.1x / DOS Programm
For DOS and Windows 3.1 the time will be adjusted by a Software-interrupt driven
background-task. The program is located in the DOS folder of the Installation-CD. To start
the program with every system-start-up, you have to copy the file to any folder on your
harddisk and call it from with the AUTOEXEC.BAT with the proper switches.
·
Copy the file to the harddisk i.e.:
copy <CDROM>:\DOS\clock77.* c:\
·
Run the program (after connecting the receiver):
clock77 /p{port} /{switch1}... /{ switch N}
Remark:
If the given port doesn’t match the address adjusted on the board, the
software will return with an error. Check your port or change the base-address
of the board.
With the reception of the synchronisation-mark the software will try to decode the received
time-signal. If you enabled the status-display (switch /e) different chars will be drawn in the
top-left corner of the screen. The description of these chars will follow.
Anzeige
`-` or `*` (permanent)
Bedeutung
No signal or receiver not connected
`-` and `*` (alternating)
Clock
is
waiting
for
the
synchronisation-mark, but signals are
present
`+` and `*` (alternating)
Receiving time
The time will be received multiple times if switch /w is set and the received time differs more
than 5 minutes from the internal PC-time.
If an error occurs while receiving the time-signal, the clock waits for the next
synchronisation-mark.
© QUANCOM Informationssysteme GmbH
32
The Windows 3.1x / DOS Programm
6.1
Switch for the DOS program CLOCK77.EXE
Switch
Function
/b
Beep when new time is set
/r
Beep when synchronisation-mark is
received
/e
Show status in top-left corner of
screen
/d
Stop background-task
Select alternate Base-address
/pxxx
LPT1: 378
LPT2: 278
Remark
xxx is a hexadecimal
between 100 and 3FF
(default.: xxx=1D0)
with Herkules- graphics-card: LPT1:
3BC
/p0
searches for the CLOCK77/PCI
/txx
Set offset for received time in hours
(positive numbers add xx hours) and Allowed values: -12 ... 12
(negative numbers subtracts xx
Date is adjusted if needed
hours).
/wx
Set the number of correct received
time-signals, with PC-time difference (default: x=2)
of more than 5 minutes
/f
number
Check and set PC-time every 2
minutes
© QUANCOM Informationssysteme GmbH
CLOCK77/PCI CLOCK77/USB CLOCK77/ISA
7.
Annex
7.1
When is the time set?
The time is sequentially received (minütlich). If disturbances arise, e.g. to spikes, invalid
telegrams are rejected. The time three times correctly received (plausibility check, parity,
etc.) is intended the relative deviation of the telegrams for the system time. If these three
telegrams do not deviate by any longer than +/-200ms from each other, then the three times
are recognized as correct. System time determines. This middle time deviation amounts to
more than the adjustable 50ms to 400ms the system time is corrected. I.e. the time is exact
on 1 second. In the sequential enterprise the time is thus always corrected in the case of a
deviation around more than +/-0,4s.
Most PC clocks drifts with the time. The time is thus corrected in certain time intervals. This
can be reconstructed in event minutes (applications). Even if the time is to be set in the case
of smaller or only in the case of larger time deviations, then exists a Registry entry, which
makes an attitude within the range v. +/-50ms… for possible 60 min.
Registry entry: MaxDiffTime 400 (default 400ms).
7.1.1
The length of my antenna cable is not sufficient
The length of my antenna cable is not sufficient. Is there an extension cord and/or on which
length can I the cable extend?
If you liked to extend the cable to more than 20 m, address us please. We can offer an
amplifier, which permits also cable lengths of up to 100 m to you. Below 20 m can you the
appropriate cable with us order or a 1:1 ground through cable use.
7.1.2
Attitudes of the time
The driver functions correctly only if it is operated in the time belt GMT+1. One can examine
this under NT, by doubleclicking the rider “time belt” on the clock symbol in the task border
and clicking then. I.e. in following countries and/or cities the driver functions:
Germany
© QUANCOM Informationssysteme GmbH
33
34
Annex
Sweden (Stockholm)
Italy (Rome)
Switzerland (Berne)
Holland (Amsterdam)
France (Paris)
7.1.3
ID' s in the event announcement under Windows XP/2000/NT
6
The Service started
9
The Service stopped
10
Information (in connection with a String)
11
Warning (in connection with a String)
12
Error (in connection with a String)
13
No signal
14
Fatal Error Service stopped
7.1.4
Windows XP/2000/NT: Distribution of the time in a Windows network
Install the clock in a computer, which is in the network. This computer has a name, e.g. \ \
Platz1 (under network characteristics). From this computer the following instructions are
entered: NET TIME \ \ PLATZ1 /SET
Each further computer in the network receives likewise the current time of day.
Install under NT for the Schedule service, and copy the instruction into a batch file.
Implement this file with the RK instruction each hour.
7.1.5
Windows XP/2000/NT: Event minutes are overfilled by a large number of
inputs
Open the diagnostic and attitude program “CLOCK77.EXE”, by clicking down right in the task
border on the antenna symbol.
Select “monitor program”. In the monitor you go please into the menu “attitudes”/“event
announcement”.
Switch all entries off up to “error messages”.
© QUANCOM Informationssysteme GmbH
CLOCK77/PCI CLOCK77/USB CLOCK77/ISA
7.1.6
Windows XP/2000/NT: Error message No.: 2140
Windows XP/2000/NT: Error message No.: 2140 when starting of the service “QUANCOM
CLOCK77” in the XP/2000/NT service manager.
The error message arises, if the monitor program is active in the task border. The service
started causes an error now. Only the monitor program with one right-click on the antenna
symbol click and then with “latches” terminate. Afterwards the service can be started.
7.1.7
I cannot install the CLOCK77 under Windows 2000
Break the hardware recognition off our driver CD provided by WIN2000 and installing you the
map manually over. After the restart now again the hardware recognition of WIN2000
appears. Therefore one must disablen the CLOCK77 in the equipment manager of
WIN2000. This goes with two different methods. Either you go to system control on start >>
>> system into the equipment manager from WIN2000 (not the service manager) and
disablen the CLOCK77.
Or you click during the hardware recognition of WIN2000 of “far ones” on, discharge for a
driver to look and break simply, if WIN2000 requests you the address drivers to indicate.
Thus the map becomes automatically disabled.
Now you must accomplish a restart, which is started automatically. The map for WIN2000 is
not now disabled and thus appeared also the hardware recognition any more.
7.1.8
Windows ME/98/95: Error message “queue was emptied (Code1)”/no receipt
Examine whether in the monitor a Rechtecksingal, as “_-_-_” and is constantly green it e.g.
emerges.
Try the position of the antenna in such a way to move that for each second on the screen a
square-wave impulse is almost drawn. Turn also the antenna head somewhat. Furthermore
it can be that at certain weather conditions and/or clock times the receipt suffers, but after
some hours the receipt again there is. The radio clock software prevents the receipt of wrong
© QUANCOM Informationssysteme GmbH
35
36
Annex
data in such a situation.
7.1.9
Possible problems under DOS
Can I use a Memory-Manager ? (QEMM 386, EMM386)
It is possible to use a Memory-Manager, but the performance maybe decrease.
© QUANCOM Informationssysteme GmbH
CLOCK77/PCI CLOCK77/USB CLOCK77/ISA
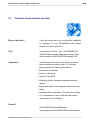
7.2
37
Customer Communication and Help
Did you need help?
If you don’t know how to go on during the installation
or operation of your QUANCOM board please
consult this user’s guide first.
! Tip !
You can find an ASCII – text – file README.TXT,
which includes changes made after printing of this
user’s manual on the QUANCOM installation CD.
! Important !
Informationen bereit:If you have further questions
please contact our support team. For this case
please prepare the following information:
· Exact type of the board.
· Version of the driver
· Version of the QLIB
· Operating system, hardware equipment and bus system
· Name and version of the program, which reports the
failure
· A detailed failure description. To make sure, please
try to reproduce the failure, and describe exactly,
which steps led to this failure.
Contact?
Die QUANCOM Internet Webseite
www.quancom.deThe QUANCOM internet website
© QUANCOM Informationssysteme GmbH
38
Annex
http://www.quancom.de/
Per Fax
+49 22 36 / 89 92 - 49
Per E-Mail:
[email protected]
Adress:
QUANCOM INFORMATIONSSYSTEME GmbH
In der Flecht 14
50389 Wesseling
Wenn Sie Hilfe brauchen, erreichen Sie uns unter:
QUANCOM Hotline Deutschland If you need urgent
help call:QUANCOM Hotline Germany
0 22 36 / 89 92 - 20
Monday-Thursday
from 9:00 to 18:00
Friday
from 9:00 to 17:00
© QUANCOM Informationssysteme GmbH
CLOCK77/PCI CLOCK77/USB CLOCK77/ISA
Aktuelle Treiber
Auf unserer Internetseite http://www.quancom.de
können sie immer die neusten Treiber Versionen
und Updates finden. Zudem finden Sie ebenfalls
viele andere Informationen und die ”Frequently
asked questions (FAQ’s)”. Bevor Sie uns
kontaktieren, überprüfen Sie ob die neueste Version
der QUANCOM Software installiert ist.
Reparatur
Wenn Sie nicht genau wissen, ob die QUANCOM
Karte defekt ist, rufen Sie unsere QUANCOM
Hotline an:
Tel.: +49 22 36 / 89 92 – 20
Bevor Sie uns die Karte zur Reparatur schicken,
rufen Sie unsere Hotline an:
Tel.: +49 22 36 / 89 92 – 20
Wenn Sie uns die Karte zurückschicken, legen Sie
diese bitte in die Originalverpackung oder eine
adäquate Verpackung, um einen Transportschaden
zu verhindern. Zusätzlich bitten wir Sie, uns eine
Kopie der Originalrechnung mitzuschicken.
7.3
Technical support form
If you have internet access please enter the following URL in your browser:
http://www.quancom.de/quancom/qshop.nsf/techniksupport?OpenForm&eng.
Else
photocopy this form and use the copy of this form as a reference for your current
configuration. Complete this form before contacting QUANCOM Informationssysteme GmbH
for technical support and our applications engineers may answer your questions more
efficiently. If you are using any other QUANCOM hardware or software products please add
them to this configuration form. Include additional pages if necessary.
© QUANCOM Informationssysteme GmbH
39
40
Annex
Name:
______________________________
Company:
______________________________
Address:
______________________________
Phone:
______________________________
Fax:
______________________________
Computer Brand / Processor:
______________________________
Operating System:
______________________________
Display Adapter:
______________________________
Mouse:
______________________________
QUANCOM board
______________________________
Other adapters installed:
______________________________
Hard disk (capacity, free):
______________________________
The problem is:
______________________________
List any error messages:
______________________________
______________________________
______________________________
The following steps cause the problem to recur:
______________________________
______________________________
______________________________
______________________________
______________________________
7.4
Hardware and Software configuration form
This form helps you to list your hardware and software settings. Complete this form each
time you change your software or hardware configuration, and use this form as a reference
for your current configuration. Complete this form accurately before contacting QUANCOM
Informationssysteme GmbH for technical support, so that our application engineers can
answer your questions more efficiently.
© QUANCOM Informationssysteme GmbH
CLOCK77/PCI CLOCK77/USB CLOCK77/ISA
· QUANCOM Product:
Name / Name of board
__________________________________
Interrupt Level
__________________________________
DMA Channel
__________________________________
Basis I/O Address
__________________________________
Operating system
__________________________________
· Other Information
Computer brand and Model
__________________________________
Processor
__________________________________
Clock Frequency
__________________________________
Type of Video Board installed
__________________________________
DOS Version
__________________________________
Programming Language
__________________________________
Programming Language Version
__________________________________
· Other Boards in System
Basis I/O-Address of other Boards __________________________________
__________________________________
DMA Channels of other Boards
Interrupt Level of other Boards
7.5
__________________________________
Dokumentations Formular
QUANCOM Informationssysteme GmbH would like you to comment on the documentation
supplied with our products. This information helps us to provide you with quality products to
meet your needs. Please include additional pages if necessary.
Title:
Edition Date:
CLOCK77/PCI CLOCK77/USB
CLOCK77/ISA
15.04.2009
Please comment on the completeness, clarity, and organisation of the manual. If you find
errors in the manual, please record the page numbers and describe the errors.
© QUANCOM Informationssysteme GmbH
41
42
Annex
Thank you for your help.
Name:
________________________________________________
Company:
________________________________________________
Address:
________________________________________________
Phone:
________________________________________________
Fax:
________________________________________________
Comment:
________________________________________________
________________________________________________
________________________________________________
________________________________________________
________________________________________________
Mail to:
[email protected]
Fax to:
+49 2236 89 92 49
Address:
QUANCOM Informationssysteme GmbH
In der Flecht 14
50389 Wesseling
Germany
© QUANCOM Informationssysteme GmbH
CLOCK77/PCI CLOCK77/USB CLOCK77/ISA
7.6
43
Trademarks
Linux is registered trade-mark of Linus Torvalds.
MS, MS-DOS, Microsoft, Visual Basic, Windows, Windows Vista/XP/2000/NT/ME/98/95 is
registered trade-mark of Microsoft Corporation.
XT and PS/2 are trade-marks and IBM, OS/2 and AT are registered trade-mark of
International Business Machines Corporation.
Intel, Pentium is registered trade-mark of Intel Corporation.
USB is registered trade-mark of USB Implementers Forum Inc.
JAVA is registered trade-mark of Sun Microsystems.
DELPHI and Pascal are registered trade-mark of Borland Corporation.
PCI is registered trade-mark of PCI Special Interest Group.
PCI Express is registered trade-mark of PCI Special Interest Group.
National Instruments, LABVIEW is registered trade-mark of National Instruments
Corporation.
Agilent VEE is registered trade-mark of Agilent Technologies.
By other product- and company names, that are mentioned in this manual, it may deal with
trademarks of the respective owners.
© QUANCOM Informationssysteme GmbH