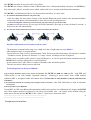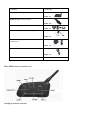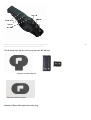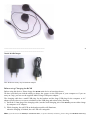
1
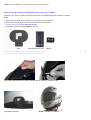
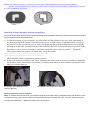
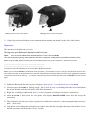
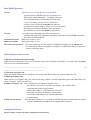
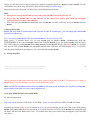
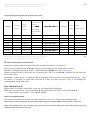
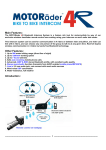
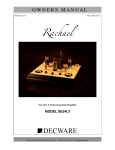
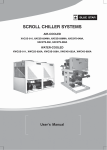
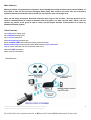
Main Features:
Motorcycle riders can operate their interphone by the handgrip mounted wireless remote control. Riders no
long need to take off his hand from handgrip while riding. this could be the most safe and convenient
operation method for bluetooth intercom that you can find out in the world right now.
Does not like many motorcycle bluetooth intercoms that only can link 2 riders , this new product can be
used for communication in 4 riders or between rider and pillion, one rider can link with 3 riders, and can
choose any person of the group to talk at a time. real full duplex wireless communication in 4 riders by
handfree bluetooth system
Other Features:
Up to 1000 meters talking range
Up to 120Km/h working speed
Up to 7 hours talking time
Safe auto-receiving cell phone calls
Advanced A2DP & EDR stereo bluetooth profile, good audio quality
Stereo music/audio function(transmits from A2DP enabled cell phone/MP3/GPS)
Line in 2.5 mm audio jack, can connect with any audio source
Wind noise DSP cancellation
Water-resistance, full weather
Introduction :
----------------------------------------------------------------------------------------------------------------------------------------------
We will describe this communications kit as R(Remote)C(Control) M(Multifunctional) I (Intercom)
1
This RCMI can either be used for rider or for pillion.
This RCMI can connect with three kinds of bluetooth devices: a bluetooth enabled cell phone, five RCMI (or:
four riders and 1 pillion), an audio source which with a built in or a external audio bluetooth transmitter.
This RCMI is a multifunctional device for motorcyclists and skiers, it can be used:
1) As a handfree bluetooth headset for cell phone calls,
while out riding, the auto answer feature of the internal Bluetooth profile enables safe automatic handfree
answering of the phone call automatically. It also offers a call rejecting function.
—receive the cell phone calls even you do not need to press any button, you just need to rider
your bike as normal, the process of receiving call will be automatic, after ring on of the call about 5 seconds , it
will receive the call automatically.
2) As a two way wireless full duplex interphone in 4 riders or between rider & pillion,
Any rider could choose one of 3 riders to talk at a time !
The maximum communication range over a high clear line of sight path can reach 1000m !
(this maximum range is not guaranteed).
Typical effective range in city is approximately 700m. Please note that actual range will depend on weather
conditions, terrain, presence of obstacles i.e. a large vehicle , buildings non line of sight etc.
Unlike a one-way walkie talkie, which is only half duplex i.e. it can not speak and listen simultaneously, the
RCMI offers real-time talking like a normal telephone.
It can connect with 5 other riders or connect with anther rider and his/her pillion.
The rider can chose which person to talk with
The working speed can be up to 120Km/h !
3) As a wireless bluetooth stereo music receiver and speaker, this RCMI has EDR and A2DP profile , with EDR and
A2DP profile it can offer another important function--- listening to stereo music from A2DP enabled
cellphone,MP3 or navigation audio information from GPS(this MP3 or GPS should has a built in audio bluetooth
transmitter)
4) As a bluetooth headset for receiving GPS navigation audio instructions ( this GPS should have a built in bluetooth
transmitter)
5) As the speakers of your MP3/GPS
If your MP3 or GPS is not Bluetooth transmitting enabled and you have not a Bluetooth AV dongle, this RCMI
also offers another method of listening to the stereo music/audio info--- the simple wired method. Plug the
audio source directly into the RCMI via the 2.5mm-3.5 mm stereo connection cable.
----------------------------------------------------------------------------------------------------------------------------------------------
Components of retail box
2
Component
Parts Number
RCMI headset main part
RCMI -001
RCMI handgrip wireless remoter
RCMI -002
Clip for mounting the main unit
RCMI -003
Speakers & microphone & audio plug
RCMI -004
AC &USB Charger (AC110V-220V / DC
OUTPUT 5V)
RCMI -005
2.5mm to 3.5mm audio adapter cable
RCMI -006
User manual
Main 6RMI communications unit
Handgrip wireless remoter
RCMI -007
-----------------------------------------------------------------------------------------------------------------------------------------------
Clip & hanging-hole for mounting the main RCMI unit
Clip/Inserted plate/Spacer
Clip with sticker for option
Speakers/Boom Microphone/audio plug
3
-------------------------------------------------------------------------------------------------------------------------------------------
4
The AC & USB Charger
Note: Different country may has different adaptor
Before using: Charging the RCMI
Before using this device, Please charge the RCMI main device at least three hours.
We have provided you with the ability to charge the system via the USB port of your computer or if you are
away on a trip, you can use the supplied Multi-voltage USB power adapter .
The charging cable has a small USB plug for the headset and the large USB plug for the computer or AC
adapter, please observe to correct orientation of the USB plug and socket before inserting
1) Insert the 2.5mm plug of the charging cable, into the small charging jack of the RCMI, you can either charge
by computer or AC adapter .
2) While charging, the red LED on the headset module will illuminate,
when the charging is finished, the red LED will extinguish .
Note: if you do not use the RCMI for a month or more , to protect the Poly-Li battery, please charge the RCMI at least every
month. (the fault damaged by wrong charging will be not guaranteed).
Attaching and removing the RCMI main unit on your helmet
With the clip, You can easily mount the main unit of the BIM on a helmet within 3 minutes.
Step:
1) find a best position on the left side of your helmet to put the clip
2) Insert the inserted plate between shell and foam of the helmet
Fix the clip on the helmet with the screws
3) hang the main unit of the RCMI on the clip
Clip
Inserted plate for clip
Spacer
-------------------------------------------------------------------------------------------------------------------------------------------
Insert the plate between the shell and the foam of a helmet, fix with screws
Clip fixed on helmet
RCMI mounted on a helmet
5
Note: 1) If the shell of your helmet is a little thick, you could put the Spacer between the clip and the inserted plate.
2) There are some helmets that the shell is very thick, maybe it is difficult to fix above clip on these helmets. In this case,
you could use below clip with sticker
Front
Back
Attaching the two speakers and the microphone
The success of the system depends on the careful positioning of the earspeakers directly over top of the ear canals. this will give
the best signal to noise of the received audio..
1) To find the position of your ear canals , put your helmet on firmly but don’t do it up. Slide your thumb of
one hand up between the inside of the helmet and your ear, with the fingers of that hand on the exterior of
the helmet. Feel the ear canal in your ear with your thumb and then grip the helmet firmly between thumb
and fingers of that hand, Carefully take the helmet off BUT don’t move your thumb from its position inside
the helmet. Look at where your thumb it ! this place marks the centre of the ear speaker ! Mount the
Velcro pad to which the speaker will attach there, inside the helmet;
----------------------------------------------------------------------- 6
---------------------------------------------------------------------
Check the other side for optimum ear speaker position.
2) Remove the protective backing of the Velcro and mount the Velcro pads in the correct positions , attach the
two speakers on the Velcro inside your helmet, the speaker with short wire cord for left ear, the speaker with
long wire cord for right ear.
the speaker with short wire cord
cord for right ear
the speaker with long wire for left ear
Adjust the position of the microphone
Note: To reduce the external noise, you need to close the visor while riding, and please adjust the position of the
microphone to be right in front of your mouth with the foam just touching your lips , the visor should cover the
microphone effectively! (Minimizes wind noise contribution )
V
Correct position of the microphone
X
Wrong position of the microphone
3) Plug in the positioned headset to the communications module and attach it to the side of the helmet .
Operation:
The operation is friendly and very easy.
Pairing with your Bluetooth phone for the first time
Note: You must have a Bluetooth enabled phone to “Pair” with the RCMI
The rider and pillion pairing their headsets with their respective mobile phone should be at different time,
Before using the 6RMI, please familiarize yourself with Bluetooth function of your cell phone.
Read the instruction
------------------------------------------------------------------------------------------------------------------------------------------manual that came with the phone so you can enable its Bluetooth function.
7
Before you can use this RCMI in combination with your phone , you will need to “pair” it with your cell phone for the first time.
This usually only needs to be performed once with that individual phone however follow the instructions supplied by the phone
manufacturer and save the “pairing” so it will be automatically connected when this Phone and the RCMI come into contact
again.
1) Enable the Bluetooth function on your cell phone. Short press(< 1 second) Reset key on the RCMI.
2) You must place the RCMI in “Pairing mode”, this is done by way of a holding down the Power/Interphone
key on the headset, until the red & blue LED flash alternately.
3) Begin the “searching for Bluetooth device” on the cell phone according to the phone’s instructions
4) when the RCMI is discovered, the cell phone will display MOTOR PHONE select this and accept the
connection
5) The cell phone will ask you to input a password to enable this connection , when prompted input password :
0000 (four zeros)
6) Your phone will confirm that pairing has succeeded. Note that the only light showing on the headset is now
the blue one and it will flash once every 5 seconds
Basic RCMI Operation
Turn on
Short press(< 1 second) Reset key on the BIM.
press the Power/ RIDER A key for 6 seconds or so ,
until the blue lamp illuminate, promptly release the
Power/Interphone key, then the blue led will flash
every 2-5 seconds, and you can see that on the
screen of your cell phone the RCMI will ask your
cell phone to connect with it , select ”yes” on your phone
then they will connect each other.(for some phones,
you will have to connect the RCMI by the phone)
Turn off
press the Power/Interphone key for 6 seconds or so ,
until the blue lamp long illuminate, promptly release the Power/RIDER A key then
the blue led will extinguish.
Increase the volume
Short press of the V+ key
Reduce the volume
Short press of the V- key
Re-connect the cell phone For some reason(e.g. In some regions of high RF strength), may the RCMI will
lose connection with the cell phone, a short press on the Phone/Play key, they will
connect each other again.
Safe Cell phone calls function
1) Receive a cell phone call automatically
When income a cell phone call, you will hear the ring on the cell phone and about 3-5 seconds later, the RCMI
will receive the call automatically.
-----------------------------------------------------------------------------------------------------------------------------------------------
8
2) Terminate cell phone call
When you finish talking on the cell phone ,a short press the Phone/Play Key, will terminate the call.
3) Reject a cell phone call
When income a cell phone call, you will hear the ring, within 1 second immediately press the Phone/Play key
about 2 seconds, it will reject the call.
4) Make a cell phone call Dial a number on your phone as normal, ( but
don’t do this if you are on road for your safety) the sound will be
automatically heard in your headset
notice: some phones, like Panasonic x70, will
not send the audio to the headset, you may have
to press the Phone/Play key to transmit the sound
to your headset
5) Dial the last number
Press the Phone/Play key 2-3 seconds, it will dial the phone number that you dialed
last time.(note: some cell phone do not support this function)
Interphone Function
Set up for bike- to- bike and rider-to-pillion intercom: pairing
Pairing is a one time process that is required for mutual recognition between a RCMI and other RCMI. once the
two headsets are paired, they will retain paired whenever they are within range.
Please note that you can speak via intercom to one buddy headset at a time.
Note:
a. when you are pairing two RCMIs, you must keep other RCMIs in status of powering off.
b. Please pair the RCIMs only by the buttons of the main unit. Don’t pair them by handgrip
remoter,otherwise it may cause mistake.
c. You could pair your RCMI with maximum total four RCMI, you also could only pair your RCMI with one
RCMI.
1) Pairing two RCMIs
Maybe you only need to communicate with a person (a rider or a passenger) , you can simply pair two RCMIs
according to below step:
To be sure that your RCMI and rider A(another RCMI) are in status of power off.
Short press(< 1 second) Reset key on your RCMI and on another RCMI, simultaneously hold the
POWER/RIDER A key on your RCMI and hold the POWER/RIDER A key on another RCMI until the red &
blue LED of the two pairing RCMIs flash, short press the POWER/RIDER A key on one of RCMI, 5-9 seconds
later the red LED of both RCMIs will extinguish and the blue LED then will flash briefly every 2-5 seconds,
thus they have finished the pairing(now you could talk with another RCMI).
2) Pairing all RCMIs
----------------------------------------------------------------------------------------------------------------------------------------------
9
Before pairing,to avoid being confused, please stick respectively 4 label of A, B, C, D separately on 4 units of
RCMIs ,thus you could call these 4 units as unitA,unitB,unitC,unitD
Note: one time it only allows one of other five 6RMIs to pair with unit A, and when you are pairing two RCMIs,
please confirm that other units are in status of power off.
1.Pair A,B,C RCMI with your intercom(RCMI D)
1.1 Pair unit A with unit B
Power on unit A (the blue LED of unit A will flash), Power on unit B (the blue LED of unit B will flash).
Simultaneously hold the B key on unit A and hold the A key on unit B until the red & blue LED of the both pairing
RCMIs flash, short press the B key on unit A, 5-9 seconds later the red LED of both RCMIs will extinguish and
the blue LED then will flash briefly every 2-5 seconds, thus they have finished the pairing(now you could talk
each other).
1.2 Pair unit A with unit C :
Be sure that unit B and unit D is in status of power off.
Power on unit A (the blue LED of unit A will flash), Power on unit C (the blue LED of unit C will flash).
Simultaneously hold the C key on unit A and hold the A key on unit C until the red & blue LED of the both pairing
RCMIs flash, short press the C key on unit A, 5-9 seconds later the red LED of both RCMIs will extinguish and
the blue LED then will flash briefly every 2-5 seconds, thus they have finished the pairing(now you could talk
each other).
1.3 Pair unit B with unit C :
Be sure that unit A and unit D is in status of power off.
Power on unit B (the blue LED of unit A will flash), Power on unit C (the blue LED of unit C will flash).
Simultaneously hold the C key on unit B and hold the B key on unit C until the red & blue LED of the both pairing
RCMIs flash, short press the C key on unit B, 5-9 seconds later the red LED of both RCMIs will extinguish and
the blue LED then will flash briefly every 2-5 seconds, thus they have finished the pairing(now you could talk
each other).
Pair unit D with unit A,B,C
1.4 Pair unit D with unit A
Because there is not D key on RCMI, so the way of pairing unit D with unit A,B,C is different a bit.
To be sure that unit B and C is in status of power off ,
Simultaneously hold the A key on unit A and hold the A key on unit D until the red & blue LED of the both pairing
RCMIs flash, short press the A key on unit A, 5-9 seconds later the red LED of both RCMIs will extinguish and
the blue LED then will flash briefly every 2-5 seconds, thus they have finished the pairing(now you could talk
each other).
1.5 Pair unit D with unit B
To be sure that unit A and C is in status of power off ,
Simultaneously hold the B key on unit B and hold the B key on unit D until the red & blue LED of the both pairing
RCMIs flash, short press the B key on unit B, 5-9 seconds later the red LED of both RCMIs will extinguish and
the blue LED then will flash briefly every 2-5 seconds, thus they have finished the pairing(now you could talk
each other).
1.6 Pair unit D with unit C
To be sure that unit A and B is in status of power off ,
Simultaneously hold the C key on unit C and hold the C key on unit D until the red & blue LED of the both pairing
RCMIs flash, short press the C key on unit C, 5-9 seconds later the red LED of both RCMIs will extinguish and
the blue LED then will flash briefly every 2-5 seconds, thus they have finished the pairing(now you could talk
each other).
----------------------------------------------------------------------------------------------------------------------------------------------
10
To get all pairing details, please refer to below pairing chart,
WHEN RED AND
BLUE LED FLASH
STATUS
ON BOTH
BEFORE
UNITS,SHORT
SHORT
PAIRING
PRESS BELOW
PAIRING
INTERPHONE
<---pair
---pair each other--other--->
--->
PAIRING
STATUS
BUTTON
BEFORE PAIRING
INTERPHONE
BUTTON
BUTTON ON LEFT
UNIT
unitA
B
powered on
B
<---pair
---pair each other--other--->
--->
unitB
A
powered on
unitA
C
powered on
C
<---pair
---pair each other--other--->
--->
unitC
A
powered on
unitB
C
powered on
C
<---pair
---pair each other--other--->
--->
unitC
B
powered on
unitA
A
powered on
A
<---pair
---pair each other--other--->
--->
unitD
A
powered on
unitB
B
powered on
B
<---pair
---pair each other--other--->
--->
unitD
B
powered on
unitC
C
powered on
C
<---pair
---pair each other--other--->
--->
unitD
C
powered on
----------------------------------------------------------------------------------------------------------------------------------------------
11
3)
)Choose which rider you will talk with
Pairing these riders seems a bit complicated, but using the intercom is very simple ☺
After you have paired with all the RCMIs, then you will can talk with one of the riders at a time.
STEP: after finishing the pairing procedure , confirm that all of RCMIs have been powered on.
Initiate an intercom call ( a short press one of intercom key A,B,C on your RCMI ), and then you can talk with
one of other riders.
For example: A short press(< 1 second) the B Key, promptly release your hand, you will hear a beep “di”, then
wait about 3-5 seconds you could talk with rider B. if then you short press the C key, it will change the
communication to talk with rider C.
Tips: Talk with unit D
Because there is not D key on the unit, so the way of calling unit D is different :
Short press A key on unit A , you will talk with D. Short press B key on unit B , you will talk with D.
………Short press C key on unit C , you will talk with D.
Finish an interphone talking
You only need a short press of same one of the intercom (A, B, C) key, to terminate communications
Note: to reduce power consumption, when you do not need to talk, don't keep your 6RMI on intercom state in a long time
Note: If two RCMIs were out of range, they may will lose connection. when you come within range, you only
need to initiate a intercom as normal.
Music /Audio function
1) listen to audio navigation info from your GPS which with a built in bluetooth transmitter
a) Pair this GPS with your 6RMI
Be sure that you have turned off the bluetooth function on your mobile phone.
Be sure that the 6RMI is in the state of power off.
Power on the GPS, hold the bluetooth key on the GPS until the red & blue LED flash.
Long press the POWER/Rider A key on the 6RMI, until the red & blue LED flash.
About several seconds later, the red LED of the GPS and the 6RMI will extinguish at the same time, thus they
have paired successfully.
b) Enjoy audio info of the GPS on the 6RMI.
Adjust screen tap sound and volume to an appropriate level on the GPS, then the user can enjoy the audio
information on the 6RMI.
Note: please obey the bluetooth Power On sequence as below:
6RMI first , then GPS.
please obey the bluetooth Power Off sequence as below:
GPS first, then 6RMI
2) Listen to stereo music from your A2DP enabled cell phone
Read the user manual of your cell phone carefully, if your cell phone is A2DP enabled, the 6RMI can receive
the stereo music from the cell phone.
Please note that only A2DP(stereo bluetooth) enabled cell phone can offer bluetooth music transmitting service.
You can use the Phone/Play key to pause/play the music from A2DP bluetooth devices.
----------------------------------------------------------------------------------------------------------------------------------------------
12
3) Listen to music from some mono bluetooth enabled cell phone
Almost all of Nokia mono bluetooth enabled cell phone can offer bluetooth music transmitting service , but
some model of other brand cell phone can not offer this service.
We do not promise that the 6RMI will support music function for all mono bluetooth enabled cell phones.
Step: confirm that your 6RMI has paired with your cell phone; play the music on the cell phone, and then you
can enjoy the music on your 6RMI.
Note: for mono bluetooth cell phone, you can not use the Phone/Play key to operate the music, you only can
operate the music on the phone.
4) listen to stereo music from your MP3 by Wired method
2.5-3.5mm audio adapter cable
With the 2.5-3.5mm audio adapter cable attached, it will can be used for connecting your 6RMI with a major of
MP3. play the MP3, you will can listen to the music via the speakers of your 6RMI.
NOTE1: when the 6RMI is working in bluetooth status, it will mute the music of the MP3. bluetooth is prior.
After bluetooth operation is finished, it will return to play the MP3 music.
NOTE2: you only can adjust the music volume on your MP3.
5) listen to audio navigation info from your GPS by Wired method
the way is same to listening to music from a MP3.
6) listen to stereo music from MP3 via external audio bluetooth transmitter
If you have a external audio bluetooth transmitter (it is easy to find this product in the market),insert the plug of
the transmitter into the jack of the MP3.
Pair the transmitter with the 6RMI according to the instruction manual of the transmitter.
Play the MP3 , you can listen to the music on your 6RMI.
7) listen to audio navigation info from your GPS via external bluetooth transmitter
The way is similar to 5) above.
8) listen to stereo music from MP3 which with a built in bluetooth transmitter
please familiarize yourself with Bluetooth function of your Bluetooth enabled MP3(this MP3 must has
Bluetooth transmitting function). read the instruction manual that came with the MP3 so you can enable its
bluetooth function. pair the MP3 with the 6RMI according to the instruction manual of the MP3. play the MP3,
you can listen to the music on your 6RMI.
-------------------------------------------------------------------------------------------------------------------------------------------
13
Auto switch between different operations
While talking by intercom or listening to music, if it incomes a cell phone call, the voice will be switched to
“cell phone talking” state automatically. After the call has been hung up, the system will auto return to
intercom talking or music playing state.
While listening to music, short press the RIDER A or RIDER B,C,D,E key, it will initiate a intercom talking.
after terminating the intercom talking, the system will return to the music automatically.
Note: it might needs about 5 seconds to auto-return to “intercom talking” state after the “cell phone talking” has
been hung up.
troubleshooting
1. not working
Could be a flat battery , charge the BIM 3 hours.
2. Reset
In some regions of high RF strength ie near high power TV transmitters ,GSM station or airport radars, these
can overwhelm the CPU in the BIM causing it to latch up.
Short press(< 1 second) Reset key on the RCMI. when you turn on the RCMI, it will work normally again.
3. No sound
Physically check to see the headset cables are ok or the audio plug is real inserted in the jack ? swap with the
other functioning RCMI to localize the problem . have you turned to volume too low?
4. Whistling of the speakers
If the microphone is too closed a speaker, the speaker will make a whistling, take the microphone away from
the speaker, reduce the volume by the Volume-key , it will be ok.
5.Lose connection with the cell phone or music from the cell phone
for some reason(e.g. In some regions of high RF strength), maybe the RCMI will
lose connection with the cell phone or music from the cell phone, a short press on the
Phone/Play key, they will connect each other. or see the below 8.
6. can not connect with your mobile phone
This RCMI can connect with a major of bluetooth enabled cell phone of main brand, but we don't undertake that
it can connect with all cell phone. Before purchasing, please confirm that if the RCMI could connect with your
cell phone.
7. auto-power off
To cell phone call, intercom, music these different using, This RCMI takes different Bluetooth profile. when
change between different using, it will change to the corresponding profile.
Some cell phone maybe do not take standard bluetooth profile, when it connect with the RCMI, some times it
may cause turning the RCMI off when the RCMI are switching between three different state(call, intercom,
music ).
in this case, you could turn on the RCMI again by pressing the Power/Interphone key, and note that only make
the RCMI working on two profile.
----------------------------------------------------------------------------------------------------------------------------------------------
14
8. Final solution
If the solution of above clause1.- 7.can not resolve the problem, turn your cellphone off (sometimes you may
have to take off the battery of your cell phone and load the battery again) and your RCMI, then turn them on
and pair them again.
9. .Lose connection between two RCMIs
If two RCMIs were out of range, they may will lose connection. when you come within range, you only need to
initiate a intercom as normal.
OTHER FEATURES
·Digital Signal Processor (DSP) Technology for wind noise cancellation
·Excellent performance at speeds up to the legal limit with a full face helmet
·Easily mounts to all full face and open face helmets
GENERAL FEATURE
·Up to 7 hours talk time when connected to your cell phone
·UP to 7 hours time when listening to music
· 500 mAh Li Polymer battery ·Standby time: 120 hours
·Charging time:~ 3 hours
·Chip brand: CSR
SPECIAL FEATURE
·All weather, rain and snow resistance
Thank you for using the 4 Riders Multi-Interphone
with handgrip wireless remoter!
-----------------------------------------------------------------------------------------------------------------------------------------------
15