1
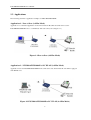
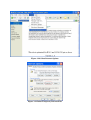
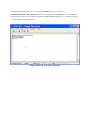
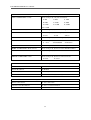
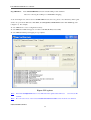
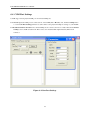
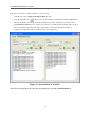
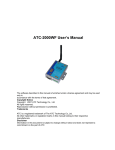
OCTOBER 2006
LWS100A
LWS100AE
WLAN Dual SerialBridge™
CUSTOMER
SUPPORT
INFORMATION
Order toll-free in the U.S.: Call 877-877-BBOX (outside U.S. Call 724-746-5500) Free technical supp-ort 24 hours a day. 7 days a week: Call 724-746-5500 or fax 724-746-0746 Mailing address: Black Box
Corporation. 1000 Park Drive, Lawrence, PA 15055-1018 Website: www.blackbox.com
LWS100A/LWS100AE User’s Manual
FEDERAL COMMUNICATIONS COMMISSION
AND
INDUSTRY CANADA
RADIO FREQUENCY INTERFERENCE STATEMENTS
This equipment generates, uses, and can radiate radio-frequency energy, and if not installed and used properly,
that is, in strict accordance with the manufacturer’s instructions, may cause interference to radio communication.
It has been tested and found to comply with the limits for a Class A computing device in accordance with the
specifications in Subpart B of Part 15 of FCC rules, which are designed to provide reasonable protection against
such interference when the equipment is operated in a commercial environment. Operation of this equipment in a
residential area is likely to cause interference, in which case the user at his own expense will be required to take
whatever measures may be necessary to correct the interference.
Changes or modifications not expressly approved by the party responsible for compliance could void the user’s
authority to operate the equipment.
This digital apparatus does not exceed the Class A limits for radio noise emission from digital apparatus set out
in the Radio Interference Regulation of Industry Canada.
Le présent appareil numérique n’émet pas de bruits radioélectriques dépassant les limites applicables aux
appareils numériques de la classe A prescrites dans le Règlement sur le brouillage radioélectrique publié par le
Industrie Canada.
2
LWS100A/LWS100AE User’s Manual
Table of Content
1.
2.
3.
4.
5.
Introduction.................................................................................................................... 6
1.1
Features .......................................................................................................... 6
1.2
Applications.................................................................................................... 8
Installation ................................................................................................................... 10
2.1
Product Kit ................................................................................................... 10
2.2
System Minimum Requirements ................................................................... 10
2.3
LWS100A/LWS100AE and AP Location ...................................................... 10
2.4
Serial Port Operation Mode Setting............................................................... 11
2.5
LED Indicator Label ..................................................................................... 13
2.6
Plug in RS232 Cable..................................................................................... 14
2.7
Plug in Power Cable...................................................................................... 14
2.8
Install SerialComm™ Utility ........................................................................ 14
2.9
Initial Settings............................................................................................... 14
2.9.1
Change PC and AP Settings................................................................... 15
2.9.2
Change LWS100A/LWS100AE Settings ............................................... 16
Web Browser Configuration ......................................................................................... 17
3.1
Home Page ................................................................................................... 17
3.2
Network Settings .......................................................................................... 18
3.3
Serial Port Settings........................................................................................ 19
3.4
WLAN Setting .............................................................................................. 20
3.5
Site Survey ................................................................................................... 21
3.6
Restore to Default ......................................................................................... 22
3.7
Firmware Upgrade ........................................................................................ 23
3.8
Password Setting........................................................................................... 24
3.9
Reboot .......................................................................................................... 25
Command Mode Configuration .................................................................................... 27
4.1
Console Port Default Settings ....................................................................... 27
4.2
HyperTerminal Settings ................................................................................ 27
4.3
Command Format ......................................................................................... 30
4.4
Command Sets.............................................................................................. 31
4.5
Telnet............................................................................................................ 33
SerialComm™ Utility .................................................................................................. 34
5.1
Define Virtual Com....................................................................................... 36
5.2
Create and Stop Virtual Com......................................................................... 41
5.3
Ident-and-Connect ™.................................................................................... 43
3
LWS100A/LWS100AE User’s Manual
5.4
Direct Connect with Discovered IP Device ................................................... 45
5.5
LED Status Graphic Display ......................................................................... 46
5.6
Ping IP Connectivity ..................................................................................... 48
5.7
Utility Version............................................................................................... 48
6. Diagnostics – ComSR Utility ....................................................................................... 49
6.1
Install ComSR Utility ................................................................................... 50
6.2
Open ComSR utility...................................................................................... 51
6.3
Select COM port ........................................................................................... 52
6.4
COM Port Settings........................................................................................ 53
6.5
Simple Terminal Simulator ........................................................................... 54
6.6
Send/Receive Text File ................................................................................. 56
If the transmission path has no error, then the comparison result will show Error Count: 0... 57
7. Specifications............................................................................................................... 58
8. Default Settings............................................................................................................ 60
8.1
Network........................................................................................................ 60
8.2
WLAN.......................................................................................................... 61
8.3
Serial Port ..................................................................................................... 62
9. Glossary ....................................................................................................................... 63
Table 1 Command Sets......................................................................................................... 31
Figure 1-1 Peer to Peer (Ad-Hoc Mode)................................................................................. 8
Figure 1-2 LWS100A/LWS100AE to PC WLAN (Ad-Hoc Mode) ......................................... 8
Figure 1-3 LWS100A/LWS100AE to Access Point (Infrastructure Mode) .............................. 9
Figure 1-4 LWS100A/LWS100AE over the Internet (Infrastructure Mode) ............................ 9
Figure 2-1 LWS100A/LWS100AE Rear Panel ..................................................................... 11
Figure 2-2 DIP Switch and Serial Port Pin Assignment Table ............................................... 12
Figure 2-3 LED Indicator Label ........................................................................................... 13
Figure 3-1 Web Configuration Home Page ........................................................................... 17
Figure 3-2 Network Settings ................................................................................................ 18
Figure 3-3 Serial Settings ..................................................................................................... 19
Figure 3-4 WLAN Settings .................................................................................................. 20
Figure 3-5 Site Survey ......................................................................................................... 21
Figure 3-6 Restore Default Settings...................................................................................... 22
Figure 3-7 Firmware Upgrade .............................................................................................. 23
Figure 3-8 Password Settings ............................................................................................... 24
Figure 3-9 Reboot ................................................................................................................ 25
4
LWS100A/LWS100AE User’s Manual
Figure 3-10 Select Internet Options...................................................................................... 26
Figure 3-11 Delete Temporary Internet Files ........................................................................ 26
Figure 4-1 Open HyperTerminal .......................................................................................... 27
Figure 4-2 PC/NB COM Port Selection................................................................................ 28
Figure 4-3 PC/NB COM Port Settings.................................................................................. 28
Figure 4-4 Ready to Accept Command ................................................................................. 29
Figure 4-5 Open Telnet Connection...................................................................................... 33
Figure 4-6 Command Setting via Telnet ............................................................................... 33
Figure 5-1 Uninstall SerialComm™ ..................................................................................... 34
Figure 5-2 Stop SerialCommSvc Service.............................................................................. 35
Figure 5-3 Start SerialCommSvc Service ............................................................................. 36
Figure 5-4 Virtual Com Settings........................................................................................... 37
Figure 5-5 Log Area............................................................................................................. 38
Figure 5-6 Add to Virtual Com List ...................................................................................... 39
Figure 5-7 Clear from Virtual Com List................................................................................ 40
Figure 5-8 Select COM port ................................................................................................. 41
Figure 5-9 Crate/Stop Virtual COM...................................................................................... 42
Figure 5-10 Subnet Broadcast Auto Discovery ..................................................................... 43
Figure 5-11 IP Range Auto Discovery .................................................................................. 44
Figure 5-12 Connect with Discovered IP Device .................................................................. 45
Figure 5-13 Select LED Status Graphic Display ................................................................... 46
Figure 5-14 LED Status Graphic Display ............................................................................. 47
Figure 5-15 Ping IP Connectivity ......................................................................................... 48
Figure 6-1 ComSR Icon ....................................................................................................... 50
Figure 6-2 ComSR Window ................................................................................................. 51
Figure 6-3 Select Virtual COM............................................................................................. 52
Figure 6-4 Com Port Settings ............................................................................................... 53
Figure 6-5 Connect Com Port............................................................................................... 54
Figure 6-6 Simple Terminal Simulator ................................................................................. 55
Figure 6-7 Select Com Ports................................................................................................. 56
Figure 6-8 Send and Receive Text File ................................................................................. 57
Figure 8-1 Network Default Settings .................................................................................... 60
Figure 8-2 WLAN Default Settings ...................................................................................... 61
5
LWS100A/LWS100AE User’s Manual
1. Introduction
The LWS100A/LWS100AE WLAN Dual SerialBridge™ easily brings a wireless connection to any serial device
in a simple and secure manner. The LWS100A/LWS100AE enables remote accessibility for services and support
to any legacy serial devices and eliminates cable interference and ground loops. In addition to expanding beyond
cabling limitations, it combines the benefits of data network with proven asynchronous connectivity to deliver
high performance serial connections to wireless LANs. Its external antenna design also allows the use of third
party antenna for extended range and performance.
The LWS100A/LWS100AE has a broad range of networking functions utilizing TCP/IP to provide serial
tunneling. It is easy to set up using a secure web browser. Its flash-upgradeable firmware provides future
upgradeability. The LWS100A/LWS100AE Site Survey function allows users to browse the available active
Access Points facilitating easy network connection. It also supports full mobility and seamless roaming from cell
to cell.
The Auto Discovery utility let user can easily find all the available LWS100A/LWS100AE in the network and
can access any specific LWS100A/LWS100AE. The Virtual COM utility will treat the LWS100A/LWS100AE
serial ports as the COM ports of the Windows based PC/NB running the Virtual COM utility.
The LWS100A/LWS100AE supports full and half-duplex transmission, software and hardware flow control, and
has programmable baud rates for application optimization. Its enhanced security features support 64 bit and 128
bit WEP (Wired Equivalent Privacy) encryption.
Overall, the LWS100A/LWS100AE will enable wireless connections for most serial applications including retail
point-of-sales, remote metering and display, industrial and building automation, security and access control and
general data acquisition applications.
1.1 Features
Easily connect all types of serial devices via IEEE 802.11b WLAN
Dual serial ports, each can be RS232, RS422 or RS485 which is DIP switch selectable
Serial ports can be set up individually via easy-to-use web browser with password protection
External antenna connector supports third-party products for extended range/performance
Programmable baud rate (from 300bps to 115,200bps)
Full-duplex (serial data in/data out)
Hardware RTS/CTS flow control
Software flow control (XON/XOF, None)
6
LWS100A/LWS100AE User’s Manual
Supports variant of protocols: TCP, UDP, IP, ICMP, HTTP, TFTP, ARP, DHCP Client, SNMP (get)
Auto Discovery function allows available LWS100A/LWS100AE in the network to be automatically
discovered
Includes Virtual COM function
Supports watch dog timer
Firmware upgrade via WLAN
Wired Equivalent Privacy (WEP) security feature supports 64 and 128-bit encryption
Unique site survey function lets users browse for all available active Access Point connections
Supports both “Ad-Hoc” and infrastructure topologies
Supports full mobility and seamless roaming from cell to cell
Full compliment of status LEDs and activity indicators for easy installation, monitoring and diagnostics
User friendly LED status graphic display for monitoring status remotely
Extended operational temperature range
Optional industrial DIN Rail mounting hardware accessory, DB9 to terminal strip or RJ-45 termination
adaptor
7
LWS100A/LWS100AE User’s Manual
1.2 Applications
The following describes 4 application examples for LWS100A/LWS100AE:
Application 1 – Peer to Peer (Ad-Hoc Mode)
Application 1 is a dedicated application environment. Both the Host PC and serial device use the
LWS100A/LWS100AE device to communicate with each other (refer to Figure 1-1).
Figure 1-1 Peer to Peer (Ad-Hoc Mode)
Application 2 – LWS100A/LWS100AE to PC WLAN (Ad-Hoc Mode)
Application 2 uses the LWS100A/LWS100AE in the serial device side and the Host PC side will be equipped
with WLAN card.
Figure 1-2 LWS100A/LWS100AE to PC WLAN (Ad-Hoc Mode)
8
LWS100A/LWS100AE User’s Manual
Application 3 – LWS100A/LWS100AE to Access Point (Infrastructure Mode)
Application 3 uses the LWS100A/LWS100AE in the serial device side (for example, Programmable Logic
Controller, PLC) and the Host PC side is connected to the AP via LAN as shown below.
Figure 1-3 LWS100A/LWS100AE to Access Point (Infrastructure Mode)
Application 4 – LWS100A/LWS100AE over the Internet (Infrastructure Mode)
Application 4 is used for far end remote communication via the Internet.
Figure 1-4 LWS100A/LWS100AE over the Internet (Infrastructure Mode)
9
LWS100A/LWS100AE User’s Manual
2. Installation
Please follow the steps described in Section 2.1 through 2.9 to install your LWS100A/LWS100AE including
hardware and utilities.
2.1 Product Kit
Before starting installation, please make sure the LWS100A/LWS100AE package includes the following four
items:
1) LWS100A/LWS100AE device with one antenna.
2) CD-ROM (containing SerialComm™ Utility and User’s Manual).
3) Power adapter.
4) Quick Installation Guide
If anything from the above items is missing, please contact your vendor.
2.2 System Minimum Requirements
For LWS100A/LWS100AE Application 3 and 4 (Figure 1-3, Figure 1-4), your system should meet the following
minimum requirements to use LWS100A/LWS100AE as the serial data transport platform.
1) A serial Device
2) A WLAN Access Point (AP)
3) A Host PC/server connected to the AP via LAN.
2.3 LWS100A/LWS100AE and AP Location
Please choose a proper location for your AP. In general, the best location to place the AP is at the center of all the
WLAN stations, including LWS100A/LWS100AE, within the line of sight. Better performance can be obtained
by locate the elevation of the AP device above obstacles. For AP installation/configuration, please refer to your
AP user manual.
10
LWS100A/LWS100AE User’s Manual
2.4 Serial Port Operation Mode Setting
LWS100A/LWS100AE supports dual serial ports. Each port can be a console, RS232, RS422 or RS485 port
selected by the DIP switch, refer to Figure 2-1.
Figure 2-1 LWS100A/LWS100AE Rear Panel
There is a DIP switch and serial port ping assignment table attached at the bottom of LWS100A/LWS100AE. Set
the serial port type based on your need, refer to Figure 2-2.
Note: The default DIP switch is set port 1 to console and port 2 to RS232. After the initial settings, remember to
set the DIP switch to meet your need.
Note: After changing the DIP switch, you need to reboot the device to make the change valid. To reboot the
device, you can do it via web browser or by command (console port or Telnet). Unplug and then re-plug
the power can also reboot the device.
11
LWS100A/LWS100AE User’s Manual
Figure 2-2 DIP Switch and Serial Port Pin Assignment Table
For example,
To set port 1 as the console port: set DIP switch 3 and 4 to OFF position (i.e. up), refer to Figure 2-1
and Figure 2-2. Port 1 LED will be all OFF.
To set port 2 as the RS232 port: set DIP switch 1 to OFF position (i.e. up) and DIP switch 2 to ON
position (i.e. down). Port 2 RS232 LED will be all ON.
12
LWS100A/LWS100AE User’s Manual
2.5 LED Indicator Label
Figure 2-3 shows the LWS100A/LWS100AE LED indicator label.
Figure 2-3 LED Indicator Label
The function for each LED is described as follow:
Power LED:
ON, green, when power adaptor is plugged into LWS100A/LWS100AE
Alarm LED:
When power is applied to LWS100A/LWS100AE, it will do self test. During this period, the
Alarm LED will be ON, red. After passing the self test, it will be OFF.
When you reboot the device, the Alarm LED will also be ON during the self test period, and
then it will be OFF.
Link LED:
ON, green, when LWS100A/LWS100AE is linked with AP (infrastructure mode) or
with another WLAN station (Ad-Hoc mode)
OFF when LWS100A/LWS100AE is not linked with any WLAN devices
Activity LED:
Blinking, yellow, when there is data transferring to/from LWS100A/LWS100AE
RS232 LED: ON, green, when the corresponding DIP switch is set to RS232
RS422 LED: ON, green, when the corresponding DIP switch is set to RS422
RS485 LED: ON, green, when the corresponding DIP switch is set to RS485
For console port, all RS232, RS422 and RS485 LED will be OFF,
13
LWS100A/LWS100AE User’s Manual
2.6 Plug in RS232 Cable
Connect PC/NB to the LWS100A/LWS100AE serial port by using an NULL cross cable with DB9 female
connector. This PC/NB will be used to configure LWS100A/LWS100AE via command mode. A NULL cross
cable will cross pins 2 & 3, 7 & 8, and 4 & 6. LWS100A/LWS100AE can be configured either by web browser
or by command mode.
2.7 Plug in Power Cable
Plug the power cord of power adapter into the socket marked with “DC IN” on the rear panel of
LWS100A/LWS100AE, and plug the power adapter into an A/C power outlet. When completed, the green power
LED on the top panel should light up.
Warning: Use only power adapter supplied with the LWS100A/LWS100AE; otherwise, the
LWS100A/LWS100AE may be damaged.
2.8 Install SerialComm™ Utility
Please follow the steps below to install SerialComm™ utility into the PC/NB. This utility support several
functions: Virtual Com, Auto Discovery, directly connect with discovered IP devices, LED status graphic display
and Ping IP connectivity.
1) Insert the supplied CD-ROM in the CD-ROM driver.
2) After inserting the CD-ROM into the driver, the SerialComm™ utility will be automatically executed.
Follow the prompt instructions to finish the installation.
3) Or, directly execute the file Setup.exe in the CD-ROM.
2.9 Initial Settings
For setting up your LWS100A/LWS100AE at the first time, the first thing you should do is to configure the IP
address, SSID and WEP settings. The PC/NB, AP and LWS100A/LWS100AE should be within at the same IP
subnet. AP and LWS100A/LWS100AE should have same SSID and WEP settings.
The default IP address, SSID and WEP of the LWS100A/LWS100AE is set to:
IP address: 192.168.1.200
SSID: WLAN
WEP: Disable
Select one of the following methods for your LWS100A/LWS100AE initial setting.
14
LWS100A/LWS100AE User’s Manual
2.9.1 Change PC and AP Settings
Connect your PC/NB directly with an AP’s LAN port (or via LAN connection).
Configure AP with the following settings:
IP Address: 192.168.1.xxx where “xxx” is a value other than “200”.
Mask: 255.255.255.0
SSID: SerialBridge
WEP: Disable
Operation Mode: AP (Infrastructure mode)
Change your PC/NB IP address to have IP address 192.168.1.yyy where “yyy” is the value other than “200”.
Now, the LWS100A/LWS100AE can be configured via web browser or telnet by enter LWS100A/LWS100AE IP
address: 192.168.1.200 (which is the LWS100A/LWS100AE default IP address).
15
LWS100A/LWS100AE User’s Manual
2.9.2 Change LWS100A/LWS100AE Settings
Your PC/NB needs to be connected with LWS100A/LWS100AE serial port. Follow the steps below to configure
LWS100A/LWS100AE:
Set LWS100A/LWS100AE serial port to be the console port as described in section 2.4. The
permanent, default settings for console port are:
Baud Rate: 2,400
Data Length: 8
Parity: None
Stop Bit: 1
Flow Control: None
Follow the steps described in section 4.1 and 4.2 to set the PC/NB COM port and open Microsoft
HyperTerminal.
Use the commands described in section 4.3 and 4.4 to change LWS100A/LWS100AE IP address.
LWS100A/LWS100AE IP address should have same IP subnet as your PC/NB and AP have.
The commands are: IP <IP_Address>
MASK <IP_Address>
GW <IP_Address>
Use the commands described in section 4.3 and 4.4 to change LWS100A/LWS100AE WLAN
Operation Mode, Channel, SSID and WEP settings. They also should be the same as your AP has.
The commands are:
MODE <[B]SS|[A]d-Hoc> Note: “B” for infrastructure and “A” for Ad-Hoc mode
SSID <SSID>
CHAN <1-11>
Note: Only needed for Ad-Hoc mode.
WEP <0|64|128>
Note: When “0” is set, WK and WKID is not needed.
Format <1|2>
Note: 1 for ASCII char and 2 for HEX char
WK <0|64|128> <1-4> <Key in Hex>
WKID <1-4>
16
3. Web Browser Configuration
This section provides directions for LWS100A/LWS100AE web browser configuration: Network Settings, Serial
Settings, WLAN Settings, Site Survey, Restore Default, Firmware Upgrade, Password Setting and Reboot the
System.
3.1 Home Page
The WIRELESS LAN DUAL SERIAL BRIDGE home page will be displayed when the
LWS100A/LWS100AE IP address is correctly entered into the web browser, refer to Figure 3-1. It also shows the
firmware version.
Figure 3-1 Web Configuration Home Page
LWS100A/LWS100AE User’s Manual
Version 1.1
18
3.2 Network Settings
At the left frame of the WIRELESS LAN DUAL SERIAL BRIDGE web page, select Network to change the
IP related settings and device description information. Refer to Figure 3-2.
Figure 3-2 Network Settings
LWS100A/LWS100AE, AP and Gateway must have the same IP subnet. When the LWS100A/LWS100AE needs
to connect to a Host PC that is in another subnet, then you need to specify the gateway IP address. If
LWS100A/LWS100AE and Host PC are at the same subnet, then just leave Gateway IP address as it is.
The LWS100A/LWS100AE web browser configuration also provides device description information: Alias,
Contact, and Location. Enter the information that meets your need. They are used to identify specific
LWS100A/LWS100AE among several LWS100A/LWS100AE devices in same IP subnet.
LWS100A/LWS100AE User’s Manual
Version 1.1
19
Serial Port Settings
At the left frame of the WIRELESS LAN DUAL SERIAL BRIDGE web page, select Serial to change the
serial port related settings, refer to Figure 3-3.
Figure 3-3 Serial Settings
Depend on the serial port operation mode setting, the LWS100A/LWS100AE web browser configuration will
provide different display for user to enter the serial port parameter. Figure 3-3 shows that port 1 is a console port
while port 2 is a RS232 port.
When the Connection Mode is set to Server, the Remote Port (TCP port) and Remote IP (IP address) filed
will not show up, instead the Local Port (TCP port) will show up.
LWS100A/LWS100AE User’s Manual
Version 1.1
20
3.3 WLAN Setting
At the left frame of the WIRELESS LAN DUAL SERIAL BRIDGE web page, select WLAN to change the
WLAN related settings, refer to Figure 3-4.
Figure 3-4 WLAN Settings
LWS100A/LWS100AE and AP must have the same SSID and WEP settings. When the Operation Mode is set to
Infrastructure, LWS100A/LWS100AE will follow the channel used by the AP. So, Channel is not displayed.
When Encryption is OFF, then other WEP related fields are not displayed.
When Encryption is set to 64 or 128, then the related WEP Key settings must be set to the same values as those
set in AP.
LWS100A/LWS100AE User’s Manual
Version 1.1
21
3.4 Site Survey
At the left frame of the WIRELESS LAN DUAL SERIAL BRIDGE web page, select Site Survey to find the
available AP, refer to Figure 3-5.
Note: Wait for few seconds to allow LWS100A/LWS100AE to scan available AP.
Figure 3-5 Site Survey
It allows users to browse the available active Access Points to which LWS100A/LWS100AE can connect (as
long as the AP SSID has not been “hidden” by the AP configuration.)
After few seconds, it will show the available AP’s SSID, Received Signal Strength Index (RSSI), Link Quality,
Channel, WEP, Mode and BSSID. Those values are not saved in the LWS100A/LWS100AE memory due to
varying RSSI and Link Quality values. To review the most current values, click the Site Survey at the left frame
again.
LWS100A/LWS100AE User’s Manual
Version 1.1
22
3.5 Restore to Default
At the left frame of the WIRELESS LAN DUAL SERIAL BRIDGE web page, select Restore Default to
change all the LWS100A/LWS100AE settings to the factory default, refer to Figure 3-6.
Figure 3-6 Restore Default Settings
Warning: When you restore the device, the configuration settings will be reset to the factory default. Make sure
you have written down the settings for record.
LWS100A/LWS100AE User’s Manual
Version 1.1
23
3.6 Firmware Upgrade
At the left frame of the WIRELESS LAN DUAL SERIAL BRIDGE web page, select Firmware Upgrade to
upgrade LWS100A/LWS100AE firmware, refer to Figure 3-7.
Figure 3-7 Firmware Upgrade
As an ongoing development, newly released features may be available. To download the new firmware, the
TFTP server must support TFTP protocol. Enter the TFTP server IP address and file name, and then click
Download and Upgrade button to upgrade firmware.
Warning: Do not cut the power while download the new firmware. The period for loading the new
firmware will depend on the IP network traffic load.
Note: When the firmware upgrade is completed, you need to reboot the device to make the change valid and then
refresh the web browser; otherwise, you might get the old file from the web browser temporary
Internet files.
LWS100A/LWS100AE User’s Manual
Version 1.1
24
3.7 Password Setting
At the left frame of the WIRELESS LAN DUAL SERIAL BRIDGE web page, select Password Setting to set
the user name and password for LWS100A/LWS100AE, refer to Figure 3-8.
Figure 3-8 Password Settings
LWS100A/LWS100AE provides web browser configuration security feature through the support of the password
protection function. The default username and password are:
User Name:
admin
Password:
admin
At the initial setting, it is recommended to change the user name and password.
LWS100A/LWS100AE User’s Manual
Version 1.1
25
3.8 Reboot
At the left frame of the WIRELESS LAN DUAL SERIAL BRIDGE web page, select Reboot to reboot
LWS100A/LWS100AE, refer to Figure 3-9
Figure 3-9 Reboot
For any change on the settings, LWS100A/LWS100AE needs to be rebooted in order to make the change valid.
Note: When the reboot is completed, you must refresh the browser, otherwise your web browser might use the
old temporary Internet file. In addition to refresh the web browser, Figure 3-10 and Figure 3-11 also shows
the methods to delete the temporary Internet files.
Figure 3-10 Select Internet Options
Figure 3-11 Delete Temporary Internet Files
LWS100A/LWS100AE User’s Manual
4. Command Mode Configuration
LWS100A/LWS100AE can be configured by command mode from HyperTerminal via console port or by
command mode via Telnet.
Note: HyperTerminal is a Microsoft Windows™ program usually accessible from Start, Programs,
Accessories, Communications, and HyperTerminal.
Refer to section 2.4 to set LWS100A/LWS100AE serial port as the console port.
4.1 Console Port Default Settings
When LWS100A/LWS100AE serial port is set to console mode, the console port default settings are:
Baud rate:
2,400
Data length (bits):
8
Parity:
None
Stop bits:
1
Flow control:
None
Note: These default values are permanent and can not be changed.
4.2 HyperTerminal Settings
From Windows, click Start, Programs, Accessories, Communications, and HyperTerminal to open the
HyperTerminal and assign a name, e.g. LWS100A as shown in Figure 4-1.
Figure 4-1 Open HyperTerminal
27
LWS100A/LWS100AE User’s Manual
Select the COM port used in your PC/NB, and then
Set the PC/NB COM port parameters to be the same
click Configure button for setting COM port
as LWS100A console port default settings, refer to
parameters, refer to Figure 4-2.
Figure 4-3.
Figure 4-2 PC/NB COM Port Selection
Figure 4-3 PC/NB COM Port Settings
28
When the PC/NB COM parameters are set complete, click OK button, then the following
LWS100A/LWS100AE – HyperTerminal window will be displayed. Press the Enter key from the PC/NB
keyboard. After entering correct Username and Password, HyperTerminal will prompt “>” symbol and is ready
to accept command, refer to Figure 4-4.
Figure 4-4 Ready to Accept Command
LWS100A/LWS100AE User’s Manual
4.3 Command Format
The command format is:
COMMAND <parameter_1> <parameter_2>
The delimiter among command and parameters is a space. The number of parameter depends on the need of
command.
Note: After using DEFAULT command, you need to enter the SAVE command in order to save the default value
into the flash memory and then enter REBOOT to make the change valid.
Note: When a command is accepted, LWS100A/LWS100AE will respond “OK”. If LWS100A/LWS100AE does
not respond “OK”, please refer to the command sets in Table 1 to verify the entered command is correct
or not.
Note: When the commands are all entered complete, enter SAVE to store the change into LWS100A/LWS100AE
flash memory and then enter REBOOT to make the change valid.
30
LWS100A/LWS100AE User’s Manual
4.4 Command Sets
The following table shows the available command sets which provide same function as web browser
configuration described in section 3.
Table 1 Command Sets
Administration
HELP
List all commands
?
Same command as HELP
DEFAULT
Restore to default
UPG <TFTP Server IP> <File Name>
Upgrade firmware through TFTP
PWD <Username> <Password>
Set username and password
CLPWD
Clear username and password
EXIT
Logout
REBOOT
Reboot System
SAVE
Save configuration to flash
WLAN Settings
MODE <[B]SS|[A]d-Hoc>
Set WLAN mode
B : Infrastructure
SSID <SSID>
Set WLAN SSID
CHAN <1-11>
Set RF channel
RATE <1|2|5.5|11>
Set Tx
1: 1Mbps
WEP <0|64|128>
A : Ad-Hoc
2: 2Mbps 5: 5.5Mbps 11: 11Mbps
WEP encryption
0:
OFF
64: 64bit
128: 128bit
FORMAT <1|2>
ASCII/HEX Character
WK <0|64|128> <1-4> <Key in Hex>
Set encryption type, WEP Key# used and then followed by
encryption Key
For 64-bit encryption, enter a 5 hexadecimal characters
encryption key.
For 128-bit encryption, enter a 13 ASCII characters or 26
hexadecimal characters encryption key.
WKID <1-4>
Selects one of four key sets to be used for encryption.
SS
Site Survey
31
LWS100A/LWS100AE User’s Manual
Serial Settings
Select serial port (1 or 2) and set baud rate
BAUD <COM1|COM2> <1-10>
1: 300
2: 600
3: 1200
4: 2400
5: 4800
6: 9600
7: 19200
8: 38400
9: 57600
10: 115200
DL <COM1|COM2> <7|8>
Select serial port (1, 2) and set data length (7, 8)
PC <COM1|COM2> <0|1|2>
Select serial port (1, 2) and set parity check
0: None
1: Odd
2: Even
SB <COM1|COM2> <1|2>
Select serial port (1, 2) and set stop bit (1, 2)
FC <COM1|COM2> <0|1|2>
Select serial port (1, 2) and set flow control
0:
None
1: XON/XOFF
2: Hardware
LPORT <COM1|COM2> <Local Port>
Select serial port (1, 2) and set local TCP port number
RPORT <COM1|COM2> <Remote Port>
Select serial port (1, 2) and set remote TCP Port number
RIP <COM1|COM2> <Remote IP Address>
Select serial port (1, 2) and set remote device IP address
RMODE <COM1|COM2> <1|2>
Select serial port (1, 2) and set connection mode
1: Client
2: Server
Network Settings
IP <IP address>
Set IP address
MASK <IP address>
Set IP Mask
GW <IP address>
Set Gateway IP address
DHCP <1|0>
Set DHCP client ON (1) or OFF (0)
System Device Information
ALIAS <Alias Name>
Set device alias name
CONT <Contact Information>
Set device contact information
LOCT <Location Information>
Set device location information
32
LWS100A/LWS100AE User’s Manual
4.5 Telnet
LWS100A/LWS100AE can also be configured by command mode via Telnet. From your PC/NB Windows,
select Start, Run, and then enter “telnet 192.168.1.200”, as shown in Figure 4-5.
Figure 4-5 Open Telnet Connection
After the Telnet connection is established, enter the username and password, then Telnet will respond the “>”
prompt symbol as shown in Figure 4-6. Follow the command format and command sets in section 4.3 and
section 4.4 to configure LWS100A/LWS100AE.
Figure 4-6 Command Setting via Telnet
33
LWS100A/LWS100AE User’s Manual
5. SerialComm™ Utility
SerialComm™ utility provides several useful functions:
Virtual Com function will treat the Black Box® Dual SerialBridge units (LWS100A,
/LES300A/LFS400A Series) serial ports as the COM ports of the Windows based PC/NB running the
SerialComm™ Virtual Com function.
Ident-and-Connect™ auto discovery function lets user find all the available SerialBridge units in
the network.
Direct connect with the discovered IP device by clicking target device IP address.
LED status graphic display helps user to monitor SerialBridge unit status remotely.
Ping IP connectivity function will check the IP connection status between PC/NB and the specified
IP device.
SerialComm™ is provided as a service with service name SerialCommSvc. When Virtual Com parameters are
set up correctly, the Virtual Com ports will be automatically created by SerialComSvc service every time when
you reboot your PC/NB. There is no need to start or stop SerialCommSvc service during normal operation. If
you have to stop and restart SerialCommSvc service, please see Stop SerialComm Service section and Start
SerialComm Service section in this chapter.
Install SerialComm
Follow the steps described in section 2.8 to install the SerialComm™ utility. After the SerialComm™ utility is
installed correctly, an icon
can be found at the Windows tool bar.
Uninstall SerialComm
To uninstall SerialComm™ utility from your PC/NB Windows, click Start, select Programs, SerialComm,
Diagnostic Tool and then click Uninstall SerialComm, refer to Figure 5-1.
Figure 5-1 Uninstall SerialComm™
Open SerialComm Window
At the Windows tool bar, double click the SerialComm™ utility icon
34
to open the SerialComm window
LWS100A/LWS100AE User’s Manual
for configuration LWS100A.
Stop SerialCommSvc Service
At the Windows tool bar, select Start, Settings, Control Panel, Administrative Tool, Service, the
following window will be displayed. Select SerialCommSvc and then click
button.
Figure 5-2 Stop SerialCommSvc Service
Start SerialCommSvc Service
At the Windows tool bar, select Start, Settings, Control Panel, Administrative Tool, Service, the following
window will be displayed. Select SerialCommSvc and then click
35
button.
LWS100A/LWS100AE User’s Manual
Figure 5-3 Start SerialCommSvc Service
5.1 Define Virtual Com
At the upper frame of the SerialComm window, select Setting tap window to configure the Virtual Com. Figure
5-4 will be displayed and shows the existing Virtual Com settings in the Virtual Com List.
36
LWS100A/LWS100AE User’s Manual
Figure 5-4 Virtual Com Settings
Com Port: Enter the Com port number that will be used as the Virtual Com for the PC/NB.
IP:
Enter the IP address of the remote LES300A/LFS400A/LWS100A Series for the Com port to be
mapped to.
TCP Port: Enter Local Port number of the remote LES300A/LFS400A/LWS100A Series into this field. TCP
port number must be between 1024 and 65535 due to TCP port number 0-1023 are reserved for well
known applications.
Add:
When data is filled, click Add button to add this Virtual Com port into the Virtual Com List.
Save Configuration: Click Save Configuration button to save the settings into the PC/NB
disk file.
Create COM Port: From the Virtual COM List select the virtual COM port then click this
button for mapping this COM port to the corresponding IP/TCP
address.
37
LWS100A/LWS100AE User’s Manual
Stop COM Port:
At the Virtual COM List select the virtual COM port then click this
button for removing the COM port <-> IP/TCP Port mapping.
As shown in Figure 5-5, at the bottom of SerialComm window, there is log area to show all activity. The log file
can also be opened from Windows, click Start, select Programs, SerialComm and then click View Log (refer
to Figure 5-1). For example,
At 2:57:15PM, there is a save configuration activity.
At 2:57:20PM, the COM3 is mapped to 192.168.1.210:1026 (IP:TCP) successfully.
At 2:57:24PM, all COM ports mapping is stop complete.
Figure 5-5 Log Area
Note:
If the Save Configuration button is not clicked then the updated data will not be
saved into the PC
disk file.
Note:
The connection mode of the remote LES300A/LFS400A/LWS100A Series should be set to Server.
Add to Virtual Com List
38
LWS100A/LWS100AE User’s Manual
Figure 5-6 shows an example to define COM5 mapping to the LES300A/LFS400A/LWS100A Series with IP
address 192.168.1.210 and TCP port number 1025. After clicking Add button, this COM port data will be added
at the last line of the Virtual Com List. Click Save Configuration button to save the settings into the PC/NB
disk file.
Figure 5-6 Add to Virtual Com List
Clear from Virtual Com List
From the Virtual Com List, select the COM port number by right clicking the row of the COM port to be
deleted. For example, in Figure 5-7 the COM5 is selected, and then click Clear to delete COM5 from the
Virtual Com List.
39
LWS100A/LWS100AE User’s Manual
Figure 5-7 Clear from Virtual Com List
40
LWS100A/LWS100AE User’s Manual
5.2 Create and Stop Virtual Com
To create and stop the Virtual Com, you must select which COM port will be activated first.
Select COM port
From the Virtual Com List, select the COM port number by clicking the check box under the COM column. For
example, in Figure 5-8 COM 3 is selected.
Figure 5-8 Select COM port
41
LWS100A/LWS100AE User’s Manual
Create/Stop Virtual COM
At the right of the Virtual COM List, click the Create COM Ports or Stop COM Ports button to crate the
virtual COM port or stop it (refer to Figure 5-9).
Figure 5-9 Crate/Stop Virtual COM
When the Virtual COM connection is created correctly, the SerialComm™ log area will display the messages
“COMx Connect to x.x.x.x : yyyy OK”, For example, in Figure 5-9, at 3:07:26PM, in the log area, there is a
message “COM3 Connect to 192.168.1.210:1026 OK” showing the COM <-> IP:TCP mapping is successfully.
When the Virtual COM connection is stopped correctly, the SerialComm™ log area will display the message
“Stop Complete”, refer to Figure 5-9, message at 3:07:30PM.
Note: When there will be any configuration change and then reboot the LES300A/LFS400A/LWS100A Series
device, the Virtual COM port should be stopped first.
42
LWS100A/LWS100AE User’s Manual
5.3 Ident-and-Connect ™
At the upper frame of the SerialComm window, select Ident-and-Connect tap window. Figure 5-10 will be
displayed. There are two methods allow user to search the available SerialBridge units (LWS100A, LES300A
Series or LFS400A Series) in the network.
Subnet Broadcast Auto Discovery will search all the available SerialBridge units within the same IP subnet
as PC/NB has, refer to Figure 5-10.
Figure 5-10 Subnet Broadcast Auto Discovery
Two buttons, Start and Stop, are available for user to start the search or stop the search.
It will take few seconds for searching the available SerialBridge units. If the target SerialBridge unit
is found, you can use the Stop button to stop the search, or wait until the utility finish the search.
The Ident-and-Connect™ auto discovery function also provides the device description information: Alias,
Contact and Location which can be used to identify a device, especially there are many SerialBridge™
43
LWS100A/LWS100AE User’s Manual
family in the same location, e.g. office, factory, warehouse, etc. Those device description information are
entered from, for example, LES300A Network Settings window, refer to section 3.2.
IP Range Auto Discovery allows user to specify any class C IP range for searching available SerialBridge™
units (LWS100A, LES300A Series or LFS400A Series) in that IP range, refer to Figure 5-11. The class C IP
range is not necessary to be the same IP subnet as the PC/NB has. IP Range Auto Discovery supports
maximum an IP class C address range, for example, from 192.168.123.100 to 192.168.123.200. Note:
Depend on the network traffic and configuration, it might take few minutes for the search.
Figure 5-11 IP Range Auto Discovery
44
LWS100A/LWS100AE User’s Manual
5.4 Direct Connect with Discovered IP Device
Ident-and-Connect™ auto discovery function also provide the capability for user to connect the PC with the
target SerialBridge unit by right clicking the target device IP address and then select Connect. Figure 5-12
shows an example to connect device with IP address 192.168.1.212 which is an LES300A device and located at
office. By clicking Connect, LES300A web browser configuration windows will be displayed, refer to section 3.
Figure 5-12 Connect with Discovered IP Device
If the LES300A (or LFS400A Series) web browser configuration window does not show up, refer to section 5.6
to check the IP connection.
45
LWS100A/LWS100AE User’s Manual
5.5 LED Status Graphic Display
LES300A/LFS400A/LWS100A Series LED Status Graphic Display function provides the capability to remotely
monitor LES300A/LFS400A/LWS100A Series device status. Right clicking the target IP device’s IP address, and
then click Status, refer Figure 5-13 and Figure 5-14.
Figure 5-13 Select LED Status Graphic Display
46
LWS100A/LWS100AE User’s Manual
Figure 5-14 LED Status Graphic Display
Figure 5-14 shows an example for LES300A. The Power is ON, Ethernet link is ON. This is traffic in Ethernet
port. Port 2 is set to RS232 port while Port 1 is set to console port (all LED is OFF).
47
LWS100A/LWS100AE User’s Manual
5.6 Ping IP Connectivity
The Ping IP connectivity function provides an easy way to check the IP connection with the specific IP device.
At the upper frame of the SerialComm window, select the Ping tap window, and then click the Ping button. The
Ping function will continue to ping the specified IP device. To stop the Ping function, click the Stop button, refer
to Figure 5-15.
Figure 5-15 Ping IP Connectivity
5.7 Utility Version
At the upper frame of the SerialComm window, select the About tap window to check the SerialComm™ utility
version if necessary.
48
LWS100A/LWS100AE User’s Manual
6. Diagnostics – ComSR Utility
Black Box® Dual SerialBridge units (LWS100A/LES300A/LFS400A Series) can be diagnosed by the
ComSR utility which provides the loop back test to allow user to send and receive data/file from the PC/NB
virtual COM via the remote SerialBridge two serial ports. The two serial ports will be connected by a null
modem serial cable. In order to do the loop back test successfully, please make sure that:
Both serial ports of a SerialBridge™ unit should be set up as server ports.
Two virtual Com ports should be set up by using SerialComm™, and they should
start/connect successfully to the server ports of the SerialBridge™ unit.
A null modem serial cable should be used to connect the two physical
serial ports of the SerialBridge™ unit.
Only text format is supported. Most ASCII control codes are not supported
in this version.
Note: The included Test_Text_File.txt can be used as the text file for testing sending/receiving file via the loop
back path.
49
LWS100A/LWS100AE User’s Manual
6.1 Install ComSR Utility
Please follow the steps below to install ComSR utility into the PC/NB.
1) Insert the supplied CD-ROM in the CD-ROM driver.
2) Read the Readme.txt file under Diagnostic Tool folder first.
3) Execute the file Setup.exe under Diagnostic Tool folder in the CD-ROM.
After the installation is completed, an icon will be generated as shown in Figure 6-1
Figure 6-1 ComSR Icon
50
LWS100A/LWS100AE User’s Manual
6.2 Open ComSR utility
To open ComSR utility, from your PC/NB Windows, click Start, select Programs, SerialComm, Diagnostic
Tool and then click ComSR, the ComSR window will be displayed as shown in Figure 6-2
Figure 6-2 ComSR Window
ComSR provide two methods for loop testing:
Terminal: ComSR is simulated as a simple terminal and allow the characters typed in one side to be shown up at
the other side.
Send/Receive Text File: The text file sent in sending side will be displayed in the receiving side. The
Test_Text_File.txt in the CD-ROM can be used for this file transfer testing.
Note: Only “Enter” and “Line Feed” ASCII control codes are supported.
Make sure the enter character or character in the text file does not include other ASCII
control code.
51
LWS100A/LWS100AE User’s Manual
6.3 Select COM port
Assume COM5 and COM6 have been set up via the SerialComm™, refer to section 5.1 and section 5.2 for detail
on the virtual COM definition and activation.
As shown in Figure 6-3, all available COM ports can be found in the pull down window.
Select the virtual COM port, which has been setup by the SerialComm™, for both Send side and Receive side.
Figure 6-3 Select Virtual COM
52
LWS100A/LWS100AE User’s Manual
6.4 COM Port Settings
ComSR supports both physical COM ports and virtual COM ports.
If the PC/NB physical COM ports are selected, then on the Send (and/or Receive) side, click the Setting button
to set the Com Port Setting parameters as same values as the physical COM ports settings of your PC/NB.
If LES300A/LFS400A/LWS100A Series virtual COM ports are selected, then it is no matter what the Com Port
Setting is, the ComSR can still work. This is due to the virtual COM is implemented by IP network
redirector.
Figure 6-4 Com Port Settings
53
LWS100A/LWS100AE User’s Manual
6.5 Simple Terminal Simulator
From the Terminal tap window, click the Connect button on both Send and Receive sides. If the connection is
established correctly, the Link LED will be ON (green). The ComSR will be acted as if a simple terminal
simulator. Any character typed in on one side will be displayed on the other side; and, the Activity LED will be
flashing (yellow), refer to Figure 6-5 and Figure 6-6.
Figure 6-5 Connect Com Port
54
LWS100A/LWS100AE User’s Manual
Figure 6-6 Simple Terminal Simulator
55
LWS100A/LWS100AE User’s Manual
6.6 Send/Receive Text File
From the Send/Receive Text File tap window, follow the similar procedures to select and setup the COM port
for both Send and Receive sides, refer to Figure 6-7.
Note 1: If the COM ports have been setup in Terminal tap windows and have not been disconnected then it not
necessary to setup again.
Figure 6-7 Select Com Ports
56
LWS100A/LWS100AE User’s Manual
Follow the steps below to transfer text file for loop back testing:
At the Receive side, click Receive/Compare File button first.
From the Send side click
The text file will be sent from the Send side and will be loop back to the Receive side via the remote
button to browse the text file to be sent and then click the Send button.
LWS100A/LWS100AE Series two serial ports connected by one null modem serial cable. The content of
the text file will be displayed at both sides. At the Receive side, the file will also be checked. A
comparison result will be shown at the Receive side, refer to Figure 6-8.
Figure 6-8 Send and Receive Text File
If the transmission path has no error, then the comparison result will show Error Count: 0.
57
LWS100A/LWS100AE User’s Manual
7. Specifications
Serial
-
Baud Rate Options: 115200, 57600, 38400, 19200, 9600, 4800, 2400, 1200, 600, 300 bps
-
Data Length Options: 7, 8 Bits
-
Parity Options: Even, Odd, None
-
Stop Bit Options: 1 (default), 2 Bits
-
Handshake Flow Control:
Hardware Flow Control (RTS/CTS)
Software Flow Control (XON/XOF, None)
-
Two Male DB9 RS232 Connectors
-
Serial UART Buffer: 4096 Bytes Input, 4096 Bytes Output
WLAN Radio
-
Protocol Type: 802.11b Standard Compliant
-
Operating Range
Open Environment: 1000 ft./300m
Office Environment: 100-330 ft./30-100m
-
Security: WEP 64 and 128 Bit Encryption
-
Site Survey Function
Radio Characteristics
-
Spread Spectrum Technology: Direct Sequence Spread Spectrum (DSSS)
-
RF Range: 2.4 – 2.4835 GHz
-
Data Rate: 11 / 5.5 / 2 / 1 Mbps
-
Modulation: DBPSK for 1 Mbps, DQPSK for 2 Mbps, CCK for 5.5 / 11 Mbps
-
Operation Channels: US - 11, Canada - 11, Europe - 13, France - 4, Spain - 2
-
RF Power Output (Typical): +15 dBm
-
Receive Sensitivity (Typical @BER10E-5): - 82 dBm
Power
-
Voltage Power Source Range: 12 to 28Vdc/Vac
-
Current: 350mA Typical @ +12Vdc
Software
-
No Driver Required
-
Utility: Auto Discovery and Virtual COM Software Run on Windows
95/98/Me/NT/2000/XP
Mechanical
58
LWS100A/LWS100AE User’s Manual
-
Antenna Connector: RSMA
-
DIP Switch for Serial Port Type Selection
-
LED: Power, Alarm, Link, Activity, RS232, RS422, RS485
-
Dimensions: 4.6” x 3.5” x 1.1” (without antenna)
11.7 x 8.8 x 2.7 cm (without antenna)
-
Weight: 10.9 oz./310 grams (without antenna)
Environment
-
Temperature:
Operating: -20 to +70°C / -4 to +158°F
Storage: -40 to +85°C / -40 to +185°F
-
Relative Humidity: 95% (non-condensing)
EMC Certifications
-
U.S.A.: FCC Part 15 Subpart B
-
CE Marked: ETSI EN 300 328, ETSI EN 301 489
59
LWS100A/LWS100AE User’s Manual
8. Default Settings
The following subsections show the default settings for LWS100A/LWS100AE.
8.1 Network
Figure 8-1 Network Default Settings
60
LWS100A/LWS100AE User’s Manual
8.2 WLAN
Figure 8-2 WLAN Default Settings
61
LWS100A/LWS100AE User’s Manual
8.3 Serial Port
When any serial port is set to console port, it has the following default settings:
Baud Rate: 2,400
Data Length: 8
Parity: None
Stop Bit: 1
Flow Control: None
They can not be changed.
62
LWS100A/LWS100AE User’s Manual
9. Glossary
802.11
802.11 refer to a family of specifications defined by the IEEE for wireless LAN technology.
802.11 specify an over-the-air interface between a wireless client and a base station or
between two wireless clients. There are several specifications in the 802.11 family:
•
802.11 -- applies to wireless LANs and provides 1 or 2 Mbps transmission in the 2.4
GHz band using either Frequency Hopping Spread Spectrum (FHSS) or Direct
Sequence Spread Spectrum (DSSS).
•
802.11a -- an extension to 802.11 that applies to wireless LANs and provides up to 54
Mbps in the 5GHz band. 802.11a uses an Orthogonal Frequency Division multiplexing
(OFDM) encoding scheme rather than FHSS or DSSS.
•
802.11b --An extension of the IEEE 802.11 standards for wireless LAN and provides
11 Mbps transmission with a fallback to 5.5, 2 and 1 Mbps, an operating frequency of
2.4GHz. Devices meet 802.11b requirements can interoperate with each other even
manufactured by different companies.
•
802.11g -- An extension of the IEEE 802.11 standards for wireless LAN and provides
54Mbps using OFDM modulation, an operating frequency of 2.4GHz, backward
compatibility with 802.11b devices.
Access Point
Any entity that acts as a communication hub for the associated wireless stations to connect
with the wired LAN via the wireless medium
Ad Hoc Network
A network composed solely of stations within mutual communication range of each other via
the wireless medium (WM) and operate on a peer-to-peer bass. An Ad Hoc network is
typically created in a spontaneous manner. The principal distinguishing characteristic of an Ad
Hoc network is its limited temporal and spatial extent. The term Ad Hoc is often used as slang
to refer to an independent basic service set (IBSS).
Basic Service Set (BSS)
A set of 802.11-compliant stations that operate as a fully connected wireless network
An Access Point is associated with several wireless stations.
Baud Rate
The number of pulses of a signal that occur in one second
63
LWS100A/LWS100AE User’s Manual
Thus, baud rate is the speed the digital signal pulses travel.
Bit Rate
The transmission rate of binary symbols (.0. and .1.)
Bit rate is equal to the total number of bits transmitted in one second.
DHCP (Dynamic Host Configuration Protocol)
A protocol that automatically assigns the dynamic IP addresses to devices on a network. With
dynamic addressing, a device can have a different IP address every time it connects to the
network and simplifies network administration because the software keeps track of IP
addresses rather than requiring an administrator to manage the task. When a device newly
added into the network, a dynamic IP address will be assigned to that device. Many ISPs use
dynamic IP addressing for dial-up users.
DNS
Domain Name Server is a server that translates domain names into IP addresses. A domain
name is alphabetic and is meaningful for human to remember and use. However, the Internet
routing is based on IP address. So, when you enter a domain name, the DNS server will
translate the domain name into the corresponding IP address. For example, the domain name
www.example.com might be translated to 198.152.212.140
DSSS (Direct-Sequence Spread Spectrum)
DSSS is a transmission technology used in WLAN transmissions to increases the signal'
s
resistance to interference. At the sending station, the data signal is combined with a higher
data rate bit sequence to generate the DSSS signal. At the intended receiving station, the
DSSS signal is recognized as valid signal, however, for an unintended station, the DSSS
signal appears as low power wideband noise and is rejected (ignored).
The bit sequence is a redundant bit pattern for each bit that is transmitted. If one or more bits
in the pattern are damaged during transmission, the original data can be recovered due to the
redundancy of the transmission.
Dynamic IP Address
In a TCP/IP network, the client station is automatically assigned an IP address by a DHCP
server. The network devices, such as servers and printers, are usually assigned with static
(fixed) IP addresses.
64
LWS100A/LWS100AE User’s Manual
ESS (Extended Service Set)
A set of more than two or more BSSs (multiple APs) forming a single network
IEEE (Institute of Electrical and Electronics Engineers)
IEEE is best known for developing standards for the computer and electronics industry
CTS (Clear To Send)
An RS-232 signal sent from the receiving station to the transmitting station to indicate it is
ready to accept data.
Default Gateway
The default gateway is a router used to forward all traffic that is not addressed to a station
within the local subnet. The traffic will be forwarded to a destination outside of the subnet of
the transmitting device.
ESS (Extended Service Set)
More than one BSS can be configured as an Extended Service Set. An ESS is basically a
roaming domain.
Identification (BSSID)
A six-byte address that distinguishes a particular access point from others
Also know as a network ID.
Infrastructure
An infrastructure network is a group of computers or other devices, each with a wireless
adapter, connected as an 802.11 wireless LAN. In infrastructure mode, the wireless devices
communicate with each other and to a wired network by first going through an Access Point.
IP Address
IP address is an identifier for a computer or device on a TCP/IP network. Networks use the
TCP/IP protocol to route the messages based on the destination devices’ IP address. IP address
is a 32-bit numeric address written as four numbers separated by periods. Each number can be
0 to 255. For example, 192.168.1.224 could be an IP address.
Within an isolated network, the IP addresses can be assigned at random as long as each one is
unique. However, to connect a private network to the Internet, it will require a registered IP
addresses to avoid duplicates.
65
LWS100A/LWS100AE User’s Manual
ISP (Internet Service Provider)
ISP is a company that provides service for the individuals or companies to access the Internet.
It also provides other related services such as web site and virtual hosting.
LAN (Local Area Network)
LAN is a group of computers or devices that share a common communications media and
typically share the resources (e.g. server, printer) within a small area (e.g. office).
MAC Address (Media Access Control)
MAC address is a unique hardware number used to identify each node in a network.
OFDM (Orthogonal Frequency Division Multiplexing)
Technology used in WLAN and provides better performance (higher data rates and more
reliable) than previous technology DSSS. OFDM works by splitting the radio signal into
multiple smaller sub-signals that are then transmitted simultaneously at different frequencies
to the receiver, i.e. OFDM divides one high-speed data stream into a number of lower speed
data streams, which are then transmitted in parallel. Each lower speed stream is used to
modulate a subcarrier. OFDM is also used for other applications, including powerline
networking.
Roaming
A function that allows one to travel with a mobile end system (wireless LAN mobile station,
for example) through the territory of a domain (an ESS, for example) while continuously
connecting to the infrastructure
SSID (Service Set Identifier)
SSID is an identification name used by a group of wireless devices to make connections to
each other. In order for wireless devices to communicate with each other, they must all be set
to the same radio channel and must use the same SSID. Even if they are set to the same radio
channel, they cannot communicate unless the SSID is the same.
Static IP Address
A permanent IP address that is assigned to a node in a TCP/IP network
Subnet Mask
An IP address has two components: network address and host address. Part of the host address
66
LWS100A/LWS100AE User’s Manual
can be used to identify a particular subnet. The system administrator can further divide the
host address into two or more subnets. A mask is used to determine what subnetwork an IP
address belongs to. The subnet mask is the network address plus the bits reserved for
identifying the subnetwork. By convention, the bits for the network address are all set to 1 due
to it will work the same if the bits were set exactly as in the network address. It'
s called a
mask because it can be used to identify the subnet to which an IP address belongs by
performing a bitwise AND operation on the mask and the IP address.
TCP (Transmission Control Protocol)
A protocol used along with the IP (Internet Protocol) to send data in message units between
network devices over a LAN or WAN. IP takes care of handling the data routing and TCP
takes care of tracking the individual units of data (called packets) that a message is divided
into for efficient delivery over the network. TCP is a connection oriented protocol due to it
requires the receiver to return an acknowledgment of receipting the packet to the sender.
TCP/IP (Transmission Control Protocol/Internet Protocol)
TCP/IP is a suite of communications protocols used to connect hosts on the Internet. It uses
several protocols, the two major protocols are TCP and IP.
UDP (User Datagram Protocol)
A protocol used along with the IP (Internet Protocol) to send data in message units (datagram)
between network devices over a LAN or WAN. IP takes care of handling the data routing and
UDP takes care of tracking the individual units of data (called packets) that a message is
divided into for efficient delivery over the network. UDP is a connectionless protocol due to it
does not require the receiver to return an acknowledgment of receipting the packet to the
sender (as opposed to TCP). UDP connection is not a reliable connection. It is used primarily
for broadcasting messages over a network.
Wired Equivalent Privacy (WEP)
The optional cryptographic confidentiality algorithm specified by IEEE 802.11 used to
provide data confidentiality that is subjectively equivalent to the confidentiality of a wired
local area network (LAN) medium that does not employ cryptographic techniques to enhance
privacy.
WLAN (Wireless Local Area Network)
A group of computers and associated devices that use radio frequency to communicate with
each other
67
LWS100A/LWS100AE User’s Manual
© Copyright 2006. Black Box Corporation. All rights reserved.
68