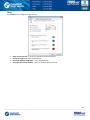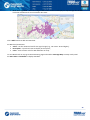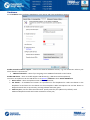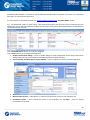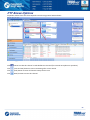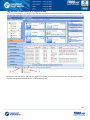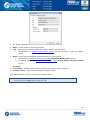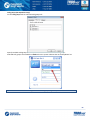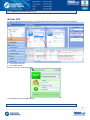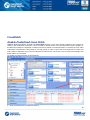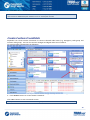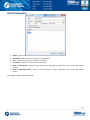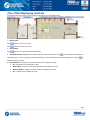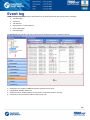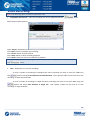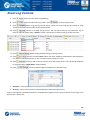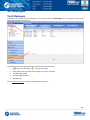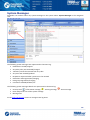
1
TRBOnet Dispatch Software User Guide August 04, 2014 1 Table of Contents Preface ..................................................................................................................................................................... 6 About the Company ............................................................................................................................................. 6 Contact Details ..................................................................................................................................................... 6 Copyright ............................................................................................................................................................. 6 Dispatch Console Interface Overview ...................................................................................................................... 7 Dispatch Console Menu ....................................................................................................................................... 9 File ................................................................................................................................................................. 10 View ............................................................................................................................................................... 12 Map ................................................................................................................................................................ 22 Tools .............................................................................................................................................................. 28 Radio interface....................................................................................................................................................... 46 Navigation Tree Customization .......................................................................................................................... 46 Radio Popup Window .................................................................................................................................... 53 Radio Context Menu ...................................................................................................................................... 54 PTT Boxes Options ............................................................................................................................................. 57 System Elements Properties .............................................................................................................................. 59 Radio Properties ................................................................................................................................................ 65 Call Types ........................................................................................................................................................... 67 Voice Calls ...................................................................................................................................................... 67 Predefined Voice Messages to Radio Subscriber ........................................................................................... 75 Receiving Mode ............................................................................................................................................. 77 CrossPatch ..................................................................................................................................................... 78 Configure Quick Commands .............................................................................................................................. 80 Send Text Message ........................................................................................................................................ 82 Send Telemetry .............................................................................................................................................. 83 Request Location ........................................................................................................................................... 84 Voice Message ............................................................................................................................................... 85 TX Passive .......................................................................................................................................................... 86 Specify a Recipient ......................................................................................................................................... 87 Select Audio File ............................................................................................................................................. 87 Saved Audio Files ........................................................................................................................................... 88 Record Audio File ........................................................................................................................................... 89 Dock Window ..................................................................................................................................................... 91 2 Recent Calls/Events Tab ................................................................................................................................. 91 Recent Calls .................................................................................................................................................... 95 Radio State ..................................................................................................................................................... 96 Active Tasks.................................................................................................................................................... 98 Active Routes ................................................................................................................................................. 99 User Activity ................................................................................................................................................. 110 Map .............................................................................................................................................................. 114 SIP Interconnect (Phone Calls) ......................................................................................................................... 115 Phone Call from the Dispatcher Console...................................................................................................... 116 Receive a Phone Call .................................................................................................................................... 118 Redirect Phone Call to a Subscriber Radio ................................................................................................... 119 Make a Call Phone to Radio ......................................................................................................................... 120 Make a DTMF Call ........................................................................................................................................ 120 Call by Sending Text Message to the Base ................................................................................................... 121 To Terminate a Call ...................................................................................................................................... 121 GPS Positioning .................................................................................................................................................... 122 Objects ............................................................................................................................................................. 123 Beacons........................................................................................................................................................ 123 Map Objects ................................................................................................................................................. 127 Map Regions ................................................................................................................................................ 127 Map Routes .................................................................................................................................................. 127 Map Tools ........................................................................................................................................................ 128 Zoom in/out ................................................................................................................................................. 128 Bookmarks ................................................................................................................................................... 128 Default region .............................................................................................................................................. 128 Filter ............................................................................................................................................................. 128 Ruler............................................................................................................................................................. 129 Search by Address ........................................................................................................................................ 130 Drawing Panel .............................................................................................................................................. 131 Route ........................................................................................................................................................... 142 Geofencing ................................................................................................................................................... 144 Google Earth ................................................................................................................................................ 147 Coverage Map .............................................................................................................................................. 147 Select Map ................................................................................................................................................... 148 Dock Window ................................................................................................................................................... 150 Beacons........................................................................................................................................................ 150 Beacons Events ............................................................................................................................................ 151 3 Text Messages ..................................................................................................................................................... 152 To Send a Text Message................................................................................................................................... 153 Send Text Message from Message Session Panel ........................................................................................ 154 Send Text Message from Navigation Tree.................................................................................................... 155 Extended Messages ......................................................................................................................................... 157 Reports and Statistics .......................................................................................................................................... 159 Report Types Overview .................................................................................................................................... 160 Main Report Parameters .............................................................................................................................. 160 Specific Report Details ................................................................................................................................. 161 Queries ............................................................................................................................................................ 163 Common Reports ............................................................................................................................................. 163 Indoor Reports ................................................................................................................................................. 163 GPS Reports ..................................................................................................................................................... 163 Data Export ...................................................................................................................................................... 163 Event log .............................................................................................................................................................. 164 Voice Recording ............................................................................................................................................... 165 Event Log Controls ........................................................................................................................................... 166 All Messages .................................................................................................................................................... 167 Text Messages.............................................................................................................................................. 167 Telemetry ..................................................................................................................................................... 170 Talk Sessions ................................................................................................................................................ 173 Registration in Radio Network ..................................................................................................................... 174 System Messages ......................................................................................................................................... 175 User Messages ............................................................................................................................................. 176 Telemetry............................................................................................................................................................. 177 Job Ticketing ........................................................................................................................................................ 179 Route Management ............................................................................................................................................. 183 Radio Allocation ................................................................................................................................................... 187 Web Console User Manual .................................................................................................................................. 189 Map.................................................................................................................................................................. 189 Geocoding Type ............................................................................................................................................... 192 Reports ............................................................................................................................................................ 193 GPS Reports ..................................................................................................................................................... 194 Location for Period....................................................................................................................................... 196 Drive Activity Detailed ................................................................................................................................. 197 Staying In A Region ...................................................................................................................................... 198 Idle time detailed ......................................................................................................................................... 199 4 Common Reports ............................................................................................................................................. 200 Messages for period .................................................................................................................................... 200 Messages ..................................................................................................................................................... 202 5 Preface This document is intended for all TRBOnet Users to customize Dispatch Console, available actions in Radio Interface, working with online and offline maps and 2D/3D floor plans, GPS Positioning details, creating different report types, Voice Recording and Event Log options, telemetry monitoring actions, creating and working with Job Tickets and using Web Interface of TRBOnet Dispatch Software. About the Company Neocom Software, Ltd was created in 2007 on the basis of Neocom, Ltd., which was founded in 1997 and is the famous supplier of radio communication systems for professional or license-free use on the ground, seas or rivers. Today, Neocom Software has Motorola Application Partner status in EMEA, Latin America and the Asia Pacific region, and Motorola Application Provider status in North America. Contact Details Region Phone North America +1 872 22 28 726 Latin America +1 872 22 28 726 EMEA APAC +7 812 45 70 893 +7 812 45 70 893 E-mail&Support [email protected] - overview, price lists, licenses [email protected] - technical support service http://kb.trbonet.com - online Knowledge Base Copyright Intellectual property rights protect the voice coding Technology embodied in this product including patent rights, copyrights and trade secrets of Digital Voice Systems, Inc. This voice coding technology is licensed solely for use within this Communications Equipment. U.S. Pat. Nos. 6,199,037, 5,870,405, 5,754,974, 5,664,051, 5,630,011, 5,517,511, 5,491,772, 5,247,579, 5,226,108, 5,226,084, 5,216,747 and 5,081,681. 6 Dispatch Console Interface Overview Launch TRBOnet Dispatch Software Dispatch Console using the shortcut on your desktop. Note: For the first launch, please refer to TRBOnet Administration Guide. Type in your credentials, assigned by Administrator to connect to Dispatch Console: Connect to: Radio Server – select the TRBOnet Dispatch Software server in the dropdown list or specify its IP Address; Port – specify command port of TRBOnet RadioServer (4021 set by default). For more details on Command port settings see TRBOnet Administration Guide, Configure Network Parameters section. Authentication: Authentication – select Authentication type in the dropdown list. User Name – specify User Name registered in TRBOnet Dispatch Software Users list; Password – type in the individual password. Check the box Connect on startup for automatic login to TRBOnet RadioServer without password prompting next time. 7 When Dispatch Console is launched it connects to TRBOnet RadioServer and by default the Radio Interface screen is displayed: 1 – Dispatch Console Menu 2 – Navigation Tree 4 – Main Windows 8 Dispatch Console Menu Dispatch Console menu allows to manage the main Dispatch Console options it can be found in the upper part of TRBOnet Dispatch Software Dispatch Console: 9 File Select File Menu to connect to another TRBOnet Dispatch Software server or to use other credentials. Also, exit from TRBOnet Dispatch Software Dispatch Console is available: 10 1. Connect to TRBOnet RadioServer Select File, Connect to RadioServer and set the connection parameters: Connect to: Radio Server – select the TRBOnet Dispatch Software server in the dropdown list or specify its IP Address; Port – specify a command port of TRBOnet RadioServer (4021 set by default). For more details on Command port settings see TRBOnet Administration Guide, Configure Network Parameters section. Authentication: Authentication – select Authentication type in the dropdown list. User Name – specify User Name registered in TRBOnet Dispatch Software Users list; Password – type in the individual password. Check the box Connect on startup for automatic login to TRBOnet RadioServer without password prompting next time. 2. Exit Select File, Exit to exit the Dispatch Console. 11 View Select View Menu to customize TRBOnet Dispatch Software Dispatch Console: 12 Click «View» to open the Menu: 1. Show Navigation – select to display Navigation Tree. 2. Show modes – select modes in the list to display in the Dispatch Console. 3. Configure PTT Boxes – select to configure PTT Boxes View. The default configuration displayed: Type – the Box type (e.g. Station) is displayed; Name – specify the Name for selected box to display in the Dispatch Console; View Mode – select the mode in the dropdown list: Invisible – the box will not be displayed in the Dispatch Console; Normal – the box will be displayed in Normal mode: 13 Minimized – the box will be displayed in Minimized mode: . Note: point mouse cursor over the minimized box to see it in the Normal Mode. Available Calls – select available Call types for the box: Select All to make all Call Types available for selected box; Select Broadcast to make Broadcast Call available for selected box. 14 To create individual boxes configuration for Group Calls and Broadcast Calls click «Create» button: Name – check the Name box to specify the configuration name and type in the configuration name. Call Type – select Call Type for new configuration. Call Target – «Select by Dispatcher» allows the Dispatcher selecting the group. «Selected from the list» allows to create the configuration for one selected group. Note: Not available for Broadcast Call Mode. Execute call on channels – select all available channels or select channels in the list below to execute calls from these channels. Note: Not available for Private Call Mode. Click «OK» to create the configuration. 15 4. Configure Active Calls panel – select to configure call types and advanced settings for Active Calls panel: Call Types – select call types to display in Active Calls panel: Advanced – specify Advanced calls and channels settings: Specify elements to display and display time. 16 Active Calls panel is displayed in the upper part of the Dispatch Console: 17 5. Configure hotkeys – select to add hotkeys for actions with selected channels: 1. If you are going to configure PTT actions for PTT boxes click «Show all PTT Boxes» button and assign the hotkey or hotkeys combination. Double-click «HotKey» column and select hotkey(s) for the action. 2. If you are going to set specific actions for PTT boxes (e.g., Mute channels or set default PTT channels), click «Create» button: Hotkey – click «Configure» button to set a key you want to assign for the selected action; Caption – type in a caption to display in the Dispatch Console; Action – select action in the dropdown list: Default PTT channel –selected PTT box functions as a default PTT channel; Mute channels – mutes selected PTT boxes; Unmute channels – unmutes selected PTT boxes; Voice from channels – mutes voice from all PTT boxes except selected one(s). Channels – check PTT boxes to assign the actions above. Click «OK» to save hotkeys configuration. 18 6. Add Radio Interface Tab – select to add new Radio Interface Tab. Select new Radio Interface in the upper part of the Calls Pane: 6. Delete Radio Interface Tab – select to delete selected Radio Interface Tab. Note: Default Radio Interface Tab is not available to delete. 19 7. Saved Audio Files This option allows adding configured Voice Messages on the Calls Pane to send it by clicking Voice Message box. Go to View, Saved Audio Files to configure Voice Messages box: Filename – specify the name of the configured voice message displayed on the Calls Pane. For more details on Voice Messages configuration see TRBOnet Administration Guide, Tasks, Voice Message section; Description – add the description for Voice Message; Severity – select severity level in the dropdown list: Information – select to set low severity level Warning – select to set middle severity level Alarm – select to set high severity level. Hot Key – select the Voice Message and click in the «Hot Key» column. Then press «Hot Key» button: 20 When the informational message appears press any key on the keyboard to set it as Hot Key for selected Voice Message. Visibility – select the Voice Message box view: Hidden – select to hide the Voice Message box; Button – select to display the Voice Message as a link on TX Passive panel (1); Panel – select to display the Voice Message as a separate panel with button (2). Click «OK» to add the Voice Message. 8. /9. Large PTT Boxes / Small PTT Boxes – select PTT Boxes size. 10. Show Active Calls Panel – select to display Active Calls Panel in the Dispatch Console. 11. Show Quick Commands Panel – select to display Quick Commands Panel in the Dispatch Console. 12. Show TX Passive Panel – select to display TX Passive Panel in the Dispatch Console. 13. Show Cross Patch Panel – select to display Cross Patch Panel in the Dispatch Console. 14. Show Extended Messages Tab – select to display Extended Messages Tab in the Dispatch Console. 21 Map Select GPS Positioning (1) in the Navigation Pane to enable Map Options: Click «Map» button (2) to open the Map Options: 22 1. Select Active Map Сlick to select a map to display radios. Type in the Caption for the Map to display as map tab title and select map in the list of available maps. User can add a custom map using its URL: Click «Add» button, type in the Name for new map and specify the URL. Type in map URL, as shown in the example below, in the URL field. Z – zoom. Type in zoom value for the map. X – coordinate in X –direction. Y – coordinate in Y – direction. Click «OK» to add a map. Note: You can only select the map of the same format the current tab map is. For example, if You click «Map» button, then Select Active Map in a tab with Open Street Map format map, the Select Map... window will display the available Open Street Map format maps. Thus, if you need to select another format map, use the Map, Open Map in Tab or the Map, Open Map in Window option. 23 2. Save online map data – select the map region you need to save the map starting from and select Save online map data: Click «Start» button and wait for the system to save the files in the Cache folder . The procedure may take several minutes. Note: The system will cash the map «downwards» which means User will not be able to zoom out the selected region in offline mode. To zoom the offline map see the following article http://kb.trbonet.com/public.pl?Action=PublicFAQZoom;ItemID=27 3. Map Content Select to specify the folder and settings to store Map Data: Cache folder – click «Change» button to select the folder on the PC to store the Map Data; Update – select data updating period; Note: when «0» value selected, the map will not update. Map Type – select your Map type in the dropdown list. For more details on maps used in TRBOnet Dispatch Software see Map Types section. Click «OK» to save map cache settings. 24 Map Types Online maps: OpenStreetMaps – free online map. Includes MAPNIK, CYCLE, TRANSPORT, LANDSCAPE and MAPQUEST subtypes. For more details on OpenStreetMaps visit official web site: http://www.openstreetmap.org Microsoft BING – commercial maps from Microsoft. Includes BING_ROAD, BING_AREA and BING_HYBRID subtypes. User can try BING Maps for 90 days and then get a Basic Key. Visit http://msdn.microsoft.com/en-us/library/ff428642.aspx to get a Basic Key. Offline Maps TRBOmap – internal map-making resource. User can customize a part of online maps according to requirements. For more details on map calibration go to TRBOnet knowledge base and read the following article: http://kb.trbonet.com/public.pl?Action=PublicFAQZoom;ItemID=27. TMap – internal map-making resource. User can create an offline copy of online maps for selected region according to requirements. User can create a map using any picture via TRBOnet.MapEdit tool. Go to %ProgramFiles%\Neocom Software\TRBOnet Dispatch Software\TRBOnet.MapEdit.exe. For more details on map calibration go to TRBOnet knowledge base and read the following article: http://kb.trbonet.com/public.pl?Action=PublicFAQZoom;ItemID=28. GIS Panorama – offline Russian map. For more details visit the official web site: http://www.gisinfo.ru/ Beacon 2D – two-dimension offline map for Indoor positioning. User can create maps using Beacon2DMapGenerator tool. To get Beacon2DMapGenerator contact your local TRBOnet dealer. Beacon 3D – tree-dimension map for Indoor positioning. User can use any dicectX(.x) files as map. MapLib map format – free offline map. Requires a lot of internal memory. Requires Franson GPSTools. For more details on Franson GPSTools visit the official web site: http://fransonGPStools.software.informer.com/2.3/ TatukGIS – commercial offline map. For more details on TatukGIS visit the official web site: http://www.tatukgis.com/. 25 4. Print Select to print the region. Select printer and set its parameters. Click «OK» to print. 5. Geocoding Geocoding server resolves GPS coordinates to street names and address for reports and other needs, for example in “GPS activity for period” reports. Online geocoding services can be used like Google or Nominatim, but they are not for free or limited by amount or requests. Also, custom geocoding server can be configured. For more details on geocoding configuration see TRBOnet Administration Guide, Map Servers for Geocoding section. 6. Open Map in Tab – select to add the new tab with selected map displayed: Map Type – select Map Type in the Dropdown List; Caption – specify the caption for the new map. New Tab Name will be the same as Caption; 7. Open Map in Window – select to open new Window with selected map displayed: Map Type – select Map Type in the Dropdown List; Caption – specify the caption to display as map tab title. New Tab Name will be the same as Caption; Available Maps – select map in the table. User can add a map using its URL: Click «Add» button, type in the Name for new map and specify the URL. 26 Click «OK» to open the window with new map. 8. Google Earth – TRBOnet Dispatch Software supports Google Earth software. Go to Map, Google Earth to open the application. Note: Google Earth should be installed on the PC. For more information about working in Google Earth visit Google official website http://www.google.co.uk/earth 9. Delete Routes from Google Earth – select to delete all routes from Google Earth. 10. Show Radios on Google Earth – select radio’s type to display on Google Earth. 27 Tools Select Tools Menu to manage the Dispatch Console: Click «Tools» button to open the Context menu: 28 1. Event Log in Window – select to open the Event Log in the new Window: 29 2. Recent Calls/Events in Window – select to display recent calls and events in window: Click «Playback» button to playback recorded calls; Click «Save» button to save calls as audio files (*.wav); Notes can be added to the event, select event in the list and click «Add Note» button: Type in note text in the field. Click «OK» to add a note. 30 3. Job Ticketing Monitoring – select to monitor all Job Tickets in the system, created by Dispatchers and assigned to Radios: 1 – select time period to show Job Ticketing data; 2 – monitor tasks created by Dispatchers; 3 – monitor tasks, assigned to radios. All tasks data is shown graphically and in the form of the Status Diagram. 31 4. Telemetry Monitoring – select to monitor configured telemetry profiles in the separate window: Show – select telemetry profile to display the data. 5. Text Messages in Window – select to open Text Messages dialog in the separate window: 1 – User can see Online Dispatchers in the list; 2 – Select the Recipient in the dropdown list. User can select all online Dispatchers, radio groups and radios registered in the system; 3 – Type in Text Message in the field; Click «Send» button to send the Text Message. The text Message will be displayed in the field above. 6. Route Management – select to display Route Management page. For more details on Route Management configuration see Route Management section. 7. Terminate All Transmissions – select to terminate all Voice calls in the system. This action is a “hard” inquiry to stop all transmission in TRBOnet software and is intended to stop any “hanged” transmission in TRBOnet. If radio communication session does not allow to be interrupted on a repeater or base station it will be interrupted for radio, but for TRBOner software only. 32 Options Select to customize Console Settings. Sound Go to Sound Tab to configure Sound Notifications: Use Sound Notifications – check this option to enable sound notifications in Dispatch Console. Choose the event in the list and specify the sound. Sound: Select Sound by default in the dropdown list to set the default sound for the event. Select Disabled to disable sound notification for the event. Click button to listen to the current sound notification. Click «Select» button to browse the sound on your PC. Alarm of Emergency Call duration – select time value in seconds for Alarm Tone when Emergency Call received. 33 Map Go to Map Tab to configure images on map: Map refresh interval – type in time period to update map data; Select the image size in the dropdown list; Select the default image type – in the dropdown list; Show the direction of motion – select to monitor objects’ motion. 34 Coverage Map TRBOnet Dispatch Software allows to see RSSI levels on a map. RSSI - received signal strength indicator. Measures radio signal loss from one map point to another. RSSI map can be used by radio systems engineers to plan further radio network extension. Go to Coverage Map tab to set signal strength levels (RSSI) displaying on map: Draw in Dots – select to display RSSI level on map as dots that represent coordinates points for more detailed data view: 35 Draw Coverage Zone – select to configure RSSI zone in meters and display on map average data of RSSI level GPS coordinates for more common data view: Click «Add» button to add new RSSI level. Set RSSI level parameters: Value – set the minimum level for the signal range (e.g., -65 means -65 and higher); Description – input level name to display in the system; Color – click to select color for RSSI indication on map. To view RSSI levels on map go to GPS Positioning page and enable «Coverage Map» on Map Tools panel. Set Start Date and End Date to display RSSI data. 36 Hardware Go to Hardware tab to configure USB devices, Proxy Server and active audio device options: Enable external hardware support – select to use external hardware devices, e.g. mic connectors. Select a port where device is connected to. TRBOnet footswitch – select if you are going to use TRBOnet footswitch as PTT button. Enable USB device – check to enable support USB devices (e.g. USB connected microphones). Connect a microphone to PC via USB device. Go to Options, Hardware. Check Enable USB Device. Device name – select microphone name in the dropdown list; PTT button – all available PTT buttons are represented in the dropdown list. Select PTT button in the dropdown list and Press the PTT button on the microphone. When microphone PTT and PTT button in Dispatch Console are set up correctly, Pressing Indicator becomes green. VoIP first port - port for audio communication. Specify VoIP first port (4022 set by default). Each additional Dispatch Console will create connection to next port; 37 Use proxy server – select to enable Proxy Sever service in TRBOnet Dispatch Software to access the Internet. Proxy server can be used when a user's computer cannot be connected directly to the Internet, but there is another computer with Internet access in the network. Click «Configure» button to set the alternative server settings: Use an alternate server – select to enable a proxy server; Settings – specify the alternate server address and port; Authentication Use authentication – select to use individual login and password to connect to the alternate server. Click «OK» to add the proxy server. Configure audio devices Playback device - select the audio device for to play incoming voice messages and playback voice recordings in Dispatch Console; Recorder device - select the recording device where the microphone is connected. Note: If Dispatch Console is running on the same PC with TRBOnet RadioServer connected to control stations via programming cable and sound card, playback and recorder devices cannot be the same for Dispatch Console and TRBOnet RadioServer. 38 Advanced Go to Advanced Tab to configure Dispatch Console Advanced settings: Options PTT Send Alert Tone on extern PTT – select to enable Alert Tone for all subscribers on a channel when Dispatcher presses PTT button; Use «Record Mode» on extern PTT – check to record all voice transmissions from external PTT devices (palm mics, Footswitches etc.) Suggest TX Passive if channel is busy or subscriber radio is offline – select to record a TX Passive Voice Message for a Radio channel is busy or subscriber is offline (see TX Passive configuration page); Enable «Short Press» PTT behavior (Semi PTT) – select to start and finish Voice Calls by short PTT pressing instead of keeping PTT pressed during the whole Voice Call; Use «Space» for press PTT – select to set a key for press PTT. Click the highlighted hot key link to set a key. When the informational message appears press any key on the keyboard to set it as PTT. Options Voice Mute voice from other Dispatchers – select to mute all other Dispatchers’ voice transmissions; Mute voice from Private Calls – select to mute all Private Calls on the channel; Mute RX when transmit or record audio – select to mute all Voice Notifications when Dispatcher transmits or records audio. 39 Options View Customize Radio display text – select to set a custom alias for Radio in the list of subscribers. Click «Customize» button: Radio display name – specify a custom alias for selected radio; Allocated radio display name - specify a custom alias for selected radio in the Allocation Console; Allocated radio display name (the owner has more than one radio) - specify a custom alias for selected radio in the Allocation Console in case when user has more than one radio. Click button to add more information about Radio: Radio Callsign – select to add a Radio Callsign; Radio Owner name – select to add an Owner name; Radio ID – select to add radio ID data; Active Channel – select to add an Active Channel for Radio. Click «Default» button to set default settings for Radio Display. 40 Show Extended Nodes – select to enable Extended Nodes in the Dispatch Console. Extended Nodes feature is intended to add predefined Extended Notes templates, the same as for Extended Messages, for selected calls and events. For more details on Templates creation see TRBOnet Administration Guide Template Maker section. E.g., Taxi Dispatcher needs to check clients’ calls response period for the company internal monitoring of the employees. He can add a predefined template and check the time period. All Extended Notes are displayed in the Extended Notes column: Сlick «Extended Notes» button (1) to fill the template; Click «View» button (2) to see the Extended Note. Display confirmation dialogs – select to enable dialogs to confirm Dispatcher actions with Confirmation dialogs required (e.g. send configured Voice Message from Dispatch Console); Show incoming Text Messages in popup window – select to optimize incoming Text Messages view: Minimize window on X-button click – select to use close-button to minimize Dispatch Console; Measurement system – select Metric or American measurement system in the dropdown list. Coordinate system – select coordinate system in the dropdown list. On Map – select to display coordinates on the map. 41 Volume Go to Volume Tab to configure speakers and volume settings: Customize selected channel speakers and volume parameters; 42 Customize unselected channel speakers and volume parameters. This option is intended for radio channels which are not selected in Dispatch Console. See the screenshot below: Customize Intercom speakers and volume parameters. This option is intended for Intercom Voice session between Dispatchers; Customize system sounds speakers and volume parameters ; To see the list of system sounds go to Options, Sound Tab. Customize SIP Interconnect speakers and volume parameters. This option is intended for SIP calls; 43 Alarm Go to Alarm tab to configure radio in Alarm mode settings: Radio in alarm mode in new window – select to display any radio in alarm mode in new window on the selected map type. Map – in the field default map for radio is displayed. Click «Select map» button and specify a default map type for displaying radio in alarm mode; Always show radio in alarm mode on map – select if you want offline radios in alarm mode to be displayed on selected map type anytime when an alarm from any radio comes. Note: When Always show radio in alarm mode on map option selected, you cannot disable offline radios in alarm mode displaying on map: Click «Default» button to reset settings to defaults. Click «OK» to save modified Dispatch Console options. 44 Set Language Select Set Language to change Dispatch Console’s language: Select language in the dropdown list and click «OK». The changes will apply with the next launch of console. Change Password Select to change Dispatcher’s password to access the Dispatch Console or create new password to connect to Dispatch Console: Type in Old Password. Type in New Password and then confirm it in the field below. Click «OK» to change the password. Help Send feedback – click to see Neocom Software, Ltd. contact details. About – click to see your TRBOnet Dispatch Software info. 45 Radio interface On Radio Interface tab Dispatcher can make radio and phone calls, send text messages to radios and phone numbers, monitor recent calls and events, radio state, active tasks and routes and view selected map in minimal mode. Navigation Tree Customization Dispatcher can customize Navigation Tree view using tools panel in the upper part of the list: 46 1 – View by radio groups: For more details about Radio Groups creation and modifying see TRBOnet Administration Guide, Radio Groups section. 2 – List view - alphanumeric descending list: 47 3 – View by logical groups: For more details about Radio Groups creation and modifying see TRBOnet Administration Guide, Logical Groups section. 4 – Filter radio subscribers by statuses: Yellow – radio is online and enters beacon coverage zone, has Indoor positioning lock. Note: In case when GPS data available and radio enters beacon coverage zone, the status turns yellow, not green Blue – radio is online, GPS data are not available; Green – GPS data available. Appears if RadioServer gets GPS data during the last 10 minutes (the time interval can be set in the server configuration); Grey – radio offline. 48 5 – Configure quick buttons and radios’ view options displayed in subscribers’ list: Radio buttons – select options you want to see in the Navigation Tree for radios. The preview is in the lower part of the Setting window. Radio Groups buttons – select options you want to see in the Navigation Tree for radio groups. The preview is in the lower part of the Setting window. Logical group buttons - select options you want to see in the Navigation Tree for logical groups. The preview is in the lower part of the Setting window. 49 Additional options: Show checkboxes – select to display radios and radio group checkboxes. When radio sends GPS and this data is saved in the database you can enable or disable radio position on map by selecting the checkboxes. Check box is not displayed in case of no GPS data for the radio. Go to GPS Positioning tab (1) and select the radio in the Navigation Tree (2): Radio is displayed on map. Unselect the checkbox to disable radio position on map. Show GPS trigger state – select to display radios GPS trigger state in the Navigation Tree. Color Description Grey Radio is offline. Blue + white dish Radio sends ARS is online without any GPS data Blue + red dish Green Radio sends ARS online and GPS packets without GPS data (radio is out of GPS coverage) Radio is online 50 6 – Filter Navigation Tree Click button to filter Navigation Tree objects according to selected categories: 1 – Open dropdown list; 2 – Select objects type and status to filter radio subscribers. You can select filter by radio groups (e.g. Firemen and Emergency) and online radios to see only online radios in Firemen and Emergency groups. Click «OK» to apply filter settings. 51 7 – Reload Navigation Tree. Click button to reload the Navigation Tree. 8 – Quick Radio filter. Type in Radio ID or Radio name in the system to filter the radio list. Search results are displayed in the Navigation Tree: 52 Radio Popup Window Dispatcher can see last received radio data in the Radio Popup Window. Select radio in the Navigation Tree and navigate mouse cursor over the selected one: Click Click button to request the subscriber's presence in the radio network button to send a text message to the radio subscriber Click button to request radio subscriber's location 1 - Current channel the radio is on 2 - The User Activity list the radio is assigned to is displayed if User Activity task is activated 3 - The Lone Worker policy's state is displayed if Lone Worker task is activated 4 – Route assigned for the selected radio if Route Management task activated for selected radio 5 - GPS: current GPS data and current radio location data. 6 – Current location. 53 Radio Context Menu To open radio context menu right-click selected radio in the Navigation Tree. Radio Context menu on Radio tab is as follows: When some tasks are assigned to a radio additional options will be displayed in the context menu list. Presence in Network – sends «check radio» command. If radio is on and is located in coverage area, Dispatcher can see a message: The message contains Agent and Control Station data for selected radio. Also, you can show selected radio on map and request its location. Request Location (for radios with GPS module only) – select to see selected radio current location data Find on Google Earth – select to display selected radio location on Google Earth Show route on Google Earth – select to see radio route on Google Earth for the set time period Google Street View - select to open Google Street View due to subscriber latest location and direction Yandex Street View – select to open Yandex Panorama due to subscribers latest location and direction Private Call – select to initiate Private Call to selected radio Send Message (for radios with display only) – select to send text message to radio 54 Send Call – select to send a beep tone to selected radio for notifying the call Remote Monitor (open mic) – select to activate subscriber radio mic in hidden mode (remote monitor duration – 30 sec.): Disable/Enable Radio – select to disable (“stun kill”) selected radio. To enable the radio make a rightclick to open the context menu and select «Enable Radio» Reset GPS Trigger (for radios with GPS module only) – select to modify GPS trigger settings: Reset GPS Trigger – select to stop and start GPS trigger, GPS polling interval can be updated; Stop GPS Trigger – select to restrict radio to send GPS data Start GPS Trigger – select to allow radio to send GPS data. Monitoring in New Window – select to open GPS Positioning tab for selected radio in new window 55 Specify Custom Icons – select to set individual parameters for radio icons: In the Custom Icons Window you can specify icons for selected radio status. Standard icons are represented in the dropdown list. To set custom color for radio status icon click «+» button and select color in the uniform color palette. Click «–» button to delete custom color. In the lower part of the window you can see icons preview. To set default icons for selected radio click «Reset» button. 56 PTT Boxes Options Dispatcher makes voice calls from Dispatch Console using Control Station boxes: The following options available for Control Station: Click button to make this channel a radio default PTT channel (for external microphone or spacebar). Click (Tone and PTT) button to start transmitting after a tone sound. Click (Solo) button to mute all channels except for this one. Click (Mute) button to mute this channel. 57 Right-click selected Control Station box to display the context menu. The following options are available in the Control Station boxes context menu: Default PTT channel - select to make this channel radio default PTT channel (for external microphone or spacebar) Specify Hot Key - select to specify the hot key to transmit on this radio channel Add to New Group – select to add a radio group attached to selected radio box in Custom CrossPatch box. When two or more groups added on custom CrossPatch box, Dispatcher can click «Create» button to enable custom CrossPatch for selected groups. Tone and PTT - click to start transmitting after a tone sound Mute this channel - click to mute selected channel Mute all channels except this - click to mute all channels except selected one Volume - allows to specify volume level on the selected channel Terminate Transmission - click to terminate a call on the selected channel Reset Control Station - click to reset the control station or repeater slot Minimize/Maximize - click to minimize or maximize the control station box. 58 System Elements Properties To see system elements’ properties right-click the selected element at the bottom of Dispatch Console window: Dispatcher can see Active and Inactive registered systems. In case you have more than 10 registered systems, systems are grouped and can be seen in the Dropdown list. 59 Common information for all system elements is listed below: 1. Description tab On the Description tab see the general info: System Type – system type for Repeater/digital or analogue mode for Control Station. For Repeater see Ошибка! Источник ссылки не найден. page. System ID – an unique System Identifier, configured in TRBOnet RadioServer configuration for repeater of controllers of a system; Caption – input channel name. 2. Channels On the Channels Page see channel properties: 60 Click «Properties» button to see repeater additional data: ID – default registration number (manufacturer’s number); Name – system element’s name in the system; Type – system type for Repeater/digital or analogue mode for Control Station. For Repeater see TRBOnet Administration Guide Ошибка! Источник ссылки не найден. section. Mode – system type for Repeater/connection mode for Control Station. For Repeater see TRBOnet Administration Guide MOTOTRBO Radio Systems section. For Control Station see TRBOnet Administration Guide Control Stations Connection Modes section. Connected Serial number – default system element’s serial number (manufacturer’s number); Firmware Version – current system element’s firmware version. Click «Reset» button to test the connection to system element. Note: For a repeater: «Reset» button reconnects the repeater. For Control Station: «Reset» button reloads the radio. 61 Talk groups (For Repeaters only) On the Talk groups tab see selected Talk group info: Specify available Talk groups for the system element in the list of created Talk groups. Selected Talk groups are available on Radio tab in the system element box in the dropdown list: Note: close TRBOnet RadioServer Configurator before making any changes to systems elements. 62 Volume tab (for Repeaters only) On the Volume tab see Volume settings for Repeater: Specify RX and TX volume level for the Repeater using Volume control indicator. Click «Reset» button to set default volume level for RX or TX. Configure system volume – check to save default volume settings for Voice transmissions from selected Repeater. 63 3. Transmits tab On the Transmits tab see the information about audio and data transmissions: Record audio – check to enable audio recordings for selected repeater; 64 Radio Properties To open and edit selected radio properties go to Navigation Tree and select Radio in the list (1): 65 Double-click selected radio to open radio properties window: For more details on radio properties see TRBOnet Administration Guide, Radios section. Note: Radios properties editing might be limited Dispatcher access rights. Contact TRBOnet Dispatch Software Administrator for the access rights. 66 Call Types Voice Calls Dispatcher can make the following calls: Private Call – an individual call from Dispatch Console to selected radio via radio channel Broadcast Call - call from Dispatch Console to all radio groups registered in the system Group Call – call from Dispatch Console to selected radio group registered in the system Intercom Call – call from Dispatch Console to other dispatchers. There are two types of Intercom Call: Intercom Call to all dispatchers Private Intercom Call to selected Dispatcher Phone Call – call from Dispatch Console to selected phone number. Also Dispatcher can send voice mails to offline subscribers. 67 Private Call Dispatcher can make a call to any online radio registered in the system. To make an individual call from Dispatch Console to selected radio via radio channel do the following: 1 – Select Radio in the list of available radios; 2 – Click button to start a Private Call 68 1 – Select Radio in the list of available radios; 2 – Right-click to open a context menu and select «Private Call» to start a Private Call. Radio Box view in Transmission Mode: To terminate the private call do the following: Click «PTT» button Click button. Note: you may also create special boxes for Private Calls. For more details see 69 View, Configure Control Stations boxes section. Broadcast Call Dispatcher can make a call to all online radios registered in the system (e.g. in case of alarm). To make a call from Dispatch Console to all radio groups registered in the system do the following: 1 – select Broadcast Call type 2 – Click «PTT» button. Radio box view in Transmission Mode: To terminate the call click «PTT» button. Note: you may also create special boxes for Broadcast Calls. For more details see 70 View, Configure Control Stations boxes section. Group Call To make a call from Dispatch Console to selected radio group registered in the system do the following: 1 – select Group Call type 2 – Click «PTT» button. Radio box view in Transmission Mode: To terminate the call click «PTT» button. Note: you may also create special boxes for Group Calls. For more details see 71 View, Configure Control Stations boxes section. Intercom Calls Dispatcher can make calls to all dispatchers or to selected dispatcher in the system. In case when Dispatcher makes a call at this moment, he will see a notification about Intercom call. To make an Intercom Call to all Dispatchers do the following: 1 – select Intercom Call box and select Broadcast Call mode in the dropdown list 2 – click «PTT» button to start an Intercom Call. Radio box view in Transmission Mode: To terminate the call click «PTT» button. 72 Note: you may also create special boxes for Intercom Calls. For more details see 73 View, Configure PTT boxes section. To make an Intercom Call to selected Dispatcher do the following: 1 – select Intercom Call box and select online Dispatcher in the dropdown list 2 – click «PTT» button to start an Intercom Call. To terminate the call click «PTT» button. Note: you may also create special boxes for Intercom Calls. For more details see 74 View, Configure PTT boxes section. Predefined Voice Messages to Radio Subscriber Dispatcher can send predefined voice messages (recorded or voice messages or audio files) to radio subscriber or selected radio group: Click Voice Message box to send the message. 75 For more details on Voice Message displaying and sending properties see 76 View, Saved Audio Files section. This option allows adding Voice Messages on the Calls Pane to send it by clicking Voice Message box. Receiving Mode Dispatch Console in Receiving mode: In Receiving mode Dispatcher receives a tone signal. In Receiving mode the PTT button disabled. It enables again once the calling subscriber or dispatcher finishes transmission. 77 CrossPatch Enable Predefined Cross Patch TRBOnet Dispatch Software provides the Cross Patch function. Cross Patch allows configuring the network to redirect calls. Predefined CrossPatch can be created by Administrator only and Dispatcher cannot configure it. Predefined CrossPatch is displayed in Radio Interface by default. CrossPatch feature is intended to unite radio subscribers from different radio groups to one talk group to make a voice calls from dispatcher to radios and from radios to dispatcher (e.g. to connect dispatcher with firemen and drivers). You can also unite analogue and digital radios via CrossPatch. To enable CrossPatch feature do the following: 1 - check CrossPatch box to enable the feature 78 2 – Click «PTT» button to start CrossPatch session. Note: CrossPatch can be created in Radio Interface. It is a temporary CrossPatch, it will be deleted after reconnection to TRBOnet Dispatch Software server or exit Dispatch Console. Create Custom CrossPatch Dispatcher can create Custom CrossPatch to connect selected radio boxes (e.g. Emergency radio group and Firemen radio group). You can also connect analogue and digital radios via CrossPatch. To create custom CrossPatch do the following: 1 – select boxes in Radio Interface you want to connect. Drag and drop them to the empty CrossPatch box 2 – click «Create» button to create custom CrossPatch. Click «PTT» button to start CrossPatch session. Note: you cannot connect via CrossPatch two radio groups on the same radio channel. 79 Note: CrossPatch can be created in Radio Interface. It is a temporary CrossPatch, it will be deleted after reconnection to TRBOnet Dispatch Software server or exit Dispatch Console. Configure Quick Commands Dispatcher can create Quick Commands (Text Messages, Send Telemetry, Request Location, Send Voice Message) and to display these commands panel in Radio Interface, so you can quickly send Text Message, Telemetry, request radio location and send Voice Message to radio by clicking selected quick command button. To configure Quick Commands do the following: Go to 80 View section (1) and select Show Quick Commands panel (2): Click «Configure» button (3) to set quick commands: Click «Create» button (1) to add new quick command. 81 Send Text Message Name – select name for new quick command Command – select Send Text Message in the dropdown list Message – type in message text Send to radio group – select to send predefined text message to radio groups registered in the system and specify groups to send text message Send to subscribed radio – select to send predefined text message to radios registered in the system and specify radios to send text message. Click «OK» to add the quick command. 82 Send Telemetry Name – select name for new quick command Command – select Send Telemetry in the dropdown list VIO – specify a VIO to send a telemetry command; Command – specify a command for selected VIO; Send to radio group – select to send telemetry to radio groups registered in the system and specify groups Send to subscribed radio – select to send telemetry to radios registered in the system and specify radios. Click «OK» to add the quick command. 83 Request Location Name – select name for new quick command Command – select Request Location in the dropdown list Recipient – select radio to request location. Click «OK» to add the quick command. 84 Voice Message Name – select name for new quick command Command – select Send Voice Message in the dropdown list Load from file - choose to load an existing file from your PC; Record Message - choose to record new message; Playback message - choose to playback an existing message. Specify call type, channel and call target for voice message: Note: to send a Voice Message to a subscriber from a phone book click and select the contact in the phone book. button in the Call Target column Impolite channel access - the radio will always transmit when the Push-to-Talk (PTT) button is pressed (not available in a Capacity Plus Personality channel). Click «OK» to add the quick command. 85 TX Passive This feature enables dispatchers to queue messages in a situation when a message must be transmitted but the channel is currently busy. The dispatcher records a message on a busy channel and then TRBOnet broadcasts this message as soon as the channel becomes available. The TX Passive function is presented in the Radio interface: 86 Specify a Recipient Select Audio File Click «File» button, Open Audio File to select audio file on the local PC: Selected audio file (.wav*, .mp3 supported) can be sent to selected radio. 87 Saved Audio Files You can select audio file from Voice Message templates. Click «File» button, Saved Audio Files: Predefined saved audio files for voice messages window appears: Select audio file in the list and click «OK» to use this file as a Voice Message for TX Passive option. 88 Record Audio File You can record a voice message to send to selected radio/s. Select Record, Record Audio to open recording tool: Click «Start» to start audio recording. Click Stop to finish audio recording. Click «Send» button to send recorded audio file immediately. Select Save, Save as file to save the recorded file as audio file on the PC. Select Save, Save as Saved Audio File to add recorded file in the list of Saved Audio Files. Then you can anytime use it for Voice Message task or for TX Passive. Click «Cancel» to close recording tool window. 89 Click «Start Voice Message» to send selected audio file to radio/s: 90 Dock Window Dock Window performs the following dispatcher actions: Monitor and listen to recent calls and view RadioServer events Monitor selected radio state Monitor active tasks for selected radio Monitor active routes for selected radio Enable and disable User Activity monitoring Display selected map in minimized mode Recent Calls/Events Tab On the Recent Calls/ Events tab Dispatcher can monitor recent RadioServer events, view and listen to recent calls. Go to Recent Calls/ Events tab of dock window: 91 Voice Recording 1. To playback selected call – select the recording you want to playback and click button. Audio player window appears: Click «Player» dropdown list and select playback device. Click «Play» button to playback the recording. Click «Pause» button to make a pause. Click «Stop» button to finish recording playback. Click «Open» button to select new audio file to playback. Note: you can playback several recordings. Hold «Ctrl» key and select recordings you want to playback. Then click button. 2. Save – Dispatcher can save the recordings. To save a number of recordings as individual files select recordings you want to save (use «Ctrl» key) click button and select Save Selection as Individual Files. Then specify a folder on the local PC to save recordings as separated audio files. To save a number of recordings as single file select recordings you want to save (use «Ctrl» key) click button and select Save Selection as Single File. Then specify a folder on the local PC to save recordings as single audio file. 92 Recent Calls\Events Controls 1. Click button to pause Recent Calls \ Events log updating 2. Click records. button to hide Recent Calls\Events log records. Click button to show all log 3. Click button to filter log records by selected radio. Select radio in the Navigation Tree. Recent Calls and Events for selected radio only will be displayed in the Recent Calls\Events tab. 4. Сlick button to group log records. Select column you want to group log records by. Drag and drop selected column header in the Grouping field. 5. Click button to set filter for recent calls and events. You can filter Recent Calls \ Events by any parameter. E.g. to filter by selected sender select «Sender» column (1) and type in sender name (2) to filter the data: 6. Click 7. Click button to apply default settings to all log records. button to see talk session members: 93 8. Click button to enable Note column. All notes added by Administrator and Dispatchers for recent calls and events are shown in the Notes column. So, you can mark recent calls and events to find it by notes. 9. Click button to add a note for selected recording and\or event. The note will be displayed in the Recent Calls \ Events log if «Show Notes» mode enabled: 10. Click button to add message for Dispatchers in the Recent Calls \ Events log. Recipient – select All if you want all Dispatchers to see the message Severity – select severity level to inform Dispatchers about message severity. Type in message text. Selected Dispatcher or all Dispatchers registered in the system will see the message in the Recent Calls \ Events tab. 94 Recent Calls On the Recent Calls tab Dispatcher can see and configure the latest Voice Calls, including Private, Group and Intercom Calls: Сlick «Private» button (1) to display the latest Private Calls; Click «Group» button (2) to display the latest Group Calls; Click «All Calls» button (3) to display all call types including Intercom Call. In the Call Boxes you can see calls number, last call date and time: Click button to start Private call to the Sender-Radio (Radio is displayed in the «Sender» column); Click button to mark calls as viewed; Click button to clear recent call history. 95 Radio State On the Radio State tab Dispatcher can see list of selected radio statuses and the last received radio data in the Radio Popup Window: Radio Popup Window: Click button to request the subscriber's presence in the radio network Click button to send a text message to the radio subscriber Click button to request radio subscriber's location 96 In the Radio State log Dispatcher can do the following: 1. Click button to enable Note column. All notes added by Administrator and Dispatchers for recent calls and events are shown in the Notes column. So, you can mark recent calls and events to find it by notes. 2. Click button to add a note for selected recording and\or event. The note will be displayed in Radio State tab if «Show Notes» mode enabled. 3. Click button to add message for Dispatchers in the Radio State tab of dock window. Recipient – select All if you want all Dispatchers to see the message Severity – select severity level to inform Dispatchers about message severity. Type in message text. Selected Dispatcher or all Dispatchers registered in the system will see the message in the Radio State tab. 97 Active Tasks On the Active Tasks tab Dispatcher can monitor all active tasks for selected radio (e.g. Lone Worker, Active Routes, etc.). For more details on tasks TRBOnet Administration Guide, Tasks section. Dispatcher can manage active tasks: Click Сlick button to group tasks. Select column you want to group tasks by. Drag and drop selected column header in the Grouping field. Click button to set filter for active tasks. You can filter tasks by any parameter. E.g. to filter by selected radio select «Radio» column and type in radio name (2) to filter the data. Click button to stop the task procedure button to apply default settings to all active tasks. 98 Active Routes On the Active Routs tab Dispatcher can monitor all routes started by Administrator. For more details on Route Management see TRBOnet Administration Guide, Routes Management section. 99 Dispatcher can mark route points as serviced and add notes for route points. Select route point and right-click to open the context menu: Waiting – service time is not came and the route point is not serviced Served - the route point is served on time Not Serviced – the route point was not serviced on time Alarm – the route point comes in alarm mode according to Service rules settings (see Route Management section) Note – click to add a note to selected route point. The note will be displayed in the popup window when Dispatcher put mouse cursor on the route point: 100 Dispatcher has the following route monitoring options: 1. Start – click button to start new route based on the created one. 2. Stop – click button to stop the route. Finished route will be deleted from Active Routes list. 3. Edit – click button to edit an existing route: Name – specify a name to display in the route list; Description – add a description for new route. 101 Click «GPS Points» button (1) to add points to selected map: Select map. For more details on map types see TRBOnet Administration Guide, Map Types section. 102 Go to Route Points tab to set GPS Points, Beacons and Map Objects: Click «Create» button or double-click selected point on the map to create new route point: Name – specify a name for new point to display on the map; Location – in the location field administrator can see current GPS coordinates of new point; Radius – specify radius to display new point on the map; Time – specify time to service new point; Time delta – time inaccuracy to serve selected point. 103 Click «OK» to add new point. Click «Beacons» button (2) to add a beacon on the map. Note: to enable Indoor feature make sure your license includes Indoor Positioning and Indoor Service is selected in the list of available services (see TRBOnet Administration Guide, Services section). 104 Click «Map Objects» button to download created map objects list: Double-click selected object in the list to modify its settings: Name – specify a name for the object; Map Object – select map object icon (type) in the dropdown list; Radius – specify radius to display the point on the map; Time – specify time to service the point; Time delta – time inaccuracy to serve selected point. 105 Click «OK» to save map object parameters. All map objects are displayed as points on the map. Go to Service Rules tab to manage point service settings: Finish route – specify parameters to mark the route as finished: Finish route automatically if all points are serviced – select to mark the route as finished when all points and objects are serviced. Set point as serviced – select point service parameters: When radio enters to the point area – select to mark point as serviced when radio becomes in the point radius; Manually by dispatcher – select to allow dispatcher make point as serviced; By condition when radio is in the point area – specify conditions to mark point as serviced: Automatically by receiving Text Message from a radio - select to mark the point serviced after dispatcher receives text message with specified text from radio subscriber; Message – specify message text; Automatically by receiving Telemetry Command from a radio - select to mark the point serviced after dispatcher receives specified telemetry command from radio subscriber; VIO – specify a VIO to send a telemetry command; Command – specify a command for selected VIO; 106 Automatically by receiving DTMF command from subscriber – select to mark the point as serviced after dispatcher receives DTMF command from radio subscriber; Command – specify a command text. Set point in alarm mode – select parameters to make the point in alarm mode: Automatically by receiving Text Message from a radio - select to make the point in alarm mode after dispatcher receives text message with specified text from radio subscriber; Message – specify message text; Automatically by receiving Telemetry Command from a radio - select to make the point in alarm mode after dispatcher receives specified telemetry command from radio subscriber; VIO – specify a VIO to send a telemetry command; Command – specify a command for selected VIO; Automatically by receiving DTMF command from subscriber – select to make the point in alarm mode after dispatcher receives DTMF command from radio subscriber; Command – specify a command text; Automatically by receiving Emergency from subscriber – select to make the point in alarm mode after dispatcher receives Emergency from radio subscriber; Emg. Type – specify an Emergency type in the dropdown list; 107 Go to Notifications tab to manage notifications to radio: Note: follow the predefined notifications templates. If text is not correct notifications will not be available. Send a Text Message on a route start – select to inform radio subscriber about route start; Text Message – type in text message text to send to radio subscriber; Send a Text Message on a route finish – select to inform radio subscriber about route finish; Text Message – type in text message text to send to radio subscriber; Send a Text Message when approaching the service time – select to notify radio subscriber about point serve; Time before service – specify a time period in minutes before service time to send a text message; Text Message – type in text message text to send to radio subscriber; Send a Text Message if point is not serviced – select to notify radio subscriber if the point is not serviced; Text Message – type in text message text to send to radio subscriber; Send a Text Message if point is in alarm mode - select to notify radio subscriber if the point is in alarm mode; Text Message – type in text message text to send to radio subscriber; 108 Click «OK» to save settings. 4. Grouping – click button to group routes in the Active Routes list. Select column you want to group log records by. Drag and drop selected column header in the Grouping field. 5. Click button to set filter for active routes. You can filter routes by any parameter. E.g. to filter by selected route name select «Name» column (1) and type in route name (2) to filter the data. 6. Click button to apply default settings to all routes. 109 User Activity The User Activity function allows the Dispatcher make lists of subscribers can be assigned to due to their activity. For example, if a subscriber sends a message «On duty» or presses an exact preset telemetry button, this subscriber gets assigned to the «On duty» list in the Dispatcher Console. The Dispatcher can also assign subscribers to lists manually. Go to User Activity tab to monitor radio subscribers’ activity: All configured custom statuses for User Activity task are displayed in User Activity tab. Click any space in the tab and scroll your mouse cursor to see all available statuses and radios assigned to the list. For more details about User Activity task configuration see TRBOnet Administration Guide, User Activity section. 110 Dispatcher can assign any status configured for User Activity task to selected radio: Select radio in the Navigation Tree Right-click to open radio context menu and select status to assign for radio: Statuses can be assigned to the radio automatically, according to User Activity task configuration. For more details on User Activity task configuration see TRBOnet Administration Guide, User Activity section. 111 Dispatcher can manage statuses and time interval to set the default status for online radios. Click «Configure» button to configure User Activity: Click «Add» button to add new User Activity status: Name – specify a name for new user activity list; Description – add a description for new user activity list; Background – select the background color to display the subscribers assigned to the list; Move a radio to this list if: Manually (on demand of Dispatcher) – select to assign subscribers to the list manually; Automatically by receiving Text Message from a radio – select to assign a radio to the list after receiving a message (specify the message text in the Message field); Automatically by receiving Telemetry Command from a radio – select to assign a radio to the list after receiving telemetry. Specify VIOs (1 to 5) and the Command; Automatically by receiving DTMF command from subscriber – to assign a radio to the list after receiving a predefined DTMF command (specify the command in the Command field). 112 To assign an offline subscriber to the default User Activity list, go to the Advanced tab: Automatically set the default status for offline radios – select to allow assign the default status for offline radios; Set the default status – specify time period to set default status to a subscriber. To disable User Activity task click «Disable User Activity monitoring» button. 113 Map Go to Map page to monitor Radio location on map (all map options e.g. Playback route, search by address, etc. are available for minimized map view on Map tab) and perform any available actions in Radio Interface (make voice calls, send messages, disable and enable selected radio, etc.): Note: for more details about map options see GPS Positioning section. 114 SIP Interconnect (Phone Calls) The SIP interconnect function allows to make calls from telephones to radios and vice versa. Register SIP account and configure the RadioServer to connect to the account. For more details on SIP configuration see TRBOnet Administration Guide, External PBX Server section. When making a call, the SIP service connects to the RadioServer. E. g., Dispatcher makes a call to a radio subscriber from the phone. Dispatcher need to dial the SIP account's phone number. After that the SIP service connects to RadioServer and the call is conducted due to RadioServer configuration (the call is forwarded to a dispatcher or the voice menu to connect you to a subscriber). For Phone Interconnect box the following options are available: Click (Solo) button to mute all channels except for this one. Click (Mute) button to mute this channel. 1. To register a SIP account, go to a SIP provider's website (for example, sipgate.co.uk or sipgate.com) and follow the prompts. 2. To configure SIP Interconnect use a virtual SIP Server for making phone calls inside a local network. 3. The Virtual SIP Server supports up to 6 telephone lines. 4. For more details on Virtual SIP Server Configuration see Configuring Virtual SIP Server Guide. 5. For more details on Virtual SIP Server Configuration with a hardware phone or SIP account see TRBOnet Administration Guide. 115 Phone Call from the Dispatcher Console To make a phone call from the Dispatcher Console use the SIP Interconnect pane Select the line (1), enter the phone number (2) and click (3) button: Dispatcher can use phone numbers from Phone Book. To open a phone book click button or go to Menu (1), Phone Book (2): 116 Phone Book is intended to register users and SIP ID’s: Click «Add» button to set a new user authorization. SIP ID – type in your SIP ID afforded by provider to make incoming phone call; SIP User – type in SIP User name mentioned when logon; Display Name – type in User Name to display in Dispatch Console; Click «OK» to add new user in the phone book. 117 Receive a Phone Call To answer a phone call click button: 118 Redirect Phone Call to a Subscriber Radio Click «Menu» (1) button, then select Redirect Call and select the subscriber or dispatcher to redirect the call to. Redirect Call icon appears: Abonent type – select radio subscriber or dispatcher to redirect the call^ Abonent name – select radio in the dropdown list. Click «OK» to redirect the call to a selected radio subscriber. 119 Make a Call Phone to Radio To make a phone call to a subscriber radio, dial the SIP account's phone number. Follow the voce menu's prompts or ask the dispatcher to redirect your call to the subscriber. Make a DTMF Call Note: Only 1.07.02 and higher firmware version for all radios equipped with dialing keyboard support DTMF. To make a DTMF call, do the following: Press PTT on a portable radio and hold it. While holding PTT, dial the phone number and press # (For example: 0079521112233#). Release PTT. The RadioServer will automatically initiate a phone call. 120 Call by Sending Text Message to the Base To make a call to a phone number send to the TRBOnet Server a text message with the text «PrefixN» where: Prefix – is a short text to define special text message (e.g. sip:) N - the phone number. For example, to initiate a call to a phone subscriber “123 456 7890” the following text message should be sent to TRBOnet Server Radio ID: “sip:1234567890”. Note: For more details on Text Messages see Text Messages section. To Terminate a Call To terminate the call press PTT and then press # twice on the subscriber radio. 121 GPS Positioning On GPS Positioning tab Dispatcher can monitor selected subscriber location on supported maps, open different map types in separated tabs and quickly toggle between map tabs: 1 – Navigation Tree. Displays Subscribers, Radio and Logical Groups. 2 – Calls Pane. Displays all available call types. 3 – Map. Allows radio subscribers and routes monitoring on map. 4 – Map objects pane. Displays connected beacons, manually created map objects, map regions and map routes. 5 – Dock Window. Displays the following dispatcher actions: Monitor and listen to recent calls and view RadioServer events Monitor selected radio state Monitor active tasks for selected radio Monitor active routes for selected radio Enable and disable User Activity monitoring Monitor beacons and beacons events. 122 Objects On Map objects section Dispatcher can view and enable/disable the following objects: Beacons – all connected beacons in the system Map Objects – all manually created map objects and predefined objects created with Map Drawing Toolbar Map Regions – all map regions created with Map Drawing Toolbar (use Add Polygon tool to create a map region) Map Routes – all map routes created with Map Drawing Toolbar (use Draw Route tool to create a map route). Beacons TRBOnet Dispatch Software provides the Indoor Positioning feature to monitor radio location inside building, where no GPS signal is available. The feature requires additional hardware (beacons spread around the building and option boards in radios). A subscriber will be displayed on indoor floor plan on exact beacon when the radio comes to the beacon's coverage area. The beacon icon on map notifies on the amount of radios that are currently in this beacon's coverage area (e.g. Room 1(3) - there are 3 radios in Room 1). For more details on Beacons adding and configuring see TRBOnet Administration Guide, Beacons section. Beacons are displayed on the building floor plan (1) and in the beacons list (2). 123 Floor Plan Displaying Controls Floor Plan Displaying Controls can be found in the upper part of the floor plan: 1 - Zoom in/out Click button to zoom in a map. Click button to zoom out a map. 2 – Set Location Click button to set beacons location manually. 3 – Available beacons dropdown list. Select beacon in the list and then click to set location manually for a selected beacon. If you are going to add a new beacon, select New Beacon in the dropdown list and click add new beacon on map. 4 – Show Beacons. Dispatcher can select beacon type to display on map. All – all beacons are displayed on map With Radios – beacons with attached radios are displayed on map Without Radios – beacons without radios are displayed on map No – all beacons are hidden on map to 124 5 – Show Route. Click button to display radio’s route for the selected time period: Radio – Select radio to display the route From/To – Select time period to show radio’s route Color – Select color to display the route. Click «OK» to show selected radio route. 6 – Clear Route. Click to hide all routes on map. 125 7 – History. Click to load beacons’ information: 1 – Select time period to request the data 2 – Select radios to request the data for. Click «Select All» to display history for all radios registered in the system. Click «Unselect All» to cancel radios selection. 3 – Click «Load» to load the history. 4 – Use these buttons to manage the history (to play, stop or skip beacons events). The history is displayed in the upper part of the window. 8 – Overview. Click to see the whole floor plan. 9 – Select map. Click to change the map. For more details on map types see Map Types section. 126 Map Objects Dispatcher can create custom and predefined map objects using Drawing . Dispatcher can attach 2D or 3D floor plans for Indoor Positioning. For more details on map objects creation see Drawing section. Map Regions Dispatcher can create map regions used for geofencing rules. Map Regions can be created manually on map (click any point on map to select it as region border) or Dispatcher can add map points by GPS coordinates to create a region. For more details on map regions creation see Drawing section. Map Routes Dispatcher can create routes on map used for geofencing rules. For more details on map routes creation see Drawing section. 127 Map Tools Map Tools can be found in the upper part of map: Zoom in/out Click button to zoom in a map. Click button to zoom out a map. Bookmarks Click button to open Bookmarks panel. Select «Save as a bookmark» to save map region. Dispatcher can create any numbers of bookmarks. To open the bookmark, select its title in the list. Default region Click button to select default region. Dispatcher can save only one default region. To open the default region select «Show default region». Filter Select filters to display radios on map: - radio on, GPS data received - radio on, no recent GPS - radio off, no recent GPS. All filters are enabled by default. Click selected icon to disable selected radios type on map. 128 Ruler Click button to enable Ruler tool to measure a distance: Left-click the selected map point to start measuring. Left-click the selected map point to see measuring results. 129 Search by Address Dispatcher can search map objects by address. Note: For online maps Internet access required! Click «Search by address» button to find address on map: Click selected object in the list to display it on map: 130 Drawing Panel Click button to open Drawing Panel: Draw Polygon Click to open dropdown menu. 1. Select Set on map to set polygon points manually on map: Left-click new polygon points on map to create a new polygon. 131 Click «Save» button on the Map Drawing Toolbar to add a new polygon: On the General page specify the following new region parameters: Name – specify a name for new map region Description – specify a description for new map region. On the Region page specify the following new region parameters: Color – select color to display new region on map Fill region area – select to mark the whole region not borders only Transparency – select filled region transparency level (%). Click «OK» to add a new region on map. 132 1.2 Select Input Coordinates to type polygon points coordinates manually: Click «Add» button to add coordinates. Click «Edit» button to edit selected coordinates. Click «Delete» button to delete selected coordinates. Dispatcher can add polygon coordinates in the Map Objects window and then save these coordinates on the local PC using «Export» tool. Coordinates file will be saved as MS Excel table (.csv file). Dispatcher can create any number of coordinate tables and save them on the local PC. And conversely, Dispatcher can create coordinates list in MS Excel and save it as .csv file to create the polygon with predefined coordinates using «Import» tool. Note: coordinates must be in format as follows: x,xxxx (comma required). Click «Save» button to save new polygon coordinates. 133 Then save a polygon as new object on map: On the General page specify the following new region parameters: Name – specify a name for new map region Description – specify a description for new map region. On the Region page specify the following new region parameters: Color – select color to display new region on map Fill region area – select to mark the whole region not borders only Transparency – select filled region transparency level (%). Click «OK» to add a new region on map. 134 2 – Draw Route. Select to draw route for geofencing feature manually. Selected route will be used as a corridor with adjusted active area. Left-click selected route points to create new route manually: New Route displayed on map. 135 Click «Save» button to save new route as map object: On the General page specify the following new region parameters: Name – specify a name for new map region Description – specify a description for new map region. On the Route page specify the following new region parameters: Color – select color to display new route on map Active area – select «corridor» width. If a radio will pass out of active area, Dispatcher will receive an alarm signal. Click «OK» to save new route as map object. 136 3 – Add point. Select to add a custom point on map Left-click on map to add a custom point: Dispatcher can add the following default map objects types: Add Warning Add Police Department Add Emergency Department Add Fire Department Add House Or add a custom object with any icon. 137 On the General page specify a Name and description for new object. Besides, if you have a 2D or 3D floor plans of the selected object, you can attach these floor plans to the new object. Go to Beacon Map to add a floor plan: Add map – click to add 2D or 3D map for a building; Note: For more details on 2D/3D maps see Map Types section. Update map – click to update an existing map; Delete map – click to delete an existing map; Download – click to download a map from the server Open - click to open a 2D\3D floor plan in a window. Set as Default Map – select to set the floor plan as a default map for the object. Click «OK» to add an object. 138 10 – Add new custom object on map. Select to add new object with custom icon and dimensions on map: Name – specify a name for new map object Select image – click selected picture. button to select icon picture for new object. Click button to delete In the «Preview» field see available icon dimensions preview. When Basic mode of custom icon used, Dispatcher can select one image for available icon dimensions. To set icons dimensions go to Tools, Options and select Map tab: 139 To set different images for every icon dimension click «Advanced mode» button: Select the same or different images for available icons dimensions. Click «OK» to save custom icons. To set icons dimensions go to Tools, Options and select Map tab: 140 11 – To delete Custom map Objects. Click to select custom map objects to delete: Select objects in the list and click «OK» to delete the object. 141 Route Show Route Click button to display radio’s route for the selected time period: 1 – Select radio to display the route 2 – Select color to display the route 3 – Select time period to show radio’s route 4 – Specify advanced options: Optimize Route (group all nearest points) – select to group all points in 100 meters radius Automatic correct GPS errors - check to detect and correct invalid GPS data. Click «Configure» button to configure auto correct GPS errors parameters: Select the maximum possible speed for your vehicles. Click «OK» to save changes. Show Route Direction – select to display Route as arrow. Click «OK» to show selected route. 142 Clear Route Click button to hide routes on map. Playback Route Click button to see selected radios location on map for a selected time period: From – select date to start radio location monitoring; To – select date to finish radio location monitoring; Optimize Route (group all nearest points) – select to group all points in 100 meters radius Automatic correct GPS errors - check to detect and correct invalid GPS data and select the maximum possible speed for your vehicles. Select radios you want to playback route and select color to mark radio’s location. Click «Select All» button to show routes of all radios registered in the system. Note: If any radio registered in the system have changed location (GPS data was sent) in a time period selected in the «Playback Route» parameters, click «Show all» button to display this radio location on map. Click «Load» button to view selected radios location data. Dispatcher can playback radios route using controls. 143 Geofencing Geofencing allows to control location and speed of radios respectively to specified regions on a map. Geofencing monitoring consists of: manually configured regions and tasks. Regions specify where to use rules, tasks specify how to rules for the regions and radios. For more details on Geofencing rules configuring see TRBOnet Administration Guide, Geofencing section. Click «Geofencing» button to configure geofencing rules: Dispatcher cans add/disable/delete rules for geofencing and edits current rules: Click «Add Rule» button (1) and select the appropriate rule in the dropdown list to add a rule in current geofencing configuration. New rule is displayed in the list of rules (4). Click «Disable rule» button (2) to disable selected rule. Click «Delete rule» button (3) to delete selected rule. 144 Variable settings for geofencing rules of event types (Map Region, Beacons, Radios and Lone Worker) are represented in the table below: Event type Common Settings Map Region. Allows to configure rules when radio(s) enters or leaves configured map region(s). Tab Name General Parameters Description Name – specify the rule's name; Description – add the rule's description; Scheduler Perform the rule on a schedule - click to start scheduler for geofencing rules; Days of week - select the days to activate the geofencing rule; Start time - set the time to start the rule; Stop time - set the time to stop the rule. Radios All radios – select to apply this rule for all radios; Only selected radios – select to apply the rule for one or several radios; Select all – click to select all radios in the list; Deselect all – click to deselect all radios in the list. General Scheduler Regions. Select regions to apply the rule Radios Lone Worker. Enables Lone Worker when the rule has been triggered Regions Control – select to enable regions control; Control mode – select the control mode for regions in the dropdown list; Activate Alarm mode if the rule has been triggered – select to activate Alarm mode in the Dispatch Console if Regions Control rule has been triggered; Send Text Message to a radio if the rule has been triggered – select to inform radio subscriber if Regions Control rule has been triggered; Activate Lone Worker if the rule has been triggered – allows automatically activating a Lone Worker policy for a radio in case of entering or leaving exact region on map. Select to enable this option. Speed and Idle Control – select to enable speed and idle control; Control mode – select the control mode for speed and idle control in the dropdown list; Maximum Speed – set the maximum speed for radio; Maximum Idle Time – set the maximum idle time for radio; Activate Alarm mode if the rule has been triggered – select to activate Alarm mode in the Dispatch Console if Speed and Idle Control rule has been triggered; Send Text Message to a radio if the rule has been triggered – select to inform radio subscriber if Speed and Idle Control rule has been triggered; Send Call Alert to a radio if the rule has been triggered – select to inform radio subscriber if the rule has been triggered; Reset Alarm mode if the rule is not triggered - select to inform radio subscriber if the rule has not been triggered; See above All regions – select to apply this rule for all regions; Only selected regions – select to apply the rule for one or several regions; Select all – click to select all regions in the list; Deselect all – click to deselect all regions in the list. See above All Tasks – select to apply all tasks, configured by Administrator, when the rule has been triggered; Only selected tasks – select to enable Lone Worker task, configured by Administrator when the rule has been triggered. 145 Beacons. Allows to configure rules when beacon (s) enters or leaves coverage zone General Scheduler See above Radios See above Beacons. Enables rule for selected beacons Lone Worker Radios. Allows use radio(s)1 as a map region and monitor when another radio(s) enters or leaves radio’s coverage zone Control mode: Control entering beacon coverage zone – select to enable the rule when a radio enters beacon coverage zone; Control leaving beacon coverage zone - select to enable the rule when a radio leaves beacon coverage zone; Activate Alarm mode if the rule has been triggered - select to activate Alarm mode in the Dispatch Console if Beacons rule has been triggered; Reset Alarm mode if the rule is not triggered – select to reset Alarm mode in the Dispatch Console automatically if the rule condition was not triggered (e.g., when «Control entering beacon coverage zone» selected and radio enters to the monitored coverage zone and then instantly leaves the zone, alarm mode in the Dispatch Console will be reseted automatically) Send Call Alert to a radio if the rule has been triggered – select to inform radio subscriber if the rule has been triggered; Send Text Message to a radio if the rule has been triggered – select to inform radio subscriber if Beacons rule has been triggered; Activate Lone Worker if the rule has been triggered – allows automatically activating a Lone Worker policy for a radio in case of entering or leaving beacon coverage zone. Select to enable this option. General Scheduler Regions Radios All Beacons – select to apply this rule for all beacons; Only selected beacons – select to apply the rule for one or several beacons. See above. Control mode: Control Entering Region – select to enable the rule when a radio enters the coverage zone associated with another radio; Control Leaving Regions - select to enable the rule when a radio leaves the coverage zone associated with another radio; Activate Alarm mode if the rule has been triggered - select to activate Alarm mode in the Dispatch Console if Radios rule has been triggered; Reset Alarm mode if the rule is not triggered – select to reset Alarm mode in the Dispatch Console automatically if the rule condition was not triggered (e.g., when «Control Entering Region» selected and radio enters to the monitored coverage zone and then instantly leaves the zone, alarm mode in the Dispatch Console will be reseted automatically); Send Text Message to a radio if the rule has been triggered – select to inform radio subscriber if Radios rule has been triggered; Send Call Alert to a radio if the rule has been triggered – select to inform radio subscriber if the rule has been triggered; Minimum distance between radios – select a distance in meters. When the distance less than selected value, the rule will be triggered according to settings above. Color of region – select radio coverage zone color. See above Select radio coverage zones the rule is applied for. See above 146 Lone Worker. Allows configure scheduled Lone Worker task General Radios Lone Worker Days of week - select the days to activate the Lone Worker rule; Start time - set the time to start the rule; Stop time - set the time to stop the rule. See above Select all or some configured Lone Worker tasks. When Lone Worker task is mentioned as «Disabled», Dispatcher should enable the task. For more details on Geofencing rules configuring see TRBOnet Administration Guide, Geofencing section. Google Earth Click button to open Google Earth application. Note: Google Earth should be installed on the PC. For more details on working in Google Earth visit Google official website http://www.google.co.uk/earth Coverage Map Coverage Map option allows to see RSSI level on map. Enable «Coverage Map» on Map Tools panel. For more details on Coverage Map see Options, Coverage Map section. Note: check your license supports Coverage Map feature. 147 Select Map Allows adding the new tab with selected map displayed: Map Type – select Map Type in the Dropdown List; Caption – specify the caption for the new map. New Tab Name will be the same as Caption; Available Maps – select map in the table. User can add a map using its URL: Click «Add» button, type in the Name for new map and specify the URL. The map should be compatible with OSM maps in Mercator projection. For more information about map calibration see the following video tutorial. Type in map URL, as shown in the example below the URL field. Z – zoom. Type in zoom value for the map. X – coordinate in X –direction. Y – coordinate in Y – direction. Click «OK» to add a map. 148 Map Types Online maps: OpenStreetMaps – free online map. Includes MAPNIK, CYCLE, TRANSPORT, LANDSCAPE and MAPQUEST subtypes. For more details on OpenStreetMaps visit official web site: http://www.openstreetmap.org Microsoft BING – commercial maps from Microsoft. Includes BING_ROAD, BING_AREA and BING_HYBRID subtypes. User can try BING Maps for 90 days and then get a Basic Key. Visit http://msdn.microsoft.com/en-us/library/ff428642.aspx to get a Basic Key. Offline Maps TRBOmap – internal map-making resource. User can customize a part of online maps according to requirements. For more details on map calibration go to TRBOnet knowledge base and read the following article: TRBOmap format (old). TMap – internal map-making resource. User can create an offline copy of online maps for selected region according to requirements. User can create a map using any picture via TRBOnet.MapEdit tool. Go to C:\Program Files\Neocom Software\TRBOnet Dispatch Software\TRBOnet.MapEdit.exe. For more details on map calibration go to TRBOnet knowledge base and read the following article: TMap format (new) GIS Panorama – offline Russian map. For more details visit the official web site: http://www.gisinfo.ru/ Beacon 2D – two-dimension offline map for Indoor positioning. User can create maps using Beacon2DMapGenerator tool. To get Beacon2DMapGenerator contact your local TRBOnet dealer. Beacon 3D – tree-dimension map for Indoor positioning. User can use any dicectX(.x) files as map. MapLib map format – free offline map. Requires a lot of internal memory. Requires Franson GPSTools. For more details on Franson GPSTools visit the official web site: http://fransonGPStools.software.informer.com/2.3/ TatukGIS – commercial offline map. For more details on TatukGIS visit the official web site: http://www.tatukgis.com/. 149 Dock Window Dock Window displays the following dispatcher actions: Monitor and listen to recent calls and view RadioServer events Monitor selected radio state Monitor active tasks for selected radio Monitor active routes for selected radio Enable and disable User Activity monitoring Monitor beacons and beacons events. For more details on Dock Window see Dock Window section. Beacons On the «Beacons» page Dispatcher can view Beacons registered in the system and radios attached to these beacons: Click «Unknown» (1) to see radios not attached to a beacon. All beacons registered in the system are listed below (2). Click any beacon to see the radio attached to this beacon. 150 Beacons Events On the «Beacons Events» page Dispatcher can see beacons location data: Dispatcher can view messages on beacons location (received or lost) and GPS data. 1. Click button to hide beacons events. Click button to show all beacon events. 2. Сlick button to group events. Select column you want to group events by. Drag and drop selected column header in the Grouping field. 3. Click button to set filter for events. You can filter Events by any parameter. E.g. to filter by selected sender select «Sender» column and type in sender name to filter the data 4. Click button to apply default settings to all events. 5. Click button to enable Note column. All notes added by Administrator and Dispatchers are shown in the Notes column. So, you can mark events to find it by notes. 6. Click button to add a note for selected event. The note will be displayed in the beacons events log if «Show Notes» mode enabled. 151 Text Messages On Text Messages tab Dispatcher can review and send text messages to other dispatchers, individual subscribers and radio groups: 1 – Navigation Tree. Displays dispatchers and subscribers available for text communication. Note: Radio must be equipped with a display to receive Text Messages 2 – Message session panel. Displays the latest messages transmitted via radio channel. 3 – New Message panel. Provides you with text sending options. 4 – Calls Pane in compact mode. Allows make a voice calls. 152 To Send a Text Message Dispatcher can send text message to: Selected Radio Subscriber Selected Radio Group Selected Logical Group Selected Dispatcher All Online Dispatchers. Dispatcher can send text message to selected subscribers from: Message session panel Navigation Tree 153 Send Text Message from Message Session Panel Dispatcher can send simple text messages from Message session panel. To send a message to a multiple radios (groups and dispatchers) using predefined templates see Send Text Message from Navigation Tree section. Go to Text Messages tab (1): Specify a Recipient (2). Radio Subscribers, Radio Group, Logical Groups and Dispatchers are represented as alphanumeric descending list. Click «Send» button to send a text message. The message is displayed in the Message session panel. If message details are highlighted red it means that the Recipient is offline and the message will be sent as soon as recipient will be registered in the network again. If message details are highlighted grey, the message is delivered. Note: an offline user will receive the message as soon as one gets online All messages are displayed in the Message Session Panel. Click «Clean» button to hide message history. Click «Reload» button to display all log records list. 154 Send Text Message from Navigation Tree Dispatcher can send text messages to a multiple radios (groups and dispatchers) using predefined templates. Select new text message recipient in the Navigation Tree – selected radio or group (1): Right-click selected recipient (radio subscriber, radio group, logical group or dispatcher(s)) to open context menu and select «Send Message» command (2). Note: Context Menu for Radios, Radio Groups and Logical Groups can be different. To send a text message you can click button. 155 New Message parameters window appears: Radios – Dispatcher can filter radios typing Radio name in the field. E.g. to find out selected radio with Radio Name «105» and to view all Radio and Logical groups which include the radio, type in «105» in the «Radios» field. Check radios or groups to send a text message. Send to offline radios – select to send a text message to an offline radio. The default delivery period is unlimited. For more details on delivery period configuration read TRBOnet Administration Guide, Advanced Settings section. Templates. There are some predefined text templates to send to a radio. Select the template in the dropdown list or click button to edit an existing templates or add new ones. Template text is displayed in the text field. Click «OK» to send a text message to selected subscribers. Note: an offline user will receive the message as soon as it comes online 156 Extended Messages Extended Messages - is a special function allowing the users to send detailed preconfigured templates containing necessary information to each other with the help of the special TRBOnet Dispatch Software application. This service was created especially f or the clients that need to use more detailed and structured messages for their work. If the standard messages are not enough to contain all the information you need to send you may use Extended Messages service. How to send Extended Message template to a radio: Text Messages (1) View (2) Select «Show Extended Messages» option. Go to «Extended Messages» tab (3), New message (4). 157 Select new message template in the list (1): Select a radio in the dropdown list to send the template (2). Click «Send to Radio» button to send the template to a radio. Note: an offline user will receive the message as soon as one gets online 158 Reports and Statistics Reports and Statistics tool provides you with various printing forms with monitored radio network activity data: 1 2 3 – Navigation Tree. Available reports groups are displayed in the Navigation Tree. – Calls Pane. Radio boxes in minimal mode are displayed in the Calls Pane. – Report Window. Tabs with report generation settings and report previews. 159 Report Types Overview TRBOnet Dispatch Software supports the following report types: Queries – reports for selected time period with information on Voice Recording and Messages for period displayed as event log (non-printed format). Common Reports – reports for selected time period with information on messages, radios’ state, user messages and notes, Radio Allocation data, Radio disabling data, Job Ticketing and Finished routes in printed format. Indoor reports - reports for selected time period for movement details for Indoor Positioning in printed format. GPS reports - reports for selected time period with information on subscribers’ location and speed in printed format. Data export - report for selected time period with information on extended notes, generated on Excel or XML formats. Main Report Parameters To generate a report go to Reports and Statistic section and select a report type you want to generate. When generating a report specify main parameters for a report described below: Name Description Start Date End Date Date to start the logging Date to finish the logging Available channels for the logging in the dropdown list. Click «Select All» button to receive report results on all available channels or select channels you want to see the report results manually Dispatchers and /or radios you want to see the report results Recipient (s) you want to see the report results. Click «Select All» button to receive report results on all available recipients or select recipients you want to see the report results manually Select radios in dropdown list to include selected radios state in the report Type in text to filter the report data. E.g. you can type in Emergency to see report data include Emergency text Select «All» to include all dispatchers’ data in the report or select dispatcher in the dropdown list Click to see reports results Channel Sender (s) Recipient (s) Radio Find Text Dispatcher Generate Report 160 Specific Report Details When generating a report set specific report details: Name Included in Report Types Description Hide zero length audio message Voice Recording Messages for Period (Queries and Common Reports section) Extended Notes Shows audio files with non-zero length only Message Type Print notes States Print Location Find User messages only Find Messages with notes only Messages for Period (Queries and Common Reports section) Messages for a period State of Radios State of Radios Select to enable notes when printing a report Select available radio events in the dropdown list to display selected data in the report. State of Radios Select to show in the report selected radios coordinates and to allow its displaying on online Google maps. User messages and notes Select to show only User Messages in the report User messages and notes Radio Allocation Select to show only User Messages with notes in the report. Device Select radios in dropdown list to include selected radios allocation data in the report Radio Allocation Select «All» to include all radio users’ data in the report or select radio users in the dropdown list Radio Allocation Report data can be grouped by radios or by users. User Group by Select Message types to include in the report: All Messages – all available messages type Text Messages – text messages from Dispatchers to radios and from radios to Dispatchers Telemetry – telemetry messages from radioserver to radios and from Radios to radioserver Talk Sessions – all talk sessions in the system Registration in radio network – «check radio» commands from repeaters to radios System Massages – messages about tasks, routes, telemetry statuses, radioserver started/stopped messages, and subscribers’ radios configuration. User Messages – messages created with «Add Message» button. Can be created for all or selected dispatchers and are shown in the Recent Calls\Events tab of dock window. 161 Job Ticketing Select Job Tickets priority level to include in the report. Select «All» to include all priority level for Job Tickets in the report or select priority level in the dropdown list Job Ticketing Select Job Tickets statuses to include in the report. Select «All» to include all statuses for Job Tickets in the report or select status in the dropdown list Priority Status Print detailed data Beacon Finished Routes Movement Details/Summary Select to see a report in the detailed mode Select connected beacons in the dropdown list to show finished routes foe selected beacons in the report Location for period Min. Interval Street names Region Min Stop Time/Stop Borders Minimal Interval to group GPS data Location for Period Staying in a region/ Proximity Drive Activity Detailed/Summary Select «Not to show» to disable online street view. Select «Online Services» to enable online street view and then select your internet connection type (local or server) Select regions to include the data in the report. Specify Stop Time and Borders and if radio (s) meets requirements, the system fixes selected radio (s) position as stop. E.g. if radio 1 is in a stop borders 100 meters during 50 seconds, it is fixed as a stop in the report. Drive Activity Detailed Show all states Select to show radio drive activity when radio is online and offline. Automatic correct GPS errors Drive Activity Detailed/Summary Speed for period Select the maximum possible speed for your vehicles. Avg. Interval Speed for period Average interval to receive speed data Speed Idle Time detailed/Summary Speed value to detect radios state as idle. In case when speed less than selected value, the system detects radio state as Idle. 162 Queries Reports for selected time period with information on Voice Recording and Messages for period displayed as event log (non-printed format). Voice Recording –a report on all talk sessions in the system for selected time period. The results are displayed in a grid, which allows Dispatcher to filter and sort data. Messages for Period - a report on activity of radio subscribers and dispatchers for selected time period. Dispatcher can filter the activity to display in the report by message type. For text messages, Dispatcher can also set an additional filter by message text (special characters are supported). The messages are displayed in a grid, which allows Dispatcher to filter and sort data. Common Reports Reports for selected time period with information on messages, radios’ state, user messages and notes, Radio Allocation data, Radio disabling data, Job Ticketing and Finished routes in printed format. Messages for Period - a report on activity of radio subscribers and dispatchers for selected time period. Dispatcher can filter the activity to display in the report according by type of message. Dispatcher can set whether to include notes to the report. For text messages, Dispatcher can also set an additional filter by message text (special characters are supported) State of Radios - a report on registration of subscribers in the network for selected time period. User Messages and Notes - a report on user messages and notes in the system selected time period. Dispatcher can filter by text and set to find only notes or messages. Radio Allocation –a report on Radio Allocation users’ activity for selected time period. Radio Disabling - a report on disabling/enabling radios for a selected time period. Job Ticketing - a report on job tickets assigned to the subscribers. Finished Routes - a report on finished routes in the system. Indoor Reports Reports for selected time period for movement details for Indoor Positioning in printed format. Movement Details - a report showing time period any radio was in the beacon signal coverage zone; Movement Details Summary - a report showing how many times the radio entered any beacon signal coverage zone; GPS Reports Reports for selected time period with information on subscribers’ location and speed in printed format. Location for Period – a report showing selected radios location data in a time period Staying in a Region / Proximity – a report showing time period any radio was in the selected map region zone; Drive Activity Detailed – a report showing all radio (s) events during selected time period Drive Activity Summary – a report showing total drive and stop time and distance in kilometers for a selected time period Speed for Period – a report showing radio (s) speed for a selected time period Idle Time Summary – a total report for Idle Time task for a selected radio(s) Idle Time Details - a detailed report for Idle Time task for a selected radio(s). Data Export Report for selected time period with information on extended notes, generated on Excel or XML formats. Extended Notes – a report showing extended notes data according to e report filter. 163 Event log TRBOnet Dispatch Software retains information on all communicational and system events, including: Text Messages Telemetry Talk Sessions Registration in a radio network System Messages User Messages The Event Log tool provides you with an interface for monitoring events recorded in the log: 1 – Navigation Tree. Displays TRBOnet Dispatch Software event types. 2 – Log Window. Displays events list. 3 – View Entry panel. Displays details of the log entry Dispatcher select in the log. 4 – Calls Pane in compact mode. Allows make a voice calls. 164 Voice Recording Note: Voice Recording option available for Talk Sessions only. 1. To playback selected call – select the recording you want to playback and click button. Audio player window appears: Open «Player» dropdown list to select playback device. Click «Play» button to playback the recording. Click «Pause» button to make a pause. Click «Stop» button to finish recording playback. Click «Open» button to select new audio file to playback. Note: you can playback several recordings. Hold «Ctrl» key and select recordings you want to playback. Then click button. 2. Save – Dispatcher can save the recordings. To save a number of recordings as individual files select recordings you want to save (use «Ctrl» key) click button and select Save Selection as Individual Files. Then specify a folder on the local PC to save recordings as separated audio files. To save a number of recordings as single file select recordings you want to save (use «Ctrl» key) click button and select Save Selection as Single File. Then specify a folder on the local PC to save recordings as single audio file. 165 Event Log Controls 7. Click button to pause Events log updating 8. Click button to hide Events log records. Click to show all log records. 9. Сlick button to group log records. Select column you want to group log records by. Drag and drop selected column header in the Grouping field. 10. Click button to set filter for log events. You can filter Events by any parameter. E.g. to filter by selected sender select «Sender» column (1) and type in sender name (2) to filter the data: 11. Click button to apply default settings to all log records. 12. Click button to enable Note column. All notes added by Administrator and Dispatchers are shown in the Notes column. So, you can mark events to find it by notes. 13. Click button to add a note for selected recording and\or event. The note will be displayed in the Events log if «Show Notes» mode enabled. 14. Click button to add message for Dispatchers in the Events log. Recipient – select All if you want all Dispatchers to see the message Severity – select severity level to inform Dispatchers about message severity. Type in message text. Selected Dispatcher or all Dispatchers registered in the system will see the message in the Recent Calls \ Events tab. 166 All Messages Text Messages Dispatcher can monitor all text messages in the system. Select Text Messages in the navigation tree to view inbox and sent text messages log: The following Text Messages details are represented in the Event log: - inbox text messages. - sent text messages. Date and precise time when the message was sent or received Text Message Sender Text Message Recipient Message text. Go to Event Log Controls section to manage event log items. 167 Inbox Text Messages In case you want to see only received Text Messages, select Inbox in the navigation tree: The following Text Messages details are represented in the Event log: Date and precise time when the message was received Text Message Sender Text Message Recipient Message text. Go to Event Log Controls section to manage event log items. 168 Sent Text Messages In case you want to see only sent Text Messages, select Sent in the navigation tree: The following Text Messages details are represented in the Event log: - text message successfully delivered; - text message is not delivered (radio offline or out of radioserver coverage area) Date and precise time when the message was sent Text Message Sender Text Message Recipient Message text. Go to Event Log Controls section to manage event log items. 169 Telemetry Dispatcher can monitor obtained telemetry signals and sent telemetry commands. Select Telemetry in the navigation tree to see telemetry log: The following Text Messages details are represented in the Event log: - obtained telemetry signals - sent text messages. Date and precise time when the telemetry was sent or received Telemetry Sender Telemetry Recipient Telemetry details. Go to Event Log Controls section to manage event log items. 170 Obtained Signals In case you want to see only received telemetry signals, select Obtained signals in the navigation tree: The following Text Messages details are represented in the Event log: Severity level: - information message, - warning message, Date and precise time when the telemetry was sent or received Telemetry Sender Telemetry Recipient Telemetry details. - alarm message Go to Event Log Controls section to manage event log items. 171 Sent Commands In case you want to see only sent telemetry signals, select Sent Commands in the navigation tree: The following telemetry details are represented in the Event log: - telemetry successfully delivered; - telemetry is not delivered (radio offline or out of radioserver coverage area) Date and precise time when telemetry was sent Telemetry Sender Telemetry Recipient Telemetry details. Go to Event Log Controls section to manage event log items. 172 Talk Sessions Dispatcher can monitor all Talk sessions in the system. Select Talk Sessions in the navigation tree to view inbox and sent talk sessions log: The following Talk Sessions details are represented in the Event log: Date and precise time of the Voice Call Control Station Voice Call Sender Voice Call Recipient Voice Call duration Go to Voice Recording section to save and to playback voice call (s). Go to Event Log Controls section to manage event log items. 173 Registration in Radio Network Dispatcher can monitor when any radio was online/offline. Select Registration in radio network in the navigation tree: The following radios details are represented in the Event log: Date and precise time of «Check Radio» command «Check Radio» command Sender Message (Radio online/offline) Go to Event Log Controls section to manage event log items. 174 System Messages Dispatcher can monitor when any system messages in the system. Select System Messages in the navigation tree: The following system messages are represented in the Event log: RadioServer started/stopped Any tasks policy was activated/changed Telemetry cannot be received from any radio Any route was created/updated Dispatcher requested radio’s presence in the network Subscriber radio registration/changing New group registration/changing CrossPatch enabled/disabled, etc. The following system messages details are represented in the Event log: Severity level: - information message, - warning message, Date and precise time of the system message Message text - alarm message Go to Event Log Controls section to manage event log items. 175 User Messages Dispatcher can monitor when any user messages in the system. Select User Messages in the navigation tree: The following system messages details are represented in the Event log: Severity level: - information message, Date and precise time of the user message User message Sender User message Recipient User message text - warning message, - alarm message Go to Event Log Controls section to manage event log items. 176 Telemetry To enable Telemetry page go to View, Show Modes (1), Telemetry (2): 177 On Telemetry page dispatcher can monitor events assigned to VIOs. Telemetry page view can be different due to Telemetry task configuration: For more details see TRBOnet Administration Guide, Telemetry section. Select radio in the navigation tree to see and update VIOs condition. 178 Job Ticketing Job Ticketing feature allows Dispatcher to send commands to the subscriber radios and to receive answers. Dispatcher can compose, assign and cancel the command. Radio subscriber can accept, cancel, execute or complete the command. To manage Job Tickets go to Job Ticketing page (1): For more details on Job Ticketing configuration and assigning to a radio see TRBOnet Administration_Guide, Configuring Job Ticketing section. 179 Note: Dispatcher can send Job Ticket to an offline subscriber. He will receive the task as soon as he will be online. Subscriber can send the answer for the job ticket. Dispatcher will receive one of the four statuses: In Progress, Completed, Cancelled, Rejected whereas the subscriber chooses status he wants to send on his radio. Dispatcher receives the following message: 180 All Job Tickets are displayed on Job Ticketing page: Job tickets marked with green are completed. The ones marked with yellow have five minutes to be accomplished before expiration. The orange ones are expired. In the lower part of the interface you see the Processing Tasks. Dispatcher can manage Job Tickets using controls in the upper part of Job Ticketing Interface: 1 – Add. Click to add a new ticket 2 – Edit. Click to edit an existing ticket 3 – Assign. Click to assign a ticket to a radio: Dispatcher can search the radio typing radio name in the «Radio» row. Select radio (s) to assign the ticket. 181 4 – Grouping. Click to group job tickets. Select column you want to group tickets by. Drag and drop selected column header in the Grouping field. 5 – Auto Filter. Click to set filter for job tickets. You can filter tickets by any parameter. E.g. to filter by selected radio select «Radio» column and type in radio name to filter the data: 6 – Default Settings. Click to apply default settings to all job tickets. 7 – Archive. Click to hide job ticket in the new tickets list. 8 – Cancel. Click to cancel job ticket. You can cancel only processing tasks. Dispatcher can see reports of Job Tickets. Go to Reports and Statistics (1) page and select Common Reports – Job Ticketing (2): Dispatcher can see Job Ticketing Monitoring in a window to monitor all Job Tickets in the system, created by Dispatchers and assigned to Radios. For more details on Job Ticketing monitoring see TRBOnet Administration_Guide, Tools section. 182 Route Management Route Management feature allows create routs and assign to selected radio subscribers or dispatchers. To create a route, go to Route Management page (1): For more details on Routes creation see TRBOnet Administration Guide, Route Management section. 183 Created route appears in the route list: Click «Start» button to start the route: Name – specify a name for Active route; Start Date – select a date to start the route; Route – select route to start in the dropdown list. Click «Create Route» button to create new route based on selected route. Click «Modify» button to modify selected route parameters. Radio – select Radio to assign the route; Radio Owner – select User to assign the route. For more details on Users creation TRBOnet Administration Guide, Users section; Dispatcher – select a Dispatcher to monitor the route. Note: do not select both: Radio and Radio Owner to prevent incorrect route running. 184 Click «OK» to start a route. The route appears in the Active Routes list: If the point is not served, it becomes red. Click «Stop» button to replace active route in the Created routes list. 185 Dispatcher can see reports of finished routes. Go to Reports and Statistics (1) page and select Common Reports – Finished Routes (2): 186 Radio Allocation Selected radio can be assigned in the system to selected employee registered in the system. All available radios are disabled and an employee will need to type in username and password to take and enable selected radio. When an employee returns allocated radio it gets disabled again. Go to Radio Allocation page (1) to assign radios to users: For more details on Routes creation see TRBOnet Administration Guide, Radio Allocation section. 187 Dispatcher can see reports of allocated radios. Go to Reports and Statistics (1) page and select Common Reports – Radio Allocation (2): 188 Web Console User Manual TRBOnet Web Console is a special on-line application. It is an extension for TRBOnet Dispatch Software which allows the dispatchers to get access to a system using web browser. Web Console is the best solution for carriers, operators and systems with the huge number of users. This application allows you to monitor your system without any special software installed on your computer. It is also possible to do it from the IPad, Smartphone, etc. All you need is just to specify the address of your system and server. Map In the Map interface user can monitor the current GPS location of the subscribers. In the Navigation tree you may see the list of your subscribers divided into groups 1 – Navigation tree – list of subscribers divided into groups; Click button to see the subscriber in the center of the map. Click button to see the route of the subscriber. Specify the date and time. You may also optimize route (group all nearest points). Click Click button to request GPS data of the subscriber. button to see the subscriber properties. 2 –Filter by name – type in subscriber’s name to find in the list; 3 – Quick text messages. Type in text message and select the subscriber to send the message; Note: The dot in front of the subscriber reflects the remoteness of the GPS data received by the system. Green means that data is received less than 2 minutes ago. Orange - from 2 up to 5 minutes ago. Red - more than 5 minutes ago. Click the subscriber to see more detailed information (speed of the subscriber and when the last GPS signal was received). Click the subscriber sign on the map to see its geographical location, its mobility, and current time of the place where the subscriber is used at the moment. 189 4 - Click this sign to see the list of available maps: 5 – zoom – select to zoom the map in or out. User can also use mouse scroll for these actions. 6 – subscriber current state icons: - subscriber-on GPS-on - select to see the on-line subscribers with activated GPS function - subscriber-on GPS-off - select to see the on-line subscribers with deactivated GPS function - subscriber-off GPS-off – select to see the off-line subscribers with deactivated GPS function. 190 7 – Find address function - select to find any certain place of the map you need: 8 – Regions management. Click «Add new region» button to save the region you see on the map at the moment; Click «Delete region» button to delete selected region; Click «Save region» button to make selected region as default. Select one of the regions you created in the Region line and click «Go to the region» button to see it. Note: Default region is activated when you start Web Console. When you launch it for the first time Default region is whole map, but you can change it. 191 Geocoding Type Go to Admin tab open Options table: Geocoding type- select the geocoding source to use with Web Console (to get the coordinates from); Show text messages on map – select to see text message interface on the map; Update timeout (seconds) – select time period to update coordinates of the subscriber. 192 Reports Go to Reports tab to generate detailed reports concerning subscribers, to print and export those reports: 193 GPS Reports GPS Reports show all subscribers’ location and activity details. 194 When any GPS report is generated, use Control Panel to save or print it: 1 - Display the search window - represents a button to invoke the search dialog, allowing the users to search for specific text in a report; 2 - Print the report - click to print the report; 3 - Print the current page - click to print only current page; 4 - First page – click to go to the first page; 5 - Previous page - click to go to the previous page; 6 - Page number – click to see current page and go to other page you need; 7 - Next page - click to go to the next page; 8 - Last page - click to go to the last page; 9 - Export a report and save it to the disk - click to download the report; 10 - Export a report and show it in a new window - click to open the report in the new window; 11 - Format - select the format to save your report in. 195 Location for Period Select to know the location of the subscriber for selected time period. Click «Generate Report» button to generate the report: Set the following parameters: Select data by period: Start Date - specify the start date; End Date - specify the end date. Filter: Radio - select the subscriber to generate the report for; Min. Interval - sets the time interval to get the data (for example to show subscriber's location every 90 seconds). 90 seconds interval is recommended for one day report. Show names of streets (reduces speed of report generation) - select to see the names of the streets in the report. 196 Drive Activity Detailed Select to see subscribers’ drive activity for a certain period of time: Set the following parameters: Select data by period: Start Date - specify the start date; End Date - specify the end date. Filter: Radio - select the subscriber to generate the report for; Min. stop time - sets the minimum time interval considered to be a stop; Stop borders (m) - sets the zone as stop borders; Show all states - select to see all the states of the subscriber in the report. 197 Staying In A Region Select to know how long the subscriber was in a certain region: Set the following parameters: Select data by period: Start Date - specify the start date; End Date - specify the end date. Filter: Radio - select the subscriber to generate the report for; Region - select the region to generate the report for. 198 Idle time detailed Select to know how long the subscriber was inactive: Set the following parameters: Select data by period: Start Date - specify the start date; End Date - specify the end date. Filter: Radio - select the subscriber to generate the report for; Speed(km/h) - select the lowest speed level starting idle time regime. 199 Common Reports Common reports are the reports to show the message details for a certain period of time. Messages for period Select to see the subscriber messages for a certain period of time: Set the following parameters: Select data by period: Start Date - specify the start date; End Date - specify the end date. Filter: Radio - select the subscriber to generate the report for; Find Text - specify the text symbols you want to find if necessary. 200 Click «Save as PDF» button to save the report in *pdf format: 201 Messages Select to send and receive messages from the subscribers: Type in text in «Send text» field; Select the subscriber in the dropdown list. Click «Send» button to send the text message. 202