1
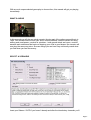
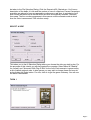
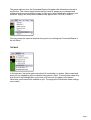
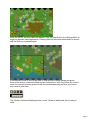
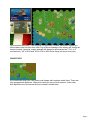
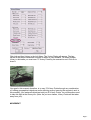
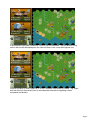
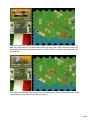
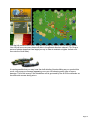
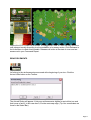
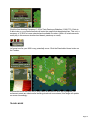
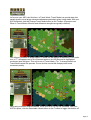
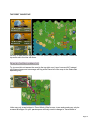
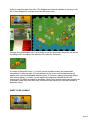
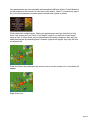
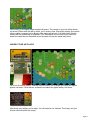
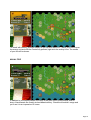
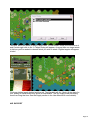
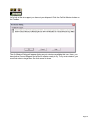
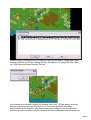
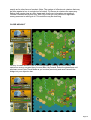
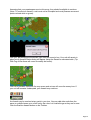
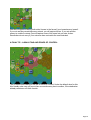
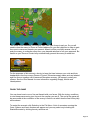
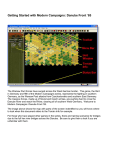
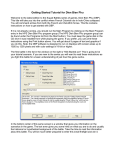
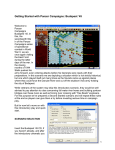
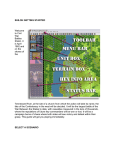
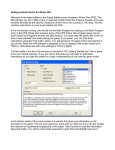
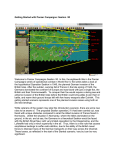
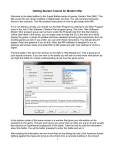
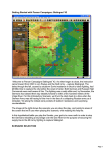
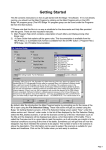
GETTING STARTED Welcome to Panzer Campaigns Salerno ’43. In a first for the Panzer Campaigns series, this title takes you through three separate yet, historically related actions, each playable individually, with many variations and each comprising many sub-actions of their own called scenarios. In 1941 as part of a growing involvement in the Mediterranean, Hitler turned his might at the Balkans and Greece immersing the German military in a risky diversion from his plans for Russia. The island of Crete saw the largest German airdrop of the war. Defeated on the mainland, here Churchill fought back. Crete is the setting for your first campaign. In 1943, with the fortunes of war slowly shifting in the Allies’ favor, an impatient Churchill sought to restore his Mediterranean prestige. Employing Stalin’s pressure for a second front, he beguiled his American allies into an Italian gambit. Churchill’s desires would never again hold sway. It started at Sicily in May. Then, with Commonwealth forces taking the Italian toe and proceeding north and east, the Americans thrust at Naples in September. Brilliantly led, the Germans anticipated this move, stymieing the advance in the cauldron known as Monte Cassino. These bloody actions at Salerno form your second campaign. Months of fierce fighting would pass almost at a stalemate. With Cassino proving a nut too tough to crack, the Americans elected a second invasion, a bold flanking swing west to the Italian heart at Rome, the psychological prize. It wouldn’t come until January 1944. The agony at Anzio sets the stage for your third campaign. Page 1 With so much unprecedented game play to choose from, this manual will get you playing immediately. WHAT’S AHEAD In this manual you will play an actual scenario forming part of the actions around Anzio in 1944. You will learn how to move your units, conduct combat, conduct indirect fire using artillery and naval power, conduct air missions – both ground attack and recon, conduct assaults and understand the basics of keeping your units in good shape. No scenario will ever play the same way twice. So some things you see here may not exactly match what you find when you face the enemy. SELECT A SCENARIO Insert your Salerno ’43 CD if you haven’t already and after the introductory cinematic you’ll Page 2 be taken to the File Selection Dialog. Click the Scenario #00_Started.scn. You’ll see a description of the battle, it’s title and the number of turns it comprises. Panzer Campaigns scenarios are played in turns as opposed to continuous or real time. In a single turn one side moves and performs its actions whilst the other automatically defends. The sides then swap. The turn number progresses in this manner until the scenario ends at which time the victor is announced. Click ok when ready. SELECT A SIDE This takes you to the AI Selection Dialog where you choose the side you wish to play. For the purposes of this tutorial you will play against the computer. Select Allied AI "Manual" for yourself, and "Automatic With Fog of War" for the Axis. Each scenario is governed by a set of default optional rules. In later games you may wish to change these and may do so by clicking the Rules button. For now, click ok to get the game underway. You are now the Allied Commander. TURN 1 Page 3 The game map and your first Command Report will appear with information relevant to the first turn. The current report informs that you have air assets at your disposal and reinforcements may be brought into play. In later turns, helpful information relating to unit condition, supply and many other variables may appear here. Click ok to close it. You may review this report at anytime during a turn by clicking Last Command Report in the Info Menu. THE MAP In this scenario, the entire game map should fit comfortably on screen. Game maps and sizes will vary depending on the scenario being played. (Note: To scroll larger maps click Auto Scroll in the Settings Menu and move your mouse to the edges of the screen. Otherwise, scroll bars will be available to you. The program will remember these settings once made). Page 4 Press the Alt key and map labels will appear. Click Alt Label Style in the Settings Menu to toggle an alternate label appearance. Pressing Shift+Alt will leave these labels on screen until the Shift key is pressed again. In this scenario most of your forces start on map and are colored orange and green. Some of the enemy’s units are visible and are colored blue. With Fog of War all, some or none of a scenario’s enemy presence will be revealed depending on what your forces may see at a given time. (Tip: Click the Divisional Markings button on the Toolbar to add further color-coding to units). Page 5 Let’s examine the enemy. Click the Axis unit as shown. Limited information regarding it will be listed in the Hex Info Area. With Fog of War knowledge of the enemy will change as contact is made. However, enemy strength will always be summarized as: "X"=1 to 9 men/vehicles, "XX"=10-99 and "XXX"=100 to 999. Some things will never be known. OBJECTIVES If you look at the map, you’ll see some oval shapes with numbers inside them. These are your geographical objectives. Objectives match the color of their owners. In this case, both objectives are Axis-owned and are colored Luftwaffe blue. Page 6 Click Info and then Victory in the Info Menu. The Victory Dialog will appear. The four values at the bottom determine success or failure in your scenario. To obtain a Major Victory in this battle you must earn 75 Victory Points by the scenario’s end. Click ok to close it. Your goal in this scenario therefore, is to earn 75 Victory Points through any combination of; holding geographical objectives and/or inflicting enemy loses by the scenario’s end. In this scenario, your assigned objectives total just 50 Victory Points. You will therefore need to take this fight to the enemy too. (Note: As you incur losses, Victory Points will be taken away from you). MOVEMENT Page 7 In this scenario your side moves first. Click on the hex indicated. The Unit Boxes of any units in the hex will be displayed in the Hex Info Area. Let’s move the Engineer unit. Click its Unit Box so that it lights up. It is now "selected" and ready for orders. (Tip: Right click the Hex Info Area at any time to see alternate information regarding a hex’s occupants and terrain). Page 8 Let’s move this unit one hex to the lower right near the bridge. Right click that location. If able, the unit will move. The Status Bar will tell you why if not. Units may be moved in any order, alternating back and forth as desired. (Note: With Fog of War movement may not be undone). Let’s now move another unit but this time to a distant hex. Click the Regimental HQ on the map as shown. Now click its Unit Box to select it. Page 9 With the left mouse button down, drag this unit along the road to the final hex as shown. Your HQ will move as many hexes as able in the general direction ordered. (Tip: Drag a series of shorter hops than one larger journey in order to maintain a tighter control over the route the AI will take). It is quite possible that you may hear the shrill whistle of bombs falling as you conduct this move, with a pop-up message appearing over your HQ showing some type of loss or damage. This is the enemy’s Air Interdiction and is governed by the AI for the defender as the other side moves during a turn. Page 10 Look at the US VI Corps HQ as shown. It is flagged as Fixed. A Fixed unit may not move until released usually according to a time schedule or by enemy action. Click Releases in the Units Menu to check this timetable. Releases will occur at the start of a turn and are announced in your Command Report. REINFORCEMENTS Let’s bring in the reinforcements announced at the beginning of your turn. Click the Arrived Units button on the Toolbar. The Arrived Dialog will appear. It lists any reinforcements eligible for arrival this turn and their hexes of entry. In this case hex 0,2 on the west map edge. (Tip: Hex coordinates are found in the Status Bar). Page 11 Click the line showing Company C, 601st Tank Destroyer Battalion (C/601 TD). Click ok. If able to do so, your reinforcements will enter the map at their designated hex. This unit, a company of 12 M10’s is now selected and available for orders. (Note: All reinforcements enter play in this manner whether land based, paratroop or naval). Let’s see how far your M10’s may potentially move. Click the Reachable Hexes button on the Toolbar. All potential hexes that your M10’s may reach at this point in time are highlighted. As movement points are used and/or blocking situations encountered, this range will update on screen accordingly. TRAVEL MODE Page 12 Let’s move your M10’s but this time, in Travel Mode. Travel Mode is a special state that usually gives a unit a larger movement allowance particularly when using roads. With your M10’s selected, click the Change Travel Mode button on the Toolbar. (Important note: When in Travel Mode, offensive and defensive strengths are greatly reduced). You will see a number of things happen. A white line will appear at the bottom of the unit’s icon, a "T" will appear next to its movement points in its Unit Box and its highlighted movement span will grow. This unit is now in Travel Mode. (Tip: To change back from Travel Mode repeat this process. Do not do this now as this redeployment costs movement points). Using any movement method desired, move your M10’s to the hex indicated. With your M10’s in place, click the Reachable Hexes button on the Toolbar to toggle this feature off. Page 13 THE FIRST OBJECTIVE Let’s try to take the first objective. Click the stack of paratroopers as shown. Select the top-most unit in the Hex Info Area. Try to move this unit across the canal to the top right now. It won’t move will it? Instead, you’ll hear a beep and a message will flag at the lower left of the map in the Status Bar explaining why. Units may only cross bridges in Travel Mode. What’s more, rivers and canals may only be crossed at bridges. So your paratroopers will firstly need to change to Travel Mode in Page 14 order to cross this water hex side. (Tip: Bridges must also be capable of carrying a unit too. Heavy Bridges for example may carry armored units). Change your paratroopers into Travel Mode as you did previously. Move the unit across the bridge one hex and into the objective. Be ready for a surprise… A number of things will occur: 1) You will uncover a hidden enemy unit entrenched immediately to your top right. 2) It may defensively fire at you and combat results will appear over your forces possibly affecting them. 3) You may undergo long-range attack from enemy artillery. 4) Lastly, you will capture the objective indicated by its color changing to US Airborne orange for the Allies. (Note: Only the side owning an objective at a scenario’s end may claim its Victory Points but once owned you need not maintain a presence there). DIRECT FIRE COMBAT Page 15 Your paratroopers are now vulnerable and somewhat inefficient whilst in Travel Mode but for the purposes of this tutorial, let’s fire them at the enemy. (Note: To conduct any type of fire, a unit must possess movement points colored white, green or yellow). Firstly check their combat range. Select your paratroopers and right click the Hex Info Area. Look closely and you’ll note a "soft target" range of one hex and a "hard target" range of zero. In other words, as your paratroopers lack heavy weaponry, they may only attack hard targets by assaulting them. However, against soft targets, they may fire from an adjacent hex. Press the Control key and place your mouse cursor over the enemy unit. A crosshairs will appear. Right click to fire. Page 16 If the enemy is an eligible target combat will ensue. The results of your fire will be shown on screen. Either there will be no effect, you’ll cause a loss, Disrupt the enemy (the results will be yellow) or cause it to be Broken (the results will be red). It is highly likely that the enemy will fire defensively in response. (Tip: Remember do not worry if your outcome does not match the one illustrated as no scenario will play the same way twice). INDIRECT FIRE ARTILLERY Let’s now fire some artillery. Artillery may fire at any unit in range as long as an eligible spotter can see it. Click the hex as shown and select the glider artillery unit there. Now check your artillery unit’s range. You will see that it is 9 hexes. The enemy unit just fired on sits well within this range. Page 17 To attack with artillery, proceed exactly as you did with direct fire – place your mouse over the enemy unit and with the Control key pressed, right click the enemy’s hex. The results of your fire will be shown. NAVAL FIRE In addition to your artillery assets, the Navy in the form of the USS Kendrick sails off shore. Naval assets fire exactly as land-based artillery. Check the Kendrick’s range and you’ll see it is an impressive 14 hexes. Page 18 This time, select the stack of enemy units in hex 13,3 as shown. Place your mouse over it and Control+right click to fire. A Target Dialog will appear. As more than one target exists in this hex you’ll be asked to choose which you wish to attack. Eligible targets will appear in bold. Click any eligible target desired and then ok. The Kendrick will fire. (Note: At the start of a turn, artillery or naval assets may show as Unavailable. This is a supply state preventing them from firing that turn. See the Supply section in the User Manual for more details). AIR SUPPORT Page 19 Let’s look at the air support you have at your disposal. Click the Call Air Mission button on the Toolbar. The Air Mission Dialog will appear listing any air missions available this turn. Here, you have both a Ground Support and a Recon mission ready to fly. To fly an air mission, you must first select a target hex. So click cancel to close. Page 20 Click the enemy unit adjacent to your objective. Open the Air Mission Dialog again. Note that both missions are in bold meaning that they are eligible to fly against this hex. Click your P38 Lightning Ground Support. Click ok. Your mission will sortie and a variety of outcomes may occur: 1) Either enemy air forces will Intercept your mission and drive it off or; 2) Your forces will attack. If the latter, anti-aircraft fire in the target hex may firstly sound and any effect on your aircraft will be reported. Should your mission survive, its results will then be displayed over the target hex Page 21 exactly as for other forms of combat. (Note: The number of offensive air missions that may be flown against a hex in a single turn is limited). Fly Recon air missions the same way. Rather than causing loss to a hex, these seek to uncover information surrounding it. Choose a location and try this now. With Fog of War you may discover a significant enemy presence to nothing at all. This outcome may be deceiving. CLOSE ASSAULT Let’s try to create a buffer zone at your bridgehead by clearing the enemy away. To capture an enemy occupied hex you must take it by Assault. Select the paratrooper unit as shown, send it into Travel Mode as you’ve done previously and send it across the bridge into your objective hex. Page 22 Assuming that your paratroopers survive this move, they should be eligible to continue. (Note: To conduct an Assault, a unit must not be Disrupted and must possess movement points colored white or green). With your paratroopers still selected, right click the enemy’s hex. Your unit will remain in place but an Assault Status dialog will appear listing the Assault’s estimated odds. (Tip: With Fog of War these will never accurately be known). Click ok to proceed. Defensive fire may ensue and an icon will cover the enemy hex. If your unit still remains Undisrupted, your Assault may continue. An Assault may be resolved at any point in your turn. You may add other units from the same or multiple hexes up to a limit set by the rules. Let’s leave things as they are for now. Click the Resolve Assault button on the Toolbar. Page 23 Results will appear showing both sides’ losses in the format "your losses/enemy losses". If you win and any remaining enemy retreat, you will capture its hex. If you win and the enemy is unable to retreat, you will capture some of its forces but not enter its hex. Remember do not worry if your outcome does not match the one illustrated. A FINAL TIP – ASSAULTING AND ZONES OF CONTROL The six hexes surrounding a unit are its Zones of Control. Under the default rules for this title, friendly units may only move from one such enemy hex to another, if the destination already contains a unit from its side. Page 24 The canals of the battlefield you currently face, hem your forces in early on. So you will need to clear the enemy’s Zones of Control adjacent to your first objective in order to gain the room to maneuver towards your second. Assault, will be your likely answer. Aim to push the enemy in a direction away from your planned advance to free your approach. Be careful as your Zones of Control may unintentionally prevent the enemy’s retreat too. For the purposes of this scenario, also try to keep the lines between your units and their headquarters free from enemy Zones of Control. Otherwise supply states such as Isolated and Low Ammo together with a lessened Disruption recovery, will severely curtail your offense. See the User Manual for more information regarding Supply, Morale and Headquarters. FINISH THE GAME You now know how to move, fire and Assault with your forces. With the victory conditions in mind keep maneuvering your forces in the manner you see fit. The end of the game will be announced at the conclusion of the enemy’s final turn at which time the final victory tally will be shown. To restart the scenario click Selection in the File Menu. A list of scenarios covering the Crete, Salerno and Anzio theatres will appear and you may select any including the Started Scenario by clicking its entry and then ok. Page 25 FURTHER INFORMATION This Guide is designed to make you feel comfortable with what’s going on in Panzer Campaigns but it is no substitute for the User Manual, which is the series’ rulebook. You can see this whilst playing by pressing F2 or click User Manual here. The Main Program Manual discusses the various elements of the interface in helpful detail. You can see this whilst playing by pressing F1 or click Main Program Help File here. If you wish to delve inside the game designer’s head, Press F3 whilst running the game and Designer’s Notes will be yours or click Notes Help File here. Pressing F4 invokes a feature called the Parameter Data Table. It provides a host of information including movement costs, terrain benefits and stacking limits amongst other things. Lastly, documentation for the game’s editors may be found in the following help files: Scenario Editor Help File Order of Battle Editor Help File For updates, downloads and the latest information visit HPS at www.hpssims.com or email [email protected]. Page 26 We hope you enjoy your game. Page 27