1
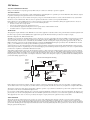
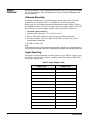
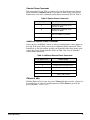
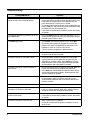
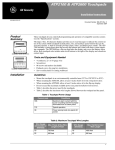
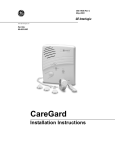
) *(6HFXULW\ ZZZ*(6HFXULW\FRP Part No: 60-883-95R CareGard User Guide 466-1936 Rev E October 2004 FCC Notices FCC Part 15 Information to the User Changes or modifications not expressly approved by GE Security can void the user’s authority to operate the equipment. FCC Part 15 Class B This equipment has been tested and found to comply with the limits for a Class B digital device, pursuant to part 15 of the FCC Rules. These limits are designed to provide reasonable protection against interference in a residential installation. This equipment generates, uses, and can radiate radio frequency energy and, if not installed and used in accordance with the instructions, may cause harmful interference to radio communications. However, there is no guarantee that interference will not occur in a particular installation. If this equipment does cause harmful interference to radio or television reception, which can be determined by turning the equipment off and on, the user is encouraged to try to correct the interference by one or more of the following measures: • Reorient or relocate the receiving antenna. • Increase the separation between the equipment and receiver. • Connect the affected equipment and the panel receiver to separate outlets, on different branch circuits. • Consult the dealer or an experienced radio/TV technician for help. ACTA Part 68 This equipment complies with Part 68 of the FCC Rules. Located on this equipment is a label that contains, among other information, the FCC registration number and the ringer equivalence number (REN) for this equipment. If requested, this information must be provided to the telephone company. FCC Part 68 Registration No. B4Z-USA-46042-AL-T The REN is used to determine the maximum number of devices that may be connected to your telephone line. Excessive RENs on a telephone line may result in devices not ringing in response to an incoming call. In most areas, the sum of all device RENs should not exceed five (5.0). To be certain of the number of devices that may be connected to a line, as determined by the total RENs, contact the local telephone company. For products approved after July 23, 2001, the REN for this product is part of the product identifier that has the format US:AAAEQ##TXXXX. The digits represented by ## are the REN without a decimal point (e.g., 03 is a REN of 0.3). For earlier products, the REN is separately shown on the label. A plug and jack used to connect this equipment to the premises wiring and telephone network must comply with the applicable FCC Part 68 rules and requirements as adopted by ACTA. A compliant telephone cord and modular plug is provided with this product. It is designed to be connected to a compliant modular jack that is also compliant. See the Installation Instructions for details. Alarm dialing equipment must be able to seize the telephone line and place a call in an emergency situation. It must be able to do this even if other equipment (telephone, answering system, computer modem, etc.) already has the telephone line in use. To do so, alarm dialing equipment must be connected to a properly installed RJ31X jack that is electrically in series and ahead of all other equipment attached to the same telephone line. Proper installation is depicted in the following diagram. If you have any questions concerning these instructions, consult your local telephone company or a qualified installer about installing an RJ31X jack and alarm dialing equipment for you. C u s to m e r P r e m is e s E q u ip m e n t a n d W ir in g N e tw o rk S e r v ic e P r o v id e r 's F a c ilitie s A la r m D ia lin g E q u ip m e n t R J 3 1 X J a c k C o m p u te r U n u s e d R J -1 1 J a c k T e le p h o n e L in e N e tw o rk D e m a r c a tio n P o in t A n s w e r in g S y s te m T e le p h o n e T e le p h o n e F a x M a c h in e U n u s e d R J -1 1 J a c k T e le p h o n e If this equipment causes harm to the telephone network, the telephone company may temporarily disconnect your service. If possible, you will be notified in advance. When advance notice is not practical, you will be notified as soon as possible. You will also be advised of your right to file a complaint with the FCC. The telephone company may make changes in its facilities, equipment, operations, or procedures that could affect the operation of the equipment. You will be given advance notice in order to maintain uninterrupted service. If you experience trouble with this equipment, please contact the company that installed the equipment for service and/or repair information. The telephone company may ask you to disconnect this equipment from the network until the problem has been corrected or you are sure that the equipment is not malfunctioning. This equipment may not be used on coin service provided by the telephone company. Connection to party lines is subject to state tariffs. Patent Information This product and the use of this product may be covered by one or more of the following patents: 4,864,636, 5,805,063, 5,872,512, 5,942,981, 5,686,896, 5,686,855, 4,855,713. Except as expressly provided herein, the purchase of this product shall not constitute a license or otherwise provide a right to practice a method covered by any of the identified patents. GE Security hereby grants the purchaser of this product a limited non-exclusive license to practice the methods patented in the identified patents solely with products manufactured, sold or licensed by GE Security. This license grant does not extend to the use of unlicensed third party products with this product. Contents System Components 1 Control Panel................................................................................... 1 Personal Help Button ...................................................................... 1 Optional Components ..................................................................... 1 Getting Started 2 Locating the Panel........................................................................... 2 Plugging in the Phone Line............................................................. 2 Powering the Panel.......................................................................... 3 Adjusting Speaker Volume.............................................................. 3 Activating an Alarm 3 Activating Your Personal Help Button ........................................... 3 Activating the Panel CALL Button................................................. 3 After Initiating a Call, the Panel................................................... 3 Speaker Phone 4 Medication Reminders 4 Setting the Clock .......................................................................... 4 Setting Medication Reminders........................................................ 4 Acknowledging Medication Reminders.......................................... 4 Home and Away ........................................................................... 5 Activity Check 5 Using Activity Check...................................................................... 5 Home and Away ........................................................................... 5 Adding a Sensor 6 Adding a Sensor with the Start Button............................................ 6 Performing System Tests 6 Testing a Sensor .............................................................................. 6 Testing Voice Event Notification .................................................... 7 i Report Features 8 Alternate Reporting......................................................................... 8 Pager Reporting............................................................................... 8 System Monitoring 9 Power .............................................................................................. 9 Backup Battery................................................................................ 9 Sensor Low Battery......................................................................... 9 Phone Test ..................................................................................... 10 Away Mode ................................................................................... 10 Check-In........................................................................................ 10 Remote Phone Commands ..........................................................11 Additional Remote Phone Commands ........................................11 Phone In Use ..................................................................................11 Troubleshooting 12 Appendix 13 Medication Reminders .................................................................. 13 Alternative Reporting Commands ................................................ 13 Contacting Your Dealer or Installer .............................................. 13 ii System Components The CareGard system allows you to activate an alarm and send a report in case of a medical emergency. Your system relies on two main components — a control panel and a personal help button — and may also be used to schedule activity timers and medication reminders. Control Panel The CareGard control panel reports an emergency after you press your personal help or the panel Call button. The panel receives a signal and sends an emergency report via phone line to a central monitoring station. When the panel cover is closed, the panel buttons are used to operate the system (see Figure 1). When the panel cover is open, the panel buttons are used Speaker to program the system. Personal Help Button The personal help button is used to activate the control panel in case of an emergency (see Figure 2). Volume Control Power Home/Away Button Help Button Reset / Status Button Call Button Figure 2. Personal Help Button Figure 1. CareGard Panel Front The personal help button may be worn on the wrist, as a pendant, or on a belt; it may also be mounted on a wall. Optional Components You can expand your system to include several wireless devices. Check with your installer about adding optional components. • Smoke Alarms • Freeze Sensors • Carbon Monoxide Alarms • Water Sensors • Motion Sensors • Touchpad • Door/Window Sensors • Keychain Touchpad • Pendant Panic Sensor • Repeater • X10 Light Control Modules System Components 1 Getting Started This section provides some helpful ideas for getting started with your CareGard panel. Read through the following procedures before your panel is installed: • Locating the Panel • Plugging in the Phone Line • Powering the System • Adjusting Speaker Volume Locating the Panel Consider the following when locating your panel: • Locate the panel near an incoming phone line and 110V AC outlet. • Locate the panel near a central location, such as a countertop or nightstand. • Do not locate the panel in or near areas with excessive moisture. Plugging in the Phone Line Plugging in the phone line provides a communication link between the panel and the central monitoring station. ¾ To plug in the phone line: 1. Plug the small end of the phone cord (included) into a home phone jack. 2. Plug the large end of the phone cord into the panel LINE jack. 3. Plug additional devices into the panel PHONE jack. Note When a phone line is plugged into the panel PHONE jack (refer to Figure 3), the panel bypasses the phone line after a panic sensor is pressed; bypassing the line ensures an emergency call can be sent, even if the phone is in use. To AC Outlet OFF ON LINE LINE PHONE PHONE Power Switch To Home Phone Jack (Large End) To Phone or Answering Machine Figure 3. Connecting Panel to AC power and Phone Line 2 Getting Started Powering the Panel To power your panel, simply plug the power adaptor into a wall outlet and set the Power switch to ON. The panel announces “Hello. System two-zero is OK.” Note To prevent your panel from losing power, do not plug the power adaptor into a wall outlet that is controlled by a switch or is part of a ground fault interrupt circuit (GFIC). Adjusting Speaker Volume The Volume button controls the audible level of announcements and two-way talk sessions. Each time you press the button, the speaker volume increases one level and the panel announces the volume level. Note If you press your personal help or panel Call button, the volume is automatically set to the highest volume level. Activating an Alarm Your panel’s main function is to respond to an alarm activation and to contact a central monitoring station. Two common methods to activate an alarm include pressing your personal help button or the panel Call button. Activating Your Personal Help Button You can activate an alarm by pressing the personal help button. The button may be worn on the wrist, as a pendant, or on a belt. ¾ To activate an alarm with the help button: 1. Press and hold the help button until the red light flashes (see Figure 4). Figure 4. Activating the Personal Help Button Activating the Panel CALL Button You can also activate an alarm by pressing the panel Call button. ¾ To activate an alarm with the panel CALL button: 1. On the panel front, press Call (see Figure 5). After initiating a call, the panel: Figure 5. Activating the panel CALL button 1. Status light flashes. 2. Dials the central monitoring station and reports an alarm condition. 3. Announces “Contacting emergency phone number. Please remain calm.” 4. Initiates a two-way audio session between you and a station operator. Activating an Alarm 3 Speaker Phone The Speaker Phone feature allows you to answer a phone call by pressing your personal help button or the panel Call button. ¾ To use the Speaker Phone feature: 1. When your phone rings, press your personal help button or the panel Call button to answer. 2. To end the call, press your personal help or the panel Call button. Medication Reminders If your provider supports the medication reminder feature, your panel can be programmed to notify you of several medication reminders. You can establish a convenient time — day or night — for up to eight different medication times. Prior to setting a medication reminder, ensure the panel clock is properly set. Setting the Clock ¾ To set the clock: 1. 2. 3. 4. Open the panel cover. Press Start. The panel announces “Please select from menu.” Press Set Clock. Next, press Hours (+/–) and Minutes (+/–) to set time. Press Done and close the panel cover. Setting Medication Reminders ¾ To set a Medication Reminder: 1. Release top latch to open the panel cover (see Figure 6). Top latch 2. Press Start (see Figure 7). The panel announces “Please select from menu.” 3. Press Set Medication Reminder. Next, press Hours Figure 6. Releasing top latch (+/–) and Minutes (+/–) to set medication reminder time. • To set additional medication reminders, repeat Step 3 as necessary. 4. Press Done and close the panel cover. All medication reminders are ON. Note Press Power again to temporarily set all programmed medication reminders to OFF. Acknowledging Medication Reminders When a medication reminder is activated, the panel announces the reminder once each minute for 15 minutes. Also, the Status button flashes and each X10-controlled light turns on and off during the announcement. ¾ To acknowledge a Medication Reminder: 1. Press Status. The panel acknowledges the medication reminder. Note If you do not acknowledge a medication reminder within 15 minutes of the announcement, the panel sends a report to the central monitoring station or to a neighbor, friend, or relative. Ask your dealer or installer for further details. 4 Speaker Phone Home and Away If you are going to be away for an extended period of time, it is necessary to set the medication reminder option to OFF. ¾ When Away from Home: On the panel front, press Power (if using a touchpad, press 3; if using a keychain touchpad, press Lock). The panel announces “Medication reminder OFF” and supervisory reports from panic buttons are ignored. ¾ When You Return: On the panel front, press Power (if using a touchpad, press 2; if using a keychain touchpad, press Unlock). The panel announces “Medication reminder ON” and supervised panic buttons are monitored. Activity Check The panel’s Activity Check feature monitors activity by responding to programmed sensors and the panel Status button. To establish an activity check time period, contact your dealer or installer. Using Activity Check When the Activity Check feature is enabled, your panel monitors activity during a set time period. If the panel fails to detect activity before the time period expires, a report is generated and sent to the central station. For example, if the feature is set to 10, the panel must detect activity during the selected 10-hour period. If the panel fails to detect activity during this time, a report is sent — signaling a potential emergency — to a station operator. ¾ If activity is not detected during Activity Check Time Period: • The Status button flashes and the panel announces “Activity time warning. Please press STATUS” once a minute for 15 minutes. • All X10-controlled lights flash on and off during the announcement. • A No Activity Report is sent if you do not press Status within 15 minutes after the Activity Check time period expires. Home and Away If you are going to be away for an extended period of time, it is necessary to set the activity check option to OFF. ¾ When Away from Home: On the panel front, press Power ( if using a touchpad, press 3; if using a keychain touchpad, press Lock). The panel announces “Activity Check OFF.” All scheduled activity checks are turned off and the Power button flashes. ¾ When You Return: On the panel front, press Power (if using a touchpad, press 2; if using a keychain touchpad, press Unlock). The panel announces “Activity Check ON.” All scheduled activity checks are turned on and the Power button remains on. Activity Check 5 Adding a Sensor The primary method for adding a sensor includes using both the Start and Add Sensor buttons. To add a sensor, refer to specific sensor Installation Instructions. Adding a Sensor with the Start Button The Start button allows you to program up to 24 sensors into panel memory. See Figure 4 for a detailed view of the panel menu. ¾ To add a sensor with the Start Button: 1. 2. 3. 4. 5. Open the panel cover. Press Start (see Figure 7). The panel announces “Please select from menu.” Press Add Sensor. Trip the sensor to be added to panel memory. Press Done. The panel adds the sensor into memory. Note If the panel does not announce the sensor type you want to add, press Add Sensor until the proper sensor type is announced. Next, press Done to complete the process. Figure 7. Panel Menu Performing System Tests To ensure your panel communicates with the central station, you can perform a series of simple tests. The tests should be done on a weekly schedule and include testing programmed panel sensors and the voice event notification. Testing a Sensor Testing a sensor requires you to activate or trip a specific sensor. Refer to Table 1 for instructions on how to activate specific sensors. ¾ To Test a Sensor: 1. 2. 3. 4. 6 Open the panel cover. Press Start. The panel announces “Please select from menu.” Press Test Sensors. The panel announces “Sensor test is on. Test sensor.” Activate the appropriate sensor to be tested (see Table 1). • After each activated sensor communicates with the panel, the panel announces “Sensor test complete. Press DONE.” Adding a Sensor 5. Press Done. The panel announces “Sensor test OK.” Table 1: Activating a Sensor How do I activate a... You simply... Personal Help / Pendant Help Button Press and hold the help button until the red light flashes. Door / Window Sensor Open a door or window that has a sensor. Freeze Sensor Remove sensor cover and press Program. Water Sensor Remove sensor cover and press Program. Smoke Alarm Press Test on the smoke alarm. Carbon Monoxide Alarm Unplug the alarm and plug it back in. Press Test/Reset until the alarm sounds six beeps. Motion Sensor Remove motion sensor from mounting plate. Repeater Remove cover and press Tamper Switch. Touchpad / Keychain Press and hold the two emergency buttons. Keychain Touchpad Press and hold the lock and unlock buttons. Testing Voice Event Notification Testing the Voice Event Notification feature requires you to activate your personal help button or press the panel Call button. To prevent a test failure, you must also answer the secondary or event notification phone. ¾ To test Voice Event Notification: 1. If your panel is monitored, contact your central monitoring station and inform the operator that you are testing your panel. 2. Press your personal help button or the panel Call button. 3. Answer the secondary or voice event phone. The panel announces “Press STAR for alarm.” 4. On the phone, press * to hear each alarm. The panel announces “Sensor XX panic alarm.” • If the call ends and you did not press *, the panel calls the programmed number eight times. • After reviewing each alarm, press 5 to enter a two-way audio session or go to Step 5. Refer to Table 2 for a list of accessible remote phone commands. 5. On the phone, press # to terminate the call. Performing System Tests 7 Report Features Your panel supports several reporting features that allow you to signal for help in case of an emergency. The reporting features include Alternate Reporting and Pager Reporting. Alternate Reporting In addition to contacting a central monitoring station, your panel can be programmed to call a friend, relative, or neighbor in case of an emergency. Ensure you pass the following important information to those friends, relatives, or neighbors you have selected as an alternate for the panel to report to. To establish or change an alternate phone number, contact your dealer or installer. ¾ To answer a panel alarm call: • After the panel announces “Press Star for alarm.” 1. Press *. The panel announces the alarm type and time of activation. 2. Press 5 to conduct a two-way audio session. Refer to Table 3 for a list of remote phone commands. 3. Press # to end the call. Note If the phone line uses a voice mail messaging system, include a star (*) and pound (#) in your voice mail message to prevent a communication problem with the panel phone line. Pager Reporting Your panel can be programmed to send reports to a pager. When a report is generated, the recipient’s pager displays a specific report code. Refer to Table 4 for a list of pager report codes. Table 2: Pager Report Codes Report Type 8 Display Code Phone Test -101-101 AC Power Restore -102-102 AC Power Fail -103-103 Medication Reminder Failure -104-104 Activity Timer Failure -105-105 Call or Personal Help Button -107-107 Smoke Alarm -109-109 CareGiver In (Open) -110-110 CareGiver Out (Closed) -111-111 Trouble Sensor Restore -115-115 General Supervision -116-116 Trouble Sensor -117-117 CO Detector -119-119 Report Features Table 2: Pager Report Codes Report Type System Monitoring Display Code Water Sensor -121-121 Enter / Exit Programming -122-122 Alarm Cancel -123-123 To ensure your system is operating properly, your panel constantly monitors for the following conditions: Power; Backup Battery; Sensor Low Battery; Phone Test; Away Mode; Check-In; Phone in Use. If the panel detects a fault, the Status light turns on. Press Status; the panel announces a brief status message. If your panel is programmed by an installer, the panel contacts the central monitoring station each time a panel or system fault is detected. Power When your panel is connected to a power source, the panel’s Power light remains lit. If power is disconnected for more than six seconds, the following events occur: • The panel Power light turns off. • A power failure report is stored in the panel. • The panel sounds a series of beeps that indicate a loss of power. • For monitored panels — reports are sent to the central station after a set time interval expires. This function can be disabled by your dealer. Note If you press Status during a power failure, the panel announces “AC power failure” and the series of beeps stops sounding for four hours. When Power is restored: • The panel Power light turns on. • All beeps that indicate power loss stop sounding. • For monitored panels — if an AC Power Failure Report is sent, a Power Restoral Report is also sent to the central monitoring station. This function can be disabled by your dealer. Backup Battery If the panel’s backup battery reports a low battery condition, the following events occur: • The panel sounds a series of beeps that indicate a low battery condition. • The panel reports a system problem to the central monitoring station. Note If you press Status during a low battery condition, the panel announces “System low battery” and the series of beeps stops sounding for four hours. Sensor Low Battery The following events occur if your panel receives a sensor low battery report: • The panel Status light turns on. System Monitoring 9 • The panel sounds a series of beeps that indicate a sensor has a low battery. • The panel reports a system problem to the central monitoring station. Note If you press Status during a sensor low battery condition, the panel announces “Sensor [type]. Low battery” and the series of beeps stops sounding for four hours. When a Sensor Low Battery condition is restored: • The panel Status light turns off. • All beeps that indicate sensor low battery stop sounding. Phone Test The automatic Phone Test feature can only be set by your installer. When an automatic phone test is performed, the panel verifies communications between the system and the central monitoring station and pager. The following events occur if your panel fails to contact the monitoring station: • The panel Status light turns on. • The panel sounds a series of beeps that indicate a communication failure. Note If you press Status during a phone test failure condition, the panel announces “Phone communication failure” and the series of beeps stops sounding for four hours. When a Phone Test condition is finished: • The panel Status light turns off. • All beeps that indicate a phone test condition stop sounding. Away Mode When you are away for an extended period of time, the Away Mode feature allows you to turn off all medication reminders and cancel activity check time periods. To set the panel to AWAY, simply press Power. If you are using a touchpad, press 3; if you are using a keychain touchpad, press Lock. When set to AWAY, the Power light flashes and the following functions are disabled: • Medication Reminders • Activity Check • Panic Sensor Supervision To set the panel to HOME, press Power again. If you are using a touchpad, press 2; if you are using a keychain touchpad, press Unlock. Check-In The Check-In feature allows a friend, relative, or other caregiver to access your panel from an outside phone line. They can then listen in and monitor for sounds or have a conversation with you by communicating through the panel. The following procedures assume that your panel is set to a factory default. ¾ To set the Check-In feature: 1. Call your panel location. Let the phone ring once and hang up. 2. Wait 10 to 40 seconds and call your panel location again. • The panel answers after the first ring. 3. Enter your Master Access Code and follow the remote phone commands listed in Table 3. 10 System Monitoring Remote Phone Commands The commands listed in Table 3 can be used to set all medication and activity check reminders to HOME or AWAY. If you press 5 while testing Voice Event Notification, refer to the additional remote phone commands listed in Table 4. Table 3: Remote Phone Commands On the phone, press... Panel Function 2 Set Medication and Activity Check Reminders to Away. 4 Set Medication and Activity Check Reminders to Home. 5 Establishes a two-way session. Refer to Table 3 for additional commands. 7 Check panel status. Additional Remote Phone Commands After you have established a two-way audio session through a remote phone by pressing 5, the panel allows you to access additional phone commands. These commands are used to perform specific panel functions other than setting medication and activity check reminders. Refer to Table 4 for a list of additional remote phone commands. Table 4: Additional Remote Phone Commands On the phone, press... Panel Function 0 or 1 Talk only 2 Conduct a two-way audio session 3 or 6 Listen only 7 Extend an audio session 90 seconds 99 or # End an audio session Phone In Use With the Phone in Use feature, the panel’s Status light turns on after a phone has been picked up or a line has been disconnected. When Status is pressed, the panel announces “Phone in use.” System Monitoring 11 Troubleshooting If the problem is... My panel does not respond after I press my personal help or the panel Call buttons. • If your panel does not respond to the personal help button, ensure you press the button until the red light flashes; if the panel does not respond to the Call button, ensure you press the button for a minimum of 1 second. • Ensure the large end of the phone cord is plugged into the panel’s LINE jack and that the small end of the phone cord is plugged into your home phone jack. • If you continue to experience problems, contact your dealer or installer. I accidentally pressed my personal help or the panel Call button. • Press the Status button to cancel the emergency call. If a central station operator contacts you, inform them that you pressed a panic button in error. The Power light is off. • Is the Power switch on the panel’s back is set to ON? • Ensure the power adaptor is plugged into a wall outlet. • Check if your panel is plugged into an outlet that is controlled by a switch or is part of a GFI circuit. • Test the outlet by plugging in a different device. My panel constantly beeps. • Press the Status button to cancel all beeps for four hours or contact your dealer or installer. The panel announces “AC power failure.” • Ensure the power adaptor is plugged into a wall outlet. • If your power has recently gone out, the panel may be operating on a backup battery. Press Status to acknowledge the power failure and to stop panel beeping sounds. Announcements stop after power is restored. • Ensure your phone lines are properly connected. Refer to Figure 3 for connecting the panel to your phone line. • Press Status to acknowledge the communications failure and to stop panel beeping sounds. Announcements stop after the condition is restored. The panel announces “System low battery.” • If you have recently plugged power adaptor into a wall outlet, the backup battery may still be recharging. If the announcement continues after a few hours, contact your dealer or installer. The panel announces “Sensor low battery.” • Perform a sensor test or contact your dealer or installer. After performing a sensor test, the panel announces “Function not available.” • The senor you are testing is not programmed into your panel or has been deleted. Refer to the Adding a Sensor section or contact your installer for further detail. I experience problems when entering my master access code. • Use the panel’s default master access code: 1234 • If you continue to experience problems, contact your dealer or installer. The panel announces “Phone in use.” • Verify a phone line is connected. • Ensure that another device (phone or modem) is not currently in use. The panel announces “Phone communications failure.” 12 Try this... Troubleshooting Appendix Medication Reminders Record and keep track of current medication reminders by writing them in the table below. You can program up to eight different reminders into panel memory. No. Medication Time 1 AM / PM 2 AM / PM 3 AM / PM 4 AM / PM 5 AM / PM 6 AM / PM 7 AM / PM 8 AM / PM Alternative Reporting Commands If your panel is programmed to report to a friend, relative, or neighbor — in addition to the central monitoring station — provide them with three simple phone commands in case you experience an emergency. Also, if their phone uses voice mail or an answering machine, instruct them to press (*) and (#) at the end of their recorded message.. Command Press... Hear alarm type and activation time * Conduct a two-way audio session 5 End a call # Contacting Your Dealer or Installer If you have questions or your panel is in need of service, please contact your authorized dealer or installer. Record the appropriate information below. Company Name ___________________________________ Address _________________________________________ City ______________________ State _____ Zip _________ Phone Number (______) ____________________________ Contact Name ____________________________________ Appendix 13 ) *(6HFXULW\ *(6HFXULW\$OOWUDGHPDUNVDUHSURSHUWLHVRIWKHLURZQHUV $OOULJKWVUHVHUYHG 14 5HG)R[5RDG $UGHQ+LOOV01 Appendix