1
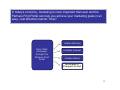
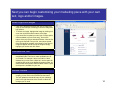
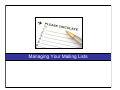
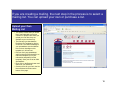
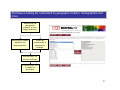
Web to Print Service
In today’s economy, marketing is more important than ever and the
Partners Print Portal can help you achieve your marketing goals in an
easy, cost effective manner. How?
Grabs Attention
Direct Mail
Campaign
through the
Partners Print
Portal
Initiates Interest
Creates Desire
Motivates a
Prospect to Act
2
The Partners Print Portal helps you create professional marketing
materials with ease at a reasonable price.
Customizable Templates
Easily customize postcards, flyers and posters for two campaigns including the Come Play Youth
Hockey campaign and OneGoal’s Vitamin H campaign.
Select your Target Audience
If you choose to mail materials, you can purchase a targeted mailing list through the Portal from
USAData or you can upload your own mailing list. The typical response rate for a direct mail campaign
is 1-2 percent however, personalized items such as postcards purchased from the Partners Print Portal
have the potential for a 2-3 percent response rate. Knowing this can help you determine how many
customers to include on your mailing list.
Place Your Order
Once you have proofread your materials and are happy with your order, you simply submit the order.
If you’d like to help increase the response rate, follow up your mailing with a phone call. The personal
touch will help you convert prospects into customers.
3
What’s In It For My Local Association?
Local
Association
• Affordable and
professional marketing
materials such as
posters, flyers and
postcards.
• The ability to reach any
number of potential or
current families with 4 to
8 year olds through a
proven marketing
medium.
Parent of 4 to 8
year old
• Not only gains an
awareness of the game of
hockey, but hopefully
selects your local
association as the best
option for youth sports.
• Digital Ink is the company
behind the scenes
running the Partners Print
Portal. They earn profits
from the print materials
you purchase.
• Views professional
marketing materials and
feels confident they are
working with a
professional local
association.
• If you like their work, you
can also utilize their sister
company, Creative Vision,
for help with logo design,
Web site design,
advertising needs and
promotional specialty
items.
• USA Hockey hopes to
see all of our local
association be successful
in increasing participation
and offers the Portal as
one way to help local
associations achieve the
2 & 2 Challenge.
• The Partners Print Portal
is a Business Solution
open to only our Partners
Program members.
4
The Partners Print Portal: 5 Easy Steps
1.
Sign Up for an Account
2.
Navigate the Web Site
3.
Customize your Marketing Materials
4.
Manage your Mailing Lists
5.
Finalize your Order
5
Sign Up for a Partners Print Portal Account
To begin creating your customized marketing materials on the Partners Print
Portal, simply visit www.usahockey.com/programservices or call your local
Program Services Manager.
Kevin
Erlenbach
Kevin
Kavanagh
Courtney
Welch
Districts: Atlantic,
Central, Minnesota,
New England,
Northern Plains,
Southeastern
(719) 538-1119
District:
Massachusetts
(719) 538-1115
Districts: Michigan,
Mid-American, New
York, Pacific & Rocky
Mountain
(719) 538-1118
[email protected]
[email protected]
[email protected]
7
Navigate the Partners Print Portal
Once you have obtained your login information, you can begin creating
your own marketing materials. First, let’s review the core components
of the Web site.
1
Product Listing
This section contains links to
each type of product featured in
the Portal. This is where you
will begin when placing an
order.
2
2
Main Navigation
This area helps you navigate
your way through the site and
includes access to your account
information, shopping cart and
more.
3
1
3
Help Files &
Resources
If you need help with any step
throughout the process, look
here for answers.
9
All of the templates ready for customization can be found in the product
listing.
The product listing contains each type of
product available. When you click on a type
of product, you will see all of the available
templates and can select the template that will
work best for your business.
For example, the screenshot on the right
shows all of the available poster templates.
10
The Main Navigation allows you to move around to different sections of the site.
Home
Takes you to the home page of the Partners Print Portal.
Sign Out
Logs you out of the system.
My Account
The My Account page contains four sections:
1.
Order History - This allows you to review past orders and reorder them if you wish.
2.
Personal Information - Update account information like changing a password, email address or contact name.
3.
Addresses - Change billing and shipping addresses for your account.
4.
Recipient Lists - Modify, download or delete your mailing lists.
Drafts
Lists templates you have begun customizing, but never completed or placed in your shopping cart.
Cart
Shows you all of the items currently in your shopping cart, ready for purchase.
Help
This is a link to a PDF of the user manual.
11
Customizing Your Marketing Materials
To create your own marketing materials, determine what type of
product and which template you would like to customize.
Choose the type of product you would like to create in
the Product Listing, then select the template.
You will see a thumbnail of the template and can view
a full-size preview by clicking the link. You can also
view the pre-written text on the template. Keep in mind
that you will be able to edit the text in the coming steps.
This page also contains a price list for the product you
selected, broken down by quantity.
If you wish to move on with your order, simply select
Continue. If you’d like to view another template, select
Back at the bottom of the screen.
13
Next you can begin customizing your marketing piece with your own
text, logo and/or images.
Select Logos and Images
• Click on the drop down arrow by the logo or image field.
A pop up box will open, showing you all of the image and
logo options.
• To choose an image, highlight that image by clicking on it
once, then click Select at the bottom of the page.
• If you would like to upload your own logo or image (these
will be available to your account only), scroll to the
bottom of the pop up box and select Browse. Note the list
of file types required. Find your file, then select Upload.
Once the upload is complete, a thumbnail of your logo or
image will appear with the rest of the images. Simply
highlight your choice and click Select.
Customize the Text
• Enter your company information and text in the
designated fields. Feel free to make modifications to fit
your needs. For example, if there is a field for a Web
address but you don’t have a Web site, use the space for
something else such as an additional contact number. Or,
delete all the text and leave that field blank. Notice a spell
check option is available for your use.
Refresh Preview
• At any time while you’re modifying your text or changing
images, you can click on the Refresh Preview button.
This will update the thumbnail image of your marketing
piece in the right hand side of the screen to reflect the
changes you’ve made.
14
Managing Your Mailing Lists
If you are creating a mailing, the next step in the process is to select a
mailing list. You can upload your own or purchase a list.
Upload your Own
Mailing List
• This option is used when you would
like to mail materials to your own
customer or prospect list. When you
upload your own lists, they are
available to your account only.
• The first step is to download the
Recipient List Template by clicking
on the link. The column headings in
your spreadsheet must be identical
to the column headings on this
template or it will not load.
• Edit your list in any spreadsheet
editor such as Excel and modify it to
match the template (or cut your
information and paste it into the
template). Save your file as an XML
Spreadsheet.
• Next, click on the Browse button and
search for your saved list.
• Create a name for your list in the List
Name field and click Next at the
bottom of the page.
16
Purchase a mailing list customized by geographic location, demographics and
more.
Determine the
geographic
location of your
target audience.
Refine your target
audience by
demographics.
Select all
households in
geographic
location.
Review your list
criteria and cost.
Confirm your list
is ready for
purchase.
17
The USAData interface walks you step-by-step through the list selection
process.
Purchase a Mailing List
1. First click the button labeled Buy a Mailing List. A new screen will open
with a link named Launch Leads Module from USADATA. Click this link.
2. A pop up box will open. This is where you will select the various criteria
to reach the customers you are targeting.
3. Select the method by which you would like to determine the
geographical location of the customers and click Next.
4. Select or enter your criteria (zip codes, cities, etc.) and click Next.
5. You will have the option of choosing all households in the given
selection or to refine the list by demographics. If you select all
households, you will skip step 6. If you choose to refine your list by
demographic, you will go through step 6 to narrow your list. This page
also gives you the option of including telephone numbers on your list.
We would recommend including the telephone numbers so you can
follow up your mailing with phone calls.
6. When narrowing your list by demographic, you will see the category
options in the top box on the left hand side of the screen and the
variables right below the categories. If you want to select all customers
who own their home, you would click on Homeowner/Renter in the
Category box, then on Homeowner in the Variables box. With
Homeowner highlighted, click the Add button. You will see the
Homeowner criteria added to the My Target Audience box on the right
side of the screen. Keep adding criteria until you have exactly the target
audience you’re looking for. Then click Next.
7. The next page will show you the number of people on the list and the
cost of the list. You will be able to review your selections and modify if
needed. Also notice the option to use the list multiple times. You should
select this option if you would like to keep this list for future use. When
you are happy with your selections, click Next.
8. You will be taken back to the Partners Print Portal. Name your list in the
List Name field and click Next.
18
You can also use a mailing list you’ve previously uploaded
or purchased.
Recipient List Manager
• When you select this option, you will
see a summary of all of the mailing
lists associated with your account,
whether they are lists you’ve
uploaded or lists you’ve purchased.
• Simply select the list you would like
to use and click Next.
19
Finalizing Your Order
Finalizing your order will place it in your shopping cart, indicating it is
ready for purchase.
Ordering Postcards
•
•
•
•
•
•
When you order a postcard or self-mailing
brochure, you will indicate that it is a mail-drop.
The number of copies indicates how many copies
each customer on the mailing list will receive.
You can recalculate the total cost if necessary
and view the pricing table for the printed
marketing piece. (The total cost will change if you
modify the quantity in the Number of Copies box.)
If you would like to make any changes to the
number of recipients on your mailing list or to your
postcard, simply click the Back button until you’re
in the section you’d like to modify.
Before the order can be placed you must proof
read your materials. Click on the Proof button.
Review your materials and click Proof is
Approved if everything looks as it should. If there
is a mistake, click the back button to make
necessary changes. Please review your materials
closely - any mistakes are your responsibility.
Click Add to Cart when you are happy with your
marketing piece.
21
You can review your shopping cart and add additional items or
continue to checkout.
Shopping Cart
•
•
•
Your shopping cart gives you
an overview of items that have
been customized and are
ready for purchase. You can
edit items in your cart or delete
them.
If you’d like to add more items
to your cart, click Continue
Shopping.
If you are happy with your
order, click Checkout.
22
In the checkout screen, you enter your payment options and submit the
order.
Checkout
•
•
•
•
The checkout screen shows you a summary
of your order.
Enter or edit your billing address. This should
match the billing address on the credit card
you are using to pay for your purchase.
Next enter your credit card information (note
that credit cards - Visa, MC, Amex - are the
only form of payment accepted), and click
Submit Order.
You can feel safe placing your order online.
The Partners Print Portal is completely
protected via encryption and the https
protocol.
Where to go for Help
There are several resources at your disposal should you
need help with any step in the Partners Print Portal.
OPTION 1
Refer to the help files found on the
Web site.
Click on the Help button found in the
top right corner of every page to
download the user manual or refer to
the help section on the home page.
.
OPTION 2
Email the Digital Ink help desk.*
Feel free to email the Digital Ink
help desk at
[email protected].
.
OPTION 3
Call the Digital Ink help desk.*
Digital Ink also has a toll-free
number available. For assistance, call
877-859-2843.
* The Digital Ink help desk is open weekdays from 8am to 4pm EST.
You can also call your USA Hockey Program Services Manager.
25