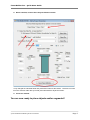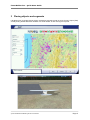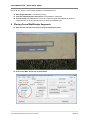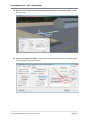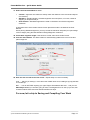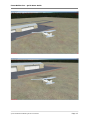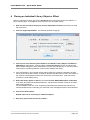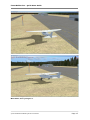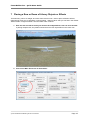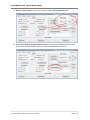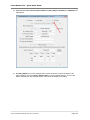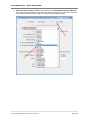
1
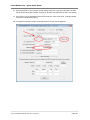
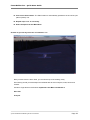
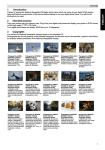
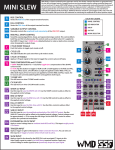
FenceBuilder Pro Quick Start Guide FenceBuilder Pro - Quick Start Guide Table of Contents 1 Installation....................................................................................................................................... 3 2 Creating a FenceBuilder project ..................................................................................................... 4 3 Placing objects and segments ........................................................................................................ 8 4 Placing Fence/Wall/Hedge Segments ............................................................................................ 9 5 Saving And Compiling Your Work ................................................................................................ 12 6 Placing an Individual Library Object or Effect............................................................................... 14 7 Placing a Row or Rows of Library Objects or Effects ................................................................... 16 © 2009 FSAddon Publishing & Don Grovestine Page 2 FenceBuilder Pro - Quick Start Guide This manual is for those of you who don't like reading user manuals but who simply want to get on with using FENCEBUILDER PRO. It is strongly recommended, however, that you take the time to read at least the first three chapters of the User Manual. 1 Installation FenceBuilder Pro is a VB NET.Framework 3.0 application. If NET.Framework 3.0 or later is not already installed on your computer, the “redistributable” can be downloaded from the Microsoft website at no charge. (At time of writing, the download link was http://www.microsoft.com/downloads/details.aspx?displaylang=en&FamilyID=10cc340b-f857-4a1483f5-25634c3bf043 .) Vista users may need full administrative privileges to install and use FenceBuilder Pro. FenceBuilder Pro does not affect the Windows Registry. To install FenceBuilder Pro, simply run the Installer (you have probably already done that), which will put the programs and manuals in a folder of your choice (or the Flight Simulator folder if you have not indicated any other choice). It will also put shortcuts on your desktop to the manuals and to TWO versions of the program. The two versions of the FenceBuilder Pro executable are: FenceBuilder Pro (FSUIPC).exe for use with either FS9 or FSX (FSUIPC, a widely-used freeware product, also must be installed), and FenceBuilder Pro (SimConnect).exe for use only with FSX. The two versions are identical, save for the medium for communicating with Flight Simulator. In this manual, both are referred to simply as FenceBuilder Pro.exe. Use the one most suitable for you. The other may be deleted. © 2009 FSAddon Publishing & Don Grovestine Page 3 FenceBuilder Pro - Quick Start Guide 2 Creating a FenceBuilder project Alright, so you’re ready to build your first fence or wall, are you? Well then, let’s get this over with quickly and give you a taste of what the program can do. And what better way to learn it than from a Total Beginner, like myself! I’ve followed Don’s ‘beginner instructions’, augmented them, and took ‘photos’ while building. And believe me, if I can do it, then anybody can! Build a Wall in 30 Easy Steps 1. Start FenceBuilder Pro … duh! The Main Panel (shown below) appears: Only those buttons and other controls that are useable at the time are enabled. The others are '"greyed-out". (This applies to all panels/dialogs.) Change the dimensions (feet/meters) and other display options as desired from the Settings menu at the top. 2. Click on the Project 3. Click on Start New Project. © 2009 FSAddon Publishing & Don Grovestine Page 4 FenceBuilder Pro - Quick Start Guide Now the Define Project Parameters Window will pop up: 4. Enter a name for the project (it can be anything up to 64 characters) 5. Click on the Select Style button. a standard Windows "file open" dialog appears. If this is the first usage of this dialog, the subfolders in the FenceBuilder Pro folder will be shown. (If the FenceBuilder Pro folder is not in view, navigate your way back to it). © 2009 FSAddon Publishing & Don Grovestine Page 5 FenceBuilder Pro - Quick Start Guide 6. Click on the "Style Files" folder (if not opened yet). You should see a list of style files similar to the following: The primary characteristics of each are as follows: Brick Wall - 3' high brick wall with concrete cap Chain Link Fence - 4' chain-link fence Cinder Block Wall - 8' wall, 9" thick cinder-block wall, with or without barbed wire top Flower Box - 2'high, 2'wide pebbled concrete base with inset "flowers" above High Hedge - 10'high, 8'wide hedge with sloped-sided top Lattice Top Fence - 6' high wooded fence with lattice top Object Placement - a general-purpose, object/effect placement "starter" Parking Lot Barrier - 2' high, sloped-sided concrete barrier Perimeter Fence - 8' chain-link with barbed wire top 7. Select one file and click on "Open". (I used the Brick Wall in my example) Several fields of the Project Definition dialog, including Nominal Length and Height (main element), will be filled in. As well, if you selected a style that draws segments like a fence or a wall (as opposed to simply placing objects), you will see the end-profile of the segments to be drawn. Adjust any of the parameters you wish. Some styles include both a top and bottom section. If you only want the bottom section, as often will be the case with, for example, Cinder Block Wall, set Height (upper element) to 0. Changes in profile will be shown immediately. You may also substitute your own textures in place of the default. © 2009 FSAddon Publishing & Don Grovestine Page 6 FenceBuilder Pro - Quick Start Guide 8. When satisfied, click the Save Project Definition button I only changed the indicated fields and pressed the button at the bottom. I selected ‘concrete’ from the ‘textures’ folder that you’ll find just underneath the Style Files folder. 9. Close this window. You are now ready to place objects and/or segments!! © 2009 FSAddon Publishing & Don Grovestine Page 7 FenceBuilder Pro - Quick Start Guide 3 Placing objects and segments I decided to pick a random field in Oregon somewhere and this turned out to be Country Squire (S48). A nicely boring default Microsoft rendition of a small airfield. So lots of things to improve! © 2009 FSAddon Publishing & Don Grovestine Page 8 FenceBuilder Pro - Quick Start Guide First of all, we need to connect Flight Simulator to FenceBuilder Pro. 10. Start Flight Simulator if not already running. 11. Click the Flight Simulator menu-item in FenceBuilder’s main panel 12. Click Connect (FenceBuilder Pro connects to Flight Simulator automatically at startup if Flight Simulator is running already when you start FenceBuilder Pro!) 4 Placing Fence/Wall/Hedge Segments 13. Slew the user aircraft to where you want the segments to start. 14. Click on the Main Panel Use as Start button. © 2009 FSAddon Publishing & Don Grovestine Page 9 FenceBuilder Pro - Quick Start Guide 15. Slew the user aircraft to where you want the first (series of) segments to end - usually the first corner. 16. Click on the Segments button. This will open the window that will do the actual placement of the segments of your wall or fence. © 2009 FSAddon Publishing & Don Grovestine Page 10 FenceBuilder Pro - Quick Start Guide 17. Select the Placement Mode as either: Custom - segments are created to exactly match the distance to be covered and sloped as necessary Standard - standard length, horizontal segments are used (which, of course, results in stepping on sloped terrain) or Semi-Custom - Standard segments are used on flat terrain and Custom segments otherwise. A fuller discussion of the relative merits of each placement mode is included in the User Manual. When placing Standard segments, you may control the maximum step size (as a percentage of fence height) using the Max Elevation Change/Segment combo box. 18. Check Auto segment length. If the terrain is not flat, also check Profile Terrain. 19. Click the Place Button. The Start Position is automatically updated to the end of the lastplaced segment. 20. Slew the user aircraft to the next corner. Repeat steps 15-19 as necessary. Cool….. without you seeing it, I have done this THREE times now, building a zig-zag wall with a concrete top. BUT…. You do NOT SEE anything yet, right!? Right. We’ll address that now… and you can SKIP steps 21-25 if you are NOT going to make a rectangular fence or wall. (If you are, then revisit this Quick Guide next time and INCLUDE those steps. For now, let’s skip to Saving and Compiling Your Work © 2009 FSAddon Publishing & Don Grovestine Page 11 FenceBuilder Pro - Quick Start Guide Optional: 21. To close the fence if desired (i.e. connect the last part back to the very first part of the fence(s)), on the Main Panel click on the Plan View button. This will bring-up the Plan View display, shown below. All your previously-placed segments will be in view. 22. Select the first segment placed by clicking near its mid-point. (You may have to zoom the display to get the right segment). 23. Click the Selected radio button 24. Click the "to Start" button. The user aircraft will be slewed to the start end of the first-placed segment. 25. Click the Segments button. And go to STEP 17. 5 Saving And Compiling Your Work 26. On the Main Panel, click the Project / Save Project Data menu item. (If Plan View is open, you may click its Save button instead.) If the placement activity cannot be completed in one session, save the project data at a convenient time. When you restart, your project will automatically be selected. (Accept FenceBuilder’s offer to place the user aircraft at the end of the last-placed segment and resume your work). 27. Click Compile. The compile Dialog pops-up 28. Check FS9 or FSX as appropriate, select the folder into which the compiled file is to be placed (by default this would be the FSX/Addon scenery folder) and click on the Compile button. The compiled .bgl file will be copied into the designated folder and, if that folder is a Flight Simulator \scenery folder, any required textures will be copied into the companion \texture folder 29. Click on the Compile button 30. Restart/reset Flight Simulator. Your placed segments/object/effect should be visible © 2009 FSAddon Publishing & Don Grovestine Page 12 FenceBuilder Pro - Quick Start Guide © 2009 FSAddon Publishing & Don Grovestine Page 13 FenceBuilder Pro - Quick Start Guide 6 Placing an Individual Library Object or Effect Now let’s replace that rather ugly looking windsock with one that looks a tad more realistic. I.e. place a library object. It so happens we have just the one at Tingass Fjords. 1. Slew the user aircraft to where you want the object/effect located, oriented as you want the object to be. 2. Click on Single Object/Effect. The following window will pop up: 3. Click on one of the following radio buttons: User Model, Library Object, FS9 Effect or FSX Effect as appropriate. If Library Object, choose the library in which the object to be placed resides using the Library Select button (or enter the path directly). If one of the Effect radio buttons, the effect parameter controls will be added to the dialog. 4. If the object/effect is to be placed at other than ground level, specify the elevation as either above-ground-level (Elev IS AGL checked) or absolute elevation (Elev IS AGL unchecked). If the object is to be displayed at other than its full size, set a scale value. (Half size would result form a scale setting of 0.5) 5. Select the library object or effect to be placed from the Model/Effect Name combo-box. If an effect, also select the desired parameters. No parameter selection results in the effect always being displayed. For the example I took one of our Tongass Fjords libraries and selected the (rather fuzzy named) windsock from it. Normally you would find more meaningful names in object libraries. 6. Click on the Place button. Repeat steps 1-6 as necessary for additional objects. 7. Save your project data and select Compile ! © 2009 FSAddon Publishing & Don Grovestine Page 14 FenceBuilder Pro - Quick Start Guide Much better, don’t you agree !? © 2009 FSAddon Publishing & Don Grovestine Page 15 FenceBuilder Pro - Quick Start Guide 7 Placing a Row or Rows of Library Objects or Effects That was easy, wasn’t it? Alright, let’s have some real fun now. I want to place a ROW of effects, representing some sort of ‘alternative’ runway lighting. I will use ‘flares’ that you can find in the default ‘Effects folder’ of Flight Simulator. We need TWO rows of effects. 1. Slew the user aircraft to where you want the first object/effect in the row to be located. If placing multiple rows, the position should be for the first object/effect in the center row. 2. Click on the Main Panel Use as Start button. © 2009 FSAddon Publishing & Don Grovestine Page 16 FenceBuilder Pro - Quick Start Guide 3. Slew the user aircraft to where you want the (center) row of objects to end. 4. Click on the Row(s) of Objects/Effects button. A dialog box containing all the controls shown in the above illustration down to Include End Model/Effect will pop up. © 2009 FSAddon Publishing & Don Grovestine Page 17 FenceBuilder Pro - Quick Start Guide 5. Click on one of the following radio buttons: Library Object, FS9 Effect or FSX Effect as appropriate. 6. If Library Object (not in this example) then choose the library in which the object to be placed resides, using the Library Select button (or enter the path directly). If one of the Effect radio buttons, the effect parameter controls will be added to the dialog. © 2009 FSAddon Publishing & Don Grovestine Page 18 FenceBuilder Pro - Quick Start Guide 7. Select the library object or effect to be placed from the Model/Effect Name combo-box. If an effect (as in this example), also select the desired parameters. I chose dawn, dusk and night. No parameter selection results in the effect always being displayed. © 2009 FSAddon Publishing & Don Grovestine Page 19 FenceBuilder Pro - Quick Start Guide 8. If the object/effect is to be placed at other than ground level, specify the elevation as either above-ground-level (Elev IS AGL checked) or absolute elevation (Elev IS AGL unchecked). 9. If the object is to be displayed at other than its full size, set a scale value. (Half size would result from a scale setting of 0.5) 10. The objects orientation relative to the placement line may also be adjusted. © 2009 FSAddon Publishing & Don Grovestine Page 20 FenceBuilder Pro - Quick Start Guide 11. The No. of Intervals in Row is initially shown as 1; the Spacing is initially shown as the distance between the Start Position and the user aircraft. Edit these two fields as necessary. When you edit the No. of Intervals in Row field, the spacing is adjusted automatically. If you edit the spacing field, the user aircraft is repositioned along the line between the Start Position and its current position to a distance from the Start Position equal to intervals * spacing. 12. If you want to place multiple rows (to represent an orchard, for example), specify the number of rows on either side of center and the spacing between those rows. And check the ‘Suppress Center Row’ option if you want only two rows! 13. If a series of rows is to be placed, you will want to avoid the starting model/effect of the next row being placed on top of the ending model/effect of the row just placed. Un-check the model/effect to be omitted using the Include start Model/Effect and Include End Model/Effect checkboxes, both of which are checked initially. (As well, you may place a different model/effect at ether the start or end of the row (e.g., a power-generating station at the beginning of a transmission line or a sub-station at the end) by selecting the alternate model using the combo box associated with these two checkboxes). © 2009 FSAddon Publishing & Don Grovestine Page 21 FenceBuilder Pro - Quick Start Guide 14. Click on the Place button. The Start Position is automatically updated to the end of the justplaced (center) row. 15. Repeat steps 1-14 as necessary. 16. Select Compile from the Main Menu So how do you like my neat rows of road flares !!?? Now you know how it is done. Well, you’ve seen the tip of the iceberg, really. Get cracking and fill your landscapes and airfields with all sorts of objects, walls, fences and sounds! And don’t forget all the extra features explained in the Main User Manual !! Have fun! François. © 2009 FSAddon Publishing & Don Grovestine Page 22