1
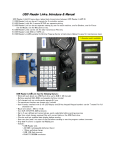
xlTRANSFER ® User Manual V.1.22
Copyright © Log-In, Inc. (2008)
All rights reserved
The xlTRANSFER ® unit is used to send and receive CNC program files between
a CNC control and a USB memory stick. The xlTRANSFER ® unit connects to the CNC
control via RS232 port. It can also ‘drip feed’ the CNC control – providing that the CNC
control is capable of receiving and executing a G code program via its RS232 port.
The xlTRANSFER ® kit contains the following items:
- xlTRANSFER ® unit
- 1G USB memory stick (with User Manual installed in PDF format)
- Charger with 110VAC wall plug connection
- 6’ cable with DB25 male connector for CNC connection
- 4 NiMh AA battery installed
The xlTRANSFER ® unit has an On/Off switch at the top right side, a charger
connection with a ‘charge’ red led on its right side, a USB and an RS232 connector on its
top side, a 2x16 character LCD display and a 20 key keypad.
Turning the xlTRANSFER ®unit ON and OFF
Flip the slide switch on the top right side of the unit to the UP position to turn it
ON, and the DOWN position to turn it OFF. After turning the unit ON, its LCD display
appears with a serial number, then a Version number, also reporting if the charger is
detected or not and finally reporting if it detected a USB memory stick or not. Note here
that the USB memory stick is referred to by the xlTRANSFER ® unit as ‘USB key’. The
unit will also beep few times during the ‘boot’ procedure.
Recommendations to maximize battery life
The battery charging is managed by the xlTRANSFER ® units processor.
Therefore the unit needs to be turned ON for the charger to operate. If the unit’s power
switch is turned OFF and the charger is connected, only the so called ‘trickle charge’
takes place, which is a small charge current and can’t really fully charge a battery.
The xlTRANSFER ® unit will ‘complain’ if its battery voltage is getting too low
(message on the LED plus beeping once every 2 seconds). That is when the user needs to
do the following:
a) Remove the USB memory stick (if connected)
b) Plug in the battery charger
c) Turn the unit ON
As the unit is charging the small red LED light by the charger connector will be on. Once
the charging is done, the light will turn off and the unit will issue a short beeping sound
once about every 2 second as a reminder that charging is done and now its time to
remove the charger and to turn the unit off. Note here, that if this charging process is
interrupted (the user needs to up/down load a program), plugging the charger back will
continue the charging process. Also note here, that the user can manually start or stop a
charging process in the 5) BATTERY CHECK menu.
General keypad operation
The xlTRANSFER ® unit has a very user friendly menu system. The user has a
20 key keypad available to make a selection, enter into a menu or type in a filename. The
1
keypad has a few dedicated keys available to speed up certain operations. The rest of the
keys are alphanumeric keys to enter numbers and letters.
Dedicated keys
HOME – when listing a directory, pressing the HOME key will take the user to
the very beginning of the directory list. Also, pressing the HOME key while at the MAIN
menu will show the current BAUD rate, EOB character, code type and handshaking
method.
END - when listing a directory, pressing the END key will take the user to the
very end of the directory list. Also, pressing the END key while at the MAIN menu will
show the connection status of the Rx and CTS signals. If the xlTRANSFER ® unit is
connected to a CNC control, and the CNC control is not sending or receiving, both
signals should show OK.
LIST - when listing a directory, pressing the LIST key on a file name will toggle
between showing the file size/last modified date and showing the first 16 characters of
the file on the second line. Pressing the LIST key on a directory name has no effect.
Also, pressing the LIST key while at the MAIN menu will show the currently selected
SETUP name. At this point the user can press the UP/DOWN or LEFT/RIGHT arrow
keys to select a different SETUP name. As the SETUP name is changed, of course the
associated BAUD RATE, CODE, EOB and HANDSHAKE method changes as well.
Pressing any other key will take the user back to the MAIN menu. This change of SETUP
name is in effect as long as the power is ON. After power OFF/ON cycle the default
SETUP name will be in effect.
ESC – normally the ESC key is used to abort an operation and it usually returns to
the Main Menu. The ESC key is also used to sow/hide the current date/time while a Main
Menu item is displayed.
ENT – normally the ENT key is used to enter into the selected directory, finish a
user entry or initiate the selected operation.
ARROW keys - the arrow keys accomplish selection and/or rotation. When the
user is asked to type in a program name, any of the number keys can be used. Once a
number is typed in, the user can leave it as a number or select a letter, which appears on
the same number key by ‘rotating’ the character with the up or down arrow key.
The left arrow serves as a backspace key.
The right arrow is used as a selection key is SETUP mode.
Navigating the Directory
When the xlTRANSFER ® unit is listing the directory of the inserted USB key,
the following rules apply:
Directory names are shown on the first line. The symbol <DIR> is shown on the
second line.
File names are shown on the first line. File length and last modified date is shown
on the second line. The user can toggle the second line info with the LIST key to show
the first 16 characters of the file.
Up or Down arrow keys will show the next/previous directory/file name in the
current directory. Note here, that the first name in any directory is a single dot ‘.’ with the
<DIR> attribute. If the current directory is a sub-directory, than the second item in the
2
directory list is a double dot ‘..’ with the <DIR> attribute. Then the rest of the
directory/file names which reside in the ‘current’ directory follow.
If the ENT key is pressed on a Directory name, the user executes an ‘entry’ into
that directory, and a new directory listing appears, and this directory becomes now the
‘current’ directory.
If the ENT key is pressed on a single dot ( . <DIR>) normally it has no effect.
However if the operation is a ‘MCH Æ USB key’ operation, the user is asked to type in
the name of the file to be received – see ‘General keypad operation’ about typing in a
name.
If the ENT key is pressed on a double dot (.. <DIR>), the user will move ‘up’ one
directory level, the new ‘upper’ directory will be listed and becomes now the ‘current’
directory.
If the ENT key is pressed on a file name, than the user makes a selection for that
file (upload, down load, delete..).
Speed search – if the directory list is long, it may take a long time to get to the
particular file name just by using the up/down arrow (or END) keys. The user can speed
up this file search by start typing in the beginning of the file name using the General
keypad operation rules (see above). Once the user typed in a few starting characters, than
the user may press the ENT key. A new directory listing will appear for the current
directory, with all the file/directory names which will match the just typed in characters.
This search is the equivalent of listing a DOS directory using the XYZ*.* format, where
‘XYZ’ would be the typed characters by the user. Now the user can select the
file/directory name from a significantly shorter list with the up/down arrow keys.
Note here, that for simple directory operation all CNC files can be placed in the
root directory this way all directory navigations can be avoided. Also note here that the
xlTRANSFER ® unit can read the long file names (longer that 8.3 DOS style), however
it will show them in the abbreviated format.
Example: SAMPLEPRG.TXT will be shown as SAMPLE~1.TXT (not 8.3 format)
PROGRAM1.TXT will be shown as PROGRAM1.TXT (8.3 format)
As a file name is displayed the user may press the LIST key which will list the first 16
characters of the file, which may help to identify a file further in case of a long file name.
This also may help to determine the exact program number for the CNC control. Some
CNC controls are ‘picky’ about entering the exact program number to be received.
When the unit is turned on or a new USB memory stick is inserted, the
xlTRANSFER ® unit will show the root directory of the USB stick, (which is also the
‘current’ directory).
Main Menu
At the top of the menu system is the Main Menu. The Main Menu is shown by a
number (1 through 6), followed by a description. After turning the power on, the
xlTRANSFER ® unit will end up at the Main Menu. Also, by pressing the ESC key will
normally take the user back to the Main Menu. Always one Main Menu item is shown
(on the first line). On the second line the user can toggle with the LIST key showing
nothing or the current date/time. The user can navigate the Main Menu items with the
up/down arrow key. Pressing the ENT key on the shown item will initiate that operation.
3
Also, the operation can be initiated by pressing the number key associated with the menu
item. Example: pressing 3 at the Main Menu will initiate the DELETE operation.
The Main Menu of the xlTRANSFER ® unit has the following items:
1) USB key Æ MCH
2) MCH Æ USB key
3) DELETE
4) SETUP
5) BATTERY CHECK
6) UPDATE
1) USB key Æ MCH menu
First, the user needs to connect the xlTRANSFER ® unit to the CNC control’s
RS232 port with the provided cable/connector, and get the CNC control ready to receive.
Next the user needs to navigate through the directory system to select the file to be sent to
the machine tool (see Navigating the Directory). Once the correct file name is displayed,
the user needs to press the ENT key. The xlTRANSFER ® unit now will send the
selected file to the CNC control. ‘Sending..’ is displayed on the first line, and the content
of the file being sent is displayed on the second line. Once sending is finished, the ‘Done
sending..’ message is displayed. Note here, that this procedure requires that the file to be
sent starts normal (usually with a % sign). If it is not the case (upon loading the control
will miss the first line), the user has the option to send out a % sign EOB character
combination by executing the following procedure: once the proper file name is selected
the user should press the LIST key – this will show the beginning of the file. If it looks
OK, the user can press the ENT key and the unit will transfer the file as normal. If at the
beginning of the file the % sign line appears to be missing, the user can now press the
(*%) key (the unit will beep) and then the ENT key – this will transfer % EOB first, then
the rest of the file. Note that if the end of file also requires special character, END string
may be set – see SETUP menu.
2) MCH Æ USB key menu
First, the user needs to connect the xlTRANSFER ® unit to the CNC control’s
RS232 port with the provided cable/connector. Next the user needs to navigate through
the directory system, and either to select the file to be received to, or select the single dot
(. <DIR>) item. Selecting the single dot item will ask the user to type in a file name (see
General keypad operations). If an existing file name was selected or a matching existing
file name was typed in, the user will be asked whether to overwrite the existing file or
not. Selecting NO will abort the operation and the unit will return to the Main Menu.
Selecting YES will enter into receive mode. ‘Receiving..’ is displayed on the first line.
The user now needs to perform the operation necessary on the machine tool to ‘send’ or
‘punch’ the required program out. As the program is being sent, the xlTRANSFER ® unit
will show the incoming characters on the second line. Once the sending is done, the user
needs to press the ESC key on the unit. The program name on the first line, the program
length/date will be shown on the second line.
4
3) DELETE menu
Upon selecting this item the user needs to navigate through the directory system
to select the file to be deleted. Once the correct file name is displayed, the user needs to
press the ENT key. The xlTRANSFER ® unit will ask the user to acknowledge the
deletion of the selected file.
4) SETUP menu
The user can set various items here, mainly regarding to the CNC RS232
interface. Since – most likely – the user will have to deal with various CNC controls,
there is a possibility to define up 5 different SETUP names with different BAUD rates,
CODES, etc. If the user does not need this feature of using varying setups, the unit can be
used only with the default SETUP-1 name.
Normally the user can just ‘view’ the set items here by using the up/down arrow
keys. If the user type in the code 147 from the keypad, then it is possible to change the
selected item with the left/right arrow keys.
Note here that the Date/Time setting and SETUP name are not ‘code’ protected
therefore it can be changed by someone who does not know the code.
SETUP name
As mentioned above, the user can define up to 5 different setups. If the SETUP
name item is selected the user can use the RIGHT/LEFT arrow keys to select a different
SETUP name. By pressing the LIST key on the SETUP name item, the user can edit the
name of the SETUP, and give some meaningful description up to 8 characters long, such
as FANUC or MAZAK, etc. Pressing ENT while editing the name will accept the name
and associate it with the current SETUP. The last SETUP name selected upon exiting the
SETUP menu becomes the default SETUP name upon power ON. To switch to a
different SETUP name while the unit is powered press the LIST key at the MAIN menu
(see LIST key description above). Again, if the user does not need to use different setups,
the default SETUP-1 can be left in place and there is no need to touch the SETUP name
item.
BAUD rate
The user settable baud rate values are: 300, 600, 1200, 2400, 4800, 9600, 19.2k,
38.4k, 57.6k, 76.8k and 115.2k. Note here, that the BAUD rate setting of the
xlTRANSFER ® unit has to match of the CNC control baud rate.
CODE
The user can set here ISO (most common, 95% of machine tools), BIN (binary,
vary rare), MZK (Mazak conversational, saved as text file) or MAZ-SW (Mazak
conversation, saved as Solutionware compatible file). Note here, that the xlTRANSFER
® unit can also recognize a Griffo compatible file upon sending beside the above two
type of files.
5
HANDSHAKE
The choices are XON/XOFF (software handshaking, most common), RTS/CTS
(hardware handshaking, less common), both Xon/Xoff and RTS/CTS and NONE.
EOB character
The choices are LF (linefeed only, most common), CR/LF (carriage
return/linefeed – also works most of the time, on some controls may result extra empty
lines), CR only (vary rare).
END string
The choices are (empty), %<LF>, ^D<LF>, ^C<LF> and END<LF>. The user
needs to set this only if generally the file to be sent does not contain a normal end of file
character. If the file is terminated normally, the END string can be left empty (default
setting). Otherwise the % sign will work with almost any control, with the exception of
CINCINNATI (^D), SIEMENS (^C) or ANILAM (END).
Date/Time
To change the current date and time setting in the xlTRANSFER ® unit, first
press the right arrow key, this brings up a blinking cursor under the first character in the
second line. The format is MM/DD/YY HH:MMam. Type in the date/time according to
this format. Leading zeroes also need to be type in (Example: 01 for January). The last
two characters are AM/PM, where the A and P can be toggled with the up/down arrow
keys. If a date/time value at the current cursor position is correct, it can be re-typed or by
using the right arrow key the cursor can be moved to the next item. The left arrow key
can also be used to move back to the previous item. If the battery is removed for more
than 10 seconds, the date/time setting most likely will be lost.
Once the setting is correct press ENT to save changes or ESC to disregard them to return
to the Main Menu.
5) BATTERY CHECK menu
This menu will let the user to check battery voltages or start/stop charging. It is
not necessary for the user to be familiar with these items they are implemented only for
troubleshooting purposes. The battery maintenance is quiet automatic – the user needs to
follow only a couple of recommendations to maximize the battery life (see above). In this
menu the user can use the up/down arrow key to view various items. ESC key will take
the user back to the Main Menu.
5V line[V]: this item shows the internal power supply voltage. The normal operating
voltage is between 4.8V and 5.0 V.
Battery [V]: this item shows the actual battery voltage. A fully charged battery would be
about 6V while it is being charged and about 5.8V when not being charged. However it is
quiet normal that the battery voltage would drop down to about 4.8V before the user
would be prompted to start re-charging the battery. For NiMh (and NiCad) batteries the
longest life cycle can be accomplished if the batteries are fully charged, then almost fully
discharged, charged again, etc..
6
Using the down arrow key the top line will report whether the batteries are being charged
or not (this corresponds to the red LED status on the side). The second line shows the
Charger[V], which is normally between 11V and 12V.
Scrolling down again the user can force to START (providing the charger is connected)
and STOP the battery charging. This is not a recommended operation, although there
might be situations that the user needs to be able to force to unit to START charging.
6) UPDATE menu
The user can update the firmware from a USB key. Updates can provide bug fixes
and can also add new features. The update steps below strictly need to be followed for it
to be successful:
a) The battery voltage have to be 5.1V or higher. This is automatically checked –
if the battery voltage is too low the user is prompted and may need to apply
the ‘START charge’ operation – see above. WARNING: Once an update
started, DO NOT TURN THE xlTRANSFER ® UNIT OFF. The actual
update takes only few seconds, and while the xlTRANSFER ® unit displays
‘Updating..’, during this time the loss of power can corrupt the firmware.
b) Copy the update file named ‘XLTXFR.UPD’ onto a USB key, and insert the
USB key into the xlTRANSFER ® unit. Select UPDATE menu, and through
file navigation have the above filename displayed on the screen.
c) Press ENT key. Next, you will be asked to enter a code. Type in 147 followed
by the ENT key. Now the update process will take place for few seconds.
d) If any error happened during the above update process, the user will be shown
an error message and update will be aborted. Also, if the xlTRANSFER ®
unit is up to date, that status will be shown to the user. If the update is
successful, the unit will re-boot on its own and the new firmware version will
be displayed.
7