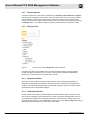
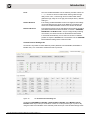
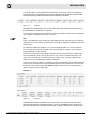
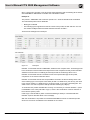
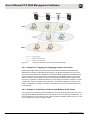
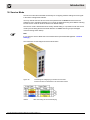
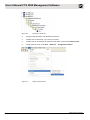
1
Edition 1.0 Status: 2011-07 / English HARTING Ha-VIS Management Software 2.0 User manual For Ha-VIS FTS 3000 People | Power | Partnership All brand and product names are trademarks or registered trademarks of the owner concerned. 1st Edition 2011, revised 07/11 © HARTING Electric GmbH & Co. KG, Espelkamp Author: Editor: HARTING Electric GmbH & Co. KG HARTING Electric GmbH & Co. KG All rights reserved, including those of the translation. No part of this manual may be reproduced in any form (print, photocopy, microfilm or any other process), processed, duplicated or distributed by means of electronic systems without the written permission of HARTING Electric GmbH & Co. KG, Espelkamp. Subject to alterations without notice. Printed on bleached cellulose. 100% free from chlorine and acid. 2 HARTING Electric GmbH Contents 1.Introduction......................................................................................................................................................... 7 2. Safety Guidelines and Approved Usage........................................................................................................... 8 3. General Notes about this Manual...................................................................................................................... 9 3.1 3.2 3.3 Explanation of the symbols.................................................................................................................................. 9 Typographical conventions.................................................................................................................................. 9 Additional information.......................................................................................................................................... 9 4. Basic Operation................................................................................................................................................. 10 4.1 4.2 4.3 Switch access and configuration........................................................................................................................ 10 Web access........................................................................................................................................................ 10 SNMP configuration........................................................................................................................................... 11 5. Introduction to the Web Browser Interface..................................................................................................... 13 5.1 5.2 5.3 5.4 The menus......................................................................................................................................................... 13 Saving changes with the Save Configuration button......................................................................................... 15 Invalid entries..................................................................................................................................................... 15 User rights.......................................................................................................................................................... 16 6. The Overview Section....................................................................................................................................... 17 7. The Systems Settings Section......................................................................................................................... 19 7.1 General Settings................................................................................................................................................ 19 7.2 Port Settings...................................................................................................................................................... 20 7.3 User Management............................................................................................................................................. 22 7.4SNMP ................................................................................................................................................................ 23 7.5 Network Discovery............................................................................................................................................. 24 7.6 Time Settings..................................................................................................................................................... 26 7.7 DHCP Relay Agent: Option 82........................................................................................................................... 28 7.8 File Transfer....................................................................................................................................................... 29 7.9 The Fast Track Settings Section........................................................................................................................ 32 7.10 The Industrial Profile Section............................................................................................................................. 39 8. The Redundancy / RSTP Section..................................................................................................................... 42 8.1 8.2 8.3 8.4 Basic Settings tab.............................................................................................................................................. 42 Port Settings tab................................................................................................................................................ 43 Port Status tab................................................................................................................................................... 45 Examples for a STP/RSTP application.............................................................................................................. 45 9. The VLAN Section............................................................................................................................................. 48 9.1 9.2 9.3 9.4 Basic Settings tab.............................................................................................................................................. 48 Port Settings tab................................................................................................................................................ 49 Static VLAN tab.................................................................................................................................................. 50 Examples for a VLAN applications..................................................................................................................... 50 10. Rate Limiting...................................................................................................................................................... 54 11. Port based network access control IEEE 802.1x........................................................................................... 55 11.1 Basic settings tab............................................................................................................................................... 55 11.2 Port settings tab................................................................................................................................................. 56 11.3 Local server tab................................................................................................................................................. 57 Ha-VIS Management Software Manual Ha-VIS FTS 3000 / Edition 1.0 3 User’s Manual Ha-VIS FTS 3000 Management Software 11.4 RADIUS server tab............................................................................................................................................ 57 11.5 Supplicant session info tab................................................................................................................................ 58 11.6 Timers tab.......................................................................................................................................................... 59 12. The IP Authorized Manager.............................................................................................................................. 61 13. The Multicast IGMP Section............................................................................................................................. 62 13.1 13.2 13.3 13.4 13.5 Basic Settings tab.............................................................................................................................................. 62 Timer tab............................................................................................................................................................ 63 Interface Configuration tab................................................................................................................................. 63 Router Ports tab................................................................................................................................................. 64 Multicast Group.................................................................................................................................................. 64 14. The Alarm Section............................................................................................................................................. 65 14.1 E-mail Alert......................................................................................................................................................... 65 14.3 SNMP Alert......................................................................................................................................................... 66 15. The Diagnostic Section..................................................................................................................................... 67 15.1 Port Mirroring..................................................................................................................................................... 67 15.2 Switch History.................................................................................................................................................... 68 15.3 The MAC Address Table.................................................................................................................................... 69 16. Service Mode..................................................................................................................................................... 71 17. The SD-Memory Card (optional)...................................................................................................................... 73 18. Configuration with Automation Software Tool............................................................................................... 75 18.1 Installing the Ethernet Switch as PROFINET device......................................................................................... 75 18.2 Alarms and Diagnostics..................................................................................................................................... 77 Glossary of Terms and Abbreviations.................................................................................................................... 83 Index.......................................................................................................................................................................... 87 4 HARTING Electric GmbH Contents Figures Figure 1 Figure 2 Figure 3 Figure 4 Figure 5 Figure 6 Figure 7 Figure 8 Figure 9 Figure 10 Figure 11 Figure 12 Figure 13 Figure 14 Figure 15 Figure 16 Figure 17 Figure 18 Figure 19 Figure 20 Figure 21 Figure 22 Figure 23 Figure 24 Figure 25 Figure 26 Figure 27 Figure 28 Figure 29 Figure 30 Figure 31 Figure 32 Figure 33 Figure 34 Figure 35 Figure 36 Figure 37 Figure 38 Figure 39 Figure 40 Figure 41 Figure 42 Figure 43 Figure 44 Figure 45 Changing and saving the IP address......................................................................................................... 11 Screen structure........................................................................................................................................ 13 The menu tree, with the Diagnostic section expanded............................................................................ 14 Invalid entry: the exclamation point indicates an improperly formatted IP address................................... 16 The Overview section............................................................................................................................... 17 The General Settings window.................................................................................................................. 19 The Basic Settings tab............................................................................................................................ 21 The Port Control tab................................................................................................................................ 21 The User Management section................................................................................................................ 22 The SNMP section.................................................................................................................................... 23 The Network Discovery section.............................................................................................................. 25 The Time Settings window....................................................................................................................... 27 The DHCP Relay Agent tab...................................................................................................................... 28 The Import/Export Firmware tab............................................................................................................. 29 The Save/Load Configuration tab........................................................................................................... 31 The Reboot tab......................................................................................................................................... 32 The General FTS Settings tab................................................................................................................. 33 The Custom Protocol Settings tab......................................................................................................... 35 Example.................................................................................................................................................... 37 Example 1................................................................................................................................................. 37 Example 2................................................................................................................................................. 38 The Industrial Profile Section window.................................................................................................... 39 IP settings in PROFINET Profile................................................................................................................ 40 LLDP settings for PROFINET.................................................................................................................... 41 The Basic Settings tab............................................................................................................................ 42 The Port Settings tab............................................................................................................................... 43 The Port Status tab.................................................................................................................................. 45 Loop detection by the STP/RSTP.............................................................................................................. 46 Benefits of RSTP....................................................................................................................................... 46 The VLAN Basic Settings tab.................................................................................................................. 48 The VLAN Port Settings tab.................................................................................................................... 49 The Static VLAN tab................................................................................................................................. 50 VLANS with all VLAN-Aware Switches...................................................................................................... 51 VLANs with VLAN-Aware and VLAN-Unaware Switches.......................................................................... 52 VLANs Over Switches with Multiple VLAN Trunks.................................................................................... 53 Rate Control.............................................................................................................................................. 54 The Basic Settings tab............................................................................................................................ 55 The Port Settings tab............................................................................................................................... 56 The Local Server tab................................................................................................................................ 57 The RADIUS Settings tab........................................................................................................................ 57 The Supplicant Session Info tab............................................................................................................. 58 The Timers tab.......................................................................................................................................... 59 The IP Authorized Manager....................................................................................................................... 61 The Basic Settings tab............................................................................................................................ 62 The IGMP Timer tab................................................................................................................................. 63 Ha-VIS Management Software Manual Ha-VIS FTS 3000 / Edition 1.0 5 User’s Manual Ha-VIS FTS 3000 Management Software Figure 46 Figure 47 Figure 48 Figure 49 Figure 50 Figure 51 Figure 52 Figure 53 Figure 54 Figure 55 Figure 56 Figure 57 Figure 58 Figure 59 Figure 60 Figure 61 Figure 62 Figure 63 Figure 64 6 The Interface Configuration tab.............................................................................................................. 63 The Router Ports tab............................................................................................................................... 64 The Multicast Group tab.......................................................................................................................... 64 The E-mail Alarm tab............................................................................................................................... 65 The SMTP Server tab............................................................................................................................... 66 The SNMP Trap 1 section......................................................................................................................... 66 The Port Mirroring section....................................................................................................................... 67 The Switch History event list................................................................................................................... 68 The MAC Address Table.......................................................................................................................... 69 Connecting the bridged plug to enable service mode: connect the wires as described in the instructions below.......................................................................... 71 Slot for SD card on the backside of the switch (figure may vary depending on type)......................................................................................................... 73 Installing the GSD file................................................................................................................................ 75 Products in the library................................................................................................................................ 76 Assign a device name............................................................................................................................... 76 Slots and modules of the Ha-VIS FTS 3100-A.......................................................................................... 77 Alarms in Slot 0......................................................................................................................................... 78 Parameters in slot X.................................................................................................................................. 79 Parameters in slot 1: FTS configuration.................................................................................................... 80 Adresses in slot 2: Global I/O.................................................................................................................... 81 HARTING Electric GmbH Introduction 1. Introduction HARTING’s FTS 3000 family of managed Ethernet Switches are suitable for creating Ethernet and Fast Ethernet networks with distributed star or nodal points in industrial environments where a high level of operational reliability is required. Equipped with up to ten ports, the Ethernet Switch are suitable for installation in the electrical cabinet. Your HARTING FTS Switch comes with an embedded web server and a user-friendly web interface that makes switch management intuitive and efficient. Configuration and maintenance are also possible using SNMP versions 1, 2 and 3. Additional to standard managed Ethernet Switches the FTS devices offer the advantages of the Fast Track Switching Technology which enables deterministic data transfer for automation frames as well as a high priority data transfer for selected types of frames. This software guide for the FTS family of switches contains information required to operate the switch management software. This information is applicable for all switches in the FTS 3000 series. The examples and screenshots in this manual are taken from the FTS 3100-A; the number of ports and the information shown in your software may vary depending on the model of switch you use. This software guide has the following structure: Chapters 1 to 3 Notes on safety and general information about this manual. Chapters 4 and 5 Basic information about the software, user rights, installation and logging in. Chapters 6 to 15 Detailed information about the individual areas and windows of the software and all the settings that can be made. Chapters 16 Specialized information about the Service Mode. Appendix A Glossary of terms and abbreviations. Appendix B Instructions for older firmware versions. Ha-VIS Management Software Manual FTS 3000 / Edition 1.0 7 User’s Manual FTS 3000 Management Software 2. Safety Guidelines and Approved Usage In order to function properly, the switch management software must be correctly installed and appropriately operated. The switch management software should be used only in conjunction with a HARTING Ethernet Switch. Observe the following general safety instructions before installing and using the switch management software: • Ensure correct polarity and voltage when connecting the power supply to the Ethernet Switch. • Use only shielded cable for data lines. • Use only cables that comply with the corresponding standards for Ethernet connections. • Cover all unused data ports with the appropriate cover. Covers must be ordered separately. ATTENTION The Ethernet Switch should be operated only when it is properly and securely mounted. CAUTION Only authorized and qualified personnel are permitted to work on this device! Improper work or repairs can damage the integrated protective safety functions and the performance of this device. This can cause the device to malfunction, be a source of personal danger, or cause damage to connected machines or connected systems. 8 HARTING Electric GmbH Introduction 3. General Notes about this Manual 3.1 Explanation of the symbols The following symbols are used in this software guide: CAUTION This symbol describes warning notes that indicate a low-level source of danger. If not avoided, light or minor injuries or damage to property may result. ATTENTION This word describes warning notes that indicate a low-level source of danger. If not avoided, damage to property may result. Note This symbol describes general notes that provide important information concerning one or more operating steps. Such notes may also provide references to further information supplied within this manual. 3.2 Typographical conventions This manual uses the following typographical conventions to describe the software interface: Italics text in italic font refers to an entered value, a selection from a drop-down list (such as Enable), a reference to a section of the software menu (such as General Settings) or drop-down list choices. Bold text in bold font refers to the name of a row or column found within the software interface, or to the name of a field where data is displayed or specified. bold blue internal links, links to web pages, or other links 3.3 Additional information Mounting instructions for this switch can be found in the Ethernet Switch Installation Notes included in the delivery. The Installation Notes also provide valuable hardware-specific information such as the pin-out assignments, LED displays, technical specifications, and power supply requirements. The latest versions of the switch firmware and the manual can be downloaded from the Internet at http://www.harting.com Ha-VIS Management Software Manual FTS 3000 / Edition 1.0 9 User’s Manual FTS 3000 Management Software 4. Basic Operation Be sure to mount the switch and verify that it is secure before starting any software configuration. Refer to the Installation Notes for mounting instructions. This Ethernet Switch must first be connected to your local area network before it can be configured. The switch management software and embedded web server are pre-installed on the switch. You will require a networked computer with an HTTP web browser or an SNMP Tool to configure the switch management software. A TFTP server program should also be installed on this PC in the event that you need to update the switch firmware or to export or import a configuration file. 4.1 Switch access and configuration The Ha-VIS FTS Ethernet Switches offer a variety of software functionalities to configurate and setting up the network. For configuration purpose, the switch can be accessed in several ways. The easiest way is to use a standard web browser to configurate the switch via a graphical HTTP based user interface. To connect to the switch, the user must log in to the switch using the web browser (following the instructions below). The user must log out before exiting the browser, because the parallel connections to the switch (web sessions) are limited to two and the timeout for each session is 2 minutes. Once you have logged out, you can close the browser window in which the web interface was running. The second way is to access the switch via an SNMP software. The Ha-VIS FTS Ethernet Switches are supporting the standard MIBII and can be easily integrated to an existing LAN infrastructure and management suit. Some functionalities are product and HARTING specific and therefore are not included in the MIBII. To get also access to this functionalities using SNMP, you have to copy the HARTING MIB file to your MIB repository of your SNMP software. An other way is to access the switch via PROFINET (see chapter 18 Configuration with Automation Software Tool). 4.2 Web access Proceed as follows to turn on the switch and login: 1. Connect the switch to your network or to a service computer using an Ethernet patch cable. You may select any free port on the switch. 2. Connect the switch to the power supply (refer to the Installation Notes). The switch will take about forty seconds to boot up. 3. Turn on a computer connected to the same network as the switch. If you are starting with a brand new switch, you should initially configure your host PC so that it is on the same network segment as the switch (the switch has a factory default IP of 192.168.0.126, and a subnet mask of 255.255.255.0). 4. Launch your web browser and open a window. 5. Enter the network address of the switch into the browser. See the Installation Notes / Quick Start Guide for more information about altering your computer’s network settings. The login screen of the software will be displayed after your browser has successfully established an HTTP connection to the switch. 10 HARTING Electric GmbH Introduction 6. Enter your username and password. Normally, the admin account is used for switch administration. A guest account exists for viewing the configuration only. The default admin password is harting. You should change this password as soon as possible. 4.2.1 Changing the switch IP address Figure 1 Changing and saving the IP address Initially, you may need to assign a new IP address to the switch. Be sure to choose a unique IP address from your LAN’s address space. Follow the steps below to change the IP address: 1. Using the clickable menu tree on the left of the screen, go to the System Settings → General Settings section. 2. Specify the new IP address in the IP Address field. 3. Check the box next to Save IP Address Persistent. 4. You will no longer be able to connect to the switch using the old IP address. Using your web browser, you will be connected automatically to the switch using the new IP address. 4.2.2 Logging out To log out from the software at any time, simply click the Logout button in the top right-hand task bar. The login screen is then once again displayed. Note It is important to use the logout button when leaving the switch web interface. The number of sessions are limited to 2 and the duration of one session is 10 minutes. 4.3 SNMP configuration To get access to the switch using SNMP, an SNMP based software tool is needed. SNMP (Simple Network Management Protocol) is the most widely-used network management protocol on TCP/IP-based networks. SNMP provides an easy mechanism for managing a network using a simple Command-Response protocol defined between the Manager and the managed entities. The management is performed through MIBs (Management Information Base) Ha-VIS Management Software Manual FTS 3000 / Edition 1.0 11 User’s Manual FTS 3000 Management Software supported by the managed entities. The MIBs contain configuration elements, which can be either Viewed (GET) or Modified (SET) by the Managers. To access the switch, you need the following information of the switch: • The switch IP address (default: 192.168.0.126) • The community password to read values from the switch (default: public) • The community password to read/write values from/to the switch (default: private) 12 HARTING Electric GmbH Introduction 5. Introduction to the Web Browser Interface The web interface offers a simple way to manage the software functionalities of the Ha-Vis mCon Ethernet Switches. The websites will be refreshed automatically in short intervals. One of the following web browser versions should be used for switch configuration: • Microsoft Internet Explorer version 7 or later, • Firefox version 2 or later, 5.1 The menus The structure of the software interface has been kept simple. After logging in to the mCon homepage, you will see a main navigation menu tree on the left side and an active window in the middle right side of the browser window. Using the menu tree, you can access all of the settings and statistics available on the switch. On the top you find the options for refreshing the window or to logout form the web interface. The menu bar at the bottom shows an overview of general switch parameters and also the status of the configuration storage. A C B D Figure 2 Screen structure A The top task bar B The menu tree C The active window D The bottom task bar Ha-VIS Management Software Manual FTS 3000 / Edition 1.0 13 User’s Manual FTS 3000 Management Software 5.1.1 The top task bar The task bar at the top of the window contains links to Support, About, Refresh and Logout. As long as you are logged in to the switch, this bar remains on the top of the browser window. It is necessary to use the logout button before closing the browser, to be sure that the web session is terminated correctly. A manual refresh of the current website is possible by pressing the Refresh button. This might be helpful to update the status during a file transfer via http. 5.1.2 The menu tree Figure 3 The menu tree, with the Diagnostic section expanded A clickable, two-level menu located on the left of the browser window is used to navigate through the switch functionality. You can view or change switch settings and statistics by clicking on any of the various second-level menu choices. 5.1.3 The active window Most of the screen is taken up with the active window, in which settings and statistics for the switch are displayed and configured. The active window consists of several tabbed subwindows. The right-most tabbed section is marked with a question mark and contains helpful explanations for the corresponding settings. 5.1.4. The bottom task bar On the left side the IP Address, the Subnetmask, the MAC Address and the firmware version of the switch is displayed. On the right site, the current configuration storage status is shown. All configuration changes done during the web session are stored to the volatile memory by pressing the apply button. These modifications are not saved, if the Save Config button has not been pressed and the switch is powered down in this state. 14 HARTING Electric GmbH Introduction 5.2 Saving changes with the Save Configuration button Whenever you modify a setting (by checking a box or specifying a value, etc.), you must click on the Apply button located at the bottom of the active window to confirm the change. Note that the Apply function normally saves the changes only temporarily to RAM. When one of the windows is opened, the Apply button is initially highlighted grey. When settings or alterations are made in the window the Apply button is activated. It now appears in a bold font to remind you that settings have been made or altered and that these must be confirmed by clicking the Apply button. After this is done, the SAVE CONFIGURATION button in the bottom bar will be shown with an additional Yellow text. Click here to save your changes permanently in flash memory to make the configuration also existent after a power down or a software reboot. Assume configuration changes and saving them permanent: • The software maintains any configuration changes in volatile memory after pressing the Apply button • The administrator must explicitly trigger the save operation (bottom bar after changing parameters • When triggered, the software saves the full configuration into a file inside the flash memory • Any old contents in the file are over-written • When the switch is restarted, the software starts with the last configuration saved to the flash Note The Apply button only saves your changes temporarily until the next reboot. With this you have the possibility to check a proper working configuration before making it persistent. You must click on the subsequent SAVE CONFIGURATION button in order to save the changes persistently. See also chapter SD Memory Card. 5.3 Invalid entries If you specify an invalid entry (for example, an out-of-range timer value or improperly formatted IP address), a red exclamation mark is displayed next to the error field to notify the user of the error. Ha-VIS Management Software Manual FTS 3000 / Edition 1.0 15 User’s Manual FTS 3000 Management Software Figure 4 Invalid entry: the exclamation point indicates an improperly formatted IP address 5.4 User rights There are three defined user modes for accessing the Ethernet Switch web-based software: 16 Guest The access category Guest enables all areas of the software to be viewed only. Admin The access category Admin enables all areas of the software to be viewed and administered. No restrictions apply to making settings or alterations. This is the normal administrative user account for making switch settings. HARTING Electric GmbH Introduction 6. The Overview Section After you login to the switch, the active window displays an overview of the switch and the main settings for each of the ports. No changes can be made in this window. To access this section, simply click on Overview in the two-level menu tree displayed at the left of the window. The top right section of the Overview window contains an illustration of the particular Ethernet Switch you are connected to. In addition, general information is displayed at the top left of the Overview window: Figure 5 The Overview section Device Name: displays the name of the device. The default is the type of Ha-VIS FTS switch in use. Device Contact: Displays contact information, as defined by the user in the General Settings section. Device location Displays the location of the device, as defined by the user in the General Settings section. Device Description: MAC address of the switch Part No. displays the HARTING part number of the switch. Hardware Version displays the hardware version number of the switch management board. Firmware Version displays the firmware version number of the switch. WebUI Version displays the version of the web interface. Port Count displays the number of ports on the switch. IP-Address displays the currently assigned IP address on the switch. Ha-VIS Management Software Manual FTS 3000 / Edition 1.0 17 User’s Manual FTS 3000 Management Software MAC-Address displays the unique hardware MAC address on the switch. Device Up Time displays the duration that the switch has been powered up. The table at the bottom of the Overview window has the following columns for each port. (Note that information cannot be changed in this window. Basic port settings can be altered from the System Settings → Port Settings menu section.) 18 Port displays all available switch ports. Jack Type displays the compatible media or jack type for the port Status displays the current status of the port. Enable means that the port is enabled; Disable is displayed if the port is disabled. (A port can be disabled in the System Settings → Port Settings section.) Link displays the status of the port. A red circle indicates that there is currently no existing link, while a green circle indicates an existing link. Auto Neg displays the negotiation state. Auto-negotiation is a technology for ensuring compatibility of a network component with the network. This column indicates if the Auto-negotiation function for the port is activated (ON) or deactivated (OFF). Data Rate displays the data transfer mode for the respective port. Duplex mode displays the port duplex mode. Half duplex means that data flows in one direction via the port at a given time; Full duplex enables data flow in both directions. HARTING Electric GmbH Introduction 7. The Systems Settings Section The System Settings section is composed of the following sub-sections: General Settings, Port Settings, User Management, SNMP Settings, Network Discovery, Time Settings, and File Transfer. Each of these sections is described below. 7.1 General Settings In order to commission the Ethernet Switch, the IP address and subnet mask must first be modified to suit the connected network (refer to the Quick-start Guide for setup instructions). If a DHCP server (Dynamic Host Configuration Protocol) is running on your LAN, you can specify Dynamic under the IP Address Mode setting. Note Context-sensitive help is available throughout the menu structure by simply clicking on the question-mark tab at the top right corner of the window. Figure 6 The General Settings window The following general settings can be displayed or specified: Device Name specify a descriptive text for the device name Device Contact specify a descriptive text for the device contact Device Location specify a descriptive text for the device location IP Address Mode specify the switch IP addressing mode. If Dynamic is selected in the drop-down list then the switch is assigned a valid IP address and subnet mask during system initialisation by the DHCP server. If Manual is selected in the drop-down list, the IP address and the subnet mask and optional the address of the Default Gateway must be entered manually. When using a DHCP server, it is also possible to assign a static IP address to the Ethernet Switch (to its MAC address) in the settings of the DHCP server. The IP switch will be assigned to the Ethernet Switch each time the system starts up. This makes it possible to centralize the address administration of a large number of Ethernet switches. Ha-VIS Management Software Manual FTS 3000 / Edition 1.0 19 User’s Manual FTS 3000 Management Software IP Address specify the IP address of the switch. IP addresses are assigned automatically if a DHCP server is installed. Note The IP address assigned to the switch must be unique for that connected network! Connectivity problems will arise if two network components are assigned the same IP address (always after the IP address at first or change to DHCP mode). Save IP Address Persistent check this box to save the IP address permanently. You will no longer be able to connect to the switch using the old IP address. Using your web browser, connect to the switch using the new IP address. Subnet Mask specify the subnet mask for the network. If the subnet mask is entered manually, it must be identical with the subnet used in the network. This value is assigned automatically if you have a DHCP server. Default Gateway Specify the default gateway for the switch or 0.0.0.0 if outside communication is permitted Service Mode Enable or disable the Service Mode Detection on the switch. ATTENTION It is recommended to keep the Service Mode Detection enabled all the time. In case of a misconfiguration, the switch can be reset to factory defaults. There is no other possibility to reset the switch. Be sure to remember to click on the Apply button to save your changes. Then click on the Save Configuration button in at the bottom of the window to save the settings permanently. The lower section of the General Settings window lists additional status information. This includes: the switch MAC address, the default VLAN identifier, the configuration save status, the remote save status, the configuration restore status and the HTTP port number. 7.2 Port Settings This section allows you to change the settings for the switch’s Ethernet ports. The ports can be individually enabled (up) or disabled (down). The data transfer rate and mode of data flow can be determined as well as the compatibility parameters for the network. Note that there are two tabbed sections (Basic Settings and Port Control) where these settings can be made. 20 HARTING Electric GmbH Introduction 7.2.1 Basic Settings tab Figure 7 The Basic Settings tab In this tabbed section, the administrative state of individual ports can be specified. Each port row has the following columns. Select/Port select the port that you would like to change by clicking on the checkbox here (in most cases automatically done if you alter one parameter in the row) Admin State select the desired state of the port. A port can be either enabled (up) or disabled (down). Link Status displays the port status. A green circle in this column indicates that a device is connected to this port. A red circle indicates that no device is connected or Admin State is down. 7.2.2 Port Control tab Figure 8 The Port Control tab Ha-VIS Management Software Manual FTS 3000 / Edition 1.0 21 User’s Manual FTS 3000 Management Software In this tabbed section, the characteristics of individual ports can be specified in the following columns: Select/Port select the port that you would like to change by clicking on the checkbox here. Autonegotiation select whether Auto-negotiation is disabled or enabled. Autonegotiation is a function which enables the participating interfaces to automatically determine the best possible transmission parameters. The Auto-negotiation function can either be activated (Enable) or deactivated (Disable). If Enable is selected, the autonegotiated settings will be used and the data-rate and duplex columns will be greyed out. Duplex select the data transmission mode for the respective port from the drop-down list. Half means that data flows in only one direction via the port at a given time; Full enables data to flow in both directions simultaneously. Speed select the data transmission rates for the port from the drop-down list: 100 Mbit/s or 10 Mbit/s, 100 Mbit/s or 1 Gbit/s, depending on the type of port interface. 7.3 User Management This section allows you to specify a new password for the admin or guest account. Figure 9 The User Management section The switch software is password-protected to prevent unauthorized access. The admin password must consist of at least six characters. The password must always be entered to gain access to the software. There are two access levels, which can be chosen from the drop-down list: Admin all rights are available. Guest all settings and values can only be viewed. It is not possible to alter the password or other settings. The system administrator is authorized to alter the valid password for the access levels for the administrator and guest in this section. The admin password must be specified correctly before you can change the guest password. Click Apply to confirm your entry. The new password will become valid when you will login next time. If the administrator password is forgotten or if it becomes necessary to alter it due to technical reasons, this process can be carried out in the service mode. To learn how to activate the Service Mode, please refer to Chapter 16 The Service Mode. 22 HARTING Electric GmbH Introduction Note A change in password must be confirmed by clicking on the Apply button. It is not sufficient to just hit Enter. This password is safed persistent. 7.4SNMP SNMP (Simple Network Management Protocol) is the most widely-used network management protocol on TCP/IP-based networks. SNMP provides an easy mechanism for managing a network using a simple Command-Response protocol defined between the Manager and the managed entities. The management is performed through MIBs (Management Information Base) supported by the managed entities. The MIBs contain configuration elements, which can be either Viewed (GET) or Modified (SET) by the Managers. SNMPv1/v2 could not provide the required security. One could easily decode the PDUs with a packet analyzer to find out the valid community name for the Agent. SNMPv3 is designed mainly to overcome the security shortcomings of SNMPv1/v2. USM (User based Security Model) is the main feature added as part of the SNMPv3 specification. USM provides for both encryption and authentication of the SNMP PDUs. With SNMPv3, the SNMP communication is completely safe and secure. The configuration of the switch can be accessed and changed directly using SNMP commands. This section allows you to specify the basic SNMP settings. This switch software now supports SNMP versions 1/2c and 3. You may also enable both versions simultaneously. Figure 10 The SNMP section The following settings may be made: SNMP V1/V2C Enable For V1/V2 operations, the HARTING SNMP Agent provides a Community based Security Mechanism. Community names are encoded into V1/V2 messages and the Agent verifies the privilege status of the community name before responding to it. Community names are associated with the privilege status. The privilege status can be of type read-only or read-write. Ha-VIS Management Software Manual FTS 3000 / Edition 1.0 23 User’s Manual FTS 3000 Management Software Enable Check this box to launch the SNMP agent and allow access to the switch via SNMP version 1/2c. Read Community Specify the community name for SNMP read access. The default is public. Read/Write Community Specify the community name for SNMP read and write access. The default is private. This community string acts as an SNMP password; you should pick one that it diffi cult to guess. SNMP V3 The HARTING SNMP Agent provides complete support for User based Security Model. The following security algorithms are supported: • Authentication HMAC MD5 and HMAC- SHA • Encryption DES-CBC and it supports all three levels of security. • NoAuthNoPriv No Authentication and no Privacy • AuthNoPriv Authentication and no Privacy • AuthPriv Authentication and Privacy Enable check this box to launch the SNMP agent and allow access to the switch via SNMP version 3. User specify the user name for SNMP version 3 access (the default user name is harting). Access Level NoAuthNoPriv No authentication and no message encryption AuthNoPriv Enables message digest (MD5) or Secure Hash Algorithm (SHA) packet authentication, but no message encyption AuthPriv Both authentication and message encryption. Authenticaton Protocol Protocol used for User Authentication (MD5) or Secure Hash Algorithm (SHA) Password specify the SNMPv3 password twice. It must be at least eight characters. A MIB Management Information Base) file can be found on the CD that is included with the switch. The MIB information allows you open-standard access to the switch using SNMP management software. Privacy Protocol Protocol used for privacy. Privacy Password specify the SNMPv3 privacy password twice Note If you are not planning on using SNMP, you should make sure that both versions are disabled so that maximum security is ensured. 7.5 Network Discovery This section allows you to activate LLDP (Link Layer Discovery Protocol). LLDP can be used to determine the capabilities of devices on your network. It allows the switch to announce its capabilities and other media-specific configuration information to the local area network. 24 HARTING Electric GmbH Introduction The Link Layer Discovery Protocol allows systems on an Ethernet LAN to advertise their key capabilities and to learn about the key capabilities of other systems on the same Ethernet LAN. Consequently, this promotes a unified network management view of the LAN topology and connectivity to aid network administration and trouble-shooting. The station and capabilities information is conveyed in protocol frames called Link Layer Discovery Protocol Data Units (LLD PDUs). In general, a network administration station can be connected to one single switch and from there can access the connectivity information of the complete network within an enterprise. The switch (or other device) that collects the information for the network management station to view and LLDP process, also provides notifications to alert an operator about changes in the network topology, in the form of SNMP traps. Note If activated the PROFINET in the mask Industrial Profile (see chapter 7.10) the settings of LLDP are fixed. If Automatic Edge Port Detection is enabled, LLDP is activated fix too. 7.5.1 LLDP Settings tab Figure 11 The Network Discovery section At the bottom of this window, the Refresh button allows you to refresh your view of neighbouring chassis IDs, port IDs, and IP addresses. Activate LLDP Select whether to disable or enable LLDP on the switch globally on the switch. Chassis ID Subtype Enter the Chassis ID Subtype which should be written in the LLDP packets. Chassis ID Enter the Chasses ID which should be written in the LLDP packets., if sub type is locally assigned. Transmit Interval The interval at which LLDP frames are transmitted on behalf of this LLDP agent. The default value for the Transmit Interval is 30 seconds., but 5 seconds in either PROFINET or ETS Edge Port Detection is enabled. TTL Multiplier The time-to-live value expressed as a multiple of the Transmit Interval. Send IP Address Transmit the IP address of the switch in every LLDP packet. Ha-VIS Management Software Manual FTS 3000 / Edition 1.0 25 User’s Manual FTS 3000 Management Software Table description The Port ID can be set individual for each port via the table. Note The interval between to LLDP PDUs is calculated with the following algorithm: LLDP Intervall = Transmit Interval x TTL Multiplier 7.5.2 LLDP Connections tab The LLDP table shows all direct connected neighbours and the corresponding information. The Refresh button allows you to refresh your view of neighbouring chassis IDs, port IDs, and IP addresses. The following information are shown in the table. • Local Port Local port where the information was learned • Neighbour Chassis ID Chassis ID of the neighbour device • Neighbour Port ID Port ID of the neighbour device • Neighbour IP IP address of the neighbour device (not always available) 7.6 Time Settings This section allows you to set the system time for the switch. The time can be specified manually or automatically via an SNTP (Simple Network Time Protocol) server. The Ha-VIS FTS Ethernet Switches include an implementation of the Simple Network Time Protocol. This is a subset of the Network Time Protocol used to synchronize computer clocks in the Internet. SNTP is useful and sufficient when the ultimate performance of a full NTP implementation is neither needed nor justified, which is the case with network infrastructure devices for Ethernet and IP based switching and routing. HARTING switches implements the client portion of the SNTP protocol and does not implement the server portion. The administrator can choose whether to set the system clock manually or to enable SNTP. If SNTP is enabled, the SNTP implementation gets the time from the server. The SNTP implementation also has callouts to set the system time based on the time received from the SNTP server. 26 HARTING Electric GmbH Introduction Figure 12 The Time Settings window Manual Time settings Time Specify the system time manually. The current system time is displayed below Current Value in the format hours:minutes:seconds (24-hour format). The time can be specified manually in the New Value column. Date Specify the date manually. The currently set date is displayed below Current Value in the format day-month-year. The date can be specified manually in the New Value column. Get Time Click on this button to enter the computer system’s time and date into the fields above. The time information will be taken from the computer on which the web browser is running. Automatic Time settings Auto Update Check this box in order to receive the system time automatically with the support of an SNTP server. Interval Specify the period of time in minutes. The system time is then updated periodically at this interval. SNTP Servers Specify the name and address of the SNTP servers that will supply the system time here. The address can be that of either a publiclyaccessible PC (for example ntp1.co.uk) or a specified PC in the network that serves as a time generator. The IP address must also be specified. More than one server may be specified to provide redundancy. Note The Ethernet Switch does not store time and date when turned off for a minimum of 24 hours. The switch starts with the following system settings after first booting up: Time00:00:01 Date01-01-2000 The Ethernet Switch does not automatically adjust to summer and winter time. This should be taken into account when evaluating log files or alarm-generated e-mails in which the time is logged. Ha-VIS Management Software Manual FTS 3000 / Edition 1.0 27 User’s Manual FTS 3000 Management Software 7.7 DHCP Relay Agent: Option 82 Upgrading and changing the structure of Ethernet networks causes usually a lot of administrative effort. Configuration of security and addressing procedures has to be redone every time a device will be changed. Replacing or moving of network devices causes a lot of trouble, because some network mechanisms such as dynamic IP address assignment are MAC based. DHCP Option 82 provides a mechanism for generating IP addresses based on the location of the client device in the network. A client device can be any device attached to the switch or a switch itself. Figure 13 The DHCP Relay Agent tab DHCP Relay Agent Status Enables or Disables the DHCP Relay Agent on the switch. To use Option 82 this option must set to enable. DHCP Option 82 Select whether to disable or enable Option 82 on the switch. Circuit-ID Defines the Circuit-ID to identify the location of the end device in the network. Attention: The Port ID must be enabled to guarantee the correct work of DHCP Option 82. 28 HARTING Electric GmbH Introduction Remote ID Defines the Remote-ID for the switch which will be added to the DHCP packets. Default Set the Remote-ID to the default value (MAC address). Device Name Add the Device Name as Remote ID. IP Address Custom Use the IP address A custom value can be added as the Remote-ID. DHCP Server RemoteID Entry Calculated value of the Remote ID. If the Remote ID is used by the DHCP Sever, this value must be entered on the server side. DHCP Server The IP address of the DHCP Server must be entered here. 7.8 File Transfer Configuring the Switch every time on restart is very tedious. To ease this job, the entire configuration of the Switch must be saved in Flash and so is restored on restart of the system. The switch may also make use of the services of TFTP and HTTP to download the configuration file from an external TFTP server or storage drive and to set the configurations as stored in the configuration file. This section allows you to transfer files to and from the switch. File transfers are used for importing or exporting specific saved configurations and for importing or exporting firmware. Uploading and downloading of the files can be done via a TFTP Server and very simple via HTTP. The address of a TFTP (Trivial File Transfer Protocol) server can be specified for importing or exporting firmware or configurations. In order to transfer files to or from the switch, a TFTP server program must be installed on a connected PC. There are three different tabbed sections within this window. 7.8.1 Firmware tab This tabbed section allows you to specify the IP address of the TFTP (Trivial File Transfer Protocol) server and the file name of the firmware file to be exported or imported. Be sure that you have the TFTP server running and configured properly on a separate computer. Click on the Import or Export button to begin the transfer. Figure 14 The Import/Export Firmware tab Ha-VIS Management Software Manual FTS 3000 / Edition 1.0 29 User’s Manual FTS 3000 Management Software Import (Load) a firmware Select Import firmware in order to import a specified firmware file. Select Import to import the current firmware from the TFTP server or via HTTP from a remote file system. Export (Save) a firmware Save the current firmware to a file on a remote system. Select Export to export the current firmware to the TFTP server or via HTTP to a remote file system. TFTP Transfer This section allows you to specify the IP address of the TFTP (Trivial File Transfer Protocol) server and the file name of the firmware file to be exported or imported. Be sure that you have the TFTP server running and configured properly on a separate computer. TFTP Server Specify the IP address of the TFTP server File Name Specify the file name of the firmware packet file Click on the Import or Export button to begin the transfer. Note The transfer status is shown in this window and will be updated automatically. Check in your TFTP server logs to see when the transfer is complete. Wait until the TFTP server log shows that the file has been transferred before rebooting. Rebooting is necessary after succsessful loading to install new firmware. If you intend to load a new version of the firmware file from the TFTP server, we recommend that the existing firmware file be backed up first to the TFTP server. HTTP Transfer This section allows you to use HTTP data transfer for the firmware file to be exported or imported. Click on the Import or Export button to begin the transfer. ATTENTION Only select firmware files which are compatible with the device for the import functionality. 30 HARTING Electric GmbH Introduction 7.8.2 Configuration tab This tabbed section allows you to load or save a configuration. The following settings are available. Figure 15 The Save/Load Configuration tab This tabbed section allows you to load or save a configuration. The following settings are available. Configuration Settings Load Type Load Config on Startup Startup with the last saved configuration (default) Load Factory default on Startup Startup with factory defaults The status of the current action are shown at the bottom of the box. To start the switch with the factory default settings, you have to select “Load Factory default on Startup”, press the Apply button and restart the switch. Import (Load) a configuration Select Import Configuration in order to import a specified configuration file. Select Import Configuration to import the current configuration from the TFTP server or via HTTP from a remote file system. Export (Save) a configuration Save the current configuration to a file on a remote system. Select Export Configuration to export the current configuration to the TFTP server or via HTTP to a remote file system. TFTP Transfer File Name Ha-VIS Management Software Manual FTS 3000 / Edition 1.0 specify the file name to which the configuration file will be saved. The default file name is iss.conf. 31 User’s Manual FTS 3000 Management Software TFTP Server specify the IP address of the TFTP server where you will save the configuration. The status of the current action are shown at the bottom of the box. HTTP Transfer This section allows you to use HTTP data transfer for the configuration file to be exported or imported. Click on the Import or Export button to begin the transfer. Note Reboot is required after restore/import. Note To save the configuration permanent to the flash memory, please see chapter 5.2 Saving changes with the Save Configuration button for further details. 7.8.3 Reboot tab To reboot the switch, click the Reboot button in this section. A timer will wait 10 seconds before execute the reboot. This is helpful if large networks should be reboot at the same time. The delay ensures that every switch in the network receive the command. Figure 16 The Reboot tab Note Be sure that transfer process of firmware was successfully done before executing reboot. 7.9 The Fast Track Settings Section This switch supports Fast Track Switching Technology. In this section it is possible to configure the FTS Mode, e.g. which frames should be preferred. It contains 2 Tabs, General FTS Settings and Custom Protocol Settings. 32 HARTING Electric GmbH Introduction 7.9.1 General FTS Settings tab Figure 17 The General FTS Settings tab When unset, the complete switch is put to Standard-Switching Mode (Store and Forward Switching Mode), no identifying and no accelerating of any frames in FTS-Mode is performed. In this mode all FTS-features are switched off. No detected protocol is enabled per factory default so the switch works in the Store and Forward Switching Mode. Port Settings: Automatic Endport Detection When set, the system detects the FTS-Ports and Endports (see below) automatically. This is the default setting. Note While Automatic Endport Detection is active, the user can not disable LLDP functionality Ha-VIS Management Software Manual FTS 3000 / Edition 1.0 33 User’s Manual FTS 3000 Management Software 34 Endport When set, the selected port is marked as an endport. This means on this port an end-device or a non-FTS-device is connected. If a Non-FTS-Device is connected to a port, it has to checked “FTS Endport”. These settings are only necessary, if NRT Bandwidth Control is enabled. If it is disabled, no endport has to be defined. These setting are only necessary in combination with NRT Bandwidth control (see below). Overtake Mode Enable The Overtake Mode is part of the Fast Track Switching mechanism and means that an identified and prioritized frame (Realtime-frame, RT-frame) can suspend a Non-RT-frame (Non-realtime-frame, NRT-frame) for instant transmission. The NRT-frame is stored and will be sent afterwards again. This increases performance and all FTS-ports work in this mode. But it also means that there could be a fragment of the suspended frame. Normally this is filtered out at the next switch or device because of a corrupt checksum (FCS). But some devices might have a problem with this fragment if it occurs on the endport. Therefore the Overtake Mode can be disabled on these endports. When set, the selected endport also supports “overtaking”. If it is not an endport it is not possible to disable the Overtake Mode for the port. That means that there will be no FTS-generated fragment to the connected device. But performance is decreased, in worst case about 1500Byte NRT could not be overtaken by RT, this means up to 125µs extra-time in worst case. This has to be calculated to stay deterministic. NRT Bandwidth Control For the highest performance for RT-frames this NRT Bandwidth Control can be switched off. However some applications might require a higher bandwidth for NRT-traffic. In this case it might happen that if there is a high amount of RT frames, nearly all NRT frames (especially if they a long) could be interrupted and will not be transmitted for longer periods of time. Therefore it is possible to ensure a certain bandwidth for NRT traffic by enabling NRT Bandwidth Control. There are up to seven levels to be set, default setting is 1. The higher the level the more NRT Bandwidth is guaranteed. Ensuring a certain bandwidth for NRT means a decrease in the performance for RT. So for each level increase about 125 µs have to be calculated for the worst case delay transmission time of RT-frames. Example: If level 2 is selected, 2* 125 µs = 250 µs have to be added to the maximum transmission time for RT frames. Recommendation is to set this on 1 or 2 for most applications. Activate When set the NRT Bandwidth Control is enabled. This is default setting. HARTING Electric GmbH Introduction Level The level of NRT Bandwidth can be selected, possibles values are 1 – 7, 1 means low amount of NRT traffic will be guided through, delay for RT is low, 7 means high amount of NRT traffic will be guided through, delay for RT is high (see Example above). Default setting is 1. Send to Network If the setting of NRT Bandwidth Control is changed, these settings can be transmitted to the whole (FTS) Network to guarantee the same level of NRT Bandwidth Control in the whole FTS domain. Detected Protocol Preconfigured profiles can be selected and which frames should be priorized and transmitted with FTS-Mode. 3 Profiles – PROFINET, EtherNet/IP and Modbus TCP – are pre-configured. By selecting one of them, the relevant frames are identified and transmitted in FTS mode automatically. If more then one of them or different profiles are required, Custom has to be selected. On the CUSTOM tab the detailed settings have to than be made. Custom Protocol Settings tab On this tab it is possible to define different profiles (different from PROFINET, EtherNet/IP or Modbus TCP) or a combination of different kinds of protocols. Figure 18 The Custom Protocol Settings tab The Buttons PROFINET as Identifier 1, Ethernet/IP as Identifier 2 and Modbus TCP as Identifier 3 will help to setup a combination of these or to setup another type of protocol. By using the buttons the identifiers of the selected profile will be put in the identifier settings below Ha-VIS Management Software Manual FTS 3000 / Edition 1.0 35 User’s Manual FTS 3000 Management Software as an example. These settings can be changed to adapt to customized solutions or be used for setting up combinations. It is possible to setup up to 4 identifiers to enable the switch identifying protocols to transmit them in FTS Mode. This can be 4 different types of protocols, a combination of them or protocols with more than one necessary attribute to be identified. To use an identifier it has to be checked at active. The Active Identifiers are shown with green mark, the others red. If compare 8Bit is not checked (default), the comparison will be done with 16Bit, if it is checked the comparison will be done with 8 bit and a mask. Example 16Bit: hex 8892 (PROFINET)all these Bits have to be the same in the Ethernet header of the frame, this means only frames with 8892 at the specified Ethernet header location will be prioritized. Example 8Bit: Value is hex 5 which is 0101 binary Mask is hex 7 which is 0111 binary the last three bits are necessary in this example, means the combination 101 binary. The first Bit is set to 0 in the mask and will be not looked for in the value then. All values and masks have to be put in as hex. Note Bits that have to be ignored (0 in mask), must also be set to 0 in the value-field. Depending the setting of compare 16Bit in value/mask a 16 bit value or a 8 bit value and a mask have to be inserted. These are identification attributes of the protocols that shall be transmitted in FTS Mode. The next settings in these rows are the location where to find these attributes inside the Ethernet header. Offset (0-45) describes the offset to the starting point of counting, where 0 means the first byte after starting point. The offset has to be entered in number of bytes (0-45). If MAC is checked, the counting will start with the first byte following the MAC-source-address of a frame. If skip VLAN is also checked, the counting will start directly behind the MAC address if no VLAN Tag is inserted else directly behind any existing VLAN Tags. If Ipdata is checked, the counting starts with the first byte following an IP header. If the option is set, it implicitly requires an IP Frame, else the identifier will report no match. For Ipv4 the header and any header options are skipped, for Ipv6 only the base header is skipped. If Offset+2 is also checked, the comparison is repeated at offset + 2 Byte, if the comparison at offset failed. This can be used to create a comparison for UDP or TCP port numbers, allowing checking if the port number exists in the source or in the destination port number field. If IP protocol is checked, the compare value is compared with the protocol field found within the IP header for both IPv4 and IPv6 frames. The offset then has no meaning and is ignored If the frame is not an valid IPv4/v6 frame the identifier will report no match. Examples: PROFINET has a special Ethertype which is 8892. So an identifier with a 16Bit value with 8892 inside is chosen. The counting should start in the Ethertype ( Offset=0), so if there 36 HARTING Electric GmbH Introduction is no VLAN tag the counting starts from the MAC (MAC is checked), if there is a VLAN tag it is skipped for this counting (skipVLAN is checked). By activating this identifier all PROFINET frames with Ethertype 8892 are identified and transmitted in FTS-Mode. Figure 19 Example EtherNet/IP has the destination port number 2222 in the UDP-Header. 2222 is 08AE in hex. In the Ipdata-field it is located with an offset of 2. In this section it is possible and necessary to combine the identifier results. This is possible with up to 4 logical combination levels Logic 1 to Logic 4. Note Logic 1 must always be used, as this logic-stage determines the final match result. If nothing is selected in logic1, there will be no transmission in FTS-Mode, regardless if identifiers above are active or not. For the INPUT LOGIC the identifiers 1 to 4 or the inverted identifiers 1 to 4 can be selected. E.g. if a frame has to have the identifier 1 but not the identifier 2, identifier 1 is checked and inverted identifier 2 is also checked. Furthermore the results of lower logical combinations can be used as input for a higher logic level in the RESULT section. So e.g. the result of Logic 4 can be combined with Logic 3 via Logic 1 The result of Logic 3 can be used in Logic 2 and in Logic 1 all lower results can be used. You can also combine Logic-results and identifiers. In the section OUTPUT LOGIC it is possible to combine the selected inputs via OR or AND. OR means one of the inputs have to be true and AND means all of the inputs have to be true. Also the results of this can be inverted with RESULT INVERT. This could e.g. be useful when the result is used as input to a higher logic. Example 1: Figure 20 Example 1 PROFINET, EtherNet/IP and Modbus TCP shall be used in the network and all their frames should be transmitted in FTS Mode. Identifier 1 is set to the PROFINET values, identifier 2 to Ethernet/IP and Identifier 3 to Modbus TCP settings. All these 3 identifiers are combined with Ha-VIS Management Software Manual FTS 3000 / Edition 1.0 37 User’s Manual FTS 3000 Management Software OR in a single logic operation. This will set the switch identifying and accelerating all the frames with PROFINET or EtherNet/IP or Modbus TCP identification inside: Example 2: Two profiles – PROFINET and a customer specific one – shall be identified and accelerated. The customized profile has two attributes: • Ethertype is 0x22CD • The following byte is significant for the RT frames of this profile, the first 4 Bit of it are 1110 This means the Bytes behind the MAC-Address start with: 22 CD E… These are the settings for this example: Figure 21 Example 2 Identifier 1 is activated and set to PROFINET, 0x8892 as the compare-value. The Ethertype has to be checked, this means Offset 0 and skipVLAN to start comparison directly behind the MACAddress for frames with no VLAN Tag and directly behind the CLAN Tag if there is one. Identifier 2 is activated and set to 0x22CD for this is the specific Ethertype of this profile, comparison on the same location like above. Identifier 3 is activated and set and compare 8Bit is checked to be able to identify those 4 Bit of the following byte. The compare value is E0 (to fulfil 1110 0000 binary, see above), the mask is F0 ( F0 hex means 1111 0000 binary) to compare exactly 1110 on the 4 interesting bits. The offset is set to 2 to start comparison directly behind the Ethertype (2 Bytes). To combine these profiles and attributes correctly, it is necessary to combine Identifier 1 (which is PROFINET in this case) with OR to Logic 2, which is the combination of the two features of the customer specific profile. Inside Logic 2 the Identifier 2 (which contains the Ethertype 22CD) is combined AND with Identifier 3 (which describes the E in the next Byte). With this combination it is possible to accelerate PROFINET as well as a customized profile which has more than one attribute to be identified as a RT frame. 38 HARTING Electric GmbH Introduction 7.10 The Industrial Profile Section In this section it is possible to activate the industrial profiles PROFINET or EtherNet/IP. By default both are not activated. Figure 22 The Industrial Profile Section window If PROFINET is checked the following settings are operated: • LLDP will be activated (if it was disabled before) • The PROFINET I/O Stack will be enabled • PROFINET-Frames (Ethertype 8892) will be identified and accelerated in FTS-Mode In the next window you can choose between three options (see figure 23) Ha-VIS Management Software Manual FTS 3000 / Edition 1.0 39 User’s Manual FTS 3000 Management Software Figure 23 IP settings in PROFINET Profile When choosing the button “Current” no settings will be changed and also IP address and subnet mask remain constant. Choose the button “PROFINET default” to clear the IP address, subnet mask and the device name. The switch will wail for IP settings via DCP sent e.g. by PLCs. All other settings remain constant. ATTENTION After clearing the IP settings by choosing “PROFINET default” the switch is not reachable via web-Access until it gets a new IP address from the PLC via DCP. Choose the button “Cancel” to abort the task for enabling the PROFINET Profile. After reboot the diagnosis LED is on red until the connection between switch and PLC succeeded. Note All following configurations should be done by an engineering tool in PROFINET enviroment ! Note If PROFINET is checked it is not possible to disable LLDP and it is not possible to change Transmit Interval. PROFINET requires 5 seconds, this value is fix during PROFINET mode. The following LLDP settings will automatically be made. 40 HARTING Electric GmbH Introduction Figure 24 LLDP settings for PROFINET If EtherNet/IP is checked the following settings are operated: • IGMP Snooping will be enabled • DHCP Option 82 will be enabled • EtherNet/IP Frames will be identified and accelerated in FTS-Mode With GSD Export it is possible to download the GSD-File from the Switch to a specified location via HTTP. The address of the connected HTTP Server has to be inserted. By pushing the Export button the file (named in File Name) will we exported to the HTTP Server. Ha-VIS Management Software Manual FTS 3000 / Edition 1.0 41 User’s Manual FTS 3000 Management Software 8. The Redundancy / RSTP Section This section allows you to construct redundancy within your network topology. Redundant or spare links can be implemented to provide automatic backup paths if an active link fails. STP (Spanning-Tree Protocol) is a link management protocol that provides path redundancy while preventing undesirable loops in the network that are created by multiple active paths between stations. To establish path redundancy, STP creates a tree that spans all of the switches in an extended network, forcing redundant paths into a standby, or blocked, state. For an Ethernet network to function properly, only one active path must exist between two stations. Multiple active paths between stations in a bridged network can cause loops in which Ethernet frames can endlessly circulate. STP can logically break such loops and prevent looping traffic from clogging the network. The dynamic control of the topology provides continued network operation in the presence of redundant or unintended looping paths. One of the problems with the Spanning Tree algorithm is that, in a large LAN, it can take a considerable time for the LAN topology to stabilize following a reconfiguration event - times of the order of 30 seconds being typical of the original form of the algorithm. To avoid this, HARTING supports RSTP (Rapid Spanning Tree Protocol). The operation of RSTP provides rapid recovery of connectivity in case of a link failure. RSTP avoids large delays by calculating an alternate root port, and immediately switching over to the alternate port if the root port becomes unavailable RSTP in compliance with IEEE 802.1D (2004). This section is divided into three tabbed sections for altering and viewing RSTP parameters: Basic Settings, Port Settings and Port Status. Each of these tabs is described below. Note When the switch boots up, Rapid Spanning Tree is enabled by default. The default configuration is applicable for most applications, normally no additional configuration are need to be done in this section. 8.1 Basic Settings tab Figure 25 The Basic Settings tab This tabbed section allows you to specify the following global settings: 42 Status Select whether to disable or enable a redundancy protocol globally on the switch. Version Select the protocol version. Either RSTP Compatible or STP Compatible can be chosen. HARTING Electric GmbH Introduction Priority Specify the STP priority. This is used to identify the root bridge in a spanning tree. The bridge with the lowest value has the highest priority and is the root. A higher numerical value means a lower priority; thus, the highest priority is 0. The highest numerical value on the drop-down list is 61440. Max Age Specify the time in seconds (STP) or hop count (RSTP) that the information received in a RSTP BPDU (bridge protocol data unit) is valid. Hello Time Specify the time interval in seconds between two successive configuration BPDUs. Tx Hold Count Specify the maximum number of BPDUs that can be transmitted in a second. Forward Delay Specify the period of time in seconds that a bridge will wait (the listen and learn period) before beginning to forward data packets. Dynamic Path Cost Calculation Select whether the dynamic path cost calculation is allowed or not. Cost calculation is allowed when this is set to True, the pathcost of all the ports will be calculated dynamically based on the speed of the interface. Note It is recommended to use RSTP instead of STP to reduce the time for the networkrecovery in case of a link failure. Note The parameter Max Age must be set to the worst case diameter within a RSTP topology to prevent loops. In a ring structure of 20 Switches for example, the Max Age value must be set to at least 20. The following two mathematical relationships must be observed when assigning values for Hello Time, Forward Delay and Max Age parameters: 1. (Forward Delay) * 2 >= Max Age 2. Max Age >= 2 * (Hello Time) 8.2 Port Settings tab Figure 26 The Port Settings tab Ha-VIS Management Software Manual FTS 3000 / Edition 1.0 43 User’s Manual FTS 3000 Management Software This tabbed section allows you to specify per-port STP settings. Changes can be made under the following columns: 44 Port Select the port that you would like to change by clicking on the checkbox here. Role Displays the current role of the port. During the calculation of the spanning tree topology, each port is assigned a port role (root, designated, backup, alternate or disabled) based on how it will participate in the tree topology. Priority Specify the RSTP port priority. This is the value of the priority field located in the first octet of the port ID. RSTP Status Select Enabled or Disabled to enable or disable RSTP for the corresponding port. Path Cost Specify the path cost associated with this port. STP associates a path cost value to each port on each bridge. This value is an adjustable weighted measure that indicates the port’s contribution to the route’s transmission speed. Higher numerical costs indicate slower paths. Protocol Migration When operating in RSTP mode, writing True to this object forces this port to transmit RSTP BPDUs. Any other operation on this object has no effect anit always returns False when read. AdminEdge Port Select True if the port is acting as an edge port. Admin Point to Point Select the Force True option to configure a port as point-to-point. The port can be forced to a non-point-to-point state by selecting Force False. If you select Auto, the decision is made dynamically (from the AL or MAC layer). Auto Edge Detection Select True if you want to have the edge port status calculated dynamically. Restricted Role Select the restricted role status of the port. If set to True, the port is restricted so that it may not be selected as a root port. A restricted port can be selected as an alternate port after the root port has been chosen. A True setting can result in poor connectivity within the spanning tree. The default setting is False. Restricted TCN Select the restricted TCN (Topology Change Notification) status of the port. If set to True, the port does not propagate received topology change notifications or topology changes to other ports. This parameter is set to False by default. Prevents the Topology change caused by that port. HARTING Electric GmbH Introduction 8.3 Port Status tab Figure 27 The Port Status tab This tabbed section allows you to view the status of each port; no settings can be specified or changed here. The following status information is shown: Designated Root Displays the unique bridge identifier (same as the MAC address) of the bridge recorded as the root for the segment to which the port is attached. Designated Cost Displays the path cost of the designated port of the segment connected to this port. Designated Bridge Displays the designated bridge identifier (MAC address) of the bridge. This is the preferred bridge which this port considers as the designated bridge for its segment. Designated Port Displays the number of the port on the designated bridge for this port’s segment. Type Displays the operation status of the LAN segment attached to this port. This indicates whether a port is considered to have a point-topoint connection or shared media. Role Displays the port’s current role as defined by the Spanning Tree Protocol (root, designated, backup, alternate or disabled). Port State Displays the port’s current state (Forwarding, Blocking, Disabled or Learning) as dynamically determined by STP. 8.4 Examples for a STP/RSTP application 8.4.1 Example 1: Loop detection by the STP/RSTP In the topology shown in the figure, frame duplication happens because of the manner in which the switches 2 and 3 are interconnected. Listed below are two different scenarios in which frame duplication happens: When Host1 sends a packet to Host3, switch 1 receives the packet on Port1 and forwards it on to Port2 (LAN B). This packet is received by both the switches - 2 and 3, and both of them forward the packets towards LAN A. Thus, Host3 receives two copies of the same packet, instead of one. When Host1 sends a broadcast packet, the packet travels in an infinite loop between the two switches 2 and 3. Switch 2 receives the packet from LANB and forwards it to LANC, which is Ha-VIS Management Software Manual FTS 3000 / Edition 1.0 45 User’s Manual FTS 3000 Management Software again received by Switch 2 and forwarded to LANB. This repeats continuously. The STP detects the loop between the two switches and disables Port1 of switch 2, thus effectively breaking the loop. Figure 28 Loop detection by the STP/RSTP 8.4.2 Example 2: Benefits of RSTP Figure 29 46 Benefits of RSTP HARTING Electric GmbH Introduction As shown in figure above, if the root port on a switch becomes unavailable, RSTP immediately brings the alternate port to forwarding. Generally, if port 1 on Switch 3 becomes unavailable, [in standard STP (802.1D), if the root port becomes unavailable], the switch must go through the listening and learning states on the alternate port to re-converge with the spanning tree. Thus, port 2 of Switch 3 must go through the listening and learning states before entering the forwarding state and re-converging with the spanning tree. In this scenario, RSTP avoids this delay by calculating an alternate root port, and immediately switching over to the alternate port if the root port becomes unavailable. The alternate port remains in the blocking state as long as the root port is in the forwarding state, but moves immediately to the active state if the root port becomes unavailable. Thus, using RSTP, Switch 3 immediately brings port 2 to forwarding, without the delays caused by the listening and learning states. RSTP selects the port with the next best cost to the root bridge.RSTP directly makes the edge ports as forwarding instead of moving in steps from blocking/listening (discarding) to learning and then to forwarding state. Ha-VIS Management Software Manual FTS 3000 / Edition 1.0 47 User’s Manual FTS 3000 Management Software 9. The VLAN Section VLANs (Virtual LANs, Virtual Local Area Networks) can be viewed as a group of devices on different physical LAN segments which can communicate with each other as if they were all on the same physical LAN segment, that is, a network of computers that behave as if they are connected to the same wire even though they may actually be physically located on different segments of a LAN. VLANs are configured through software rather than hardware, which makes them extremely flexible. VLAN provides the following benefits for switched LANs: • Improved administration efficiency • Optimized Broadcast/Multicast Activity • Enhanced network security This switch supports port-based VLANs (Virtual Local Area Networks) in compliance with IEEE 802.1Q. Initially, all ports on the switch are assigned to the configured default VLAN 1. Additional VLANs can be created on the switch and ports can be assigned to the new VLANs. This allows traffic from devices connected to these ports to bridge within their VLAN domains. The VLAN window is divided into four tabbed sub-sections: Basic Settings, Port Settings and Static VLAN. Each of these sections is described below. 9.1 Basic Settings tab Figure 30 The VLAN Basic Settings tab This tabbed section displays VLAN global configuration settings. Learning Mode Select the VLAN learning mode. You can enable either IVL (independent), SVL (shared) or hybrid. This determines the access method to the VLAN filtering database. In IVL, the information learnt by one VLAN is never used by other VLANs in making forwarding decisions. As a result of this, there are separate filtering databases maintained for each VLAN. The advantage in using IVL is that security restrictions can be applied to prevent unauthorized users from learning the sources of data traffic. This mode is typically employed in situations where, a. End stations operate over multiple VLANs with the same MAC address. b. Learning database size is not a constraint. In SVL, a global address table is used for all VLANs combined. 48 Port Based on All Ports Select per-port protocol-based classifications to be either enabled or disabled. Maximum VLAN ID Displays the largest valid VLAN ID that the switch allows. HARTING Electric GmbH Introduction Maximum Support VLANS displays the maximum number of VLANs that this switch can support. Number of VLANs in the System displays the active number of VLANs currently configured on the switch. 9.2 Port Settings tab Figure 31 The VLAN Port Settings tab This tabbed section allows you to specify the following port settings: Select/Port Select the port that you would like to change by clicking on the radio button here. PVID Specify a port default VLAN ID (PVID) for the port for port-based VLAN classification. This is the VLAN ID which will be assigned to all untagged frames received on the port. The possible values are 1 to 4094. VLANs are created and assigned ports exclusively in the Static VLAN tab. Acceptable Frame Types Select the frame types accepted (accept only tagged frames, untagged and priority tagged frames or all frames). Ingress Filtering Select if ingress (incoming) filtering is enabled or disabled at the port level. If filtering is enabled, incoming frames are discarded if they are tagged for VLANs which do not include this particular ingress port in their member set. If filtering is disabled, incoming frames are discarded if they are tagged for VLANs which are not configured on the switch. Ha-VIS Management Software Manual FTS 3000 / Edition 1.0 49 User’s Manual FTS 3000 Management Software 9.3 Static VLAN tab Figure 32 The Static VLAN tab This tabbed section displays the available VLANs and allows you to create new VLANs. VLAN ID Here you can create a new VLAN with the specified VLAN ID. Note that an existing default VLAN which includes all ports is labelled with VLAN ID 1. The possible values are 1 to 4094. VLAN Name Specify a user-defined name, usually used to remember the purpose of the VLAN. Member Ports Specify the ports that belong to the VLAN that you are creating. Untagged Ports Specify ports which forward packets untagged. Forbidden Ports Specify ports which may not be included in the VLAN. At the bottom of this section, a list displays all existing VLANs along with the user-defined information above. The values in this table can be changed to alter the properties of existing VLANs (the name, member ports, untagged ports or forbidden ports). 9.4 Examples for a VLAN applications 9.4.1 Example 1: VLANS with all VLAN-Aware Switches In the figure below, the Hosts E1, E2 and E3 are grouped to form the VLAN 2, while the Hosts E4 and E5 are grouped to form the VLAN 3. Any multicast/broadcast traffic from Host E1 is sent to Switch 2 by Switch 1. Switch 2 then forwards the traffic to Hosts E2 and Switch 3. Switch 3 forwards the received traffic to Hosts and E3. At no given point of time will the traffic from Host E1 be transmitted to Hosts E4 and E5. 50 HARTING Electric GmbH Introduction Figure 33 VLANS with all VLAN-Aware Switches 9.4.2 Example 2.1: VLANs with VLAN-Aware and VLAN-Unaware Switches In VLAN-aware switches group the end nodes into three VLANs 2, 3 and 4. VLAN 4 is untagged, i.e., all members of the VLAN are VLAN-unaware. These VLANs span multiple switches. Note that the end node ‘E7’ in VLAN 4 is not connected to a VLAN-aware switch directly. It is connected to the VLAN-unaware switch uSwitch1 (unmanaged Switch). VLANaware switches need to untag frames before forwarding them to VLAN-unaware devices. Therefore, Switch2 and Switch3 transmit untagged frames for VLAN 4, but transmit tagged frames for other VLANs. This behavior allows the end node E7 to participate in VLAN configuration even though it is connected to a VLAN-unaware bridge. The ports that transmit both tagged and untagged frames are called hybrid ports. The Frames forwarded by VLANaware switches on a given port must be either tagged or untagged for a given VLAN. Ha-VIS Management Software Manual FTS 3000 / Edition 1.0 51 User’s Manual FTS 3000 Management Software Figure 34 VLANs with VLAN-Aware and VLAN-Unaware Switches 9.4.3 Example 2.2: Tagging and Untagging frames in the switch Segmenting bridged LANs into VLANs reduces the broadcast domain. Broadcast frames/ Multicast and unknown unicast frames belonging to a VLAN are forwarded only on the ports where the VLAN members are reachable. For example Switch1 forwards the broadcast traffic sent by Host E1 only on the port that is connected to the VLAN Bridge Switch2. If the switch Switch1 had been VLAN unaware, then the broadcast traffic would have been flooded on all of its ports. In Switch2, the default VLAN ID for the port that is connected to uSwitch1, must be configured to VLAN Z. The traffic sent by Host E7 is forwarded to Switch2 by uSwitch1. As a result of configuration in Switch2, the traffic is associated to VLAN 4 and is forwarded to Host E6 by Switch2. 9.4.4 Example 3: VLANs Over Switches with Multiple VLAN Trunks In the figure below, the RSTP protocol disables one of the VLAN trunk links to form a loop free topology and enables the disabled trunk link whenever the currently enabled trunk link fails. All VLAN configuration must be done for both ports to guarantee a stable network recovery in case of a link failure on one of the VLAN trunk links. 52 HARTING Electric GmbH Introduction Figure 35 VLANs Over Switches with Multiple VLAN Trunks Ha-VIS Management Software Manual FTS 3000 / Edition 1.0 53 User’s Manual FTS 3000 Management Software 10.Rate Limiting The Rate Control feature protects the switch from packet flooding from malicious users. Traffic that exceeds a configured threshold traffic rate must be dropped. Rate control can be applied on unknown Unicast, Multicast and Broadcast traffic. By applying rate control on Broadcast Traffic, Broadcast Storm can be prevented. The threshold and the type of packet which should be filtered can be set separated for each port of the switch. Figure 36 Rate Control Egress Limit Value 54 Select the bandwidth limit for the outgoing traffic on this port. The possible values are 1 Mbit/s / 2 Mbit/s / 4 Mbit/s / 8 Mbit/s / 16 Mbit/s / 32 Mbit/s / 64 Mbit/s HARTING Electric GmbH Introduction 11.Port based network access control IEEE 802.1x The Port based Network Access Control (PNAC) is based on the IEEE 802.1X standard. It provides a means of authenticating and authorizing devices attached to a switch port. It prevents access to a port in cases when the authentication and authorization fails. The entity that facilitates authentication of other entities attached to it is called an Authenticator. The entity that is being authenticated by an Authenticator attached to the other end is called a Supplicant. Authentication, Authorization and Accounting for a user session with the remote Server, is done by RADIUS. The switch acts as a RADIUS client. It encapsulates the accounting information passed by the User in the required format and sends the packet to the designated RADIUS accounting server. 11.1 Basic settings tab Figure 37 The Basic Settings tab The 802.1x Basic Settings page allows you to configure the basic settings of 802.1x. Function Description 802.1xAuthentication Specifies the status of 802.1x based port security feature in the switch. Options are: Enable – Enables 802.1x based port security feature in the switch. Disable – Disables 802.1x based port security feature in the switch. Range of value:Enable / Disable Default value:Disable Authentication Mode Specifies the Authentication Server Location. Range of value:Local / Remote Default value:Local Network Access Server ID Specifies the Authenticator ID, which originates the AccessRequest Packets. Range of value: Not more than 20 printable characters. Default value: none Supplicant Name Range of value: Not more than 20 printable characters. Default value:admin Supplicant Password Range of value: Not more than 20 printable characters. Default value:harting Ha-VIS Management Software Manual FTS 3000 / Edition 1.0 55 User’s Manual FTS 3000 Management Software 11.2 Port settings tab Figure 38 The Port Settings tab The 802.1x Port Settings page allows you to configure the security information at the individual port levels. Function Port Control Description Specifies the control values of the Authenticator Port. Options are: ForceAuthorized – Allows all the traffic through this port. ForceUnauthorized – Blocks all the traffic through this port. Auto – Imposes 802.1x authentication process in this port. Range of value:ForceAuthorized / ForceUnauthorized / Auto Default value:ForceAuthorized Auth. Port Status Shows the current status of the Authenticator Port. Range of value:Authorized / Unauthorized Auth. Mode Specifies the configuration for selecting the authentication mode. Range of value: Port Based / Mac Based Default value: Port Based Control Direction Specifies the current value of the administrative controlled directions parameter for the port. Range of value:Both / In Default value:Both Auth. State Shows the current status of the Authenticator Port. Range of value:Authorized / Unauthorized Auth. Restart Restart Authentication Specifies the initialization control for the port to restart authentication. Re-Auth. Reauth enables / disables re-authentication mechanism on the port. Range of value:Enable / Disable Default value:Disable Suplicant Count 56 Number of Supplicants authorized on the switch. HARTING Electric GmbH Introduction 11.3 Local server tab Figure 39 The Local Server tab The Local Authentication Server Configuration page allows you to configure the Local Authentication Server information. Function Description User Name Specifies the identity of the user, seeking authentication. Range of value: Not more than 20 printable characters. Default value: none Password Specifies the password specific to the user name. Range of value: Not more than 20 printable characters. Default value: Port List none Represents the complete set of ports of the authenticator to which the user is Allowed. Default value:All 11.4 RADIUS server tab Figure 40 The RADIUS Settings tab The Radius Server Configuration page allows you to configure the Radius Server information. Function IP Address Ha-VIS Management Software Manual FTS 3000 / Edition 1.0 Description Specifies the IP Address of the Radius Server. 57 User’s Manual FTS 3000 Management Software Shared Secret Specifies the secret string, which is to be shared between the Radius Server and the Radius Client. Range of value: Not more than 20 printable characters. Default value: Server Type none Specifies the RADIUS server type Range of value:Authenticating / Accounting / Both Default value:Both Response Time Specifies the maximum time within which the Radius Server has to respond for a request from the Radius Client. Range of value:1 ... 120 sec Default value:20 Retry Count Specifies the maximum number of times a radius request is to be re-transmitted before getting response from the Radius Server. Range of value:1 ... 254 sec Default value:100 11.5 Supplicant session info tab Figure 41 The Supplicant Session Info tab The Supplicant session info page displays the Supplicant Session information details. Function 58 Description Supplicant MacAddr Specifies the Supplicant MAC Address. Session Identifier Specifies the Session Identifier of the supplicant. AuthSM State Specifies the state of the Authenticator State Machine. Auth Session Status Specifies the Authentication Session Status. Session PortNumber Specifies the port number through which a particular Session MAC address is learnt. HARTING Electric GmbH Introduction 11.6 Timers tab Figure 42 The Timers tab The 802.1x Timer Configuration page allows you to configure the Timer parameters at the individual port level. Function Description Quiet Period Specifies the duration for which the authenticator will be silent and will not attempt to acquire a supplicant. Range of value:0 ... 65 535 sec Default value: 60 sec Transmit Period Specifies the Time Period used by the Authenticator State machine to define when the EAPOL PDU is to be transmitted. Range of value:1 ... 65 535 sec Default value: 30 sec Re-Auth. Period Specifies the time between periodic re-authentication of the supplicant. Range of value:1 ... 65 535 sec Default value: 3600 sec Supplicant Timeout Specifies the amount of time the switch waits for a response before retransmitting the request to the client, when relaying a request from the authentication server to the client. Range of value:1 ... 65 535 sec Default value: 30 sec Server Timeout Specifies the amount of time the switch waits for a reply before retransmitting the response to the server, when relaying a response from the client to the authentication server. Range of value:1 ... 65 535 sec Default value: 30 sec Held Period Specifies the amount of time the client will wait before reattempting a failed 802.1X authentication. Range of value:1 ... 65 535 sec Default value: 60 sec Ha-VIS Management Software Manual FTS 3000 / Edition 1.0 59 User’s Manual FTS 3000 Management Software Auth Period Specifies the time interval for resending 802.1X request messages after not receiving a response. Range of value:1 ... 65 535 sec Default value: 30 sec Start Period Specifies the time interval for resending Start messages. Range of value:1 ... 65 535 sec Default value: 30 sec Auth. Retries Number of times the switch sends an EAP-request/identity frame before restarting the authentication process Range of value:1 ... 10 Default value:2 60 HARTING Electric GmbH Introduction 12.The IP Authorized Manager This section allows you to define an incoming IP address that is allowed access to the switch (thus functioning as an IP-based access control list). This rule also restrict which SNMP managers can access the switch MIB. The access control list of user-defined IP address is then displayed at the bottom of this section. Figure 43 The IP Authorized Manager IP Address Specify IP addresses that you wish to allow to gain access to the switch configuration. This IP address has to be an address of an existing device and no subnet or network address. All addresses which are not entered to the authorization list will be blocked. Port List Specify the port numbers (i.e. 3-7,9) which will be controlled by the rule. At least one port must be specified. Services Allowed Specify which services should be allowed or denied. If you are creating a Deny rule, no boxes should be checked. The access control list is displayed at the bottom of the page. Incoming packets are then checked against this list and the first applicable rule is applied. Note Do not use a subnet or network address. Only Host IP addresses are allowed! ATTENTION The first filter must include the workstation which is being used to gain access to the switch. If you accidentally create a Deny rule that locks you out of the switch, it is sufficient to reboot the switch to revert back to the last set of functional filter rules. Example Alow the access to the switch for one single station Source IP of the station which should access the switch: Authorized Manager IP entered at the Authorized Manager: Ha-VIS Management Software Manual FTS 3000 / Edition 1.0 192.168.5.101 192.168.5.101 61 User’s Manual FTS 3000 Management Software 13.The Multicast IGMP Section The IGMP Snooping feature in helps the switch to control IPv4 multicast traffic in a switched network. A Layer 2 switch by default, floods multicast traffic within the broadcast domain. This can consume a lot of bandwidth if many multicast servers are sending streams of data. IGMP Snooping are meant to dynamically discover the presence of multicast receivers and use the learnt information to control the multicast traffic flow, restricting it only to the desired ports on which receivers are present. The IGMP Snooping Switch examines or “snoops” IGMP packets sent between the hosts and the “router” (Multicastsource) and learns the Multicast Group membership of the hosts. The Ha‑VIS FTS Ethernet Switch learns the multicast forwarding information through the IGMP report messages from hosts and updates the Forwarding database. It also learns the router ports through the multicast control messages from the routers or Querier-Switch. The IGMP Snooping switch forwards multicast data traffic over a particular port only if one host at least has joined that particular multicast group that is reachable on that port. HARTING provides support for dynamic multicast registration support through IGMP snooping (for IPv4 multicast traffic). IGMP snooping can be used for Layer 2/3 traffic and provides a much greater degree of granularity in selecting multicast traffic. It is possible to edit and add information to the forwarding database manually, so there is no limitation and restriction for the network topology and the application. This section allows you to enable and configure the switch’s IGMP (Internet Group Management Protocol) snooping capabilities. IGMP snooping can be used to limit high-bandwidth tasks to their intended targets without flooding the entire LAN. The following tabbed sections are available: 13.1 Basic Settings tab Figure 44 62 The Basic Settings tab IGMP Snooping Status Select Enabled to enable IGMP snooping globally throughout this switch. If this setting is disabled, no interface configuration is possible. Operational Status Displays the global status of IGMP snooping on the switch. You can click on the tabbed header Basic Settings at the top to refresh the display. Report Forwarding Select whether the IGMP reports are forwarded on all ports or only on router ports. Query Transmit on TC Select Enabled or Disabled to specify whether IGMP snooping queries are transmitted after a topology change. Enabled activates query transmissions. HARTING Electric GmbH Introduction 13.2 Timer tab Figure 45 The IGMP Timer tab Router Port Purge Interval Specify the interval (in seconds) at which the learnt router port will be purged. The valid range is from 60 to 600 seconds. The default value is 125 seconds. Group Member Port Purge Interval Specify the interval (in seconds) after which a port is deleted if no IGMP reports are received on that port. The valid range is from 130 to 1225 seconds. The default value is 260 seconds. Report Forward Interval Specify the forwarding interval (in seconds) before which the next report messages for the same multicast group will not be forwarded. The valid range is from 1 to 25 seconds. The default value is 5 seconds. Group Query Interval Specify the interval (in seconds) after which the switch sends a group-specific query on a port when an IGMPv2 leave message is received. The valid range is from 2 to 5 seconds. The default value is 2 seconds. 13.3 Interface Configuration tab Figure 46 The Interface Configuration tab This tabbed section allows you to define a specific IGMP snooping configuration for the switch. The bottom of this section displays the list of IGMP-enabled VLANs which have already been configured. The following parameters can be specified when snooping is globally enabled in the Basic Settings tab: Ha-VIS Management Software Manual FTS 3000 / Edition 1.0 63 User’s Manual FTS 3000 Management Software VLAN ID Select from the list of configured VLANs to specify the VLAN to which the configuration will apply. IGMP Snooping Status Select to enable or disable snooping on the specific VLAN. You can disable snooping for a specific VLAN even if snooping in enabled globally in the Basic Settings tab. Fast Leave Select whether the fast leave processing should be enabled or disabled on the specified VLAN. Querier Status Select whether the IGMP snooping switch should be enabled or disabled as a querier on a specific VLAN. Querier Interval Specify the interval (in seconds) used to send general queries by the switch when it is configured as a querier. The valid range is from 60 to 600 seconds. Router Port List Specify the router ports on the specified VLAN. All ports in VLAN 1 may be on this list (by default VLAN 1 includes all ports). Note The bottom of this section displays the list of IGMP-enabled VLANs which have already been configured. Changes can also be made to the list in order to modify pre-existing IGMP profiles. 13.4 Router Ports tab Figure 47 The Router Ports tab This tabbed section displays a table showing which ports (in column 2) belong to IGMP-enabled VLANs (in column 1). 13.5 Multicast Group Figure 48 The Multicast Group tab This table displays all current multicast streams active on the switch. The VLAN ID, MAC address and port list are shown for the multicast VLAN. 64 HARTING Electric GmbH Introduction 14.The Alarm Section Certain network or switch events may require the attention of service personnel. In this section it is possible to specify certain events that should trigger an alert to be sent out. The Alarm section is divided into the E-mail Alert and SNMP Alert sub-sections. 14.1 E-mail Alert This section allows you to create two distinct e-mail alert profiles; these profiles are maintained in the Alarm 1 and Alarm 2 tabs. 14.2.1 Alarm 1 and Alarm 2 tabs Two separate alarm profiles can be set up under these tabs. You must select which of the profiles to activate by clicking on one or both of the Active boxes at the top of these tabs. Figure 49 The E-mail Alarm tab Link Up / Link Down Specify, on a per-port basis, if an e-mail is sent when a link is brought up or down by checking one or both of the Link Up and Link Down boxes. System Events Check a box next to the appropriate event: user login, configuration changes, new IP address and power failure. If a checked event takes place, it will trigger an e-mail alert. Receiver Specify the To:, CC: and Subject: fields for the alert e-mail. The SMTP server information must also be correctly specified in the next tab in order to send e-mail from the switch. Ha-VIS Management Software Manual FTS 3000 / Edition 1.0 65 User’s Manual FTS 3000 Management Software 14.2.2SMTP Server tab Figure 50 The SMTP Server tab This tabbed section allows you to specify the IP address for your SMTP server here. Do not specify the server’s fully-qualified domain name. 14.3 SNMP Alert Two separate SNMP traps can be set up under these tabs. You must select which profiles should be activated by clicking on one or both of the Active boxes at the top of these tabs. Be sure to remember to click on the Apply button after activating one of the trap profiles. Figure 51 66 The SNMP Trap 1 section On Link Change Check this box in order to trigger an SNMP alert for the corresponding port number when the link is brought up or down. If the Active box is checked, then a link change on the port will trigger a trap being sent to the receiver. Trap Receiver 1/2 Specify the IP address of an external SNMP manager that will act as the trap receiver here. This field is required. HARTING Electric GmbH Introduction 15.The Diagnostic Section This section allows you to enable and view diagnostic information. Additional diagnostic information can be obtained from the power, fault and port LEDs on the switch. Refer to the Installation Notes for more details on the LEDs. The three diagnostic sections – Port Mirroring, Switch History, Mac Address Table and Ping – are described below. 15.1 Port Mirroring In this tabbed section, settings are made that determine if the data traffic at a port should be mirrored to a second port for evaluation purposes. The mirrored information can then be evaluated by a network analyser. Figure 52 The Port Mirroring section Status Select Enabled or Disabled to enable or disable port mirroring globally. Note Mirroring must first be activated globally; it can then be activated for the ports that you want to mirror. In this way, a maintenance configuration can be created and then activated or deactivated with this global switch. Monitor Port Select the port that you would like to use as your diagnostic (monitor) port. Only one port can be selected. This port will receive the mirrored traffic. Port Select the port that you would like to change by clicking on the checkbox here. Receive Monitoring Select Enabled or Disabled to enable or disable receive monitoring for the corresponding port. If monitoring is enabled, then all incoming traffic will be mirrored to the specified monitor port. Port monitoring must be globally enabled for this change to take effect. Ha-VIS Management Software Manual FTS 3000 / Edition 1.0 67 User’s Manual FTS 3000 Management Software Transmit Monitoring Select Enabled or Disabled to enable or disable transmit monitoring for the corresponding port. If monitoring is enabled, then all outgoing traffic will be mirrored to the specified monitor port. Port monitoring must be globally enabled for this change to take effect. 15.2 Switch History This section lists a system log of all significant switch events. The one-hundred most-recent events are listed in chronological order. This list is maintained until the switch is rebooted or until the user deletes the list using the Clear button. Figure 53 The Switch History event list Event No. Switch events are numbered in decreasing order as they occur. The last 100 events are displayed. Note The counter starts with “1”. New events will be inserted on the first line of the list, so that the oldest event (with the lowest number) will move downwards. If more than 100 events reported, the oldest events will be deleted on the bottom line of this list. Event Displays a text message which describes the event which occurred. Time / Date Displays the time and date that the event occurred in the format hours:minutes:seconds and day.month.year. SysUp Time Displays the time elapsed from when the system was last powered on to when the event occurred. Clear Click on this button to delete the listed sequence of events. Then click on the Switch History tab at the top of this section to refresh the view. Refresh Click on this button to update the list with the most current events. Event messages are described in the table below. 68 Event Message Description Switch History deleted The switch history has been cleared. HARTING Electric GmbH Introduction Switch started in HARTING service mode The switch has been booted up in the special service IP address fixed to 192.168.0.5 mode and the IP address has been changed to the service mode IP. SYSTEM IS STARTING The switch is booting up. The switch has detected low supply power A low voltage level was detected on the switch power supply. Configuration was saved The configuration has been saved. IP address has been changed The IP address has been changed. HTTP login successful An HTTP login was successful. Console login successful A successful attempt was made to login to the console on the switch. Console login failure A failed attempt was made to connect to the switch console’s command line interface. Firmware update was initiated An update of the firmware has begun. Link status <up|down> on interface Fa0/ Displays when a physical device is connected or <port-number> disconnected physically to a switch interface. Admin status <up|down> on interface Fa0/ Displays when the admin status is changed for an <port-number> interface. Not currently supported in firmware version 2.0.1.18. Got time from <SNTP-server-ip-address> The time was successfully fetched from an SNTP server. (a. <SNTP-server-index>) Writing new <issNVRAM-file-name> with Writing factory default settings to non-volatile random default values access memory (NVRAM). Not currently supported in firmware version 2.0.1.18. Send email message: <message-text> An e-mail message was successfully relayed to the SMTP server. Send email failure: <error-text> An error prevented the e-mail message from being sent. Servicemode IP is <ip-address-of-switch> The IP address and result code for service mode is (<result-code>) shown. hTrap: <config-failure-info> A HARTING-specific SNMP trap alarm function has had a configuration failure. [PNE] ... Table 1 PROFINET Stack Manager Event messages 15.3 The MAC Address Table Figure 54 The MAC Address Table This section displays a table of MAC (Media Access Control) addresses for devices connected to the switch. The following information and functions are available: Ha-VIS Management Software Manual FTS 3000 / Edition 1.0 69 User’s Manual FTS 3000 Management Software 70 All Ports Select which ports you want to see listed in the table. If all ports are not listed, re-select All Ports and click on the Apply button. Index Displays the row or sequence number of the entry. MAC Displays the hardware-based MAC address for the device connected to the port. Type Displays whether the MAC address was learned automatically by the switch or if it was entered manually. Unlearned is displayed when the address has been manually specified. Port Displays the number of the port from which the MAC address was be learned. Aging Time Specify the ageing period (in minutes) after which the MAC address entry will be deleted from the table if it is no longer needed. Clear Table Click on this button to delete the current address/port assignments table. A new address/port table is created once again after you click to select All Ports at the top of this section. This feature allows you to quickly verify which devices have been replaced or added. Refresh Click on this button to update the information. HARTING Electric GmbH Introduction 16.Service Mode The service mode offers extended functionality for configuring network settings and user rights in the switch management software. You may need to enter the service mode if the password for the Admin access level to the software is lost or the Ethernet Switch can no longer be addressed using its IP address. Booting into the service mode will reset the switch to its default settings. This service mode is deactivated as the factory default setting. It is possible to enter the service mode by first enabling the Service Mode detection via SNMP and using a special bridged connector during switch startup. Note It is is using the Service Mode has to be enabled at first (see Switch Management - General Settings). The instructions for the bridged connector follow below. Figure 55 Table 2 Connecting the bridged plug to enable service mode: connect the wires as described in the instructions below Wire connecting for Service Mode plug Ha-VIS Management Software Manual FTS 3000 / Edition 1.0 71 User’s Manual FTS 3000 Management Software Note The switch can be reset to factory default settings without entering the service mode. Simply go to the Systems Settings → File Transfer section. Then select the Configuration tab and select the Reset to Factory Defaults option. Then click Apply. Entering service mode: 1. Construct a special bridged Ethernet plug. You can make such a plug by cutting through a standard eight-wire Ethernet patch cable. Connect the TX+ wire together with the RX+ wire. Then connect theTX- wire with the RX- wire.The other wires should be left disconnected. 2. Disconnect power to the switch. Insert this bridged plug into the last RJ45 port. For example: • Ha-VIS FTS 3100-A: port 10 • Ha-VIS FTS 3060-A: port 6 etc Turn on the switch and wait a minute while it boots. 3. Take out the bridged plug and insert the cable from your administrative console into the last port. 4. You can now connect to the switch using the service mode IP address (http://192.168.0.5). Make sure that no other computer on your LAN uses this IP address. 5. Login to the switch using the admin account and the default password harting. 6. Change the switch IP address and the admin password as required. 7. Restart the switch. The switch will boot up with the new settings. If you do not specify a new IP address, the switch will be assigned its default IP address of 192.168.0.126. Note No data traffic takes place to the connected network when service work is being carried out in the service mode. 72 HARTING Electric GmbH Introduction 17.The SD-Memory Card (optional) The FTS 3000 Switches offer the possibility to insert a SD - memory card (e.g. part number XXXXXX, optional) to store configurations (e.g. for maintenance purpose). The slot to insert and eject the card is on the backside of the switch: Figure 56 Slot for SD card on the backside of the switch (figure may vary depending on type) Please push the metal holder to one side and insert the memory card until it is locked. Then push the metal holder back again. To remove the memory card please open the metal holder again, then press the card to unlock it, then remove it If the inserted memory card is empty, please insert it and then start-up the switch. The active configuration will be stored on the memory card when SAVE CONFIGURATION is pushed (see chapter 5.2). If the inserted memory card already contains a valid configuration, the switch will load this configuration directly from the SD card. If no card is inserted the switch starts with the flash-memory configuration. If the switch is new this is the default configuration. The card configuration will only be used during start-up process or by using the button for saving the configuration (SAVE CONFIGURATION, see chapter 5.2). Note • It is only possible to use HARTING SD cards in the FTS switches. • It is only possible to store one configuration on the memory card at the same time. This configuration has a special file name. Ha-VIS Management Software Manual FTS 3000 / Edition 1.0 73 User’s Manual FTS 3000 Management Software • If a valid SD-Memory-Card is inserted and the SAVE CONFIGURATION button is pressed, the configuration will be stored inside the flash memory of the Ethernet Switch as well as on the SD-Card • To save a configuration on the SD Card it has to be unlocked. Note Plug in or remove the SD card only when the switch is turn off. When SD card is plugged in the switch stores the configuration alsways at SD card and the internal flash. 74 HARTING Electric GmbH Introduction 18.Configuration with Automation Software Tool The FTS Ethernet Switch supports the PROFINET I/O stack and can be projected via automation software tool. Following instructions refer to Step7 as example for an automation software tool. Settings via automation software tool and Web access: Several settings like IP address can be made via Web access or via automation software tool. All new setting made via automation software tool overwrite old settings. After reboot as PROFINET device all settings stored in the automation project will overwrite old settings. For more information about PROFINET please look at the homepage of the PROFIBUS & PROFINET International under http://www.profibus.com/ For more information about Step7 please look at the homepage of the Siemens AG under http://www.siemens.com/ 18.1 Installing the Ethernet Switch as PROFINET device As default setting the switch is no PROFINET device. For using it in a PROFINET network you have to enable PROFINET in the tab Industrial Profile. After automatic reboot the switch can be projected via automation software tool. Export the GSD file from the switch as in chapter “Industrial Profile Section” explained or download it from the HARTING homepage: http://www.harting-connectivity-networks.de/service/download-software/ 1. Open the Step7 Hardware Config and install the GSD file via Options. Figure 57 Installing the GSD file Now the HARTING Ha-VIS Fast Track Ethernet Switch can be found in the library tree under Additional Field Devices → Switching Devices → HARTING Ha-VIS Switch. Ha-VIS Management Software Manual FTS 3000 / Edition 1.0 75 User’s Manual FTS 3000 Management Software Figure 58 2. Drag and drop the switch onto the Ethernet bus line. 3. Double click on all devices, if you want to use them. 4. Double click on the FTS icon and give the FTS device a name under Device name 5. Assign a device name under PLC → Ethernet → Assign Device Name: Figure 59 76 Products in the library Assign a device name HARTING Electric GmbH Introduction Figure 60 Slots and modules of the Ha-VIS FTS 3100-A 18.2 Alarms and Diagnostics 18.2.1Slot 0: Ha-VIS FTS 3100-A Double click at the line so the window Properties will be opened. In the window General information about order number, hardware and software revision level, name and description of the device can be found. In window Parameters general device alarms can be set: • No SD Card in Slot When activated the PLC will get an alarm in cases of an empty SD card slot in the back of the switch. • Low Voltage detected (US1 or US2) When activated the PLC will get an alarm in cases of low voltage (less than 9.6 V) at Power Supply 1 or Power Supply 2. It doesn’t matter witch of the both has low voltage. • Invalid Authorisation (Web-Frontend/Console) When activated the PLC will get an alarm in cases of failed login via Web front-end or console. Ha-VIS Management Software Manual FTS 3000 / Edition 1.0 77 User’s Manual FTS 3000 Management Software Figure 61 Alarms in Slot 0 18.2.2Slot X1 Double click at the line so the window Properties will be opened. In window General you can edit the name of the slot PN-I/O. In window Addresses you can edit the address of that interfaces used for diagnostics. In window I/O Cycle you can change the update time. The number of accepted update cycles with missing I/O data is set fix to 3. 18.2.3Slots X1 P1 to X1 P10 Double click at the line so the window Properties will be opened. In window General you can edit the name of the port. In window Addresses you can edit the address of that port used for diagnostics. In window Topology you can interconnect devices. In window Options you can make the settings for data rate and duplex mode. You can choose between 78 Turned off select a desired state of the port (like admin state down) Automatic settings takes the current setting of the port (done e.g. via Web front-end) Automatic settings (monitor) takes the current setting of the port (done e.g. via Web front-end) and checks data rate and duplex mode of the connected partner port via LLD TP / ITP 100 Mbps full duplex Auto-negotiation with check if the transmission parameters are 100 Mbit/sec and duplex mode For fixing the data rate and mode Disable Auto-negotiation HARTING Electric GmbH Introduction TP / ITP 10 Mbps half duplex Auto-negotiation with check duplex mode if the transmission parameters are 10 Mbit/sec and half mode For fixing the data rate and mode Disable Auto-negotiation In window Parameters you can enable the sending of an alarm to the PLC when the operational link state goes down. Figure 62 Parameters in slot X 18.2.4Slot 1: FTS configuration The slot FTS Management can be put optional into slot 1 to make FTS specific settings via automation software tool. Double click at the line so the window Properties will be opened. In window General information about hardware and software revision level, name and description of the device can be found. In window Addresses you can edit the address of the device for diagnostics. In window Parameters FTS specific settings and realtime settings can be made: You can activate (ON), deactivate (OFF) the functionalities or leave the settings in current state (e. g. done via Web front-end) Fast Track Switching Activates FTS mode for identifying, acceleration and overtaking RT traffic NRT Traffic Control Activates NRT Traffic Control with level 1 FTS-RT-profile: PROFINET Activates PROFINET as identifier for acceleration Ha-VIS Management Software Manual FTS 3000 / Edition 1.0 79 User’s Manual FTS 3000 Management Software FTS-RT-profile: Ethernet/IP Activates EtherNet/IP as identifier for acceleration No other settings needed for EtherNet/IP like IGMP will automatically be activated. To enable these functionalities please change them via Web front-end. FTS-RT-profile: Modbus TCP Activates Modbus TCP as identifier for acceleration Figure 63 Parameters in slot 1: FTS configuration 18.2.5Slot 2: Global I/O The slot Global I/O can be put optional into slot 2 to make settings for global device I/O data. Double click at the line so the window Properties will be opened. In window General information about Hardware and Software revision level, Name and description of the device can be found. In window Addresses you can edit the I/O addresses. One byte output data is reserved and currently not used. One byte for global input data is reserved with the following meaning: 80 Bit Value 0 0 SD card in put in 1 SD card is not put in 1 0 Voltage in valid range 1 Low voltage detected (US1 or US2) 2 0 No change in configuration 1 Change in configuration (Web front-end or console) 3 0 1 Invalid autorisation (Web front-end or console) Meaning Value Meaning HARTING Electric GmbH Introduction 4 0 FTS disable 1 FTS enable 5 0 NRT disable 1 NRT enable 6 0 - 1 - 7 0 - 1 - Figure 64 Adresses in slot 2: Global I/O 18.2.6Slot 3: Port I/O The slot Port I/O can be put optional into slot 3 to make settings for port specific I/O data. Double click at the line so the window Properties will be opened. In window General information about hardware and software revision level, name and description of the device can be found. In window Addresses you can edit the I/O address. Two bytes output data is reserved and currently not used. Two input bytes are reserved for Link state of the ports (1 means UP and 0 means DOWN) Byte 1 7 6 5 4 3 2 1 0 port 8 port 7 port 6 port 5 port 4 port 3 port 2 port 1 7 6 5 4 3 2 1 0 - - - - - - port 10 port 9 Byte 2 Ha-VIS Management Software Manual FTS 3000 / Edition 1.0 81 User’s Manual FTS 3000 Management Software 82 HARTING Electric GmbH Appendix Appendix Glossary of Terms and Abbreviations Ageing The dating process which the Ethernet Switch uses to keep track of how old certain data is. Entries in the MAC address table, for example, are deleted after they pass a certain age. Auto-negotiation An Ethernet mechanism which allows 10/100 Mbit/s or 10/100/1000 Mbit/s Ethernet ports to automatically establish the optimal duplex mode, flow control and speed. Boot The process of starting up a device and loading the operating system. Browser An application program running on a client PC which allows the user to view and interact with web pages on the switch or anywhere on the Internet. Collision The event when two packets in an Ethernet network collide. A minimal number of collisions are typical on Ethernet. A sudden prolonged increase in the number of collisions, however, may indicate that a device is experiencing a problem. Community A SNMP group, minimally consisting of a manager and an agent. Access to the group is limited by a community string. Cost A factor used when calculating path transmission speeds. The cost of a port or path is assigned based on its desirability, with desirable (faster) paths being assigned lower costs. DHCP (Dynamic Host Configuration Protocol) A method for dynamically assigning IP addresses on a network. Dynamic addressing simplifies the administration of a network because the DHCP software (and not the network administrator himself) is responsible for tracking the IP address allocation. Typically, a DHCP server can be used on a LAN to “lease” an IP address to a new device for a limited amount of time. The Ha-VIS mCon Ethernet Switch is configured to accept this address when IP Address Mode is set to Dynamic. Ethernet An IEEE standard networking protocol. The protocol describes a frame-based technology for sending out and receiving from a transmission media. Export The process of transferring (uploading) a saved configuration or firmware file from the Ethernet Switch to a TFTP server. Fast Ethernet An Ethernet network capable of operating at 100 Mbit/s. Firmware The programming code used by the switch for its basic operating functions. The Ethernet Switch firmware operating system can be upgraded by overwriting it with a new firmware version. Flow Control A mechanism that allows high speed devices to communicate with lower speed devices. The rate of data transmission is limited when the fast sender slows down to prevent a slow receiver from being overrun with data. Full Duplex The ability of a network connection to handle communication in both directions simultaneously. Gigabit Ethernet An Ethernet network capable of operating at 1000 Mbit/s (1 Gbit/s). Ha-VIS Management Software Manual FTS 3000 / Edition 1.0 83 User’s Manual FTS 3000 Management Software 84 Half Duplex A network connection that is not capable of communications in both directions simultaneously. Communication in both directions is possible, but each device must wait for the other to stop transmitting before replying. HTTP (HyperText Transport Protocol) A communication protocol used between a web browser and web server. HTTP is used throughout the world wide web and is also used between the client web browser and the web server on the Ethernet Switch. IEEE (Institute for Electrical and Electronics Engineers) An American organization created in 1963 that has been responsible for setting standards for communications. IGMP (Internet Group Management Protocol) A protocol used to manage the membership within IP multicast groups. It enables hosts to notify a local router or switch and inform them that they would like to receive transmissions assigned to a specific multicast group. IGMP Snooping A method where a switch listens (“snoops”) in on IGMP messages so that it can optimize the traffic flow. IGMP snooping is able to limit bandwidth-intensive traffic (such as streaming video) to only the specific requestors. Flooding of the entire network is then avoided. Import The process of transferring (downloading) a configuration or firmware file from a TFTP server to the Ethernet Switch. IP (Internet Protocol) The broad-based protocol used in the Internet layer of the Internet protocol suite. The IP protocol defines addressing and data packet formats. IP Address A numeric address used to identify a computer or device on a network. The Ethernet Switch has a default IP address of 192.168.0.126 set at the factory. A new, unique IP address should be assigned to fit the user LAN. LAN (Local Area Network) The group of computers and devices that populate your local network. The address range of a LAN can be defined by the subnet mask. Link Aggregation A trunking strategy which optimizes available resources by linking a group of ports together to form a single trunk. MAC (Media Access Control) Address The unique, physical address assigned to a device by the manufacturer. The switch maintains a MAC address table of connected devices. These addresses are used for sending layertwo Ethernet frames to a specific host. Managed Switch An intelligent device which filters and forwards packets between network segments. A managed switch features one or more ways for the user to directly access and configure switch operations (such as a web or command-line interface). MIB (Management Information Base) A database used by SNMP to describe and manage devices within a network. Mirroring A process where data flow from or to a particular port is duplicated and sent to another port for monitoring purposes. HARTING Electric GmbH Appendix Multicast A method of network addressing used to deliver information to a group of targets simultaneously. Multicast addressing attempts to implement the most efficient strategy possible for delivery and creates copies of data streams only when links to multiple destinations split apart. Packet A discrete unit of data sent out over a network. Port A connection jack on a switch or device which is used for plugging in connections to other devices. Port Mirroring A network monitoring method where a copy of all incoming or outgoing port traffic is forwarded from one switch port to another. The duplicated traffic flow can then be analyzed at the forwarded port. The network administrator may use a protocol analyzer which captures and evaluates the data flow without influencing the client on the original port. QoS (Quality of Service) A control mechanism or strategy for achieving a higher quality of service. The strategy used on the Ethernet Switch assigns different priority to packets from different ports. Thus, certain critical ports on the switch can be given priority over others. This can help assure better transmissions for those ports during network congestion. Redundancy A strategy used by the switch to provide back-up paths in the event that an active link fails. The back-up link guarantees that data transmission can continue even when the primary link goes down. RSTP is used to create a redundant network topology. Relay An electrical circuit that can be open or closed. The mCon Ethernet Switch uses a relay port to send out electrical signals based on the configuration in the Alarm -> Relay Alert section. RFC (Request For Comment) A formalized publication of the Internet Engineering Task Force describing a certain protocol or method used in Internet-base communications. RFCs can be downloaded from http://tools.ietf.org/html/. RSTP (Rapid Spanning Tree Protocol) A layer-two protocol that creates a spanning tree topology within a network of inter-connected bridges (such as the Ethernet Switch). RSTP disables links that are not part of this spanning tree, thus creating a single loop-free path between any two network nodes. SMTP (Simple Mail Transfer Protocol) The standard Internet e-mail transmission protocol. A relay SMTP server should be specified on an e-mail client (such as the Ethernet Switch) to enable it to send outgoing e-mails. SNMP (Simple Network Management Protocol) A network management system used to monitor attached devices (such as the Ethernet Switch). Managed devices collect state information about themselves and make this information available to centralized network-management systems. The Ethernet Switch maintains status information in its MIB which can be accessed by a separate SNMP management workstation. SNMP V1 An earlier version of SNMP where security is based only on private community strings. SNMP V3 The current version of SNMP with support for authentication, access control and privacy. Ha-VIS Management Software Manual FTS 3000 / Edition 1.0 85 User’s Manual FTS 3000 Management Software 86 Subnet A group of networked computers that all share a common IP address prefix. All devices within the same IP subnet can be reached in one hop without a router. Subnet mask The IP decimal representation for the subnet prefix of the IP address. The subnet mask specifies the length of the shared subnet prefix as used by all devices in the local subnet. A subnet mask of 255.255.255.255 is used by the Ethernet Switch to isolate a specific IP address. Switch A device that connects several LANs together to form one logical LAN. A switch is similar to a bridge, but usually offers more sophisticated features for bridging LANs of different types. TFTP (Trivial File Transfer Protocol) A simplified version of the TCP/IP file transfer protocol used by the switch to transfer saved configuration profiles and to perform new firmware updates. The switch can download new firmware from a customer’s TFTP server. A username and password are not required by the TFTP protocol. VLAN (Virtual Local Area Network) A logical subgroup which acts like a LAN and communicates as if attached to one broadcast domain. HARTING Electric GmbH Index Index A Admin password...................................................... 22 Alarm profiles.......................................................... 65 Alert......................................................................... 65 Automatic settings (monitor).................................... 78 Auto-negotiation.......................................... 18, 22, 83 B Industrial Profile....................................................... 75 Ingress filtering........................................................ 49 Internet Group Management Protocol........... see IGMP Invalid entry............................................................. 15 IP address.......................................................... 11, 19 default................................................................ 12 IVL........................................................................... 48 BPDU...................................................................... 43 Bridge protocol data unit.............................. see BPDU J C L Collision................................................................... 83 Configuration........................................................... 69 D Designated bridge................................................... 45 Designated root....................................................... 45 DHCP...................................................................... 83 DHCP Option 82...................................................... 28 Differentiated Services...............................see DiffServ Differentiated services code POINT..............see DSCP Duplex..................................................................... 22 Duplex mode........................................................... 18 Dynamic Host Configuration Protocol.......... see DHCP K Link Aggregation Control Protocol................. see LACP Link Layer Discovery Protocol........................see LLDP Link Layer Discovery Protocol Data Units .............................................................. see LLD PDUs LLDP........................................................................ 24 LLD PDUs............................................................... 25 Log.......................................................................... 68 Low Voltage............................................................. 77 M Firmware file............................................................ 29 Firmware version..................................................... 17 Flow Control............................................................ 83 MAC................................................................... 69, 84 MAC address..................................................... 20, 70 Management Information Base........................ see MIB Maximum Transmission Unit...........................see MTU Media Access Control..................................... see MAC Member ports.......................................................... 50 Menu tree................................................................ 13 MIB............................................................... 11, 23, 84 Multicast.................................................................. 85 Multicast streams.................................................... 64 Multifunction Button.........................................see MFB G N E Edge port................................................................. 44 E-mail alert.............................................................. 65 F GSD file................................................................... 75 H Hardware................................................................. 77 Hardware version.................................................... 17 HTTP....................................................................... 84 HyperText Transport Protocol........................ see HTTP I IEEE 802.1Q........................................................... 48 IGMP................................................................. 62, 84 IGMP snooping............................................ 62, 63, 84 Ha-VIS Management Software Manual FTS 3000 / Edition 1.0 Network analyser..................................................... 67 O P Password................................................................. 22 PNAC...................................................................... 55 Port based Network Access Control............. see PNAC Port mirroring..................................................... 67, 85 Port monitoring........................................................ 68 Port status............................................................... 45 privilege status........................................................ 23 87 User’s Manual FTS 3000 Management Software PROFINET.............................................................. 75 PVID........................................................................ 49 Trivial File Transfer Protocol...........................see TFTP Type of service................................................. see ToS Q U QoS......................................................................... 85 Quality-of-Service............................................ see QoS Untagged ports........................................................ 50 User based Security Model............................ see USM User modes............................................................. 16 USM......................................................................... 23 R Rapid Spanning Tree Protocol...................... see RSTP Rate Control............................................................ 54 Realtime.................................................................. 79 Reboot..................................................................... 32 Request For Comment.................................... see RFC RFC......................................................................... 85 RSTP................................................................. 42, 85 S Safety Guidelines...................................................... 8 Save configuration............................................. 15, 20 Save IP Address....................................................... 11 SD Card................................................................... 77 Service Mode.......................................................... 20 Simple Mail Transfer Protocol.......................see SMTP Simple Network Management Protocol........ see SNMP Simple Network Time Protocol...................... see SNTP SMTP....................................................................... 85 SMTP server............................................................ 65 SNMP........................................................... 11, 23, 85 SNMP alert.............................................................. 66 SNMPv1/v2............................................................. 23 SNMPv3.................................................................. 23 SNTP....................................................................... 26 Software.................................................................. 77 Spanning-Tree Protocol....................................see STP STP.......................................................................... 42 STP/RSTP application examples........................................................... 45 Subnet mask............................................... 19, 20, 86 SVL.......................................................................... 48 V Virtual LAN.................................................... see VLAN Virtual Local Area Network............................ see VLAN VLAN........................................................... 48, 50, 86 VLAN identifier........................................................ 20 W Web browser........................................................... 13 X Y Z T Tag Control Information.....................................see TCI TCN......................................................................... 44 TFTP.................................................................. 29, 86 TFTP server............................................................. 30 Time settings........................................................... 26 Topology Change Notification.......................... see TCN Trap receiver........................................................... 66 88 HARTING Electric GmbH HARTING Electric GmbH &Co. KG Wilhelm-Harting-Straße 1 | D-32339 Espelkamp P.O.Box 14 73 | D-32328 Espelkamp Phone: +49 5772 47-0 | Fax: +49 5772 47-495 E-Mail: [email protected] | Internet: www.HARTING-FTS.com © 2011 HARTING Electric GmbH & Co. KG Subject to alterations without notice Ha-VIS FTS 3000 Management Software Manual Part number: 20 78 110 4xxx/99 Status: 2011-07 / English Printed in Germany Ha-VIS Management Software Manual Ha-VIS FTS 3000 / Edition 1.0 www.HARTING.com