1
•
•
Two installation disks
This manual
If one of these parts should not be contained, please refer to your retailer.
IMPORTANT! BEFORE BEGINNING WITH THE ASSEMBLY
Before you begin with the assembly of the BLIZZARD 2060 Turbo Board, you should first consider the
following items.
1. To function correctly, the BLIZZARD 2060 Turbo Board needs special 68060 - specific software. This
software has to be installed before the assembly of the BLIZZARD 2060 Turbo Board. See also chapter
„Software installation“.
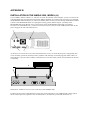
2. The AMIGA 2000 has been delivered as two different models by Commodore, namely the older models (A)
and the later models (B). You an find out which model your AMIGA is from the imprint on the left bottom side
of the main board. If you discover here a lable with the imprint „COMMODORE AMIGA 2000“, a serial
number and „MADE IN GERMANY (BSW)“, than your AMIGA is a model (A). With these models, the 68000
CPU has to be removed before you being with the installation of the BLIZZARD 2060 Turbo Board. Please by
all means read the Appendix B „Installation in the AMIGA 2000, model (A)“ before you begin with the
assembly !
3. Find out with which Kickstart-ROM your AMIGA 2000 is furnished. To grant the full functionality of the
BLIZZARD 2060, we urgently recommend the usage of Kickstart-ROM Version 3.1. Should you have a
different Kickstart-version, please read the Appendix A „Working under Kickstart 1.3 or 2.04“ first.
4. If you want to expand your BLIZZARD 2060 Turbo Board with memory modules (SIMMs), please read the
corrresponding chapter first, because the assembly of the SIMMs has to be made before inserting of the
BLIZZARD 2060 Turbo Board into the computer.
ASSEMBLY OF THE BLIZZARD 2060 Turbo Board
Remove all cables (mains cable, monitor cable, mouse, serial and parallel cables), as well as, if applicable, all
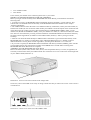
externally connected units from your AMIGA 2000. Now loosen the two screws on the lower left and right side
of your AMIGA 2000 (illustration 1).
Illustration 1. Screws on the lower left side of the Amiga 2000
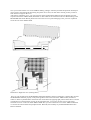
On the rear, remove the middle screw lastly. In doing so make sure that you remove the correct screw as shown
in illustration 2.
Illustration 2. Center screw on the rear of the AMIGA 2000