1
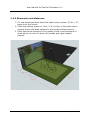
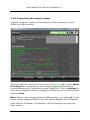
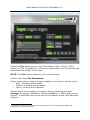
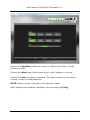
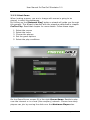
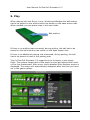
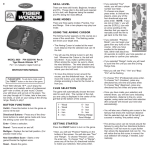
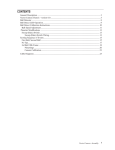
User Manual ProTee Golf Simulator 2.0 User Manual ProTee United Golf Simulator V20110524 Topics: Installing software Connecting hardware Configuring software © 2001 – 2011 ProTee United B.V. All Rights Reserved Page 1 of 69 User Manual ProTee Golf Simulator 2.0 Page 2 of 69 User Manual ProTee Golf Simulator 2.0 The ProTee Golf Simulator allows you to use your own golf clubs (from driver to putter) and play a complete round of golf - or maybe just practice, working on that swing fault - in the comfort of your own home, office, indoor golf facility or hotel. The views of the golf course can be either projected onto a large screen set in front of the player or just viewed on your computer monitor set to the side. Using your own clubs, you set up to hit the shot just as you would on the course. The system allows you to drive off the tee, hit fairway shots, pitch, chip and putt the ball into the hole. After every shot, the system automatically flies along the ball's trajectory to where the ball lies, ready for the next shot. The 3D golf simulator game software allows up to 8 players to play in one flight and automatically keeps score for you. Apart from being great fun to use, the simulator system is also a great teaching and learning aid. If you want to improve your game and/or are struggling with a swing fault, you will see what causes the problem. A MUST FOR EVERY SERIOUS GOLFER! Page 3 of 69 User Manual ProTee Golf Simulator 2.0 TABLE OF CONTENTS INTRODUCTION.................................................................................................. 6 System requirements ......................................................................................... 6 Important legal information ............................................................................... 7 1. INSTALLATION ............................................................................................... 8 1.1 Hardware ..................................................................................................... 8 1.2 Simulator setup ............................................................................................ 9 1.2.1 Halogen light setup ................................................................................... 9 1.2.2 Dimension and distances.......................................................................... 10 1.3 Software installation .................................................................................. 11 1.4 Interface configuration .............................................................................. 12 1.4.1 License key ............................................................................................ 12 1.4.2 Connection the sensor system .................................................................. 13 1.4.3 Club adjustments .................................................................................... 15 1.4.4 Ball adjustments ..................................................................................... 16 1.4.5 Calculated launch angles .......................................................................... 16 1.4.5 Ball launch camera .................................................................................. 16 2. STARTING UP THE GAME .............................................................................. 19 2.1 Create an account....................................................................................... 19 2.2 ProTee Portal.............................................................................................. 22 2.3 Starting the game....................................................................................... 24 3. GAME CONFIGURATION AND SETTINGS........................................................ 25 3.1 Options....................................................................................................... 27 3.1.1 Players .................................................................................................. 28 3.1.2 Game .................................................................................................... 33 3.1.3 Screen Settings ...................................................................................... 34 3.1.4 Graphics ................................................................................................ 35 3.1.5 Audio .................................................................................................... 38 3.2 Play ............................................................................................................ 39 3.2.1 Quick Play .............................................................................................. 40 3.2.2 ProTee Play ............................................................................................ 40 3.2.3 Network Play .......................................................................................... 46 3.2.3.1 Lobby .............................................................................................. 48 3.2.3.2 Host Game ....................................................................................... 49 3.2.4 Challenges ............................................................................................. 50 3.2.5 Practice ................................................................................................. 50 Page 4 of 69 User Manual ProTee Golf Simulator 2.0 3.2.6 Load...................................................................................................... 51 4. IN THE GAME ................................................................................................ 52 4.1 Screen layout ............................................................................................. 54 4.2 Menu .......................................................................................................... 56 4.2.1 View FlyBy ............................................................................................. 57 4.2.2 Controls................................................................................................. 58 4.2.3 Game Options......................................................................................... 58 4.2.4 Shot Cameras......................................................................................... 60 4.2.5 Green grid.............................................................................................. 60 4.2.6 Skip Hole ............................................................................................... 60 4.2.7 Shot Analysis.......................................................................................... 60 4.2.8 Ball Trail ................................................................................................ 60 4.2.9 Mini map................................................................................................ 61 4.2.10 Leaderboard ......................................................................................... 61 4.2.11 Scores ................................................................................................. 62 4.3 Club ............................................................................................................ 62 4.4 Aim Left...................................................................................................... 63 4.5 Aim Right ................................................................................................... 63 5. PLAY............................................................................................................. 64 6. FREQUENTLY ASKED QUESTIONS (FAQ) ....................................................... 66 INDEX .............................................................................................................. 69 Page 5 of 69 User Manual ProTee Golf Simulator 2.0 Introduction Thank you for choosing the ProTee Golf Simulator 2.0. We hope you will enjoy the Simulator as much as we enjoyed developing it! If you have any comments or suggestions please email us at [email protected] For support related questions email us at [email protected] System requirements ProTee Golf Simulator 2.0 requires the following minimum hardware specifications: • • • • • • • • • Internet connection for license activation and online game play and remote support Operating system MS Windows XP / MS Windows Vista / Windows 7 Processor multiple cores 2.8 GHz Memory 2.0 GB RAM 30 GB free hard disk space DVD-ROM Player for installation DirectX 9 compatible video card with 512MB RAM Microsoft DirectX 9.0 Input keyboard / mouse Recommended hardware: • • • • • • • • • • Broadband internet connection MS Windows 7 High end multiple core Intel or AMD PC Memory 4 GB RAM 60 GB free hard disk space DVD-ROM Player NVidia GTS 250 Graphics adapter with 512 MB Multi Media projector 3000 Ansi lumen 17” Touch screen Input keyboard / mouse Supported graphic card chipsets: NVidia Geforce 250 GTS or better and ATI HD 5850 or better. Laptop versions of these chipsets may work but are not supported. Updates to your video and sound card drivers may be required. See vendors website for more details. Page 6 of 69 User Manual ProTee Golf Simulator 2.0 Important legal information This is a work of fiction. All events and characters in this software are fictional. Any resemblance to actual incidents or to persons, living or dead is purely coincidental. The software, hardware and related manual for this product are copyrighted. They may not be photocopied, scanned, translated, copied, or reduced to any tangible or electronic medium or machine-readable form, or publicly performed or displayed, in whole or in part, without the prior written consent of ProTee United B.V. The owner of this product is entitled to use the software and manual for this product for his or her own non-commercial use, but is not entitled to sell or transfer reproductions of the software and manual to other parties in any way; nor to rent or lease the product to others without prior written permission from ProTee United B.V. ProTee Golf 2.0 online is a community based experience with user created content. By submitting ideas or content online, the sender agrees that other online users of the game shall have the unlimited right, free of charge, to use such ideas or content in their use of the game. The sender further agrees that ProTee United B.V. shall have the unlimited right, free of charge, to use such ideas or content in the development of the game in any format or in any other software it may develop at a future date. Access to ProTee Golf 2.0 online must be for lawful purposes only and in a way that does not infringe the rights of others or stop or restrict anyone else’s use. Any behaviour which causes distress, inconvenience or harassment to other users is prohibited. All contributions made online must be legal, honest, decent and truthful and in any event transmitting obscene or offensive content is prohibited. Please report anything which causes concern to [email protected]. WARNING, the game experience may vary while online. We do not warrant that functions contained in ProTee Golf 2.0 online will be uninterrupted or error free, nor that defects will be corrected or that the server which makes the game available will be free of viruses or bugs. Save for liability for death or personal injury, ProTee United B.V. will not be responsible for any losses or damages arising from the use of the game online. Property of ProTee United B.V. The ProTee United, ProTee Play and ProTee Golf 2.0 logos are registered trademarks of ProTee United B.V., © 2001-2010 ProTee United B.V. All Rights Reserved. Health Warning It is strongly recommended that 15 minutes of rest is taken for every 1 hour of play. Try to ensure that you play the game in a well-conditioned and well-lit room and sit a reasonably distance away from the monitor. Please note that some people experience epileptic seizures when viewing flashing lights or patterns and this is equally applicable to watching TV pictures or playing video games. If you have an epileptic condition, you should consult with your doctor prior to playing this game. Please also consult your doctor if you experience dizziness, altered vision, muscle twitching or other involuntary movements, loss of awareness, mental confusion and/or convulsion. Piracy Piracy harms consumers as well as legitimate developers, publishers and retailers. Please note that the authorised reproduction of all or any part of this game and any unauthorised use of registered trademarks are likely to constitute a criminal offence. Please contact ProTee United B.V. if you suspect this game is an unauthorised copy. Limited warranty If you are experiencing problems with this software please check www.protee-united.com for further information. Use the ProTeePortal or the ProTeePlay.com website to check for the latest patches and upgrades. Please ensure you have the latest drivers, DirectX9.0c installed and that your PC is at least as good as the minimum specification detailed under the section ‘system requirements’. ProTee United B.V. warrants only to the original purchaser of this software that the disk will be free from defects and materials and workmanship for 90 days from the date of purchase. Should defective media be identified during this 90 day period, it shall be replaced, provided that the original disk is returned to ProTee United B.V., contact [email protected]. Please note that all returns must be supported with proof of purchase and a letter describing any alleged defects. For the avoidance of doubt, this does not alter your statutory rights. Please note that this warranty is not applicable to the software programme itself and this provided "AS IS". License Information YOU SHOULD CAREFULLY READ THE END USER LICENSE AGREEMENT BEFORE INSTALLING THIS SOFTWARE PROGRAM. BY INSTALLING OR OTHERWISE USING THE SOFTWARE PROGRAM, YOU AGREE TO BE BOUND BY THE TERMS OF THIS AGREEMENT. IF YOU DO NOT AGREE TO THE TERMS OF THIS AGREEMENT, PLEASE CONTACT PROTEE CUSTOMER SUPPORT FOR FURTHER INFORMATION. ProTee Golf Simulator 2.0 End User License Agreement (EULA) and limited warranty information set forth in the PTP_EULA.pdf, found on the ProTee United Website: www.protee-united.com. Page 7 of 69 User Manual ProTee Golf Simulator 2.0 1. Installation 1.1 Hardware Connect the ProTee Base Sensor System to your PC using a serial port. If your PC does not have a Serial Port you can use a Serial to USB convertor. We recommend to use a USB 1.1 / USB 2.0 convertor with a Prolific chipset. Note: Tested USB to Serial adapters are sold separately. Connect the 5v power supply to the ProTee Base Sensor Mat by plugging the power cable in the power inlet. Note: The negative (-) from the power supply should be on the inside of the connector. The positive (+) is on the outside of the connector. You should see a green light indicator inside the ProTee Base Sensor Mat when the power is connected. If you purchased the additional putting mat, connect it to the ProTee Base Sensor Mat using the included (25 core) flat cable. Note: The additional putting mat doesn’t need a power cable. The green light on de putting mat indicates the power is connected. For the optimal experience we recommend the Sensor mat to be approx 3,15m / 10’ away from the screen. ProTee Sensor System 2.0 ProTee Putting Sensor 2.0 Page 8 of 69 User Manual ProTee Golf Simulator 2.0 1.2 Simulator setup Without a proper light setup the system won't work. Setting up the system to the standards provided will ensure a solid working system. In order for the sensor mat to function correctly the club head should produce a clear shadow when held over the mat, so make sure that there is not too much ambient light around. You can place a piece of white paper on the mat to verify that the shadow is clearly defined and sharp. The lamp should be placed straight above the tee spot. The sensors inside the sensor system must all get enough light. Sensors may not be covered by shadow from objects or debris. Note: Make sure that there are no external (halogen)lights or direct sunlight influencing the system. 1.2.1 Halogen light setup 1. For spots we recommend to use a Halospot 111 24° 50W 2. If you have 2 light, make sure the light beam from the second light does not cross the first light to avoid double shadows. 3. Place the light source directly over the sensor mat 4. Make sure that it casts a sharp shadow 5. Make sure the lights reach all sensors 6. Realign the lights regularly 7. Replace the lights every 1500 hours of use Page 9 of 69 User Manual ProTee Golf Simulator 2.0 1.2.2 Dimension and distances 1. For the best experience place the base sensor system 3,15m / 10’ away from the screen 2. Place the putting sensors 1,15m / 3.8’ in front of the base sensor system (front-side base sensors to front-side putting sensors) 3. Place the sensor systems in the middle of the room/enclosure to allow plenty of room for both left handed and right handed players. Page 10 of 69 User Manual ProTee Golf Simulator 2.0 1.3 Software installation To use the ProTee Golf Simulator you must first install the ProTee Portal. The Portal will allow you to get the most out of the ProTee Golf Simulator software including free updates, online play and extras. To install ProTee Golf Simulator 2.0, insert the disc and select FULL INSTALLATION. Make sure your graphics card drivers are updated to the latest version. Check you graphics card manufacturer for updates. Microsoft DirectX 9.0 or better is required to run the software. The distribution contains DirectX 9.0. You can download the latest version from the Microsoft website: http://www.microsoft.com/directx Select the latest DirectX downloads for gamers and next the DirectX EndUser runtime. Page 11 of 69 User Manual ProTee Golf Simulator 2.0 1.4 Interface configuration The ProTee Golf sensor mat is connected at one of the communication ports of your PC. You have to configure the interface, by selecting the right comm. Port (Serial port), to establish the correct connection. Start the ProTee Golf Interface by double clicking on the desktop icon ProTee Golf interface or select from the Windows menu Start All Programs ProTee Golf Interface ProTee Golf Interface to get access to ProTee Golf Interface program. The ProTee Golf Interface starts-up in the Windows system tray. Click on the ProTee Golf Interface icon, at the right bottom of the screen, to open the interface screen. Note: The ProTee Golf Interface requires Administrator access upon installation and first time execution. Administrator access is required to register software components, which access the serial port of your computer. If you get any errors when running the software, please reinstall the ProTee Golf Interface software manually with Administrator rights. Copy the PTPInstallerX.XX.exe from the DVD to your Desktop. Right click the program and select “Run as Administrator”. After installation right click the installed program and select “Run as Administrator”. Note: We recommend to put a shortcut to the ProTee Golf Interface in your startup folder. 1.4.1 License key The ProTee Golf Interface will ask for a license key when you first start the software. Click on “ENTER LICENSE KEY”. Here you will find a 16 character Machine-ID. Please send this Machine-ID together with a proof of purchase to [email protected] to obtain your license key. Page 12 of 69 User Manual ProTee Golf Simulator 2.0 1.4.2 Connection the sensor system Connect the sensor system to the serial port of the computer or use a SERIAL to USB convertor. When the light bar under the Comm port is not green and the text Ready for swing does not appear you first need to change the Sensor Mat communication port to reflect the correct COMM Port. Click on Settings to go to the configuration screen. Change the COMM port to the correct value and click Save. Note: When you are using a Serial to USB convertor, you will need to look up the virtual assigned COMM Port in the Device Manager of MS Windows. Right click My Computer Properties Device Manager and open the Ports section. Page 13 of 69 User Manual ProTee Golf Simulator 2.0 Restart the ProTee Golf Interface program and check if the COMM port is configured properly. Note: You can check the Sensors of the Sensor Mat by clicking Show Sensors in the main menu. When everything is working correctly you should be able to trigger each individual sensor moving you hand, foot or golf club over the Sensor Mat. You should also be able to start and stop all the timers you find on the Show Sensors screen. Page 14 of 69 User Manual ProTee Golf Simulator 2.0 If the ProTee Golf Simulator Interface stated Ready for Swing, place the application back in the tray (right bottom corner) by clicking the Tray button. Note: Make a few test shots inside the ProTee Golf Interface main screen before you start the game for the first time. If you do not get feedback in the ProTee Golf Interface main screen or it does not report a ball launch the Game will not work. 1.4.3 Club adjustments The ProTee Golf interface allows for individual club adjustments with its corresponding side spin behaviour. Use the club adjustments sliders to tune the speed of each club and use the side spin slider to increase or reduce the side spin. Side spin is calculated from the open/closed club face on impact. Less side spin will result in more straight shots. More side side will result in faster draws, fades and slices. Page 15 of 69 User Manual ProTee Golf Simulator 2.0 1.4.4 Ball adjustments The ball adjustment screen allows to change the speed of the ball, the drag and the lift behaviour for each club. A ball speed of 1.1 will give 10% more distance. A ball speed of 0.8 will reduce the distance with 20%. The drag factor will pull the ball down and the lift factor will increase the air time. With the drag and lift you can create your own custom ball flight. 1.4.5 Calculated launch angles Ball launch angles are taken from the club loft. To have the system calculate a more accurate launch angle for lower angled shots, like push shots, switch on “Calculate launch angle” under SETTINGSOPTIONS. 1.4.5 Ball launch camera To use the ProTee launch angle camera to capture the ball launch in real time switch on “Video capture” and “Calculate launch angle” under SETTINGSOPTIONS. When switched on the “Camera” button will be enabled to configure, setup and test the ball launch camera. To capture the ball flight place the camera 1,00m/40” to the front of the ball and 2,40m/100” to the left or the right from the ball. When the camera driver is installed correctly, the installed camera is listed in the camera selection box. Select the camera and click “Preview” to check if the camera is working correctly. The camera preview screen contains a red square and a red horizontal line. Make sure the ball is place inside the red square and the red line is aligned with the floor. When the camera is not aligned correctly (tilted), launch angles will be off. The camera speed and resolution must be set to 320x240 @ 125 FPS. Click the “Camera stream” button to set the resolution and frame rate. Page 16 of 69 User Manual ProTee Golf Simulator 2.0 Click “Camera devices” to set the GAIN and EXPOSURE of the camera capture. Camera captures should show a clear ball streak / ball flight line. Use the gain and exposure to get the required results. Example captures: Page 17 of 69 User Manual ProTee Golf Simulator 2.0 Configure the sensitivity and the ball detection levels to correctly capture the ball for Drivers/woods, Irons and Wedges. The background of the camera should be as dark as possible. Any moving objects or light reflections will interfere with the capture process resulting in invalid launch angles. A typical golf simulator setup might require an extra light from the side to illuminate the golf ball. The light should be setup close to the camera. On the Camera Setup screen you can configure the following items: • Camera To choose from available ready for use cameras • Club Select the club to test with (required when calibrating) • Sensitivity Color and pixel sensitivity (default set to 25) • Raster To filter our noise (default set to 2) • Ball detection level Used to determine when to capture. A lower value will result in a quicker capture Page 18 of 69 User Manual ProTee Golf Simulator 2.0 • Ball on Tee Offset Used to compensate for teed balls. The ground level is used when the ball is placed on the ground (fairway shot). Set the offsets for the different clubs when the ball is hit from the tee box. With “Save captures” the current captured video frames will be saved to the Capture folder of the Golf Interface installation. These captures can be send to ProTee in case of any questions or camera setup support. By clicking the “Preview” button the live camera stream will be shown in the preview window. After selecting a club the system is ready for testing and calibrating. 2. Starting up the game 2.1 Create an account Double click on the desktop icon ProTeePortal or select from the Windows menu Start All Programs ProTeePortal ProTeePortal to get access to ProTee Golf Simulator 2.0. The first time you are playing the game you will need to create a new account by pressing the button [Create New Account…]. A wizard will guide you trough the steps for creating a new account. Page 19 of 69 User Manual ProTee Golf Simulator 2.0 First create a new Account Name and Password, then re-type the same password for verification. Press the [Next] button to go to the following step. In this screen you fill in your e-mail address. If you forget your login details, this address will be used to send and verify your details. You have to re-type the same e-mail address for verification. Press the [Next] button to go to the following step. Page 20 of 69 User Manual ProTee Golf Simulator 2.0 The last step shows you that your account has been successfully created. After pressing the [OK] button you will return to the main screen. Page 21 of 69 User Manual ProTee Golf Simulator 2.0 2.2 ProTee Portal Fill in your just created Account name and Password and press the [Login] button, the ProTeePortal will open. Check the Remember Login Details to store the username and password on your PC. On startup the ProTeePortal will try to find the ProTee servers on the Internet to check for updates and to enable online game play. Make sure you have a working internet connection before you start the ProTeePortal. In the ProTeePortal you currently find 3 menu items and 6 tabs (2 tabs in OFFLINE MODE. The menu items have several sub-menu items i.e.: Page 22 of 69 User Manual ProTee Golf Simulator 2.0 File Change User Settings Exit Games Enter Activation Code Help FAQ About ProTeePortal Update History Register Before playing ProTee Golf Simulator 2.0 you have to activate the product by entering the activation code. In the menu go to Games Enter Activation Code, the activation screen will appear: Fill in the activation code as printed on the DVD or as send by the activation e-mail. After entering the correct activation code press the [OK] button. Now ProTee Golf Simulator 2.0 is activated and ready to use. The 6 tabs in the ProTeePortal are: • News Latest news about the product and relevant items • Store To buy additional courses, future new games and hardware, etc • Lobby To invite other people to play a game with you over the internet or a local computer network (LAN) • Games To start one of the games you activated or to uninstall a game • Courses Available extra courses and driving ranges • Demos To download demos The 2 tabs in the ProTeePortal OFFLINE MODE are: • Games To start one of the games you activated or to uninstall a game • Demos To play demos Page 23 of 69 User Manual ProTee Golf Simulator 2.0 2.3 Starting the game Go to the tab Games and select the game you want to play. After you made your selection the program will turn blue. When there are new updates available, the portal will start downloading the new updates automatically. Press the play button when the game status says ready to play. Note: ProTee Sim will start up the simulator; ProTee Play will start up the computer game (when available). Page 24 of 69 User Manual ProTee Golf Simulator 2.0 3. Game configuration and settings The program will load and you will see the ProTee Golf Simulator 2.0 flag waving in the wind. Click anywhere on the screen or press Enter to go to the Main Menu. Note: On first start-up the system will ask you to select your language. The current supported languages are: English, French, Italian, German, Spanish, Korean and Chinese. Page 25 of 69 User Manual ProTee Golf Simulator 2.0 On the Main Menu you can choose from the following items: • Play To choose from several game modes and online/offline playing • Options To configure ProTee Golf Simulator 2.0 • Website To Visit our website for more information • Exit To leave the game It is strongly recommended that you check the game configurations. To ensure the game runs smoothly on your PC you should choose a configuration that best suits. In chapter Options the configuration items are explained. Page 26 of 69 User Manual ProTee Golf Simulator 2.0 3.1 Options The game can be configured via the Main Menu item Options. Selecting this item will open the main configuration screen. On the Options Menu you can choose from the following items: • Players – To create and edit players • Controls – Configure special keys • Game – Configure game settings • Sreen Settings - Configure screen resolutions • Graphics – Configure detailed graphics settings • Audio – Configure audio • Back – To go back to the Main menu. Page 27 of 69 User Manual ProTee Golf Simulator 2.0 3.1.1 Players From the Option menu choose Players to create and edit the ProTee Golf Simulator 2.0 players. On first time use, press the [Create Player] button to add a player, a wizard will guide you through the process. NOTE: Before playing you have to create at least one player and mark it as the Default Player. The Quick Play option requires a Default Player. Page 28 of 69 User Manual ProTee Golf Simulator 2.0 On the Personal Information screen you fill in the Name of the player as it appears in the game. Choose the right Sex by clicking the button Male or Female. Select the Left or Right handedness. Select if you are a left handed or right handed golfer. The Skill option is not used in the Simulator edition. One of the players you create has to be the Default Player. Only one player can be the Default Player. NOTE: The default player is the player that will be selected automatically when you play via the Quick play option. The player can (optional) appear by an image, this image can be chosen out of a list of players. The available images have to be stored in the location: C:\ProgramData\ProTeePortal\Games\ProTeeSim\System\CreatePlayer Page 29 of 69 User Manual ProTee Golf Simulator 2.0 Press the [Next] button to set the Equipment options. Select the clubs the player will carry during the game. Choose the right Woods, Irons and Wedges. The putter is mandatory. You have to select 14 clubs. Select and deselect the club by clicking on the button. NOTE (for non golfing gamers): The woods are used for long distances. The irons are used for shorter distances. The wedges are used for small distances or to play a ball out of a bunker. The putter is used on the green to put the ball to the pin. The higher the number of the wood or iron the smaller the distance it will carry. Optionally manipulate the appearance of the ball by setting the colour, the Front image, the Back image and the Top image. Page 30 of 69 User Manual ProTee Golf Simulator 2.0 Press the [Next] button to open the screen Shot Cameras. These options determine how the ball flights are presented on the screen. Set one camera position for normal shots and one for putting, choose one out of: • TV Style Destination First the ball is moving away from the camera. Somewhere halfway another camera is taking over the ball flight, the ball is coming to the camera. Main scenario is that the ball flight is presented towards the position the ball will end up to. • TV Style Behind Pin First the ball is moving away from the camera. Somewhere halfway another camera is taking over the ball flight, the ball is coming to the camera. Main scenario is that the ball flight is presented from a camera position behind the pin. • Ball Cam Fly with the ball, just close behind it. Camera moves with the ball • Chase Ball Cam First the ball is moving away from the camera. Somewhere halfway the ball flight the camera moves with the ball, just close behind it. • Reverse Ball Cam Fly, just in front of the ball, looking backwards. • Fixed The ball flight is presented from one fixed point behind the pin, just like in real. • Fixed Tracking The ball flight is presented from one point, just like in real. The horizon moves up and down during the ball’s lift and decreasing. • Snap To Lie Immediately after ball launch a fixed camera, which stand at the end of the ball track, takes over the ball flight. • Fixed-to-Lie (Tracking) First the ball launch is presented from one fixed point behind the pin. A few moments later a fixed camera, which stand at the end of the ball track, takes over the ball flight. • Random Every shot is presented in one of the above camera positions. Page 31 of 69 User Manual ProTee Golf Simulator 2.0 NOTE: During the game the camera position can be easily changed. Choose, in the game, Menu Shot Cameras to change the camera positions. Press the [Create Player] button to finalize the steps in creating a player. NOTE: You can change the player options by selecting a player in the left box on the Players screen and clicking the [Edit Player] button that will appear after selection. Press the [Exit] button to go back to the main menu. Page 32 of 69 User Manual ProTee Golf Simulator 2.0 3.1.2 Game From the Option menu choose Game to select the units of measurements. Choose between Imperial or Metric. The Swing Analysis tells you how many seconds you want the Analysis screen to appear after each shot. The Green Friction Slider tunes the green speed. Increase the slider to make the ball roll less fast on the green. Page 33 of 69 User Manual ProTee Golf Simulator 2.0 3.1.3 Screen Settings From the Option menu choose Screen Settings to adjust the game to meet your screen characteristics. Select one of the available Screen Resolution by clicking on the measurements (which will highlight after selection). Select the best available Display Adapter on your system. If you want to play ProTee Golf Simulator 2.0 in a Window, you select the Window option under the screen section. Select Full screen if you want ProTee Golf Simulator 2.0 to be maximized. Select the right Aspect Ratio so everything will appear in the right proportions. During the game. When you determine distortion or double images and graphics which results in non realistic animations, you have to adjust the anti-aliasing settings.The default setting is none. Increase the anti-aliasing setting step by step until the game operates realistic. Page 34 of 69 User Manual ProTee Golf Simulator 2.0 NOTE: Anti-aliasing is the technique of minimizing the distortion artifacts known as aliasing when representing a high-resolution signal at a lower resolution. NOTE: Aliasing refers to an effect that causes different continuous signals to become indistinguishable (or aliases of one another) when sampled. It also refers to the distortion or artifact that results when a signal is sampled and reconstructed as an alias of the original signal. NOTE: Playing in Full Screen mode you can go back to MS Windows at any time by pressing the Windows button or ALT-TAB. 3.1.4 Graphics From the Option menu choose Graphics to adjust the game to meet your system characteristics. If the game doesn’t runs smoothly the graphics options are set to high. In this case you have to lower the graphics options to meet your system characteristics. The option Quick Select makes it easy to set the graphics options. Choose between Minimum, Balanced and Maximum. If your system meets our preferred requirements you can set the graphics options to maximum. If your system meets our minimum requirements you should balance the graphics options. If the game doesn’t run smoothly, minimize the graphics options. The individual options can also be set manually. Shadows • None The objects appear without shadows • Low The objects appear with low resolution shadows • Medium The objects appear with medium resolution shadows • High The objects appear with high resolution shadows Reflections Reflections are presented in rivers, lakes, open water, etc. Choose which objects should generate reflections: • Scenery Sky, clouds, panorama’s • Terrain Golf course including hills, raisings, etc • Objects Trees, bridges, houses, golf cars, etc. Reflection Draw Distance How far will the reflections been drawn on the screen. Choose somewhere between 100 (minimum) to 500 (maximum) Page 35 of 69 User Manual ProTee Golf Simulator 2.0 Shader Model Which set of software instructions will be used by the graphic resources primarily to perform rendering effects? • DirectX7 (low rendering) • DirectX8 (medium rendering) • DirectX9 (maximum rendering) Max. Texture Size A texture can be termed as a pattern that has been scaled down where the individual elements that goes on to make the pattern not distinguishable. Textures are applied to the surface of a shape (like fairway, green, rough and sky) or polygon (like building, car and tree). Choose upon: • Low • Medium • High Terrain Detail How much details will be shown on the terrain. Choose somewhere between • 0%(no detail) to 100% (detail) Object Draw Distance Till how far the objects will appear. Choose somewhere between: • 300 (minimum) to 2500 (maximum) Enable Blending Objects and images can be blend smoothly together or displayed separately. Choose between. • (Blending) On / (Blending) Off Tree LOD Distance Trees will appear in (the chosen tree) detail up to a certain distance. In further distance the trees will appear in low(er) detail. Choose somewhere between: • 100 (minimum) to 500 (maximum) Tree Detail Choose in which detail the trees should appear on the screen: • Low • Medium • High Page 36 of 69 User Manual ProTee Golf Simulator 2.0 Grass The grass can be moved by the wind. If this is desirable you can turn this option on. Choose between: • On/Off (Grass) Draw distance Till how far the moving grass (if turned on) should be presented. Choose somewhere between: • 20 (minimum) to 90 (maximum) NOTE: By setting the graphics options you have to consider next: The more details (higher graphic settings) the slower the game will perform. The less details (lower graphic settings) the faster the game will perform. Page 37 of 69 User Manual ProTee Golf Simulator 2.0 3.1.5 Audio From the Option menu choose Audio to set the right audio options Select the appropriate Sound volume and Music volume. Enable or disable Crowd sound so you can play with our without spectators. Sophisticated 3D Sounds effects can be enabled, to experience the max. Page 38 of 69 User Manual ProTee Golf Simulator 2.0 3.2 Play The game can be started via the main menu item Play. Selecting this item will open the Play screen. On the Play Menu you can choose from the following items: • • • • • • • Quick Play – To start playing immediately. ProTee Play – Select a specific course, weather conditions, etc. Network Play – Play against others over the internet or in a local network. Challenges – Play a nearest pin or longest drive competition. Practice – Train yourself on any hole on any course. Load – Start from a saving point from a earlier game. Back – To go back to the Main menu. Page 39 of 69 User Manual ProTee Golf Simulator 2.0 3.2.1 Quick Play The Quick Play option allows you to play instantly, without making any selection. ProTee Golf Simulator 2.0 loads a random golf course and the default player is ready to play. 3.2.2 ProTee Play The ProTee Play option allows you to make certain selection before playing ProTee Golf Simulator 2.0. By clicking on the [ProTee Play] button on the Play screen a wizard will guide you through the process. First select a golf course out of the list. By selecting a golf course an overview or club info is presented at the right side of the screen. Click the [Next] button after the selection. Page 40 of 69 User Manual ProTee Golf Simulator 2.0 In the Hole Selection screen you can select the holes you want to play. The buttons [Select all], [Front nine] and [Back nine] makes a quick selection possible. Pressing the button [Clear Selection] deselects all chosen holes. Manual selection of each hole is possible by selecting the number of the hole(s). After selecting the holes press the [Next] button. The Player Selection screen will appear. Page 41 of 69 User Manual ProTee Golf Simulator 2.0 Double click on the player(s) in the Player List to select. To deselect a player double click on the player in the Selected Players list. It’s also possible to compete against CPU players (players who are generated by the computer). Select the Allow CPU Players box if you want the computer player to join the game. NOTE: The maximum number of selected players is eight. At least one non CPU player has to be selected. This means that at max 7 CPU players can be added. The Player Selection screen also allows players to be created, maintained or deleted. Press the [Next] button after selecting the players. The Game Options screen appears. Page 42 of 69 User Manual ProTee Golf Simulator 2.0 Select the Tee positioning to one of the options [Tee 1 (Pro)], [Tee 2 (Men)] or [Tee 3 (Ladies)] by clicking the right button. The Tee positioning determines the length of the holes. NOTE: The Tee options depend on the course design. Choose one of the Pin Placements: Select where the pin (and the flag) is placed on the green, choose out of: • Easy Putting will be easier • Default Putting will be regular • Hard Putting will be difficult Choose which kind of game you want to play by selecting the right Scoring. Strokeplay, Stablefort, Modified stablefort or Match play can be played.1 A small definition of the scoring will appear at the right side after selection. 1 Scorings as stated by the Royal and Ancient Golf Club of St Andrews (R&A) and published in The Rules of Golf. Page 43 of 69 User Manual ProTee Golf Simulator 2.0 Select the Course Conditions choose between Soft, Normal or Dry. Select the numbers of Mulligans that can be taken. A mulligan allows the player to play the same ball without scoring consequences. Choose between: • • • • • None 1 Per hole 2 Per hole 3 Per hole Unlimited Choose the distance to the flag Gimmies will be given. When the distance between the ball and the flag is closer than the Gimmie distance an automatic put will be launched by the computer. Choose out of none, 20”, 40”, 60”, 80”, 100” or All (putting will be skipped). NOTE: When Mulligans and/or Gimmies are enabled, player stats will not be recorded. After selecting the Game Options press the [Next] button, the Play Conditions screen will appear. Page 44 of 69 User Manual ProTee Golf Simulator 2.0 Choose the Weather conditions to play in. Options are Clear, Cloudy, Showers or Rain. Choose the Wind type. Options are None, Light, Medium or Strong Choose the hour the game is starting. This option allows you to play at sunrise, sunset or during daytime. NOTE: When you tee of at 4pm it will get dark slowly. After selecting the weather conditions you are ready to [Play]. Page 45 of 69 User Manual ProTee Golf Simulator 2.0 3.2.3 Network Play ProTee Golf Simulator 2.0 allows you to play with other players on different locations via a local network or via the Internet. If you connect to the Internet through a router you will need to setup “port forwarding” before you can play. When playing ProTee Golf Simulator 2.0 online, each player is identified by his or her IP address. This is an unique number normally assigned to you by your Internet Service Provider (ISP). If you connect to the Internet via a router then it will have an IP address assigned to it and your computer will then have a sub-net IP address such as “192.168.0.2”. During the online game of ProTee Golf Simulator 2.0, data will be sent to the Internet IP address which is assigned to your router. The router must be told to forward that data to your PC – this is called Port Forwarding, ProTee Golf Simulator 2.0 requires that the TCP ports in the range 60,000 60,030 be forwarded. Please refer to your router’s manual on how to do this. For more help, we recommend the website portforward.com which carries tutorials on how to setup port-forwarding for many common routers. Locate your router in the list and then select the “Default Guide”. NOTE: Only one PC on a sub-net can connect to an internet game at a time. However, if you host an internet game, other players on the same sub-net can connect via the LAN option. The option Network Play can be found via the main menu item Play Network Play. Selecting this item will open the Network Play screen. On this screen four buttons are presented: • Lobby See who is online and who wants to play. The chatbox lets you lobby. • Host Game Be the lead in the play and invite others to play. • Join Game Only one of the created players can be used in a network play. • Back To go back to the Play screen. Page 46 of 69 User Manual ProTee Golf Simulator 2.0 Page 47 of 69 User Manual ProTee Golf Simulator 2.0 3.2.3.1 Lobby At the left side all available games are presented these are the hosts. In the middle the chat boxes are presented. The upper box shows what is written by all chatters, the lower box is your editor box. Use the [Send] button to post your message. At the right side all online users are presented. You can host the game by clicking the [Host Game] button on the Lobby screen, or from the Network play screen, pressing the same button. Page 48 of 69 User Manual ProTee Golf Simulator 2.0 3.2.3.2 Host Game When hosting a game, you are in charge with course is going to be played, in which circumstances. By clicking on the [Network Play] button a wizard will guide you through the process. This wizard is familiar with the wizard as described in chapter ProTee Play. Read that chapter for more details. Follow these steps: 1. 2. 3. 4. 5. Select the course Select the holes Choose the players Set the game options Select the play conditions On the Game Server screen fill in the right Server Name. Decide to play over the internet or in a local (like company) network. Choose how many players can join by moving the slide over the Maximum Players bar. Page 49 of 69 User Manual ProTee Golf Simulator 2.0 3.2.4 Challenges ProTee Golf Simulator 2.0 allows you to play a Nearest To Pin (a so called Neary) competition or a Longest Drive contest. From the main menu select Play Challenges 3.2.5 Practice From the main menu select Play Practice to practice your swing on any hole. A wizard will guide you to make the right selections. This wizard is familiar with the wizard as described in chapter Custom Play. Read that chapter for more details. In practice mode every hole is presented as a driving range. After each shot you turn back to the tee, to tray again, like an unlimited mulligan mode. In the game you can select another hole to practice by clicking on Menu Select Hole [Hole number] Page 50 of 69 User Manual ProTee Golf Simulator 2.0 3.2.6 Load From the main menu select Play Load to continue playing from an earlier saved round. When quitting the game ProTee Golf Simulator 2.0 asks to save the game. By saving the game ProTee Golf Simulator 2.0 offers you to continue your round at a later time at the point you stopped. Page 51 of 69 User Manual ProTee Golf Simulator 2.0 4. In the game The game starts after selecting an item out of the Play menu. First the select course will be fully loaded in memory, this might take a minute. While loading a loading screen with progress indicator will appear. Page 52 of 69 User Manual ProTee Golf Simulator 2.0 A course fly over is presented after loading the course. The ball is teed up on the first hole, by clicking on the left mouse button. NOTE: Not every course is designed with a course fly over. If you do not see a fly over and find yourself directly on the tee, the fly over has not been designed for the selected course. Page 53 of 69 User Manual ProTee Golf Simulator 2.0 4.1 Screen layout On this main screen you find in the top left corner the current player, the number of coming shot and some hole info. Right under the current player box you see the leaderboard. This leaderboard show the ranking of the players. Note: Next to the Player information you find a GREEN or RED square. This square indicates the Sensor Mat status. GREEN means the Sensor Mat is Ready to accept a swing. RED either means there is problem with the Sensor Mat or the ProTee Golf Interface is not running. Page 54 of 69 User Manual ProTee Golf Simulator 2.0 At the top right corner you find information of the distance to the flag and the relative height of the pin related to the current ball position. At the right you also find a course overview / mini map. When moving your mouse in this map you will find two lines. One line measures the distance from the tee to the current mouse position, the other line measures the distance from the current mouse position to the flag. By clicking the left mouse button and holding it down you will fly, in the main screen, to the current mouse position. While holding the left mouse button down, mouse movements result in a fly over on the main screen. Once the mouse button is released, you will jump back to position of the ball in the main screen. Clicking the right mouse button on the mini map will position the target pole at the selected point on the course. NOTE: In practice play clicking the right mouse button on the mini map will position the ball. At the bottom of the screen you will find the menubar. In the bottom of the screen a menu is shown. The items Menu, Club, <Aim Left and Aim Right> are selectable. The item Wind is presenting information. Page 55 of 69 User Manual ProTee Golf Simulator 2.0 4.2 Menu Click on Menu to select one of the items: • • • • • • • • • • • • • Quit To exit the game (with or without saving) View FlyBy To fly over the hole Controls Overview of the shortcut keys Game Options Select the language and tuning Graphics Options To optimize the performance of the game Shot Cameras To view the shots from different angles Green Grid To place a grid over the green, making reading more easy Skip Hole To exit the hole a go to the next one Shot Analysis To analyse the last shot details Ball Trail To make the ball more visible by adding a trail at the back of it Mini Map To present a map of the hole that is played Leaderboard To show the ranking so far Scores To show the results so far NOTE: A mulligan button (when enabled) will appear after your shot. A Practice Shot button will appear when you play a round with 1 player. Extra buttons will become available during the game. • • • • View Replay Replay your last shot Skip Hole Finish the hole and go to the next hole Practice Shot Make a practice shot without adding an extra stroke to your score. Mulligan Redo your shot without affecting your score Page 56 of 69 User Manual ProTee Golf Simulator 2.0 4.2.1 View FlyBy The menu option View FlyBy shows an overview of the hole. The fly by repeats and will stop at a left mouse click or by pressing the space bar on your keyboard. Page 57 of 69 User Manual ProTee Golf Simulator 2.0 4.2.2 Controls Select the menu option Controls to get an overview of all shortcuts that can be used while playing. The shortcut keys that are presented in boxes can be changed to meet your own preferences. Press [OK] to leave this screen. 4.2.3 Game Options Select the menu item Game Options to change the regional settings. You can change the language the game is presented, by clicking the right flag. You can change the Units Of Measurements. Choose between Imperial or Metric. Page 58 of 69 User Manual ProTee Golf Simulator 2.0 The Swing Analysis tells you how many seconds you want the Analyse screen to appear after each shot. The Scores After Each Hole tells you how many seconds you want the scorecard to appear after each hole. By selecting Unlimited the scorecard stays on the screen until you close it manually. The Shot Distance Boost slider increases your carry by X percent. The Green Friction Slider tunes the green speed. Increase the slider to make the ball roll less. Press [OK] to leave this screen. Page 59 of 69 User Manual ProTee Golf Simulator 2.0 4.2.4 Shot Cameras The menu option Shot Cameras shows you different ways the ball flight / roll is presented on the screen. The camera position can be set for normal shots and for puts. You can choose one out of eleven positions. Press [OK] to leave this screen. 4.2.5 Green grid This menu item enables or disables grids on the greens. 4.2.6 Skip Hole Select this item to go to the next hole. 4.2.7 Shot Analysis This menu item enables or disables the Analyse Screen. 4.2.8 Ball Trail This menu item enables or disables the trail at the back of the ball. Page 60 of 69 User Manual ProTee Golf Simulator 2.0 4.2.9 Mini map This menu item enables or disables the mini map at the right side of the screen. 4.2.10 Leaderboard The menu option Leaderboard shows the ranking of the current players. Press [OK] to leave this screen. Page 61 of 69 User Manual ProTee Golf Simulator 2.0 4.2.11 Scores The menu option Scores shows the actual score of each player. Press [OK] to leave this screen. 4.3 Club Click on Club to select the club you are going to play with. The clubs available are the ones that have been selected when creating the player. NOTE (for non golfing gamers): The woods and Driver are used for long distances. The irons are used for shorter distances. The wedges are used for small distances or to play a ball out of a bunker or other obstacles. The putter is used on the green to put the ball to the pin. The higher the number of the wood or iron the smaller the distance it will carry. Page 62 of 69 User Manual ProTee Golf Simulator 2.0 NOTE: You can also use the keyboard to quick select your club. Key 1 – 9 to select an iron. Key D to scroll through the drivers and woods, Key P to select a pitching wedge or putter. Key W to scroll through the available wedges. 4.4 Aim Left Default the player is always lined up to play towards the hole. You can decide not to play in the direction of the hole, for instance to avoid hitting a tree. Use the <Aim Left menu button to line up in a direction left from the hole. Hold this button down for a faster movement to the right. 4.5 Aim Right Default the player is always lined up to play towards the hole. You can decide not to play in the direction of the hole, for instance to avoid ending up in the water. Use the Aim Right> menu button to line up in a direction right from the hole. Hold this button down for a faster movement to the right. Page 63 of 69 User Manual ProTee Golf Simulator 2.0 5. Play When playing with the Driver, Irons, Woods and Wedges the ball always has to be placed on the white sunken tee holder on the base sensor mat. When needed, you can place a tee in this tee holder. Ball position If there is no putting mat connected, during putting, the ball has to be placed on the white sunken tee holder on the basis sensor mat. If there is an additional putting mat connected, during putting, the ball has to be placed in front of this putting mat. The ProTee Golf Simulator 2.0 supports up to 8 players in one single flight. The system keeps track of the player’s score and shows who’s next on the live leaderboard. After every shot a detailed Shot Analysis screen is displayed. The screen will automatically disappear after the time you have set in the game options. Page 64 of 69 User Manual ProTee Golf Simulator 2.0 Note: You can press the I (i) key on your keyboard to recall the last shot analysis. The Shot Analysis screen shows the following information: • • • • • • • • • • • • • • • • • • • • • Player name Current shot Club used Total Distance hit Smash factor (clubspeed vs. ballspeed) Club speed Club face (open/closed) Face relative to path Sweet spot deviation Swing path (in-out/out-in) Ball launch angle Ball launch velocity Ball speed Ball path Carry Bounce Roll distance Under spin Side spin Axis tilt Offline distance You can Replay your shot and view it from different camera positions. Click the Replay button in the in game main menu when the game is ready to take your next shot. You can save the Replay to a Video file to show your friends the hole in one you just hit. When you are on the green you can press the G key on your keyboard to show the green grid. The green grid contains moving drops showing the direction of the slope. The different colours on the grid indicate the difference in height. When finished the hole, the system will show the scorecard and moves to the next hole without extra loading times. Most courses have driving ranges, which you can select in practice mode. For your convenience we have added two ProTee driving ranges. One with metric and one with imperial distances. Make sure you select the proper driving range to reflect your local settings. Have fun! Page 65 of 69 User Manual ProTee Golf Simulator 2.0 6. Frequently Asked Questions (FAQ) Q. I’m missing DVD content. A. You can order the latest DVD from the ProTee Online Shop. Q. I only have 1 halogen light. A. You only need 2 lights if you own a putting sensor mat. Q. ProTee.exe crashed. A. Make sure your computer meets the requirement and install the latest version of DirectX (www.microsoft.com/directx). Q. I have another interface version. A. Always make sure you use the latest version. Make sure you read the news inside the portal regularly. Q. I don’t see the ProTee sim inside the Portal. A. You did not enter the activation key or the activation key was invalid. Q. Can I use the Sensor Mat outdoor? A. No. The Sensor Mat is not intended for outdoor use. Q. What is the recommended ceiling height? A. 2,70 meter / 8.8 feet minimum. For commercial use we recommend 3,00 meter / 10 feet minimum. Q. Do I have to place the Sensor Mat in the middle of the room? A. Yes that is recommended. Q. Can I use the system without an Internet connection? A. Yes, but you will not receive automatic updates and will not be able to play online. Also we will not be able to provide online support. Internet is required for license activation. Q. The square box in the game is red. A. Check if the interface is running in the system tray. Also check if the sensor mat is powered and if there is no debris on the sensors. Q. How do I get updates? A. Updates are distributed automatically when connected to the Internet. This way you will always have the latest releases. Q. How do I get the course on the monitor AND on the projector at the same time? A. You need to “CLONE” your screen in the graphics card driver settings. Page 66 of 69 User Manual ProTee Golf Simulator 2.0 Q. When putting the ball is not being launched. A. Make sure your head is not covering sensors when you putt or swing. Q. I can’t control my mouse anymore. It’s flying over the screen. A. Windows has identified the Sensor Mat as a Serial Mouse. Goto the Windows Device manager and DISABLE (do not uninstall) the Microsoft Serial Mouse and reboot your computer. Q. Where can I find the remote support client software? A. You can download the latest client software from http://www.protee-united.com/golfsimulator/support Q. Where do I place the golf ball? A. The golf ball MUST ALWAYS be placed on the white tee position, otherwise the system won’t be able to read the club details on impact and will give inaccurate results. Q. Can I tee up the ball? A. Yes. Use a tee on your first shot only. Q. May/can I use the Sensor System in a commercial environment? A. Yes. Q. The system reports that the sensors have to be cleaned. A. This message should disappear on your next shot. If the message stays, check the sensor for possible debris blocking the sensors. Q. Every shot I make in the game returns to the initial position. A. You are playing in practice mode. Q. The screen gets very dark after a while. A. The game runs on a daylight time system. The later its get the darker it will be. Make sure you set your tee off time to allow plenty of time before it gets dark. Q. When I start the game the screen stays black. A. You have selected a screen resolution, which is not supported by you monitor. Locate the “resetsettings” utility on the installation DVD. Double click the program to reset the graphic settings back to default. Q. I need to buy an extra power adapter. A. Make sure you buy a 5volt adapter and that the negative is on the inside of the plug. Q. I only have 30 courses available. Where is the rest? A. Make sure you install the extra course packs from the DVD. Page 67 of 69 User Manual ProTee Golf Simulator 2.0 Q. I can’t find the Green Grid. A. Press the key G on your keyboard. Q. The simulator will not start inside the ProTee Portal when I click PLAY. A. Update Microsoft DirectX http://www.microsoft.com/directx Q. Shots are not being recognized. A. Make sure all sensors inside the sensor system get enough light. Make sure your club produces a clear black shadow when moving over the sensors. Check if the light is positioned correctly. Q. The ProTee Golf interface is asking for a license key. A. You can request your license key via E-mail: [email protected] . Make sure you include the 16 digit Machine-ID, displayed when you click “ENTER LICENSE KEY”, in your E-mail. Q. What screen resolutions are supported? A. ProTee Golf 2.0 support any resolution supported by your graphics card. From 640x480 to 5760x3600. Q. How can I switch clubs during the game? A. You can use the ingame club selection menu or press keys: “1-9” (for iron 1 to 9), “W” for Pitching and SandWedge, “P” for Putter and “D” for Driver and Woods. Q. ProTee Sim 2009 is not showing inside the Portal. A. You will need to enter a 16 character activation code inside the portal: GAMES -> ENTER ACTIVATION CODE. Page 68 of 69 User Manual ProTee Golf Simulator 2.0 Index account, 19, 20, 21 activation code, 23 Aim Left, 55, 63 Aim Right, 55, 63 Aliasing, 35 Audio, 27, 38 Blending, 36 Challenges, 39, 50 Club, 43, 55, 62 Comm port, 13 configuration, 26, 27 Course Conditions, 44 CPU players, 42 Create Player, 28, 32 default player, 29, 40 driving range, 50 Gimmies, 44 Interface, 12, 14, 15 irons, 30, 62 leaderboard, 54 light, 8, 9, 13 login, 20 Longest Drive, 50 Match play, 43 measurements, 33, 34, 58 mini map, 55, 56, 61 Modified stablefort, 43 Mulligans, 44 Nearest To Pin, 50 Network Play, 39, 46, 47, 49 NOTE, 28, 29, 30, 32, 35, 37, 42, 43, 44, 45, 46, 53, 55, 56, 62, 63 Object Draw Distance, 36 Pin Placements, 43 power supply, 8 ProTeePortal, 11, 12, 19, 22, 23, 29 putter, 30, 62 Reflection Draw Distance, 35 Reflections, 35 Screen Settings, 34 serial port, 8 Shader Model, 36 Shadows, 35 Shot Cameras, 31, 32 Stablefort, 43 Strokeplay, 43 Tee positioning, 43 Terrain Detail, 36 texture, 36 tray, 12, 15, 50 Tree Detail, 36 Tree LOD, 36 Weather conditions, 45 wedges, 30, 62 Wind, 45, 55 woods, 30, 62 Page 69 of 69