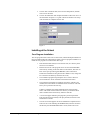
1
2002
STIDistrict Enrollment
User Manual
Information in this document is subject to change without notice. Student and school data used herein are fictitious
unless otherwise noted.
© 2000-2002 Software Technology, Inc. All rights reserved.
Microsoft, Windows and Word are registered trademarks or trademarks of Microsoft Corporation in the United States
and other countries.
Other product and company names herein may be the trademarks of their respective owners.
Software Technology, Inc.
4721 Morrison Drive, Suite 200
Mobile, AL 36609-3350
1-877-844-0884
This manual, which covers material through STIDistrict Enrollment version 4.0, was last updated on October 19, 2002.
Any subsequent changes made to the application will be discussed in the release notes that accompany each update.
Contents
About STI Products
1
Product Name Changes ................................................................................................................... 1
Other Products ................................................................................................................................. 2
Introduction to the STIDistrict Enrollment Program
3
Overview.......................................................................................................................................... 3
Installing the STIDistrict Enrollment Program
5
Workstation Requirements .............................................................................................................. 5
Installation Process .......................................................................................................................... 5
STIDistrict Login Accounts ............................................................................................. 5
Installing at the School ..................................................................................................... 6
Configuring the Program................................................................................................................. 7
STIDistrict Setup ............................................................................................................................. 8
Running STIDistrict Enrollment..................................................................................................... 8
Enrolling Transfer Students with the Program
9
Procedure ......................................................................................................................................... 9
Data Processing Prompts............................................................................................................... 10
Enrolling a New Student (Not Previously Enrolled in the District)
11
Overview........................................................................................................................................ 11
Withdrawing Students with the Program
13
Overview........................................................................................................................................ 13
Procedure ....................................................................................................................................... 13
Other Features
15
SQL Connect Info.......................................................................................................................... 15
Options ........................................................................................................................................... 15
Show Errors .................................................................................................................... 15
Lower Case ..................................................................................................................... 15
Trace File ........................................................................................................................ 16
Check SSN for New Students ........................................................................................ 16
Index
2002 STIDistrict Enrollment
17
Contents • iii
About STI Products
Product Name Changes
As of the 2002 summer mandatory update releases, the names of all STI applications
have officially been changed. The chart below displays the current names of all
products.
School Level Applications
Previous Product Name
Current Product Name
SSTS/Win2000
Teacher Classroom Module
Teacher Classroom Module
-Teacher Takehome Module
SETS (School Install)
-SETS Companion
Health Tracker
IIOD
IOD
Local School Accounting / School
Bookkeeper
DaisiNet
STIOffice
STIClassroomWeb or
STIClassroomWin
-STIClassroom Companion
STISets
-STISets Companion
STIHealth
STIHome
STICaller
STIBookkeeper
Accessory Products
District Level Applications
2002 STIDistrict Enrollment
STIDistrict Net
Query Builder
Save-It
Data Import/Export
SSTS/Palm2000
STIAccessories
-STIQuery
-STISave-It
-STIData Import/Export
-STIPalm
DAISI/2000
-DAISI Enrollment
-DAISI District Net
-DAISI Import Engine
-District Net
DAISI SETS
-Board Install
Central Office Accounting Package
Textbook Inventory Tracking
[new product]
STIDistrict
-STIDistrict Enrollment
-STIDistrict Net
-STIDistrict Import Engine
-STIDistrict Net
STIDistrict Sets
-STISets DL
STIFinancial
STITextbook
STIDistrict Exchange Manager
About STI Products • 1
Other Products
In addition to our own software applications, STI markets the following products:
1.
Teacher's Pal-Curriculum Management (Instructional Management)
2.
Data Futures-PrimoWare Transportation, Facilities, and Routing
(Transportation)
3.
ConfluentTechnologies-ConfluentEDU (Data Mining)
4.
Comalex-Comalex (Child Nutrition)
5.
E on Campus (Professional Development Tracking)
Please contact the STI Sales Department at 800-844-0884 for more information.
2 • About STI Products
2002 STIDistrict Enrollment
Introduction to the STIDistrict
Enrollment Program
Overview
The STIDistrict Enrollment program is an interface to the STIDistrict database and is
installed at the local school level. The primary purpose of this program is to allow
the local school user to browse the district level database, determine the enrollment
status of a student who is transferring into the school from another school in the
district, and then enroll the student in the STIOffice database at the school. The
program will then insert data from the other school to the enrolling school. The
district will determine which information is to be transferred from STIDistrict to the
enrolling school.
Please note that the use of this program requires that the local school is running the
STIOffice program. Also, Software Technology, Inc., (STI) recommends that this
product be installed in districts employing a WAN to connect schools to the
STIDistrict server.
The district determines the data that is transferred from school to school. The district
must set up STIDistrict to define which data is to be transferred. The complete
instructions for configuring STIDistrict are in the STIDistrict Setup section. The data
that is eligible for transfer is as follows:
•
Tests
• Entry/Withdrawal
•
User 1
•
User 6
•
Transcripts
• Vocational
•
User 2
•
User 7
•
Discipline
History
• Medical
•
User 3
•
User 8
•
Attendance
History
• Contacts
•
User 4
•
User 9
•
Requests
• SETS/2000 Data
•
User 5
•
User 10
The program will check to see each time what data is to be transferred. So, if at
some point the district chooses to transfer additional information, the selected data
will be transferred for students enrolled using the program from that point forward.
Introduction to the STIDistrict Enrollment Program • 3
However, the data for any student previously transferred using the STIDistrict
Enrollment program will not include the additional information when the change is
made in the STIDistrict setup.
There is also an option in the setup that allows the Enrollment Program to
automatically assign a student number to any new student enrolled using the
program. Enabling this functionality is very easy. Complete instructions for
configuring STIDistrict are in the STIDistrict Setup chapter of this document.
4 • Introduction to the STIDistrict Enrollment Program
2002 STIDistrict Enrollment
Installing the STIDistrict
Enrollment Program
Workstation Requirements
The program should be installed on the computer at the school normally used to
enter and withdraw students. This computer must have the following:
•
Windows95, 98, NT, or 2000
•
Internet Explorer 5.0. (Internet Explorer does not have to be used as the
web browser. However, it must be installed on the workstation.)
•
ADO. To verify that ADO is installed, download and run the file called
mdac_typ.exe from the updates page of http://www.ssts.com/ www.stik12.com.
•
The computer must have network access to the STIOFFICE data folder
for the school.
•
The computer must have network connectivity to the district’s
STIDistrict database.
Installation Process
Before installing the program at a local school, it will be necessary for the local
school users to be set up as a user in STIDistrict.
STIDistrict Login Accounts
To create the login account to STIDistrict for the user, do the following:
One account may be created for all school users, or one for each school.
1.
Open the STIDistrict Workstation at the district office. Login using the
Administrator account. (User=@@@)
2.
Click on File in the main menu, then User File Setup Menu, and then
click on User Group Edit. Create a group called “School” by clicking
on the Add button.
Installing the STIDistrict Enrollment Program • 5
3.
Click on File in the main menu, then User File Setup Menu, and then
click on User File Edit.
4.
Click on the Add button and complete the fields to add a new user. Use
the information in Figure 1 as a guide. Choose the School User Group.
After all fields are completed click on Ok.
Figure 1
Installing at the School
Core Program Installation
The core program install is done once at each school, and then multiple workstations
may be installed within the school that will relate to the core program installation. To
install the core program at a school follow these steps:
•
Download the install files (Ienr.exe and Ienr.w02) to a directory at the
school or on to diskettes.
•
Run the Ienr.exe file. This program can be run from the START/Run
menu item by clicking on the Start button in the task bar, then click on
Run. In the space provided type a:\Iner.exe. (These instructions
assume the installation is being done from a diskette. If not, change the
a:\ to the drive and directory where the file exists.)
•
The installation program will prompt the user to select a district or
school installation. Click on School and click the Next button.
•
The install will ask if SETS is installed at the school. If SETS is not
installed, then select SETS Not Installed and click Continue. This will
allow you to proceed to the next step.
If SETS is installed, select SETS Installed and click the Continue
button. The install will then ask for the directory in which the SETS
data is installed. Select the directory and then click OK.
•
A screen will appear indicating the program is password protected.
Enter the password (provided by STI upon purchase) and click on the
OK button to continue.
•
The next screen that appears will be the Installation Completed screen.
There will be a note indicating the IENRWS.EXE, which is located in
the directory the SSTS2/Win2000 data is stored, needs to be run on
6 • Installing the STIDistrict Enrollment Program
2002 STIDistrict Enrollment
each workstation running the STIDistrict Enrollment program. Click
the Finish Button to exit the program.
Workstation Program Installation
The Ienrws.exe needs to be run on each workstation that will use the STIDistrict
Enrollment program. Make certain that the workstation meets the requirements
addressed earlier in this document.
Run the Ienrws.exe install file from the folder where the core installation was done.
When the installation begins, a Welcome screen will appear. There is a note that it
will not install the program on the school file server. There will also be a note that
ADO must be installed on the workstation before proceeding. The ADO is installed
when the mdac_typ was installed on the workstation. If the mdac_typ.exe was
installed, click OK to continue.
•
At this point, an Enrollment Directory screen will appear. Select the
directory where the “core” Enrollment program is installed. The
program will default to the directory in the SST.INI file if the
STIOFFICE program is installed on the workstation. Select the location
and click the OK button to continue.
•
The next screen that will appear will be the Local Directory screen.
This location is the local directory on the workstation. The program
will default to C:\ENR. Select this default location. To continue, click
the OK button.
•
The program will run an additional script and then another Welcome
screen will appear. This screen is the STI cwScript Control Setup
Program. Click the Next button to continue. A Start Installation screen
will appear. Click on the Next button to continue.
•
The program will install some files and then the SQL Server Client
Network Utility screen will appear. This screen is used to set the
Default Network Library to TCP/IP. Be sure that the Default Network
Library is TCP/IP and click the OK button to continue.
•
An Installation Completed screen will appear. Click the Finish button
to complete the installation.
Configuring the Program
To start the program click on Start, STI Applications, and then select STIDistrict
Enrollment. The first time the user opens the program a message will appear
indicating the program cannot attach to the database. In order to attach to the
database, the user must configure the SQL Connection. The SQL Connection screen
will appear. Enter the following information:
•
Server Name – Enter the STIDistrict Server’s IP Address.
•
Database Name – Enter the word, daisi.
•
User ID – Enter, sa.
•
Password – Enter the STIDistrict database password.
•
Timeout – Leave the default timeout setting.
Once all the fields have been completed, click the OK button.
Installing the STIDistrict Enrollment Program • 7
STIDistrict Setup
The district must set up STIDistrict before utilizing STIDistrict Enrollment. The
district set up informs the program what data elements to transfer to the school when
a student is enrolled using the program. To set up STIDistrict for STIDistrict
Enrollment, open the STIDistrict workstation and do the following:
•
Click on File.
•
Move the mouse to District Setup Menu and click on District Setup.
•
Click on the Enrollment Options tab.
•
Click on the box to the left of each of the data elements to be
transferred when a student is enrolled using STIDistrict Enrollment.
The option to move Special Ed (SETS) data is only valid for districts in
Alabama and Kentucky.
•
Click on the Auto Number button to have the program automatically
assign student numbers to new students. After clicking this button,
select each component of the student numbers to be assigned by
clicking on the checkbox to the left of each. The default format will be
School Number, District Number, then a four digit Incremental
number. For example, if the school number is 99, and if the district
number is 123, then the first student enrolled using the Enrollment
Program at that school would be assigned the number 991230001. The
program will not allow a number that will be more than 10 digits, and
the incremental number element of the number must be at least 4 digits.
•
After checking the fields to transfer, click the OK button.
Running STIDistrict Enrollment
Once the school workstations have been installed and the program is configured to
the SQL database, the user is ready to run the program. To start the program, click on
Start in the Task Bar, then Programs, then STI Applications. Then click on
STIDistrict Enrollment.
8 • Installing the STIDistrict Enrollment Program
2002 STIDistrict Enrollment
Enrolling Transfer Students with
the Program
Procedure
Login
The district's STIDistrict Database Administrator will assign a user name and
password for signing on to the Enrollment Program. To begin using the program,
type in the user name and password, then click on OK.
Enroll the student
To enroll a student, click on the File pull-down menu and choose Enroll a Student.
Or click on the Plus icon under the File item in the main menu. The Enroll a Student
screen will appear.
The next step is to find the student who is to be enrolled. To find the student, use one
of the following four ways to search for the student:
•
Name – Enter any or all of the characters of the student’s last name.
The program will search the database and return a list of all student
names that begin with what was entered.
•
Student # - Enter the student number. This must match the student
number in the STIDistrict database at the central office.
•
School – Enter any part of a school name, such as High. The search is a
‘contains’ search, which means it will return any record that contains
the letters entered in the school field. This search requires at least one
letter in the name field as well.
•
Address – Enter the address or a portion of the address. This search
also functions as a contains search returning records that contain what
was entered in the field.
The list of students that appears is from the STIDistrict database. The students who
have been enrolled in more than one school during the year will be displayed with
the most current record listed first and the other records grayed out.
To bring up a student record, click on the student and click on the Select button. Or,
double click on the student. Whichever approach is used, the Record will be Added
screen will appear.
Enrolling Transfer Students with the Program • 9
The program will not allow the user to enroll a student who is still active in another
school. Follow district procedures on how to handle a student that is still enrolled in
another school in the district.
A student who has been withdrawn at another school will have a date in the
Withdrawn column. In the event a student is still enrolled in another school in the
district, a message will appear indicating that the student has not been withdrawn
from another school in the district. When this message appears, click OK to
continue.
Once the record appears, change the student's demographic data as necessary. Assign
an Entry Date and Code for the student's Entry record. Click on the Enroll button.
The student now has a record in both STIOFFICE and STIDistrict that shows
enrollment as of the date selected.
Data Processing Prompts
When enrolling a student, the program will verify the following data elements to
ensure proper data entry:
•
Name – There must be a name in the field to proceed.
•
Home Room – The student must be assigned to a homeroom. The
program will provide a count of the number of students in the
homeroom to the right of the homeroom field when the homeroom is
selected.
•
Entry Date – There must be a valid date in the Entry Date field. The
date must be a valid term date in the STIOffice database.
•
Entry Code – The student must be given an entry code.
•
Valid Grade – The student must be assigned a valid grade. The
program will prompt the user if it is not a valid grade and the user can
click OK to accept the grade or Cancel to correct the grade.
10 • Enrolling Transfer Students with the Program
2002 STIDistrict Enrollment
Enrolling a New Student (Not
Previously Enrolled in the
District)
Overview
The Enrollment Program may also be used to enter students who are new to a school
that has never been enrolled in the district during the current year. The advantage of
using the Enrollment Program instead of STIOffice, in this case, is that the district
database, STIDistrict, is immediately updated with the entry of the student
To enroll a student who has not previously been enrolled in the district, click on the
File pull-down menu and choose Enroll a Student. Or, click on the Plus icon under
the File item in the main menu. The Enroll a Student screen will appear.
Click on the button labeled New. The Record will be Added screen will appear.
Enter data in the following fields:
Student
•
Number – Enter the student’s number. The number entered should
follow the district or school guidelines.
•
Last Name – Enter the student’s last name.
•
First Name – Enter the student’s first name.
•
Middle Name – Enter the student’s middle name.
•
Suffix – Enter the student’s suffix. The drop down box will display the
suffixes added previously. If there are no suffixes, type in the suffix
and in the future that suffix will be in the drop down list.
•
AC/Phone – Enter the area code and phone number for the student.
•
Address 1 – Enter the first address for the student. This field should be
the address where the student resides, in most cases.
•
Address 2 - Enter the second address for the student. This field should
be the student’s mailing address if it is different from Address 1.
•
City – Enter the city that applies to Address 1.
Enrolling a New Student (Not Previously Enrolled in the District) • 11
•
State – Enter the state that applies to the City field.
•
Zip Code – Enter the zip code that applies to the City and State fields.
School Info
•
Grade – Enter the grade the student is enrolling in.
•
Home Room – Enter the student’s homeroom.
•
Race – Select the appropriate race from the drop down list.
•
Sex – Click on Male or Female to indicate the student’s gender.
•
DOB – Enter the student’s date of birth. When the date of birth is
entered, the program will calculate the student’s age.
•
SSN – Enter the student’s social security number.
•
Entry Date – Enter the effective entry date.
•
Code – Select the appropriate entry code from the drop down list.
After entering the data, click on enroll. The program has several built in checks that
will not allow the user to enroll without the required data fields populated. It will
also ensure that dates are valid term dates.
12 • Enrolling a New Student (Not Previously Enrolled in the District)
2002 STIDistrict Enrollment
Withdrawing Students with the
Program
Overview
The STIDistrict Enrollment program also allows the user to withdraw a student.
When the program is used instead of STIOffice to withdraw a student, the
STIDistrict database is immediately updated of the withdrawal, making that student
available for enrollment in another school.
Procedure
To withdraw a student with the STIDistrict Enrollment program, click on the File
pull-down menu and choose Withdraw a Student. Or, click on the Minus icon under
the File item in the main menu. The Withdraw a Student screen will appear.
To find the student to be withdrawn, enter the student number in the Student Number
field and click on Search. Or type in part of the last name and click on the Search
button. Once the student appears in the list or a list of students appears on the screen,
click on the student to withdraw and click the Select button. Or double click on the
student to be withdrawn.
After selecting the student, the Record will be Added screen will appear with the
student’s name in the title bar.
Complete the Record by entering the following:
•
Withdraw Date – Enter or choose the date the withdrawal is to be
effective. The date entered must be a valid date in the calendar. The
program will not complete the withdrawal without a proper date, which
must be in the calendar and after the entry into the school.
•
Time – Enter the time the withdrawal is to be effective.
•
Code – Select the appropriate withdrawal code.
•
From/To – Enter the information the school or district wants entered
for a student. There is a limit of 30 characters in this field.
•
Note – Enter any notes that need to be recorded with the withdrawal.
Withdrawing Students with the Program • 13
Once the fields have been completed, click on the Withdraw button to complete the
withdrawal.
14 • Withdrawing Students with the Program
2002 STIDistrict Enrollment
Other Features
SQL Connect Info
The SQL Connection must be set up in order for STIDistrict Enrollment to function.
The SQL Connect Info screen will appear the first time a user goes into the program.
When the SQL Connection Information screen appears, enter the following
information as needed:
•
Server Name – Enter the STIDistrict Server's IP Address.
•
Database Name – Enter the word, daisi.
•
User ID – Enter, sa.
•
Password – Enter the STIDistrict Database password.
•
Timeout – Leave the default.
To access the SQL Connection Information, click on File in the main menu and click
on SQL Connect Info.
Options
Show Errors
This feature will provide information when the user is encountering a connection
problem or the program is pointing to the wrong data. This feature is intended for
support to assist the user when problems occur.
Lower Case
The program, when entering a student who has not been in the school database, will
utilize upper case letters. The user can change the student information to appear in
mixed upper and lower case letters. To change the data to lower and upper case
letters, go to File in the main menu and then click on Options. Then click on lower
case.
Other Features • 15
Trace File
When selected this feature will help STI support staff to assist the user when
problems occur.
Check SSN for New Students
Selecting this option will prevent the user from assigning a Social Security Number
to a new student when that number has already been assigned to another student in
the district.
16 • Other Features
2002 STIDistrict Enrollment
STIDistrict Login Accounts 5
STIDistrict Setup 8
Index
T
Trace File 16
W
Workstation Requirements 5
A
About STI Products 1
C
Check SSN for New Students 16
Configuring the Program 7
D
Data Processing Prompts 10
I
Installation Process 5
Installing at the School 6
L
Lower Case 15
O
Options 15
Other Products 2
Overview 3, 11, 13
P
Procedure 9, 13
Product Name Changes 1
R
Running STIDistrict Enrollment 8
S
Show Errors 15
SQL Connect Info 15
2002 STIDistrict Enrollment
Index • 17