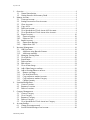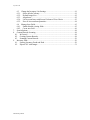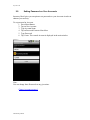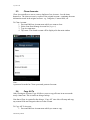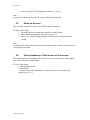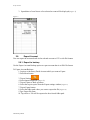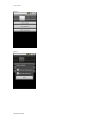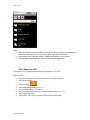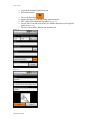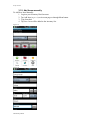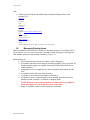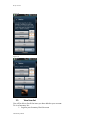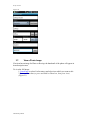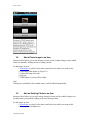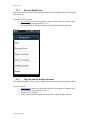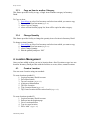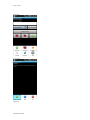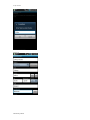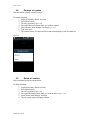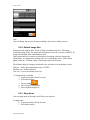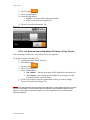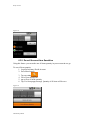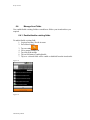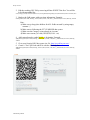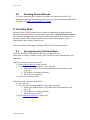
1
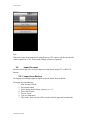
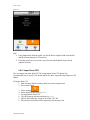
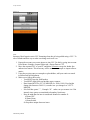
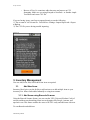
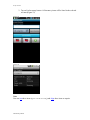
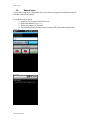
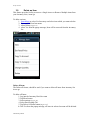
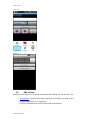
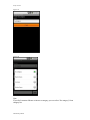
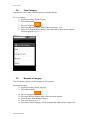
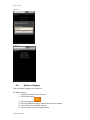
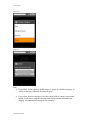
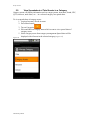
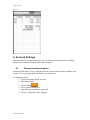
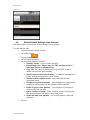
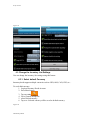
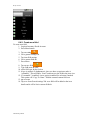
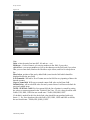
1 |P A G E Inventory Droid Version 2.29+ User Guide 20110727 Inventory Droid 2 |P A G E 1. 2. 3. 4. 5. 6. Overview ..................................................................................................................... 4 1.1. General Introduction ......................................................................................... 4 1.2. Getting Started with Inventory Droid ............................................................... 4 Manage Account ......................................................................................................... 4 2.1. Create an Account............................................................................................. 4 2.2. Setting Password on Your Accounts ................................................................ 6 2.3. Clone Accounts................................................................................................. 7 2.4. Copy All To ...................................................................................................... 7 2.5. Delete an Account............................................................................................. 8 2.6. View Spreadsheet of Total Assets of all Accounts........................................... 8 2.7. View Spreadsheet of Total Assets of an Account ............................................ 9 2.8. Export Account ............................................................................................... 10 2.8.1. Export to backup ......................................................................................... 10 2.8.2. Export to CSV ............................................................................................. 12 2.9. Import Account ............................................................................................... 13 2.9.1. Import from Backup.................................................................................... 13 2.9.2. Import from CSV ........................................................................................ 14 Inventory Management ............................................................................................. 16 3.1. Add New Items ............................................................................................... 16 3.1.1. Add Items using Barcode Scanner .............................................................. 16 3.1.2. Add items manually .................................................................................... 18 3.2. Managing Existing Items ................................................................................ 19 3.3. View Item list ................................................................................................. 20 3.4. Search Items.................................................................................................... 22 3.5. Delete an Item ................................................................................................. 23 3.6. Edit an Item..................................................................................................... 24 3.7. View a Photo Image........................................................................................ 25 3.8. Add a Photo Image to an Item ........................................................................ 26 3.9. Add an Existing Photo to an Item ................................................................... 26 3.10. Remove an Image........................................................................................ 27 3.11. Get Item Retail Price................................................................................... 28 3.12. Copy an Item to another Account ............................................................... 28 3.13. Copy an Item to another Category .............................................................. 29 3.14. Change Quantity ......................................................................................... 29 Location Management............................................................................................... 29 4.1. Create a Location ............................................................................................ 29 4.2. Rename a Location ......................................................................................... 32 4.3. Delete a Location ............................................................................................ 32 Category Management .............................................................................................. 33 5.1. Create a Category ........................................................................................... 33 5.2. View Category ................................................................................................ 35 5.3. Rename a Category ......................................................................................... 35 5.4. Delete a Category ........................................................................................... 36 5.5. View Spreadsheet of Total Assets in a Category............................................ 38 Account Settings ....................................................................................................... 39 6.1. Change Account password ............................................................................. 39 6.2. Set the Default Settings of an Account ........................................................... 40 Inventory Droid 3 |P A G E 6.3. Change the Inventory List Settings................................................................. 41 6.3.1. Select default Currency ............................................................................... 41 6.3.2. Default Image Size...................................................................................... 42 6.3.3. Align Items.................................................................................................. 42 6.3.4. List Account Items with Second Column of Your Choice. ........................ 43 6.3.5. Zero all Account Item Quantities................................................................ 44 6.4. Manage Item Fields ........................................................................................ 45 6.4.1. Enable/disable existing fields...................................................................... 45 6.4.2. Create new field .......................................................................................... 46 7. Search Options .......................................................................................................... 48 8. Custom Barcode Scanning ........................................................................................ 48 8.1. In General ........................................................................................................... 48 8.2. Creating Custom Barcode .................................................................................. 48 8.3. Scanning Custom Barcode ................................................................................. 50 9. Inventory Desk .......................................................................................................... 50 9.1. Syncing Inventory Droid and Desk .................................................................... 50 9.2. Export CSV with Images.................................................................................... 51 Inventory Droid 4 |P A G E 1. Overview Inventory Droid user manual provides the full functionality required to assist users. This manual explains the features and functions in the application in a step-by-step manner, enabling the users to use Inventory Droid with ease. 1.1. General Introduction Inventory Droid is an android phone application that used to manage inventory. Inventory Droid can handle multiple inventories called “accounts” (ex: Hardware Shop, Home goods…etc.). Items inside each inventory are categorized. (Ex: memory, hard disk etc.., or no category at all). In simple terms it is a data base of items available in your stock. Inventory Droid can be used as a small business inventory tool, a pantry logger, a Book/CD/DVD cataloger, asset manager for insurance purposes, and many more… 1.2. Getting Started with Inventory Droid Tap the Inventory Droid icon in Android phone desktop, to gain access to the Inventory Droid Application. If you have already created an Account tap the Account Name to access or Press menu button to create a new Account. Create an Account 2. Manage Account You can create an Account, Password protect your accounts, Clone, Delete and Import/Export Account details as required. 2.1. Create an Account To Create a New Inventory Droid Account: 1. Press Menu Button 2. Tap on New Account 3. Type Account Name 4. Tap on Create .The created Account is displayed in the main window.( see Figure1 ) Inventory Droid 5 |P A G E Figure1 Figure2 Note: You can create multiple Accounts and Password protect your accounts. Inventory Droid 6 |P A G E 2.2. Setting Password on Your Accounts Inventory Droid gives you an option to set passwords to your Accounts in order to enhance your security. To set password to Account: 1. Press Menu Button 2. Tap on New Account 3. Type Account Name 4. Tap on Password Protected check box 5. Type Password 6. Tap Create .The created Account is displayed in the main window Figure 3 Note: You can change these Passwords at any given time. Change Account password Inventory Droid 7 |P A G E 2.3. Clone Accounts Clone Account allows a user to create a duplicate of an Account – less the items themselves. The clone account is a replica of the original account - containing the same information stored in the original account - e.g. Categories, Custom fields, etc. To Clone Account: 1. Press and Hold on Account name which you want to clone 2. Select clone from Manage Account list. (Figure 4 ) 3. Type Account name 4. Tap create .The cloned account will be displayed in the main window Figure 4 Note: A password is needed to Clone a password protected account. 2.4. Copy All To After Cloning an Account, Copy all allows a user to copy all items in an account the newly cloned one. This is similar to doing a backup. Note that a Clone is required before doing a “Copy All” since this will setup and copy any custom fields and categories that are in the account. To Copy All To Account: 1. Press and Hold on Account name which you want to copy Inventory Droid 8 |P A G E 2. Select Copy All To from Manage Account list. (Figure4 ) Note: A password is needed to Copy All To a password protected account. 2.5. Delete an Account Once you have created Accounts you can delete them as required. To delete an Account: 1. Press and Hold on Account name which you want to clone 2. Select Delete from Manage Account list. (Figure 4 ) 3. Select „Yes‟ from the popup message window. Selected Account will be created Note: No need for password to delete a password protected account, since the protection is for viewing the private data. 2.6. View Spreadsheet of Total Assets of all Accounts Total assets displays information such as Total cost of assets, total items, total quantity ect... in all Account in a spread sheet. To view Total Assets: 1. Start Inventory droid 2. Press Menu 3. Tap on Total Assets. Spreadsheet of total Assets of all accounts will be displayed. (Figure 5 ) Inventory Droid 9 |P A G E Figure 5 Figure 6 2.7. View Spreadsheet of Total Assets of an Account Account assets displays information such as Total cost of assets, total items, total quantity ect… in an Account in a spread sheet. To view Account assets: 1. Press and hold on Account name. 2. Select Account Assets. ( Figure 4 ) Inventory Droid 10 | P A G E 3. Spreadsheet of total Assets of an selected account will be displayed.( Figure 7 ) Figure 7 2.8. Export Account You can export the account details in the selected account to CSV or ida file formats. 2.8.1. Export to backup Use the Export Account Backups option to export account data in to IDA file format. To Export Account Backups: 1. Login to an Inventory Droid Account which you want to Export 2. Press Menu button 3. Tap on Settings 4. Select Import/Export tab (Figure 8 ) 5. Tap on Export to Back up button 6. Select the require option from the Export settings window (Figure 9) 7. Tap on Export button 8. Select the folder path where you want to export the file (Figure 10) 9 Type Export file name 10. Tap on Save. File will be exported to the selected folder path. Inventory Droid 11 | P A G E Figure 8 Figure 9 Inventory Droid 12 | P A G E Figure 10 Note When you Export an account details using Export Back up option, all item details and the account settings (ex: password) will be exported to an ida file. Item details can be exported with or without Item photos as you required. Only ida files can be imported to the Inventory Droid application. 2.8.2. Export to CSV Use Export to CSV option export account item details to CSV file. Export to CSV: 1. Login to an Inventory Droid Account which you want to Export 2. Press Menu button 3. 4. 5. 6. 7. 8. Tap on Settings Select Import/Export tab (Figure 11) Tap on Export data to CSV option Select the folder path where you want to export the file (Figure 10) Type Export file name Tap on Save. File will be exported to the selected folder path Inventory Droid 13 | P A G E Figure 11 Note When you export an account details using Export to CSV option ,only the item details will be exported to a CSV file(account settings will not be exported). 2.9. Import Account Inventory Droid provides facility to import account details using CSV or IDA file formats. 2.9.1. Import from Backup Use Import from Backup option to import Account details from a n ida file. To Import Account Backups: 1. Start Inventory Droid 2. Press menu button 3. Select Import from backup option (Figure 12 ) 4. Select ida file path 5. Tap on Open 6. Type Account name, 7. Tap Create, New account will be created with the imported Account data. Inventory Droid 14 | P A G E Figure 12 Note Using Import from backup option you will be able to import all the item details and the account settings (ex: Password). Using this option you can create a new account with all details in previously exported account. 2.9.2. Import from CSV You can import item data from CSV file using Import from CSV option. It is recommended you to use CSV file format which you have Exported using Export to CSV option. To Import from CSV 1. Start Inventory Droid account which you want to import items 2. Press menu button 3. 4. 5. 6. 7. 8. Select settings Select Import/Export tab(Figure 13 ) Tap Import data from CSV Tap OK in popup warning message(Figure 14 ) Specify file path where you have saved the CSV file Tap on Open. Item data will be imported to the inventory list. Inventory Droid 15 | P A G E Figure 13 Note: Inventory Droid requires strict CSV formating when data is being added using a CSV. To rule of thumb and best way to make sure things work well is to: 1. Export the account you want to import to into CSV. Do this by going into account Press Menu->Settings->Import\Export tab->Export Data to CSV 2. Move the exported CSV to your PC and delete all entries except the header line and one item entries. This item entry will be used as an example to import all new entries. 3. Using the previous entry as examples or placeholders, add your entries to match in format and field alignment. 4. Make use to follow those rules: o You MUST keep the field headers o You MUST align fields and include empty commas. o Date format MUST be YYYY-MM-DD (ex: 2010-01-09). Excel might change this format to 2010/1/9, so make sure you change it to YYYYMM-DD. o If as field has quotes ' " ', Example: 34" make sure you rename it to 34in instead, since quotes are translated to boundary limit items. o Keep in mind that the item is considered identical to another if: a) Same UPC b) Same Name c) Same Serial# So keep those unique between items.. Inventory Droid 16 | P A G E o Beware of Excel, it sometimes adds characters and messes up CSV formatting. Make sure you using Notepad or NotePad++ or another simple Text Editor and create CSV file. If you are having issues, email me at [email protected] the following: 1) The account in "ida" format file . Press Menu->Settings->Import\Export tab->Export to Backup 2) The CSV file you are having trouble importing. Figure 14 3. Inventory Management You can Add, Scan, Edit, Search & Delete items as required. 3.1. Add New Items Inventory Droid gives you the facility to add an item or to add multiple items to your inventory List. Items can be added manually or using item scanner. 3.1.1. Add Items using Barcode Scanner Using the Barcode Scanner feature, you can scan the UPC (Universal Product Code) of an item and then search matching items in search engines like Google, Amazon, and upccheck.com. This feature enables the users to fill UPC easily and add items with ease. To scan Barcode and add item: Inventory Droid 17 | P A G E 1. Login to the Inventory Droid Account 2. Press Menu button 3. 4. 5. 6. Tap on the Scan item capture the Barcode of an item using Android camera UPC field will be filled and Tap update (Figure 17 ) Tap on That‟s It to add items to the list, Another description, or Forget It to ignore it.(Figure 18 ) 7. Tap Save. Item will be added to the inventory list Figure 17 Figure 18 Inventory Droid 18 | P A G E 3.1.2. Add items manually To Add New Item Manually: 1. Login to your Inventory Droid account 2. Tap Add Item (Figure 19 ) on Account page or through Menu button. 3. Type Item data 4. Tap Save. Item will be added to the inventory list. Figure 19 Figure 20 Inventory Droid 19 | P A G E Note Following Item fields can be added when manually adding an Item to the Inventory list. Category Brand Location Cost Retail Cost Currency Model Serial# Quantity-to put negative quantity value UPC Purchase Date Purchase Location Photos of Item Photos of Receipts Notes on Loan Reminders (Name, Date, Loaned to or from options) 3.2. Managing Existing Items When a scanned item is found to be already in Inventory because of a matching UPC or Serial Number (only for custom barcodes), Inventory Droid will popup a message box with multiple options to help manage Inventory. (Figure 21) Those options are: 1. The current amount of items in Inventory will be disp layed. 2. An option to Increase or Decrease the inventory quantity will be provided. (If decimal quantity support is enabled, increments will be in decimal else in whole numbers) 3. An option to create a completely new item description in Inventory for this UPC. 4. An option to delete this item from Inventory. 5. An option to view this item description in Inventory. 6. An option to move a certain amount of item quantity from this account to another account. (example: warehouse to shipping dock) NOTE: Both the source and destination accounts needs to be similar in fields and options. ie: one should be a clone of the other. 7. Image, if available, of the Inventory Item for verification. Inventory Droid 20 | P A G E Figure 20 Figure 22 3.3. View Item list You will be able to list all the items you have added to your account. To view Inventory list: 1. Login to your Inventory Droid Account Inventory Droid 21 | P A G E 2. Tap on List Inventory button. All inventory items will be listed in the selected account (Figure 23) Figure 23 Figure 24 Note You can sort these items (Ignore a/an/the in sorting ) and align these items as require. Inventory Droid 22 | P A G E 3.4. Search Items If you wish to search for a particular item, you can do so using the search option which is available in the Main window. To perform an item search: 3. Login to your Inventory Droid Account 4. Enter search details (Figure 25) 5. Select the category if you know 6. Tap Search Inventory button ,search results will be displayed in the window Figure 25 Figure26 Inventory Droid 23 | P A G E 3.5. Delete an Item This feature provides facility to remove a Single item or to Remove Multiple items from your Inventory Lists, in one go. To delete an item: 1. Search Item or select List Inventory and select item which you want to delete 2. Press and Hold on Item name 3. select Delete (Figure 27) 4. select Yes from the popup message, Item will be removed from the inventory list Figure 27 Delete all items The Delete all feature, should be used if you want to delete all items from inventory list in one go. To delete all Items: 1. Log into the Inventory Droid Account 2. Tap Menu button 3. Select settings ( Figure 28) 4. Select Extra settings Tab 5. Tap Delete All Items button (Figure 29 ) 6. Click Yes from the popup message, all items in selected account will be deleted. Inventory Droid 24 | P A G E Figure 28 Figure 29 3.6. Edit an Item Inventory Droid allows you to update items detail after adding it to the inventory list.. 1. Search Item or select List Inventory and select item which you want to edit. 2. Do the modification as you required. 3. Tap Save .Modifications will be saved to the selected item. Inventory Droid 25 | P A G E Figure 30 3.7. View a Photo Image If an item has an image for Photo or Receipt, the thumbnail of the photo will appear in item description area. To view the full image: 1. Search Item or select List Inventory and select item which you want to edit 2. Press on Photo box (or press and hold on Photo box, then press view). (Figure 31) Inventory Droid 26 | P A G E Figure 31 3.8. Add a Photo Image to an Item Inventory Droid allows you to add images to items you have added. Images can be added when you manually Adding an item or editing an item. To add images to item: 1. Search Item or select List Inventory and select item which you want to edit 2. Tap Snap a photo button () (Figure 31) 3. Capture the snap of an item 4. Tap save. 5. ITEM Photo or receipt will be added. Note If images are available for the scanned items, it will be added automatically. 3.9. Add an Existing Photo to an Item Inventory Droid allows you to add existing images to items you have added. Images can be added when you manually Adding an item or editing an item. To add images to item: 1. Search Item or select List Inventory and select item which you want to edit 2. Press and hold on Photo box Inventory Droid 27 | P A G E 3. Press on “Add existing photo” (Figure 32 ) 4. Browser your phone and choose a photo. 5. ITEM Photo or receipt will be added. Figure 32 Note If images are available for the scanned items, it will be added automatically. 3.10. Remove an Image You can remove Photo once you added it into an item. To remove Photo: 1. Search Item or select List Inventory and select item which you want to Remove Photo 2. Press and Hold on the photo 3. Tap remove (Figure 32 ) 4. Tap Yes from popup message. Photo will be removed from the Item details. Inventory Droid 28 | P A G E 3.11. Get Item Retail Price This feature provides facility to get the Retail price from Google Products site for Single item, in one go. To get Retail Price an item: 1. Search Item or select List Inventory and select item which you want to copy 2. Press and Hold on Item name(Figure 33) 3. select Retail Price. Browser will open to Google Products for that item. Figure 33 3.12. Copy an Item to another Account This feature provides facility to copy a Single item to another account in Inventory Droid. To Copy an item: 4. Search Item or select List Inventory and select item which you want to copy 5. Press and Hold on Item name (Figure 33) 6. select Copy to Account 7. select account from the popup list, Item will be copied to other account. Inventory Droid 29 | P A G E 3.13. Copy an Item to another Category This feature provides facility to copy a Single item to another category in Inventory Droid. To Copy an item: 1. Search Item or select List Inventory and select item which you want to copy 2. Press and Hold on Item name(Figure 33) 3. select Copy to Category 4. select account from the popup list, Item will be copied to other category. 3.14. Change Quantity This feature provides facility to change the quantity item of an item in Inventory Droid. To change an item Quantity: 5. Search Item or select List Inventory and select item which you want to copy 6. Press and Hold on Item name (Figure 33) 7. select Change Quantity 8. Edit the quantity and press “OK” 4. Location Management Once you have added an Item you can its location from a list of locations or type in a new location. Inventory Droid provides with the facilities to create, delete, rename locations 4.1. Create a Location You can create Location using two methods. To create location: (method 1) 1. Login to Inventory Droid Account 2. Press Menu button 3. Tap on Locations ( Figure 34 ) 4. Again press Menu button 5. Tap New Location 6. Type Location Name (Figure 35 ) 7. Tap Create Location will be created and it (Figure 36 ) To create location: (method 2) 1. Login to Inventory Droid Account 2. Enter an item description page. 3. Go to Location edit box 4. Type in a new location 5. Press “Add” (Figure 37 ) Inventory Droid 30 | P A G E Figure 34 Figure 35 Figure 36 Inventory Droid 31 | P A G E Figure 37 Inventory Droid 32 | P A G E 4.2. Rename a Location You can rename already created location. To rename location: 1. Login to Inventory Droid Account 2. Press Menu button 3. Tap on Locations (Figure 34) 4. Press and Hold on location name you want to rename 5. select Rename from Manage Location(Figure 38 ) 6. Type new name 7. Tap rename button .Location will be renamed and display in the Location list. Figure 38 4.3. Delete a Location Once you added location you can delete. To delete location: 1. Login to Inventory Droid Account 2. Press Menu button 3. Tap on Locations (Figure 34) 4. Press and Hold on location name you want to delete (Figure 38 ) 5. select Delete from Manage Location 6. Tap on require option in popup window Inventory Droid 33 | P A G E 5. Category Management Once you have added an Item you can categorize it as you required. Inventory Droid provides with the facilities to create, Delete, rename & view categorized items. 5.1. Create a Category You can create category using two methods. To create category: (method 1) 1. Login to Inventory Droid Account 2. Press Menu button 3. Tap on Categories 4. Again press Menu button 5. Tap New Category 6. Type category Name(Figure39 ) 7. Tap Create category will be created and it will display under item details All categories list. (Figure40 ) To create category: (method 2) 1. Login to Inventory Droid Account 2. Enter an item description page. 3. Go to Category dropdown 4. Press “Add” 5. Enter new Category name and press “OK” 6. New Category will be automatically chosen. Inventory Droid 34 | P A G E Figure 39 Figure 40 Note If you don‟t want to allocate an item to a category you can select „No category‟ from category list. Inventory Droid 35 | P A G E 5.2. View Category You can view Items under selected category using this feature. To view category: 1. Login to Inventory Droid Account 2. Press Menu button 3. Tap on Categories 4. Press and Hold on category name which you want to view 5. Select view from Manage category. Items allocated to the selected category will be displayed (Figure 41 ) Figure 41 5.3. Rename a Category You can rename already created category as you required. To rename category: 8. Login to Inventory Droid Account 9. Press Menu button 10. Tap on Categories 11. Press and Hold on category name which u want to rename 12. select Rename from Manage category 13. Type new name(Figure42 ) 14. Tap rename button .category will be renamed and display in the category list. Inventory Droid 36 | P A G E Figure 42 Figure 43 5.4. Delete a Category Once you added category you can delete. To delete category: 7. Login to Inventory Droid Account 8. Press Menu button 9. Tap on Categories 10. Press and Hold on category name which u want to rename 11. select Delete from Manage category 12. Tap on require option in popup window Inventory Droid 37 | P A G E Figure 44 Figure 45 Note If you select „Delete all items in this category‟ option, it will delete category as well as all the items allocated in to that category. If you select „Remove category, leave these items with no category association‟ option, it will remove only the category name and items allocated under that category will automatically assign to „No category‟. Inventory Droid 38 | P A G E 5.5. View Spreadsheet of Total Assets in a Category Category assets will display information such as category name, item name, brand, UPC, QTY, total cost, total assets, etc….in a selected category in a spread sheet. To view spread sheet of category assets: 1. Login to Inventory Droid Account 2. Press Menu button 3. Tap on Categories 4. Press and Hold on category name which u want to view spread sheet of category assets 5. Select category assets from category management Spread sheet will be displayed with all assets in the selected category.(Figure 46 ) Figure 46 Inventory Droid 39 | P A G E Figure 47 6. Account Settings Inventory Droid‟s Account setting allows you to change account password, set default settings of an account, change inventory list settings etc… 6.1. Change Account password Inventory droid allows you to set the password for your account in order to enhance your security. You can change these Passwords at any given time. To change password: 1. Login to Inventory Droid Account 2. Press Menu button 3. 4. 5. 6. Tap on settings Go to General settings tab Type old password and new password Tap save. Password will be changed. Inventory Droid 40 | P A G E Figure 48 6.2. Set the Default Settings of an Account This feature allows you to set the default settings of your account. To set default account: 1. Login to Inventory Droid Account 2. Press Menu button 3. Tap on settings 4. Go to General settings tab 5. Set the default setting as required. Default Currency - List of world currencies. Default Image Size- High is max of 3.2MP, me dium is half of maximum, and low is thumbnail size. Copy UPC To– this will automatically copy the UPC String to another selected field upon scanning. Quick Scan(scan back to back ite ms) – Continuous scanning back to back without having to press "Scan" button Disable Item Description search – this will disable the item description search Prompt for Scan Ite m Quantity – when adding items using barcode scanning it will prompt to set item quantity if this is enabled. Enable Negative value Quantity – you will allow to put negative values for the Item Quantity. Ignore a/an/the in sorting – if this is enable Articles in front of the item name (a/an/the) will ignore when sorting items Enable decimal value quantity – for decimal quantity values and arithmetic. 6. Tap save Inventory Droid 41 | P A G E Figure 49 6.3. Change the Inventory List Settings You can change the inventory list settings using this feature. 6.3.1. Select default Currency Inventory droid support multiple currencies such as USD, ARS, CAD, CHF, etc… To set default currency: 1. Login to Inventory Droid Account 2. Press Menu button 3. 4. 5. 6. Tap on settings Go to General settings tab select Default currency Tap save. Selected currency will be saved as default currency. Figure 50 Inventory Droid 42 | P A G E Note You can change the currency when you adding a new item or editing an item. 6.3.2. Default Image Size Inventory droid supports three levels of image resolutions and sizes. This image resolution setting is only for images taken by phone‟s or device‟s camera, and NOT for images downloaded from online database sites. Since phone and device camera resolution keep increasing with new phones and technologies, it is important to manage the size of such images since a 5MP camera phone results in a 1.5Mbyte image, which in part takes lots of space. The default setting for images resolution for new accounts is set to Medium, where: Full size = Full Camera Resolution (max is 3.2MP) Medium size = Full divided by 2 Low size = Lowest resolution (icon size) To change image resolution: 1. Login to Inventory Droid Account 2. Press Menu button 3. Tap on settings 4. Go to General Settings tab 5. Select Default Image Size. 6.3.3. Align Items You can align items in Inventory droid list as you required. To align items: 6. Login to Inventory Droid Account 7. Press Menu button Inventory Droid 43 | P A G E 8. Tap on settings 9. Go to List settings tab 10. select the align option Center – list items will be align in the middle Left – list items will be align to left 11. Tap save from General settings Tab. Figure 51 6.3.4. List Account Items with Second Column of Your Choice. You can manage columns in your inventory list as you required To manage column in inventory list: 1. Login to Inventory Droid Account 2. Press Menu button 3. Tap on settings 4. Go to List settings tab 5. select column option One column – only the item name will be displayed in inventory list Two column – two columns will be displayed in inventory list with item name and the selected column. 6. if select two column, select the column name which you want to display 7. Tap save from General settings Tab. NOTE : v2.23 introduced the option of listing Custom Fields as second column items. Please note that choosing custom fields as second col umn is processor intensive and will make the Item View List appear very slow (del ays from 15secs to 50 secs). So it is recommend not to use custom fiel ds as second col umn i tems. Inventory Droid 44 | P A G E Figure 52 6.3.5. Zero all Account Item Quantities Using this feature you can make zero all items quantity in your account in one go. To zero all item quantity: 1. Login to Inventory Droid Account 2. Press Menu button 3. 4. 5. 6. Tap on settings Go to Extra settings tab tap on Zero all items quantity Tap Yes from popup message. Quantity of all items will be zero. Figure 53 Inventory Droid 45 | P A G E 6.4. Manage Item Fields You enable/disable existing fields or can add new field to your item details as you required. 6.4.1. Enable/disable existing fields To enable/disable existing field: 1. Login to Inventory Droid Account 2. Press Menu button 3. 4. 5. 6. 7. Tap on settings Go to general settings tab Tap item field settings Tap on field name to enable/disable Tap save .selected fields will be enable or disabled from the item details. Figure 54 Figure 55 Inventory Droid 46 | P A G E 6.4.2. Create new field To create new field 1. Login to Inventory Droid Account 2. Press Menu button 3. 4. 5. 6. 7. Tap on settings Go to general settings tab Tap item field settings Go to custom field tab Press Menu 8. Tap on new field 9. Type field name & units 10. select field type & place below 11. if type is numeric or alphanumeric, then you have an option to make it “scannable”. This will add a “Scan” button next to the field in the item view. 12. If “scannable” is enabled. A new option is enabled for selection if needed. This option will “Copy To Name” field the scanned custom field text. 13. tap on create 14. Tap save from General settings Tab. new field will be added to the item details and it will be list in custom field tab. Inventory Droid 47 | P A G E Figure 56 Note Units- select the unit of an item (KG, M, and cm….etc) Field type – if select Numeric you can put numbers in the field, if you select alphanumeric you can put numbers as well as the characters to the field, and if you select Date you can enter dates, Boolean for Checkbox style of data, and List for a drop down list. Place below- position of the newly added field (can select the field which should be displayed before the new field) Is It Scannable- Will add a “Scan” button next to the field for easy inputting of data with barcode scanner. Copy to Name field- Will copy a scanned custom field value to the Name field. Default Value- will set a default value for newly created items. It will not set default for previously added items. NOTE - SPECIAL CASE: For list custom field, the list of options is created by setting the values as comma separated in the "Default Value" box. Ex: for a drop down list with FedEx, UPS, DHL, USPS the user would enter " FedEx,UPS,DHL,USPS" If a default is needed for this list, the default value should be encapsulated with curly braces { }. Ex: for a drop down list with FedEx, UPS, DHL, USPS and DHL as default, the user would enter " FedEx,UPS,{DHL},USPS" Inventory Droid 48 | P A G E 7. Search Options Inventory Droid‟s supports search options from supported countries under Amazon and Google. To change your Amazon and Google search country, do the following: 1. Login to Inventory Droid Account 2. Press Menu button 3. Tap on settings 4. Go to Search Options 5. Choose Amazon and Google Base countries. NOTE: The search results and their accuracy are dependent on Google and Amazon and their availability and activeness in set country. 8. Custom Barcode Scanning Inventory Droid‟s Custom Barcode Scanning allows the user to create custom 250 text QR Codes using sites as in: http://www.google.com/search?q=qr+code+generator&ie=utf-8&oe=utf8&aq=t&rls=org.mozilla:en-US:official&client=firefox-a 8.1. In General Those custom barcodes can be created in a way to auto- fill into Inventory Droid upon scanning by using comma separated fields following the syntax: @#@ , <ITEM NAME>, <CATEGORY> , <OTHER FIELD1> , …, <OTHER FIELDn> 8.2. Creating Custom Barcode To create a custom barcode to use with Inventory Droid do the following steps: 1. Do an Export to CSV of the account you want to use custom barcodes with. Inventory Droid 49 | P A G E 2. Edit the resulting CSV file by removing all lines EXCEPT the first. You will be left with something like: Name,Category,Brand,Location,Cost,Retail Cost,Currency,Model,Serial,Quantity,UPC,Purchase Date,P urchase Location,Notes 3. Replace the field names with your item information. Example: Samsung Phone,Home Stuff, Samsung, At home, 400.00, 500.00, USD, 9H11,,,,463246933459,2010-10-25,Best Buy, Android Note: a) Make sure to keep place holders for ALL fields not used by using empty commas “,,” b) Make sure to following the YYYY-MM-DD date syntax c) Make sure the Category exists already in Account. d) Make sure currency is valid (USD,EUR,CAN…etc) 4. Add custom barcode symbol @#@, to beginning. Example: @#@,Samsung Phone,Home Stuff, Samsung, At home, 400.00, 500.00, USD, 9H11,,,,463246933459,2010-10-25,Best Buy, Android 5. Go to your favorite QR Code creator site. Ex: http://qrcode.kaywa.com/ 6. Create a “Text” QR code and fill it with the following line: @#@,Samsung Phone,Home Stuff, Samsung, At home, 400.00, 500.00, USD, 9H11,,,,463246933459,2010-10-25,Best Buy, Android Inventory Droid 50 | P A G E 8.3. Scanning Custom Barcode To scan a custom barcode is similar to scanning any commercial barcode. The difference is that custom barcodes provide more user-specific information that will be auto-filled. Use Add Items using Barcode Scanner. 9. Inventory Desk Inventory Desk is FREE utility that was created to compliment the Android-based Inventory Droid application. The initial and current releases will be limited in features but eventually this application will provide mechanisms to add/remove/edit items from Accounts created with on Android with Inventory Droid. Those changes can be reimported back into Inventory Droid for use. The current release only supports Windows (XP/Vista/7) based host machine. 9.1. Syncing Inventory Droid and Desk Currently, Inventory Droid and Desk can only sync using .ida files. Many tools are readily available to easily move .ida files between Android phone and Desktop PC. Steps for moving .ida to Inventory Desk: 1) Do an Export to Backup on the account. 2) Use one of the following methods to copy .ida to PC: a. Mount your Android Phone using USB Cable as Mounted Drive and copy .ida. b. Use Dropbox or similar application. c. Email the .ida to yourself. 3) Open .ida on Inventory Desk. Steps for moving .ida to Inventory Droid: 1) Save your .ida. 2) Use one of the following methods to copy .ida to Android: a. Mount your Android Phone using USB Cable as Mounted Drive and copy .ida. b. Use Dropbox or similar application. c. Email the .ida to yourself. 3) Do an Import from Backup to import .ida. Inventory Droid 51 | P A G E 9.2. Export CSV with Images You can export the information in IDA files with their accompanying images in Inventory Desk using “Export with Images”. This will create a n CSV file with links to images in a folder on the same path level. To make these image paths clickable: 1) Open the exported .csv file using Excel. 2) Without editing it, click “Save As” and save file as an .xls 3) Open the newly created .xls and click on an image file name to see it. Inventory Droid