1
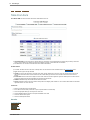
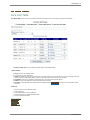
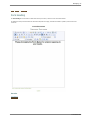
Form Master 2008
User Manual
Created: Friday, September 04, 2009
Form Master 2008
Welcome
Welcome to the Form Master 2008 User
Guide. The guide presented here will help you
the user, get up and running quickly with Form
Master 2008 for DotNetNuke®
Table of Contents
1
2
Welcome
1
Support
2
Installation
3
System Requirements
Installing Form Master 2008
3
Getting Started
About Form Master
Form Submit Workflow
Form Elements
Menu Items
4
5
Settings
6
7
8
9
10
11
Form Settings
Other Settings
12
14
Basic Functions
18
Form Layout
Tab Index
Adding Fields
Common Options
Textbox
Checkbox
Dropdown List
Listbox
Checkbox List
Radiobutton List
Label
File Upload
Submit Button
Hidden Field
Field Options
Auto Fill Options
Textbox Options
Field Query Options
Send Value By Options
Validation
Requred Field Validator
Regular Expression Validator
Compare Validator
Checkbox List Validator
Validation Summary
Localization
File Management
6
4
5
Data Manager
The Connection String
Map Existing Table
Table From Form
19
21
22
23
25
26
27
28
29
30
31
32
33
34
36
37
38
39
40
41
42
43
44
45
46
47
48
49
50
51
52
Form From Table
The Mapped Form
Edit Mappings
External Table Mask
7
Formatting
Form Formatting
Email Formatting
XSL Templates
Tokenized Templates
Custom Template
8
Reports
Viewing Reports
Downloading Reports
9
Messaging
53
54
56
57
58
59
61
62
63
64
65
66
67
68
Form Heading
Form Thank You
Auto Responder
69
70
71
10 Advanced Functions
72
Silent Post
Field Rules
User Manager
73
74
76
Welcome . 1
Form Master 2008
User Guide
Installation
Getting Started
Settings
Reports
Messaging
Advanced Functions
Basic Functions
Data Manager
Formatting
Welcome
Welcome to the Form Master 2008 online help system. Browse through the help pages by clicking on the links above or selecting pages in the
table of contents. To quickly find specific product information, enter search criteria in the search box above and click the search button.
Ask Someone
If you're unable to find what you're looking for in this help system, try these alternative resources, or contact our customer support
department.
Most popular pages
●
Welcome
●
Support
●
Settings
●
System Requirements
●
Other Settings
●
Getting Started
●
Installation
●
Validation
●
Data Manager
●
About Form Master
Form Master 2008
2 . Welcome
Home > Welcome > Support
Get help from Customer Support or other resources
Ask Someone
Post a question or search for an answer in our online User Forum.
Knowledgebase
Search the Knowledgebase for common bugs, tips & tricks, and compatibility issues with other
software.
If you're unable to find what
you're looking for in this help
system, try these alternative
resources:
●
User Forum
●
Knowledgebase
●
FAQ
Contact our support department:
Email: Email Support
Customer Support
Contact our customer support department by email at Email Support
Form Master 2008
Installation . 3
Home > Installation
Installation
Topics in this section
System Requirements Installing Form Master
2008
See also
Welcome
Getting Started
Settings
Basic Functions
Data Manager
Formatting
Reports
Messaging
Advanced Functions
Form Master 2008
4 . Installation
Home > Installation > System Requirements
System Requirements
Platform:
DotNetNuke® Version 4.5.2 or Later. Form Master 2008 has been tested to DotNetNuke® Version 5.1.2 which was the latest version available when
this help was published.
Database:
Form Master 2008 is designed to use the Microsoft® SQL Server version listed below.
●
SQL Server 2005 Express
●
SQL Server 2005 Standard, Workgroup, and Enterprise
●
SQL Server 2008 Express
●
SQL Server 2008 Standard, Workgroup, and Enterprise
See also
Installing Form Master 2008
Form Master 2008
Installation . 5
Home > Installation > Installing Form Master 2008
Installing Form Master 2008
BACKUP YOUR DATABASE!!!
BACKUP YOUR FILES!!!
BEFORE INSTALLING ANY MODULE!!!
********************** IMPORTANT *******************************************
If you have modified the default TokenIzed or XSL templates, please
backup these files prior to installing the module, then replace them
after installation is complete.
****************************************************************************
1.
Unzip the file FormMaster_DNN4_02.XX.XX_UNZIP_ME.zip or FormMaster_DNN4_02.XX.XX_SRC.zip
2.
Included in the file is FormMaster_DNN4_02.XX.XX_PA.zip
3.
Login as host
4.
Under the host menu select Module Definitions
5.
Hover over the Module Definitions Action Menu, select Upload New Module
6.
Click the Browse button and find FormMaster_DNN4_02.XX.XX_PA.zip
7.
Click Add
8.
After the file is done uploading click Upload New File
9.
On the results page check that there were no errors installing the module
10.
You are done
As always it is recomended that you install into a test environment
similar to your production environment, and of course backup all
data and disk files before installing or upgrading any module in test
or production.
DO NOT DELETE ANY PREVIOUS VERSION OF FORM MASTER
Data loss will occur if the module is deleted
See also
System Requirements
Form Master 2008
6 . Getting Started
Home > Getting Started
Getting Started
Topics in this section
About Form Master Form Submit Workflow
See also
Welcome
Installation
Settings
Basic Functions
Data Manager
Formatting
Reports
Messaging
Advanced Functions
Form Master 2008
Form Elements
Menu Items
Getting Started . 7
Home > Getting Started > About Form Master
About Form Master
Form Master 2008 is a form creation module for the DotNetNuke® Content Management System. Form Master 2008 allows an average user to create a wide
variety of input forms comprising all the common Input Controls available for any web page quickly and easily. As needs become more complex, Form Master
2008 provides the advanced user with the flexibility and tools to include a high degree of functionality in one complete package. Listed below are the functional
areas which will be discussed in more detail later in this User Guide.
1.
Form Creation
2.
Input Validation
3.
Data Storage
4.
Email
5.
Auto Responder
6.
Post Submission Options
7.
Data Retrieval
8.
User Registration
See also
Form Submit Workflow
Form Elements
Menu Items
Form Master 2008
8 . Getting Started
Home > Getting Started > Form Submit Workflow
Form Submit Workflow
See also
About Form Master
Form Elements
Menu Items
Form Master 2008
Getting Started . 9
Home > Getting Started > Form Elements
Form Elements
Form Master end user interface is made up of several HTML elements which will be referred to in other sections of the User Guide.
See also
About Form Master
Form Submit Workflow
Menu Items
Form Master 2008
10 . Getting Started
Home > Getting Started > Menu Items
Menu Items
●
●
Form
❍
Edit Form: This is where you will spend the majority of time. This section provides the tools to design the form
❍
Form Query: The Form Query Editor allows for Getting Data from Database Tables, Spreadsheets, Text Files and other Data Sources
supported by ADO.NET. This data can then be used to Auto Fill fields on the form based on the query Where clause. Note: Form Query is
available for Super Users and users in the Administrators Role only.
❍
Field Rules: The Field Rules page allows you to define rules which will show or hide fields on the form based on the value of other fields on the
form. For example of Region is Other then show the Other Text Box field
Settings:
❍ Form Settings: Form Name, Email, Database, and Captcha settings
❍
Other Settings: Other specific functionality settings can be seen
❍
Web Service Settings: Used to setup Authorization and get the URL for the Web Service. Note: Web Service Settings is available for Super
Users and users in the Administrators Role only.
❍
Data Manager: The Data Manager allows for Mapping Existing Fields to a Data Table, Create Table from Form, or Create Form from
Table. Note: Data Manager is available for Super Users and users in the Administrators Role only.
❍
User Manager: The User Manager page allows you to Register a User and include them in multiple Roles when the Form is Submitted. Users
who are already Logged in, can be added to Roles. Note: User Manager is available for Super Users and users in the Administrators Role only.
●
Files: Used to View and Manage uploaded Files
●
Messaging:
❍ Form Heading: Used for creating the form heading or introduction above the start of the form entry fields
❍
Form Thank You: Used for creating the message displayed after the user submits the form
❍
Auto Responder: Used for designing the Auto Responder Email
❍
Custom Template: Used for designing the Custom Email Template
●
Report: Used for viewing or downloading collected data
●
Exit: Leave the Form Master Edit menu
●
User Guide: A link to the online User Guide
See also
About Form Master
Form Submit Workflow
Form Elements
Form Master 2008
Settings . 11
Home > Settings
Settings
Topics in this section
Form Settings
Other Settings
Settings in Form Master are Controled in the "Form Settings" page and the "Other Settings Page"
See also
Welcome
Installation
Getting Started
Basic Functions
Data Manager
Formatting
Reports
Messaging
Advanced Functions
Form Master 2008
12 . Settings
Home > Settings > Form Settings
Form Settings
Form Settings
The Form Settings page allows for setting options for email, saving of data etc. Shown below is the form with a description of each field below. The setting here
are saved when the form is exported using the Export menu item in the module action menu.
1.
Form Name: The form name is used in the Subject for emails, and for the Cookie name when the form is in Survey Mode. Form names should be
unique for each domain name for the Survey Mode feature to work properly.
2.
Table Class: The class name for the “Inner Table” in the Elements section above.
3.
Send to Action: There are four options described below:
❍ None: No email is sent when the form is submitted
4.
5.
❍
Use Admin Email: Email is sent to the Site Administrator when form is submitted
❍
User Defined: Email is sent to the email address entered in the “To Email:” textbox. Multiple recipients can be entered separtated by a semicolon.
❍
Use Form Value: Email is sent to the email address in a selected form field. This is useful for example: A Dropdown List could contain Regions
with the value of each region being an email address of the person responsible for covering that region.
To Email: Depending on the value of the “Send To Action” this can be:
❍ A Disabled Textbox
❍
An Enabled Textbox
❍
A Dropdown list of Fields defined on the form
Send From Action: This is important when the recipient of the email hits Reply in their Email client. There are three options described below:
❍ Use Admin Email: The email is send from the Site Administrator
❍
User Defined: Email is sent from the email address entered in the “From Email:” textbox
❍
Use Form Value: Email is sent from the email address in a selected form field.
6.
From Email: Depending on the value of the “Send From Action” this can be the same as the “To Email” field in #5 above
7.
Show CC Me on Form: This will enable/disable the checkbox at the bottom of the form so users can be Carbon Copied on the email which is sent.
8.
CC Me Email: When “Show CC Me on Form” is checked allows for the selection of the form field to use to send a copy to the user.
9.
BCC: Use the Blind Carbon Copy to send an email to any email address entered in the Textbox. Multiple recipients can be entered separtated by a semicolon.
Form Master 2008
Settings . 13
10.
Save Data to Database: When checked, saves for form data to the database for later retrieval
11.
Use Captcha: Check to Enable the use of the the DotNetNuke Captcha Requirement on the Form
12.
When "Use Captcha" is Checked, specify the Characters which will be used in the Captcha Image (optional)
See also
Other Settings
Form Master 2008
14 . Settings
Home > Settings > Other Settings
Other Settings
●
Main Form Table Width: This is the width in Pixels or Percentage for the “Outer Table” shown in the Elements Section above
●
Main Form Table Class: This it the class name for the “Outer Table” shown in the Elements Section above.
●
Form Table Width: The width of the table which contains all the controls. This table is inside the Main Table which contains the Header text in the
First Row and the Form Table in the Second Row. This value can be a whole number or a percentage.
●
Form Table Height: The height of the table which contains all the controls. This table is inside the Main Table which contains the Header text in the
First Row and the Form Table in the Second Row. This value can be a whole number or a percentage. Percentage does not work with all browsers.
●
Outer Table Alignment: This is the Outer Table which contains the Heading Message in the top row and the Form in the second row.
●
Inner Table Alignment: This is the Inner Table which directly contains the fields and is contained in the Outer Table
●
Survey Mode: When checked prevents users from submitting the form more than once. When using this mode, the “Redirect after Submit” must be
set to a value other than “None”. Default un-checked.
●
Allow Anonymous uploads: When unchecked any File Upload field will be disabled for anonymous users. Default un-checked.
●
Authenticate File Downloads: When a file is uploaded, a link is created in the email to the downloaded file. When this is checked, only users with
Edit privileges on the module will be allowed to download the file. Default is checked.
●
Hide Posted By in Reports: By default Form Master will add the Submitted by column to the posted data and in the email. Checking this option
removes the data. Default un-checked.
●
Use Form Field for Email Subject: When checked, the Field Value specified in the Dropdown List will be used as the Subject line
●
Second Field Valut for Email Subject: Optionally Select a Second Field Value to Apend to the Subject Line selected in #14
●
Silent Post Url: Url to which a Silent Post of Form Data is made on Submit.
Form Master 2008
Settings . 15
●
Send Auto Responder User: If Checked, the form will send an Email Auto Responder using the Field value selected in the Dropdown List.
●
Auto Responder From Email: Specify the Auto Responder From Email address. For Exaimple ([email protected].
●
Auto Response Subject: Specify the Email Subject for the Auto Responder Subject Line
●
Auto Responder File Attachment: Specify a File to be attached to the Auto Responder Email. Usefull for Softare Trials etc.
●
Redirection After Submit: There are four options for redirection described below:
❍ None: No redirection the Thank You page is shown by default
❍
URL: This allows the user to enter any valid Internet Address.
❍
Page: This allows the user to select a page within the site
❍
File: This allows the user to select a file on the server for download to the user’s browser. When this option is used the default Thank You
message is shown and for most Browsers (User Agents), the file download should automatically start. A link to the file is provided for those
browsers which block automatic downloads.
●
Email Encoding : Form most installations using the Default value will work just fine. If there are problems with the email containg strange characters,
expirimenting with the other encodings may help with the problem.
●
Email Template: Form Master offers two Template styles for formatting the email message which are described below:
Form Master 2008
16 . Settings
❍
Text Template: The text templates can be used for “Plain Text”, or “Html” formatting. For each format the file contains text with replaceable
tokens to insert the form data.
The files can be found in the Templates folder in the Module root. Copying these files to a new folder under the Templates folder allows for
creating multiple templates on a Host.
To Make Templates which are Specific to Individual Portals Create a Folder Under the Templates Fold corresponding the the Portal's PortalID
for example Templates/0
Each format is made up of three files with the .TXT extension for “Plain Text” and .HTM for “Html”:
■
HEADER
❍
■
ITEM
■
FOOTER
XSL Templates: The XSL templates are available for those users familiar with XSL style sheet transformations. For version 1.1, this was the
default method for formatting the email message.
The XSL Templates offer the advantage of being able to supply a unique custom template for each instance of Form Master without affecting
any other instance. A sample data document located as “assets/xml/SampleData.xml” from the module root can be used to develop the XSL
style sheet.
The “Text”, or “Html” format default style sheets can be found at “assets/xslt”, EmailSend.xslt and EmailSendHtml.xslt. It is recommended that
not to overwrite these files, but rather upload a custom style sheet using the “Upload Custom Email Style Sheet” option.
❍
Custom Template: A Custom Template can be designed using the HTML Editor and the Field Tokens defined when creating the Form. This
Template type is by Default sent in HTML format.
●
Text Template: Only “default” is available in the Dropdown List until new templates are added by copying the default files to a new folder as noted in
19.1 above. When new templates are available the folder name will appear in the Dropdown List.
●
Send HTML formatted Email: By default Form Master sends email in “Plain Text” format, If “Html” format is needed, simply check this box, and the
default template with be used, for either style of template. (Custom Template is HTML always)
●
Send Multipart Email: Check to Send HTML email with a Text Section for Email Readers which cannot of choose not to show HTML (Note: Only
applies to HTML emails) Checked by Default.
●
Use custom Email XSL Stylesheet: To use a custom XSL style sheet check this checkbox.
●
Upload custom Email Stylesheet: File Upload to upload a custom style sheet when #22 is checked
Vallidation Summary Video
●
Enable Client Script: When checked, enables field validation in the user's browser. When un-checked all validation is done on the Server which forces
a reload of the page.
●
Use Validation Summary: Check to use a Validation Summary Control on the Form. A Validation Summary shows all the Validation Errors in one
central location and/or in an Alert popup box
●
Summary Heading Text: The Text which will appear before any error messages, for example "Errors Have Occurred"
●
Vallidation Summary CSS Class: The CSS class which is used for the displayed Error Messages
●
Show Validation Summary: Check to show the Validation Summary on the Page when a Validation Error Occurs
●
Show Validation Summary Message Box: Check to show an Alert Box when Form Validation Fails
●
Suppress Field Validation Messages: When using the Validation Summary, check this option to stop the Validation Messages from showing under
the Fields
●
Suppressed Field Character: When Supress Field Validation Messages is On. This value will be output to the right of the Field. This value can be any
Form Master 2008
Settings . 17
character, string, or an Image Tag
Example: <img src="/images/required.gif" originalAttribute="src" originalPath=""/images/required.gif"" originalAttribute="src"
originalPath=""/images/required.gif"" />
●
Vallidation Summary Mode: Error Messages can be displayed in three modes: List, Bullet List, or Paragraph
●
Validation Summary Row: Gennerally Validation Summary is placed at the Top or the Bottom of a form. Form Master offers the opton to place the
Summary at any positon
●
Validation Summary Cell Alignment: Select the Cell Alignment for the Error Messaging
See also
Form Settings
Form Master 2008
18 . Basic Functions
Home > Basic Functions
Basic Functions
Topics in this section
Form Layout
File Management
Add Content
See also
Welcome
Installation
Getting Started
Settings
Data Manager
Formatting
Reports
Messaging
Advanced Functions
Form Master 2008
Tab Index
Adding Fields
Field Options
Validation
Localization
Basic Functions . 19
Common OptionsHome > Basic Functions > Form Layout
Form Layout
The Form Master 2008 Form Layout page allows you to add, delete, and Move fields in a visual desinger. The designer includes several options which are
described folowing the Screenshots shown below.
●
Label Posision: Specify where the Label for the Field will be shown. Options are:
❍ Above: The text in the Label Field will be output above the Field in the same Table Cell
●
Cols: The Number of columns in the form table
●
Rows: The Number of rows in the form table
●
Update: Click the Update link to save changes to the settings listed above.
●
Reset Form: Click the "Reset Form" link to delete all Fields from the form. Note: This cannot be undone.
❍
Left: The text in the Label Field will be output to the Left of the Field in a separate Table Cell
The top row of the form layout contain "C:" and the Column number. Clicking on for
example "C:1" opens the Column Manager which will allow you to Insert or Delete
Columns in the form.
The first Column of the form layout contains "R:" and the Row Number. Clicking on for
Example "R:1" opens the Row Manager which will allow you to Insert or Delete Rows
in the form.
●
Add: The "Add" link opens the Input Control Form where a new Form Field can be added.
●
Edit: The "Edit" link allows for editing a Form Field.
●
Move: The "Move" link allows for moving a Field to another location on the form.
●
CS: Column Span for the Field.
●
RS: Rowspan for the Field.
●
TI: Tab Index for the Field. When the user uses the Tab key to move between fields on a form the TI dropdown list can be used to control the order of
the fields the will be move to when the Tab Key if pressed
View the Form Layout Video
Form Master 2008
20 . Basic Functions
See also
Tab Index
Adding Fields
Field Options
Validation
Localization
File Management
Form Master 2008
Basic Functions . 21
Home > Basic Functions > Tab Index
Tab Index
The Tab Index Feature allows for the ordering of the input focus when the user presses the “Tab” key on their keyboard
The Tab Index is set by using the “TI:” dropdown in each field cell while in design mode. Label fields do not participate in the Tab Index.
The Ordering can be Left-Right, then Top-Down.
Setting Left-Right then Top-Down Tab Index Presentation
Or Top-Down, then Left-Right
Setting Top-Down, then Left-Right Tab Index Presentation
In reality, the ordering can be in any combination, these shown are the most common.
See also
Form Layout
Adding Fields
Field Options
Validation
Localization
File Management
Form Master 2008
22 . Basic Functions
Home > Basic Functions > Adding Fields
Adding Fields
Topics in this section
Common Options
Textbox
Checkbox
Dropdown List
Listbox
Radiobutton List
Label
File Upload
Submit Button
Hidden Field
See also
Form Layout
Tab Index
Field Options
Validation
Localization
File Management
Form Master 2008
Checkbox List
Basic Functions . 23
Home > Basic Functions > Adding Fields > Common Options
Common Options
Common Options are common to all types of Form Fields i.e the Textbox, Dropdown List, etc.
●
Type: Select the type of field needed
❍ Textbox
❍
Checkbox
❍
DropDownList
❍
ListBox
❍
CheckBoxList
❍
RadioButtonList
❍
Label
❍
File Upload
❍
Submit Button
❍
Hidden Field
●
Label: The visible Label for the input field.
●
Field Name: The Name which will be used in the Database Colums, and for Columns in Reports
●
Label Align: The alignment of the Label in the Table Cell when Label Position is on Left
❍ Not Set
❍
Left
❍
Center
❍
Right
●
Label Class: The CSS class applied to the Label Default is DotNetNuke "SubHead" class. Portal.css is the best place to define CSS Class Rules
●
Disabled: Disable User input ,useful if user need to see pre-filled data but is not allowed to change it
●
Field Token: A Replaceable Token which is replaced by the Submitted Data in Email messaging and the Thank You message. Usually formatted like
[TOKENNAME]
●
Encrypt Field: Useful for hiding Data on the Web Page such as a List of Email Addresses which are used for the Send To: address on a Lead
Generation Form
●
Allow Markup: Check to allow markup (html tags) in field imput.
●
Width: Specify the Width of the input control in Pixels. Example: 250
●
Controls Align: The alignment of the input control in the Table Cell
❍ Not Set
❍
Left
❍
Center
❍
Right
●
Height: Specify the Height of the input control in Pixels. Example: 150
●
Hide Label: Hides the Label specified in #1. This can be useful when a actual Label Control is used as a heading for a CheckBoxList for example.
●
Exclude Field: Exclude the field from being sent in the Email & Stored in the Database. This is useful when the Silent Post Feature is being used and it
is not necessary to store or email required Hidden fields used in the Silent Post
●
Class: The CSS class applied to the input control. Default is DotNetNuke "NormalTextBox". This field allows for a second Class name separated by a
semi-colon ";" which when present is applied to the Table Cell containing the input control. Portal.css is the best place to define CSS Class Rules
See also
Form Master 2008
24 . Basic Functions
Textbox
Checkbox
Dropdown List
Listbox
Checkbox List
Radiobutton List
Label
File Upload
Submit Button
Hidden Field
Form Master 2008
Basic Functions . 25
Home > Basic Functions > Adding Fields > Textbox
Textbox
The Textbox is the workhorse of most any form, and adding a Textbox only takes a few mouse clicks and keystrokes. In addition to adding a Textbox, this
presentation will introduce:
■
Adding rows to the form
■
Entering a Label for a field
■
Using the Auto-Fill feature
■
Introduce the field management controls
Add Textbox Presentation
See also
Common Options
Checkbox
Dropdown List
Listbox
Checkbox List
Radiobutton List
Label
File Upload
Submit Button
Hidden Field
Form Master 2008
26 . Basic Functions
Home > Basic Functions > Adding Fields > Checkbox
Checkbox
The Checkbox is a very simple field control to add to the form. In addition to adding a Checkbox, this presentation will introduce:
■
Setting a default for a field control
■
Hiding the field label
■
Positioning the field labels to the left of the fields on the form
For the Checkbox the “Label Class” is used to format the text.
Add Checkbox Presentation
See also
Common Options
Textbox
Dropdown List
Listbox
Checkbox List
Radiobutton List
Label
File Upload
Submit Button
Hidden Field
Form Master 2008
Basic Functions . 27
Home > Basic Functions > Adding Fields > Dropdown List
Dropdown List
The Dropdown List and all the List type field controls share one common element which is the “List Item”.
A List Item is what appears in the Dropdown List when you click on the down arrow. A List Item is made up of two parts the “Text” and the “Value” parts.
These two values can be the same, or as an example in a list of US states “New York” will be the Text part and “NY” will be the Value part.
With the Dropdown List, it is always a best practice to enter a Prompt for the user as the first item in the list for example: Enter “<< Select >>” for the
Text part and “0” for the Value part. This will ensure that Validation can be applied to the field forcing the user to make a selection from the list. Without
Validation, users will often submit the form without making a selection, submitting the first item in the Dropdown List as default.
Adding the Dropdown List will introduce new features, and make use of some which have already been covered:
●
Use of the Auto-Fill feature which in the case of the Dropdown will find the correct value in the list and pre-select that for the user
●
Manually adding a Item to the List Items form
●
Adding List Items by using the Fill List Items with States from a selected Country feature
We will add a Required Field Validator to this Dropdown List in the Validation section.
Add DropDown List Presentation
See also
Common Options
Textbox
Checkbox
Listbox
Checkbox List
Radiobutton List
Label
File Upload
Submit Button
Hidden Field
Form Master 2008
28 . Basic Functions
Home > Basic Functions > Adding Fields > Listbox
Listbox
The Listbox control it useful where there are a small number of items in a list for the user to choose from.
Typically, a Listbox can be in two modes, Single, or Multi select modes. By default, Form Master uses Multi select mode only. The reason for this is simple,
for Single selection mode, a Dropdown List, or RadioButton List provide a better user interface.
For Multi select mode, the preferred field control is the Checkbox List which offers a better user interface as there is no need for the user to know how to
use “Ctrl Click” Selects Multiple Items functionality.
The one advantage in using a Listbox is when a user must make a selection, as the Checkbox List cannot have a Required Field Validator, whereas the
Listbox can.
In addition to adding a Listbox, this presentation will introduce:
●
Adding a Column to the form
●
Moving Controls between cells
Add Listbox Presentation
See also
Common Options
Textbox
Checkbox
Dropdown List
Checkbox List
Radiobutton List
Label
File Upload
Submit Button
Hidden Field
Form Master 2008
Basic Functions . 29
Home > Basic Functions > Adding Fields > Checkbox List
Checkbox List
This opening paragraph should describe the feature that you are documenting. Explain how it is commonly used and what the benefits are. For example: The
Widget Master email link allows you to easily send information about each widget to various departments within your company. Often, the feature that you are
documenting can be best explained by walking the reader through step by step. Use screenshots to illustrate the steps where possible.
1.
Start the application by...
2.
On the startup screen, click the...
3.
See also
Common Options
Textbox
Checkbox
Dropdown List
Listbox
Radiobutton List
Label
File Upload
Submit Button
Hidden Field
Form Master 2008
30 . Basic Functions
Home > Basic Functions > Adding Fields > Radiobutton List
Radiobutton List
The RadioButton List is used when the number of items in the list is small, and the user is allowed to select one item in the list. The procedure for adding
a RadioButton List is the same as for the Checkbox List. The only two differences are:
1.
There can only be one selected item in the List Items form, whereas the Checkbox List can have multiple items selected in the List Items form.�
2.
The Required Field Validator can be used to require that a user make a selection.
We will add a Required Field Validator to this RadioButton List in the Validation section
Add RadioButton List Presentation
See also
Common Options
Textbox
Checkbox
Dropdown List
Listbox
Checkbox List
Label
File Upload
Submit Button
Hidden Field
Form Master 2008
Basic Functions . 31
Home > Basic Functions > Adding Fields > Label
Label
The Label Control can be used to insert any Html content including pictures to a Table Cell in the Form. The most likely use will be to introduce a section of the
form or to provide instructions to the user which involve more than a one to three word prompt entered in the Label textbox on the “Input Control” form.
When used to provide instructions it is common to hide the label prompt for the target field control so as not to duplicate the field name.
We will use the Label Control to introduce and provide instructions for the “Interests”, and “Favorite Color” fields added above. This will require us to move
these two fields in the form to make room for the Label above.
Add Label Control Presentation
See also
Common Options
Textbox
Checkbox
Dropdown List
Listbox
Checkbox List
Radiobutton List
File Upload
Submit Button
Hidden Field
Form Master 2008
32 . Basic Functions
Home > Basic Functions > Adding Fields > File Upload
File Upload
The File Upload Field allows end users to upload files to a Server.
File Storage
Files can be stored in the Database or in the File System. Even if the Form is not set to save the form submissions to the database the uploaded files are still
stored in the database it the individual File Upload Field is set to that storage media. Multiple File Upload Fields can store the file in different locations,
depending on the setting of the individual field.
File Size*
File size can be controlled by each field on the form, the default is 1000KB. In a form with multiple File Upload Fields, the module uses Transactional
Processing to Rollback the entire form submission if any part of the submission fails, which would happen if a file were larger than the size set in the File
Upload Field settings.
*The default maximum size for all content uploaded to a server is set to 4096 KB by ASP.NET See Apendix A for instructions on modifying this value.
File Types
Any File Type which the DNN Host has allowed can be uploaded using the File Upload Field. If a file type is not listed, it will be necessary to contact the DNN
Host to add that extension to the allowable extensions for the DNN installation.
Downloads
If emailing is enabled for the form a link to the uploaded file will be in the body of the email, also the file will be available for download from the Reports area of
the Form Master Edit menu. By default Form Master requires that a user be in an Authorized Edit Role in order to download a file from the server, but Form
Master can be set to allow anonymous file downloads if needed.
Validation:
Form Master automatically adds a Regular Expression Validator for the File Upload Field to ensure that the File Type is one of the selected types. A
Required Field Validator can be added when the end user must supply a file in order to submit the form.
Add File Upload Presentation
See also
Common Options
Textbox
Checkbox
Dropdown List
Listbox
Checkbox List
Radiobutton List
Label
Submit Button
Hidden Field
Form Master 2008
Basic Functions . 33
Home > Basic Functions > Adding Fields > Submit Button
Submit Button
The Submit Button comes in three types:
■
Standard HTML Button
■
Link Button
■
Image Button
Form Master automatically adds a Link Button to the form if no Submit Button is added by the form designer.
Form Master supports Multiple Submit Buttons on a single form, and each Button can be a different type. Multiple Submit Buttons are useful for example on
a large form where some fields are required and others are optional. Required fields can be grouped at the top of the form with a Submit Button below the
group. Another Submit Button can be added at the bottom of the form after the optional fields.
Adding Submit Buttons Presentation
See also
Common Options
Textbox
Checkbox
Dropdown List
Listbox
Checkbox List
Radiobutton List
Label
File Upload
Hidden Field
Form Master 2008
34 . Basic Functions
Home > Basic Functions > Adding Fields > Hidden Field
Hidden Field
The Hidden Field has many uses on a Web form. It can be used to provide data to the Database, Email Recipient, or Process which the user does not or
should not see.
Consider a sceenario where the user will be redirected to an affiliate web site after the Form Submission. A requirement of course in these cases is an Affiliate
ID in the URL Querysting. Using the Hidden Field, an Affiliate ID can be added to the form which the user will not see. When setting up this field, make sure that
Querystring Parameter name is what is expected by the Affiliate and mark this field to be sent by Url in the Send Value By Options of the Input Control
Page. In this scenario, it is also nessecary to make sure the form redirects after submission in the Settings > Other Settings page. It is also commong to
exclude Hidden Fields used in this way from being stored or sent in the email using the Exclude from Email & Data option as shown below.
Hidden Field Screen Capture
See also
Common Options
Textbox
Checkbox
Dropdown List
Listbox
Checkbox List
Form Master 2008
Basic Functions . 35
Radiobutton List
Label
File Upload
Submit Button
Form Master 2008
36 . Basic Functions
Home > Basic Functions > Field Options
Field Options
Topics in this section
Auto Fill Options
See also
Form Layout
Tab Index
Adding Fields
Validation
Localization
File Management
Form Master 2008
Textbox Options
Field Query Options Send Value By Options
Basic Functions . 37
Home > Basic Functions > Field Options > Auto Fill Options
Auto Fill Options
1.
Select the Auto Fill Option A - G
2.
Encrypt Field: Useful for hiding Data on the Web Page such as a List of Email Addresses which are used for the Send To: address on a Lead
Generation Form Note: This does not Encrypt the data when posted to the server, it only protects sensitive data which is ourput to the page before
the user submits the form.
3.
When 1.A "None" is selected, text entered here will be used in the appropriate way for the selected field type.
4.
When 1.B "Membership" is selected, the dropdown list is shown and populated with Membership field names. This list will include custom Membership
fields as well as the default DotNetNuke fields
5.
When 1.C thru 1.G are selected this field contains:
❍ C: Session Variable Name
❍
D: URL Parameter Name
❍
E: Cookie Name
❍
F and G: Column Name
See also
Textbox Options
Field Query Options
Send Value By Options
Form Master 2008
38 . Basic Functions
Home > Basic Functions > Field Options > Textbox Options
Textbox Options
1.
Text Mode:
1. Single Line: this mode is for standard one line data entry such as a name or street address
2.
MiltiLine: this mode is for free form text such as a detaild problem report, or free form question
3.
Password: this mode allows for the user to securly enter a password
2.
Columns: is an older style method for setitng a Text Box width, the prefered method is by using the Width field
3.
Use Calendar: This will add the default DotNetNuke Calendar functionality to the Form Field
4.
Wrap Text: Check this to automatically Wrap text as the User types in a Multiline Textbox
5.
Rows: Rows is an older style method for setitng a Text Box height when Text Mode is MultiLine, the prefered method is by using the Height field
6.
Max Length: Maximum number of characters allowed in the input field. This is not effecive for MultiLine Text Mode
See also
Auto Fill Options
Field Query Options
Send Value By Options
Form Master 2008
Basic Functions . 39
Home > Basic Functions > Field Options > Field Query Options
Field Query Options
Note: Field Query Options is available for Super Users and users in the Administrators Role only.
●
Connection String: The connection string is optional, and when left blank the Query Engine will use the default DotNetNuke Connection string
defined in the Web.Config. The Query Engine will accept any Valid Connecton string which is Suported by ADO.NET. ConnectionsStrings.com is a
great resource for connection string syntax. Connection Strings are Encrypted when stored for later use hiding any login information which might be
used. It is advised that when defining a connection string with login information, the login be allowed only the premissions requred to execute the
Query.
●
SQL Query: This is where the Query is Entered. Execution of Stored Procedures is supported. Writing Queries and Structured Query Language usage
is beyond the scope if this user guide.
●
Query Tokens: Replacable Tokens from Membership can be used in Queries. Place the cursor where the Token should be inserted in the Query, Select
the Token, and click on the "Insert Token" button. Tokens must be used Unchanged to work. Session and URL variables can also be used in the
Query and can be inserted from the Query Tokens Dropdown List the Syntax is: #URL:YOURURLPARAMETERNAME# and
#SESSION:YOURSESSIONPARAMETERNAME#
●
The Query Engine will display the results of the Query or an Error Message when "Test Query" is clicked as shown in the Grid of Frequencies
●
Text Column: When using a List Item type Control, the Query Column name is entered here which will be the data shown to the user
●
Value Column: When using a List Item type Control, the Query Column name is entered here which will be the data used for the Value part of the List
Control
●
Test Query: Click this Link to test the Query entered in the "SQL Query" field.
See also
Auto Fill Options
Textbox Options
Send Value By Options
Form Master 2008
40 . Basic Functions
Home > Basic Functions > Field Options > Send Value By Options
Send Value By Options
●
●
Send Value By: Select how the Value for this field should be handled after the user has submitted the form. Choices are explained below:
❍ None: Do not send the value
❍
Session: Creates a Sesson Variable using the name in the "Value Name" field. This makes the value available by Name to any process in the
Website which can assess the Session Object. A good example of use is to send the user to another Form Master form where some of
the First Form Data is placed in Session and used in the Second Form.
❍
Url: This option will send the value of the field as a Parameter in a Url using the name in the "Value Name" field when redirect is set in Other
Settings. One example of use it sending Product ID information to an external Shopping Cart, or Payment Processor such as PayPal®.
❍
Cookie: Creates a Trasient Cookie using the name in the "Value Name" field. This makes the value available by Name to any process in the
Website which can read a Cookie Value.
❍
Silent Post: Creates an HTTP Post as a Background process to the URL specified in Other Settings. Read more about using Silent Post
❍
Silent Post & Sesson: A combination of the two actions adding more flexibility for the post submit process
❍
Silent Post & Cookie: A combination of the two actions adding more flexibility for the post submit process
Value Name: Assigns a name to the Field Value by which other processes can access the value.
See also
Auto Fill Options
Textbox Options
Field Query Options
Form Master 2008
Basic Functions . 41
Home > Basic Functions > Validation
Validation
Topics in this section
Requred Field
Validator
Regular Expression
Validator
Compare Validator
Checkbox List
Validator
Validation Summary
Validation is used to ensure that users supply all the information required on the form, and that the data entered meets specific formatting requirements. A
field can have only one of each type of Validator; generally two will be enough to do proper data validation.
During Design time, the error messages will be shown under the fields to show what validation rules have been applied. During Runtime, the error messages will
be hidden until required to enforce validation.
Form Master makes use of three of the Validators available in ASP.NET
■
Required Field Validator
■
Regular Expression Validator
■
Compare Validator
Additionally Form Master also used a Checklist Validator Control and the Validator Summary Control.
Field Validation is important to ensure that clean consistent data is collected which can be used efficiently throughout the organization
See also
Form Layout
Tab Index
Adding Fields
Field Options
Localization
File Management
Form Master 2008
42 . Basic Functions
Home > Basic Functions > Validation > Requred Field Validator
Requred Field Validator
The Required Field Validator is used to ensure that a user enters a value in a Textbox, or selects a value from one of the “List Item” fields.
The Field Control types which support the Required Field Validator are:
■
Textbox
■
Dropdown List
■
Listbox
■
RadioButton List
■
File Upload
The Required Field Validator has three attributes which can be modified when adding this Validator to a field:
■
Error CSS Class: This is the CSS class name applied to the Error Message when displayed in the Browser. The DotNetNuke® class name “NormalRed”,
is used by default.
■
Error Message: This is the message to be displayed in the Browser when the user input fails validation.
■
Initial Value: The value entered here is used by the Required Field Validator to determine if the user supplied value is the same as the “Initial Value”, if
so then validation fails.
Using the Required Field Validator with the different field types is explained below:
Adding a Required Field Validator to a Textbox or File Upload
Adding a Required Field Validator for a Textbox is straightforward, simply edit the field, click on “Add Validator” in the Validators Data Grid, modify the Error
Messages, and click “Update”. The Error Message is shown in the Designer.
Adding a Required Field Validator to a Dropdown List
Adding a Required Field Validator to a Dropdown List requires some planning, as mentioned in Adding a Dropdown List, adding a prompt as the first item in the
List Items data grid like “<< Select >>” for the Text part and “0” for the Value part gives us “0” to use as the Initial Value. If a user does not make a
selection, validation will fail.
Adding a Required Field Validator to a Listbox or RadioButton List
When an Initial Value is not used, adding a Required Field Validator to a Listbox or RadioButton list is the same as for the Textbox. When an Initial Value is used
the steps are the same as for the Dropdown List.
This section will show how to require a user to agree to the Terms & Conditions in order to submit the form using a RadioButton List, but the steps would be the
same for a Listbox. This section will also use a different form.
Required Field Validator Presentation
See also
Regular Expression Validator
Compare Validator
Checkbox List Validator
Validation Summary
Form Master 2008
Basic Functions . 43
Home > Basic Functions > Validation > Regular Expression Validator
Regular Expression Validator
The Regular Expression Validator checks whether the value of an input control matches a pattern defined by a regular expression. This type of validation
allows you to check for predictable sequences of characters, such as those in social security numbers, e-mail addresses, telephone numbers, and postal codes.
The Regular Expression Validator does not require that a field contain a value, it only validates if a value is present.
The use of Regular Expressions it beyond the scope of this User Guide, however there are many resources on the Internet to help learn how to create Regular
Expressions for use in this Validator. Form Master provides 4 built-in expressions which are:
■
E-Mail Address
■
Internet URL
■
U. S. Phone Number
■
U. S. SSN
■
U. S. or Canadian Postal Code
Regular Expression Validator Presentation
See also
Requred Field Validator
Compare Validator
Checkbox List Validator
Validation Summary
Form Master 2008
44 . Basic Functions
Home > Basic Functions > Validation > Compare Validator
Compare Validator
The Compare Validator is used to compare values in two different fields on the form, or compare the data entered to a specific type a data such as a Date.
The Compare Validator does not require that a field contain a value, it only validates if a value is present.
For example: Many forms ask the user to enter their email address then confirm the email address by entering it a second time to help the user avoid
typographical errors. The Compare Validator is just the tool to use to solve this. The Compare Validator has four new attributes in the Validators Data Grid
●
Operator: The values available here are:
❍ DataTypeCheck: Use this when comparing the user entered value with a specific Data Type such as a Date
❍
Equal: =; Compare value with another form field or with the Value to Compare. The remaining Operators share the same function.
❍
GreaterThan: >
❍
GreaterThanEqual: >=
❍
LessThan: <
❍
LessThanEqual: <=
❍
NotEqual: <> or !=
●
Value to Compare: When “Control to Compare” is “<< None >>”, works with the Operator and Data Type to compare the user entered value.
●
Control to Compare: Sets which form Field to Compare this Field to. Works with the Operator
●
Data Type: When using the “DataTypeCheck” Operator forces the user to enter the proper type of data such as a Date or Whole Number
When the “Control to Compare” is not set to “<< None >>”, the field will not be part of the data sent by email or saved to the database.
In this example, we will use the Compare Validator to make sure the user enters their email address without typographical errors.
Compare to Field Validation Presentation
This example validates a date entry field.
Compare to Data Type Validation Presentation
This example validates the value is Greater than or Equal to 5 and is a whole number
Value to Compare Validation Presentation
See also
Requred Field Validator
Regular Expression Validator
Checkbox List Validator
Validation Summary
Form Master 2008
Basic Functions . 45
Home > Basic Functions > Validation > Checkbox List Validator
Checkbox List Validator
The Checkbox List Validator can be used to make sure that a user checks a certain number of checkboxes. For Example we have a list of ten Options and a user
must choose three of those Options to continue. See the Setup Screen Shot below.
See also
Requred Field Validator
Regular Expression Validator
Compare Validator
Validation Summary
Form Master 2008
46 . Basic Functions
Home > Basic Functions > Validation > Validation Summary
Validation Summary
The Validation Summary allows for locating all the Validation Error Messages in one place on the form or in an Alert Message Box or Both.
The Validation Summary is useful on Long forms where a Validation Error may have occured on a field at the top of the form which has scrolled out of the user's
view. Then this happens the user may think that the page is not working properly and leave.
Validation Summary Options Include:
●
Placement Top, Bottom, or any row in between.
●
Optional Header Text
●
Simple List, Bullet List, or Paragraph style
●
Message Box Alert
●
Supress the default Error Message under the Field
●
Customizable Invalid Field Indicator when Supress Error Message is set
●
Left, Center, and Right cell alignment
View the Video
See also
Requred Field Validator
Regular Expression Validator
Compare Validator
Checkbox List Validator
Form Master 2008
Basic Functions . 47
Home > Basic Functions > Localization
Localization
Localization
Form Master supports localization using the standard DotNetNuke® methods. The App_LocalResources folder in the Module root can be used to create
Resource files for any Locale.
The files Resource files are listed below:
■
FormAutoRespMsg.ascx.resx
■
FormCustomTemplate.ascx.resx
■
FormDataServiceSettings.ascx.resx
■
FormDispatcher.ascx.resx
■
FormFieldRules.ascx.resx
■
FormHeadingEdit.ascx.resx
■
FormMaster.ascx.resx
■
FormMasterDBMgr.ascx.resx
■
FormMasterEdit.ascx.resx
■
FormMasterFiles.ascx.resx
■
FormMasterFormOptions.ascx.resx
■
FormMasterFormQuery.ascx.resx
■
FormMasterOptions.ascx.resx
■
FormReport.ascx.resx
■
FormThankYouEdit.ascx.resx
■
FormUserManager.ascx.resx
■
SharedResources.resx
In addition the DotNetNuke Membership field names for the Auto-Fill feature can be Localized using the Lists menu option on the Host Menu.
Form Master does not support Multi-Lingual content at this time.
See also
Form Layout
Tab Index
Adding Fields
Field Options
Validation
File Management
Form Master 2008
48 . Basic Functions
Home > Basic Functions > File Management
File Management
Form Master 2008 iincludes a File Manager page to manage the files uploaded by users.
The Files page allows for Downloading, Searching, and Deleting of uploaded files. Sorting is also available on the File ID, File, and Date columns.
When a file is uploaded when the “Save Data to Database”, on the “Form Settings” is checked, the file cannot be deleted using the Files page since the
files are linked to the data submitted by the user. These files are available here for download, but must be deleted with the related record
See also
Form Layout
Tab Index
Adding Fields
Field Options
Validation
Localization
Form Master 2008
Data Manager . 49
Home > Data Manager
Data Manager
Topics in this section
The Connection String
Map Existing Table
Table From Form
Form From Table
The Mapped Form
Edit Mappings
External Table Mask
Form Master 2008 Stores data as XML Fragments by default in a single Table Column. While convenient and easy to manage, this make it difficult for other
applications to access the collected data. Form Master 2008 introduces the ability to store data in Standard Microsoft® SQL Server® Tables. Form Master 2008
offers three methods to help Map Form Fields to Standard SQL Tables as noted below.
Note: Data Manager is available for Super Users and users in the Administrators Role only.
●
Map an Existing Form to an Existing Table
●
Create a SQL Table From a Form
●
Create a Form From an SQL Table
When Forms are Mapped to an SQL Table, Form Master 2008 will continue to store the data in XML Fragments as a backup. This gives the user the ability to
restore the data to a SQL Table by re-mapping the form.
See also
Welcome
Installation
Getting Started
Settings
Basic Functions
Formatting
Reports
Messaging
Advanced Functions
Form Master 2008
50 . Data Manager
Home > Data Manager > The Connection String
The Connection String
Form Master 2008 allows the user to specify a Connection String to a MS-SQL Database external to the Database running the DotNetNuke® Application. Once
a Form is Mapped to a Table the Connection String cannot be changed. If the Connection String needs to change for some reason, it will be necessary to ReMap the Fields.
See www.connectionstrings.com for a good connection string referenct
See also
Map Existing Table
Table From Form
Form From Table
The Mapped Form
Edit Mappings
External Table Mask
Form Master 2008
Data Manager . 51
Home > Data Manager > Map Existing Table
Map Existing Table
Form Master 2008 can map Form Fields to an Existing SQL Table.
●
Connection String: The Connection string to the Data Resource. Leave blank to use the Default System Connection String. If defining a Connection
string, it must be set before any Mappings are started since Mappings are based on what Tables exist in the Database.
●
Data Source Table List: The List of Tables from the Default DNN or User Specified Database
●
Existing Table Fields: The Grid shows the Fields in the Selected Table and allows for Mapping to Form Master Created Fields.
●
Form Field: List of Fields Defined in the Form used for Mapping to External Table Fields.
The Grid Columns:
●
Column: The name of the Table Column
●
Type: The Data Type of the Table Column
●
Length: The allowable Length of data for the Column. This is useful primarily for Text type data and does not apply to Integer types or Boolean
values. A discussion of SQL Data Types is beyond the scope of this User Guide.
●
Prec & Scale: These are for use with Numeric & Decimal Data Types
●
Nullable: If a column is not Nullable then a Requred Field Validator will need to be included on the Form.
●
Form Field: Initially empty, will show Form Field names as they are mapped to the Table.
The Process:
1.
Select the "Map Existing Table" Radio Button
2.
Optionally Specify a Connection String
3.
Select a Table to map to in the "Data Source Table List" dropdown list. Note: the selected table must have an Auto Increment Identy Column
4.
Select a Form Field Radio Button from the "Form Fields" list
5.
Click on the "Map" link on the Table Column to be mapped to the Form Field. If a mistake is made the UnMap link can be used to remove the mapping.
6.
When all Form Fields have been mapped, click the "Commit Operation" button.
See also
The Connection String
Table From Form
Form From Table
The Mapped Form
Edit Mappings
External Table Mask
Form Master 2008
52 . Data Manager
Home > Data Manager > Table From Form
Table From Form
Form Master 2008 can create an External Table from the Fields defined in the Form.
●
Connection String: The Connection string to the Data Resource. Leave blank to use the Default System Connection String. If defining a Connection
string, it must be set before any Mappings are started since Mappings are based on what Tables exist in the Database
●
New Table Name: The name for the new Table which will be created in the Database
The Grid Columns:
●
Form Field: This will be the name of the column in the SQL Table. This value is taken from the "Field Name" value in the Common Options section.
●
Type: The Data Type for the SQL Table Field
●
Length: The Length of the SQL Field. For Text fields, Char, NChar, VarChar, NVarChar the value can be set to the greatest expected value for the
field. In cases where the ammount of data is unknown the Text or NText Data Types should be used as will allow more data then can be sent in a
browser.
●
Prec. & Scale: Precision is the number of digits in a number. Scale: Scale is the number of digits to the right of the decimal point in a number. Precision
and Scale only apply to Numeric and Decimal Data Types and will be ignored otherwise
●
Nullable: If Checked the SQL Table will allow Null as a Value in the Column
●
Ignore: If Checked the Column will not be created in the SQL Table and no Mapping will be created for it. This is usful for Hidden Fields or Conformation
type Fields which do not need to be stored.
The Process:
1.
Select the "Create Table From Form" Radio Button
2.
Enter a Name for the New Table (a name with no spaces or special charaters is recommended)
3.
Choose the appropriate Data Type and Length for the Form Field
4.
Check the Nullable Checkbox if it there is no Required Field Validator on the Field
5.
Check if the Field should be Ignored
6.
Click the "Commit Operation" Button
See also
The Connection String
Map Existing Table
Form From Table
The Mapped Form
Edit Mappings
External Table Mask
Form Master 2008
Data Manager . 53
Home > Data Manager > Form From Table
Form From Table
Form Master 2008 can create a Form from the Fields in an External Table. Using this function will overwrite any existing form for this Module.
●
Data Source Table List: The List of Tables from the Default DNN or User Specified Database
The Grid Columns:
●
Column: The name of the SQL Table Column
●
Type: The Data Type of the Table Column
●
Length: The allowable Length of data for the Table Column. This is useful primarily for Text type data and does not apply to Integer types or Boolean
values and is shown for seting up field validation. A discussion of SQL Data Types is beyond the scope of this User Guide.
●
Prec & Scale: These are for use with Numeric & Decimal Data Types, and is shown for seting up field validation
●
Nullable: If a column is not Nullable then the Requred Checkbox should be checked.
●
Form Field: The Form Field name which will be specified in the Field Name textbox in Common Options (this name must not contain spaces or special
characters)
The Process:
1.
Select the "Create Form From Table" Radio Button
2.
Select the Field Type
3.
Enter a Form Field Name or use the suppled Name
4.
Check if the Field will have a Reqired Field Validator added
5.
Click the "Commit Operation" Button
The Connection String
Map Existing Table
Table From Form
The Mapped Form
Edit Mappings
External Table Mask
Form Master 2008
54 . Data Manager
Home > Data Manager > The Mapped Form
The Mapped Form
Once a Form is mapped to a Table Form Master 2008 will show the page below. Once a Form is Mapped all mapping options and Connection String options will
be un-available. In a newly mapped form which previously had saved data the option to Import the XML data will be available. Once the data has been imported
the "Import Data Stored as XML" button will not be available.
The Mappings can be deleted by using the "Delete Mappings" button. The Mappings can easily be done again which allows for easy changes to the database
schema.
To Import data from the default data store click the "Import Data Stored as XML" button.
Form Master 2008 will report the results of the import and show any records which failed the import process.
Form Master 2008
Data Manager . 55
The Error returned above indicates that the Data Type in the SQL Table is not correct for the type of Data stored in the XML. In this case the error was caused
by trying to import two letter Country Codes into an Integer Data Type.
See also
The Connection String
Map Existing Table
Table From Form
Form From Table
Edit Mappings
External Table Mask
Form Master 2008
56 . Data Manager
Home > Data Manager > Edit Mappings
Edit Mappings
Once a Form has been Mapped to a SQL Table, the mappings can be edited. This may become necessary for example if a new field is added to the SQL Table
and a new Form Field is created to collect the new data. In cases like this either the new SQL Table Field will need to allow Nulls or the new column must be
populated with default values.
See also
The Connection String
Map Existing Table
Table From Form
Form From Table
The Mapped Form
External Table Mask
Form Master 2008
Data Manager . 57
Home > Data Manager > External Table Mask
External Table Mask
For Security Reasons Form Master 2008 creates an External Table Mask List in Host > Lists which is used to Mask Tables in the List from the User during
Table Mapping Operations in the Default Database. Only the Host Role can manage this list which is partially shown below.
See also
The Connection String
Map Existing Table
Table From Form
Form From Table
The Mapped Form
Edit Mappings
Form Master 2008
58 . Formatting
Home > Formatting
Formatting
Topics in this section
Form Formatting
Add Content
See also
Welcome
Installation
Getting Started
Settings
Basic Functions
Data Manager
Reports
Messaging
Advanced Functions
Form Master 2008
Email Formatting
Formatting . 59
Home > Formatting > Form Formatting
Form Formatting
Formatting the form provides visual cues which draw attention to different sections of the form, this improves the User Interface by helping the user
perform the task more efficiently, and helps deliver a better user experience..
Applying formatting to Form Master is done using Cascading Style Sheets (CSS), and applying Class Name Rules to elements of the form. The logical
place for the Style Rules is in Portal.css since this Stylesheet is specific to earh Portal, but the Rules can be in any Stylesheet which get loaded with the Form.
Class names can be applied to the elements below:
■
Outer Table
■
Inner Table
■
Individual Table Cell within the Inner Table
■
Labels for each individual fields in the form
■
Individual fields within the form
The presentations below will show where and how the Class Names can be applied, and finally, the Class Name definitions.
Formatting the Form Presentation
Form Master 2008
60 . Formatting
See also
Email Formatting
Form Master 2008
Formatting . 61
Home > Formatting > Email Formatting
Email Formatting
Topics in this section
XSL Templates
Tokenized Templates
Custom Template
Email can be sent in either HTML or Text Formatting. When sent in HTML format Form Master 2008 sends both the HTML and Text in a Multipart Alternative
Email Message (Auto Responder messages).
See also
Form Formatting
Form Master 2008
62 . Formatting
Home > Formatting > Email Formatting > XSL Templates
XSL Templates
XSL Email Templates
Form Master offers two Template styles for formatting the email message which was previously covered in the Other Settings topic. This section will show
how the XSL templates work.
Customizing the XSL templates will not be shown as this is beyond the scope of this User Guide
XSL Email Templates Presentation
See also
Tokenized Templates
Custom Template
Form Master 2008
Formatting . 63
Home > Formatting > Email Formatting > Tokenized Templates
Tokenized Templates
Form Master offers two Template styles for formatting the email message which was previously covered in the Other Settings topic.
This section will show how the Tokenized templates work and how to use them to modify the body of the email sent from Form Master.
Tokenized Email Templates Presentation
See also
XSL Templates
Custom Template
Form Master 2008
64 . Formatting
Home > Formatting > Email Formatting > Custom Template
Custom Template
Custom Template
By using Field [TOKENS] and the Custom Template, it is possible to completely customize the email which is sent
to the email addresses in the SendTo: field of the Settings > Form Settings page
●
The body of the message can contain any valid HTML
●
To Insert the user supplied data from the form just use any of the previously defined Field [TOKENS] from the Defined Tokens column on the right.
●
When the Form is submitted, Form Master will replace the [TOKENS] such as Administrator above with the information provided by the user.
See also
XSL Templates
Tokenized Templates
Form Master 2008
Reports . 65
Home > Reports
Reports
Topics in this section
Viewing Reports
Downloading Reports
Add Content
See also
Welcome
Installation
Getting Started
Settings
Basic Functions
Data Manager
Formatting
Messaging
Advanced Functions
Form Master 2008
66 . Reports
Home > Reports > Viewing Reports
Viewing Reports
Reports
When “Save Data to Database” is checked in the “Form Options”, reports will be available for viewing, editing, downloading, and of course deleting.
Reporting and deleting is done based on a user specified date range, the default is a range covering the past 30 days from the current date.
Viewing Reports
If files have been uploaded, links are available in the form to download the files. Each record can be edited, and even uploaded files can be replaced or added
to records where files have not been uploaded.
Records can ge deleted individually or by date range. Any uploaded files associated with any deleted record are deleted from the database or from the file
system.
Viewing Reports Presentation
See also
Downloading Reports
Form Master 2008
Reports . 67
Home > Reports > Downloading Reports
Downloading Reports
Downloading Reports
Download of data is available in four formats:
■
Excel 2007: Use this link if you are using Excel 2007. Excel will complain about the format since it no longer supports HTML Table formatting. Clicking
Yes and Excel will open it in 2003 Compatibilty Mode.
■
Excel 2002 & 2003: Use this option for Excel versions 2002 and 2003. This method downloads Html to Excel. After the file is saved to disk, it can be
opened in Excel and saved in Excel Native format using the “Save As” menu item.
■
CSV: Comma Separated Values: This is a standard format for sharing information between disparate databases. The fields are separated by commas
using double quotes as field delimiters.
■
Tab Delimited: Again another standard format. Fields are separated by Tabs with no field delimiters.
Downloading Reports Presentation
See also
Viewing Reports
Form Master 2008
68 . Messaging
Home > Messaging
Messaging
Topics in this section
Form Heading
See also
Welcome
Installation
Getting Started
Settings
Basic Functions
Data Manager
Formatting
Reports
Advanced Functions
Form Master 2008
Form Thank You
Auto Responder
Messaging . 69
Home > Messaging > Form Heading
Form Heading
The Form Heading allow for the insertion of Html content at the top of the form, in the first row of the “Outer Table” element.
The default text used to provide instructions when the Module is first placed on the page, should either be deleted or replaced by custom content for the
current form
See also
Form Thank You
Auto Responder
Form Master 2008
70 . Messaging
Home > Messaging > Form Thank You
Form Thank You
The Form Thank You allows for the messaging after the form has been submitted. This message will be shown based on the setting of the “Redirection
After Submit” in the “Other Settings” page. The options which will show the Form Thank You message are “None” and “File”
For the “File” option, it is important to provide the user with instructions to click the link provided it the filed does not start to download automatically
When Field Tokens are defined in the fields they will show in the "Defined Tokens" area and can be used in the body of the Thank You message. These Tokens
will be replaced with the User Entered data when the form is submitted.
See also
Form Heading
Auto Responder
Form Master 2008
Messaging . 71
Home > Messaging > Auto Responder
Auto Responder
Form Master allows for an Automated Response to be sent to the user when the form is submitted, by using the Auto Responder options on the
Other Settings page.
Auto Response Email Body text can contain any HTML suitable for email messaging. Any image URL need to be absolute URL in order for the image to show in
the user’s email client. The email body is designed using the Messaging > Auto Responder menu option.
The Auto Responder is not dependant on the state of any other options in Form Master, and can be sent in any configuration
When Field Tokens are defined in the fields they will show in the "Defined Tokens" area and can be used in the body of the Auto Responder message. These
Tokens will be replaced with the User Entered data when the message is sent.
See also
Form Heading
Form Thank You
Form Master 2008
72 . Advanced Functions
Home > Advanced Functions
Advanced Functions
Topics in this section
Silent Post
See also
Welcome
Installation
Getting Started
Settings
Basic Functions
Data Manager
Formatting
Reports
Messaging
Form Master 2008
Field Rules
User Manager
Advanced Functions . 73
Home > Advanced Functions > Silent Post
Silent Post
The Silent Post feature is useful for sending information to outside Partners, Vendors, or another process in the same Website.
A classic example of using the Silent Post feature is when using an outside Vendor to manage a Continuity Marketing Program, or CRM management. These
programs are offered by many Vendors, the most notable are Constant Contact®, AWeber®, Vertical Response®, and SalesForce®.
In these services it is common for the vendor to supply code which shows a Form where an end user can sign up for a Mailing List, or some other service which
the Vendor offers.The Vendors Client is instructed to place the code in their Web Page. This works fine for plain HTML pages which can have multiple Form Tags
in the page. For DotNetNuke this becomes a problem, as it is difficult in ASP.NET and DotNetNuke to include a FORM tag in the page.
Using he Silent Post Feature a Vendor Form can be Mimicked with the appropriate end User Visible Fields and the required Vendor Hidden fields. When the Form
Master 2008 Form is submitted the Vendor form is Created and Posted in the Background to the URL supplied by the Vendor in their Forms Tag "Action"
attribute. The series of events is shown below
1.
End User enters information into the Form Master form and Submits
2.
Data is collected and stored according to the options specified
3.
The Specified Silent Post Fields are used to create an HTTP Request to the Vendor URL
4.
The end user does not know anything about the Silent Post activity, Form Master handles the End User as specified in Settings > Other Settings as
usual.
For a an example of setting up a form to work with SalesForce® please see this Salesforce® Case Creation Form
See also
Field Rules
User Manager
Form Master 2008
74 . Advanced Functions
Home > Advanced Functions > Field Rules
Field Rules
Form Master 2008 supports conditional field display rules. For example in a Form where we have a DropDown List of Regions populated with US States and
Canadian Provinces, is a User is not from one of these countries, we should provide a option in the DropDown List for "Other", and a TextBox where the user
can fill in a Region. Field Rules will allow us to show the Other Region TextBox if the value of the DropDown List is "other" and hide it when it is not. Below is the
Field Rules page.
●
When Source Field: The Field for which the Value will cause other Fields to be shown or hidden. This Dropdown List contains the defined form Fields
excluding incompatible types such as Hidden, File Upload, Button, and Label Fields.
●
Contains/Is: For Checkboxes the default show value is "Checked". All other field types, the show value will be Contains. A Partial value will be
matched for example:
❍ A DropDown List of Regions contains "Other Region" and a TextBox should be shown when the user selects that value. If "Other" is entered
into the Contains TextBox it will match the DropDown value.
●
Show Target Fields(s): Select One or More Fields to Show when the Rule is True
●
Existing Rules: The grid shows existing rules for this form.
❍
The Contains TextBox can also contain a wildcard of *.* which will match any value Target Fields. This works for any type of Source Field.
The Grid Columns:
●
Source Field: The Form Field which Triggers the Rule
●
Contains/Is: The Value which the Source Field must Contain, or for Checkboxes be Checked to Trigger the Rule
●
The Grid Columns: The list of Fields which will be shown when the Rule Condition is True.
The Process:
1.
Select a Source Field from the "When Source Field:"
2.
Enter a value which the Source Field must contain to Trigger the Rule. For Source Field of type Checkbox the value defaults to Checked
3.
Select one or more fields to be the target of the Rule in the "Show Target Field(s)" Checkbox List
4.
Click the "Add Rule" button
Field Rule In Action: Not Triggered
Form Master 2008
Advanced Functions . 75
Field Rule In Action: Triggered
See also
Silent Post
User Manager
Form Master 2008
76 . Advanced Functions
Home > Advanced Functions > User Manager
User Manager
Form Master 2008 can Register a User and add the user to any number of Roles when the Form is Submitted. If a user is already logged in the Registration
will be ignored, but the user will still be added to any Roles which they are not already members of. Below is the User Manager page which is used to manage
this feature.
Note: User Manager is available for Super Users and users in the Administrators Role only.
●
Register User: Check to Register the User when the Form is Submitted. Fields to be used for the UserName, Password, First Name, Last Name, and
Email must be defined. If user is logged in this setting is ignored.
●
User Name Field: Field to be used as the User Name when Registering a User
●
Password Field: Field to be used as the Password when Registering a User
●
First Name Field: Field to be used as the First Name when Registering a User
●
Last Name Field: Field to be used as the Last Name when Registering a User
●
Email Field: Field to be used as the Email when Registering a User
●
User Roles: Select The Roles the User should be Added to when Submitting the Form. Note: User Must be logged in or being Registered during
submission.
See also
Silent Post
Field Rules
Form Master 2008
Index
A
About Form Master 2008 7
Adding Fields 22
Advanced 72
Advanced: Field Rules 74
Advanced: Silent Post 73
Advanced: User Manager 76
Fields: Listbox 28
Fields: Radiobutton List 30
Fields: Submit Button 33
Fields: Textbox 25
File Management 48
Form Elements 9
Form Layout 19
Formatting 58
Formatting: The Form 59
G
Getting Started 6
I
D
Data Manager 49
Data: Connection Strings 50
Data: Edit Mappings 56
Data: External Table Mask 57
Data: Form From Table 53
Data: Map Existing Table 51
Data: Mapped Form 54
Data: Table From Form 52
E
Email Formatting 61
Email Formatting: Custom 64
Email Formatting: Tokenized 63
Email Formatting: XSL 62
F
Field Options 36
Field Options: Auto Fill 37
Field Options: Field Query 39
Field Options: Send Value By 40
Field Options: Textbox 38
Fields: Checkbox 26
Fields: Checkbox List 29
Fields: Common Options 23
Fields: Dropdown 27
Fields: File Upload 32
Fields: Hidden Field 34
Fields: Label Conttrol 31
Installing Form Master 2008 5
L
Localization 47
M
Menu Items 10
Messaging 68
Messaging: Auto Responder 71
Messaging: Form Heading 69
Messaging: Form Thank You 70
O
Other Settings 14
R
Reports 65
Reports: Downloading 67
Reports: Viewing 66
S
Settings 11
Support 2
System Requirements 4
T
Tab Index 21
V
Validation 41
Validation: Checkbox List 45
Validation: Compare 44
Validation: Regular Expression 43
Validation: Required Field 42
Validation: Summary 46
W
Workflow 8
PDF Back Cover . 77
Form Master 2008
Copyright © 2005 - 2008
All Rights Reserved
Form Master 2008