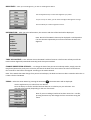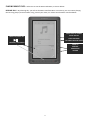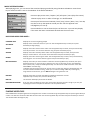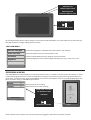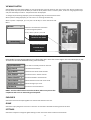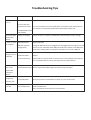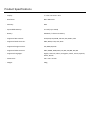
1
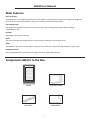
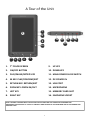
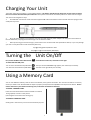
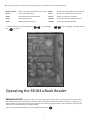
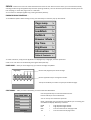
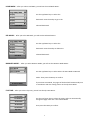
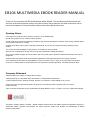
EB104 MULTIMEDIA EBOOK READER MANUAL Thank you for purchasing the EB104 Multimedia eBook Reader. The operational guidelines below will ensure a quick and convenient guide to its main functions and provide the user with trouble-free use for business and pleasure. Please carefully read the instructions below before use. Opening Notes: *This product is a high-precision electronic product, do not disassemble. *Avoid strong impact or any collision with the product. *Avoid using this product in the following conditions: high and low temperature, moisture, dust, strong magnetic fields and long-term exposure to sunlight. *Please use a damp cotton cloth to wipe the product shell, do not use any chemical cleaning solutions on the product. *To prevent accidental spillage on this product, do not place it near any liquid. *Excess use of headphones at high volume may cause permanent hearing impairment. *Only use permitted chargers and accessories. Use of any other type of products violates the warranty and may be dangerous. *Please follow the relevant local environmental regulations to deal with disposing and recycling of product. *The manufacturer assumes no responsibility for any loss of data / music / video or any other files if the product is used in a careless manner. Please follow the user manual for standard operation, and make timely backups. Company Statement ● Specifications are subject to change without notice. ● Always backup your important data. We assume no responsibility for data loss. ● This manual has been carefully checked, however, we assume no responsibility for any errors. ● If there are any discrepancies between the pictures in this manual and the actual product, the actual product prevails. ● We cannot be responsible for any downloading of illegal eBooks, music, or videos, or for any content that is illegal. The EB104 contains Adobe ® Reader ® Mobile software under license from Adobe System Incorporated, Copyright © 1995-2009 Adobe Systems Incorporated. All rights reserved. Adobe and Reader are trademarks of Adobe System Incorporated. 1 Understanding Adobe DRM A Digital Rights Management (DRM) eBook is a copy-protected eBook. There is no simple way to check if your eBook has DRM or not. But most of the time, if you paid for the book, it’s most likely a DRM file. If the book was free, it is probably not a DRM file. Authorizing Your Device for Adobe DRM 1. Download the free Adobe Digital Editions eBook reader software and create an Adobe Account at http://www.adobe.com/products/digitaleditions To learn more, please go to http://www.adobe.com/products/digital editions/faq 2. After installing the software, open Adobe Digital Editions and sign in with your Adobe ID. 3. Plug your EB104 into the computer using the USB cable. 4. Adobe Digital Editions will ask if you would like to authorize the device with your Adobe ID. Click Authorize Device. *Books transferred with Adobe Digital Editions desktop software must use the same Adobe ID on the both the computer and the eBook Reader. Transfer Non-DRM eBooks, Music, and Video To transfer non-DRM eBooks, music, or video files to the unit, simply use Windows Explorer to copy from your PC to the drive you want, either directly to the memory of the unit, or to a memory card that is inserted into your computer. Transferring DRM eBooks with Adobe Digital Editions 1. Download the free Adobe Digital Editions eBook reader software from http://www.adobe.com/products/digitaleditions To learn more, please go to http://www.adobe.com/products/digital editions/faq 2. After installing the software, you can use it to view eBooks in the PDF and ePUB formats. Simply download an eBook to your computer, and then open it with Adobe Digital Editions. 3. Connect your unit to your computer via the USB cable, and open Adobe Digital Editions software. 4. Tap on “All Items”, and choose the files or eBooks you want to transfer. Then drag them over to your unit. You will find your unit on the left hand side, and it will be called “EB104.” 5. After you’ve finished transferring your files, please tap on the “Safely Remove Hardware” icon from your computer’s taskbar. Choose “removable disk,” and when your computer says “It’s safe to remove the device,” unplug the USB cable. 2 EB104 User Manual Main Features Easy on the Eyes The EB104 uses an anti-‐glare high resolution screen which is crisp and easy to read. You can adjust the brightness and text size to suit your preferences, and you can read for extended periods of time. Full Viewing Angle Low Power Consumption. The unit can run for up to 4.5 hours* reading time between battery charges. * Depending on use. Portable Lightweight, slim and easy to carry. Music The built-‐in speaker and headphone port can be used for listening to your favorite music. Video The EB104 can play your favorite videos in full color. The screen/unit can process high resolution, up to 720P. Reading Essentials Search, add bookmarks, and set text size, page orientation, page jump and more. Components-‐What’s In the Box EB104 THIS USER GUIDE USB CABLE EARPHONES 3 A Tour of the Unit 7 8 1 6 5 4 3 15 10 16 9 13 12 11 14 2 1. 7” COLOR SCREEN 9. UP KEY 2. ON/OFF BUTTON 10. DOWN KEY 3. PLAY/PAUSE/ROTATE KEY 11. MAIN POWER SLIDE SWITCH 4. M KEY: PLAY/CONFIRM/EXIT 12. DC-‐POWER IN 5. RETURN KEY: RETURN/EXIT 13. USB PORT 6. ZOOM KEY: ZOOM IN/OUT 14. MICROPHONE 7. LEFT KEY 15. MEMORY CARD SLOT 8. RIGHT KEY 16. EARPHONE SOCKET NOTE* THE UNIT IS SHIPPED WITH A PROTECTIVE PLASTIC FILM OVER THE SCREEN FOR PACKAGING AND TRANSPORTATION PURPOSES. IT IS EASY TO CAREFULLY FIND THE EDGE OF THIS FILM FROM ONE OF THE CORNERS AND THEN PEEL IT OFF. 4 Charging Your Unit The power supply of this product is a rechargeable battery. The battery should be fully charged for at least 12 hours before first use to ensure the best battery life of the unit. Please perform the above mentioned process for the first three charges. The unit can be charged in 2 ways: 1. Via USB cable: Connect the small end of the supplied USB cable to the bottom of the unit with the other (large) end to a USB port of your PC. 2. By an AC power adaptor (not supplied*). Connect the cable of the AC power adaptor into the port on the bottom of the unit labeled DC, and plug the AC wall charger into an electrical outlet. * When purchasing your AC wall charger, please make sure it conforms with the specifications below, or you may damage your unit in a way which will not be covered by warranty: InputğAC110Vj240V 50/60Hz Max:150m OutputğDC5.0j5.5V 1000mA(USB) 1000mA(DC) Turning the Unit On/Off First, locate the Main Power Slide Switch 11 on the bottom of the unit, and slide it to the right. TO TURN THE UNIT ON / OFF: Turn on: Press and hold the on/off switch 2 Turn off: Press and hold the on/off switch 2 until you see the WELCOME Logo appear, then release (3-‐5 seconds). until the screen goes black (3-‐5 seconds). Using a Memory Card You can use additional memory cards to store more eBooks, music, photos and video. This unit uses microSD or TF memory cards up to 16Gb in size. Please follow the steps to properly insert/remove the SD/SDHC card into/from the device. Do not remove the memory card while transferring data, or the data could become damaged. TO INSERT A MEMORY CARD: Insert the card into the device with the metallic connectors facing upward, as shown in the picture (assuming the front of the unit is facing you). TO REMOVE A MEMORY CARD: Gently push in the memory card. It will click and then pop out. 5 Connecting Your Unit to Transfer Files Connect the unit to your computer using the supplied USB cable. If your unit is switched off, please turn it on. The screen on the unit will show the USB connection screen below: USB Your computer will recognize the device as a “Removable Drive,” which is located under the “My Computer” folder. The unit, will be allocated a “drive letter” by Windows Explorer, as well. The drive letter will vary on different computers. In general, the most common Drive Letter will be ‘E.” (Note: If the EB104 has a memory card inserted, then the computer will recognize two Removable Drives, and there will be two drive letters allocated: one for the unit, and one for the memory card. As the EB104 is a generic USB device, you do not need to install any specific software drivers to connect it. 6 After turning on the unit, you will see the “Opening Screen,” from which you can choose what to do: Browser History: Shows a list of the latest books you have read. EBook: Shows a list of the eBooks stored in the unit Music: Goes to the Music Menu Video: Shows a list of videos stored in the unit Radio: Not available for Australian Market Record: Begins recording via microphone Photo: Shows Files Directory Explorer: Shows a list of all files stored in the unit Game: Begin playing built-‐in games Settings: Goes to the Settings Sub Menu To select the function, use the left/right keys 7 key 3 to confirm. 8 or the up/down 9 10 keys to highlight, then press the “M” Browser History eBook Music Video Radio Record Photo Explorer Game Settings Operating the EB104 eBook Reader BROWSER HISTORY– Select this to see a list of the latest books you have read. You will notice each book will have its title, the page last read, the total pages in the book, and the last date the book was opened. Once the list is shown, you can select the book by selecting the title using the Up/Down keys and then pressing the M key. The unit will then open the book and take you to the page where you stopped reading. You can return to the Opening Menu by pressing the Return/Exit key . 5 7 EBOOK – Select this to see a list of the latest books stored on the unit. Once the list is shown, you can select the book by selecting the title using the Up/Down keys and then pressing the M key. The unit will then open the book and take you to the last read page, or to the first page, if this is a new book. You can return to the Opening Menu by pressing the Return/Exit key . EBOOK READING CONTROLS – To use different options while reading a book, press the M key to reveal the pop-‐up menu below: Page Jump > SaveMark > LoadMark > DelMark > Browser Mode > Flip Time > Brightness > Information > Table of Contents > To make a selection, simply use the Up/Down or Left/Right keys to highlight, and then press M to confirm. You can return to the eBook by pressing the Return/Exit key. PAGE JUMP – After you select Page Jump, you will see the Page Jump Menu: Page Jump 0 0 0 0 0 0 Use the Left / Right keys to select the digit. Use the Up/ Down keys to change the number. Then press the M key to confirm and jump to the desired page. SAVE MARK – After you select Save Mark, you will see the Save Mark Menu: Empty Empty Empty Use the Up/Down keys to select the bookmark box. Page 0008/ 0080 Empty Save Mark Press the M key to save the bookmark. You can save up to 5 bookmarks per book. NOTE: Depending on the file format of the eBook you are reading, the Save Mark will display differently as follows: EPUB PDF PDB TXT = = = = 8 Page No/Total Pages of book Page No/Total Pages of book First line of the text on the page saved First line of the text of page saved LOAD MARK – After you select Load Mark, you will see the Load Mark Menu: Page 0008/ 0080 Empty Use the Up/Down keys to select the Empty Empty bookmark. Press the M key to go to the Empty Load Mark selected bookmark. DEL MARK – After you select Del Mark, you will see the Del Mark Menu: Page 0008/ 0080 Empty Empty Empty Use the Up/Down keys to select the bookmark. Press the M key to delete the Empty Del Mark selected bookmark. BROWSER MODE – After you select Browser Mode, you will see the Browser Mode Menu: Auto Mode Manual Mode Use the Up/Down keys to select either the Auto Mode or Manual mode. Then press the M Key to confirm. Browser Mode If you select Auto Mode, the pages of the book will automatically turn in accordance with the setting chosen in the Flip Time Menu. FLIP TIME – After you select Flip Time, you will see the Flip Time Menu: 10 Seconds 15 Seconds 20 Seconds 25 Seconds 30 Seconds Use the Up/ Down keys to select the time it takes to automatically change the page if the unit is set to Auto Mode. Then press the M Key to confirm. Flip Time 9 BRIGHTNESS – After you select Brightness, you will see the Brightness Menu: One Two Three Four Five Use the Up/Down keys to select the brightness you prefer. As you scroll up or down, you will see the background brightness change. Press the M key to confirm brightness chosen. Brightness INFORMATION – After you select Information, the statistics and data of the book will be displayed: Title Author Subject Keywords Creator Producer Note: Not all of the eBook’s data may be displayed. It will depend on if all the data was inputted by the Creator and when the book was digitized. Creation Date Information TABLE OF CONTENTS – This selection shows the eBook’s table of contents. This function will only work if the book has been digitized (created electronically) with this option enabled. CHANGE ORIENTATION OF BOOK – To change the book from portrait to landscape mode, simply press the Play/Pause/ Rotate key. Each press of the key will switch the book from one mode to the other. Please allow a few seconds for the book to be aligned according to the mode selected. Note: If the eBook does NOT change from portrait to landscape, the book has been not been created to allow this. It is NOT a fault in the EB104. ZOOM – Select the Zoom Menu by pressing the Zoom Key 6 The Zoom Menu will be displayed: Use the Up/Down keys to select font size desired. Press the M key to confirm and the book will then be re-‐scaled as per your selection. This may take a few seconds, depending on the size of the book. Scale to S Scale to M Scale to L Scale to XL Note: If you are reading a book that has been stored as a .TXT file, pressing the Zoom Key will change the font size without using the menu. Scale to XXL Set Font 10 PLAYING MUSIC FILES – Select this to see the Music Sub-‐Menu, as shown below: RESUME PLAY – By selecting this, you will see the Music Interface Menu. From there, you can resume playing the last song played, choose another song, control your music, etc. Please see the Music Interface below: PRESS ONCE TO CHANGE MUSIC PLAYED PRESS PLAY/PAUSE KEY PRESS AND HOLD TO SCROLL MUSIC BY 10SEC TO PAUSE / PLAY MUSIC 11 PRESS TO INCREASE OR DECREASE VOLUME MUSIC INTERFACE MENU – While playing music, you can control the sound and playing method by using the Music Sub-‐Menu. Press the M key to reveal this menu. Here is a breakdown of the Music Sub-‐Menu: Repeat Mode > Choose to play music: Once / Repeat / All / All repeat / Intro (Plays first 10 sec) Play Mode > Choose to play music: In order of storage, or in Shuffle Mode EQ Sel > User EQ Setup > Display > Choose your favorite sound: Normal / Rock / Pop / Classic / Bass / Jazz / User EQ Use this to set up the equalizer sound you like. Use the Up/Down and Left/Right keys to set up. Choose whether or not to show the lyrics of the music. Lyrics will only display if the music has been created with this built into the music data. Music Setting MUSIC SUB-‐MENU EXPLAINED – CURRENT PLAY = Displays the current song being played. ALL MUSIC =Displays all the music files stored on your unit. Use the Up/Down keys to select, then press ARTIST =Displays music files sorted in artist order. Use the Up/Down keys to select, then press the M Key ALBUM =Displays music files sorted by album order. Use the Up/Down keys to select, then press the GENRE =Displays music files sorted in genre order. Use the Up/Down keys to select, then press the M key MY FAVOURITE =Displays music files you have marked as a favorite. Use the Up/Down keys to select, then press RECORD =Displays all the files you have recorded using the Record function. Use the DIR LIST =This selection will display all the file sub folders. HOLD RECOLLECTION =If you turn the unit off during music play, this function will store the last 3 songs so you can pick the M Key to begin playing. to list by each artist. You can then select the song and press the M Key to play. M key to list the albums. You can then select the album and press the M key to play. to list by genre. You can then select the genre and press the M key to play. the M key to play. To mark a song as a favorite, go to any list of songs on your unit (All Music / Artist / Genre, etc.) and press the Play/Pause key. You will see the “Add to Favorite” menu box. Select YES to mark the song. To delete songs from the Favorite List, put the cursor on the song and press Pause/Play key. You can then choose to Delete the song, “Clear Up” to remove all songs. NOTE: By removing any songs from the Favorite List, you are NOT deleting the song from the unit. Up/Down keys to select, then press the M key to play. up playing from the same place as when the unit was powered down. PLAYING VIDEO FILES Select VIDEO from the Opening Menu and navigate to the “Videos” sub folder using the Up/Down keys and pressing the M key to confirm. You will then see all the video files stored on the unit. Use the Up/Down keys to select and press the M key to confirm. The selected video will begin to play. 12 PRESS ONCE TO CHANGE VIDEO PLAYED PRESS AND HOLD TO SCROLL VIDEO BY 10SEC PRESS PLAY/PAUSE KEY TO PAUSE / PLAY VIDEO By pressing the M Key while a video is playing, you will reveal the Video Sub-‐Menu. This menu allows you to control the way the video is viewed, its length of playing time, and more. VIDEO SUB MENU – Sub Title Language Choose the language of any subtitles that may be stored in the video file. Select Time Play Choose the length of time you wish the video to play. Full Screen Choose to switch between Normal / Original / Full Screen modes. RECORDING A MEMO Select RECORD from the Opening Menu to record short memos, notes, or reminders. You will see the menu below. To record, simply press the Play/ Pause key. You will see the RED icon change to Green while recording and change back to Red if you press Pause. To finish recording, press the RETURN key, and you will be prompted to “Save” the file. Select Yes and press the M key to confirm saving, or select No to reject the file. Quality > Volume > Set the quality of the recording. Set the volume level of the recording. PRESS M KEY TO REVEAL THE RECORD SETTING SUB-‐MENU Choose the Brightness of the video playing by selecting One / Two / Three / Four / Five. Brightness Record Setting PRESS PLAY/PAUSE KEY TO PAUSE / PLAY RECORDING NOTE: For best results, hold the unit so that you speak into the bottom, where the microphone is located. 13 VIEWING PHOTOS Select PHOTO from the Opening Menu to view all the photos you have stored on the unit. Scroll to the “Photos” folder using the Up/ Down keys and press the M key to show the list of photos stored. To view a photo, scroll to it using Up /Down keys and press the M key to confirm. The photo will then be displayed. To change the photo being displayed, press the Left/ Right keys to move forward or back. While a photo is being displayed, you can zoom in or out using the Zoom key. While a photo is displayed, you can press the M key to reveal the Photo Sub-‐ Menu. Browse > Select this to choose the time taken to auto change the photos: 5 sec / 10 sec / 20 sec / Turn off. PRESS M KEY TO REVEAL THE PHOTO SUB-‐MENU Record Setting PRESS THE ZOOM KEY TO ZOOM IN/OUT OF PHOTO USING THE RADIO Select Radio from the Opening Menu. First, check if the unit is set to the correct region. You can use Europe or USA. To select this and other Radio Functions, press the M Key: Search Manually Auto Search Preset Mode Save Channel > Delete Channel > Stereo Switch > Receive Area > FM Record Press this to manually search for channels. Use Auto Search feature. Choose this to select saved channels. Use this to save a “found” channel. Use this to Delete a saved channel. Switch between stereo and mono sound. Select the region you are in. Use this to record the station. NOTE:-‐ For the radio function to work at its best, make sure you use the earphones and are in an area with good reception. EXPLORER Select this item from the Opening Menu to view ALL files stored on the unit. GAME Select this to play the games on the unit. There are no instructions available for these games at this time. SETTINGS Select this to adjust or change the global settings on the unit. Please see the reference chart below. 14 Settings Display Setting System Setting Language System Information AutoShut Time Time Calendar Calculate Font Set Settings Menu Explained: SELECTION Display Setting System Setting MENU ITEM CHOICE COMMENT Light-‐Time 5 / 10 / 15 /20 30 Seconds / Always On This sets the amount of time the unit will stay on without activity, in order to save battery use. Brightness One / Two / Three / Four / Five This sets the overall brightness of the unit’s screen. Restorable Yes / No This resets the unit to factory default settings. Key Lock Time 10 sec/ 30 sec/ 5 min / This sets the amount of time taken before the buttons are locked. 10 min / None Language English / Deutsch / Italian / Portuguese / Dutch / French / Spanish / Russian / Chinese System Info Select the language you would like to use. The default is English. Displays the hardware specifications of this unit. AutoShut Time 3 / 5 / 10 / 15 / 20 Min This sets the time taken before the unit completely shuts down No Auto Shutdown when there is no activity, in order to save battery use. Time Time and Date Calendar Font Set Allows you to set the unit’s time and date. Displays the calendar. Scroll to different dates using Up /Down keys. Default / Arial / Times This allows you to choose the font in which all the menus are New Roman / displayed. Helvetica / DroidSansFaliback 15 Troubleshooting Tips PROBLEM Unit will not turn on POSSIBLE REASON SOLUTION Battery not charged Plug the unit into a computer via USB cable and allows battery to fully re-‐charge. Incorrect operation caused unit to freeze Turn the unit off and on via the on/off switch on the front. If the unit still will not start, switch it on at the Main Power Switch at the bottom of the unit. Corrupted book caused unit to freeze Unit shuts down Battery not charged shortly after startup Plug the unit into a computer via USB cable and allow battery to fully recharge. Cannot connect USB Cable broken. to computer USB port on PC not enough power Replace USB cable. No Sound when Volume set too low playing music or Earphones broken video files Incorrect file format Change the USB port the unit is plugged into. We suggest that you plug the unit into the rear of a PC, where the actual USB port resides. On some PC’s, front USB ports do not carry enough power to operate the connection. Do not use a USB hub. Increase the volume by using the Up key. Replace Check the file on another device to see if the file is corrupt. Double check that the file is compatible with the unit by referring to the unit’s specifications. Cannot see any text on the screen after opening an eBook Corrupted or Check the unit’s specifications to make sure the eBook is in a compatible incompatible book file format. Download the eBook again and transfer to the unit again. Unit does not recognize TF memory card Faulty TF Card Reformat or replace the TF card. Card upside down Gently remove the TF card without any force, turn over and re-‐insert. Radio sound is not clear Not using earphones Poor reception area Use earphones. Move to a better area. Wait a moment for the unit to lock in to the channel. Product Specifications ¨ Display: 7” Color LCD Screen 16:9 ¨ Resolution: 800 x 480 Pixels ¨ Memory: 4GB ¨ Expandable Memory: TF Card (Up to 16GB) ¨ Battery: 2000mAh / Lithium Ion Battery ¨ Supported Text Formats: ePUB, PDF, TXT, MOBI, LRC FB2, RTF, HTML, PDB ¨ Supported Audio Formats: MP3, WMA, FLAC, AAC, OGG ¨ Supported Image Formats: JPG, BMP, GIF, PNG ¨ Supported Video Formats: MPG, RMVB, WMV, MP4, FLV, ASF, 3GP, RM, AVI,DAT ¨ Supported Languages: English, Deutsch, Italian, Portuguese, Dutch, French, Spanish, Polish, Turkish ¨ Dimensions: 195 x 122 x 10 mm ¨ Weight: 240g Limitations of Liability Statement Links to Third Party Sites The Ematic User Manual may contain links to third-‐party sites, however, please be aware that Ematic is not responsible for and cannot control these other sites. Ematic makes no representations or claims whatsoever about any other website which you may access through this user manual. When you access a non-‐Ematic website, even one that may contain an Ematic logo, please understand that is independent from Ematic, and that Ematic may have no control over the content on that website. In addition, a link to a non-‐Ematic website does not mean Ematic endorses or accepts any responsibility for the content, or the use, of such website. It is up to you to take precautions to ensure that whatever you select for your use is free of such items as viruses, worms, Trojan horses and other items of a destructive nature. The Ematic User Manual is for your exclusive benefit and you assume all risks, losses and/or damages of whatever nature that may result in using the Ematic User Manual. Limitation of Liability and Indemnity To the maximum extent permitted by applicable law, Ematic shall not be liable for any damages suffered as a result of using, modifying, contributing, copying, distributing, or downloading the materials, use of the Ematic User Manual or use of any Ematic product and/or software. In no event shall Ematic be liable for any indirect, extraordinary, exemplary, punitive, special, incidental, or consequential damages (including, without limitation, loss of data, revenue, profits, use or other economic advantage) however arising, whether for breach or in tort, even if Ematic has been previously advised of the possibility of such damage. You agree that you have sole responsibility for adequate protection and backup of data and/or equipment used in connection with the product and software and will not make a claim of any nature against Ematic for lost data, inaccurate output, work delays or lost profits resulting from the use of the materials. You agree to indemnify, hold harmless and defend Ematic, together with its affiliates, parent and subsidiary entities, successors, assigns, partners, managers, members, employees, officers, directors and shareholders, from and against any and all damages, liens, liabilities, losses, demands, actions, causes of action, claims, costs and expenses (including, without limitation, reasonable attorneys' fees, charges and disbursements, as well as the cost of in-‐house counsel and appeals) arising from or related to Ematic, the use of The Ematic User Manuel or any Ematic product and/or software. Some states do not allow the exclusion or limitation of incidental or consequential damages, so the above limitation or exclusion may not apply to you.. Android is a trademark of Google Inc. Use of this trademark is subject to Google Permissions. Copyright © 2011 Adobe Systems Incorporated. All rights reserved. ©2010 Kobo Inc. All rights reserved. TM Kobo, the Kobo logo, the Kobo eReader logo and eReading: anytime. anyplace. are trademarks of Kobo Inc., 364 Richmond Street West, Suite 300, Toronto, ON M5V 1X6 Canada. ©-‐2010 Bluetooth SIG, Inc. All rights reserved. Borders is the registered trade mark of Borders Properties Inc.