1
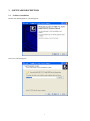
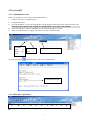
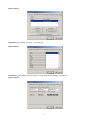
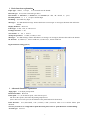
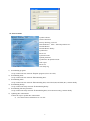
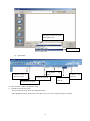
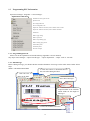
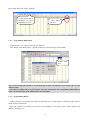
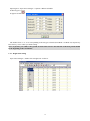
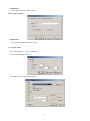
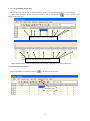
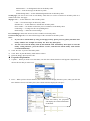
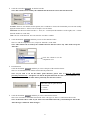
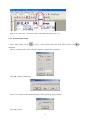
BARCODE LABEL SCALE PC SOFTWARE MANAGEMENT Pinnacle Technology Corp. CONTENT 1 2 SOFTWARE DESCRIPTION ........................................................................................................................... 1 1.1 Software installation .......................................................................................................................... 1 1.2 Use Link32......................................................................................................................................... 3 1.2.1 Communication Test ................................................................................................................ 3 1.2.2 Main table explanation ............................................................................................................ 3 1.3 Programming PLU Information ....................................................................................................... 12 1.3.1 Programming Barcode .......................................................................................................... 12 1.3.2 Edit Message........................................................................................................................... 12 1.3.3 Programming Multi Label .................................................................................................... 14 1.3.4 Programming Rebate............................................................................................................. 14 1.3.5 Weight Unit Setting................................................................................................................ 15 1.3.6 Shelf Time Setting .................................................................................................................. 16 1.3.7 Import from Excel and Export to Excel............................................................................... 17 1.3.8 Package by Fixed weight ....................................................................................................... 18 1.3.9 Piece Together Usage ............................................................................................................. 18 1.3.10 Preferences.............................................................................................................................. 19 1.3.11 Page setup ............................................................................................................................... 20 1.3.12 PLU Print ............................................................................................................................... 21 1.3.13 Programming PLU hotkey .................................................................................................... 22 1.3.14 Download PLU hotkey........................................................................................................... 22 1.3.15 Make PLU hotkey sheet ........................................................................................................ 23 1.4 Programming label........................................................................................................................... 26 1.4.1 General description................................................................................................................ 26 1.4.2 Create a new label .................................................................................................................. 28 1.4.3 Editing the label ..................................................................................................................... 29 1.4.4 Download label format .......................................................................................................... 31 APPENDIX ..................................................................................................................................................... 32 2.1 Appendix 1: TXP (XU) File Format ................................................................................................ 32 2.2 Appendix 2: Barcode Coding List ................................................................................................... 33 2.3 Appendix 3 Live Commodity Batch Management .......................................................................... 35 1 1.1 SOFTWARE DESCRIPTION Software installation Double click lbmnXXXX.exe, and then appear: Select next, and then appear: 1 Select installation catalog, then select next, then appear: select Next,then appear: Select Install. Finally, select „Finish‟ to end installation. 2 1.2 Use Link32 1.2.1 Communication Test Before you use link 32, you need to test the communication: 1. Connect scale to PC: Via Ethernet port 2. Communication Test a) Set scale IP address, or query the scale IP (the scale IP displays on the LCD screen when turn on the scale. Note:Query the scale IP: enter „System Set‟, and then press „@‟ to refer to the scale IP. b) Open the attached PC software LB-MNEn on the CD-disk, and choose „Link32‟. c) Input scale information, we suggest you connect LS to PC via Ethernet port. 3.Double click to choose the scale d) Choose the button 2. Input LS‟s IP address here. 1.Input scale name and click it, then, start to test communication. Communication is OK <Result> 1.2.2 Main table explanation A B C D E F G 3 H I J K A: Select the department name B: Input the department name C: Double click to select the scale name D: Enter Scale name E: This field is for communicating with other scales or PC by phone line (Modem). F: Enter Scale IP address for Ethernet communication, or input machine no. for COM communication. G&H: Set up new label format and download the label format to the scale. 1) Set up new label format: double click the column, input the filename in the popup window, click OK, then double click the filename to edit label and save it. 2) Download the label format to the scale: choose the column; double click the file on right. I: Set up new PLU file. J: Update PLU. K: Download the hotkeys to the scale. The operation is introduced in Chapter 11.3.12. File menu 1) Set preferences Click „File/Preferences‟ to set the following options: Figure option 1 Explanation: Work directory:set default work directory(influence area I ). System decimal position:0,1,2. Set PLU decimal digit of PLU manager. Auto download hotkey:Always so: Download hotkey with PLU. No, I needn‟t: Don‟t download hotkey. Auto download rebate schedule: See PLU manager part. 4 Figure option 2 Explanation:set Link32 user name,user password; Figure option 3 Explanation:This defined unit, the setting is corresponding to PLU manager‟s weight unit. Figure option 4 5 Figure option 5 Explanation: Set Link32 download PLU and update PLU automatically (set I, J area firstly). 2) Set function Click „File/set function‟ to set the following options: Figure function setting (part 1) Explanation: Click it, then the parameter in this dialog box will back to the default status. Export the current parameter in this dialog box and save it as a *.hex file. Download the *.hex file of the parameter that has just been saved in last step. After set all the parameter in this dialog box, click it to download the parameter to the scale. Explanation: All scales use same setting:When Link32 connects with several scales at the same time, if select this option,it will download these parameters to all connected scales;if not,it will list all connected scale IP at the bottom of dialog box. Select a scale IP, then you can set the scale separately. 6 Basic functions explanation: Paper type:0:label;1:receipt ;2: no-rewinder.0 is the default. Barcode type:0~99 (refer to barcode type table). Date format:0: DDMMYY; 1: MMDDYY; 2: YYMMDD (D,date;M,month;Y,year). Decimal position:0,1,2;Set price decimal digit. Rounding:Set round carry digit. Message 2:0~12000 default message. If PLU data hasn‟t set message1 or message2, this PLU data will be the default. Display darkness:Reserved. Label type:6: D0; 7: D1; 0~5: Reserved. Package tolerance:1~20 Year format:0:YY; 1:YYYY. Total price precision:1: N.N0; 2: N.NN; 3: N.N. Message 1:0~12000 message. If PLU data hasn‟t set message1 or message2, this PLU data will be the default. 18 -barcode:0, width 2/5; 1, narrow width 2/5; 2, EAN 128; 3, narrow EAN 128. Figure function setting (part 2) Advanced functions explanation: Align paper:-8~8 adjust print position. Horizontal Offset:Reserved. Print speed:0~7; 0: the fastest speed; 7 the slowest speed The lower the speed is, the better the printing impression is. (Note: don‟t set too low speed, or the lifetime of the print head will be shortened) Print direction: 0-0° (horizontal), 1-90° (vertical), 2-180° (converse). This is to set all the label‟s print direction. Note: If you want to set a single label‟s print direction, please refer to „print direction‟ on label editing. Account type:reserved. 7 Security functions explanation: Set the password of the scale lock function. Weight unit: Set the unit of calculating price. Figure function setting (part 3) Set Barcode 99: The characters here show what you have defined. Set the barcode format in this function. Set each item‟s font length in the column „Length‟. Among them, „Number/Weight, unit price, and total price‟ are with another item „checksum‟. You could tick it to get the checksum value. Note: If you want to use this kind of barcode, you should input „99‟ at the „Barcode Type‟ column in „PLU manager‟. Communication menu Reserved for COM scale. Reserved for COM scale. 1) Set In this popup window, you can set communication parameter for non-TCP/IP scale. 2) Detect port You can detect port in this operation: input IP address of the label scale, and then press the “Detect” button 8 Network menu Update software. Check connection. Factory checking, reserved. Download PLU,label,function parameter etc. Download PLU. Download PLU hotkey. Update PLU. Reserved. Upload account. Upload parameter Update PLU & upload account. Sale report. Reserved. View daily log. 1) downloading program: Set up connection first. Network update program (select *.hex file) 2) downloading PLU: Set up connection first. Network downloading PLU. 3) downloading label: Set up connection first. Network downloading data, select label (D0) and label (D1), confirm finally. 4) downloading hotkey: Set up connection firstly. Network downloading hotkey. 5) downloading function parameter: Set up connection firstly. Network downloading data, select function setting, confirm finally. 6) Updating PLU information: Follow the steps to update PLU information: a) Save the new PLU information as *.txu file. 9 The name must be the same with old PLU file Choose this type b) Open link32 3.Double click to choose the scale 6.download label 1.Input the scale IP 2.input the scale name the 4.choose PLU file old 5.choose PLU file c) Click „network‟, choose „update PLU‟ item. 7) Upload account & sale report: Set up connection firstly. Network upload account. After uploading account, choose the “sale report” item, you can see a popup window as follow: 10 new Input the period of time you want to query, input the scale IP and corresponding LFCode, then click “OK”. The sale report shows as follow: Programs menu Open label editor Open PLU manager 11 1.3 Programming PLU Information Open PLU manager: „Programs‟→„PLU manager‟ Explanation of file menu: Establish PLU data, open new file Open PLU file Save changed PLU file Save as changed PLU file Import PLU data from excel file, refer to Picture excel in below. Export PLU data from excel file, refer to Picture references. Preferences Refer to page setting Refer to print PLU Refer to input hotkey page Refer to hotkey page preview Check hotkey sheet Print hotkey sheet Exit PLU manager. 1.3.1 Programming Barcode Please refer to the explanation of barcode makeup (Appendix 2 in User manual). Step: Open „PLU manager‟→input „barcode type‟ →input „department‟ →input „code‟ or „LF code‟. 1.3.2 Edit Message Before editing message, you should edit the related information of message on the label. Please follow below steps. STEP1: edit and download label 4 Click this button to download label to the scale after editing the label. 1 Click M1 here to add it on the label Here shows message1 2 Input number in the Columns which stands for the length of Message1 3 Choose the width in Lines here 12 Note: More details about the label editing please refer to Chapter 11.4 Programming label STEP2: edit message by scale or by software There are two methods to edit message, one is by scale directly and the other is by software. Method 1: edit message by scale 1 Press [ZERO] key and hold it for seconds to go into editing status. 2 Please press [PRINT/ENTER] key when the LCD display “Edit Message”. 3 Please input index code to edit message when LCD display “? Index?”, then please press [PRINT/ENTER] NOTE: Index code is equal to the number in software PLU MANAGER. Index code 4 The LCD display “Line 1”, then please press [PRINT/ENTER] key again, and you can input the content of line 1 at this time. When you finish “line 1”, please press [PRINT/ENTER] key to edit Line 2 till line 8 by repeating this action. 5 If you don‟t want to edit all lines content, and need to exit just after finishing line 1 etc, please press [PRINT/ENTER] key repeatedly till the LCD display “SAVE”, then press [PRINT/ENTER] key again, and you can hear “beep” which stands for you have saved successfully. Please press [C] key to exit this edit status. Method 2: edit message by software Open „PLU manager‟→„Options‟→„Edit message‟→input message. Or directly press . Index code Note: 1. You should only input index code in the message edit field under PLU manager table. 2. Every PLU message is corresponding with the Index code entered. 3. You could edit 8 lines messages for each PLU. 13 Step3: Input index code in PLU manager. 2 Click this button to download the PLU information to scale 1.3.3 1 Input index code here Programming Multi Label In this operation, you can set Label type for each PLU. Step: Double click „Multi Label‟, it appears prompt box, select label type and click OK. Double click here Note: 1. If you using this method to set the label type for PLU, the function „choose label type‟ on scale will lose action. 2. The choice of “Multi Label” is just an index code. PLU will transfer the corresponding Multi Label by index code automatically, if the Multi Label was downloaded. 1.3.4 Programming Rebate In this operation, you can input plus number to rebate directly, or input negative to denote the index code of rebate in each period of time. Input plus number: for example, you want to sell something at a discount of 50%. Please double click „Rebate‟, then input „50‟. 14 Input negative: Open „PLU manager‟→Options→Rebate Schedule. Or directly press . It appears as follow: The number from –1 to –10 is corresponding to the ten types of mode (from Mode 1 to Mode 10) respectively. Press the key „Close‟ when you finish setting. Note: At present, you could set five period of rebate time at most. The end time of the first period should be the beginning of the second time. 1.3.5 Weight Unit Setting Open „PLU manager‟, double click „Weight Unit‟ to choose. 15 1.3.6 Shelf Time Setting You can set shelf life for the PLU if necessary. Open „PLU manager‟ to enter following interface: Set PLU shelf time in this column. Note: The shelf time can be day or hour. If you want to set day, the number you input here should be positive number (range from 0 to 365); if you want to set hour, the number you input here should be negative number (range from -24 to 0). For example: if the shelf time of a PLU is 15 days, you should input „15‟ in the column „Shelf Time‟; if the shelf time of a PLU is 12 hours, you should input „-12‟ in the column „Shelf Time‟. Method 2: 1) Download a PLU file: Click , select a PLU file, and click “open” to download it. 2) A popup window prompts: 3) Click “Y” to make the hotkey. 16 1.3.7 Import from Excel and Export to Excel Import from Excel Open the Excel file you want to import to Link32 first and make sure it‟s the only Excel file opened in your PC. Suppose below is the main table of the opened excel file: Define: PLU “name” is in the column “A” “LFcode” is in column “B” “Code” is in column “C” “Barcode type” is in column “D” “Unit price” is in column “E” Open „PLU manager‟→„File‟→„Import from Excel‟, the following interface will be opened: Then set the relation between PLU field and Excel column as following: 1.Choose PLU field 2. Choose the Excel column from which import the “Name” field. Follow the above instructions, and set the relations between Excel columns and all PLU Fields you want to import from the Excel. After you set all the relations, the following interface will appear: 17 Input selected range. Input the start line in the PLU manager. the Excel After the above setting, click „OK‟ to import the PLU data to the PLU manager. Then open „file‟→select „Export to Excel‟, an Excel file will pop up automatically: 1.3.8 Package by Fixed weight Fix weight package, this function is available by setting on PC software first. For example: pack fish by the fixed weight 0.250kg, and the corresponding hotkey is 38. The operation processes are as follows: 1. Open „Start/Program/LB-MNV/PLU manager‟ on your PC. Choose „Fixed weight‟ in the column „Package Type‟; input 0.250kg in the column „Package Weight‟; input 5% in the column „Package Tolerance (%)‟. Double-click to set the fixed weight. Unit: kg. Double-click and choose „fixed Weight‟. 2. After setting, click I.e. weight tolerance +5%kg can be sold. in the toolbar to download it to the scale. 1.3.9 Piece Together Usage Piece together function is usually used in the aspect, such as pack gift-box and fruit-dish. This function is available by setting a hotkey „piece together‟ on PC software first. The operation processes are as follows: 1. Open „Start/Program/LB-MNV/PLU manager‟ on your PC. And set hotkey 01 as the „piece together‟ hotkey. Following the operation below to set the „piece together‟ hotkey: Input „piece together‟ in the column „Name‟; set unit price as „0‟ in the column „Unit Price‟; double-click the column „Package Type‟ and choose „both fixed‟; input „0.000‟ in the column „Package Weight‟; input 5% in the column „Package Tolerance (%)‟. Note:When use piece together function, two label-printing styles are for your option (Set the label-printing style in the column „Package Weight‟). They are „0.000‟ and „0.001‟, where „0.001‟ stands for:when 18 weighing each item of the fruit-dish (for example), each will print a single label, and at last print the total one; „0.000‟ stands for:only print the total label. Set unit price as „0‟ 2. After setting, click Double-click and select „Both Fixed‟. i.e. weight tolerance +5%kg can be sold. in the toolbar to download it to the scale. 1.3.10 Preferences Open „PLU manager‟→„File‟→„Preferences‟, you can see the popup window: Picture references/general: Download hotkey with PLU * We Recommendatory: ask me first. (When downloading, a prompt frame will appear.) *Always yes. (When downloading there is not prompt frame appear.) *No, I needn‟t download hotkey. Hotkey sheet type: Please select 112keyX2 on model LS serial scale; select “84key X2” sheet type on model LH scale. 19 Picture references/customer field label: Explanation: Self-define PLU field name. 1.3.11 Page setup Open „PLU manager‟→„File‟→„Page setup‟, you can see the popup window: Picture page setting1: Explanation: PLU print-out page margin setting. Picture page setting 2: 20 Explanation: Select the PLU field on PLU print-out. Picture page setting 3: Explanation: PLU print-out header and footer setting. 1.3.12 PLU Print Open „PLU manager‟→„File‟→„PLU Print‟. You can see the popup window: Press Options to select Printer and Paper: 21 1.3.13 Programming PLU hotkey You can input number directly to distribute hotkey for PLU, or distribute the hotkey by “PLU manager”. 1) Open „PLU manager‟, double click each column to edit it, and then click to save. You can revise hotkey in the same way. Double click these spaces to edit them. Double click these spaces to edit them. More details about each column please take below explanation as your references: 1.3.14 Download PLU hotkey After programming PLU hotkey, click key to download it to the scale. Click this button 22 1.3.15 1) Make PLU hotkey sheet Click „File/Preferences‟ to enter the following setting interface: Select the correct hotkey sheet type. 2) Click „File/Hotkey sheet input‟ or click this button to set the hotkey table in the following interface: first page: Font --- set the characters‟ font on hotkey table. Load Plu --- click this item, you can choose the PLU in the pop-up window: Double click the blank to choose the PLU or tick up “check all”.. 23 BackGround --- set background color for the hotkey table. Clear --- clear all messages on the hot key table. default background --- set the default background color of the hotkey table. second page: you can set two levels of each hotkey. This item is to set the second level on hotkey table. It is similar to the item „first page‟. all page: Font --- set the characters‟ font on hotkey table. Clear --- clear all messages on the hot key table. default Font --- set the characters‟ default font on hotkey table. Price Visible --- set whether to show the price of each PLU on the hotkey table. Load Image --- set image for the corresponding PLU. Delete Image --- delete the selected image. Use second page: choose this item to use the second level on hotkey table. Cancel second page: this is to cancel all messages of the second level on hotkey table. Note: 1. If you want to sell the PLU by using second page hotkey, please press key [PLU] and then enter hotkey number. For example: use hotkey 113. Press key [PLU][113]. 2. You also can create the hotkey table by this method: click „File/Hotkey sheet input‟ to enter the hotkey setting interface, press the button „Create‟, and then the whole hotkey table will be created automatically. 3) Click „Preview‟ to preview the hotkey table: 4) Click „Print‟ to print the hotkey table and cut it down: 5) Insert the hotkey sheet into the scale: Properties Explanation Caption: When you need to set some PLU, can click this column, then there will appear a dropdown list, choose the one that you want to set. Price: When you have chosen the PLU, this column will auto-display the PLU‟s price; when you click the PLU that have been set in hotkey sheet, this column will also display the unit price. Click this hotkey; the properties will display the related information of this PLU. 24 Background:Set the background of each PLU hotkey. Click this column then there will pop up a window. Choose the color that you want to set to be the background. Font: set each PLU‟s font. Click this column then there will pop up a window. Choose the font that you want to set. Code: Display commodity‟s code information. Function: reserved. The second page setting is the same with the first page. 25 1.4 Programming label 1.4.1 General description Open link32, and Click to open “label editor”, there is a default label appearing automatically, such as: The whole components for the label Set the label components‟ size, font, and format, etc. This field is for customers to self-define the barcode. Its barcode code is „100‟. The ruler mark Choose the print direction. Click each bar sign „ self-define labels. ‟ in the right to set the label components‟ size, font, and format, etc. and Click the first bar „ ‟ and then you can see the interface below. This is to edit the components‟ position in the label. Click it to choose the item and edit it. Input the digit according to the scale of the ruler mark. Then the component will place at the position that you have defined. Note: you can also select the component and keep it, and the component can be moved to any position. 26 Click the second bar „ ‟ to edit the barcode. Note: this column can be used by the condition that the first bar selects the item „Barcode‟. „Format‟: there are two formats for this printer, Ean-13 and Int15. Choose the format that you want. We usually apply the format „Ean-13‟. Please refer to Chapter 12.2 for details. „Direction‟: the direction of the barcode. 0 – level; 90 – vertical (barcode number is on the right); 270 – vertical (barcode number is on the left). „Size‟: the size of the barcode. You can select the size that is suitable. Click the third bar „ ‟ and then you can see the interface below. This is to edit the components‟ size (except for „Barcode‟) in the label. Note: This column can be used by the condition that the first bar selects any other items except for „Barcode‟. Click the column to set the components‟ size. Print direction Click the fourth bar „ ‟ and then you can see the part of the interface below. This is to set which direction will the current label be printed out. Note: If you want to set all the label‟s print direction, please refer to Page 50 ‘link 32/set function/print direction’. And please note that if the print direction here isn‟t accord with that is set on „link 32/set function‟, the label will be printed by the direction set here. Select the code for print direction. 0: horizontal 1: vertical 2: converse Click the fourth bar „ ‟ and then you can see the interface below. This is for customers to self-define the barcode if the code types of „Ean-13‟ cannot meet their needs. Note: Its barcode code is „100‟. If you want to use this kind of barcode, you should input „100‟ at the „Barcode Type‟ column in „PLU manager‟. 27 Choose each item and edit it. Select each item‟s font length. Among them, „Number/Weight, unit price, and total price‟ are with the item „checksum‟. You could tick it to get the checksum value. Here, the green characters show what you have defined. 1.4.2 Create a new label Input width (no more than 56) 28 Input height (no more than 109) 1.4.3 Editing the label 1) Click left „component‟ page. Choose „component‟ page 2) Click each item in the tool bar, and then click the label again, the component will lay in the label, select the component and keep it, the component can be moved to any position. When you are editing the barcode, you can change its direction by changing the value in the right function area „Direction‟. And you can also alter each item‟s size by choose its size on the right function area. A B C D E F G H I J A: barcode; B: PLU name; C: unite price; 29 K L M N O D: weight; E: total price; F: period of validity; G: package date; H: info 1; I: info 2; J: fresh code; K: head message; L: foot message; M: total price discount; N: unit price discount. O: tare (The items M and N are used to print „Delmark‟ for the primal price on the label. If these two are not edited on the label, the option „Print Delmark‟ on the scale will lose function. Please refer to Chapter 8.2 No.15 for the detail of „set Print Delmark‟) 3) Click left „background‟ page, select function groupware bar, set font etc, can edit word,line,background, and company logo etc. When you edit the company logo, you can open the logo by picture software, then copy and paste it on the „background‟. A B C D E F a G b A. Select B. eraser C. pencil D. Text E. fill F. beeline G. rectangle H. Filled rectangle I. round angle J. filled round angle rectangle K. Ellipse L. filled ellipse H I J K L c d e f g a. Line thickness b. fill in type c. Font d. word size e. bold font f. italic g. underline Paste self-defined logo (BMP file) on the label: In „Background‟ page, click „Edit/Paste from…‟, choose the logo (BMP file) you want in the pop-up window and click the button „Open‟, then you can drag and drop it on the label. 4) After editing the label, you should save it: Choose a format (D0/D1/A0/A1/B0/B1/C0/C1) for the label as follow: 30 Open “File”, choose the “save” item, enter a non-blank name, then click „save‟. 1.4.4 Download label format Open „Label editor‟→press to select a label format which has been edited before→press download. There is a popup window, select “TCP/IP” and enter current scale‟s IP address: Click OK, it appears prompt box: Click “Y” to confirm, then begin downloading, and it appears the popup window: Click OK to finish. 31 to 2 APPENDIX 2.1 Appendix 1: TXP (XU) File Format TXP (or TXU) file is the text storage format of PLU table in Link32. TXP file and TXU file are totally same except their usage purpose is different. So their suffixed names are different. Generally speaking, TXP file contains all PLU message of a scale which is mainly used by Link32 to overcast and download while TXU file contains PLU varying message (such as adding, modifying and deleting PLU) which is mainly used by Link32 to update PLU. Every PLU contains the following columns: English name Width Default Value range and function description PLU No. 4 Name 36 LFCode 6 Uniquely to identify every life commodity and used to input indirect PLU Code 10 Refer to barcode coding list Barcode Type 2 0~99, refer to barcode coding lost Unit Price 8 No decimal mode that is to multiply 10 when its decimal digit is 1 and to multiply 100 hen its decimal digit is 2.Example: 12.34 is expressed as 1234 (=12.34*100) Weight Unit 1 1:g, 2:10g, 3:100g, 4:kg, 5:oz, 6:lb, 7:500g, 8:600g, 9: PCS (g), A: PCS (Kg), B: PCS (oz), C: PCS (Lb) Department 2 0~99, Refer to barcode coding list Tare 6 0 Container weight for weighing, within 15kg after logic conversion. Shelf Time 3 15 0~365, note: 364-no print valid date; 365-o print valid date and package date. Package Type 1 0 0:normal mode (common weighing mode),1:fixed weight mode,2:fixed price mode,3: piece together function (both fixed). Package Weight 6 0 Within 15kg after login conversion. Package Tolerance 2 5 0~20, error tolerance in fixed eight package or fixed price package. Message1 3 0 0~12000 [0-no use this message] Message2 3 0 Reserved Multi Label 3 0 0~255, every 8 bit corresponds to 8 labels. Rebate 3 0 -10~100, -1~-10means to use corresponding period of time to discount PCS Type 2 0 0~15, number unit used by commodity sold according to entries. User can set 15kg kinds of number unit such as bag, block in Link32. It is reserved to be compatible with old version and has no real meaning Notes: 1. One space is added after every column and columns are right aligned. 2. Return (0xd) and new line (0xa) are added after every PLU as separator. Example: one example is demo.txp, which is installed in the subdirectory Demos and can be opened by notepad. 32 2.2 Appendix 2: Barcode Coding List Barcode type Department Commodity Total price Weight number 00~09: Ean13 code, the front two codes represent department code: 00 DD (2) IIIIIIIIII (10) X X 01 DD (2) IIIIII (6) PPPP (4) X 02 DD (2) IIIII (5) PPPPP (5) X 03 DD (2) IIII (4) PPPPPP (6) X 04 DD (2) III (3) PPPPPPP (7) X 05 DD (2) IIIIII (6) X Q.QQQ (4) 06 DD (2) IIIIII (6) X QQ.QQ (4) 07 DD (2) IIIII (5) X QQ.QQQ (5) 08 DD (2) IIIII (5) X QQQQ.Q (5) 09 DD (2) IIIII (5) X QQQQQ (5) 10~19: Ean13code, the front two codes represent fixed code: 10 20(2) IIIIIIIIII (10) X X 11 21(2) IIIIII (6) PPPP (4) X 12 22(2) IIIII (5) PPPPP (5) X 13 23(2) IIII (4) PPPPPP (6) X 14 24(2) III (3) PPPPPPP (7) X 15 25(2) IIIIII (6) X Q.QQQ (4) 16 26(2) IIIIII (6) X QQ.QQ (4) 17 27(2) IIIII (5) X QQ.QQQ (5) 18 28(2) IIIII (5) X QQQQ.Q (5) 19 29(2) IIIII (5) X QQQQQ (5) 20: no print barcode 21~29: Ean13 code, the front one code represents department code: 21 D (1) IIIIIII (7) PPPP (4) X 22 D (1) IIIIII (6) PPPPP (5) X 23 D (1) IIIII (5) PPPPPP (6) X 24 D (1) IIII (4) PPPPPPP (7) X 25 D (1) IIIIIII (7) X Q.QQQ (4) 26 D (1) IIIIIII (7) X QQ.QQ (4) 27 D (1) IIIIII (6) X QQ.QQQ (5) 28 D (1) IIIIII (6) X QQQQ.Q (5) 29 D (1) IIIIII (6) X QQQQQ (5) 30~35,40~45: 18code, the front one code represents department code 30&33 D (1) IIIIII (6) PPPPP (5) QQ.QQQ (5) 31&34 D (1) IIIIII (6) PPPPP (5) QQQQ.Q (5) 32&35 D (1) IIIIII (6) PPPPP (5) QQQQQ (5) 50~52: 8 code 50 X IIIIIII (7) X X 51 D (1) IIIIII (6) X X 33 Checksum C C C C C C C C C C C C C C C C C C C C C C C C C C C C C C C C C C 52 DD (2) 53 X 54 D(1) 55 DD(2) IIIII (5) IIIIIIII(8) X X C X X X IIIIIII(7) X X X IIIIII(6) X X X 36-38: 18code, the front one code represents department code, which is particular for the batch management of live commodity. 36 D (1) LLLLLL (6) IIII (4) RR (2) QQ.QQQ (5) 37 D (1) LLLLLL (6) IIII (4) RR (2) QQQQ.Q (5) 38 D (1) LLLLLL (6) IIII (4) RR (2) QQQQQ (5) Bar code type Department Art. No Quantity/weight 79~85,87:18 Total/Unit price Check sum WW.WWW PPP.PP X WW.WWW PPP.PP C WWWW.W PPP.PP C WWWWW PPP.PP C WW.WWW UUU.UU C WWWW.W UUU.UU C WWWWW UUU.UU C WW.WWW PPP.PP C code 79 DD 80 D 81 D 82 D 83 D 84 D 85 D 87 DD IIIIII(6) IIIIII(6) IIIIII(6) IIIIII(6) IIIIII(6) IIIIII(6) IIIIII(6) IIIII(5) Bar code type Department Art. No Total price Quantity/weight Unit price Check sum 90~95: 18 code, the former two codes print department code 90 DD(2) IIIIII(6) WW.WWW UU.UU(4) C 91 DD(2) IIIIII(6) WWWW.W UU.UU(4) C 92 DD(2) IIIIII(6) WWWWW UU.UU(4) C 93 D(1) IIIIII(6) PPP.PP(5) UUU.UU(5) C 94 DD(2) IIIII(5) PPP.PP(5) 95 DD(2) IIIIII(6) WW.WWW WWWWW C UU.UU(4) C Meaning of characters in the above list: C: CHECKSUM D: Department code 2: Fixed number I: commodity number L: Live code P: price R: discount Q: weight X: no this item Notes: 1. Ean 13= DEPMENT+CODE+[TOTAL PRICE]+[WEIGHT]+C Items with [] mean no this item in some coding system. 2. Usually Ean13 adopts 2 or 22 as its price barcode type while 7 or 77 as its weight barcode type. 34 3. CHECKSUM is calculated by the scale automatically and it is not necessary for user to input in PLU manager. 4. The difference between 30-32 and 33-35 is the method to calculate checksum. 5. The difference between 40-45 and 30-35 is that the price in 30-35 is total price while in 40-45 is unit price. 6. 36-38 is barcode type, which can be accessed by live batch management. Commodity batch number takes up commodity number column and commodity number takes up live code column. 2.3 Appendix 3 Live Commodity Batch Management Merits of live commodity batch management: It can check every batch separately, take different discount in different period within self time, show warning message when the commodity is going to be overdue (degenerative or even decayed), find out the overdue batch and process in time. General flow chart of live commodity batch management: Batch number is created when the live commodity is bought. Its forma is: Year (1) + Week of year (2) + day of week (1), four number totally. At the same time, name, code, batch number of the commodity are put into the batch commodity in order for the packing person to identify the commodity correctly. Commodity code + batch number is used to identify the batch of the commodity in the following task flow chart. Our company has already complete batch management function currently which can be realized by adding three kinds of bar code. When user calls this kind of PLU, the scale will show a prompt for the user to input batch number. These three kinds of bar code type is as following: Bar code type Depart ment Live LFD code Commodity number Discount Weight 36-38: 18 code, the former code prints department code which is special for live commodity batch management. 36 D (1) LLLLLL (6) IIII (4) R (2) QQ.QQQ (5) 37 D (1) LLLLLL (6) IIII (4) R (2) QQQQ.Q (5) 38 D (1) LLLLLL (6) IIII (4) R (2) QQQQQ (5) Meaning of the characters in the above tables: D: department code L: live code I: commodity number P: price R: discount Q: weight Notes: 1. Live code corresponds to background management system commodity code and commodity number corresponds to background management system batch number. 2. Commodities requiring batch management is those packed background. Bach management is not used to the commodity sold and weighed in the spot. 3. How Cash register makes a difference between batch number and non-batch number when it decodes. Thee are two methods: (1) Set different department code, for example: Set the department code 2 which doesn‟t require batch management and 3 which does require batch management. (2) Live code can be resolved out because the live code position and length of two kind of 18 code are same. And then distinguish between batch commodity and non-batch commodity according to live code. 4. Using step; Screen shows the prompt to input batch number when calling PLU. Input four-digit code. 35


![[ TVS M ASCOT USER M ANUAL ] - TVS-E](http://vs1.manualzilla.com/store/data/005862685_1-4bbb7317613bf954ee62497b52c82516-150x150.png)