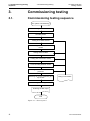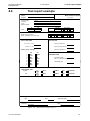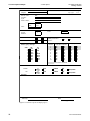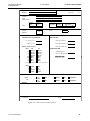
1
VAMP Arc Flash Protection Testing Manual Publication version VARCTEST/EN M/B002 VARCTEST/EN M/B002 Legal notice Arc flash protection Testing manual Legal notice Copyright © Schneider Electric 2012. All rights reserved. Disclaimer No responsibility is assumed by Schneider Electric for any consequences arising out of the use of this document. This document is not intended as an instruction manual for untrained persons. This document gives instructions on device installation, commissioning and operation. However, the manual cannot cover all conceivable circumstances or include detailed information on all topics. In the event of questions or specific problems, do not take any action without proper authorization. Contact Schneider Electric and request the necessary information. Contact information 35 rue Joseph Monier 92506 Rueil-Malmaison FRANCE Phone: +33 (0) 1 41 29 70 00 Fax: +33 (0) 1 41 29 71 00 www.schneider-electric.com VARCTEST/EN M/B002 3 Safety information Arc flash protection Testing manual Safety information Failure to follow these instructions will result in death or serious injury. Only qualified personnel should install this equipment. Such work should be performed only after reading this entire set of instructions. Turn off all power supplying this equipment before starting the installation work. Ensure the protective grounding is connected. Before performing visual inspections, commissioning, or maintenance on this equipment, disconnect all sources of electric power. Assume that all circuits are live until they have been completely de-energised, tested and tagged. Pay particular attention to the design of the power system. Consider all sources of power, including the possibility of backfeeding. Beware of potential hazards, wear personal protective equipment, carefully inspect the work area for tools and objects that may have been used during commissioning or maintenance. Neglecting fundamental installation requirements can lead to personal injury as well as damage to electrical equipment or other property. Handling this equipment requires relevant expertise in the field of protection of electrical networks. Only competent people who have this expertise are allowed to configure and set up this product. 4 Before performing dielectric (Hi-Pot) testing on any equipment in which the IED is installed, disconnect all input and output wires to the IED. High voltage testing can damage electronic components contained in the unit. VARCTEST/EN M/B002 Safety information Arc flash protection Testing manual VARCTEST/EN M/B002 Always use a properly rated voltage sensing device to confirm that all power is off. The successful operation of this equipment depends upon proper handling, installation, and operation. 5 Table of Contents Arc flash protection Testing manual Table of Contents Legal notice .................................................................................. 3 Safety information ....................................................................... 4 1. This document ........................................................................ 8 1.1. Purpose.............................................................................. 8 1.2. Related documents ............................................................ 8 1.3. Symbols ............................................................................. 8 2. Preparations for the testing................................................... 9 2.1. Required documentation .................................................... 9 2.2. Required equipment ........................................................... 9 2.4. System inspection ............................................................ 10 2.5. Safety precautions ........................................................... 11 3. Commissioning testing ........................................................ 12 3.1. Commissioning testing sequence .................................... 12 3.3. Checking I/O unit addresses ............................................ 13 3.4. Checking zones ............................................................... 13 3.5. Disconnecting trip circuits ................................................ 13 3.6. Testing of arc flash sensors ............................................. 14 3.6.1. Testing point or fibre sensors ................................... 15 3.6.2. Testing portable sensors.......................................... 16 3.6.3. Testing of the supervision of arc flash sensors ........ 17 3.6.4. Testing the supervision of I/O units .......................... 18 3.7. Connections for testing devices ....................................... 19 3.7.1. Connecting a current injection device without the time measurement ...................................................................... 19 3.7.2. Connecting a current injection device for the time measurement ...................................................................... 20 3.8. Testing the BI/O channel.................................................. 21 3.9. Testing alarm contacts ..................................................... 21 3.10. Testing the arc flash protection with the overcurrent condition ................................................................................... 22 3.10.1. Testing the pickup value .......................................... 22 3.10.2. Testing without the time measurement .................... 22 3.10.4. Testing with the time measurement ......................... 23 3.10.5. Testing protection zones .......................................... 23 3.10.6. Testing the circuit-breaker failure protection ............ 24 3.11. Testing the selectivity of the arc flash protection .............. 25 3.12. Restoring the system ....................................................... 25 4. Test report............................................................................. 26 4.1. Filling in the test report ..................................................... 26 4.2. Test report example ......................................................... 27 5. Troubleshooting ................................................................... 30 5.1. Checking the wiring .......................................................... 30 5.2. Checking the trip condition ............................................... 30 5.3. Checking the I/O unit and arc flash sensor installation .... 30 5.4. Checking the suitability of the light source ....................... 30 5.6. Checking the daylight blocking mode ............................... 31 6 VARCTEST/EN M/B002 Arc flash protection Testing Manual Table of Contents 6. Glossary ................................................................................ 32 VARCTEST/EN M/B002 7 1.1 Purpose 1 This document 1. This document 1.1. Purpose Arc flash protection Testing manual This document contains instructions on the secondary commissioning test procedure of the VAMP arc flash protection systems VAMP 321 and VAMP 221 as well as VAMP 121 and 120 units. This guide also contains troubleshooting information. The prerequisite for the testing procedure described in this manual is that the system to be tested is installed and configured. 1.2. Related documents Document VAMP Mounting and Commissioning Instructions VAMPSET Setting and Configuration Tool User Manual VAMP 120 Arc protection unit user manual Identification*) VARCMC/EN M/xxxx VVAMPSET/EN M/xxxx V120/EN M/xxxx VAMP 121 Arc protection unit user V121/EN M/xxxx manual VAMP 221 Arc protection system V221/EN M/xxxx Operation and configuration instructions/ Technical descriptions *) xxxx = one document revision index and a three-digit document version number NOTE! 1.3. Symbols Symbol 8 Download the latest documents and software at www.schneider-electric.com. Description Indicates a hazardous situation which, if not avoided, will result in death or serious injury. Indicates a hazardous situation which, if not avoided, could result in death or serious injury. Indicates a hazardous situation which, if not avoided, could result in minor or moderate injury. Addresses practices not related to personal injury. VARCTEST/EN M/B002 Arc flash protection testing Manual 2 Preparations for the testing 2.1 Required documentation 2. Preparations for the testing 2.1. Required documentation During the testing the test results and remarks are documented in a test report. The test report should clearly indicate what tests have been performed and what the respective test results are. In addition to the test report, the customer may also request other documentation not specified in this manual. Risk assessment Method statement Commissioning program List of the equipment to be used during the testing 2.2. Required equipment Special tools and protective clothing are required during the testing. Current injection device o One phase (for example Sverker 750/760) o Three phase with time measurement is recommended (for example Freja 300) Powerful light source o Flashlight (burning time >5ms, non LED) o Flashlight with an output contact for time measurement (burning time >5ms, non LED) o Torch (MagLite) o Recommended flash device: Nissin Digital, Di622 Mark II / Canon, Speedlite 430EX II or equivalent. Screwdriver kit Test leads Extension cord Multimeter Relay tester Arc flash resistive clothing including helmet, protective goggles and gloves VARCTEST/EN M/B002 9 2.4 System inspection 2.4. 2 Preparations for the testing Arc flash protection Testing manual System inspection Before the actual testing begins, the station and the system to be tested should be inspected. The aim is to find out the relevant details of the system to be able to choose a suitable testing procedure. The inspection consists of different procedures. Consulting the customer about the details of the system as good communication and mutual understanding is a prerequisite for successful testing. Defining the boundaries of the safe and hazardous working areas and checking that they are properly marked. Inspecting the devices and wiring visually. Checking the application; comparing the actual system to the available system drawings and also checking that the system and application are logical. Checking that the used settings correspond to the system plans and further, checking any anomalies in the settings, like a deviation from the planned value, with the customer. Based on the details of the system, defining the proper testing procedure. Checking device code and location map; comparing the device and location codes with the available system drawings and documenting the deviations in the test report. 10 VARCTEST/EN M/B002 Arc flash protection testing Manual 2.5. 2 Preparations for the testing 2.5 Safety precautions Safety precautions The required level of safety for the system to be tested should always be defined before the testing can begin. Also, the safety procedures need to be verified with the customer. Note that the safety regulations and procedures vary significantly, for example, depending on the country or the application area but certain points need to be considered. What is the level of testing? What part of the station is deenergised? Has the system been de-energised if the light sensors are installed near the busbar? Should auxiliary power be fed to the protection units? What is the level of lightning? Testing the arc flash sensors using a light source can trip the neighboring zones. Working near live components is dangerous. Be careful when testing in the vicinity of live circuits. VARCTEST/EN M/B002 11 3.1 Commissioning testing sequence 3 Commissioning testing Arc flash protection Testing manual 3. Commissioning testing 3.1. Commissioning testing sequence Arc system commissioning Checking I/O addresses Checking zones Testing of arc flash sensors Connecting the circuit for the test current Testing alarm contacts Testing with overcurrent criteria Cross-checking between zones Testing the circuit breaker failure protection Restoring the current measuring and trip circuits Filling in test results Gathering of test equipment Finalising the test report End Figure 3.1-1 Test sequence 12 VARCTEST/EN M/B002 Arc flash protection testing Manual 3.3. 3 Commissioning testing 3.3 Checking I/O unit addresses Checking I/O unit addresses 1. Check the settings of the main unit and verify how many I/O units and sensors are configured. 2. Compare the settings with the actual number of installed I/O units and sensors in the system. 3. Compare the settings with the drawings. NOTE! See the user manual for information on how to check the settings. 3.4. Checking zones 1. Check the protected zones and compare them against the drawings. 2. Study the system and find out if a part of the system needs to be disconnected before the test. 3. Consult the customer if the configuration does not match with the drawings. 3.5. Disconnecting trip circuits Disconnect the trip signals to the circuit breakers that may disturb other parts of the system during the test. Disconnect also trip signals routed to other parts of the system, such as the CBFP backup trip to upstream breakers and the transfer trip signals. Test the disconnected trip signals with a multimeter. VARCTEST/EN M/B002 13 3.6 Testing of arc flash sensors 3.6. 3 Commissioning testing Arc flash protection Testing manual Testing of arc flash sensors Testing the arc flash sensors with the light only criteria operates the trip outputs of the main unit or I/O units for the protected zone. Testing the arc flash sensors with the light and current criteria, without an injected current, only generates an indication on the unit that protects the zone. The indication of the fault is registered by the possible main unit and I/O unit. NOTE! For more information on viewing indications, see the user manual. Three different arc flash sensors are available to be used with the VAMP arc flash protection systems. Sensor Type Arc point sensors VA1DA-x VA1EH-x Arc fibre sensor Arc-SLmx Arc portable sensors VA1DP-5 VA1DP-5D 14 VARCTEST/EN M/B002 Arc flash protection testing Manual 3.6.1. 3 Commissioning testing 3.6 Testing of arc flash sensors Testing point or fibre sensors Figure 3.6.1-1 Testing point sensors Figure 3.6.1-2 Testing fibre sensors Reset the main unit before the test. 1. Point light to each arc flash sensor, one at a time, until activated with a powerful light source such as a flashlight or torch. 2. Check the light sensor indication from the unit. 3. Check the light sensor address from the main unit. In case of stand alone units VAMP 120 and VAMP 121, check the light sensor address from the channel number beside the sensor indication LED. VARCTEST/EN M/B002 15 3.6 Testing of arc flash sensors 3 Commissioning testing Arc flash protection Testing manual 4. Compare the light sensor address information from the main unit with the sensor location map. 5. Fill in the test result in the test report. 6. Reset the main unit. 7. Repeat the procedure with the next point or fibre sensor. For more information on viewing and resetting indications, see the user manual. Due to their placement, some sensors may not be tested without dismantling parts of the system. Either dismantle the necessary parts of the system to run the test or pass the test. Document the choice in the test report. 3.6.2. Testing portable sensors Figure 3.6.2-1 Testing portable sensors NOTE! Reset the main unit before the test. 1. Connect the portable arc flash sensor to the I/O unit and test it. Provide light to the sensor with a powerful light source such as a flashlight or torch. Be sure to connect to an I/O unit that is protecting the area where the work is ongoing. Some units may only trip the circuit breaker of the outgoing feeder. 2. Check the light sensor indication from the unit. 3. Check the light sensor address from the main unit. 4. Fill in the test result in the test report. 5. Reset the main unit. 6. Repeat the procedure with the next I/O unit. For more information on viewing and resetting indications, see the user manual. To avoid false activations, disconnect the portable sensor from the unit immediately after use. 16 VARCTEST/EN M/B002 Arc flash protection testing Manual 3.6.3. 3 Commissioning testing 3.6 Testing of arc flash sensors Testing of the supervision of arc flash sensors Figure 3.6.3-1 Testing the self-supervision of sensors Testing the supervision of point sensors 1. Disconnect one wire from one point sensor, one for each unit, to see that the self-supervision system recognises the fault in the sensor. 2. Wait until the fault indication appears. Depending on the device this can take several minutes. 3. Check that the internal fault relay operates and that the selfsupervision information travels to the possible external systems. 4. Fill in the test results in the test report. 5. Reconnect the wire and reset the system. 6. Repeat the procedure with the any other units. Testing the supervision of fibre sensors 1. Disconnect one end of the fibre sensor, one for each unit, to see that the self-supervision system recognises the fault in the sensor. 2. Wait until the fault indication appears. Depending on the device this can take several minutes. 3. Check that the internal fault relay operates and that selfsupervision information travels to the possible external systems. 4. Fill in the test results in the test report. 5. Reconnect the arc fibre sensor and reset the system. 6. Repeat the procedure with the any other I/O units. VARCTEST/EN M/B002 17 3.6 Testing of arc flash sensors 3.6.4. 3 Commissioning testing Arc flash protection Testing manual Testing the supervision of I/O units Figure 3.6.4-1 Testing of the I/O units self-supervision 1. Disconnect the modular cable from one I/O unit. 2. Wait until the fault indication appears on the main unit. Depending on the device this can take several minutes. 3. Check that the internal fault relay in the main unit operates and that the self-supervision information travels to the possible external systems. 4. Fill in the test results in the test report. 5. Reconnect the modular cable. For the VAMP 321 unit the self-supervision has to be configured. For more information on self-supervision, see the user manual. 18 VARCTEST/EN M/B002 Arc flash protection testing Manual 3.7. 3 Commissioning testing 3.7 Connections for testing devices Connections for testing devices The current measuring circuit always has to remain intact. Do not open a loaded current measuring circuit before the secondary circuit of the current transformer is reliably short-circuited. An open secondary circuit in the current transformer may destroy the current transformer. 3.7.1. Connecting a current injection device without the time measurement 1. Short circuit the secondary circuit of the current transformer and disconnect the main unit or I/O unit from the measuring circuit. 2. Connect a current injection device, one phase at a time, to the main or current measuring I/O units current measuring circuit. VARCTEST/EN M/B002 19 3.7 Connections for testing devices 3.7.2. 3 Commissioning testing Arc flash protection Testing manual Connecting a current injection device for the time measurement Figure 3.7.2-1 Connecting injection device for the time measurement 1. Short circuit the secondary circuit of the current transformer and disconnect the main unit or I/O unit from the measuring circuit. 2. Connect a three-phase current injection device with time measurement to the main or current measuring I/O units of the current measuring circuit. Connect the injection device either to inject the current continuously or to be triggered by the time measuring circuit. 3. Use the digital input of the current injection device for the stop trigger in the time measurement circuit. 4. Connect the trip output of the tested unit to the digital input of the current injection device for the stop trigger. For measuring the total operating time, use the circuit breaker’s 20 VARCTEST/EN M/B002 Arc flash protection testing Manual 3 Commissioning testing 3.8 Testing the BI/O channel NO contact, which indicates that status of circuit breaker is open, for the stop trigger. 5. Connect the time measuring start signal output to the flashlight. Configure the time measuring start signal to either trigger only the flashlight or both the flashlight and the current injection. Preferably, the current injection should be triggered before the flashlight. 6. Measure the operate time between the start trigger and stop trigger. 3.8. Testing the BI/O channel BI/O signals such as light and overcurrent information are transmitted between units via a BI/O bus. 1. Activate the signal outputs in the BI/O bus for the sending unit by generating arc fault light signal, overcurrent pickup or both. 2. Check the sent signal from the receiving unit to verify that the function operates according to the configuration. 3. Fill in the test result in the test report. 4. Reset the main unit. 3.9. Testing alarm contacts Alarm signals generated by the arc protection system (trip and self-supervision alarms) can be forwarded to higher-level switchgear supervision and control systems through the output contacts. 1. Activate an alarm by generating an arc fault trip or selfsupervision alarm. 2. Check the alarm contact operation from the higher-lever system. For VAMP 321, alarm signals can also be sent via communication. 3. Fill in the test result in the test report. 4. Reset the main unit. 5. Repeat the procedure with the next alarm contact. VARCTEST/EN M/B002 21 3.10 Testing the arc flash protection with the overcurrent condition 3 Commissioning testing Arc flash protection Testing manual 3.10. Testing the arc flash protection with the overcurrent condition 3.10.1. Testing the pickup value 1. Check the pickup value settings of the current criteria by injecting a current to the main or I/O unit. 2. Increase the current until the overcurrent criterion picks up. 3. Fill in the test results in the test report. 4. Reset the main unit. 5. Compare the current settings with the drawings. 6. If needed, connect the current injection device to another unit in the protected zone and repeat the test. For more information on viewing and resetting indications, see the user manual. 3.10.2. Testing without the time measurement 1. Inject a current, two times greater than the set current level, to the unit that protects the zone. Inject a current in each phase, one phase at a time, for every current measuring main unit or I/O unit. Check that the technical characteristics of the channels are not exceeded. 2. While injecting the current, point light with a flashlight to at least one of the arc flash sensors, one at a time. 3. Check that the function operates. 4. Generate at least one trip with current per I/O unit. 5. Fill in the test result in the test report. 6. Reset the main unit. 7. If needed, connect the current injection device to another unit in the system and repeat the test. For more information on viewing and resetting indications, see the user manual. 22 VARCTEST/EN M/B002 Arc flash protection testing Manual 3.10.4. 3 Commissioning testing 3.10 Testing the arc flash protection with the overcurrent condition Testing with the time measurement 1. Inject current, two times greater than the set current level, to the unit that protects the zone. Inject current to all three phases for every current measuring main unit or I/O unit. The current can be injected in two ways. Continuous injection Injection triggered by the time measurement start Check that the technical characteristics of the channels are not exceeded. 2. Point the flashlight and start the time measurement to trigger it. Point light to at least one of the arc flash sensors, one at a time. 3. Check that the function operates. 4. Check the operate time from the time measuring device. 5. Generate at least one trip with current per I/O unit. 6. Fill in the test result in the test report. 7. Reset the main unit. 8. If needed, connect the current injection device to another unit in the system and repeat the test. For more information on viewing and resetting indications, see the user manual. 3.10.5. Testing protection zones Checking the operation within the same zone 1. Test the protection zones, one at a time, by applying signals to operate the arc flash protection within the zone according to the plans. 2. Check that the function operates. 3. Compare the result with the plans. 4. Fill in the test result in the test report. 5. Repeat the procedure with the other zones. Minimise the need to move the test equipment by cross-checking the operation between different zones in parallel with this test. VARCTEST/EN M/B002 23 3.10 Testing the arc flash protection with the overcurrent condition 3 Commissioning testing Arc flash protection Testing manual Cross-checking the operation between different zones 1. Test the protection zones, one at a time, by applying signals to operate the arc flash protection in other protection zones according to the plans. 2. Check that the other protection zones do not cause unwanted operations in the zone being tested. 3. Check that the function operates according to the plans. 4. Fill in the test result in the test report. 5. Repeat the procedure with the other zones. 3.10.6. Testing the circuit-breaker failure protection 1. Inject a current above the overcurrent setting value to the main unit or to one of the current measuring I/O units. 2. Point light to one of the light sensors in the protected zone with a bright torch. The light pulse has to be longer than the CBFP time setting. Thus, the light pulse from a flashlight is too short. 3. Check that the CBFP function operates. 4. Fill in the test result in the test report. 5. Reset the main unit. 6. If needed connect the current injection device to another unit in the protected zone and repeat the test. For more information on viewing and resetting indications, see the user manual. Use a torch to test the CBFP, because the light pulse from a flashlight is too short. Ensure that the light pulse is not too long. If the light pulse is longer than 3 seconds, the daylight blocking function generates an alarm. 24 VARCTEST/EN M/B002 Arc flash protection testing Manual 3.11. 3 Commissioning testing 3.11 Testing the selectivity of the arc flash protection Testing the selectivity of the arc flash protection 1. Test the selectivity of the protection zones, one at a time, by pointing light to an arc flash sensor in a protection zone. 2. Compare the operation against the plans. 3. Inject current to the tested zone. 4. Compare the operation against the plans. 5. Inject current and at the same time point light to one arc flash sensor in the tested zone. 6. Compare the operation against the plans. 7. Fill in the test result in the test report. 8. Repeat the procedure with the other zones. 3.12. Restoring the system 1. Disconnect the current injection device from the current circuit and restore the wiring for the current measuring circuit to the pre-test conditions. 2. Open the short circuit for the current measurement transformer. 3. Reconnect the opened trip circuits. 4. Ensure that there are no active warnings or errors on the units. 5. Reset the system to clear the events from the tests. 6. Gather all the test equipment and devices. Ensure that no equipment used during the test is left behind. VARCTEST/EN M/B002 25 4.1 Filling in the test report 4 Test report 4. Test report 4.1. Filling in the test report Arc flash protection Testing manual Download the test report template from the Schneider Electric Web site. Fill in all the required information about the system, the tested arc flash units and the test results. See the example test report with the VAMP 221 arc protection system. 26 VARCTEST/EN M/B002 Arc flash protection testing Manual 4.2 Test report example 4 Test report 4.2. Test report example Client Main unit test report Project Page / pages Dev ice code: Location: Ty pe: Serial number: - K40 SS05-J12 VAMP221 Ac Dc CT ratio: Uaux: Does the unit receiv e BI/O - message f rom other unit: No Yes Pick-up current IL1: Pick-up current IL2/Io: Switch group settings Pick-up current IL3: On Latch No latch L> & I> L> CBFP Fast 100 ms 150 ms Matrix Matrix Matrix Matrix Matrix Matrix Master Slave OK: No TEST VALUES IL2/lo I> ( x In ): FUNCTIONAL TEST DONE: 5A Light Current IL1, IL3 I> ( x In ): Off Secondary 1A Yes RELAY SETTINGS 1 2 3 4 5 6 7 8 Primary OPERATING TIME Injected current: (2x I>, in all three phases) Measured time: rips Alarms Indication BI/O Self-supervision rips Alarms Indication BI/O Self-supervision Remarks Test equipment Type: S/N: Tested by: Calibration dat e: Date: Yo u r n am e dd.mm. Figure 4.2-1 Test report example page 1 VARCTEST/EN M/B002 27 4.2 Test report example 4 Test report Client Project Arc flash protection Testing manual Point/fibre sensor I/O unit test report Page / pages Dev ice code: K42 Location: SS05-J07 Ty pe: VAM 10L 2/x Serial number: Modular cable Terminal X2:1-2 Uaux: I/O unit address: Zone: 1 Is the zone shif t in use? Yes No Zone shif t tested Yes No Sensor channel 1 2 3 4 5 6 7 8 9 10 Switch group settings SW1 1 2 3 4 5 6 7 8 Off On L> ext L> int No latch Latch L> & I> L> Addr 16 Addr 16 Addr 8 Addr 8 Addr 4 Addr 4 Addr 2 Addr 2 Addr 1 Addr 1 Mobile point sensor tested ? Yes No Sensor channel activ ation checked Tripping checked Yes No Yes No Yes No Yes No Yes No Yes No Yes No Yes No Yes No Yes No Yes No Yes No Yes No Yes No Yes No Yes No Yes No Yes No Yes No Yes No =f ibre sensor channels FUNCTIONAL TEST DONE: rips Alarms Indication BI/O Self-supervision OK: rips Alarms Indication BI/O Self-supervision Remarks Tested by: Date: Your name dd.mm.yyyy Figure 4.2-2 Test report example page 2 28 VARCTEST/EN M/B002 Arc flash protection testing Manual 4.2 Test report example 4 Test report Client Project Current I/O unit test report Page/pages Dev ice code: Location: Ty pe: Serial number: K41 SS05-J02 VAM 4C Modular cable Terminal X2:1-2 CT ratio: Primary Secondary 5A 1A Uaux: I/O unit address: Zone: 32 CURRENT PICK-UP SETTINGS TEST VALUES IL1, IL3 I> ( x In ): Pick-up current IL1: IL2/lo I> ( x In ): Pick-up current IL2 / Io: Switch group settings SW1 1 2 3 4 6 7 8 1/x Off Pick-up current IL3: On Zone 1 L> Zone 1 L> Zone 2 L> Zone 2 L> Zone 3 L> Zone 3 L> Zone 4 L> Zone 4 L> Addr 8 Addr 8 Addr 4 Addr 4 Addr 2 Addr 2 Addr 1 Addr 1 OPERATING TIME Injected current: (2x I>, in all three phases) Actual address is "32" + switch 5-8 coefficient Note ! value SW2 1 2 3 4 No latch Latch 1A 5A No I> out I> out No ext I> Ext I> in FUNCTIONAL TEST DONE: rips Alarms Indication BI/O Self-supervision OK: rips Alarms Indication BI/O Self-supervision Remarks Tested by: Date: Your name dd.mm.yyyy Figure 4.2-3 Test report example page 3 VARCTEST/EN M/B002 29 5.1 Checking the wiring 5 Troubleshooting 5. Troubleshooting 5.1. Checking the wiring 5.2. Check that the wiring of the trip circuit is not faulty if the trip signal does not reach the circuit breaker. Checking the trip condition 5.3. Arc flash protection Testing manual Check the configuration if the protection does not trip even when a sufficient light signal is provided. The protection may be configured to require both the light and current condition to trip. In that case, inject also the current. Checking the I/O unit and arc flash sensor installation Check the sensor wiring if the self-supervision detects a faulty sensor. The sensor wire may have loosened in the terminal blocks. Check the distance between each end in the communication chain if errors occur in the communication. The total distance between the ends of the communication bus must be less than 100 meters. Lengths exceeding 100 meters can cause interruptions and faults in the communication. Check the number of the I/O units if errors occur in the communication. In systems with more than 5 I/O units, it is recommended to have a separate auxiliary power installed for the I/O units. Pay particular attention to the polarity of the cable connections. For more information on the I/O units, see the user manual. 5.4. Checking the suitability of the light source 30 Check that the light source is powerful enough and gives a long enough pulse. Inadequate light in case of fibre sensors can result in a situation where the main unit registers the arc flash event but does not trip. VARCTEST/EN M/B002 Arc flash protection testing Manual 5.6. 5 Troubleshooting Checking the daylight blocking mode VARCTEST/EN M/B002 Check that the light pulse to the arc flash sensor is not too long. If light is supplied to the arc flash sensor for over three seconds the self-supervision function activates and switches the light sensor channel to daylight blocking mode, the sensor channel is blocked. The sensor channel indication activates and an error message appears on the main unit. Remove the light in order reset the blocked channel.. 31 5.6 Checking the daylight blocking mode 6. Testing manual Glossary Term BI/O CBFP CT HMI IED LED Local HMI NO UAUX VAMPSET 32 6 Glossary Description Binary input/output Circuit-breaker failure protection Current transformer Human-machine interface Intelligent electronic device Light emitting diode IED front panel with display and push-buttons Normally open contact Auxiliary voltage Configuration tool for VAMP protection devices VARCTEST/EN M/B002 VARCTEST/EN M/B002 Customers Care Center © 2014 Schneider Electric. All rights reserved http://www.schneider-electric.com/ccc Schneider Electric 35 rue Joseph Monier 92506 Rueil-Malmaison FRANCE Phone: +33 (0) 1 41 29 70 00 Fax: +33 (0) 1 41 29 71 00 www.schneider-electric.com Publication version: VARCTEST/EN M/B002 Publishing: Schneider Electric 02/2014