1
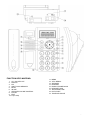
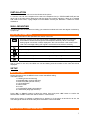
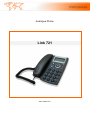
Analogue Phone
Link 721
User manual v2.0
1
FUNCTION KEYS MAPPING:
1.
2.
3.
4.
5.
6.
7.
8.
9.
10.
UP / CALLER LIST
DELETE
NO
ONE TOUCH MEMORY
MUTE
IN USE
SPEAKER VOLUME CONTROL
PAUSE
EDIT
R (FLASH)
11.
12.
13.
14.
15.
16.
17.
18.
19.
MENU
YES / REDIAL
SPEAKER
HEADSET
DOWN / PHONE BOOK
HEADSET JACK
TELEPHONE LINE
DATA PORT
TONE AND PULSE
2
INSTALLATION
1. Connect the handset coil cord on the left side of the phone.
2. Connect one end of the telephone line cord to the telephone line (17 TELEPHONE LINE) and the
other end to the wall socket. Make sure that the plugs are correctly matched. If there is no suitable
wall outlet in the house, a plug adaptor must be added. Consult your distributor / retailer for further
assistance.
WALL MOUNTING
In order to prevent the handset from falling, just rotate the handset lock knob 180 degree clockwise by
a paper clip
DISPLAY INFORMATION
Here is the information of the specified icons shown in the LCD:
Message waiting icon This unit provides a message waiting facility if the user has
subscribed to the service through the local telephone authority. When a messagewaiting signal is received, it will be displayed in the LCD and flash. It will remain in the
LCD until a message waiting OFF signal is received from the telecom authority.
Speakerphone mode (indicates that the unit is engaging the line using speaker phone)
Repeat call (indicates the same calls received more than one time)
New call (indicates that a new caller ID is received)
RINGER MELODY (indicates the current ringer melody setting)
RINGER VOLUME (indicates the current ringer volume setting)
In idle mode, the LCD shows the real time clock. When the user receives a new incoming call which
has no record in the unit, the NEW icon will be blinking and the number of the new call will be
displayed.
SETUP
MENU SETTING
During idle state, press the MENU button to enter the MENU setting.
There are 6 items:
1. STORE (phone book storing)
2. RING MELODY (melody selection)
3. RING VOLUME (volume control)
4. LCD CONTRAST
5. AREA CODE
6. FLASH
7. CLOCK/DATE (date & time setting)
8. LANGUAGE (language selection)
Press “Up” or “Down” buttons to adjust the above items and press “OK” button to confirm the
selected item. Details of each item will be shown in next sections.
Note: During setting, if headset or speaker key is pressed, or if the phone is left idle for 30 sec, the
new settings will not be saved and the phone resumed to normal idle state.
Menu function 1: Phone book storing
3
Select STORE by following the steps in MENU setting,
[1] The display shows: NAME, enter the name using the alphanumeric keys. If you press the wrong key,
use “
” button to correct. Press “OK” key to confirm the name.
[2] Enter the phone number to store. You can use the “
” button again to correct error entry. Then press
“OK” key to save the record.
Remarks: The phone has 50 Memories. Each memory can store 14 characters & 24 digits.
Menu function 2: Ringer melody selection
Select RING MELODY by following the steps in MENU setting.
[1] There are 3 ringer melodies pre-stored in your phone. Press “Up” or “Down” button to test each
melody
[2] After hearing the desired melody, press “OK” button to confirm your selection.
Menu function 3: Ringer volume control
Select RING VOLUME by following the steps in MENU setting.
[1] There are 3 ring volume levels (high, medium and low) available on your phone.
Each level is respectively designated by icons
,
and
[2] Press “Up” or “Down” button to choose desired Ring Volume.
[3]Press “OK” button to save your selection.
.
Menu function 4: LCD Contrast
Select LCD CONTRAST by following the steps in MENU setting.
[1]There are 5 levels of LCD contrast available.
[2] Press “Up” or “Down” button to test the different levels of contrast of your LCD display.
[3] When you have chosen the most comfortable brightness level, press “OK” button to save your
selection.
Menu function 5: Area Code
After entering this mode by the above steps in MENU setting,
[1] The display will show “AREA CODE”. Press “Yes/Redial” key to confirm
[2] And the “- ” will flash, Enter the number to store area code and press “Yes/Redial” key for confirmation.
If you make a mistake, press “
” button to correct.
Remark: When you receive a local call, the LCD will only show the telephone number without the area
code. Press the ‘’Caller list’’ to select the local call and press the ‘Yes / Redial’ key to dial the telephone
number directly.
Menu function 6: Flash Time setting
The phone has only one flash button. It is possible to change it directly from the menu:
Change the flash duration:
1. Press the Menu button and then use “Up” or “Down” button to access to “flash” menu.
2. Press “Down” and “UP” button to change the flash duration. (100ms, 300ms, 600ms, 900ms).
3. Press “OK” button to confirm your selection.
Menu function 7: Date & time setting
Select CLOCK/DATE by following the steps in MENU setting,
[1] The hour displayed on LCD will be blinking.
[2] Enter the desired hour, minutes by using the numeric keypad.
[3] Move the blinking prompt to the date position by pressing “Up” or “Down” button, enter the
desired date.
[4] Press “C” button or just wait until time out, the Settings will be saved automatically
4
Noted: The time and date will be automatically set when the first call is received. This function
depends on the support available of your local Telecom services.
Menu function 8: Language selection
Select LANGUAGE by following the steps in MENU setting,
1.FRENCH is shown in the LCD first.
2.There are 6 different languages to select: ENGLISH, SPANISH, GERMAN, GREEK,
PORTUGUESE, FRENCH. Press “Up” or “Down” button to select the language and Press “OK“
button to confirm it.
Tone / Pulse mode control
Press “*” button until the LCD showed “-T-” or “-P-”. Press the “*” button again to select the tone or
pulse mode.
Note: This function is according to your local telecom standard, ask your dealer about it.
OPERATION
Speakerphone operation & Volume control
Leave the handset on the cradle, press the
button once to obtain a dial tone. Dial your number.
When you hear the called party answers the phone, just talk without picking up the handset. You can
also answer an incoming call by pressing the button once. Press the button again when you want
to hang up the line.
During the speakerphone operation, the user can adjust the speaker volume level by pressing the
“Vol” button repeatedly. There are 4 different volume levels that can be set.
Caller ID – Type I & II
There are 2 types of Caller ID service, depending on the availability provide by your local telecom
network.
Type I – allow you to see the caller’s phone number when your phone starts ringing.
Type II – allows you to see the phone number of a second caller when you are on-line with the first
caller. You can decide to pick up the second line while leave the first line on-hold.
Headset
You can answer a call by using a headset without the need of picking up the handset or pressing the
speaker key.
1. Insert the headset to the headset jack that located on the head of the lower housing.
2. Leave the handset on the cradle, when there is an incoming call, press button to answer the call.
3. You can also press “ ” key to make a phone call.
Data port connection
There is additional jack for the parallel connection of modem, fax machine or any other telecom
equipment.
Mute
Press
button once to mute the Microphone preventing the party on the other end of the telephone
line from hearing you. Press the
button once again to release the microphone and continue your
conversation.
5
Line in used & Missed call & Message LED indication
Line in use:
When the unit is engaged on line, the LED will light up indicating that the line is used.
Missed call:
When a missed call appears, it will be indicated by the icon
on display.
Voice mail indication:
This unit provides a message waiting facility if the user has subscribed to the CLIP service through the
local telephone operator. When the message waiting is received, the
icon on LCD display will be
blinking reminding you that there is / are messages for you. You can hear the messages by following
the service instructions from your local telephone operator. The
icon will stop blinking after you
review all the messages.
Message waits indication under special PBX:
This unit provides a message waiting facility under special PBX, It will detect the ringing cadence (4
seconds On and 9 seconds Off).
When the message waiting is received, the
icon on LCD display will be blinking reminding you
that there is / are messages for you. You can hear the messages by following the service instructions
from you local telephone operator. The
icon will stop blinking after you review all the messages.
Auto timer
The timer will start automatically after 6s if the telephone line is engaged.
Flash, R
Press the flash button to reset the line without replacing the handset on hook.
Pause
Pressing PAUSE button will insert a delay of approximately 3 seconds in a dialing sequence.
ON-SCREEN DIALING
The unit has on-screen dialing function which allows you to edit the number before dial it out.
The following procedure describes how to use this function:
- Leave the handset on the cradle and ensure that the unit is not seizing the line using speaker phone
function
” button to delete the number shown on the LCD.
- Dial the wished number, you can press “
- Press “OK” button to confirm and the unit will dial out the number using hands free mode, or if the
user already engage the line, the number will dial out directly.
Memory programming & dial out
One Touch Memory
[1] Press “MENU” Keys, select “STORE” by pressing “OK” Key for confirmation.
[2] The display shows NAME: enter the name using the alphanumeric keys. Use “
” button to
delete any errors. Press “OK” button to confirm the name.
[3] Enter the number to store and press “ M1 ” button to save it in one touch memory dialing or " M1 “
to save it in the directory.
View Direct Memory & Dial out
[1] In on-hook mode, press M1 button.
[2] Press “OK” key to dial out.
Note: One touch memory cannot be deleted but can be replaced by a new stored entry.
6
View Repertory & Dial out
[3] In on-hook mode, press DOWN button. Enter the first letter of the contact using the alphanumeric
keyboard. Use DOWN and UP buttons to select the contact.
[4] Press “OK” to call the contact.
Reviewing Incoming phone number & dial out
The unit can store up to 50 records of incoming caller list and each can be viewed and dialed out by
the following procedures:
1. Press “Up” button once and the LCD will show the last received record
2. Press “Up” or “Down“ button once to view other record on the list.
3. Press “OK” button to dial out the selected number automatically.
Note: The maximum length of name and number are 14 characters & 24 digits respectively.
Edit, Copy incoming messages to phonebook
The user can store 50 phone numbers in caller list to the phone book based on the following
procedures:
1. Press “Up” button to select the designated contact.
2. Press “Edit” button once to edit the incoming contact. The user can delete the character by
pressing Delete button. If there is no change, press “OK” button to confirm and the record will be
transferred from caller list to phone book.
Name matching
The caller ID will be displayed for the incoming calls if you have already stored its number and name.
View & dial out phone numbers from phonebook
There are 50 phone book memories which can be viewed and dialed out.
1. Press “Down” button and use the numeric keypad to enter the first alphabet of the name of the
person, then press “OK” button once to confirm the entry. The display will move to the first name
entry in phone book started with the alphabet you entered.
2. Press “Up” or “Down” button to select desired number. Press the “OK” button and the number
will be dialed automatically.
Review last 10 numbers redial& dial out
The unit can record a maximum of 10 last dialed out numbers.
Press “OK” button once in the on-hook mode and use “Up” or “Down” buttons to display 10 last dialed
numbers.
When the desired phone number is shown, press the “OK” button to dial the selected number.
Delete memories
Delete Phone book memories:
1. Press “Down” button, then press “Up” or “Down” button to search the number to delete.
and “OK” key for deletion.
2. Press
Delete Caller list memories:
1. Press “Up” button, then press “Up” or “Down” button to search the number to delete.
2. Press Delete and “OK” buttons for deletion.
Delete last dialed out numbers:
1. Press “OK” button, then press “Up” or “Down“ button to search the number to delete.
2. Press Delete and “OK” buttons for deletion.
7
Pre- fix IP Number
If you always need to dial the pre-fix operator code, you can enter the pre-fix IP number first, then all
the dialed out number will be automatically added to the prefix number.
Set up pre-fix IP number
Press *477* buttons + pre-fix IP number + # button.
Once you set the prefix number, then each time you pick up handset or press
number, the unit will firstly dial out the pre-fix number.
to dial out one
Delete the IP number
Press *477* + # buttons, the Pre-fix IP number will be deleted.
Temporary disable IP function.
1. Press ** buttons.
2. Dial the phone number without the pre-fix IP number first temporarily.
PABX user mode
If you are using the phone with a PABX, you can dial out the phone memories without dialing the
PABX prefix each time.
Procedures to set the PABX prefix ON:
In idle state, press # + 7229 buttons + PABX prefix ‘any one digit’ & then press “OK” button.
Remarks: 7=P, 2=A, 2=B, 9=X. The user will easily remember the PABX code (7229)
Example: (suppose 0 is the PABX prefix access)
# + 7229 + 0 + OK
After this setting, all phone memories will be dialing out with 0 first.
Disable the PABX user mode.
In idle state, press # + 7229 + OK buttons.
Welcome note
The unit provides the personal facility that shows your personal information, such as your name or
your company name, on LCD in standby mode. To introduce the welcome note, you can follow below
procedures.
[1]In standby mode, press *93 52 663# buttons, then the LCD will show “-“.
[2]Enter your personal information (Maximum 14 characters) & Press “OK” key for confirmation, then
the LCD will show the information.
NOTE: 9=W, 3=E, 5=L, 2=C, 6=O, 6=M,3=E(welcome), It will be easy for the user to remember the
Welcome note code.
Memory full
There are 50 phonebook memories.
The LCD will show memory full when all memories have been occupied in the phonebook. The user
should delete some messages which are stored in the phonebook.
8
Features sum-up
DATA Port
Permanent memory back-up
Flash adjustable
In-use LED
Hands free
Message icon
Headset Port
Caller Name Identification
Presentation
50 contacts directory
50 last incoming calls
Time of call displayed
Tone & Pulse
ROHS compliant
Battery free
Ring tone volume
adjustable
Wall mountable
9