1
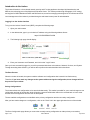
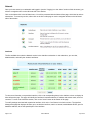
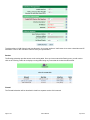
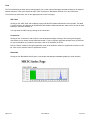
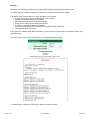
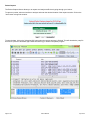
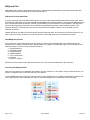
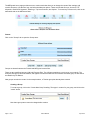
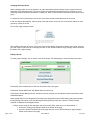
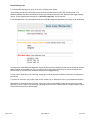
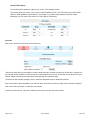
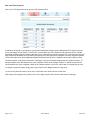
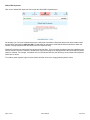
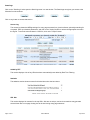
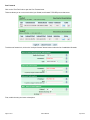
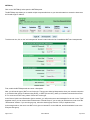
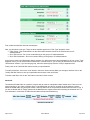
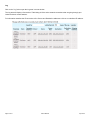
Joebox M-series User’s Manual Networkmaine Joebox Manual Copyright © 2010 University of Maine System All rights reserved. Published: Revision: April 2010 1 Under the copyright laws this manual or the software described within cannot be copied, in whole or part, without the written consent of the manufacturer, except in the normal use of the software to make a backup copy. The same proprietary and copyright notices must be affixed to any permitted copies as were affixed to the original. This exception does not allow copies to be made for others, whether or not sold, but all of the material purchased (with all backup copies) can be sold, given, or loaned to another person. Under the law, copying includes translating into another language or format. Joebox™ and MECguard™ are registered trademarks of Merrimack Education Center. The Joebox OS and JBCP are the property of MEC and © 2004-2010. Other product and company names mentioned herein can be trademarks and/or registered trademarks of their respective companies. Companies, names, and data used in examples herein are fictitious unless otherwise noted. Information, specifications and descriptions in this document are subject to change without notice. Contact Information: Networkmaine 5752 Neville Hall Computing Center Orono, ME 04469-5752 Telephone: Fax: +1 (207) 561-3587 561-3531 http://www.networkmaine.net/ Networkmaine is a Unit of the University of Maine System Table of Contents Introduction to the Joebox ................................................................................................................................................... 1 Logging in to the Joebox Interface ...................................................................................................................................... 1 The Boot Process ................................................................................................................................................................ 1 Saving Configurations ......................................................................................................................................................... 1 Choosing Which Configuration to Boot ............................................................................................................................... 2 Rebooting the Joebox .......................................................................................................................................................... 2 System Indicator Lights ....................................................................................................................................................... 3 Updating Software ............................................................................................................................................................... 3 Shutting Down the System .................................................................................................................................................. 3 Logging out of the Joebox Interface .................................................................................................................................... 3 Network .................................................................................................................................................................................. 4 Interfaces ............................................................................................................................................................................. 4 Routing ................................................................................................................................................................................ 5 Tools .................................................................................................................................................................................... 6 ARP Table ........................................................................................................................................................................ 6 Connections ..................................................................................................................................................................... 6 Bandwidth ........................................................................................................................................................................ 6 DNS Dig ........................................................................................................................................................................... 7 Ping .................................................................................................................................................................................. 8 Traceroute ........................................................................................................................................................................ 8 Packet Capture .................................................................................................................................................................... 9 MECguard Filter .................................................................................................................................................................. 10 Differences from the N2H2 Filter ....................................................................................................................................... 10 How MECguard Operates ................................................................................................................................................. 10 Accessing the MECguard Filter ......................................................................................................................................... 10 Groups ............................................................................................................................................................................... 11 Creating a Group ........................................................................................................................................................... 11 Changing the Group Order ............................................................................................................................................ 12 Editing a Group .............................................................................................................................................................. 12 Adding/Removing Group Members ............................................................................................................................... 13 Group Filtering Lists ....................................................................................................................................................... 14 Group MECguard Settings ............................................................................................................................................. 15 Group L7PC Settings ..................................................................................................................................................... 16 Accounts ............................................................................................................................................................................ 16 Real Time Filter Keywords ................................................................................................................................................ 17 Global URL Keywords ....................................................................................................................................................... 18 Stats/Logs .......................................................................................................................................................................... 19 Top Level Domains ............................................................................................................................................................ 20 Options .............................................................................................................................................................................. 20 Firewall ................................................................................................................................................................................. 21 Accessing the Firewall ....................................................................................................................................................... 21 Groups ............................................................................................................................................................................... 21 Blacklist.............................................................................................................................................................................. 21 Port Forwards .................................................................................................................................................................... 23 NAT/Masq .......................................................................................................................................................................... 25 Table of Contents Joebox Manual April 2010 Opened Ports .................................................................................................................................................................... 27 Closed Ports ...................................................................................................................................................................... 28 Web Filter .......................................................................................................................................................................... 28 Advanced ........................................................................................................................................................................... 29 Log ..................................................................................................................................................................................... 30 Options .............................................................................................................................................................................. 31 Table of Contents Joebox Manual April 2010 Introduction to the Joebox The Joebox M-series is a Linux-based network security and IP routing appliance developed by Networkmaine and MECnet, the technology arm of the Merrimack Education Center. The Joebox provides high throughput, full IP routing, and support for MSLN distributed DHCP and DNS services, as well as emerging technologies like IP multicast and IPv6. Local management of the Joebox is provided through a web-based control panel for administration. Logging in to the Joebox Interface To log in to the Joebox Control Panel (JBCP), complete the following steps: 1. Open your web browser 2. In the address bar, type in your Joebox's IP address using the following address format: https://YOURJOEBOXIP:10000 3. The following login page should display: 4. Enter your Username and Password, and click on the "Login" button Once you have successfully logged in, you will be presented with three main sections: Network, Services, and System. Through accessing these sections, you will be able to perform the tasks described in this document. The Boot Process When the Joebox is booted, the system reads the software and configuration that is stored in its flash memory. Therefore, if you have made any changes to the system without saving the configuration, those changes will not be preserved upon reboot. Saving Configurations The Joebox allows two configurations to be stored simultaneously. This makes it possible for you to make changes to one configuration and test its functionality while still storing a second configuration that can be reverted back to in the event that the second configuration does not work as anticipated. The two available configurations are identified as the primary configuration and the secondary configuration. After you have made changes to a configuration, click on the "Save" link in the upper right-hand corner of the window. The Save Configuration page allows you to save the currently running configuration as either primary or secondary. Page 1 of 31 Joebox Manual April 2010 Click on either the "primary" or "secondary" button. Also on this page, you can make a backup of a configuration. It will be the responsibility of each site to make configuration backups for their own Joebox. Click on the "backup" button to make a backup of the current configuration. Choosing Which Configuration to Boot If you do not specify which configuration to use on reboot, the system will by default reboot with the last used configuration. To select a configuration, click on the "Boot Cfg." link in the upper right-hand corner of the window. The Change Boot Configuration page allows you to specify whether the primary or secondary saved configuration will be used on the next reboot. At this point, you are simply selecting which configuration to use. The choice made here will not take effect until the system is actually rebooted. Click on either the "primary" or "secondary" button to select a configuration to use on reboot. Rebooting the Joebox Before rebooting your Joebox, make sure that you have saved the configuration and selected the configuration to use as indicated in the above sections of this document. After selecting a saved configuration to use, you can reboot the Joebox. Click on the System link in the left-hand menu. The System front page will display, with a list of its various subsections. Click on the "Uptime and Power" button in the navigation menu or use the link in the body of the System page. Page 2 of 31 Joebox Manual April 2010 The Uptime and Power page displays the amount of time your Joebox has been powered on, and also provides the mechanism to reboot or shutdown the system. Click on the "reboot" button to reboot the system. A secondary prompt will display. Make sure that the "Save running configuration to flash drive" checkbox is checked, and click on the "continue" button. System Indicator Lights You will notice colored lights next to the various items in the navigation menu on the left-hand side of the window. A green light means that the service is enabled. A gray light means that the service is disabled. A red or purple light means that the service is unable to be enabled, and there is a problem with the Joebox. Updating Software You will be notified periodically of upgrades to the Joebox software. Networkmaine will not perform the upgrades; it will be the responsibility of each site to perform the upgrade on their own Joebox. To install an upgrade, click on the "System" link in the left-hand navigation menu, and then click on the "Info/Tools" button. On the Info/Tools page, click on the "Software/Update" tab. Select any packages to be updated, and then click on the "update Joebox packages" button at the bottom of the screen. Shutting Down the System If you need to shut down the Joebox for network maintenance, click on the "System" link in the left-hand navigation menu, click on the "Uptime & Power" button, and then click on the "Shutdown" button located on the Uptime & Power page. Logging out of the Joebox Interface To log out of the Joebox interface, click on the "Logout" option in the left-hand navigation menu. Page 3 of 31 Joebox Manual April 2010 Network Once you have entered your credentials and logged in (see the "Logging in to the Joebox" section of this document), you will see a navigation menu on the left-hand side of the window. Click on the Network link in the left-hand menu. You will be presented with the Network front page, which lists its various subsections. To access any section, either click on the link on this page or use the navigation buttons on the left-hand side of the window. Interfaces The first available item under the Network section is the Interfaces subsection. In this subsection, you can view, disable/enable, and modify the Joebox's interfaces. To view more information on a particular interface, click on its corresponding button in the Interface column to display its More Information page. This page will identify the interface's hardware address, IP address and subnet mask, and error counters. To return to the Interfaces section, click on the "return" button at the bottom of the page. To modify settings associated with a particular interface, click on the "mod" button in its Action column. The Interface Management page that displays will allow you to enable the interface, mark it as internal, enable/disable DHCP, spoof a hardware address, and set the speed/duplex of the interface. Page 4 of 31 Joebox Manual April 2010 To add an alias or VLAN (Virtual Local Area Network), click on the interface's "add" button, then enter a description and IP information. Click on the "add alias" button to save your specifications. Routing The Routing subsection provides access to the routing table. Once you have entered the Routing area, you will need to click on the "Routing Table" tab to display a routing table listing any routes that the Joebox has discovered. Firewall The Firewall subsection will be described in detail in a separate section of this manual. Page 5 of 31 Joebox Manual April 2010 Tools The Tools subsection provides various tools that allow you to view network information and that will help you to diagnose network problems. These tools include the ARP Table, Connections, Bandwidth, DNS Dig, Ping, and Traceroute. To access any of these tools, click on the appropriate tab on the Tools page. ARP Table Clicking on the "ARP Table" tab will display a page with the ARP (Address Resolution Protocol) table. This table is semi-interactive, and displays all IP addresses and hardware addresses that the Joebox sees, as well as which interface it sees each address on. You may delete an ARP entry by clicking on the "del" button. Connections Clicking on the "Connections" tab will open a new window that displays a listing of all incoming and outgoing connections to your Joebox and the machines behind it. This is a dynamic page that refreshes every 30 seconds. For more information on a particular connection, click on an IP address in the list. Use the "Search" textbox in the upper right-hand corner of the window to search for a particular connection in the list. Click on the "execute" button to perform the search. Bandwidth Clicking on the "Bandwidth" tab will open a new window that displays bandwidth graphing for each interface. Page 6 of 31 Joebox Manual April 2010 DNS Dig Clicking on the "DNS Dig" tab allows you to retrieve DNS-related information about a specific host. To use the Dig tool, enter the hostname or IP address of a location in the "Domain" textbox. The options in the "Retrieve Record of Type" dropdown menu include: Any Record: Any resource record information on the domain Address: Translates hostname to IP address Mail Exchange: Mail servers used by this domain Name Servers: Name servers used by this domain IP Pointer: Translates IP address to hostname Start of Authority: Name server, host master, and serial number information Text: Miscellaneous information If you enter an IP address rather than a hostname, you must choose IP Pointer from the "Retrieve Record Type" dropdown menu. To run your query, click on the "execute" button. The requested data will display. To reset the query, change any of the menu options or end your session. Page 7 of 31 Joebox Manual April 2010 Ping Clicking on the "Ping" tab provides a mechanism to determine if you can reach a host on the internet. Enter an IP address in the "Ping" textbox, and select the desired number of pings (1, 5, or 10) using the "Ping Count" dropdown menu. To begin the ping process, click on the "execute" button. Traceroute Clicking on the "Traceroute" tab provides a mechanism that allows you to track down the route your network takes to get to a given host on the Internet or other network. Enter a URL or IP address into the "Destination" textbox and click on the "execute" button to begin the process. Page 8 of 31 Joebox Manual April 2010 Packet Capture The Packet Capture feature allows you to capture and analyze traffic that is going through your Joebox. To capture a packet, select an interface to analyze and enter the desired duration of the capture session. Click on the "start" button to begin the session. To save the data, click on the "download file" button when the capture process is finished. This will download a .pcap file that can be opened in Wireshark (http://www.wireshark.org) or another compatible program. Page 9 of 31 Joebox Manual April 2010 MECguard Filter MECguard is the Joebox's content filtering proxy server. When enabled, all web traffic is passed through the filter and checked before being downloaded to the client that requested it. Differences from the N2H2 Filter If you are a previous user of the MSLN N2H2 service, there are a few important differences that should be noted. Unlike the N2H2 filter, MECguard checks both the URL and the body of the requested website. This means that MECguard is far more comprehensive than the old filter in that any keywords that you have blocked, if found anywhere in the page body, will cause the web page to be blocked. As an example, many websites have links to their Facebook profiles. If the keyword "facebook" is blocked, then none of those sites would be accessible. Instead, it would be better to block Facebook by domain. Another difference from N2H2 is domain blocking. When blocking a domain, all sub-domains will also be blocked. If you were to block the domain youtube.com, then ads.youtube.com and help.youtube.com would also be blocked. How MECguard Operates It is necessary to explain how the filter rules are applied in order to fully understand their usage. MECguard checks filtering rules in a certain hierarchical order, stopping when a rule applies or allowing the page if it goes through all rules with no matches. The order it checks (from first to last) is: 1. Group Allowed list 2. Group Blocked list 3. Group Keywords 4. Global Keywords 5. Top Level Domains 6. Category 7. Real-Time Filtering What each of these checks mean, and where they are set, will be covered in detail later in this document. Accessing the MECguard Filter Once you have entered your credentials and logged in (see the "Logging in to the Joebox" section of this document), you will see a navigation menu on the left-hand side of the window. To access MECguard, first click on the "Services" button in the navigation menu to display its subsections, and then click TM on the "MECguard " button. MECguard can also be accessed using the link in the body of the Services page. Page 10 of 31 Joebox Manual April 2010 The MECguard home page provides access to various tools that allow you to change the content filter settings, add override accounts, view the filter logs, and edit miscellaneous options. These tools include Groups, Accounts, RTF Keywords, Global URL Keywords, Stats/Logs, Top Level Domains, and Options. To access any of these tools, click on the appropriate tab on the MECguard page. Groups Click on the "Groups" tab to open the Groups area. Groups are shared between the Firewall and MECguard content filter. There are two predefined groups: LAN and Everyone Else. The LAN group applies to every host on your network. The Everyone Else group cannot be deleted, and applies to hosts that either are not members of another group or that cannot be classified by IP address. New groups can also be created. In the example above, a Teacher group has already been created. Creating a Group To create a group, click on the "Create New Group" heading. Then type in a name for your group, and click on the "create" button. Note that a group name cannot be changed after creation. Page 11 of 31 Joebox Manual April 2010 Changing the Group Order When creating groups, be sure to list them in an order that reflects specific subsets of your network users first, followed by more general groups. The Everyone Else group should always appear last. For example, a group containing teachers should be listed before a LAN group, which in turn should be listed before the Everyone Else group. To change the order of the groups, click on the "group order" button located below the list of groups. In the new window that displays, select a group name and use the "move up" and "move down" buttons to move groups up or down in the list. Click on the "apply changes" button. After modifying the order of groups, click on the "apply group settings" button at the bottom of the page, and then go to the "Options" tab at the top of the page and click on the "Restart firewall to apply changes" button located at the bottom of the Options page. Editing a Group To edit a group's settings, click on its title in the list of groups. This will display an area below the group name. Unchecking "Allow Internet Access" will turn off access to the entire group. Unchecking "Enable MECguard" will disable filtering for the group. Currently the "Enable MECguard SSL" checkbox does not have any use and should remain unchecked to avoid undefined behavior. Other settings that can be manipulated by clicking on the appropriate button include editing the group members, turning filtering and internet on/off, and altering the filtering settings. Each time a button is clicked, it either expands or collapses the analogous section. *** When you are ready for the changes to the group to take effect, make sure to do the following: *** 1. click on the "apply group settings" button at the bottom of the page 2. go to the "Options" tab at the top of the page and click on the "Restart firewall to apply changes" button at the bottom of the page Page 12 of 31 Joebox Manual April 2010 Adding/Removing Group Members Click on a group's "Members" button to edit its member list. To add a member to the group, type its network or IP address into the "Members IP Addresses" textbox, making sure that each address is on its own line. Group members can either be an individual IP address or an IP network 1 written in CIDR notation . Any host that is listed here, or belongs to a network listed here, will be subject to whatever settings are applied to the group. In the example above, all of the hosts in the 192.168.6.0/24 network are members of the group, as well as 192.168.7.15 and 192.168.7.42. Note that the /24 indicated on the first line represents 254 host addresses. In this case, 192.168.6.2 to 192.168.6.254 are the addresses specified. If you try to add members that are already part of another group, MECguard will alert you and remove them from this group once you click on the "apply group settings" button. To remove a member from a group, select the member's IP address and use the "delete" key or "backspace" key to delete it. After adding or removing a member, click on the "apply group settings" button at the bottom of the page, and then go to the "Options" tab at the top of the page and click on the "Restart firewall to apply changes" button located at the bottom of the Options page. 1 Classless Inter-Domain Routing, see http://en.wikipedia.org/wiki/CIDR_notation Page 13 of 31 Joebox Manual April 2010 Group Filtering Lists To work with filtering lists for a group, click on the "Filtering Lists" button. Group filtering lists give you the ability to allow or block websites based on their URL, domain name, or IP address. Websites can also be blocked for the group by entering keywords in the "Keywords that trigger filtering" section. These keywords are searched for in the entire page body, not just the URL. In the example below, if any web page has the word NSFW or webgame anywhere on the page, it will be blocked. As noted in the "How MECguard Operates" section of this document, the Allowed sites are the first thing checked when a website is requested by a user. If a match is found, the page is allowed and no other checking is done. Blocked sites are checked next, followed by Keywords that trigger filtering. To add a site or keyword to one of the lists, simply type it into the appropriate textbox. Each item must appear on its own line. To remove an item from a list, select it and use the "delete" key or "backspace" key on your keyboard to delete it. After adding or removing a site or keyword, click on the "apply group settings" button at the bottom of the page, and then go to the "Options" tab at the top of the page and click on the "Restart firewall to apply changes" button located at the bottom of the Options page. Page 14 of 31 Joebox Manual April 2010 Group MECguard Settings To work with the MECguard settings for a group, click on the "MECguard Settings" button. The Group MECguard Settings section is broken into two sub-sections: MECguard Group Options and Distributed Filtering Categories. MECguard Group Options The MECguard Group Options provides finer control over which filtering checks are enabled. Some of these options enable filters that are set up in other tabs/sections of the MECguard interface, such as RTF Keywords, Top Level Domain blocking, and URL keywords. Additional options in this section include: Keyword threshold, "small" pages: The score a small (less than 4kB) page must reach before being blocked by the RTF engine Keyword threshold, "large" pages: The score a large (greater than 4kB) page must reach before being blocked by the RTF engine Check URLs for blocked keywords: Enables the Keywords that trigger filtering group list Block access to IP addressed websites: Forces users to use domain names rather than entering IP addresses Distributed Filtering Categories Distributed Filtering Categories has a list of predefined categories that you can choose to block. These categories can save time and energy through not having to manually create lists of certain commonly blocked types of sites. To see exactly which sites are blocked under a particular category, click on the category's title. Page 15 of 31 Joebox Manual April 2010 Group L7PC Settings To work with L7PC settings for a group, click on the "L7PC Settings" button. This section allows you to turn on the Layer-7 Packet Classifier (L7PC). The L7PC allows you to block traffic based on what application is generating it. For example, if you wish to stop students using AOL Instant Messenger, you can set the aim service in L7PC to Block, or Block/Log. Accounts Click on the "Accounts" tab to open the Accounts area. This section simply gives you the ability to create override accounts. Override accounts can be Self only, meaning on a per-computer basis, or Master override accounts, meaning that the user can turn off the filter for everyone else in your network. Master override accounts should be used sparingly and guarded closely. To add a user with override privileges, enter a username and password in the textboxes provided. If the user should be given the ability to turn the filter off for all accounts, check the "Allow master overrides" checkbox. Click on the "Add user button" to create the user account. To delete an override user, click on the "Delete" button for the user that you wish to delete. Page 16 of 31 Joebox Manual April 2010 Real Time Filter Keywords Click on the "RTF Keywords" tab to open the RTF Keywords area. If enabled in the Groups > [groupname] > [groupname] MECguard Settings section, MECguard's RTF engine scans the text on web pages for both "good" or "bad" words. If it encounters any of the words from the keywords list, the "weight" associated with that keyword is added to the page's score. Web page scores start at neutral (0). If the total score of a web page reaches the threshold set in your MECguard groups, the block page will be displayed. Positively weighted keywords increase the page score, while negatively weighted words decrease the score. Keywords cannot have a space in them. To add a keyword, scroll down to the bottom of the page. Type the new desired keyword into the "Keyword" textbox. To add this keyword to the Bad Keywords list, enter a positive number in the "Weight" textbox. To add this keyword to the Good Keywords list, enter a negative number in the "Weight" textbox. Click on the "add" button to complete the process. To change a keyword's weight, simply type a new number in the "Weight" textbox for that word. To remove a keyword from the list, click on the "del" button in the Action column for that word. After making any changes to this section, click on the "apply rtf keyword list" button at the bottom of the page. Page 17 of 31 Joebox Manual April 2010 Global URL Keywords Click on the "Global URL Keywords" tab to open the Global URL Keywords area. On this page, you can enter keywords that cause a web page to be blocked. Keywords listed in this area indicate words that should be searched for within the URL of a web page as opposed to words that should be searched for within the content of a page (keywords that are listed in the RTF Keywords area). Global URL searches are performed for everyone behind the filter. They occur after the Allowed sites list contained in the Groups section is checked. Therefore, Allowed sites may permit a page to be displayed before the Global URL Keywords section is checked. For example, if facebook.com is in the Allowed sites list, then blocking it under Global URL Keywords would have no effect. To include a global keyword, type it into the textbox and then click on the "apply global keywords" button. Page 18 of 31 Joebox Manual April 2010 Stats/Logs Click on the "Stats/Logs" tab to open the Stats/Logs area in a new window. The Stats/Logs area gives you access to the following four sub-sections: Click on any button to access that section. Access Log The access log shows the MECguard logs for every page accessed in a given timeframe, optionally searching for a keyword. Enter your desired parameters, and click on the "display" button to retrieve the appropriate records in the log file. To save the returned data in a CSV file, click on the "export" button. Added by RTF This section displays a list of any URLs that have automatically been added by Real Time Filtering. Statistics The statistics section shows counters for blocked sites since the last reboot: URL Hits This section displays hit counters for the top URLs. Hits are not unique, and one host machine may generate several dozen hits in one page viewing due to the site having many page elements. Page 19 of 31 Joebox Manual April 2010 Top Level Domains Click on the "Top Lvl Domains" tab to open the Top Level Domains area. On this page, you may enter domains to allow and to block. The Top Level Domains are checked after the Global URL Keywords. The block list isn't of much use because generally speaking no entire TLD can said to be bad or unnecessary; however the option is there for those with special requirements. As an example, ".biz" is provided in the picture above, but this type of blocking would be better done under a group's filtering list. The allow list is more realistic, because certain TLDs like .edu or .gov should, in most cases, never contain explicit or harmful material. To add an item to either list, enter it into the appropriate textbox and click on the "apply top level domain settings" button. Options Click on the "Options" tab to open the Options area. This area allows you to configure miscellaneous options such as where unblock request emails will go and how long to keep log files. In addition, you can set up an internal white list in this area. Page 20 of 31 Joebox Manual April 2010 Firewall The SPI firewall built into the Joebox tracks the state of connections and provides detailed logging for all traffic. Accessing the Firewall Once you have entered your credentials and logged in (see the "Logging in to the Joebox" section of this document), you will see a navigation menu on the left-hand side of the window. To access the firewall area, first click on the "Network" button in the navigation menu to display its subsections, and then click on the "Firewall" button. The firewall area can also be accessed using the link in the body of the Network page. The Firewall home page provides access to various tools including Groups, Blacklist, Port Forwards, NAT/Masq, Opened Ports, Closed Ports, Web Filter, Advanced, Log, and Options. Groups The Groups area is shared between the Firewall and MECguard content filter. Refer to the "Groups" section of this document under "MECguard Filter" for a detailed explanation. Blacklist Click on the "Blacklist" tab to open the Blacklist area. The blacklist prevents specific computers/devices outside your network from accessing your network, and prevents specific computers/devices on your network from accessing the Internet. Page 21 of 31 Joebox Manual April 2010 To create a new entry for the blacklist, click on the "add blacklist entry" button. First, enable the entry and enter a description. Then in the Source Options section, select whether you are blocking an IP/Hostname or a Group that you have made. If you are using an IP/Hostname, enter it into the "IP/Hostname" textbox. If you are using a group, select the desired group from the "Group" dropdown menu. The Destination section follows the same format as Source Options, but refers to the where the packet is destined. In the above example, traffic is being blocked traffic from one specific IP address that may be destined for any IP in the LAN group. Finally, click on the "add blacklist entry" button to save your specifications and return to the blacklist. To modify an entry on the blacklist, click on the "mod" button in the entry's Action column. Make your changes, and then click on the "modify blacklist entry" button to save your specifications and return to the blacklist. To delete an entry on the blacklist, click on the "del" button in the entry's Action column. Page 22 of 31 Joebox Manual April 2010 Port Forwards Click on the "Port Fwds" tab to open the Port Forwards area. This area allows you to run a server behind your firewall, and forward TCP/UDP ports to that server. To add a new forward rule, click on the "add port forward" button located under the list of established forwards. First, enable the entry and enter a description. Page 23 of 31 Joebox Manual April 2010 Next, you will select a rule type.There are two available rule types: Port Forward and One-to-One NAT. For Port Forward, you are able to set which external port and protocols are accepted to forward a user to another internal port in the internal local network. A One-to-One NAT allows you to send a user from an external IP address to an internal IP address in the internal local network. Note that when setting up a one-to-one NAT entry, you must create a rule here and in the NAT/Masq area (see the next section of this document). In the External Information and Internal Information sections, you will enter an IP address and port. External IP is the address/port the remote users connect to. The Internal IP is the IP behind the Joebox (on your LAN). Use the Restrict Access section to restrict access by a certain IP address. Finally, click on the "add port forward" button to save your specifications. To modify a port forward, click on the "mod" button in the item's Action column. Make your changes, and then click on the "modify port forward" button to save your specifications and return to the list of forwards. To delete a port forward, click on the "del" button in the item's Action column. Page 24 of 31 Joebox Manual April 2010 NAT/Masq Click on the "NAT/Masq" tab to open the NAT/Masq area. The NAT/Masq area allows you to enable multiple computers/devices on your internal network to access the Internet as the firewall single IP address. To add a new rule, click on the "add masquerade" button located under the list of established NATs and masquerades. First, enable the NAT/Masquerade and enter a description. Next, you will set the type of NAT to use for the rule. The type can either be Masquerade, when your external connection is via a device that gets its IP address using DHCP, or SNAT (Source NAT), when your external connection has a fixed IP. For a one-to-one NAT entry, select Source NAT as the type. In the Source Options and Destination Options sections, you will set the source and destination for the rule. In the "Type" dropdown menu, you can select either IP/Hostname or Firewall Group. If you are using an IP/Hostname, enter it into the "IP/Hostname" textbox. If you are using a group, select the desired group from the "Group" dropdown menu. In the example above, the one-to-one NAT rule is given an internal IP on the LAN side, and the destination is set to the Everyone Else group. Page 25 of 31 Joebox Manual April 2010 In the Misc. NAT/Masquerade Options section, if setting up a SNAT, give it an external IP and set the outgoing interface to None. If setting up a masquerade, there is no need to change the settings in this section. Packets originating from machines behind your Joebox and sent out to other networks over the Internet will have their IP headers rewritten to appear as if they were coming from the Joebox interface or IP address you specify here. Finally, click on the "add NAT/masquerade" button to save your specifications. To modify a rule, click on the "mod" button in the item's Action column. Make your changes, and then click on the "modify NAT/masquerade" button to save your specifications and return to the list of rules. To delete a rule, click on the "del" button in the item's Action column. Page 26 of 31 Joebox Manual April 2010 Opened Ports Click on the "Opened Ports" tab to open the Opened Ports area. This feature allows you to open a port for forwarded or incoming traffic. It is only applicable if using the MED or HIGH firewall modes. To open a port, click on the "add opened port" button. First, enable the port and enter a description. Then set the Rule Chain. There are three available chain types. INPUT: Allow/disallow packets going to the Joebox itself FORWARD: Allow/disallow packets going to clients behind the Joebox OUTPUT: Allow/disallow packets originating from the Joebox itself The majority of the time you will want to select the FORWARD chain. In the Source Options and Destination Options sections, you will set the source and destination. In the "Type" dropdown menu, you can select either IP/Hostname or Firewall Group. If you are using an IP/Hostname, enter it into the "IP/Hostname" textbox. If you are using a group, select the desired group from the "Group" dropdown menu. Page 27 of 31 Joebox Manual April 2010 In the Misc. Opened Port Options section, select the protocol and port to be opened. To open a range of ports, enter the start and end ports with a colon between them, e.g. 3390:4000. Finally, click on the "add opened port" button to save your specifications. To modify an opened port, click on the "mod" button in the item's Action column. Make your changes, and then click on the "modify opened port" button to save your specifications and return to the list opened ports. To remove an opened port from the list, click on the "del" button in the item's Action column. Closed Ports Click on the "Closed Ports" tab to open the Closed Ports area. Adding a rule to Closed Ports area is the same series of steps as opening a port, except that you are choosing the range to block traffic on. Note that this option is only aplicable in the LOW firewall mode, since the MED and HIGH modes block non-open ports by default. Web Filter Click on the "Web Filter" tab to open the Web Filter area. This area is used to create policies to direct groups of computers/devices from your LAN to be filtered and unfiltered via MECguard content filtering, and to define exceptions to these policies. To add a web filter, click on the "add web filter" button. Page 28 of 31 Joebox Manual April 2010 First, enable the web filter and enter a description. Next, you will select a rule type. There are three available types in the "Rule Type" dropdown menu. Filter Source - Run content filtering on the Web pages viewed by people in the selected group or IP address/website Don’t Filter Source - Do not run content filtering on the group or IP address/website Don’t Filter Destination - Do not run content filtering on the group or IP address/website In the Source Options and Destination Options sections, you will set the source and destination for the rule. In the "Type" dropdown menu, you can select either IP/Hostname or Firewall Group. If you are using an IP/Hostname, enter it into the "IP/Hostname" textbox. If you are using a group, select the desired group from the "Group" dropdown menu. Finally, click on the "add web filter" button to save your specifications. To modify a web filter, click on the "mod" button in the item's Action column. Make your changes, and then click on the "modify web filter" button to save your specifications and return to the list of filters. To delete a web filter, click on the "del" button in the item's Action column. Advanced The advanced firewall editor is a powerful, complex way to create or manipulate custom firewall rules. There is no rule syntax checking. If you make a mistake, there is a possibility that you will lock yourself out of the machine. Use the advanced firewall editor only with great caution, and only when none of the pre-defined firewall solutions work for you. If you are not familiar with IP Tables, please call the Networkmaine support center before creating an advanced rule. For more information, consult the IP Tables documentation at http://www.netfilter.org. Page 29 of 31 Joebox Manual April 2010 Log Click on the "Log" tab to open the Log area in a new window. The Log area will display a Connections Table listing all of the active network connections that are going through your Joebox and their current statuses. For information regarding the IP connection of the Source and Destination addresses, click on an underlined IP address. Page 30 of 31 Joebox Manual April 2010 Options Click on the "Options" tab to open the Options area. In this section you will find miscellaneous settings that will affect the operation of your firewall. Explanations of some of the more obscure options are below. Firewall Policy Level: OFF: Disable firewalls and all protection to the Joebox and the clients behind it – Not Recommended. LOW: Accept any connections to the Joebox. Accept and forward any connections from machines behind the Joebox – Not Recommended. MEDIUM: Deny any connections to the Joebox unless a firewall rule has been created to allow the connection. Accept and forward any connections from machines behind the Joebox. HIGH: Deny any connections to the Joebox unless a firewall rule has been created to allow the connection. Deny any connections from machines behind the Joebox unless a firewall rule has been created to allow the connection. Explicit Congestion Notification Support: Enable or disable ECN to warn devices of buffer-full conditions on routers. Misc. TCP Packet Checking: Enable or disable the filtering of TCP packets for potentially harmful attacks. Liberal Internal Packet Forwarding: YES: Firewall will allow traffic on internal interfaces to be forwarded through it when the source and destination hosts are on the same physical network interface. NO: Firewall will allow traffic on internal interfaces with a destination of machines connected on another physical network interface. Min. Pattern Quality for Layer-7 Packet Classifier: Poor: Someone posted this pattern to our mailing list without explanation. It looks dubious and is completely untested by us. Marginal: This might work, but it's not well understood. It may have only been tested with one client/server in a limited set of cases or not at all. Ok: This probably works, but maybe not in all cases. It has been tested only lightly. Good: We are pretty confident that this pattern works, but it could use more testing. Great: This pattern works as intended. It is well understood and well tested. Page 31 of 31 Joebox Manual April 2010