1
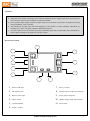
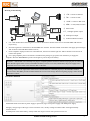
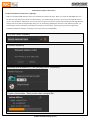
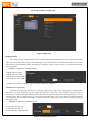
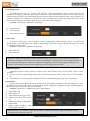
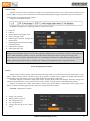
ESS-PRO ESS-PRO Engine Sound Simulation User Manual for Vehicle Model V1.0 Product Introduction ESS-PRO is a high-performance vehicle engine sound simulation system with strong sound-mixing unit, efficient highpower amplifier and a loudspeaker of optimized acoustic design, presenting perfect and realistic simulation effect. Http://www.sensehobby.com Product Specification Main Functions 30W double-channel Power Amplifier Supply voltage range of amplifier: 5Volts-25Volts Speaker impedance: 4-8Ohm 30W (8 Ohm) output for each channel MIRCO USB interface Size:53mm x 33mm x 15mm Weight: ESS-PRO:18g; S1510 loudspeaker: 65g Output is short-circuit, overload, over-current and thermally protected Capable of simulating the sound of engine start, different throttle speed, turning-off, braking, turbo, overload and special effects (users may need to purchase some sounds before usage ) Engine sound replaceable ESS-PRO firmware upgrading Battery type selection and low voltage alarm 9-grade adjustment of volume Built-in electronic switch and special sound effect of the AUX channel Default factory settings Before delivery, a “sense standard” engine sound and standard braking sound that may differ in different batches were downloaded into ESS-PRO. For value-added services such as other types of sounds, please see details in the resource section on RC PLUS. Other sounds are not deemed as being included in an ESS-PRO. Declaration and warning ESS-PRO is an engine sound simulation system with high integration level and performance with highly-powered built-in audio amplifier to suit speakers of different powers. Therefore, please use speakers from or recommended by original manufacturer to work together with ESS-PRO to caution against overheating and burning of amplifier because of unsuitable speakers. Follow the manufacturer’s requirement to set-up volume strictly to control the power output of the amplifier, as the speaker might be damaged by high volume under high voltage. Choose as low voltage as permitted by the equipment to control the heating of the amplifier, and place ESS-PRO in an environment with good ventilation and heat dissipation. Speakers are consumables so users should choose proper volume level to match the speakers. Engine sound simulation system is equipped with RC PLUS, a software platform for product configuration, video playing and changing engine sound. This software provides better application services to users but does not constitute a part that must be included in ESS product sales. Except the configuration function in RC PLUS, services unavailable through RC PLUS out of some reasons do not constitute a product defect. Ningbo Sense Innovations Electronic Technology Co., Ltd. owns the final interpretation right of uncovered contents in this user manual. www.sensehobby.com 1 Attentions Install the device strictly according to the connection method and power supply requirement specified in this user manual to make sure the installation is stable and reliable; S1510 speaker adopts highly magnetic trumpet. Keep items vulnerable to the affect of magnetic field away during installation, such as watches; The interference of other items above the diaphragm of the speaker is strictly forbidden. Meanwhile, try installing it in a place with good ventilation and heat dissipation; Turn the volume to a low level before powering on ESS-PRO again after its adjustment and re-installation to caution against damage to the speaker by too high volume. Interface Description 11 1 8 2 9 5 3 10 4 6 7 1、Receiver TH input 7、 Enter (+) button 2、TH output to ESC 8、 Speaker output of right sound channel 3、Receiver AUX input 9、 Power input of amplifier 4、LSW E-switch 10、Speaker output of left sound channel 5、1-4 LED indicator 11、Micro USB 6、Cancel (-) button www.sensehobby.com 3 Drawing of ESS Wiring 1、<TH : Connect to RX TH TH R/C Receiver AUX 2、TH> : Connect to ESC 3、<AUX : Connect to RX AUX 5 1 6 4、LSW> : Load (LED) E-switch 2 8 battery battery ESC 6-7、left/right speaker output 3 battery 7 4 CANCEL(-) 5、Micro-USB 9 ENTER(+) 8、AMP power output 9、Volume/calibration button Use 3-Pin double-head connecting wires to connect the throttle channel of the receiver and ESS-PRO<TH channel respectively; Insert the signal wire of the ESC to the ESS-PRO TH> channel. The built-in BEC of the ESC will supply power through TH> channel to the ESS-PRO and the receiver; Power amplifier output provides two sound channels, the left one and the right one. Either channel can be chosen to connect the speaker. Use T-plug amplifier power cord which is included in the package to get power from the battery to supply the amplifier. DO NOT REVERSE the positive and negative pole of the power battery. Remarks: <TH and TH> are essentially two plugs in complete parallel connection with the major purpose of connecting three throttle signals of the receiver, ESS-PRO and ESC (it serves as a Y line). Meanwhile, the power supply to the ESS-PRO and receiver both comes from the BEC of the ESC. Warning: make sure the signal lines of the receiver and the ESC are connected properly to the ESS-PRO without reverse insert; ESS-PRO provides standard futaba anti-reverse insert design. When using JR type plugs, make sure the direction is correct. ESS header definition ESS-PRO needs two kinds of power supply in operation, logic circuit power supply and AMP power supply. Supply voltage range of the logic circuit is between 4-8V, usually coming from ESC’s BEC with approximately 100mA current AMP power comes from battery, usually within the range of 5-26V with a peak current of 3A. www.sensehobby.com 4 Attentions ESS-PRO needs two kinds of power supply in operation. The AMP power supply can directly use the battery, while the ESS-PRO logic circuit power supply comes from the BEC output of the ESC. LSW output in essence is an E-switch controlled by the AUX channel. The output voltage of the E-switch matches the BEC of the ESC-PRO. The E-switch can withstand a voltage range of 4-8V and a maximum current of 3A. When LSW output is used for driving the LED, please apply a proper resistance between the LED and the LSW in serial connection to prevent too high voltage from directly being exerted on the LED and burn it. When connecting the battery to the power amplifier, please mind the positive and negative pole as reverse connection will burn the ESS-PRO circuit. External LED resistance E-switch (BEC power ) GND GND E-switch (BEC power ) Quick start Enter Calibration mode:Press & hold the ENTER(+) 1S,LED1-4 on,after“DI---”sound,release the button, ESS-PRO enters the “Setup mode”; Neutral Calibration : LED-1 on,make sure the TH at Neutral, Click the ENTER(+), after “DI”sound, the neutral calibration finishes. Forward TH calibration:LED1-2 on, Pull the TH stick to max forward position,click the ENTER(+),after"DI"sound, forward TH calibration finishes. Backward TH calibration:LED1-3 on,Push the TH stick to max backward position, click the ENTER(+), after “DI”sound, the backward TH calibration finishes. After the steps above, LED1-4 flash in order, after "DI---", calibration is completed. Calibration mode exit automatically. With only LED1 on and "Di, DI, DI" sound, the calibration fails. It returns to the neutral calibration to re- calibration. In process, you can quit the calibration mode by pressing CANCEL (-), with "DI -------" and three Red flashes. With power-on, the ESS-PRO is still in off state. The engine starts upon the push of the throttle. Then ESS-PRO generates engine sound according to the throttle signal. Meanwhile the LED displays the current speed status synchronously. Warning: ESS PRO must have its throttle calibrated before being used for the first time. If ESC is connected in the throttle calibration process, it will offer voltage output to the motor and rotate the wheels of the vehicle. For your safety and to decrease the influence of noises coming from motor rotation on your judgment on sound during calibration, please MAKE SURE that the motor and the ESC are disconnected, or do not use ESC in calibration but use additional receiver battery to offer power supply to the receiver and the ESS-PRO, and connect the ESC after the completion of the calibration. www.sensehobby.com 5 About RC PLUS RC PLUS is a software platform with online function which has various characters of internet software. RC PLUS will upgrade automatically when it detects a new version. You may from time to time see new function updates from RC PLUS also with new videos and sound resources, etc. Please kindly pay attention! RC PLUS is a kind of cloud service software with such functions as videos, consultation and audio resources. Meanwhile, it is the tool for the setup and configuration of ESS PRO. It is a comprehensive online applications platform for model products. For better enjoyment of value-added services of Sense products in the future, you may kindly register a membership on the RC PLUS platform. Get RC PLUS software for free Applicable to Windows 8/7/Vista systems(Microsoft has stopped updating XP system so we cannot guarantee its normal usage in XP systems) The software has undergone strict test and does not have any attached ads. Besides, it does not threat privacy safety in any manner. But the launch of new software may trigger false alarms in some anti-virus software. We have submitted the sample of the software to major manufacturers of anti-virus software for review. Download RCPlus: http://www.sensehobby.com/rcplus/install MSI installation package:http://download.sensehobby.com/rcplus_1_2_1_x86.zip Online installation of RC PLUS When you have bought an ESS product, you can directly install RC Plus through the product: Connect the ESS PRO through a USB cable to a PC, then the PC will automatically identify a disk driver. Enter into the disk; Double click the icon of “安装RCPlus” (install RCPlus) and the PC will automatically download and install the software; Meanwhile you could verify relevant information of the ESS product you bought through QR code scanning by your mobile phone. www.sensehobby.com 6 Function Description of RC PLUS Product information and firmware updating: ESS has a standard USB interface which can communicate with the RC Plus. When you insert the ESS PRO into a PC, RC Plus will run and connect the device automatically. You could change the name of your device through RC Plus to give it a neat nickname. Meanwhile, you can also get your device and current engine sound information through RC Plus and preview the sound. We adopted open design so we would keep updating the firmware of the ESS and present you with the latest version which may include the increasing of new functions, repairing of bugs and more optimized calculation method of sound to constantly increase the value of your ESS-PRO. Give ESS a neat nickname Firmware updating Installed sound resources(Click the play button to preview) Product information(Each product has a unique SN) www.sensehobby.com 7 Video sharing RC PLUS will constantly update various application videos of ESS. Meanwhile, we are expecting you to share your videos when you use our products with other fans. Resource download Resource download section provides various sounds resources of vehicles and aircrafts as well as attachments’ sounds. This section provides value-added service of ESS. You can download sounds you like for your car models or plane models to acquire the best experience. We will keep increasing the types of resources to meet your demand. Product launch SENSE works on the development of innovative electronic product used in models. Whenever we have something new we will launch it in this area. Configure your product RC PLUS provides satisfactory user interface and convenient operations for quick configuration of your ESS product. Main contents include product information, firmware upgrading, parameter configuration and local resource management. User registration Before using various functions with RC PLUS, users need to register a RC PLUS account, in the process of which email verification is required. This account will also be used for a user to purchase products and sound resource with RC PLUS, so please keep the account and password well. Resources you may download later will all be related to this account. Account verification will be needed in the process of sound downloading. We require users to kindly follow the rule to download sounds with your own accounts to your ESS product and do not share resources with others by offering your account information. By principle every account corresponds to a device authentication license. If we find that a certain account shares and installs resources in a malicious way, we reserve the right to cancel the account as well as resources related to it. Ningbo Sense Innovations Electronic Technology Co., Ltd. owns the right of final interpretation of the content of this paragraph. www.sensehobby.com 8 ESS-PRO hardware function description ESS PRO includes three major parts: Sound-mixing unit: a 32-bit processor is the CPU to realize complicated sound-mixing algorithm in this unit, producing various realistic sounds. This is a logic part with 4-8V power supply coming from the BEC of the ESC together with the receiver. Power amplifier: it is used to amplify the sound signals. A high-efficiency D-Class amplifier with the maximum load of 30W x 2 (8 ohm resistance) is used, supporting the input of 2-6S lithium batteries. Speaker: it consists of power speaker and its cavity, more specifically, a 1.5 inch 10W speaker and a sound cavity with reverse phase hole. Power amplifier Supply voltage range:5Volts-26Volts Speaker Impedance:4-8Ohms - DO NOT use speaker lower than 8 Ohms on voltages greater than 12V Output power under 4 Ohms:20W/3S(LiPO) per channel Output power under 8 Ohms:10W/12V, 23W/18V, 30W/22Volts supply Number of audio channels:TWO channels 30W X 2 Output is Short-Circuit, Overload and Thermally Protected Remarks: ESS-PRO is a universal sound simulation system with quite big output power to meet different models of speakers. Therefore in the usage process, remember to adjust your volume as per the speaker power and input voltage of the amplifier. Too high volume may cause speaker damage which will not be categorized as product issues and covered by warranty policies. Power output of amplifier and volume setting Firstly, identify the supply voltage of your amplifier. If it is higher than 12V (3S lithium battery), please use a speaker with 8-ohm impedance. If you want to use a speaker of 4-ohm impedance, maintain the volume under level 4 and make sure heat dissipation will be well performed. A 4ohm S1510 speaker is equipped for this product with the maximum power of 10W. Therefore, when the supply voltage surpasses 12V, the maximum power output of the amplifier will surpass the highest power it can bear, so we recommend that this speaker use 2S lithium battery for power supply. If you use the lithium battery higher than 3S, please firstly turn down the volume and increase step by step and go back one step when you feel the sound of the speaker becomes unclear and distorted. By this time it is basically the highest power that can be applied on the speaker and now you can have the best quality of sound which shall not be higher than Level 5. Try not to maintain the speaker for a long time under the static state of the vehicle when the throttle speed is highest, because at this time the speaker will undertake the highest power and tends to be heated. Remarks: there are totally nine levels for volume adjustment (including Mute). In the adjustment process 4 LEDs stand for 8 levels of volumes. The system has the default value of level 2 in factory setting. Use the Cancel(-) button and Enter(+) button in the ESS-PRO to adjust the volume. www.sensehobby.com 9 ESS-PRO installation Before using ESS-PRO, secure it reliably onto your model and install the ESS-PRO and speaker in a well ventilated place as much as possible. If the high power output of the module could not guarantee good cooling, the overheating protection function of the module will automatically stop the device from working until temperature drops to normal value. The speaker is a heating element and long time of overheating will deform or even damage the diaphragm. Working mode of the ESS-PRO There are 3 working modes: Remote control calibration: in sound simulation mode, press ENTER(+) for more than one second to activate the calibration mode; Sound simulation mode: when the ESS-PRO is powered-on, the system will enter into sound simulation mode as default; USB mode: when the USB of ESS-PRO connects the PC, the device will enter into USB mode. Then set-up, sound source changing and firmware upgrading of ESS-PRO can be conducted through RC PLUS. USB functions ESS-PRO connects with PC through USB and thus enters into USB mode, mutually exchanging data with the RC PLUS in the PC to realize sound resource downloading, function configuration and firmware upgrading; Upon connection of the ESS-PRO with PC, the operation system will identify a removable disk through a link in which RC PLUS installation can be realized; When the ESS-PRO is in USB mode, it only exchanges data with PC and will not send audio signals to the amplifier circuit and the latter will not work. Calibrate ESS-PRO Enter Calibration mode:Press & hold the ENTER(+) 1S,LED1-4 on,after“DI---”sound,release the button, ESS-PRO enters the “Setup mode”; Neutral Calibration : LED-1 on,make sure the TH at Neutral, Click the ENTER(+), after “DI”sound, the neutral calibration finishes. Forward TH calibration:LED1-2 on, Pull the TH stick to max forward position,click the ENTER(+),after"DI"sound, forward TH calibration finishes. Backward TH calibration:LED1-3 on,Push the TH stick to max backward position, click the ENTER(+), after “DI”sound, the backward TH calibration finishes. After the steps above, LED1-4 flash in order, after "DI---", calibration is completed. Calibration mode exit automatically. With only LED1 on and "Di, DI, DI" sound, the calibration fails. It returns to the neutral calibration to re-calibration. In process, you can quit the calibration mode by pressing CANCEL (-), with "DI -------" and three Red flashes. Remarks: after the device is powered on, the CANCEL button and ENTER button will be used for volume adjustment. When switching to the calibration mode upon long pressing ENTER, ENTER button will serve as the confirmation button and the CANCEL button will mean cancellation. www.sensehobby.com 10 LEDs status in the ESS PRO Under sound simulation mode, the LEDs in the ESS-PRO mainly have three functions to display the engine speed, volume and abnormal states. Under default state, the LEDs display current speed of the engine; when adjusting the volume through a button, the LEDs will display current level of the volume. If within 10 seconds upon the completion of volume set-up there is not further volume adjustment, LEDs will go back to display engine speed; when the ESS-PRO has abnormal occurrence, the red LED and green LED will flash alternatively to warn the user. In this condition LEDs will not display engine speed or volume until the abnormal occurrences are cleared off. Batter status monitoring ESS-PRO can collect battery voltage and thus monitor and give alarm on the battery status. When the battery is not connected to the amplifier, a red LED and a green LED of the ESS-PRO will alternatively flash to mind the user. When the battery has a voltage higher than 26V, alternative flash of twice for green LED and 3 times for red LED will give the alarm. Then the ESS-PRO must immediately be cut off from the battery or else the former may be damaged. ESS-PRO has low voltage alarm function. Under default condition, this function is closed; the ESS-PRO can be connected with USB to the PC to configure the low voltage alarm function of RC PLUS. If the low voltage alarm function is activated, the type and number of serial batteries and the threshold value of low voltage alarm shall be selected in the configuration option. When ESS-PRO is working and the output voltage of the battery falls below the aforementioned threshold value, ESS-PRO will give consecutive beeping sounds to give alarm and the LED will alternatively flash of twice for red lamps and twice for green lamps. www.sensehobby.com 11 RC PLUS parameter configuration Engine configuration Braking function The braking function of ESS is mainly meant to match the ESC brake. When ESC sets up brake function, ESSPRO will also be able to play braking sound. Meanwhile, it can also lock down the sound under braking state to match the forward or backward brake of ESC. This function currently provides two types of brakes, only forward brake and bidirectional brake. Location: Configuration->ENGINE->Brake Brake function closed Brake function started Bi-directional brake mode Forward only brake mode Click the “save” button on the upper right corner after selection is completed. Automatic start-stop (ECO) Automatic start-stop means that when you start your sound system, if the current state maintains a neutral throttle, the vehicle will keep motionless and the engine sound will be in idle state. If the automatic start-stop system is activated, the sound system will automatically play the sound of engine turning-off after the delayed time you set up, and the engine will be re-started as long as you trigger the throttle again. You can also choose to shut the automatic start-stop down, then no matter in what state, as long as the engine is started, the sound system will always keep playing the engine sound. Location: Configuration->ENGINE-> ECO Automatic start-stop off Automatic start-stop on Delayed time of engine flameout www.sensehobby.com 12 Overloading sound Overloading sound refers to a special sound when the vehicle automatically controls the oil circuit to offer intermittent oil supply to protect the engine when the throttle is in maximum position and the rotation speed range of engine reaches the red line. This sound usually appears when the engine speed hits the limit under certain conditions, for example, in drifting. You could start or shut down this function through option set-up, and define a time interval after which when the throttle is in maximum position the overload sound will be triggered. Location: Configuration->ENGINE-> overloading Overloading off Overloading on Overloading delay time Turbo sound In terms of vehicle types, some of them are of turbo supercharging models and there will be a sound of turbo decompressing. You could modify your vehicle by downloading various turbo sounds. Through RC PLUS you can start or turn down the turbo sound. Location: Configuration->ENGINE->Turbo Effect Turbo Effect off; Turbo Effect on; Remarks: in factory setting, ESS does not have the turbo sound. If you want it, you may obtain it from RC Plus. Meanwhile, the trigger of the turbo sound is subject to comprehensive calculation upon such multiple parameters as rotation speed, pressuring time and throttle change before triggering, instead of being triggered simply upon one location. Users could try to probe into the triggering process by triggering it more times. Additional functions Additional functions contain extensive functions of the third channel (AUX) of the remote control, mainly including: The play of special sounds through signal control of the third channel of remote control, such as sirens, trumpets, etc; Controlling on the E-switch output of LSW channel can be realized through the signal of the third channel. Special Effect You may purchase and download special sounds such as police whistle, ambulance sirens and trumpets, etc, from the sound resource shops of RC PLUS. Then through RC PLUS configuration, triggering of these sounds through the third channel (AUX) of remote control can be realized. Location: Configuration->Additional Function->Special Effect Special Effect off Special Effect on Third channel AUX trigger mode Normal Open mode upon poweron PWM trigger direction through the third channel PWM trigger threshold value through the third channel Remarks: there are two modes to trigger special sound: 1. the third channel AUX trigger of the remote control; 2. Normal Open mode upon power-on www.sensehobby.com 13 LSW E-switch ESS has a built-in E-switch with maxim voltage of 8V and maximum current of 3A, used to connect external devices such as LEDs. As long as your external devices meet aforementioned power supply requirement, they can be subject to LSW E-switch control through AUX channel. LSW pins are defined as follow: Location: Configuration->Additional Function->Electronic Switch LSW off LSW on Third channel AUX trigger mode Power-on trigger mode PWM trigger direction through the third channel PWM trigger threshold value through the third channel LSW output frequency LSW output duty ratio Remarks: LSW channel in essence is an E-switch. Through configuration it can realize the control on electrical devices such as LED and smoke generators. Not only could this channel realize the output of voltage on or off by AUX channel but also can set up the output after power-on, controlling such functions as LED flashing mode through two modes, adjusting the output frequency and duty ratio. Extend your imagination freely to enjoy this function. Power management and alarm Battery ESS provides a battery monitor and alarm function through which you could choose the type and quantity of your battery. When you have chosen your battery type, the system has a default value to trigger low voltage alarm based on current battery type and quantity. Users may adjust this default value upon actual needs. Amplifier supports a maximum voltage input of 26V. A higher input could cause damages. When the voltage used surpasses 3S lithium battery (12V), please take care of the volume. Too high volume could damage the speaker. ESS has an inherent low voltage alarm function which, upon special filtering, could judge current voltage of the battery accurately without triggering a false alarm out of frequent throttle changes. Location: Configuration->battery battery type selection battery quantity selection low voltage alarm off low voltage alarm on voltage value set-up for low voltage alarm www.sensehobby.com 14