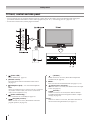
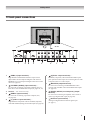
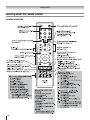
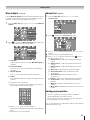
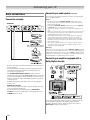
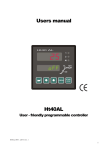
1
Contents Introduction Welcome to Toshiba............................................................3 Important Safety Instructions..............................................3 Installation.....................................................................3 Use ...............................................................................4 Service...........................................................................5 Cleaning........................................................................6 Important information.........................................................6 Getting started Connecting an antenna........................................................7 Exploring your new TV.......................................................7 Installing the remote control batteries...........................7 TV front, control and side panel .......................................8 TV back panel connections.................................................9 Learning about the remote control....................................10 Location of controls....................................................10 Learning about the menu system.......................................11 Displaying the Digital TV/Analog TV SETUP menu chart . ................................................................11 Turning the TV on.............................................................12 Switching on the TV...................................................12 Switching off the TV . ................................................12 Tuning the TV for the first time........................................13 Programming channels into the TV’s channel memory....13 Full Search - digital only -..........................................13 Manual Search - digital only -....................................14 Auto Tuning - analog only -........................................14 Manual Adjust - analog only -....................................15 Channel List - digital only -........................................15 Sorting program position ...........................................15 Favorite Channel ........................................................16 Channel List - analog only -........................................16 Watching TV programs.....................................................17 Viewing Digital programs - digital only -...................17 Switching between two program positions.................17 Selecting the menu language .....................................17 Displaying the on-screen information.........................17 Setting the On-Screen-Display Time .........................17 Using the TV’s features (General) Picture adjustment.............................................................18 Selecting the picture size............................................18 Using the picture still..................................................19 Adjusting the picture position - PC only -..................19 Automatically Adjusting the picture position PC only -.....................................................................19 Selecting the picture mode..........................................19 Adjusting the basic picture quality ............................19 Activating the DNR (Digital Noise Reduction) .........20 Selecting the color temperature...................................20 Using the active backlight control...............................20 Using the cinema mode . ...........................................20 Sound adjustment..............................................................21 Setting the MTS (Multi-channel TV Sound)analog only -...............................................................21 Selecting the dual 1 or dual 2 mode- analog only -....21 Selecting the stereo programs - analog only -.............21 Selecting the bilingual programs - analog only -........21 Adjusting the sound quality .......................................21 Using the Bass Boost..................................................22 Using the Virtual Surround.........................................22 The timers..........................................................................22 Setting the Current Time ............................................22 Setting the Wakeup Timer ..........................................22 Setting the Sleep Timer ..............................................22 Setting the Power Control ..........................................23 Setting the Banner Duration - digital / analog -..........23 Selecting the video input source to view...........................23 Teletext in Analog TV.......................................................24 Setting up the teletext mode........................................24 Teletext general information ......................................24 Using Auto mode........................................................24 Using LIST mode . .....................................................24 Teletext buttons on the remote control........................25 Teletext in Digital TV........................................................25 Reset to default setting .....................................................25 Other Digital TV features and settings Setting the EPG (Electronic Program guide) digital only -........................................................................26 Password............................................................................26 Setting the Password...................................................26 Parental Rating..................................................................26 Setting the Parental Rating..........................................26 AV Connection .................................................................27 Subtitle..............................................................................27 Audio Preference...............................................................27 Selecting The Audio Mode ........................................27 Digital Output Format.................................................27 Connecting your TV Back connections...............................................................28 Connection example....................................................28 Connecting an audio system - digital only -...............28 Connecting an amplifier equipped with a Dolby Digital decoder.................................................28 Connecting an amplifier equipped with an MPEG decoder........................................................................29 Connecting an amplifier equipped with a digital audio (optical or coaxial) input........................29 Side connections................................................................29 Connection example....................................................29 Connecting an HDMI or a DVI device..............................29 Connecting an HDMI or a DVI device.......................29 Connecting an HDMI device......................................30 Connecting a DVI device ...........................................30 Connecting a computer......................................................30 Using the PC setting..........................................................31 Adjusting the picture size/position, the clock phase of the picture and sampling clock ..............................31 PC of the Auto Adjust ................................................31 Reference section Troubleshooting.................................................................32 Symptom and solution................................................32 Symptom and solution - digital only -........................32 APPENDIX.......................................................................33 AUSTRALIAN PARENTAL GUIDANCE CODES (Normative).................................................................33 Broadcast system...............................................................34 Broadcast transmission systems of each country or region......................................................................34 Specifications....................................................................34 Introduction Welcome to Toshiba • Thank you for purchasing this Toshiba LCD Color television. This manual will help you use the exciting features of your new TV. • Instructions in this manual are based on using the remote control. • Please read all safety and operating instructions in this manual carefully, and keep this manual for future reference. Important Safety Instructions 4) Never block or cover the slots and openings in the cabinet. • Never place the TV so that it is facing upward or on its side. • Never place the TV in a closet, bookcase or other similar area where the ventilation is poor. • Never drape a newspaper, tablecloth or curtain on the TV. • When installing the TV against a wall, always keep the TV at least 10 cm away from the wall. • Never place the TV on a soft unstable surface, such as a carpet, or a cushion. The inside of this TV will overheat if the ventilation holes are covered, blocked or sealed, which may result in a fire. Be sure to observe the following instructions and precautions to ensure safe use of this TV. Installation 1) Always connect the power plug to an appropriate electrical outlet equipped with 220-240V, AC 50Hz. Never use the TV outside the specified voltage range. It may cause a fire or an electric shock. 5) Never place the TV near a heater or in direct sunlight. The surface of the cabinet or power cord may melt and result in a fire or an electric shock. 220-240V AC, 50Hz Check! 2) Never insert or remove the power plug with wet hands. This may cause an electric shock. 3) Never place the TV in an unstabilised location such as on a shaky table, incline or location subject to vibration. The TV may drop or fall off which may cause injury or damage. 6) Never place the TV in an area exposed to high humidity levels, such as in a bathroom or close to a humidifier. This may cause a fire or an electric shock. 7) Never place the TV next to a stove where it will be exposed to oil, smoke, or steam, or in a location where there is a large quantity of dust. This may cause a fire or an electric shock. Introduction 8) Always place the TV on the floor or a sturdy, level, stable surface that can support the weight of the unit. To secure the TV, use a sturdy strap from the hooks on the rear of the TV to a wall stud, pillar, or other immovable structure. Make sure the strap is tight, secure, and parallel to the floor. 9) Precautions for moving the TV • When moving the TV, be sure to remove the plug from the wall outlet and disconnect the antenna cable and audio/video cables, any steady ties. Fire or electric shock may result if the power cord is damaged. • When carrying the TV, at least two people are needed. Be sure to carry it upright. • Never carry the TV with the screen facing up or down. 10) Precautions for installing on outdoor antenna An outside antenna system should not be located in the vicinity of overhead power lines, or other electric light or power circuits. If the antenna falls down or drops, it may cause injury or electric shock. Use 1) Never place hot objects or open flame sources, such as lighted candles or nightlights, on or close to the TV. High temperatures can melt plastic and lead to fires. 2) The apparatus shall not be exposed to dripping or splashing and that no objects filled with liquids, such as vases, shall be placed on the apparatus. When liquids are spilled or small items are dropped inside the TV, this may cause a fire or an electric shock. If small objects drop inside the TV, turn off the TV and remove the power plug from the outlet immediately and contact a service technician. 3) Never insert objects (metal or paper) or pour water inside the TV through ventilation holes and other openings. These items may cause a fire or an electric shock. If these objects are inserted inside the TV, turn off the TV and remove the power plug from the outlet immediately and contact a service technician. Be especially careful that children do not insert objects into the TV. Clip 4) Never stand or climb on the TV. Be especially careful in households with children to prevent them through climbing on top of the TV. It may move, fall over, break, become damaged or cause an injury. Introduction 5) When the TV will not be used for a long period of time, such as during vacation or travel, remove the power plug from the wall outlet for safety. • The TV is not completely disconnected from the power supply line, as minute current is consumed even when Power switch is turned off. the • The Mains plug or an appliance coupler is used as the disconnect device, therefore the disconnect device shall remain readily operable. Service 1) Never repair, modify or disassemble the TV by yourself. It may cause a fire or an electric shock. Consult a service technician for inspection and repairs. 6) Never pull on the power cord when removing the plug from the wall outlet. Always hold the plug firmly when removing it. If the power cord is yanked, the cord may become damaged and a fire or an electric shock may occur. 2) When a malfunction occurs, or if smoke or an unusual odour comes from the TV, turn off the TV and remove the power plug from the outlet immediately. Make sure that the smoke or smell has stopped, then contact a service technician. If the TV is still used in this condition, it may cause a fire or an electric shock. 7) Never cut, break, modify, twist, bunch up or bend the cord or apply excessive force or tension to it. Never place heavy objects on the cord or allow it to overheat as this may cause damage, a fire or an electric shock. Contact a service technician if the power cord is damaged. 3) If the TV is dropped or the cabinet is broken, turn off the TV and remove the power plug from the outlet immediately. If the TV is still power used in this condition, it may cause a fire or an electric shock. If the cabinet is broken, be careful when handling the TV to prevent an injury. Contact a service technician for inspection and repair. 8) If there is thunder or lightning, never touch the antenna cable or other connected cables. You may suffer an electric shock. 4) When the TV reaches the end of its useful life, ask a qualified service technician to properly dispose of the TV. Note: The lamp unit contains a small amount of mercury. Disposal of mercury may be regulated due to environmental considerations. Dispose of the used lamp unit by the approved method for your area. For disposal or recycling information, please contact your local authorities. Introduction Cleaning Important information 1) Remove the power plug before cleaning. Never use solvents such as benzine or thinner to clean the TV. • These solvents may distort the cabinet or damage its finish. • If rubber or vinyl products remain in contact with the TV for a long time, a stain may result. If the cabinet becomes dirty, clean it with a soft, dry cloth. When cleaning the surface of the LCD display, wipe the panel surface gently with a soft, dry cloth. 1) About LCD screen • If you have the LCD screen facing to the sun, the LCD screen will be damaged. Be aware of locating the TV in the place such as window side or outside of the room. • Never press the LCD screen strongly or scratch it, and never put anything on it. These actions will damage the LCD screen. 2) About cabinet and LCD screen Never spray volatile compounds such as insecticide on the cabinet and LCD screen. This may cause a discoloration or damage the cabinet and LCD screen. 3) Some pixels of the screen do not light up 2) Periodically disconnect the power plug from the outlet and check it. If dust has collected on the power plug connectors, clean off the dust with dry cloth. This dust may cause a fire due to reduced insulation on the plug. Clean here The LCD display panel is manufactured using an extremely high level of precision technology, however sometimes some pixels of the screen may be missing picture elements or have luminous spots. This is not a sign of a malfunction. 4) About Interference The LCD display may cause interference in image, sound, etc. of other electronic equipment that receives electromagnetic waves (e.g. AM radios and video equipment). 5) About using under the low temperature places If you use the TV in the room of 0°C or less, the picture brightness may vary until the LCD monitor warms up. This is not a sign of a malfunction. 6) About afterimage If a still picture is displayed, an afterimage may remain on the screen, however it will disappear. This is not a sign of malfunction. Exemptions • Toshiba is not liable for any damage caused by fires, natural disaster (such as thunder, earthquake, etc.), acts by third parties, accidents, owner's misuse, or uses in other improper conditions. • Toshiba is not liable for incidental damages (such as profit loss or interruption in business, modification or erasure of record data, etc.) caused by use or inability to use of product. • Toshiba is not liable for any damage caused by neglect of the instructions described in the owner's manual. • Toshiba is not liable for any damage caused by misuse or malfunction through simultaneous use of this product and the connected equipment. Getting started Connecting an antenna Exploring your new TV Optimum reception of color requires a good signal and will generally mean that an outdoor antenna must be used. The exact type and positioning of the antenna will depend upon your particular area. Your Toshiba dealer or service personnel can best advise you on which antenna to use in your area. Before connecting the antenna cable, turn off all main power switches. VHF Installing the remote control batteries Remove the battery cover. Insert two R03 (AAA) batteries matching the –/+ polarities of the battery to the –/+ marks inside the battery compartment. UHF Outdoor antenna Mixer Decoder TV back view IN OUT Cautions: • Dispose of batteries in a designated disposal area. Never throw batteries into a fire. • Attention should be drawn to the environmental aspects of battery disposal. • Never mix battery types or combine used batteries with new ones. Notes: • If the remote control does not operate correctly, or if the operating range becomes reduced, replace both batteries with new ones. • If the batteries are dead or if you will not use the remote control for a long time, remove the batteries to prevent battery acid from leaking into the battery compartment. Media Recorder IN OUT Effective range Antenna cable (75 (not supplied) 300 twin-lead feeder Antenna adaptor (not supplied) 75 coaxial) 75 antenna terminal coaxial cable Plug (not supplied) 75 antenna terminal Getting started TV front, control and side panel • You can operate your TV using the buttons on the TV control panel or the remote control. The back and side of the panel provide the terminal connections to connect other equipment to your TV (- “Connecting your TV” pages 28 - 31). • For the use of each control, see the pages in brackets. 1� (Power LED) — Power indicator ( page 12). 2� (Remote sensor) — Point the remote control toward this remote sensor ( page 7). (Headphone jack) — For use with headphones. 3� Note: When the Headphone jack is being used, the sound from all speakers will be muted, and normal sound will be output to the headphones only. 4� (Power on/Standby) — Press to turn the TV on/standby ( page 12). 5� (Program position) — When no menu is on-screen, these buttons select the program position. ( page 16). 6� - + (Volume) — When no menu is on-screen, these buttons adjust the volume level ( page 10). 7� MENU — Press to access the TV SETUP menu ( pages 11, 12). 8� (Input source selection) — When no menu is on-screen, this button selects the input source ( page 23). 9� (Arrows) — When a TV menu is on-screen, these buttons function as up/down/left/right menu navigation buttons or adjust settings ( page 11). 10� OK — When a TV menu is on-screen, this button functions as the next menu navigation button ( page 11). Getting started TV back panel connections 40” TV 1� HDMI1,2 (input terminals) — High-Definition Multimedia Interface input receives digital audio and uncompressed digital video from an HDMI device or uncompressed digital video from a DVI device ( page 29). 2� PC/HDMI1 (AUDIO) (input terminals) — For use when connecting a personal computer (PC) or a DVI device with standard audio output ( pages 28, 30). 3� Service — For service use only. 4� RGB/PC (input terminal) — For use when connecting a personal computer (PC) ( page 30). 5� (1) (Video 1 input terminals) — High-definition component video or standard (composite) video and standard (analog) stereo audio inputs ( page 28). 6� (2)(Video 2 input terminals) — Standard (composite) video and standard audio inputs plus optional S-video inputs for connecting devices with composite video or S-video output. 7� MONITOR (output terminals) — For use when connecting a VCR/HDD/DVD video recorder with standard video and standard audio inputs ( page 28). 8� DIGITAL AUDIO (coaxial/optical) (output terminal) — For use when connecting an amplifier with coaxial or optical type digital audio input ( page 28). 9� (Antenna input terminal) — Analog TV/Digital DVB-T antenna signal input ( page 7). Getting started Learning about the remote control Location of controls 10 Getting started This integrated TV is equipped with both Digital and Analog system. To switch between Digital and Analog TV press A/D on the remote control. TV SETUP menu chart About DTV Menu Learning about the menu system We suggest you familiarize yourself with the display charts before using the menu system: to display menu, then press v or w to select main menu headings. • Press r or s to select sub manu headings. to select or adjust setting. • Press to display the next menu. • Press • Press Displaying the Digital TV/Analog TV SETUP menu chart When source input " DTV "or " ATV " is selected, press to display the TV SETUP menu chart. The menu will display "DTV Menu" if Digital TV selected. The menu will display "ATV Menu" if Analog TV selected. There will be some functions which not available in Digital TV. 11 Getting started About ATV Menu Turning the TV on Switching on the TV Connect the power cord to a wall outlet, the indicator lights in red (standby mode). 1� power Press on the remote control or on the TV control panel, the power indicator lights in green. Switching off the TV 1� Press on the remote control or on the TV control panel to switch to the standby mode. Notes: • This TV is not fully disconnected from the main supply, as minute current is consumed even when is turned off. When the TV will not be used for a long period of time, such as during vacation or travel, remove the power plug from the wall outlet. • If power is cut off while you are viewing the TV, the Last Mode Memory function turns on the TV automatically when power is applied again. If power is going to be off for a long time and you are going to be away from your TV, unplug the power cord to prevent the TV from turning on in your absence. Notes for menu system: • In the video input mode (Video1, Video2, HDMI, PC), Auto tuning / Full Search and Manual Adjust / Manual Search are not available. ( page 13). • If you do not make a selection for a while, the menu display disappears automatically. • If you want to close the menu display instantly, press . 12 Getting started Tuning the TV for the first time Before switching on the TV, put your decoder and media recorder to Standby if they are connected and ensure the antenna is connected. To setup the TV use the buttons on the remote control as detailed on page 10. 1� This screen will appear the first time that the TV is switched on and each time the TV is reset. 2� Press v or w to select the Menu Language function. Language include the English, Français and . 3� Use s to select Province/State. Press v or wto select the state in which you live. State include the NSW/ ACT(New South Wales/Australian Capital Territory), VIC(Victoria), QLD(Queensland), SA(South Australia), WA(Western Australia), TAS(Tasmania) and NT(Northern Territory). 4� 5� Press to setup Energy Saving Mode. Press v or w to select the Energy Saving Mode. 7� When DTV search is completed, the TV will automatically turn to the lowest logical channel number. Programming channels into the TV’s channel memory Full Search - digital only As new services are broadcast, it will be necessary to re-tune the TV in order to view them. Full Seach will completely re-tune the TV and can be used to update the channel list. It is recommended that Full Seach is run periodically to ensure that all new services are added. All stored programs and settings, including Timer entries, favorites and locked programs, will be lost. 1� 2� 3� , and v or w to select the SETUP menu. Press Press , and r or s to select Full Search menu. Press , a confirmation screen will appear indicating that This will do full search, Are you sure? 4� Press , to start Auto tuning. The below sample display shows Full Search in progress. The channel number will show 1~ 69. DTV Channels will display searched channel and name information. Radio Channels will display searched channel and name information. Notes: To ensure your television is operating at optimal energy efficiency, select Home mode during initial activation. Home mode is recommended for normal home use. Energy Saving Mode: The factory default settings of this television meet ENERGY SAVING requirements. Changing Picture Settings may increase energy consumption, possibly beyond the limits required for ENERGY SAVING qualification. To return to Home mode settings, select Standard picture mode. Standard picture mode is used to achieve published average power values, and this mode is recommended for normal home use. 6� Press to set Energy Saving Mode and to start ATV/ DTV Scan . The Auto Scan screen will appear and the TV will automatically start to search for available stations. The progress bar will move along the line. 13 Getting started 5� 6� Full Search will show scan of DTV Channels /Radio Channels list. When the search is complete, the TV will automatically tune to the lowest logical channel number. Note: After the Full Search, the TV may have scanned identical channels being broadcast from different transmitters. Pressing or helps you to check Full Search result. If you do find channels with the same logical channel numbers but different physical channel numbers, it is recommended that you skip these duplicate channels and keep only one channel with the best signal strength as indicated by the signal strength bar in the on-screen information. Auto Tuning - analog only First, use the Auto Tuning function to preset all the active channels in your area automatically. Then, arrange the preset channels with the Manual Adjust function so that you can tune into desired channels. 1� 2� 3� Press , and v or w to select the Setup menu. Press , and r or s to select Auto Tuning menu. , a confirmation screen will appear indicating Press that This will do auto tuning , Are you sure? Manual Search - digital only If there were any missing channel after Full Search, these channels might be found by using Manual Search described in this section. 1� From the Setup menu, press s or r to select Manual Search. 2� Press , then press v or w to select the channel(0~69) you wish to search. 3� If scanning was successful, Signal Strength will appear at almost 100%. Repeat to scan other channels as necessary. 4� 5� 6� Press to start the automatic search. The search will begin for all available stations. The slide bar will move along line as the search progresses. If you make a mistake, simply repeat steps 1-3 to start again from the beginning. When the automatic search is completed, the TV will automatically return to the first program position. Press or to view the programmed position. Note: When you preset the program channel which sound of broadcast transmission system adopts “M” system, the sound system may not be tuned correctly if the radio waves transmit badly. At that time, preset the channel by Manual Search. 4� If scanning was unsuccessful, Signal Strength will appear at almost 0%. At this point you can rescan the signal or refer to aligning the direction of the antenna to get the signal. Refer to your antenna installer if problem persists. Notes: • Signal Strength refers to the input Radio Frequency (RF) signal strength as perceived by the TV. Note that too strong signal may cause erroneous readings. If you use an antenna booster and find that you still get a low signal level, your booster gain may be set too high. In this case, adjust the gain accordingly. You may also see the No Signal on the screen when the signal level is low. 14 Getting started Manual Adjust - analog only Use the Manual Adjust operation if desired channels cannot be preset with the Auto tuning or if you would like to preset channels to specific position numbers one by one. 1� 2� Channel List - digital only 1� From the SET UP menu, press s or r to select Channel List. From the SET UP menu, press s or r to select Manual Adjust. 2� Press 3� Press s or r to select the program position you want to arrange. Press w to display the breakdown menu. Press s or r to select an item, then press to select the item as shown below. A. Add to Fav: 1 - Add selected channel to Favorite group 1. B. Add to Fav: 2 - Add selected channel to Favorite group 2. C. Add to Fav: 3 - Add selected channel to Favorite group 3. D. Sort: LCN - Sort all channels by channel number. E. Sort: Name Down - Sort all channels by name. ( page 16) F. Sort: Name Up - Sort all channels by name. ( page 16) G. Delete – Delete selected channel from the channel list. H. Lock/ Unlock – Lock / Unlock selected channel by password. I. Move Up – Selected channel will be move up one channel. J. Move Down – Selected channel will be move down one channel. to display the Channel List menu. Press to display the Manual Adjust menu, then press s or r to select the item as shown below. 4� 5� A. Channel You can select channel no for which Manual Adjust is required. B. Fine Tune Mode Press v or w to select “Auto fine Tune” and “Manual fine Tune”. C. Sound System Press v or w to select Auto, B/G,I or D/K system. D. Label The video label allows you to label each input source for your TV. To change or create video labels: 1.) Press s or r to select Label, and press yellow key to use the EDIT window as shown below. Sorting program position • The TV is capable of receiving a number of different channels depending upon where you live. • Program sorting is an easy way of storing each channel on the program position of your choice. Ex.: To swap channel A1. TEN Digital 1(Prog.13) for channel TEN Digital 2 (Prog.14): 2.) Press s, r,v and w to select character. And you can use Delete and Caps Lock to edit your label name. 3.) Press Save to store your settings. 15 Getting started 1� 2� From the SET UP menu, Press Channel List. and s or r to select Press to display the Channel List menu. Press s or r to select 13. TEN Digital 1. A. B. C. D. Add – Add selected channel from the channel list. Delete – Delete selected channel from the channel list. Move Up – Selected channel will move up one channel. Move Down – Selected channel will move down one channel. 5� You can press to save edited channel program and press to exit . 6� When viewing in Digital TV, press to display the Fav Group channel list. Press s and r to select your favorite program, then press 7� . Fac Group: DTV Menu...[Setup...Channel List] Channel List - DTV 1 7 . 7 Digital 70. 7 HD Digital 71. 7 Digital 1 72. 7 Digital 2 73. 7 Digital 2 1. TEN Digital 10. TEN Digital 11. TEN Digital 12. TEN HD 13. TEN Digital 1 14. TEN Digital 2 OK Confirm OK Confirm MENU Return 3� DTV/Radio EXIT Cancel Press s or r to select Move Down menu, then press . MENU Return Favorite Grope 1/2/3 EXIT Cancel Channel List - analog only 1� From the SET UP menu, Press and s or r to select Channel List . ATV Menu...[Setup...Channel List] Language Country/Region Auto Tuning Manual Adjust Channel List Fav Group : 1 Fav Group : 2 4� Confirm new Channel List menu. Favorite Channel 1� Press , then press v or w to select the SETUP menu. 2� Press and press s or r to select Fav Group 1, 2 or 3, then press OK Confirm MENU Return 2� Press ATV Menu...[Setup...Channel List] TV Channel List 1. TEN Digital 10. TEN Digital . 11. TEN Digital 12. TEN HD 13. TEN Digital 1 14. TEN Digital 2 DTV Menu...[Setup...Fav Group : 1] Language Country/Region Full Search OK Confirm MENU Return 3� Quick Search Manual Search 4� 5� Channel List Fav Group : 1 OK Confirm MENU Return 3� 4� Navigate EXIT Cancel Press w will display the breakdown menu. Press s and r to select an item. DTV Menu...[Setup...Fav Group: 1] Fav Group: 1 20 ABV HDTV OK Confirm MENU Return 16 Add Delete Move Up Move Down Favorite Group 1/2/3 EXIT Cancel Navigate EXIT Cancel to display the Channel List menu. Skip1 Luck/ Unlock Delete Sort : Name Up Sort : Name Down Move up Move down DTV/Radio EXIT Cancel Press s or r to select the program position you want to arrange. Press w to display the breakdown menu. Press s or r to select an item, then press to select the item as shown below. A. Skip- If you turn this option on, selected channel will be skipped when you select channels with or . B. C. D. E. F. G. Lock/ Unlock – Lock / Unlock the channel by password. Delete – Delete selected channel from the channel list. Sort: Name Up - Sort all channels by name. Sort: Name Down - Sort all channels by name. Move Up – Selected channel will move up one channel. Move Down – Selected channel will move down one channel. Getting started Watching TV programs Viewing Digital programs - digital only After you have tuned the TV, you have several ways to navigate through all programs: • Press the Number buttons (a channel number has 3-digits) and you may omit the leading zeroes, which will be appended automatically; (Please note that if you have channels with different frequencies but the same channel number, the TV will always tune to the first channel that has been stored into the channel database. To view the other duplicating channels, you can select the channels from the Channel List-DTV or use the / buttons.) / to view the previous and next program. The • Press channels are arranged in ascending order according to the channel number. to display Favorite channel list and press s or • Press r to select a program, then press to view the favorite program. Switching between two program positions You can switch two program positions without entering actual position number each time. 1� 2� 3� Displaying the on-screen information 1� Press to display the following on-screen information. - Analog TV - 1 ATV−1 NICAM MNO TTX The information will disappear in variable time which is dependent on banner duration setting. • Program position or external input mode selected • Label (if set) • Mono/Stereo/Dual audio status • Teletext signal status - Video 1, Video 2, HDMI 1, HDMI 2, PC - HDMI 1 1920x1080p(60Hz) The information will disappear in variable time which is dependent on banner duration setting. • Source input name • Video input resolution - Digital TV - Select the first program position you want to view. Select the second program position with the Number buttons (0-9). Press . The previous channel will be displayed. Each time you press , the TV will switch back and forth between the two program positions. Selecting the menu language Choose from 3 different languages (English, French, Chinese(CS)) for the On-Screen-Display. 1� Press , then press v or w to display SET UP menu. 2� 3� Press ,then press s or r to select Language. Press ,then press v or w to select the desired language. DTV Menu...[Setup...Language] Language Country/Region Menu Language When viewing in Digital TV, the on-screen information will give the details of the channel program currently being viewed. The contains the following information: • Current Channel Number and Name • Received program video format • Current time • Subtitle (closed-caption) availability (indicated by CC) • Teletext availability (indicated by TTX) • Dolby® Digital audio track availability (indicated by Dolby D) • Now and Next Program Names • Parental Guidance code (PG, MA, G, R, etc.) • Audio setting • Signal Strength 2� To close the display instantly, press . Setting the On-Screen-Display Time 1� From the TIMER menu, press s or r to select Banner 2� Duration. Press , then press v or w to set duration time for which on-screen DTV information will stay on the screen. English Full Search Quick Search Manual Search Channel List Fav Group : 1 OK Confirm MENU Return Navigate EXIT Cancel Note: Banner Duration function is display DTV information and menu display on screen timing. 17 Using the TV’s features (General) Picture adjustment Selecting the picture size 1� Each time you press , picture size information will 4:3 Use this setting to view a true 4:3 broadcast may see bars on the top and bottom of the screen. change again. The information will disappear in variable time, which is dependent on banner duration setting. Super Live 1 When receiving “4:3 format” signal, this setting will enlarge the image to fit the screen by stretching the image vertically and horizontally, holding the better proportions at the center of the image. 2� Picture size will change as below mode: Wide, Super Live 2, Cinema 2,4:3, Super Live 1, Cinema 1, Subtitle,14:9 and Auto . Auto - HDMI only Use this setting when watching a wide-screen DVD, widescreen video tape or a 16:9 broadcast (when available), than aspect ratio will automatically follow DVD player of HDMI output format to change the same picture size to display. You can easily see good display on the screen. Wide Use this setting when watching a wide-screen DVD, widescreen video tape or a 16:9 broadcast (when available). Due to the range of wide-screen formats (16:9, 14:9, 20:9 etc.), you may see bars on the top and bottom of the screen. Cinema 1 When watching “letterbox format” films/video tapes, this setting will eliminate or reduce the black bars at the top and bottom of the screen by zooming in and selecting the image without distortion. Subtitle Super Live 2 When receiving “side panel format” signal, this setting will enlarge the image to fit the screen by stretching the image vertically and horizontally, holding the better proportions at the center of the image. Also the black bars on the both sides of the screen will eliminate or reduce. When subtitles are included on a letterbox format broadcast, this setting will raise the picture so that the most of text is displayed. 14:9 Use this setting when watching a 14:9 broadcast. Cinema 2 When watching “all sides panel format” films/video tapes, this setting will eliminate or reduce the black bars on all the sides of the screen by zooming in and selecting the image without distortion. 18 Using the TV’s features (General) Notes: • Using the special functions to change the size of the displayed image (e.g. changing the height/width ratio) for the purpose of public display or commercial gain may infringe on copyright laws. • If the aspect ratio of the selected format is different from the one of the TV transmission or video program, it can cause a difference in vision. Change to the correct aspect ratio picture size. Automatically Adjusting the picture position - PC only - Adjustment to the position of the picture may be made to suit your viewing preferences. 1� 2� From the VGA Set menu, press s or r to select Auto Adjust. Press w, then TV starts adjusting the picture position. • In the PC input mode ( page 31), the picture size selection is wide or 4:3 only. Selecting the picture mode • When DTV teletext ( page 25) displayed, the picture size selection is not available. You can select the picture quality instantly among three preset modes and one user-set mode. • Press to select the desired picture quality. • When Subtitle( page 27) displayed, the picture size selection is available. • In Digital TV, the picture size selections are Super Live 1, Cinema 1, Wide, Super Live 2, Cinema 2 and 4:3. Mode Using the picture still • Press to freeze the picture. Even if an image is frozen on the TV screen, the pictures are running on the input source. Audio continues to be output as well. To return to a moving picture, press again. Picture quality Dynamic Bright and dynamic picture Standard Standard picture Movie Mild soft picture Memory Memory the picture quality you set Note: In the PC input mode ( page 23), this mode is not available. Adjusting the basic picture quality 1� Press , then press v or w to display the PICTURE menu. Note: • If you use this function except for the purpose of your private viewing and listening, it may infringe the copyright protected by the copyright laws. 2� 3� Press , then press s or r to select Picture Mode. Press v or w to select Memory. 4� Press s or r to select an item you want to adjust, then press v or w to adjust the settnig as required. Adjusting the picture position - PC only Adjustment to the position of the picture may be made to suit your viewing preferences. 1� Press , then press v or w to display the PICTURE menu, then press . 2� Press the s or r to select VGA Set, then press . 3� Press the s or r to select H pos, V pos, Clock and Phase. 4� Press v or w to adjust to settings as required. Selection v Pressing Contrast lower higher Brightness darker lighter Color paler deeper Sharpness softer sharper Tint reddish greenish w Notes: • The Tint may only be adjusted on a tape which has been recorded and played back on an NTSC VCR. • In the PC input mode ( page 23) Sharpness mode is not available. 19 Using the TV’s features (General) Activating the DNR (Digital Noise Reduction) 3� If you want to adjust Backlight manually, turn Active Backlight Control to Off, then press s. 4� Press v or w to adjust the settings as required. If the receiving signal is weak and the picture is blurry, the picture may be improved when using this function. 1� 2� From the Picture menu, press s or r to select DNR then press . Presss or r to select an item you want to adjust, pressv or w to adjust the settings as required. Using the cinema mode Note: In the PC input mode, this mode is not available. Selecting the color temperature You can change the tone of the picture by selecting from three preset color temperatures: Cool, Normal or Warm. 1� 2� From the Picture menu, press s or r to select Color Temp then press . Press v or w to select mode you prefer. Cool: Lends a blue hue to the picture. Normal: Neutral Warm: Lends a red hue to the picture. Using the active backlight control In order to improve screen visibility, the active backlight control sets the screen brightness automatically during dark scenes. 1� 2� From the Picture menu, press s or r to select Backlight then press . Press v or w to select Off or On. 20 A movie film’s picture runs at 24 frames a second, whereas movie software such as DVD, etc., that you enjoy watching on television at home runs at 30 (NTSC) or 25 (PAL) frames a second. To convert this signal to reproduce a smooth motion and picture quality, select the On mode. Effective signal and setup conditions: • When the Video input mode is selected. • When the input signal format is 480i and 576i signals. 1� 2� 3� Press , then press v or w to display the PICTURE menu then press . Press s or r to select Cinema Mode then press . Press v or w to turn On or Off. Note: When a DVD movie with subtitle is playing back, this mode may not work correctly. Cinema Mode only support to 1, 2, HDMI 1 and HDMI 2 input sources. Using the TV’s features (General) Sound adjustment Setting the MTS (Multi-channel TV Sound) Selecting the stereo programs - analog only 1� 2� When a stereo program is received, Stereo appears. Press to select the Auto/Mono mode. Auto and Mono appear cyclically on the screen. - analog only - Auto mode The MTS Auto mode automatically recognize stereo/bilingual programs depending on the broadcast signal. 1� 2� Press , then press v or w to display the SOUND menu then press . Press s or r to select MTS, then press and v or w to select Auto or Mono. Selecting the bilingual programs - analog only 1� 2� When a bilingual program is received, Dual appears. Press to select the sound to be heard. The sound differs according to the transmission system: NICAM or German stereo/bilingual broadcast. Sound to be heard Display NICAM German stereo/ bilingual broadcast Mono mode Dual 1 Sub I sound Main sound If you experience noise or poor reception of any stereo/ bilingual program, set the Sound mode to Mono. Noise will be reduced and reception may improve. Dual 2 Sub II sound Sub sound Mono Main sound --- Note: If you experience noise with a particular program on whose channel reception is usually good, try setting MTS mode to Auto, then switch to Mono (monaural). Note: These settings are not stored in the TV memory. Selecting the dual 1 or dual 2 mode - analog only - Adjusting the sound quality 1� Press , then press v or w to display the SOUND menu then press . 2� Press s or r to select Selectable Sound, then press and v or w to select Standard, Movie, Music and User. 3� In User item , you can press s or r to select an item you want to adjust, press v or w to adjust the settings as required. When you select Standard, Movie or Music, the setting was fixed and can’t adjust. You can hear only dual 1 or dual 2 sound selected, whenever bilingual programs are received. 1� 2� Press , then press v or w to display the SOUND menu then press . Press s or r to select Dual, then press and v or w to select Dual 1 or Dual 2. Notes: • When the MTS setting is in Mono mode, the Dual menu is not selectable. • The Dual menu setting status remains even if the TV is turned off. Selection v Pressing Bass weaker stronger Treble weaker stronger Balance decreases the right channel decreases the left channel w 21 Using the TV’s features (General) Using the Bass Boost 1� From the SOUND menu, press s or r to select Bass . Boost then press 2� Press v or w to select Off, Low, Mid and High. 4� Press w into the Timer data position and press s or r to set up current time. 5� Press to save the Time Setting. Note: Note: The Bass Boost effect is active only when the sound outputs from the speaker. Using the Virtual Surround Setting the Wakeup Timer The Virtual Surround is especially useful if you want to setting up virtual surround for TV. 1� 2� From the SOUND menu, press s or r to select Virtual Surround then press . Press v or w to select Off or On. Notes: The Virtual Surround effect is active only when the sound outputs from the speaker. When the Selectable Sound setting isn't in User mode, the Virtual Surround menu is not selectable. The timers The Current Time is especially useful if you want to setting up current time for TV. Press press 2� 3� Press s or r to select Time Setting, then press , then v or w to display the TIMER menu, then . Press s or r to select Current Time, then press 22 The Wakeup timer is especially useful if you want the TV to turn itself on after a selected period of time. 1� Press press 2� 3� Press s or r to select Time Setting, then press , then v or w to display the TIMER menu, then . . Press s or r to select Wakeup Timer, then press . 4� Press w into the Timer data position and press s and r to set the time period. 5� 6� Press to exit Menu. Press on the remote control or control panel. Setting the Sleep Timer Setting the Current Time 1� If TV receives time information in digital TV signal, TV will automatically update current time. . . The Sleep Timer is especially useful if you want the TV to turn itself off after a selected period of time. 1� Press press 2� 3� Press s or r to select Time Setting, then press , then v or w to display the TIMER menu, then . Press s or r to select Sleep Timer, then press . . Using the TV’s features (General) 4� 5� Press w into the Timer data position and press s and r to set the time period. Press to start the timer. Notes: After power code unplug/plug, the Timer setting change to default. Setting the Power Control 1� Press press 2� 3� Press s or r to select Power Control, then press . Press s or r to select which you want adjust, then press v or w to set function. , then v or w to display the Timer menu, then . Notes: • Banner Duration function is setting on-screen information display timing. • On-Screen-Display will remain about 1 minute. Selecting the video input source to view 1� Press on the remote control to display the video input mode list, then presss or r to select appropriate input source. You may also press to display the video input mode. 2� Press . DTV (Digital TV) 1 (CVBS input or component video input) ( page 27) 2 (CVBS input or S-video input) ( page 27) HDMI 1, HDMI 2 (HDMI input) PC (PC input) ATV (Analog TV) A. No Operation Off can be set Disable or 1 to 6 hours. B. No Signal Off can be set Disable or 5 to 45 minutes. Notes: • If you set No Operation Off for 1~6 hours, it will automatically power off when you do not do any operation. • If you set No Signal Off for 5~45 minutes, it will automatically power off when input has no signal. • Power Control function (No Signal Off) will work only on the ATV, 1, 2, PC, HDMI and DTV sources. Setting the Banner Duration - digital / analog 1� Press , then v or w to display the TIMER menu, then press 2� 3� . Press sor r to select Banner Duration, then press . Press v or w to set Banner Duration which can be set 1 to 12 seconds. 23 Using the TV’s features (General) Teletext in Analog TV This TV has a multi-page teletext memory, which takes a few moments to load and it offers two ways of viewing Teletext Auto and LIST which are explained below. Setting up the teletext mode To select teletext mode: Select a channel position with the desired teletext service. 1� 2� Press menu. Using Auto mode There are two Modes: Auto will display FASTEXT or TOPTEXT, if available. LIST will display your four favorite pages. In either mode, as an alternative to the colored buttons, you can access a page by entering a 3-digit number, using the Number buttons on the remote control, or to advance to the or r, to go back to the previous page next page, press press or s. To change between Auto and LIST, see above. • Press to access teletext. , then press v or w to display the FUNCTION Press s or r to select Teletext Mode, then press v or w to select Auto or LIST mode. If FASTEXT or TOPTEXT is available, you will see 4 colored titles at the bottom or top of the TV screen respectively. To access any given subject, simply press the relevant colored button on the remote control. If FASTEXT or TOPTEXT is not available, you can access any page simply by entering a 3-digit page number or pressing the corresponding colored button. For further information on your particular text system(s), see the broadcast teletext index page or consult your local Toshiba dealer. Using LIST mode 1� Press to access teletext. Teletext general information button: Pressing once will bring up the teletext screen. Press again to superimpose the teletext over a normal broadcast picture. Press again to return to normal TV mode. You need to return to normal viewing if you wish to change channels. When you first press to access the text service, the first page you see will be the initial page. In Auto mode, this displays the main subjects available and their relevant page numbers. In LIST mode, you will see the page numbers currently stored on the each color button. Sub-pages: Once in this chosen page, if there are sub-pages they will automatically load into memory without changing the one you are reading. If there are many sub-pages, it will take a long time for them all to load and this will depend on the speed with which the broadcaster transmits them. To access the sub-pages in memory, press , then use v or w to view them. Note: If you press while the picture mode is activated, this mode will be cancelled. 24 The four choices at the bottom of the screen are now number – 100, 200, 300 and 400, which have been programmed into the TV’s memory. 2� To view these pages, use the colored prompt buttons. e.g. press the Green button to view page 200. 3� If you want to change these stored pages, press the colored button for the color you want to change. e.g. Press the Green button and enter the 3-digit number. This number will change in the top left of the screen and in the colored highlight. Using the TV’s features (General) 4� Press to store your choice. The bars at the bottom of the screen will flash white. Teletext in Digital TV 5� You may view other pages by simply entering the 3-digit page number – but NEVER press or you will lose the favorite already stored. 1� When indicates the presence of Teletext (TTX) in a channel, press to view Teletext. Press again to superimpose the Teletext over a normal broadcast picture. Press again to close Teletext and watch TV. 2� and to select Teletext page. Press the Press Number buttons to input a Teletext page to view the page directly. If FASTEXT is available, simply press the relevant colored button on the remote control. 3� Press Teletext buttons on the remote control Below is an introduction to the teletext buttons on your remote control and their functions. To display an index/initial page: In Auto mode to close the Teletext and watch TV. Press to access the index page. The one displayed is dependant on the broadcaster. In LIST mode Press Reset to default setting to return to the 100 page or initial page. To reveal concealed text: Some pages cover topics such as quizzes and jokes. To . discover the solutions, press To hold a wanted page: When any user require to reset adjustment values of the Picture, Sound, Setup, Timer and Function that can use Reset to default to back factory default setting. 1� From the FUNCTION menu, press s or r to select Reset to default and press . 2� Press , a confirmation screen will appear indicating that This will do Reset to default, Are you sure? Press to start the Reset to default then TV will be power off automatically. Press , it will appear initial screen as Tuning the TV for the first time( page 13). This function is included as it is part of the broadcast teletext system but you will not need it as this TV allows you to control the display of sub-pages. To enlarge the teletext display size: Press once to enlarge the top half of the page, press again to enlarge the bottom half of the page. Press again to revert to the normal size. To select a page while viewing a normal picture: When in teletext mode, if a page selection is made and then is pressed, a normal picture will be displayed. The TV will indicate when the page is present by displaying the title bar of the text page at the top of the screen. Press to view the page. Note: It will not be possible to change program position while in Teletext mode, you will have to cancel the teletext first by to return to a normal TV picture. pressing 3� 4� Note: Password won't be reset. To select the time display : If you press while watching a normal TV broadcast, you will see a time display from the broadcaster. It will remain on the screen for about 5 seconds. 25 Other Digital TV features and settings Setting the EPG (Electronic Program Password guide) - digital only In Digital TV, channels and programs can be locked to prevent 1� 2� Press viewing of unsuitable films and programs. These can only accessed with a password. Default password is 0000. ,then v or w to select Function menu. Press ands or r to select EPG then, press display EPG. to Setting the Password 1� Press , then press v or w to select the FUNCTION menu. 3� 2� Press press 3� Enter your password using the number buttons or press 0000 (which is the default password), then presss. Press s and enter your new password, then press s to confirm again, then press . Press r,s,v,wto select the channel, names of the program being broadcast will appear. 4� 4� and press s or r to select Password, then . Press , then Event List will appear. Note: Note: If you forgot the password, press [Green], [Yellow] , buttons on the remote control so that the password and returns to the default setting (0000). Parental Rating The type of program displayed on the TV can be limited based on the parental guidance codes. See Appendix for Australian parental guide code. 5� Press r or s to select an item, then press v or w to change the content, then press to save. Note: Toshiba does not provide EPG data; therefore Toshiba is not liable for the content of such data. The data provider may elect to discontinue the service or it may cease to be (or never be) available in your area. In any of these circumstances, the EPG feature will not function. Toshiba is not liable in the event that this service is unavailable or for any consequences arising from customers having used or not being able to use this service. 26 Setting the Parental Rating 1� Press , then press v or w to select the FUNCTION menu. 2� Press press 3� 4� Enter password when prompted. ands or r to select Parental Rating, then . Press v or w to select the suitable Rating, then press to save. Other Digital TV features and settings AV Connection 1� Press menu. 2� Press and press s or r to select AV Connection, then press . , then press v or w to select the FUNCTION Audio Preference Selecting The Audio Mode 1� 2� 3� Press s or r to select Video 1 or Video 2, then press v or w to select input source as required. Video 1 selections are YPbPr and CVBS. Video 2 selections are CVBS and S-Vide. 3� From the SETUP menu, press s or r to select Audio Mode, then press . Press s or r to select Audio Mode or Digital Audio Output then press v or w to select mode. Press v or w to select Dolby Digital or MPEG. Dolby Digital If you select this option, the TV will select the first Dolby Digital audio track, if available. However, if the channel does not contain any Dolby Digital audio track, then the first available MPEG audio track will be selected. Notes: Default settings of Video1 is YPbPr input. And default settings of Video2 is CVBS input. You can select YPbPr input, CVBS input or S-Video input from AV Connection. i.e.: CVBS - Composite Video YPbPr - Component Video MPEG If you select this option, the TV will select the first MPEG audio track, if available. However, if the channel does not contain any MPEG audio track, then the first available Dolby Digital audio track will be selected. Note: Manufactured under license from Dolby Laboratories. “Dolby” and the double-D symbol are trademarks of Dolby Laboratories. Digital Output Format Subtitle 1� 1� 2� 2� When on-screen information indicates the presence of Subtitle (CC) in a channel, press to display the current Subtitle status. While this status is displayed, press again to change the setting. Subtitle On or Off can be selected. If you switch off the TV, the Subtitle mode will be remembered the next time it is switch ON. From the Audio Mode, press v or w to select Digital Audio Output. Press v or w to select Bitstream or PCM. Bitstream: Select this when an amplifier equipped with builtin Dolby Digital or MPEG decoder is connected to this TV. Select this when a 2ch digital stereo PCM: amplifier is connected to this TV. When you select a Dolby Digital or MPEG audio track in Audio Track, the sound is converted to the PCM (2ch) format and output. Notes: • If Subtitle is ON, the TV will always display subtitle whenever such information is available in the channel you to check if subtitle is currently are viewing. You may use available. • In Australia, you may also view Subtitle by directly entering page 801 in Teletext. However, by doing so, the TV remains in Teletext mode and you cannot change the channels because and will change Teletext pages rather than channels. To view subtitle, it is recommended that you turn on Subtitle mode. • If Subtitle is ON, When user press on remote control that audio mute function can work but the TV won't display mute icon in screen. 27 Connecting your TV Back connections Connection example Connecting an audio system - digital only You can enjoy high quality dynamic sound by connecting the TV to an audio system. Notes: • DO NOT connect the DIGITAL AUDIO output terminal to the AC-3 RF input of a Dolby Digital Receiver with a built-in Dolby Digital decoder. • Connect the DIGITAL AUDIO output terminal to the Optical or Coaxial input of a Receiver or Processor. • Refer to the owner’s manual of the connected equipment as well. • When you connect the TV to other equipment, be sure to turn off the power and unplug all of the equipment from the wall outlet before making any connections. • The output sound of the TV has a wide dynamic range. Be sure to adjust the audio amplifier’s volume to a moderate listening level before turning on the power. Otherwise, the speakers and your hearing may be damaged by a sudden high volume sound. • Turn off the amplifier before you connect or disconnect the TV’s power cord. If you leave the amplifier power on, the speakers may be damaged. Warning: When you are connecting (via the DIGITAL AUDIO output terminal) an AV decoder that does not have Dolby Digital or MPEG decoding function, be sure to set PCM in Digital Output (page 27). Otherwise, the speakers and your hearing may be damaged by a sudden high volume sound. Connecting an amplifier equipped with a Dolby Digital decoder • Before connecting any external equipment, turn off all main power switches. • The unauthorized recording of television programs, DVDs, • • • • video tapes and other materials may infringe upon the provisions of copyright law. The COMPONENT VIDEO INPUT consists of three component video signals (Y, PB/CB, PR/CR) and provides the best picture performance. These terminals can only be used with the component video compatible equipment e.g. DVD video player, etc. Additional equipment and cables shown are not supplied with this TV. MONITOR OUTPUT That will only support ATV/DTV signal to display out or by VCR TV signal recording use. If you connect mono sound equipment to MONITOR OUTPUT, connect the audio input of the equipment to the L/MONO jack on the TV. You can enjoy dynamic realistic sound by connecting the TV to an amplifier equipped with a Dolby Digital decoder or Dolby Digital processor. When using this setup, select Bitstream in Digital Output menu. 28 Connecting your TV Connecting an amplifier equipped with an MPEG decoder Side connections Connection example • The audio from the speaker will be muted when connecting the headphone to this terminal. Connecting an HDMI or a DVI device • This TV is not intended for connection to and should not be used with a PC. You can enjoy motion picture with dynamic realistic sound by connecting the TV to an amplifier equipped with an MPEG audio decoder or MPEG audio processor. When using this setup, select Bitstream in Digital Output menu. • When turning on your electronic components, turn on the TV first, and then the HDMI or DVI device. • When turning off your electronic components, turn off the HDMI or DVI device first, and then the TV. • This TV may not be compatible with features and/or specifications that may be added in the future. Connecting an amplifier equipped with a digital audio (optical or coaxial) input • This TV is only operable with L-PCM on 32/44. 1/48 kHz and 16/20/24 bits. Connecting an HDMI or a DVI device The HDMI input on your TV receives digital audio and uncompressed digital video from an HDMI device or uncompressed digital video from a DVI device. This input is designed to accept HDCP program material in digital from EIA/CEA-861/861B compliant consumer electronic devices (such as a set top box or DVD player with HDMI or DVI output). The HDMI input is designed for best performance with 1080i (50 Hz/60 Hz), 1080p (50Hz/60Hz) high-definition video signals, but will also accept and display 480i, 480p, 576i, 576p, 720p (50 Hz/60 Hz (60Hz: except for the E-EDID)) and VGA signals. HDMI: High-Definition Multimedia Interface DVI: Digital Video Interface HDCP: High-bandwidth Digital Content Protection EIA/CEA-861/861B compliance covers the transmission of uncompressed digital video with high-bandwidth digital content protection, which is being standardized for reception of high-definition video signals. Because this is an evolving technology, it is possible that some devices may not operate properly with the TV. • E-EDID: Enhanced-Extended Display Identification • VGA: VESA 640 x 480 @ 60 Hz • L-PCM: Linear-Pulse Code Modulation • • • • You can enjoy dynamic sound of 2-channel digital stereo by connecting the TV to an amplifier equipped with a digital audio (optical or coaxial) input and speaker system (right and left front speakers). When using this setup, select PCM in Digital Output menu. 29 Connecting your TV Connecting an HDMI device One HDMI cable (type A connector) HDMI (type A connector)-to-DVI adapter cable For proper operation, the length of an HDMI-to-DVI adapter cable should not exceed 3m. The recommended length is 2m. Standard analog audio cables An HDMI-to-DVI adapter cable transfers only video. Separate analog audio cables are required. Note: HDMI, the HDMI logo, and High-Definition Multimedia Interface are trademarks or registered trademarks of HDMI Licensing, LLC. Connecting a computer An analog RGB (15 pin) computer cable can be connected. For proper operation, it is recommended that you use a short HDMI cable. HDMI cable transfers both video and audio. Note: • It is possible that some HDMI device may not operate properly with this TV. Connecting a DVI device One HDMI (type A connector)-to-DVI adapter cable and audio cables. Connect a PC cable from the computer to the terminal on the back of the TV. RGB/PC The following signals can be displayed: • • • • • • VGA: VESA 640 x 480 @ 60/72/75 Hz SVGA: VESA 800 x 600 @ 60/72/75 Hz XGA: VESA 1024 x 768 @ 60/70/75 Hz W-XGA: VESA 1280 x 768 @ 60/75 Hz W-XGA: VESA 1360 x 768 @ 60 Hz S-XGA: VESA 1280 x 1024 @ 60/75 Hz (Compressed) However, these signal formats are converted to match the number of pixels of the LCD panel. Therefore, the TV may not display small text properly. If you connect this unit to your PC, the compressed image is displayed in S-XGA mode, therefore the picture quality may deteriorate and characters may not be read. 30 Connecting your TV Notes: • Some PC models cannot be connected to this TV. • There is no need to use an adapter for computers with DOS/ V compatible mini D-sub 15 pin terminal. • A bar may appear in the upper, lower, right or left side of the screen, or parts of the picture may be obscured depending on some signals. This is not the malfunction. • If the edges of the picture are stretched, readjust the picture position adjustments in the VGA SET of PICTURE menu. • Depending on the specification of the PC you are playing the DVD-Video on, and the DVD’s title, some scenes may be skipped, or you may not be able to pause during multi-angle scenes. Signal names for mini D-sub 15 pin connector Using the PC setting • First press to display the video input mode list, then press s or r and in order to select the PC input mode ( page 23). • This function may not be available for some signal or if no signal is received. • The optimum points of the clock phase and sampling clock adjustments may be incomprehensible according to the input signals. Adjusting the picture size/position, the clock phase of the picture and sampling clock 1� Press , then press v or w to display the PICTURE menu, than press Pin No. Signal name Pin No. Signal name 1 R 9 VGA-5V 2 G 10 Ground 3 B 11 NC (not connected) 4 NC (not connected) 12 VGA-SDA 5 NC (not connected) 13 H-sync 6 Ground 14 V-sync 7 Ground 15 VGA-SCL 8 Ground . 2� Press s or r to select VGA Set menu. 3� Press or w to select an option you want to adjust. Press v or w to adjust the settings as required. PC of the Auto Adjust Adjust Horizontal Position, Vertical Position, Horizontal Clock, and Clock Phase automatically. Depending on the type of the signal, there is a possibility that the display may not be adjusted in its optimum condition with this function. In that case, please adjust each item manually. 1� Press , then press v or w to display the PICTURE menu, than press . 2� Press s or r to select VGA Set menu. 3� 4� Press and press s to select Auto adjust. Press w. 31 Reference section Troubleshooting Before calling a service technician, please check the following table for a possible cause of the symptom and some solutions. Symptom and solution TV will not turn on • Make sure the power cord is plugged in, then press or . • The remote control batteries may be dead. Replace the batteries. No picture, no sound • Check the antenna connections. No sound, picture OK • The sound may be muted. Press +, – or . • The station may have broadcast difficulties. Try another The brightness of the screen comes down, or flickers of the screen are caused, or some parts of the screen do not light up. • When you just buy and start to use this TV, a flickering may be caused in the screen. In this case, switch off the TV, then switch on it again to cure the condition. • The cold cathode fluorescent lamp used for the back light on this TV has longevity. When the brightness of the screen comes down, or the flickers of the screen are caused, or some parts of the screen do not light up, it may reach the end of its life. Contact a service technician. Symptom and solution - digital only Poor picture • Check the antenna connections. Make sure it is aligned to the correct broadcast direction. • Check the signal level and quality in the Manual Search channel. Poor sound, picture OK menu. • If you use any kind of amplifier to boost the signal level, check whether it works well, and ask for help from the antenna installer. • The station may have broadcast difficulties. Try another channel. Poor picture, sound OK • Check the antenna connections. • The station may have broadcast difficulties. Try another channel. • Adjust the PICTURE menu. Poor reception of broadcast channels • Check the antenna connections. • The station may have broadcast difficulties. Try another channel. • Make sure the Color system is properly set. Teletext problems • Check the antenna connections. Good performance of text depends on a good strong broadcast signal. Multiple images • The station may have broadcast difficulties. Try another channel. • Antenna reception may be poor. Use a high directional outdoor antenna. • Check if the direction of the antenna has changed. Poor color or no color • The station may have broadcast difficulties. Try another channel. • Adjust the Tint and/or Color in the PICTURE menu. The remote control does not operate • Remove all obstructions between the remote control and the remote control sensor on the TV. • The remote control batteries may be dead. Replace them with new ones. • Check that the TV/STB/DVD switch on the remote control is properly set. Some pixels of the screen do not light up • The LCD display panel is manufactured using an extremely high level of precision technology, however, sometimes some pixels of the screen may be missing picture elements or have luminous spots. This is not a sign of a malfunction batteries. The picture brightness varies when you switch the TV on. • If you switch the TV on at 0°C and under, wait until the warms up. 32 No picture • Use the Manual Search menu to rescan this channel. • Try another channel. • Reduce RF amplifier gain if connected to RF booster. No sound from DIGITAL AUDIO • • • • The sound may be muted. Press +, – or . Make sure the TV is adjusted to the correct Audio Track. Use the Manual Search menu to rescan this channel. Try another channel. Not all channels are available after using the Full Search when tuning the TV for the first time. • This symptom is caused by unexpected frequency offset. • The Manual Search menu to scan for the missing channels. The TV scan receive these channels by the Full Search menu most of the time, but we suggest that you use the Manual Search menu when tuning the TV for the first time. Once the TV picks up the signal, all the transmission parameters will be stored in the internal memory. Cannot lock signal by using Manual Search • Check the frequency that you have entered is exactly the Middle frequency of the wanted channel. • Refer to the solutions for “Poor picture”. No Teletext, no Subtitle • Make sure the channel that you are watching carries Teletext/Subtitle information from . Cannot receive channels after moving the TV between cities (e.g. from Melbourne to Sydney) • Refer to page 13 to reset data. Weak signal appears on one channel but not the other, but these channels have the same logical number • Please make sure that you do not keep duplicate channels (i.e. channels with the same logical channel number but different physical numbers, see page 13). If you do, please delete the duplicate ones and keep only one channel with the best signal strength. Program Timer and Alarm do not operate properly. • Check the antenna connections. • Weak signal may cause inaccurate time information. Reference section APPENDIX AUSTRALIAN PARENTAL GUIDANCE CODES (Normative) Recommended On-Screen-Display for parental guidance codes transmitted within DVB-SI EIT information using the DVB parental_rating_descriptor. Receiver Menu Set-up and Suggested OSD wording for Setting Blocking (Restriction of access) Block G Block Block Block Block Block Block All and above PG and M and MA and AV and R and (optional) above above above above above Transmitted rating hex code Australian parental guide code On-ScreenDisplay 0 x 00 Not Classified - 0 x 01 0 x 02 P Pre school C Children's G General PG PG M Mature Audience 15+ 0 x 0B 0 x 0C G G PG Parental Guidance Recommended 0 x 09 0 x 0A C C 0 x 07 0 x 08 P P 0 x 05 0 x 06 Resultant receiver action to received hex code is show program - is block until PIN entered - 0 x 03 0 x 04 No Block M M MA Mature Adult Audience 15+ 0 x 0D MA MA 0 x 0E AV Adult Audience, Strong violence 15+ AV 0 x 0F R Restricted 18+ R 33 Reference section Analog TV system (Antenna input) Broadcast system Channel coverage: PAL B/G (CCIR) Broadcast transmission systems of each country or region Asia M.E. Color Sound Bahrain, Kuwait, Israel, Oman, Qatar, United Arab Emirates, Yemen, etc. Indonesia, Malaysia, Singapore, Thailand, etc. PAL B/G S2 - S44 Compliant Standard DVB-T Video Decoding MP @ ML & MP @ HL Audio Decoding Dolby® Digital, MPEG (I & II) Audio Sampling Rate 32, 44.1, 48 kHz Digital TV Terrestrial Tuner / Demodulator Oceania Country or region Color Sound Australia, New Zealand, etc. PAL B/G Specifications Integrated Digital LCD TV Model 40CV550A Power source 220 - 240 V AC ± 10% , 50 Hz Power consumption 40CV550A: 185W , 0.9 W (standby) Dimensions 40CV550A: 996.6mm (W) 682 mm (H) 276.3 mm (D) 40CV550A: 19.1 kg Frequency 51~858 MHz Loop Through 51~858 MHz Bandwidth 7 MHz Demodulator COFDM FFT Mode 8 K Constellation QPSK, 64 QAM Guard Interval 1/8, 1/16 Inner Coding Rate 2/3, 3/4 COMPONENT VIDEO INPUT terminals (the signal format) 480i, 480p, 576i, 576p, 720p (50/60 Hz), 1080i (50/60 Hz) (These signal formats are converted to match the number of pixels of the LCD panel.) Composite Color system PAL, SECAM, NTSC 3.58/4.43 Aspect ratio 16 : 9 Visible size (diagonal) 40CV550A: 107.1 cm Number of pixels 40CV550A: 1,920 (H) dots x 1,080 (V) dots Audio power 10 W + 10 W (10 % THD) Speakers Main 60 x 120 mm 2 pcs. 34 0 - 12 Digital TV System Country or region Mass (Weight) VHF UHF 27 - 69 CATV C2, C10, C31, Reference section Input/Output terminals (1) Input RCA Component Video RCA Composite Video Audio : RCA Y, PB/CB, PR/CR CVBS L/Mono+R (shared between Component and Composite) (2) Input RCA/Mini-Din(4 pin) Composite Video(CVBS) +S-video Audio : RCA L/Mono+R (shared between S-Video and Composite) MONITOR Output RCA video ouput Audio out RCA(L+R) RGB/PC Input Mini D-sub 15 pin Analog RGB PC/HDMI1 Input Phone jacks Audio L+R (AUDIO) HDMI1 Input(type A) 19 pin A/V Digital HDMI2 Input(type A) 19 pin A/V Digital Digital Audio Output (optical + coaxial) Bitstream/PCM Headphone jack 3.5 mm (Diameter) stereo Operating condition Temperature 0 °C - 35 °C Humidity 20 % - 80 % (No moisture condensation) Supplied accessories Owner’s manual (1), Remote control (1), Batteries (2), Clean Cloth (1) • Design and specifications are subject to change without notice. • Never service or remodel the TV by yourself. It may expose you to a fire hazard or dangerous voltages. 35 License Information on the software used in the TOSHIBA Digital TV The software pre-installed in the TOSHIBA Digital Televisions consists of multiple, independent software components. Each software component is copyrighted by TOSHIBA or a third party. The TOSHIBA Digital Televisions uses software components that are distributed as freeware under a third-party end-user license agreement or copyright notice (hereinafter referred to as a “EULA”). Some EULAs require that the source code of the applicable component be disclosed as the condition for distributing the software component in executable format. You can check the software components subject to such EULA requirements found at www.av.toshiba.com.au Service and Support Pages. In addition, some of the software components which are used in Toshiba Digital Televisions include the software that are made or developed originally by TOSHIBA. These software and accompanied documents are copyrighted by TOSHIBA, and protected by Copyright Act, an international treaty's articles and other governing laws. The software components which are made or developed originally by TOSHIBA and not subject to EULAs are not a target of source code offering. The Toshiba warranty provided in respect of the Digital TV is the only warranty provided and no additional warranties are provided in respect of the software components subject to EURAs. Some of the software components distributed under EULAs are made available for use by the user on the premise that they are not copyrighted or warranted by TOSHIBA or any third party. These software components are licensed to the user free of charge and therefore not covered by any warranty within the scope of the applicable laws. These software components are provided in “as is” condition without any warranty, whether express or implied. “Warranty” here includes, but not limited to, an implied warranty for marketability or fitness for specific uses. All risks associated with the quality or performance of these software components are assumed by the user. TOSHIBA shall not be liable whatsoever for any cost of repair or correction or other incidental expense incurred in connection with a defect found in any of these software components. Unless specified under the applicable laws or in a written agreement, a party who changes or redistributes the software with consent from the copyright holders or based on the aforementioned licenses shall not be held liable whatsoever for any loss arising from the use of or inability to use such software components. The same applies even when the copyright holders or relevant third parties have been informed of the possibility of such loss. “Loss” here includes normal, special, incidental and indirect loss (including, but not limited to, the loss of data or its accuracy; loss incurred by the user or any third party; and interface incompatibility with other software). Please read each EULA for details on the use conditions and items that must be observed regarding these software components. The table below lists the software components pre-installed in the TOSHIBA Digital Televisions, which are subject to EULAs. The user should read the applicable EULAs carefully before using these software components. The EULAs are exhibited in their original text (English) as exactly written by the respective parties other than TOSHIBA. Pre-Installed Software AC3 decoder liba52.c EULA Exhibit A Exhibit A GNU GENERAL PUBLIC LICENSE Version 2, June 1991 Copyright © 1989, 1991 Free Software Foundation, Inc. 59 Temple Place, Suite 330, Boston, MA 02111-1307 USA Everyone is permitted to copy and distribute verbatim copies of this license document, but changing it is not allowed. Preamble The licenses for most software are designed to take away your freedom to share and change it. By contrast, the GNU General Public License is intended to guarantee your freedom to share and change free software – to make sure the software is free for all its users. This General Public License applies to most of the Free Software Foundation’s software and to any other program whose authors commit to using it. (Some other Free Software Foundation software is covered by the GNU Library General Public License instead.) You can apply it your programs, too. When we speak of free software, we are referring to freedom, not price. Our General Public Licenses are designed to make sure that you have the freedom to distribute copies of the free software (and charge for this service if you wish), that you receive source code or can get it if you want it, that you can change the software or use pieces of it in new free programs; and that you know you can do these things. To protect your rights, we need to make restrictions that forbid anyone to deny you these rights or to ask you to surrender the rights. These restrictions translate to certain responsibilities for you if you distribute copies of the software, or if you modify it. For example, if you distribute copies of such a program, whether gratis or for a fee, you must give the recipients all the rights you have. You must make sure that they too, receive or can get the source code. Also you must show them these terms so they know their rights. We protect your right with two steps: (1) copyright the software, and (2) offer you this license which gives you legal permission to copy, distribute and/or modify the software. Also, for each author’s protection and ours, we want to make certain that everyone understands that there is no warranty for this free software. If the software is modified by someone else and passed on, we want its recipients to know that what they have is not the original, so that any problems introduced by others will not reflect on the original authors’ reputations. Finally, any free program is threatened constantly by software patents. We wish to avoid the danger that redistributors of a free program will individually obtain patent license, in effect making the program proprietary. To prevent this, we have made it clear that any patent must be licensed for everyone’s free use or not licensed at all. The precise terms and conditions for copying, distribution and modification follow. GNU GENERAL PUBLIC LICENSE TERMS AND CONDITIONS FOR COPYING, DISTRIBUTION AND MODIFICATION 0. This license applies to any program or other work which contains a notice placed by the copyright holder saying it may be distributed under the terms of this General Public License. The “Program”, below, refers to any such program or work, and a “work based on the Program” means either the program or any derivative work under copyright law: that is to say, a work containing the Program or a portion of it, either verbatim or with modifications and/or translated into another language. (Hereinafter, translation is included without limitation in the terms “modification”.) Each licensee is addressed as “you”. Activities other than copying, distribution and modification are not covered by this License; they are outside its scope. The act of running the program is not restricted, and the output from the Program is covered only if its contents constitute a work based on the Program (independent of having been made by running the program). Whether that is true depends on what the Program does. 1. You may copy and distribute verbatim copies of the Program’s source code as you receive it, in any medium, provided that you conspicuously and appropriately publish on each copy an appropriate copyright notice and disclaimer of warranty; keep intact all notices that refer to this License and to the absence of any warranty; and give any other recipients of the Program a copy of this License along with the Program. You may charge a fee for the physical act of transferring a copy, and you may at your option offer warranty protection in exchange for a fee. 2. You may modify your copy or copies of the program or any portion of it, thus forming a work based on the program, and copy and distribute such modifications or work under the terms of Section 1 above, provided that you also meet all of these condition: a) You must cause the modified files to carry prominent notices stating that you changed the files and the date of any change. b) You must cause any work that you distribute or publish, that in whole or in part contains or is derived from the Program, or any part there of, to be licensed as a whole at no charge to all third parties under the terms of the this License. c) If the modified Program normally reads commands interactively when run, you must cause it, when started running for such interactive use in the most ordinary way, to print or display an announcement including an appropriate copyright notice and a notice that there is no warranty (or else, saying that you provide a warranty) and that users may redistribute the program under these conditions, and telling the user how to view a copy of this License. (Exception: if the program itself is interactive but does not normally print such an nnouncement, your work based on the program is not required to print such an announcement.) These requirements apply to the modified work as a whole. If identifiable sections of that work are not derived from the program, and can be reasonably considered independent and separate works in themselves, then this License, and its terms, do not apply to those sections when you distribute them as separate works. But when you distribute the same sections as part of a whole which is a work based on the Program, the distribution of the whole must be on terms of this License, whose permissions for other licensees extend to the entire whole, and thus to each and every part regardless of who wrote it. Thus, it is not the intent of this section to claim rights or contest your rights to work written entirely by you; rather, the intent is to exercise the right to control the distribution of derivative and collective works based on the Program. In addition, mere aggregation of another work not based on the Program with the Program (or with a work based on the Program) on a volume of a storage or distribution medium does not bring the other work under the scope of this License. 3. You may copy and distribute the program (or a work based on it, under Section 2) in object code or executable form under the terms of Sections 1 and 2 above provided that you also do one of the following: a) Accompany it with the complete corresponding machine-readable source code, which must be distributed under the terms of Sections 1 and 2 above on a medium customarily used for software interchange; or, b) Accompany it with a written offer, valid for at least three years, to give any third party, for a charge no more than your cost of physically performing source distribution, a complete machine-readable copy of the corresponding source code, to be distributed under the terms of Sections 1 and 2 above on a medium customarily used for software interchange; or, c) Accompany it with the information you received as to the offer to distribute corresponding source code. (This alternative is allowed only for noncommercial distribution and only if you received the program in object code or executable form with such an offer, in accord with subsection b above.) The source code for a work means the preferred form of the work for making modifications to it. For an executable work, complete source code means all the source code for all modules it contains, plus any associated interface definition files, plus the scripts used to control compilation and installation of the executable. However, as a special exception, the source code distributes need not include anything that is normally distributed (in either source or binary form) with the major components (compiler, kernel, and so on) of the operating system on which the executable runs, unless that component itself accompanies the executable. If distribution of executable or object code is made by offering access to copy from a designated place, then offering equivalent access to copy the source code from the same place counts as distribution of the source code, even though third parties are not compelled to copy the source along with the object code. 4. You many not copy, modify, sublicense, or distribute the program except as expressly provided under this License. Any attempt otherwise to copy, modify, sublicense or distribute the Program is void, and will automatically terminate your rights under this License. However, parties who have received copies, or rights, from you under this License will not have their licenses terminated so long as such parties remain in full compliance. 5. You are not required to accept this License, since you have not signed it. However, nothing else grants you permission to modify or distribute the Program or its derivative works. These actions are prohibited by law if you do not accept this License. Therefore, by modifying and distributing the Program (or any works based on the Program), you indicate your acceptance of this License to do so, and all its terms and conditions for copying, distributing or modifying the Program or works based on it. 6. Each time you redistribute the Program (or any works based on the Program), the recipient automatically receives a License from the original licensor to copy, distribute or modify the Program subject to these terms and conditions. You may not impose any further restrictions on the recipient’s exercise of the rights granted herein. You are not responsible for enforcing compliance by third parties to this License. 7. If as a consequence of a court judgement or allegation of patent infringement or for any other reason (not limited to patent issues), conditions are imposed on you (whether by court order, agreement or otherwise) that contradicts the conditions of the License, they do not excuse you from the conditions of this License. If you cannot distribute so as to satisfy simultaneously your obligations under this License and any other pertinent obligations, then as a consequence you may not distribute the Program at all. For example, if a patent license would not permit royalty-free redistribution of the Program by all those who receive copies directly or indirectly through you, then the only way you could satisfy both it and this License would be to refrain entirely from distribution of the Program. If any portion of this section is held invalid or unenforcable under any particular circumstances, the balance of the section is intended to apply and the section as a whole is intended to apply in other circumstances. It is not the purpose of this section to induce you to infringe any patent to other property right claims or to contest validity of any such claims; this section has the sole purpose of protecting the integrity of the free software distribution system, which is implemented by public license practices. Many people have made generous contributions to the wide range of software distributed through that system in reliance upon consistent application of that system; it is up to the author/donor to decide if he or she is willing to distribute software through any other system and a licensee cannot impose that choice. This section is intended to make thoroughly clear what is believed to be a consequence of the rest of this License. 8. If the distribution and/or use of the program is restricted in certain countries either by patents or by copyrighted interfaces, the original copyright holder who places the Program under this License may add an explicit geographical distribution limitation excluding those countries, so that distribution is permitted only in or among countries not thus excluded. In such case, this License incorporates the limitation as if written in the body of this License. 9. The Free Software Foundation may publish revised and/or new versions of the general Public License from time to time. Such new versions will be similar in spirit to the present version, but may differ in detail to address new problems or concerns. Each version is given a distinguishing version number. If the Program specifies a version number of this License which applies to it and “any later version”, you have the option of following the terms and conditions either of that version or of any later version published by the Free Software Foundation. If the Program does not specify a version number of this License, you may choose any version ever published by the Free Software Foundation. 10. If you wish to incorporate parts of the Program into other free programs whose distribution conditions are different, write to the author to ask for permission. For software which is copyrighted by the Free Software Foundation, write to the Free Software Foundation; we sometimes make exceptions for this. Our decision will be guided by the two goals of preserving the free status of all derivatives of our free software and of promoting the sharing and use of software generally. NO WARRANTY 11. BECAUSE THE PROGRAM IS LICENSED FREE OF CHARGE, THERE IS NO WARRANTY FOR THE PROGRAM, TO THE EXTENT PERMITTED BY APPLICABLE LAW. EXCEPT WHEN OTHERWISE STATED IN WRITING THE COPYRIGHT HOLDERS AND/OR OTHER PARTIES PROVIDE THE PROGRAM “AS IS” WITHOUT WARRANTY OF ANY KIND, EITHER EXPRESSED OR IMPLIED, INCLUDING, BUT NOT LIMITED TO, THE IMPLIED WARRANTIES OF MERCHANTABILITY AND FITNESS FOR A PARTICULAR PURPOSE. THE ENTIRE RISK AS TO THE QUALITY AND PERFORMANCE OF THE PROGRAM IS WITH YOU, SHOULD THE PROGRAM PROVE DEFECTIVE, YOU ASSUME THE COST OF ALL NECESSARY SERVICING, REPAIR OR CORRECTION. 12. IN NO EVENT UNLESS REQUIRED BY APPLICABLE LAW OR AGREED TO IN WRITING WILL ANY COPYRIGHT HOLDER, OR ANY OTHER PARTY WHO MAY MODIFY AND/OR REDISTRIBUTE THE PROGRAM AS PERMITTED ABOVE, BE LIABLE TO YOU FOR DAMAGES, INCLUDING ANY GENERAL, SPECIAL, INCIDENTAL OR CONSEQUENTIAL DAMAGES ARISING OUT OF THE USE OR INABILITY TO USE THE PROGRAM (INCLUDING BUT NOT LIMITED TO LOSS OF DATA OR DATA BEING RENDERED INACCURATE OR LOSSES SUSTAINED BY YOU OR THIRD PARTIES OR A FAILURE OF THE PROGRAM TO OPERATE WITH ANY OTHER PROGRAMS), EVEN IF SUCH HOLDER OR OTHER PARTY HAS BEEN ADVISED OF THE POSSIBILITY OF SUCH DAMAGES. END OF TERMS AND CONDITIONS