1
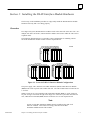
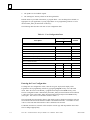
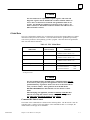
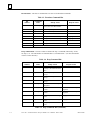
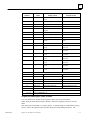
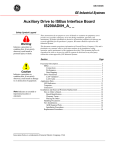
GE
Intelligent Platforms
ÎÎ
Programmable Control Products
Series 90* -70 DLAN/DLAN+
Interface Module
User’s Manual
GFK-0729D
March 2010
GFL-002
Warnings, Cautions, and Notes
as Used in this Publication
Warning
Warning notices are used in this publication to emphasize that hazardous voltages,
currents, temperatures, or other conditions that could cause personal injury exist in this
equipment or may be associated with its use.
In situations where inattention could cause either personal injury or damage to equipment,
a Warning notice is used.
Caution
Caution notices are used where equipment might be damaged if care is not taken.
Note:
Notes merely call attention to information that is especially significant to
understanding and operating the equipment.
This document is based on information available at the time of its publication. While efforts
have been made to be accurate, the information contained herein does not purport to cover all
details or variations in hardware or software, nor to provide for every possible contingency in
connection with installation, operation, or maintenance. Features may be described herein
which are not present in all hardware and software systems. GE Intelligent Platforms assumes
no obligation of notice to holders of this document with respect to changes subsequently made.
GE Intelligent Platforms makes no representation or warranty, expressed, implied, or statutory
with respect to, and assumes no responsibility for the accuracy, completeness, sufficiency, or
usefulness of the information contained herein. No warranties of merchantability or fitness for
purpose shall apply.
* indicates a trademark of GE Intelligent Platforms, Inc. and/or its affiliates. All other
trademarks are the property of their respective owners.
©Copyright 2010 GE Intelligent Platforms, Inc.
All Rights Reserved
Contact Information
If you purchased this product through an Authorized Channel Partner, please contact the seller
directly.
General Contact Information
Online technical support and
GlobalCare
http://www.ge-ip.com/support
1H2
Additional information
http://www.ge-ip.com/
3H
Solution Provider
[email protected]
4H
Technical Support
If you have technical problems that cannot be resolved with the information in this guide, please
contact us by telephone or email, or on the web at www.ge-ip.com/support
5H
Americas
Online Technical Support
www.ge-ip.com/support
6H7
Phone
1-800-433-2682
International Americas Direct Dial
1-780-420-2010 (if toll free 800 option is unavailable)
Technical Support Email
[email protected]
8H9
Customer Care Email
Primary language of support
[email protected]
10H
English
Europe, the Middle East, and Africa
Online Technical Support
www.ge-ip.com/support
12H3
Phone
+800-1-433-2682
EMEA Direct Dial
+352-26-722-780 (if toll free 800 option is unavailable or if
dialing from a mobile telephone)
Technical Support Email
[email protected]
14H5
Customer Care Email
Primary languages of support
[email protected]
16H7
English, French, German, Italian, Czech, Spanish
Asia Pacific
Online Technical Support
www.ge-ip.com/support
Phone
18H9
+86-400-820-8208
+86-21-3217-4826 (India, Indonesia, and Pakistan)
Technical Support Email
[email protected] (China)
20H1
[email protected] (Japan)
2H3
[email protected] (remaining Asia customers)
24H5
Customer Care Email
[email protected]
26H7
[email protected] (China)
28H
Preface
The Series 90t-70 DLAN/DLAN+ Interface Module, from GE Intelligent Platforms North
America, Inc., is a high-performance interface between the GE Drive Systems DLAN and
DLAN+ local area network (LAN) protocols and Series 90-70 PLC systems.
Revisions to This Manual
This version (GFK-0729D) of the Series 90-70 DLAN/DLAN+ Interface Module User’s Manual
has added information to Table 3-12, Drop Feedback Registers, in Chapter 3. A description of
Register Number 78 has been added, and additional information for Register Number 80 has been
added. These changes were implemented in v1.31 DLAN_L and v1.31 DCONFIG.
Content of this Manual
This manual contains the following chapters:
Chapter 1. Introduction: describes the features of the DLAN Interface module. The basic
operation of Series 90-70 DLAN applications is also introduced in this chapter.
Chapter 2. Installing the DLAN Interface Module: explains how to install and configure the
DLAN Interface module in a Series 90-70 PLC system and how to install the companion
Logicmaster 90-70 program folder.
Chapter 3. The DLAN User Interface: describes the PLC interface to DLAN devices and
how to customize it, including the PLC data and Logicmaster 90-70 program.
Related DLAN Interface Module Publications
For more information, refer to these publications:
Important Product Information for Series 90t-70 DLAN/DLAN+ Interface Module
(GFK-1048).
Data Sheet for the DLAN/DLAN+ Interface module (GFK-0728).
Related Series 90 Publications
For more information on Series 90 programmable controllers, refer to these publications:
Series 90t-70 Programmable Controller Installation Manual (GFK-0262).
Logicmastert 90-70 Programming Software User’s Manual (GFK-0263).
Series 90t-70 Programmable Controller Reference Manual (GFK-0265).
v
GFK-0729D
Preface
We Welcome Your Comments and Suggestions
At GE Intelligent Platforms, we strive to produce quality technical documentation. After you
have used this manual, please take a few moments to complete and return the Reader’s
Comment Card located on the next page.
Henry A. Konat
Senior Technical Writer
vi
Series 90t-70 DLAN/DLAN+ Interface Module User’s Manual - March 1996
GFK-0729D
Contents
Chapter 1
Introduction . . . . . . . . . . . . . . . . . . . . . . . . . . . . . . . . . . . . . . . . . . . . . . .
1-1
Section 1: System Overview . . . . . . . . . . . . . . . . . . . . . . . . . . . . . . . . .
1-1
DLAN Basics . . . . . . . . . . . . . . . . . . . . . . . . . . . . . . . . . . . . . . . . . . . . . . . . . .
DLAN Interface Module Functions . . . . . . . . . . . . . . . . . . . . . . . . . . . . . . . . .
Series 90-70 DLAN Applications . . . . . . . . . . . . . . . . . . . . . . . . . . . . . . . . . .
Section 2: DLAN Interface Module Description . . . . . . . . . . . . . . . .
LED Indicators . . . . . . . . . . . . . . . . . . . . . . . . . . . . . . . . . . . . . . . . . . . . . . . . .
Restart Pushbutton . . . . . . . . . . . . . . . . . . . . . . . . . . . . . . . . . . . . . . . . . . . . . .
Battery . . . . . . . . . . . . . . . . . . . . . . . . . . . . . . . . . . . . . . . . . . . . . . . . . . . . . . .
DLAN Network Connector . . . . . . . . . . . . . . . . . . . . . . . . . . . . . . . . . . . . . . .
DLAN Configuration Jumpers . . . . . . . . . . . . . . . . . . . . . . . . . . . . . . . . . . . . .
25-Pin Connectors . . . . . . . . . . . . . . . . . . . . . . . . . . . . . . . . . . . . . . . . . . . . . .
Chapter 2
1-3
1-4
1-4
1-4
1-5
1-5
1-6
Installing the DLAN Interface Module . . . . . . . . . . . . . . . . . . . . . . . . .
2-1
What You Will Need . . . . . . . . . . . . . . . . . . . . . . . . . . . . . . . . . . . . . . . . . . . .
2-2
Overview . . . . . . . . . . . . . . . . . . . . . . . . . . . . . . . . . . . . . . . . . . . . . . . . . . . . . .
Installing a Series 90-70 DLAN Interface Module . . . . . . . . . . . . . . . . . . . . .
Section 2: DLAN Jumper Configuration . . . . . . . . . . . . . . . . . . . . . . .
DLAN Configuration Jumpers . . . . . . . . . . . . . . . . . . . . . . . . . . . . . . . . . . . . .
Selecting the Network Type . . . . . . . . . . . . . . . . . . . . . . . . . . . . . . . . . . . . . . .
Selecting RS-485 Termination Resistors . . . . . . . . . . . . . . . . . . . . . . . . . . . . .
Section 3: Configuring a DLAN Interface Module . . . . . . . . . . . . . .
I/O Configuration Rack Screen . . . . . . . . . . . . . . . . . . . . . . . . . . . . . . . . . . . .
Adding a DLAN Interface Module to the Rack Screen . . . . . . . . . . . . . . . . . .
Section 4: Installing the GE_DLAN Logicmaster Folder . . . . . . . . .
2-3
2-3
2-4
2-5
2-5
2-6
2-6
2-8
2-8
2-9
2-11
Installing the Folder . . . . . . . . . . . . . . . . . . . . . . . . . . . . . . . . . . . . . . . . . . . . .
2-11
The DLAN User Interface . . . . . . . . . . . . . . . . . . . . . . . . . . . . . . . . . . . .
3-1
Section 1: Overview
3-2
The DLAN Interface Program . . . . . . . . . . . . . . . . . . . . . . . . . . . . . . . . . . . . .
Signals . . . . . . . . . . . . . . . . . . . . . . . . . . . . . . . . . . . . . . . . . . . . . . . . . . . . . . . .
Section 2: Data Allocation and Configuration . . . . . . . . . . . . . . . . .
Limitations On Use Of Discrete Temporary References . . . . . . . . . . . . . . . . .
User Configuration . . . . . . . . . . . . . . . . . . . . . . . . . . . . . . . . . . . . . . . . . . . . . .
Global Data . . . . . . . . . . . . . . . . . . . . . . . . . . . . . . . . . . . . . . . . . . . . . . . . . . . .
GFK-0729C
1-3
Section 3: Configuring the DLAN Interface module . . . . . . . . . . . .
Section 1: Installing the DLAN Interface Module Hardware . . . . .
Chapter 3
1-1
1-2
1-2
Series 90t-70 DLAN/DLAN+ Interface Module User’s Manual - November 1995
3-2
3-3
3-5
3-5
3-5
3-7
vii
Contents
Section 3: Using the DLAN Interface Program . . . . . . . . . . . . . . . . .
GFK-0729C
3-17
What the GE_DLAN Program Provides . . . . . . . . . . . . . . . . . . . . . . . . . . . . .
3-17
Adding Application-Specific Logic To the GE_DLAN Program . . . . . . . . . .
3-17
GE_DLAN Program Structure . . . . . . . . . . . . . . . . . . . . . . . . . . . . . . . . . . . . .
3-17
Adding a DLAN Application Block . . . . . . . . . . . . . . . . . . . . . . . . . . . . . . . . .
3-18
What the DLAN Application Block Needs to Do . . . . . . . . . . . . . . . . . . . . . .
3-19
Series 90t-70 DLAN/DLAN+ Interface Module User’s Manual - November 1995
viii
Contents
Table 1-1. MODULE OK LED Status . . . . . . . . . . . . . . . . . . . . . . . . . . . . . . . . . . . . . . . . . . . . . . . . . . . . . . .
1-4
Table 2-1. Jumper Positions For Selecting DLAN Network Type . . . . . . . . . . . . . . . . . . . . . . . . . . . . . . . . .
2-6
Table 2-2. Jumper Positions For RS-485 Network Termination Resistors . . . . . . . . . . . . . . . . . . . . . . . . . . .
2-7
Table 3-1. User Configuration Data . . . . . . . . . . . . . . . . . . . . . . . . . . . . . . . . . . . . . . . . . . . . . . . . . . . . . . . . .
3-6
Table 3-2. PLC Global Data . . . . . . . . . . . . . . . . . . . . . . . . . . . . . . . . . . . . . . . . . . . . . . . . . . . . . . . . . . . . . . .
3-7
Table 3-3. Broadcast Command Bits . . . . . . . . . . . . . . . . . . . . . . . . . . . . . . . . . . . . . . . . . . . . . . . . . . . . . . . .
3-8
Table 3-4. Drop Command Bits . . . . . . . . . . . . . . . . . . . . . . . . . . . . . . . . . . . . . . . . . . . . . . . . . . . . . . . . . . . .
3-8
Table 3-5. Broadcast Setpoints . . . . . . . . . . . . . . . . . . . . . . . . . . . . . . . . . . . . . . . . . . . . . . . . . . . . . . . . . . . . .
3-10
Table 3-6. Drop Setpoints . . . . . . . . . . . . . . . . . . . . . . . . . . . . . . . . . . . . . . . . . . . . . . . . . . . . . . . . . . . . . . . . .
3-10
Table 3-7. Status Registers . . . . . . . . . . . . . . . . . . . . . . . . . . . . . . . . . . . . . . . . . . . . . . . . . . . . . . . . . . . . . . . .
3-11
Table 3-8. Link Presence Bits . . . . . . . . . . . . . . . . . . . . . . . . . . . . . . . . . . . . . . . . . . . . . . . . . . . . . . . . . . . . . .
3-12
Table 3-9. Diagnostic Registers . . . . . . . . . . . . . . . . . . . . . . . . . . . . . . . . . . . . . . . . . . . . . . . . . . . . . . . . . . . .
3-12
Table 3-10. Page Presence Bits . . . . . . . . . . . . . . . . . . . . . . . . . . . . . . . . . . . . . . . . . . . . . . . . . . . . . . . . . . . .
3-13
Table 3-11. Broadcast Feedback Registers . . . . . . . . . . . . . . . . . . . . . . . . . . . . . . . . . . . . . . . . . . . . . . . . . . . .
3-13
Table 3-12. Drop Feedback Registers . . . . . . . . . . . . . . . . . . . . . . . . . . . . . . . . . . . . . . . . . . . . . . . . . . . . . . .
3-14
GFK-0729C
Series 90t-70 DLAN/DLAN+ Interface Module User’s Manual - November 1995
ix
Contents
Figure 1-1. Series 90-70 DLAN/DLAN+ Interface Module . . . . . . . . . . . . . . . . . . . . . . . . . . . . . . . . . . . . . .
1-3
Figure 2-1. Series 90-70 DLAN Interface Module Configurations . . . . . . . . . . . . . . . . . . . . . . . . . . . . . . . . .
2-3
Figure 2-2. Detail of DLAN Configuration Jumpers From Figure 1-1. . . . . . . . . . . . . . . . . . . . . . . . . . . . . .
2-5
Figure 2-3. Selecting a DLAN Configuration Jumper Position . . . . . . . . . . . . . . . . . . . . . . . . . . . . . . . . . . . .
2-6
Figure 3-1. GE_DLAN Interface Program Structure . . . . . . . . . . . . . . . . . . . . . . . . . . . . . . . . . . . . . . . . . . . .
3-17
Figure 3-2. GE_DLAN MAIN Program Flow . . . . . . . . . . . . . . . . . . . . . . . . . . . . . . . . . . . . . . . . . . . . . . . . .
3-18
Figure 3-3. Program Flow . . . . . . . . . . . . . . . . . . . . . . . . . . . . . . . . . . . . . . . . . . . . . . . . . . . . . . . . . . . . . . . .
3-19
GFK-0729C
Series 90t-70 DLAN/DLAN+ Interface Module User’s Manual - November 1995
x
restart lowapp ARestart oddapp: ARestarts for autonumbers that do not restart in each
chapter. figure bi level 1, reset table_big level 1, reset chap_big level 1, reset1 Lowapp
Alwbox restart evenap:A1app_big level 1, resetA figure_ap level 1, reset table_ap level
1, reset figure level 1, reset table level 1, reset these restarts oddbox reset: 1evenbox
reset: 1must be in the header frame of chapter 1. a:ebx, l 1 resetA a:obx:l 1, resetA
a:bigbx level 1 resetA a:ftr level 1 resetA c:ebx, l 1 reset1 c:obx:l 1, reset1 c:bigbx level
1 reset1 c:ftr level 1 reset1 Reminders for autonumbers that need to be restarted
manually (first instance will always be 4) let_in level 1: A. B. C. letter level 1:A.B.C.
num level 1: 1. 2. 3. num_in level 1: 1. 2. 3. rom_in level 1: I. II. III. roman level 1: I. II.
III. steps level 1: 1. 2. 3.
Chapter
1 Introduction
1
Section 1: System Overview
The Series 90t-70 DLAN/DLAN+ Interface Module (catalog number IC697BEM763), from
GE Intelligent Platforms, 32 North America, Inc., is a high-performance interface between the GE
Drive Systems DLAN and DLAN+ local area network (LAN) protocols and Series 90t-70 PLC
systems. It permits DC300, AC2000, and DC2000 drives to be controlled from Series 90-70
PLC application programs.
In this manual, the module will usually be referred to simply as the DLAN Interface module.
The reader should keep in mind that it supports both GE Drive Systems network protocols.
DLAN Basics
GE Drive systems devices communicate using one (or both, in some cases) of two types of
network protocol:
H
DLAN, a multidrop serial protocol - sometimes referred to as DLAN– or old DLAN.
H
DLAN+, a high speed protocol based on Arcnet
Information is shared on the network using data pages. A page is a collection of 16 bit data
words. Each device (or drop) is allocated one or more pages. Each page can contain up to 256
words and is partitioned into blocks of 16 words each. DLAN supports 32 pages per network,
and DLAN+ supports 255 pages per network. The information within a page (its data structure)
depends on the device and is often referred to as a dialect. Devices with multiple pages can use
a different dialect for each page.
Each device is responsible for periodically detecting changes in its page(s) of information and
then broadcasting any changes on the network. This is the mechanism used by controllers, such
as the DLAN Interface module, to maintain an up-to-date copy of the data in other network
devices.
Controllers issue commands to other devices on the network by sending messages. Command
messages can be directed to a specific target device or broadcast, and can contain one new data
item for the device’s data page(s).
DLAN Interface Module Functions
The Series 90-70 DLAN Interface module can operate as either a DLAN or DLAN+ controller.
However, a single module can not be both a DLAN and DLAN+ controller at the same time. If
GFK-0729D
1-1
1
an application requires both DLAN and DLAN+ devices, two DLAN Interface modules must be
used.
The module passes page data and commands between network devices and a PLC application
program. The knowledge about what the network devices are intended to do is contained in the
PLC program.
Series 90-70 DLAN Applications
Hardware Requirements
The minimum hardware configuration for a Series 90-70 DLAN or DLAN+ application requires
these components:
1.
A Series 90-70 rack and power supply.
2.
A Series 90-70 PLC CPU module to run the application program. CPU firmware version
5.00 or later is required.
3.
One or more Series 90-70 DLAN Interface modules installed in another slot or slots.
4.
A DLAN or DLAN+ network connected to each DLAN Interface module.
5.
One or more GE Drive Systems devices connected to each network.
Typically, additional Series 90-70 modules will also be required to monitor and control the
application. However, the discussion in this manual is limited to the DLAN Interface module
and the associated PLC program.
1-2
Series 90t-70 DLAN/DLAN+ Interface Module User’s Manual - March 1996
GFK-0729D
1
Section 2: DLAN Interface Module Description
LED Indicators
The three LED indicators, shown in the following figures, are mounted along the top front edge
of the DLAN Interface module.
a47027
DOOR
Î
Î
MODULE OK
COMMAND OUT
DATA IN
RESTART
ÎÎ
ÎÎ
BEM 763
MODULE OK
COMMAND OUT
DATA IN
ON = OK, ACTIVE
OTHER LEDS FOR
FACTORY USE.
PUSH TO RESTART
COMMUNICATION.
DLAN
CONNECTOR
DLAN
NETWORK
CONNECTOR
TXATXA+
TXBTXB+
5V
0V
TX
RX
1
2
3
4
5
6
7
8
(D CONNECTORS
NOT USED)
DLAN
CONFIGURATION
JUMPERS
MODULE FUNCTION
GE DRIVES
DLAN INTERFACE
MODULE:
IC697BEM763
LABEL:
44A726758-139R02
Figure 1-1. Series 90-70 DLAN/DLAN+ Interface Module
MODULE OK LED
The MODULE OK LED indicates the current status of the DLAN Interface module. It has
three states:
GFK-0729D
Chapter 1 Introduction
1-3
1
Table 1-1. MODULE OK LED Status
State
OFF
Description
When the MODULE OK LED is off, the DLAN Interface module is not functioning. This is the
result of a hardware malfunction; for example, the diagnostic checks detected a
failure, or the PLC CPU is not present. Corrective action is required in order to get the module
functioning again.
When the LED is on steadily, the DLAN Interface module is functioning properly. Normally, this
LED should always be on, indicating that the diagnostic tests were successfully completed and
the Logicmaster 90-70 configuration data for the module
is correct.
ON
Flashing
The LED flashes during power-up diagnostics.
Note
The DLAN Interface module has a hardware watchdog timer that is periodically
reset by the module software. If the watchdog timer expires, the module stops
functioning and the MODULE OK LED turns off.
COMMAND OUT LED
The center LED indicator, referred to as COMMAND OUT on the module door label, has two
functions. It flashes on briefly during the self test that occurs when the PLC is powered on or the
module Restart pushbutton is pressed. During normal operation, it flashes whenever a command
from the PLC application program is sent to a network drop.
DATA IN LED
The lower LED indicator, referred to as DATA IN on the module door label, flashes whenever a
page data update message is received from one of the network drops. Most frequently, these
messages contain feedback data. If none of the drops broadcasts an update message, this LED
will flash every two seconds as long as any active drops are connected to the network.
Restart Pushbutton
Pressing the Restart pushbutton on the DLAN Interface module for any length of time will halt
DLAN communication and cause the module to perform its internal tests. If the module is used
with the GE_DLAN PLC program furnished with the module (or an application derived from
it), communication will restart automatically.
Battery
The DLAN Interface module does not use a battery.
DLAN Network Connector
This eight-pin connector provides the connections from the DLAN Interface module to the
DLAN or DLAN+ network.. A connector on the cable from the DLAN network connection
block mates to the connector on the module.
1-4
Series 90t-70 DLAN/DLAN+ Interface Module User’s Manual - March 1996
GFK-0729D
1
DLAN Configuration Jumpers
These jumpers are used to configure the network connection when the Network Type is
specified as DLAN. JP2 through JP4 are used to select either the optically isolated LAN
network or an RS-485 LAN network. If the RS-485 LAN network is selected, JP5 and JP6 are
used to select whether the RS-485 network termination resistors are IN or OUT.
25-Pin Connectors
The two DB-25S connectors on the DLAN Interface module are not used.
GFK-0729D
Chapter 1 Introduction
1-5
1
Section 3: Configuring the DLAN Interface module
Before a DLAN Interface module can be used in a Series 90-70 PLC system, it must be
configured using the Logicmastert 90-70 Configuration software. This topic is covered in
detail in chapter 2 of this manual.
1-6
Series 90t-70 DLAN/DLAN+ Interface Module User’s Manual - March 1996
GFK-0729D
Chapter
1
1 Installing the DLAN Interface Module
section level 1 1
figure bi level 1
table_big level 1
This chapter explains how to install a DLAN Interface module in a Series 90-70 PLC system
and how to install the necessary software. There are several easy steps in preparing the DLAN
Interface module for use.
This chapter is divided into four sections. The necessary equipment and software packages
required for the installation process are described on the following page. After that, each
section describes one step of the installation procedure in detail.
Step 1. Installing the DLAN Interface Module Hardware: Refer to section 1 for the first
step in the installation procedure. Section 1 describes the physical installation of the DLAN
Interface module in a Series 90-70 rack. Hardware descriptions are also included.
Step 2. DLAN Jumper Configuration: Section 2 describes how to set the DLAN
configuration jumpers located on the DLAN daughter board when the Network Type is
specified as DLAN.
Step 3. Configuring the DLAN Interface Module: Section 3 contains the second step in the
installation procedure. It describes how to add a DLAN Interface module to the Series 90-70
I/O configuration, using Logicmaster 90-70 configuration software.
Step 4. Installing the DLAN Interface Module Software: Section 4 describes how to install
DLAN Interface PLC software on a programming computer.
GFK-0729D
1-1
1
What You Will Need
Before you can begin the installation procedure, you must have the following equipment and
software:
1-2
A Series 90-70 programmable controller (PLC) system. The PLC CPU must have version
5.00 or later firmware.
One or more DLAN Interface modules (catalog number IC697BEM763).
An MS-DOS based computer with a hard disk and MS-DOS version 3.0 or later. The
computer can be:
A Workmaster
An IBM PC-XT, PC-AT, PS/2 or compatible personal computer with an 83-key or
101-key keyboard.
A Workmaster
keyboard.
II industrial computer.
or CIMSTAR I industrial computer with an 83-key or 101-key
Logicmaster 90-70 configuration and programming software, version 5.01 or later.
The DLAN Interface software that is provided with the DLAN module..
MS-DOS is a registered trademark of Microsoft Corporation
IBM is a registered trademark of International Business Machines Corporation
Series 90-70 DLAN/DLAN+ Interface Module User’s Manual - March 1996
GFK-0729D
1
Section 1: Installing the DLAN Interface Module Hardware
The first step in the installation procedure is to physically install the DLAN Interface module
hardware and verify that it is working properly.
Overview
In a single rack system, DLAN Interface modules reside in the same rack as the PLC CPU. In a
multiple rack Series 90-70 PLC, DLAN Interface modules can reside in either the CPU rack or
expansion racks.
The following illustration shows two possible system configurations for installing a Series
90-70 DLAN Interface module in either a local or expansion rack.
ÎÎ
Î
ÎÎ
ÎÎ
ÎÎ
Î
ÎÎ
ÎÎ
ÎÎ
Î
ÎÎ
Î
ÎÎ
ÎÎ
ÎÎ
Î
ÎÎ
ÎÎ
ÎÎ
Î
Î
ÎÎ
Î
ÎÎ
ÎÎ
ÎÎ
Î
ÎÎ
ÎÎ
ÎÎ
Î
Î
ÎÎ
ÎÎ
ÎÎ
Î
ÎÎ
ÎÎ
ÎÎ
Î
Î ÎÎ
ÎÎ
Î
ÎÎ
ÎÎ
ÎÎ
Î
ÎÎ
ÎÎ
ÎÎ
Î
ÎÎ
Î
ÎÎ
ÎÎ
ÎÎ
Î
ÎÎ
ÎÎ
ÎÎ
Î
ÎÎ
ÎÎÎ
ÎÎ
ÎÎÎÎ
ÎÎÎÎÎ
Î
ÎÎ
ÎÎ
ÎÎ
ÎÎ
Î
ÎÎ
ÎÎ
ÎÎ
Î
ÎÎ
ÎÎ
ÎÎ
ÎÎ
ÎÎ
Î
ÎÎ
ÎÎ
Î
ÎÎ
ÎÎ
ÎÎ
ÎÎ
ÎÎ
ÎÎ
Î
ÎÎ
ÎÎ
ÎÎ
Î
ÎÎ
ÎÎ
ÎÎ
ÎÎ
ÎÎ
Î
ÎÎ
ÎÎ
Î
ÎÎ
ÎÎ
ÎÎÎ
ÎÎÎ
ÎÎ
ÎÎ
ÎÎ
Î
ÎÎ
ÎÎ
ÎÎ
Î
ÎÎ
ÎÎ
ÎÎ
ÎÎ
Î
ÎÎ
ÎÎ
Î
ÎÎ
ÎÎ
ÎÎ
ÎÎ
ÎÎ
ÎÎ
Î
ÎÎ
ÎÎ
ÎÎ
Î
ÎÎ
ÎÎ
ÎÎ
ÎÎ
ÎÎ
Î
ÎÎ
ÎÎ
Î
ÎÎ
ÎÎ
ÎÎ
ÎÎ
ÎÎ
ÎÎ
Î
ÎÎ
ÎÎ
ÎÎ
Î
ÎÎ
ÎÎ
ÎÎ
ÎÎ
ÎÎ
Î
ÎÎ
ÎÎ
Î
ÎÎ
ÎÎ
ÎÎ
ÎÎ
ÎÎ
ÎÎ
ÎÎÎÎÎ
ÎÎ
Î
ÎÎ
ÎÎÎÎ
ÎÎÎ
ÎÎ
ÎÎÎÎ
ÎÎÎ
ÎÎ
LOCAL RACK CONFIGURATION
P
S
C D
P L
U A
N
CPU RACK
P
S
a47028
EXPANSION RACK
C B
P T
U M
P
S
B D
R L
M A
N
Figure 1-1. Series 90-70 DLAN Interface Module Configurations
The power supply, CPU, and Series 90-70 Bus Transmitter (BTM) or Bus Receiver Module
(BRM) must reside in specific slots within each rack. The CPU module must be located in slot
1 of rack 0.
When a Series 90-70 system includes a Bus Transmitter Module (BTM), it can be located in
any slot as long as it is not to the right of an empty slot. If the PLC system has more than one
rack, a Bus Receiver Module (BRM) must be located in slot 1 of each expansion rack.
Note
Version A of the Bus Transmitter Module must be installed to the right of all
other GE modules. There must be no empty slots between the Bus
Transmitter Module and the CPU module.
GFK-0729D
Chapter 2 Installing the DLAN Interface Module
1-3
1
DLAN Interface modules can be placed in any unused slot in any rack, provided that these
conditions are met:
The configuration created by Logicmaster 90-70 configuration software must match the
physical configuration of the modules. If it does not, the PLC can not operate as expected.
Configuration faults are logged in the PLC fault table. Refer to the Logicmaster 90-70
Programming Software User’s Manual, GFK-0263, for more information on PLC
configuration using Logicmaster 90-70 software.
The DLAN Interface module(s) must be configured correctly in the Logicmaster 90-70
configuration. If not, the DLAN Interface module(s) will not operate. See section 2 of this
chapter for information on configuring the module.
All the slots between the DLAN Interface module(s) and the PLC CPU (in the CPU rack)
or the Bus Receiver Module (in an expansion rack) must be occupied. If any of these slots
are empty, the DLAN Interface module(s) cannot communicate across the backplane to the
PLC CPU or Bus Receiver Module.
Installing a Series 90-70 DLAN Interface Module
To install a Series 90-70 DLAN Interface module, follow these steps:
1-4
1.
Set the CPU Run/Stop switch to STOP. This prevents the PLC program from initiating any
command that can affect the operation of the module.
2.
Power off the Series 90-70 PLC system.
3.
Locate the desired rack and slot.
4.
Remove the Series 90-70 DLAN Interface module from the shipping carton, but leave it in
its anti-static plastic bag. Touch an exposed metal surface of the PLC rack to discharge any
electrostatic charge you may have picked up. Then remove the DLAN Interface module
from the protective bag.
5.
Slide the DLAN Interface module completely into the slot. The three LEDs are located at
the top of the module.
6.
Press the module firmly against the front rails of the PLC rack, but do not use excessive
force. When the module is fully seated, you will hear and/or feel clicks from the latches on
the top and bottom of the module faceplate.
7.
Mount the DLAN/DLAN+ network connection block to the Series 90-70 PLC rack where
the DLAN Interface module is installed. Connect the ground wire from the connection
block securely to one of the ground studs on the PLC rack. Connect the cable from the
connection block to the DLAN Interface module by mating its connector with the DLAN
NETWORK CONNECTOR shown in figure 1-1. Finally, connect the network cable or
cables to the connection block. If the DLAN Interface module is at one end of the network
cable, the appropriate network terminator must be connected at the connection block.
8.
Power on the PLC rack. The MODULE OK LED of the DLAN Interface module should
immediately begin to flash, and then stay on when diagnostics tests have completed.
Series 90-70 DLAN/DLAN+ Interface Module User’s Manual - March 1996
GFK-0729D
1
Section 2: DLAN Jumper Configuration
DLAN Configuration Jumpers
When the Network Type specified by user configuration data (See Chapter 3, section 2) is
DLAN, jumpers on the DLAN daughter board must be used to configure the network
connection. This section describes how to set the jumpers. If you are using a DLAN+ network,
skip this section.
Figure 2-2 is an enlarged view of the DLAN configuration jumpers shown in Figure 1-1.
Jumper JP6 is nearest the DLAN network connector. The positions of these jumpers configure
the DLAN module connections to a DLAN network.
a47078
JP6
JP5
JP4
JP3
JP2
Figure 1-2. Detail of DLAN Configuration Jumpers From Figure 1-1.
Figure 2-3 shows the two possible positions for jumpers JP2 through JP6. All of the jumpers
are installed in the 1-2 position at the factory.
If you need to change one or more jumper positions, use this procedure. Each jumper has a thin
tab that extends beyond the edge of the DLAN daughter board toward the front of the module.
Grip the tab with needle nose pliers and pull it forward until it is free. Then move the jumper
so that it will engage pins 2 and 3, and push it onto the pins. Repeat for each jumper that needs
to be changed.
GFK-0729D
Chapter 2 Installing the DLAN Interface Module
1-5
1
a47079
Pin 3
Pin 3
Pin 2
Pin 2
Pin 1
Pin 1
Jumper shown in 1-2 position.
Jumper shown in 2-3 position.
Figure 1-3. Selecting a DLAN Configuration Jumper Position
Selecting the Network Type
In addition to DLAN+, two types of DLAN networks are supported by version 1.04 and later
versions of the DLAN Module: optically isolated and RS-485. The DLAN network type is
selected by setting jumpers JP2, JP3, and JP4, as shown in Table 2-1. At the factory, these
jumpers are set to select the optically isolated network.
Table 1-1. Jumper Positions For Selecting DLAN Network Type
Jumper
Optically Isolated LAN
RS-485 LAN
JP2
1–2
2–3
JP3
1–2
2–3
JP4
1–2
2–3
Caution
If the DLAN module is powered on while connected to an optically
isolated network and jumpers JP2, JP3, and JP4 are set to the 2–3
position, the external isolated power supply for the isolated network will
be damaged.
Selecting RS-485 Termination Resistors
If the RS-485 network is selected, the drop at each end of the network cable should have the
termination resistors IN. This is true for all drop types, both DLAN modules and drives.
Adding additional termination resistors will improve the signal to noise ratio of RS-485
networks, but more than five sets of termination resistors will overload the drivers.
Accordingly, no more than five drops on a network should have the termination resistors IN.
1-6
Series 90-70 DLAN/DLAN+ Interface Module User’s Manual - March 1996
GFK-0729D
1
Table 2-2 shows the jumper settings for termination resistors. At the factory, these jumpers are
set for termination resistors IN.
Table 1-2. Jumper Positions For RS-485 Network Termination Resistors
Termination Resistors
Jumper
IN
OUT
JP5
1–2
2–3
JP6
1–2
2–3
If the optically isolated network is selected, the termination resistors are not used, and the JP5
and JP6 jumper settings are ignored.
GFK-0729D
Chapter 2 Installing the DLAN Interface Module
1-7
1
Section 3: Configuring a DLAN Interface Module
The second step in the DLAN Interface module installation procedure is to add a DLAN
Interface module to the Series 90-70 I/O configuration, using Logicmaster 90-70 configuration
software. The configuration software is used to describe all the modules present in the PLC
racks. Rack and slot location and other features for individual modules are specified by
completing setup screens that represent the modules in a rack. Editing features make it easy to
copy, move, replace, or delete module configurations.
After completing the Logicmaster 90-70 configuration, you must store it to the PLC where your
DLAN Interface module is installed. The configuration has no effect until it is stored to the
PLC. The Logicmaster 90-70 status line must display CONFIG EQUAL after the
configuration is stored to the PLC.
I/O Configuration Rack Screen
From the main menu of the Logicmaster 90-70 configuration software, press the I/O soft key
(F1). A screen representing the modules in a rack is displayed.
The current module on a Series 90-70 I/O Configuration rack screen is highlighted in reverse
video. Upon entering the rack screen, the Power Supply module is shown in reverse video. Use
the left and right cursor keys to move from module to module. Use the up and down cursor
keys to move between racks in descending or ascending order, respectively.
The rack screen presents an overview perspective of one Series 90-70 PLC rack. CONFIG
VALID is displayed in the lower right corner of each display screen after the configuration is
successfully validated. When CONFIG INVALID is indicated, the configuration can not be
stored to the PLC. A CONFIG INVALID status is most likely to occur when:
1-8
Series 90-70 DLAN/DLAN+ Interface Module User’s Manual - March 1996
GFK-0729D
1
A slot in a Series 90-70 rack to the left of a module that generates interrupts, such as the
DLAN Interface module, is vacant.
Input reference addresses (%I and %AI) assigned to two input modules overlap.
Bus Transmitter and/or Receiver Modules in a multi-rack Series 90-70 PLC are missing.
A Series 90-70 Version A BTM module is not located to the right of all other modules.
Adding a DLAN Interface Module to the Rack Screen
1.
GFK-0729D
With the selected slot location highlighted, press other (F8) and then dlan (F3) from the
I/O Rack Configuration screen.
Chapter 2 Installing the DLAN Interface Module
1-9
1
1-10
2.
Press the Enter key to select the catalog number shown in reverse video and display the
DLAN Interface Module detail screen.
3.
There are no configurable options for the DLAN Interface module. Press the Esc key to
accept it as the module for the current slot. The screen showing all the modules in the
rack, now including the DLAN Interface module, will reappear.
4.
Press Esc again to save the new configuration and return to the main menu.
5.
Press utility (F9), store (F2), and then Enter to store the new configuration to the
PLC. The Logicmaster 90-70 status line should now display CONFIG EQUAL.
Series 90-70 DLAN/DLAN+ Interface Module User’s Manual - March 1996
GFK-0729D
1
Section 4: Installing the GE_DLAN Logicmaster Folder
In order to use the DLAN Interface module, you must create a PLC ladder program to monitor
the operation of DLAN or DLAN+ devices and send commands to them. A ladder program that
is provided with the module contains the interface between PLC data and the module. This
section describes how to install the Logicmaster 90-70 folder that contains this program on your
personal computer.
Installing the Folder
Two software distribution diskettes, one 5.25-inch and one 3.5-inch, are included with the
DLAN Interface module. Choose a diskette that fits any diskette drive in your computer. Then
follow these steps.
1.
Slide the selected diskette into an appropriate diskette drive in your computer.
2.
Set your computer’s current disk drive to the floppy drive where you inserted the distribution
diskette. If your diskette is in drive A, type a: followed by the Enter key.
3.
Run the installation program by typing install followed by the Enter key.
4.
The INSTALL program will display a default drive and path for the GE_DLAN folder,
usually C:\GE_DLAN. You can change the drive letter to any hard drive or network
drive in your computer. You can also change the file path where the GE_DLAN folder will
be installed to any valid path. If the path you specify contains subdirectories that do not
exist, the INSTALL program will create them. You can install two or more GE_DLAN
folders on the same drive by choosing different paths.
The INSTALL program does not have the capability to change the GE_DLAN folder name.
Accordingly, the program will not permit you to modify the folder name where it appears
in the path specification.
If your computer does not have a hard drive or network drive, the INSTALL program will
display an error message and exit.
5.
When you confirm a path for the folder, the INSTALL program will create the new folder
and copy these files into it:
CPUCFG.CFG
DCONFIG.EXP
DCONFIG.PDT
DCONFIG.STE
DLAN_C.PDT
DLAN_L.EXP
DLAN_L.PDT
DLAN_L.STE
DLAN_L.XRF
IOCFG.CFG
LMFOLDER.70
PRINT.XOV
_MAIN.DEC
_MAIN.LH1
_MAIN.PDT
_MAIN.STE
_MAIN.XRF
This completes the software installation for the DLAN or DLAN+ Interface.
GFK-0729D
Chapter 2 Installing the DLAN Interface Module
1-11
Chapter
1
1 The DLAN User Interface
section level 1 1
figure bi level 1
table_big level 1
This chapter describes the PLC interface to DLAN devices and how to configure it.
This chapter contains the following sections:
Section 1. Overview: summarizes the PLC data and program logic that comprise the user
interface to DLAN devices.
Section 2. Data Allocation and Configuration: describes the PLC data used by DLAN
applications.
Section 3. Using the DLAN Interface Program: A DLAN interface program for Logicmaster
90-70 is provided as a part of the DLAN/DLAN+ Interface Module product.
GFK-0729D
1-1
3
Section 1: Overview
This section summarizes the PLC data and program logic that comprise the user interface to
DLAN devices. Other sections in this chapter describe each of these topics in detail.
The DLAN Interface Program
The DLAN/DLAN+ Interface Module product includes a distribution diskette that contains a
Series 90-70 PLC program folder. This program provides a bit and data mapped interface to a
DLAN/DLAN+ network.
Interface Rules
The interface supports drives only and is subject to the following rules:
1.
Network drop number assignments must begin at one (1) and continue sequentially.
2.
On DLAN+ networks, the page number for each drop must equal the drop number.
3.
On DLAN networks, the expected acks and weighted zero options must be selected for all
drives.
4.
All drives will receive the same command set and must send the same feedback data.
Program Components
The program contains these parts:
H
A MAIN program.
H
A DLAN_L program block.
H
A DCONFIG program block.
H
A DLAN_C external block.
These components are summarized in the following paragraphs. For a detailed discussion of
the program and information on adapting it for your application, see section 3 of this chapter.
The MAIN Program
The MAIN program version in the distribution diskette contains only a CALL to the DLAN_L
block. This version is a starting point for your application. You will need to add program logic
that uses the data described in section 2 of this chapter.
The DLAN_L block
The DLAN_L block is called by MAIN once during each PLC execution sweep. It contains
program logic for initializing DLAN data; for configuring the DLAN Interface module; for
updating status data, diagnostic data, and feedback signals; and for sending DLAN command
messages.
DLAN_L contains local register (%L) data used for configuration of your application. This
data is initialized by the DATA_INIT_DLANA function block in DLAN_L. You will probably
need to change some of the values specified in this function block.
1-2
Series 90t-70 DLAN/DLAN+ Interface Module User’s Manual - March 1996
GFK-0729D
3
See User Configuration in section 2 of this chapter for information on configuring DLAN
global data.
The DCONFIG block
The DCONFIG block is called as necessary by DLAN_L to configure the DLAN Interface
module. This configuration process is transparent to the user application. All the logic needed
to configure the module is provided for you in the DLAN_L program block.
The DLAN_C External Block
The DLAN_C block is responsible for communication between the PLC CPU and the DLAN
Interface module(s).
Signals
Series 90-70 PLC applications for DLAN and DLAN+ devices use PLC data and program logic
as the interface to these devices. This interface is based on the concept of signals. A DLAN
signal is an item of data that is sent either from the PLC program to a data page of a DLAN or
DLAN+ device, or from a data page in the device to the PLC program. Signals contain at least
16 bits of data. Four kinds of signals are used.
1.
Command bits
2.
Setpoint data
3.
Feedback data
4.
Link presence bits
These signal types are summarized in the following paragraphs.
Command Bits
The PLC program sends DLAN commands by setting one or more discrete data points. An
action list is predefined for each command bit. Action lists consist of individual LAN
commands in a generic list structure. Each command bit is preconfigured to send one or more
commands to one or more DLAN drops.
During each PLC program sweep, all command bits are compared their previous values. When
one or more changes are detected, the commands that correspond to each changed bit are sent
to the DLAN Interface module for transmission on the network.
Setpoints
In the PLC, a setpoint consists of a data word and a corresponding setpoint bit. Each setpoint
bit is preconfigured for a particular drop and page location within that drop.
To issue a new setpoint, the PLC program first updates the setpoint value and sets the
corresponding setpoint bit. During the program sweep, all the setpoint bits are also checked.
When a setpoint bit is detected, the corresponding value is sent to the DLAN Interface module
for transmission on the network, and the setpoint bit is cleared.
LAN Update of Setpoints
There are actually two copies of setpoint data in the PLC:
GFK-0729D
Chapter 3 The DLAN User Interface
1-3
3
1.
A value in the user setpoint table that can be changed by the PLC program.
2.
The corresponding location in the feedback data array for the target DLAN drop. This
copy is written by the DLAN interface program; it may be read by MAIN and other
program blocks.
When the user changes a setpoint value and then sets the command bit to send it, the target
drive updates its corresponding page location after it receives the command. A short time later,
the drive echoes the new value back to the DLAN feedback data array.
In anticipation of the new value from the drop, the DLAN_L program block updates the
setpoint in the feedback array with the new value. This provides a convenient mechanism for
the user’s PLC logic to determine when to set a particular setpoint bit. Whenever the setpoint
value and the corresponding feedback value are different, the setpoint value needs to be sent to
the drop. The user logic can accomplish this by setting the appropriate setpoint bit.
Note that a temporary interruption of communication between the DLAN Interface module and
the drop could occur after the DLAN feedback array was updated but before the drop actually
changed its data page. In this case, the interruption would cause a discrepancy between the
DLAN feedback array and the data page in the drop. When communication is restored, the
current value from the drop’s data page will be copied to the feedback array. If the user
program now compares the setpoint to the corresponding feedback value, the difference will be
detected, and the appropriate setpoint bit can be set in order to update the page data in the drop.
Feedback Signals
Feedback data is copied to a PLC global (%R) memory block (specified in the DLAN_L block
user configuration data) as it arrives from DLAN drops. The user program may examine this
data at any time.
Link Presence Signals
Periodically, all devices on the LAN network report their presence. The DLAN Interface
program keeps a record of this information in link presence bits. These bits, along with the
LAN status and diagnostic information, are copied to a PLC global memory block specified by
the user.
1-4
Series 90t-70 DLAN/DLAN+ Interface Module User’s Manual - March 1996
GFK-0729D
3
Section 2: Data Allocation and Configuration
This section describes the PLC data used by DLAN applications.
Caution
Some of the data used by the DLAN interface program is global, such as
Discrete Internal (%M) and Register (%R). The application designer
must be certain that data references in other parts of the application do
not conflict with references assigned to the DLAN interface.
The DLAN_L program block uses Register %R00001 and preserves its
contents. The only restriction on its use by other parts of the PLC
program is that it must never be modified by an interrupt block.
The DLAN_L program block also uses Discrete Temporary (%T)
references. These references may be used in other program blocks, but
are subject to the limitations described below.
Failure to observe this caution will result in unexpected and potentially
unsafe operation.
Limitations On Use Of Discrete Temporary References
Temporary references that are used by the DLAN_L block are subject to these limitations when
used in other program blocks:
1.
They must never be modified by an interrupt block.
2.
The DLAN_L program block modifies the states of discrete temporary (%T) points.
Consequently, the program must never rely on the state of %T points that are set before it
calls the DLAN_L block to be correct after the call unless the MAIN program saves the
%T table before the DLAN_L call and restores the table after the call.
3.
Transitional %T contacts must not be relied on because the DLAN_L block affects them in
complex ways.
User Configuration
Values are assigned to user configuration data in a Series 90-70 PLC DATA_INIT function
block in DLAN_L. This data specifies certain information about each DLAN Interface module
used by the application:
GFK-0729D
1.
The rack and slot location of the DLAN Interface module.
2.
Whether a DLAN or DLAN+ network will be used.
3.
The network address of the DLAN Interface module.
4.
The total number of network drops, including the DLAN Interface module, connected to
the network.
Chapter 3 The DLAN User Interface
1-5
3
5.
The update rate for feedback signals.
6.
The starting PLC memory offsets for DLAN signal tables.
Default values are provided in the DLAN_L program block. You can change these defaults, as
appropriate for your application, by using Logicmaster 90-70 programming software to zoom
into the DATA_INIT_DLANA block in DLAN_L.
The following table describes each item of user configuration data.
Table 1-1. User Configuration Data
Range
Description
DLAN
DLAN+
Default
PLC CONFIGURATION
Rack number of DLAN interface module
0–7
0
Slot number of DLAN interface module
2–9
2
Start address of Command bits (%M)
Varies with CPU model.
1
Start address of Setpoint bits (%M)
Varies with CPU model.
305
Start address of Setpoint registers (%R)
Varies with CPU config.
3
Start address of Status and Diagnostic registers (%R)
Varies with CPU config.
101
DLAN CONFIGURATION
Network type
Group assignment of this DLAN interface module
0
1
1
30
0–255
30
Drop number of this DLAN interface module
1–31
1–255
250
Total number of drops on this DLAN
2–32
Don’t care
32
Feedback update rate (.01 sec)
3–32
3–32
32
Number of class A drives
1–31
1–48
1
Entering the User Configuration
To change the user configuration values, enter the Program Display/Edit display of the
Logicmaster 90-70 programming software by typing the progrm soft key (F1) at the main
menu. Move the cursor to the DLAN_L program block and press the zoom soft key (F10).
The user configuration data is initialized by the DATA_INIT_DLANA function block in RUNG
4. Move the cursor to the DATA_INIT_DLANA function block and press the zoom soft key
(F10) again. You will see a screen that is similar to Table 3-1.
The rack number and slot number values in this display must be changed to match the rack and
slot location where the DLAN Interface module was installed in the PLC. The number of class
A drives value must match the number of drives attached to the network.
If a DLAN (not DLAN+) network will be used, the network type and drop number values must
also be changed appropriately.
1-6
Series 90t-70 DLAN/DLAN+ Interface Module User’s Manual - March 1996
GFK-0729D
3
Caution
The start addresses for setpoint bits, setpoint registers, and status and
diagnostic registers must be modified in accordance with the number of
class A drives on the network so that the four global data tables do not
overlap. The default start addresses are based on seven (7) drives. See
table 3-2, below, for information needed to calculate start addresses for a
different number of drives.
Global Data
The User Configuration contains four (4) parameters specifying the starting addresses of global
data tables used by the DLAN interface. You must allocate the PLC global data specified by
each of these parameters when planning your PLC program. This table shows the global data
table sizes that must be allocated.
Table 1-2. PLC Global Data
Table Name
Default
Start Location
Data Size
Command Bit Table
%M00001
16 points +
(number of class A drives * 36)
Setpoint Bit Table
%M00305
8 points +
(number of class A drives * 12)
Setpoint Value Table
%R00003
8 registers +
(number of class A drives * 12)
Status and Diagnostics Table
%R00101
50 registers
Feedback Table
%R00151[
1–16 class A drives:
17–32 class A drives:
33–48 class A drives:
554
1108
1662
[ The feedback table start location is not configurable. It always begins 50 registers after the start of the status
and diagnostics table.
Caution
The PLC global data tables specified in user configuration data must not
be used for any other purpose in the application. Because these tables are
specified indirectly, Logicmaster 90-70 is not aware of them and will not
warn you about conflicts. The Logicmaster 90-70 SEARCH and
HIGHEST REFERENCE USED functions are also unaware of these
tables.
When developing your application, you must be absolutely certain that these
tables do not overlap data references used by other parts of the application.
Use caution when increasing the number of class A drives.
Command Bit Table Format
The format of the command bits is defined in the following tables. The Bit Number value for
each table entry is relative to the start address of the command bit table. For example, the
default address of the Qstp bit is %M00002.
GFK-0729D
Chapter 3 The DLAN User Interface
1-7
3
Broadcast bits: The first 16 command bits are reserved for broadcast commands.
Table 1-3. Broadcast Command Bits
Bit
Number
Command
Name
Pickup Action
Dropout action
1
Normal Stop
Issues a normal stop command to all
drives; also clears Run Fwd/Rev
None
2
Qstp
Issues a quick stop command to all drives
None
3
Cstp
Issues a coast stop command to all drives
None
4
SoftReset
Issues a soft reset command to all drives
None
5
Jog Fwd
Brings all drives to the Fwd Jog state
Stop jog
6
Jog Rev
Brings all drives to the Rev Jog state
Stop jog
7
Run Fwd
Brings all drives to the Run0 Fwd state
Stop
8
Run Rev
Brings all drives to the Run0 Rev state
Stop
9 - 16
Reserved
Drop command bits: The next 36 bits are defined for drop 1 commands, followed by 36 bits
for drop 2, etc. The total number of command bits is (16 broadcast bits + (36 times the number
of drives on the network)).
Table 1-4. Drop Command Bits
Bit
Number
Command
Name
Pickup Action
Dropout action
17
Normal Stop
Issues a normal stop command
to drop 1; also clears Run Fwd/
Rev
None
18
Qstp
Issues a quick stop command to
drop 1
None
19
Cstp
Issues a coast stop command to
drop 1
None
20
SoftReset
Issues a soft reset command to
drop 1
None
21
Draw Req
Issues a transfer to Draw Speed
Regulator
None
22
Cur Req
Issues a transfer to Current Regulator
Issues a transfer to Draw Speed
Regulator
23
Proc Req
Issues a transfer to Process Regulator
Issues a transfer to Draw Speed
Regulator
24
Jog Fwd
Brings drop 1 to the Fwd Jog
state
Stop jog
25
Jog Rev
Brings drop 1 to the Rev Jog
state
Stop jog
26
Run Fwd
Brings drop 1 to the Run0 Fwd
state
Stop
Table 3-4. Drop Command Bits (continued)
1-8
Series 90t-70 DLAN/DLAN+ Interface Module User’s Manual - March 1996
GFK-0729D
3
Bit
Number
Command
Name
Pickup Action
Dropout action
27
Run Rev
Brings drop 1 to the Run0 Rev
state
Stop
28
Slow
Sets up drop 1 for Slow
Removes slow command
29
Run1
Sets up run reference for run1
Removes Run1
30
Run2
Sets up run reference for run2
Removes Run2
31
Refr Inh
Inhibits drop 1 reference
register
Removes reference inhibit
32
Mot1
Motor 1 request
Removes motor 1 command
33
Mot2
Motor 2 request
Removes motor 2 command
34
Hold Diam
Issues hold diameter mode
Removes hold diameter
35
Rcal Ilimit
Selects recalibrate current limit
mode
Removes recalibrate current
limit
36
Auto Ref
Selects auto reference
Removes auto reference select
37
Lup_out 01
Sets physical output 1 on LUP
card
Resets physical output 1 on
LUP card
38
Lup_out 02
Sets physical output 2 on LUP
card
Resets physical output 2 on
LUP card
39
Lup_out 03
Sets physical output 3 on LUP
card
Resets physical output 3 on
LUP card
40
Lup_out 04
Sets physical output 4 on LUP
card
Resets physical output 4 on
LUP card
41
Lup_out 05
Sets physical output 5 on LUP
card
Resets physical output 5 on
LUP card
42
Lup_out 06
Sets physical output 6 on LUP
card
Resets physical output 6 on
LUP card
43
Lup_out 07
Sets physical output 7 on LUP
card
Resets physical output 7 on
LUP card
44
Reserved
45
Auxcmd 16
Sets Auxcmd 16
Resets Auxcmd 16
46
Auxcmd 17
Sets Auxcmd 17
Resets Auxcmd 17
47
Auxcmd 18
Sets Auxcmd 18
Resets Auxcmd 18
48
Auxcmd 19
Sets Auxcmd 19
Resets Auxcmd 19
49
Slak_tk_up
Issues Slack take up
Removes Slack take up
50
Slak_tk_dn
Issues Slack take down
Removes Slack take down
51 - 52
Reserved
53 - 88
Drop 2 command bits
89 - 124
Drop 3 command bits, etc.
Setpoint Bit and Register Table Formats
The start addresses for setpoint bits and setpoint registers that are specified in the
DATA_INIT_DLANA function block in DLAN_L define the beginning references for these
tables.
Each setpoint bit corresponds to a setpoint register. A setpoint change is commanded by storing
the new value in the setpoint register and then setting the corresponding setpoint bit. The
GFK-0729D
Chapter 3 The DLAN User Interface
1-9
3
setpoint bit is reset by the DLAN interface when the command is issued. The setpoint
bits/registers are defined as follows:
Broadcast setpoints: The first 8 setpoints are reserved for broadcast commands. The
Bit/Setpoint Number value for each table entry is relative to the setpoint bit start address for
setpoint bits and relative to the setpoint register start address for setpoint registers. For
example, the default address of the MMS_SETPT bit is %M00305, and the default address of
the MMS_SETPT register is %R00003.
Table 1-5. Broadcast Setpoints
Bit/Setpoint
Number
Mnemonic
Description
1
MMS_SETPT
MMS speed setpoint
2
SPEED_SETPT
Speed setpoint
3-8
Reserved
Drop command setpoints: The next 12 setpoints are reserved for drop one (1) commands,
followed by 12 setpoints for each additional drop. The total number of setpoint bits/registers is
(8 broadcast setpoints + (12 times the number of drives on the network)).
Table 1-6. Drop Setpoints
Bit/Setpoint
Number
1-10
Mnemonic
Description
9
MMS_SETPT
MMS speed setpoint
10
SPEED_SETPT
Speed setpoint
11
IRATIO_SETPT
Iratio setpoint
12
PROCESS_SETPT
Process setpoint
13
GAGE_SETPT
Winder gauge preset
14
WIDTH_PRESET
Winder width preset
15
TENRF_SETPT
Tension reference
16
PRESET_DIAM
Winder preset diameter
17
DRAWSETP
Draw Setpoint
18 - 20
Reserved
21 - 32
Drop 2 bits/setpoints
33 - 44
Drop 3 bits/setpoints, etc.
Series 90t-70 DLAN/DLAN+ Interface Module User’s Manual - March 1996
GFK-0729D
3
Status, Diagnostics and Feedback Table Format
The start address for status and diagnostic registers that is specified in the DATA_INIT_DLAN
A function block in DLAN_L defines the beginning of these tables. The first 50 registers are
reserved for status and diagnostic information. They are followed by the feedback variables for
each drop, as shown in the following tables. The Register Number value for each table entry is
relative to the start address of the table. For example, the default address of LAN_STATUS_1
is %R00101.
Table 1-7. Status Registers
Register
Number
1
2
3
4
GFK-0729D
Mnemonic
Description
LAN_STATUS_1
BIT
1 - READY
2 - RUN
3 - ENABLED
4 - Q_FULL
5 - 16
Status Bits:
LAN_STATUS_2
BIT
1 - 16
Status Bits:
LAN_ERROR_1
BIT
1 - INVCC
2 - NLCFG
3 - UDDIAL
4 - NSCFG
5 - INVIP
6-7
8 - MDIALE
Power up diagnostics complete
DLAN card configuration complete
DLAN card communicating on the network
Network command queue full
Reserved
Reserved
Configuration errors:
Invalid configuration command
No LAN configuration
Undefined dialect
Invalid configuration
Invalid internal page
Reserved
Maximum number of dialects exceeded
9 - SMIF
10 - UADPR
11 - ICDB
12 - DBFI
13 - SRAM
Initialization errors:
Shared memory interface failure
Unable to allocate dual port RAM
Incorrect daughter board
Daughter board failed to initialize
Daughter board shared RAM failure
14 - 16
Reserved
LAN_ERROR_2
BIT
1 - INVLC
2 - DBWD
3 - HOSTWD
4 - IPUPDF
5 - INVIM
6-8
9 - 16
Run time errors:
Invalid LAN command
Daughter board watchdog timeout
Host watchdog timeout
Internal page update failure
Invalid internal page marker
Reserved
Reserved
5
UPDATE_CTR
Feedback update counter
6
FAILED_2_ACK
Last drop number that failed to acknowledge
7
DYNGRPA
Dynamic group membership (16 - 01)
8
DYNGRPB
Dynamic group membership (32 - 17)
9
Reserved
10
LUV_VUP_FAULT
Chapter 3 The DLAN User Interface
DLAN card fault code
1-11
3
Link Presence Bits: The bits in these registers are set to one when the corresponding drop is
present on the network.
Table 1-8. Link Presence Bits
Register
Number
Bit Numbers
Corresponding Drops
11
16 - 1
Drops 15 -
12
16 - 1
Drops 31 - 16
0
13
16 - 1
Drops 47 - 32
14
16 - 1
Drops 63 - 48
15
16 - 1
Drops 79 - 64
16
16 - 1
Drops 95 - 80
17
16 - 1
Drops 111 - 96
18
16 - 1
Drops 127 - 112
19
16 - 1
Drops 143 - 128
20
16 - 1
Drops 159 - 144
21
16 - 1
Drops 175 - 160
22
16 - 1
Drops 191 - 176
23
16 - 1
Drops 207 - 192
24
16 - 1
Drops 223 - 208
25
16 - 1
Drops 239 - 224
26
16 - 1
Drops 255 - 240
Diagnostics Registers: The INV_CMND_NUM, UNDEF_SIGNAL, and INV_SIGNAL
registers contain non-zero values only when the corresponding error bits in LAN_ERROR_1 or
LAN_ERROR_2 are set.
Table 1-9. Diagnostic Registers
Register
Number
1-12
Mnemonic
Description
27
INV_CMND_NUM
Invalid command number - zero unless bit 1 of LAN_ERROR_1 or bit 1 of LAN_ERROR_2 is set.
28
UNDEF_SIGNAL
Undefined signal number (invalid dialect) - zero unless bit 3
of LAN_ERROR_1 is set.
29
INV_SIGNAL
Invalid signal number (invalid internal page) - zero unless bit
5 of LAN_ERROR_1 is set.
30
NUM_SIGNALS
Number of signals configured - always valid.
Series 90t-70 DLAN/DLAN+ Interface Module User’s Manual - March 1996
GFK-0729D
3
Page Presence Bits: Each bit in these registers is set to one when data in the corresponding
page is present on the network (applies to Arcnet only).
Table 1-10. Page Presence Bits
Register
Number
Bit Numbers
Corresponding Pages
31
16 - 1
Pages 15 -
32
16 - 1
Pages 31 - 16
0
33
16 - 1
Pages 47 - 32
34
16 - 1
Pages 63 - 48
35
16 - 1
Pages 79 - 64
36
16 - 1
Pages 95 - 80
37
16 - 1
Pages 111 - 96
38
16 - 1
Pages 127 - 112
39
16 - 1
Pages 143 - 128
40
16 - 1
Pages 159 - 144
41
16 - 1
Pages 175 - 160
42
16 - 1
Pages 191 - 176
43
16 - 1
Pages 207 - 192
44
16 - 1
Pages 223 - 208
45
16 - 1
Pages 239 - 224
46
16 - 1
Pages 255 - 240
47 - 50
Reserved
Broadcast Feedback Variables: The first 10 feedback variables are reserved for broadcast
commands. By default, the address of ACTION_0 is %R00151.
Table 1-11. Broadcast Feedback Registers
Register
Number
GFK-0729D
Mnemonic
Description
51
ACTION_0
52
RUP_IN_0
53
MMS_SETPT
MMS speed setpoint
54
SPEED_SETPT
Speed setpoint
55 - 60
Reserved
Chapter 3 The DLAN User Interface
1-13
3
Drop Feedback Variables: The broadcast feedback variables are followed by 34 feedback
variables for each drop. The total number of status and feedback registers is 50 status + 10
broadcast + (34 times the number of drives on the network)).
Table 1-12. Drop Feedback Registers
Register
Number
Description
61
ACTION_0
Reserved
62
RUP_IN_0
Bit
1- 2
3
4
5
6
7
8
9
10 - 12
13
14
15
16
Command status:
RUP_IN_1
Bit
1- 6
7
8 - 10
11
12 - 16
Command status
LUP_OUT
Bit
1
2
3
4
5
6
7
8 - 16
LUP output status
AUXCMD
Bit
1
2
3
4
5 - 16
Auxcmd status
ACTION_1
Bit
1-6
7
8
9 - 16
Command Status
67
MMS_SETPT
MMS speed setpoint
68
SPEED_SETPT
Speed setpoint
63
64
65
66
1-14
Mnemonic
Reserved
Drive run command
Reverse command
Slow command
Reserved
Run 1 commanded
Run 2 commanded
Reference inhibit commanded
Reserved
Motor 1 commanded
Motor 2 commanded
Diameter hold active
Reserved
Reserved
Recalibrate current limit commanded
Reserved
Auto reference selected
Reserved
LUP output 1
LUP output 2
LUP output 3
LUP output 4
LUP output 5
LUP output 6
LUP output 7
Reserved
Auxcmd 16
Auxcmd 17
Auxcmd 18
Auxcmd 19
Reserved
Reserved
Slack take up commanded
Slack take down commanded
Reserved
Series 90t-70 DLAN/DLAN+ Interface Module User’s Manual - March 1996
GFK-0729D
3
Table 3-12. Drop Feedback Registers (continued)
Register
Number
Description
69
IRATIO_SETPT
Iratio setpoint
70
PROCESS_SETPT
Process setpoint
71
GAGE_SETPT
Gauge setpoint
72
WIDTH_PRESET
Width preset
73
TENRF_SETPT
Tension reference
74
PRESET_DIAM
Preset diameter
75
DRAWSETP
Draw setpoint
76 - 77
Reserved
78
AUXFBK16_31
Bit
1
2
3
4
5
6
7
8
9
10
11
12
13
14
15
16
Aux fbk status
COMB_BITS
Bit
1
2
3
4
5- 6
7
8
9
10
11
12
13
14
15 - 16
Drive status
79
GFK-0729D
Mnemonic
Chapter 3 The DLAN User Interface
Aux fbk bit 16
Aux fbk bit 17
Aux fbk bit 18
Aux fbk bit 19
Aux fbk bit 20
Aux fbk bit 21
Aux fbk bit 22
Aux fbk bit 23
Aux fbk bit 24
Aux fbk bit 25
Aux fbk bit 26
Aux fbk bit 27
Aux fbk bit 28
Aux fbk bit 29
Aux fbk bit 30
Aux fbk bit 31
Run fwd active
Run rev active
Jog fwd active
Jog rev active
Reserved
Slow fwd active
Slow rev active
Stop active
Maint locked
Speed active
Draw active
Current active
Process active
Reserved
1-15
3
Table 3-12. Drop Feedback Registers (continued)
Register
Number
80
81
1-16
Mnemonic
RUP_OUT_0
Bit
1
2
3
4
5
6
7
8
9
10
11
12 - 16
Description
Drive status
No fault (1 = nofault)
Trip fault (1 = fault)
or winning speed
run active
jog active
ma closed
reserved
preconditioned
reference enabled
running
zero speed
reserved
LUP_IN
Bit
1
2
3
4
5
6
7
8
9
10
11
12
13
14
15 - 16
LUP in 01 status
LUP in 02 status
LUP in 03 status
LUP in 04 status
LUP in 05 status
LUP in 06 status
LUP in 07 status
LUP in 08 status
LUP in 09 status
LUP in 10 status
LUP in 11 status
LUP in 12 status
LUP in 13 status
LUP in 14 status
Reserved
82
FAULT
Drive fault code
83
LCPSFB
Speed feedback
84
FDIAMFDB
Diameter feedback
85
VFB
Voltage feedback
86
LCPCFB
Current feedback
87
FLDFB
Field current feedback
88
POSFDBK
Position Feedback
89 - 94
Reserved
95 - 128
Drop 2 feedback variables
129 - 162
Drop 3 feedback variables, etc.
Series 90t-70 DLAN/DLAN+ Interface Module User’s Manual - March 1996
GFK-0729D
3
Section 3: Using the DLAN Interface Program
A DLAN interface program for Logicmaster 90-70 is provided as a part of the DLAN/DLAN+
Interface Module product. See The DLAN Interface Program in section 1 of this chapter for an
overview of the program.
What the GE_DLAN Program Provides
The interface program is installed in a Logicmaster 90-70 folder named GE_DLAN. The MAIN
program in GE_DLAN is not a complete DLAN application. It contains only the interface logic
that will enable a PLC application program to monitor and control DLAN drives. Other logic
must be added to make use of the interface.
Adding Application-Specific Logic To the GE_DLAN Program
There are two ways to use the GE_DLAN folder:
1.
You can create a new folder and copy the contents of the GE_DLAN folder to it. Then,
you can add new logic for your application to the program that was copied.
2.
You can add the interface logic in the GE_DLAN folder to an existing application in
another folder. To do this, first export the DLAN_L, DCONFIG, and DLAN_C blocks
from GE_DLAN to a Logicmaster 90-70 library. Then import these blocks into the other
folder. Finally, add a CALL to DLAN_L to the existing application at a location that will
assure that DLAN_L is called once per program sweep.
See the Logicmastert 90-70 Programming Software User’s Manual, GFK-0263, for
information on these procedures.
GE_DLAN Program Structure
GE_DLAN contains a MAIN program plus blocks named DLAN_L, DCONFIG, and DLAN_C.
Figure 3-1 shows the block calling structure of the GE_DLAN program.
MAIN
DCONFIG
DLAN_L
DLAN_C
Figure 1-1. GE_DLAN Interface Program Structure
GFK-0729D
Chapter 3 The DLAN User Interface
1-17
3
The MAIN Program
Figure 3-2 shows the trivial logic sequence of the MAIN program of GE_DLAN.
Call DLAN_L
MAIN
Figure 1-2. GE_DLAN MAIN Program Flow
The DLAN_L Program Block
DLAN_L is called once from the MAIN program during every PLC sweep. Each time it is
called, DLAN_L performs this sequence of operations:
1.
If necessary, initialize DLAN_L data and the DLAN module.
2.
Update global status data.
3.
Update global feedback data.
4.
Configure DLAN module.
5.
Service commands
The DLAN_C External Block
DLAN_C performs all the command processing and communication functions of the interface.
It is implemented in the C programming language to make it fast and efficient.
Adding a DLAN Application Block
To make a working DLAN application, other processing steps must be added. The details of
these additional steps will vary, depending on your application.
The preferred method of adding these processing steps is to put them into a program block of
their own. The application block must be called once each PLC sweep either from MAIN or
another program block. Figure 3-3 shows how to add a block named USR_APP to MAIN.
Additional program logic may also be added to MAIN, if necessary.
1-18
Series 90t-70 DLAN/DLAN+ Interface Module User’s Manual - March 1996
GFK-0729D
3
Call USR_APP
Call DLAN_L
( Additional processing
if desired )
MAIN
Figure 1-3. Program Flow
What the DLAN Application Block Needs to Do
Every DLAN application block needs to carry out at least these steps:
1.
Evaluate network status
2.
Evaluate feedback data
3.
Set command bits
4.
Assign setpoint data
These steps are described in the following sections.
Evaluate Network Status
Link presence bits and Network diagnostics status values should be checked on every program
sweep. Safety requirements for your application may require specific actions based on these
values.
Evaluate Feedback Data
Feedback data values from DLAN drives should also be checked on each sweep. These values
often determine what commands and setpoint changes will need to be made on the next sweep.
Set Command Bits
In this step, appropriate commands are enabled by setting the corresponding bits in the
Command Bit Table. The choice of appropriate commands and the conditions that should
enable them will depend on the specific requirements of your application.
Assign Setpoint Data
In this processing step, the Setpoint Value Table is updated with new setpoint values, and the
corresponding bits in the Setpoint Bit Table are set. Other setpoint bits may also need to be set
to correct discrepancies between the Setpoint Value Table and the corresponding setpoint values
in the Feedback Table.
GFK-0729D
Chapter 3 The DLAN User Interface
1-19
Index
A
I/O configuration rack screen, 2-8
with Logicmaster 90-70 software, 2-8
Adding a DLAN application block, 3-18
Connector, DLAN network, 1-4
Adding a DLAN interface to the rack screen,
2-9
Connectors, 25-pin (not used), 1-5
Controllers, 1-1
Allocation and configuration, 3-5
Application block
assigns setpoint data, 3-19
evaluates feedback data, 3-19
evaluates LAN status, 3-19
sets command bits, 3-19
D
Data allocation and configuration, 3-5
DATA IN LED, 1-4
Application block, adding, 3-18
Data pages, 1-1
Applications, DLAN, 1-2
Data, global, 3-7
Arcnet, 1-1
Data, user configuration, 3-6
Assign setpoint data, 3-19
Diagnostic registers, 3-12
Dialect, 1-1
B
Basics, DLAN, 1-1
Diskette, distribution, 2-11
Battery, 1-4
Distribution diskette, 2-11
Bits, page presence, 3-13
DLAN, 1-1
application, hardware requirements, 1-2
applications, 1-2, 3-5
basics, 1-1
configuration, 1-6
interface module functions, 1-2
module description, 1-3
Block
application, 3-18
DLAN_C external, 3-18
DLAN_L program, 3-18
Broadcast command bits, 3-8
Broadcast feedback registers, 3-13
Bus receiver module (BRM), 2-3
Bus transmitter module (BTM), 2-3
C
Command bit table format, 3-7
broadcast bits, 3-8
drop command bits, 3-8
Command bits, set, 3-19
COMMAND OUT LED, 1-4
Configuration data, user, 3-6
DLAN application block
adding, 3-18
assign setpoint data, 3-19
evaluate feedback data, 3-19
evaluate LAN status, 3-19
set command bits, 3-19
DLAN Configuration Jumpers, 1-5
DLAN interface program
interface rules, 3-2
program components, 3-2
DCONFIG block, 3Ć3
DLAN_C external block, 3Ć3
DLAN_L block, 3Ć2
MAIN program, 3Ć2
using, 3-17
Configuration, user, 3-5
DLAN jumper configuration, 2-5
Configuring DLAN jumpers, 2-5
DLAN module
battery, 1-4
COMMAND OUT LED, 1-4
configuration jumpers, 1-5, 2-5
Configuring the DLAN module, 1-6
adding a DLAN module to the rack screen,
2-9
GFK-0729C
Discrete temporary references, limitations,
3-5
Index-1
Index
DATA IN LED, 1-4
LED indicators, 1-3
network connector, 1-4
OK LED, 1-3
watchdog timer, 1-4
DLAN network connector, 1-4
DLAN+, 1-1
DLAN_C external block, 3-18
Drop command bits, 3-8
Drop command setpoints, 3-10
Drop feedback registers, 3-14
E
Evaluate feedback data, 3-19
Evaluate LAN status, 3-19
External block, DLAN_C, 3-18
F
Feedback data, evaluate, 3-19
DLAN configuration jumpers, 1-5
DLAN module description, 1-3
DLAN network connector, 1-4
installing other modules, 2-3
installing the DLAN hardwaree, 2-3
LED indicators, 1-3
OK LED, 1-3
steps for installation, 2-4
watchdog timer, 1-4
what you will need, 2-2
Hardware requirements, 1-2
I
I/O configuration rack screen, 2-8
Installing the DLAN interface, 2-1
configuring with Logicmaster 90-70
software, 2-8
creating a PLC ladder diagram, 2-11
installing other modules, 2-3
installing the DLAN hardware, 2-3
installing the folder, 2-11
steps for installation, 2-4
what you will need, 2-2
Interface module functions, 1-2
Folders, Logicmaster 90-70, 2-11
Functions, DLAN interface module, 1-2
G
J
Jumper configuration, DLAN, 2-5
Jumpers, DLAN configuration, 1-5
GE Drive Systems, 1-1
GE_DLAN interface program
adding application specific logic, 3-17
contents of, 3-17
program structure
DLAN_C external block, 3Ć18
DLAN_L program block, 3Ć18
MAIN program, 3Ć17
Global data, 3-7
command bit table format, 3-7
setpoint bit, 3-10
L
LAN status, evaluate, 3-19
LED indicators, 1-3
on Series 90-70 DLAN, 1-3
Limitations for discrete temporary references,
3-5
Link presence bits, 3-12
Local area network, 1-1
H
Hardware
battery, 1-4
COMMAND OUT LED, 1-4
DATA IN LED, 1-4
Index-2
Logicmaster 90-70 software, 2-8
adding a DLAN interface to the rack
screen, 2-9
DLAN2 folder, 2-11
GE_DLAN folder, 2-11
I/O configuration rack screen, 2-8
NEWDLAN folder, 2-11
GFK-0729C
Index
M
Registers, broadcast feedback, 3-13
Registers, drop feedback, 3-14
Module description
COMMAND OUT LED, 1-4
DATA IN LED, 1-4
DLAN configuration jumpers, 1-5
LED indicators, 1-3
network connector, 1-4
OK LED, 1-3
restart pushbutton, 1-4
watchdog timer, 1-4
Restart pushbutton, 1-4
RS-485 termination resistors, 2-6
S
Selecting network type, 2-6
Selecting RS-485 termination resistors, 2-6
Module functions, 1-2
Set command bits, 3-19
Module hardware, restart pushbutton, 1-4
Setpoint bits and registers, 3-10
broadcast, 3-10
drop commands, 3-10
Monitor operation of DLAN devices, 2-11
N
Network connector, DLAN, 1-4
Network type, selecting, 2-6
O
OK LED, 1-3
Operation of DLAN devices, monitoring of,
2-11
Other modules, installing, 2-3
Overview, system, 1-1
P
Page presence bits, 3-13
Setpoint data, assign, 3-19
Setpoints
broadcast, 3-10
drop command, 3-10
Signals
command bits, 3-3
feedback, 3-4
link presence, 3-4
setpoints, 3-3
Status and diagnostic registers, 3-11
broadcast feedback variables, 3-13
diagnostic registers, 3-12
drop feedback variables, 3-14, 3-15, 3-16
link presence bits, 3-12
page presence bits, 3-13
status registers, table of, 3-11
Status registers, 3-11
System overview, 1-1
Pages, data, 1-1
PLC data, description of, 3-5
PLC global data, 3-7
T
Transitional contacts, 3-5
Program block, DLAN_L, 3-18
Protocol
high speed, 1-1
multidrop serial, 1-1
Pushbutton, restart, 1-4
R
Rack screen, 2-8
Register table, 3-10
GFK-0729C
U
User configuration
changing values, 3-6
entering, 3-6
User configuration data, 3-5
network address of module, 3-5
network type (DLAN or DLAN+), 3-5
number of network drops, 3-6
rack and slot location, 3-5
Index-3
Index
starting PLC memory offsets, 3-6
table, 3-6
update rate for feedback signals, 3-6
V
Variables
broadcast feedback, 3-13
Index-4
drop feedback, 3-14
W
Watchdog timer, 1-4
GFK-0729C