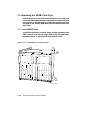
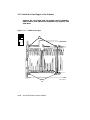
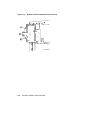
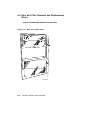
1
VAX 6000 Platform Service Manual
Order Number EK–600EA–MG–001
This manual is intended for Digital customer service
engineers. It covers the removal and replacement of
field-replaceable units (FRUs) in the H9657-CA/CB/
CU cabinet.
digital equipment corporation
maynard, massachusetts
First Printing, December 1990
The information in this document is subject to change without notice and should not be
construed as a commitment by Digital Equipment Corporation.
Digital Equipment Corporation assumes no responsibility for any errors that may appear in
this document.
The software, if any, described in this document is furnished under a license and may be used
or copied only in accordance with the terms of such license. No responsibility is assumed
for the use or reliability of software or equipment that is not supplied by Digital Equipment
Corporation or its affiliated companies.
Copyright ©1990 by Digital Equipment Corporation.
All Rights Reserved.
Printed in U.S.A.
dt
The following are trademarks of Digital Equipment Corporation:
DEMNA
DEC
DEC LANcontroller
DECnet
DECUS
PDP
ULTRIX
UNIBUS
VAX
VAXBI
VAXcluster
VAXELN
VMS
XMI
FCC NOTICE: The equipment described in this manual generates, uses, and may emit
radio frequency energy. The equipment has been type tested and found to comply with the
limits for a Class A computing device pursuant to Subpart J of Part 15 of FCC Rules, which
are designed to provide reasonable protection against such radio frequency interference when
operated in a commercial environment. Operation of this equipment in a residential area
may cause interference, in which case the user at his own expense may be required to take
measures to correct the interference.
Contents
Preface
xi
Chapter 1 Introduction
1.1
1.2
1.3
1.4
System Physical Description
System Front View . . . . . . . .
System Rear View . . . . . . . .
Field-Replaceable Units . . . .
.
.
.
.
.
.
.
.
.
.
.
.
.
.
.
.
.
.
.
.
.
.
.
.
.
.
.
.
.
.
.
.
.
.
.
.
.
.
.
.
.
.
.
.
.
.
.
.
.
.
.
.
.
.
.
.
.
.
.
.
.
.
.
.
.
.
.
.
.
.
.
.
.
.
.
.
.
.
.
.
.
.
.
.
.
.
.
.
.
.
.
.
.
.
.
.
. 1–2
. 1–6
. 1–8
. 1–10
Chapter 2 XMI Card Cage
2.1
XMI Card Cage Description . . . . . . . . . . . . . . . . . . . . . . . . .
2.1.1
System Use . . . . . . . . . . . . . . . . . . . . . . . . . . . . . . . . . . .
2.1.2
XMI Card Cage Specifications . . . . . . . . . . . . . . . . . . . . .
2.2
Removing the XMI Card Cage . . . . . . . . . . . . . . . . . . . . . . .
2.2.1
Prepare for Removal . . . . . . . . . . . . . . . . . . . . . . . . . . . .
2.2.2
Remove the XMI Card Cage from the Cabinet . . . . . . . . .
2.2.3
Remove the Daughter Card . . . . . . . . . . . . . . . . . . . . . . .
2.3
Replacing the XMI Card Cage . . . . . . . . . . . . . . . . . . . . . . .
2.3.1
Attach the Daughter Card . . . . . . . . . . . . . . . . . . . . . . . .
2.3.2
Install the Card Cage, Attach the Cables, and Insert the
Modules . . . . . . . . . . . . . . . . . . . . . . . . . . . . . . . . . . . . . .
2.4
Configuring Modules in Model 300 and 400 Systems . . . . . .
2.5
Configuring Modules in Model 500 Systems . . . . . . . . . . . . .
2.6
XMI Troubleshooting . . . . . . . . . . . . . . . . . . . . . . . . . . . . . .
.
.
.
.
.
.
.
.
.
2–2
2–2
2–4
2–6
2–6
2–10
2–12
2–14
2–14
.
.
.
.
2–16
2–18
2–20
2–22
iii
Chapter 3 VAXBI Card Cage
3.1
3.1.1
3.1.2
3.1.3
3.2
3.2.1
3.2.2
3.2.3
3.2.4
3.3
3.3.1
3.3.2
3.4
3.5
VAXBI Card Cage Description . . . . . . . . . .
System Use . . . . . . . . . . . . . . . . . . . . . .
VAXBI Card Cage Specifications . . . . . .
VAXBI Card Cage Subassemblies . . . . . .
Removing the VAXBI Card Cage . . . . . . . .
Prepare for Removal . . . . . . . . . . . . . . .
Remove the VAXBI Card Cages from the
Remove the VAXBI Bus Bars and FBE .
Remove Other VAXBI Parts . . . . . . . . . .
Replacing the VAXBI Card Cage . . . . . . . .
Install VAXBI Parts . . . . . . . . . . . . . . . .
Install the Card Cages in the Cabinet . .
VAXBI Expansion and Configuration Rules
VAXBI Troubleshooting . . . . . . . . . . . . . . .
..............
..............
..............
..............
..............
..............
Cabinet . . . . . . .
..............
..............
..............
..............
..............
..............
..............
3–2
3–2
3–4
3–6
3–8
3–8
3–10
3–12
3–14
3–16
3–16
3–18
3–20
3–22
Chapter 4 System Control Assembly
4.1
4.2
4.3
4.4
4.5
4.6
4.7
4.8
4.9
4.10
iv
System Control Assembly Specifications . . . . . . . . . .
System Control Assembly Removal and Replacement
XTC Power Sequencer Specifications . . . . . . . . . . . . .
XTC Removal and Replacement . . . . . . . . . . . . . . . . .
Control Panel Assembly Specifications . . . . . . . . . . . .
Control Panel Assembly Removal and Replacement .
Filter Board and TOY Clock Battery Specifications . .
Filter Board and TOY Clock Battery Removal and
Replacement . . . . . . . . . . . . . . . . . . . . . . . . . . . . . . . .
Tape Drive Specifications . . . . . . . . . . . . . . . . . . . . . .
Tape Drive Removal and Replacement . . . . . . . . . . . .
.
.
.
.
.
.
.
.
.
.
.
.
.
.
.
.
.
.
.
.
.
.
.
.
.
.
.
.
.
.
.
.
.
.
.
.
.
.
.
.
.
.
4–2
4–4
4–8
4–10
4–12
4–14
4–16
. . . . . . 4–18
. . . . . . 4–20
. . . . . . 4–22
Chapter 5 Power Subsystem
5.1
Power Subsystem Design . . . . . . . . . . . . . . . . . . . . . . . . . .
5.2
Power Specifications . . . . . . . . . . . . . . . . . . . . . . . . . . . . . .
5.3
Power Modules . . . . . . . . . . . . . . . . . . . . . . . . . . . . . . . . . .
5.4
H7214 Power Regulator . . . . . . . . . . . . . . . . . . . . . . . . . . .
5.5
H7214 Power Regulator Removal and Replacement . . . . . .
5.6
H7215 Power Regulator . . . . . . . . . . . . . . . . . . . . . . . . . . .
5.7
H7215 Power Regulator Removal and Replacement . . . . . .
5.8
H7242 Power Regulator . . . . . . . . . . . . . . . . . . . . . . . . . . .
5.9
H7242 Power Regulator Removal and Replacement . . . . . .
5.10 H7206-B Power and Logic Unit . . . . . . . . . . . . . . . . . . . . .
5.10.1 Specifications . . . . . . . . . . . . . . . . . . . . . . . . . . . . . . . . .
5.10.2 H7206-B Power and Logic Unit Switches and Indicators
5.11 H7206-B Power and Logic Unit Removal and Replacement
5.12 H7206-B Fan Removal and Replacement . . . . . . . . . . . . . .
5.13 H405 AC Power Controller . . . . . . . . . . . . . . . . . . . . . . . . .
5.14 H405 AC Power Controller Removal and Replacement . . .
5.15 50 Hz Transformer . . . . . . . . . . . . . . . . . . . . . . . . . . . . . . .
5.16 50 Hz Transformer Removal and Replacement . . . . . . . . .
5.17 H7236-A Battery Backup Unit . . . . . . . . . . . . . . . . . . . . . .
5.18 H7236-A Battery Backup Unit Removal and Replacement
5.18.1 Fan Removal and Replacement . . . . . . . . . . . . . . . . . . .
5.18.2 Battery Pack Removal . . . . . . . . . . . . . . . . . . . . . . . . . .
5.18.3 Battery Pack Replacement . . . . . . . . . . . . . . . . . . . . . . .
5.18.4 Enclosure Removal and Replacement . . . . . . . . . . . . . . .
.
.
.
.
.
.
.
.
.
.
.
.
.
.
.
.
.
.
.
.
.
.
.
.
.
.
.
.
.
.
.
.
.
.
.
.
.
.
.
.
.
.
.
.
.
.
.
.
5–2
5–4
5–6
5–8
5–10
5–12
5–14
5–16
5–18
5–20
5–20
5–22
5–24
5–26
5–28
5–30
5–32
5–34
5–36
5–38
5–38
5–40
5–42
5–44
.
.
.
.
.
.
.
.
.
.
.
.
.
.
.
.
6–2
6–4
6–6
6–8
6–10
6–12
6–14
6–16
Chapter 6 Cabinet and Airflow Subsystem
6.1
6.2
6.3
6.4
6.5
6.6
6.7
6.8
Door and Filter Removal and Replacement (Front)
Door and Filter Removal and Replacement (Rear) .
Airflow Sensor Removal and Replacement . . . . . . .
Temperature Sensor Removal and Replacement . .
Blower Assembly Specifications . . . . . . . . . . . . . . .
Blower Assembly, Front and Rear . . . . . . . . . . . . .
Blower Assembly Removal and Replacement . . . . .
Side Panel Removal . . . . . . . . . . . . . . . . . . . . . . . .
.
.
.
.
.
.
.
.
.
.
.
.
.
.
.
.
.
.
.
.
.
.
.
.
.
.
.
.
.
.
.
.
.
.
.
.
.
.
.
.
.
.
.
.
.
.
.
.
v
Appendix A Cable List
Appendix B XMI Backplane Connectors
Appendix C Module Handling
C.1
C.2
Handling Modules . . . . . . . . . . . . . . . . . . . . . . . . . . . . . . . . .
Inserting Modules . . . . . . . . . . . . . . . . . . . . . . . . . . . . . . . . .
C–2
C–4
Appendix D VAX 6000 Platforms
Index
Figures
1–1
1–2
1–3
2–1
2–2
2–3
2–4
2–5
2–6
2–7
2–8
2–9
2–10
2–11
2–12
2–13
3–1
3–2
3–3
vi
Sample <REFERENCE>(VAX_XXXX) System . . .
System Front View . . . . . . . . . . . . . . . . . . . . . . . .
System Rear View . . . . . . . . . . . . . . . . . . . . . . . .
XMI Card Cage Connections . . . . . . . . . . . . . . . .
XMI Card Cage . . . . . . . . . . . . . . . . . . . . . . . . . .
XMI Backplane Cables and Power Connections . .
Control/Status Cable . . . . . . . . . . . . . . . . . . . . . .
XMI Backplane Diagram . . . . . . . . . . . . . . . . . . .
XMI Card Cage . . . . . . . . . . . . . . . . . . . . . . . . . .
XMI Daughter Card . . . . . . . . . . . . . . . . . . . . . . .
XMI Daughter Card . . . . . . . . . . . . . . . . . . . . . . .
XMI Card Cage . . . . . . . . . . . . . . . . . . . . . . . . . .
Numbering of XMI Slots . . . . . . . . . . . . . . . . . . .
XMI Configuration Rules for Models 300 and 400
Numbering of XMI Slots . . . . . . . . . . . . . . . . . . .
XMI Configuration Rules for Model 500 . . . . . . . .
VAXBI Card Cage Connections . . . . . . . . . . . . . .
VAXBI Card Cages . . . . . . . . . . . . . . . . . . . . . . . .
VAXBI Card Cage Subassemblies . . . . . . . . . . . . .
.
.
.
.
.
.
.
.
.
.
.
.
.
.
.
.
.
.
.
.
.
.
.
.
.
.
.
.
.
.
.
.
.
.
.
.
.
.
.
.
.
.
.
.
.
.
.
.
.
.
.
.
.
.
.
.
.
.
.
.
.
.
.
.
.
.
.
.
.
.
.
.
.
.
.
.
.
.
.
.
.
.
.
.
.
.
.
.
.
.
.
.
.
.
.
.
.
.
.
.
.
.
.
.
.
.
.
.
.
.
.
.
.
.
.
.
.
.
.
.
.
.
.
.
.
.
.
.
.
.
.
.
.
.
.
.
.
.
.
.
.
.
.
.
.
.
.
.
.
.
.
.
.
.
.
.
.
.
.
.
.
.
.
.
.
.
.
.
.
.
.
1–2
1–6
1–8
2–2
2–4
2–6
2–8
2–9
2–10
2–12
2–14
2–16
2–18
2–19
2–20
2–21
3–2
3–4
3–6
3–4
3–5
3–6
3–7
3–8
3–9
3–10
3–11
3–12
4–1
4–2
4–3
4–4
4–5
4–6
4–7
4–8
4–9
4–10
4–11
5–1
5–2
5–3
5–4
5–5
5–6
5–7
5–8
5–9
5–10
5–11
5–12
5–13
5–14
5–15
5–16
VAXBI Backplane Cables and Power Connections . . . . .
VAXBI Card Cages . . . . . . . . . . . . . . . . . . . . . . . . . . . . .
VAXBI Bus Bar Assembly . . . . . . . . . . . . . . . . . . . . . . .
VAXBI Flexible Backplane Extension . . . . . . . . . . . . . . .
VAXBI Backplane Components . . . . . . . . . . . . . . . . . . .
VAXBI Cage Mounting Plates . . . . . . . . . . . . . . . . . . . .
Installation of Foam Air Seals . . . . . . . . . . . . . . . . . . . .
VAXBI Card Cages . . . . . . . . . . . . . . . . . . . . . . . . . . . . .
Numbering of VAXBI Slots . . . . . . . . . . . . . . . . . . . . . . .
System Control Assembly . . . . . . . . . . . . . . . . . . . . . . .
System Control Assembly Removal (Rear) . . . . . . . . . . .
System Control Assembly Removal (Front) . . . . . . . . . .
XTC Power Sequencer . . . . . . . . . . . . . . . . . . . . . . . . . .
XTC Power Sequencer Removal . . . . . . . . . . . . . . . . . . .
Control Panel Assembly . . . . . . . . . . . . . . . . . . . . . . . . .
Control Panel Assembly Removal . . . . . . . . . . . . . . . . . .
Filter Board and TOY Clock Battery . . . . . . . . . . . . . . .
Filter Board and TOY Clock Battery Removal . . . . . . . .
Tape Drive . . . . . . . . . . . . . . . . . . . . . . . . . . . . . . . . . . .
Tape Drive Removal . . . . . . . . . . . . . . . . . . . . . . . . . . . .
Power Subsystem Design . . . . . . . . . . . . . . . . . . . . . . . .
DC Power Regulators in Cabinet (Rear View) . . . . . . . .
Location of Power Modules (Rear View) . . . . . . . . . . . . .
H7214 Power Regulators (Rear View) . . . . . . . . . . . . . .
H7214 Power Regulator Removal . . . . . . . . . . . . . . . . . .
H7215 Power Regulators (Rear View) . . . . . . . . . . . . . .
H7215 Power Regulator Removal . . . . . . . . . . . . . . . . . .
H7242 Power Regulator (Rear View) . . . . . . . . . . . . . . .
H7242 Power Regulator Removal . . . . . . . . . . . . . . . . . .
H7206-B Power and Logic Unit (Rear View) . . . . . . . . .
H7206-B Power and Logic Unit Switches and Indicators
H7206-B Power and Logic Unit Removal (Top View) . . .
H7206-B Fan Removal . . . . . . . . . . . . . . . . . . . . . . . . . .
H405 AC Power Controller (Rear View) . . . . . . . . . . . . .
H405 AC Power Controller Removal . . . . . . . . . . . . . . .
50 Hz Transformer (Front View) . . . . . . . . . . . . . . . . . .
.
.
.
.
.
.
.
.
.
.
.
.
.
.
.
.
.
.
.
.
.
.
.
.
.
.
.
.
.
.
.
.
.
.
.
.
.
.
.
.
.
.
.
.
.
.
.
.
.
.
.
.
.
.
.
.
.
.
.
.
.
.
.
.
.
.
.
.
.
.
.
.
.
.
.
.
.
.
.
.
.
.
.
.
.
.
.
.
.
.
.
.
.
.
.
.
.
.
.
.
.
.
.
.
.
.
.
.
.
.
.
.
.
.
.
.
.
.
.
.
.
.
.
.
.
.
.
.
.
.
.
.
.
.
.
.
.
.
.
.
.
.
.
.
3–8
3–10
3–12
3–13
3–14
3–15
3–16
3–18
3–20
4–2
4–4
4–6
4–8
4–10
4–12
4–14
4–16
4–18
4–20
4–22
5–2
5–4
5–6
5–8
5–10
5–12
5–14
5–16
5–18
5–20
5–22
5–24
5–26
5–28
5–30
5–32
vii
5–17
5–18
5–19
5–20
5–21
5–22
5–23
6–1
6–2
6–3
6–4
6–5
6–6
6–7
6–8
6–9
B–1
C–1
C–2
C–3
50 Hz Transformer Removal . . . . . . . . . . . . . . . . . . .
H7236-A Battery Backup Unit (Front View) . . . . . . .
H7236-A Battery Backup Unit (Rear View) . . . . . . . .
H7236-A BBU Fan Removal . . . . . . . . . . . . . . . . . . .
H7236-A BBU Battery Pack Removal . . . . . . . . . . . .
H7236-A Battery Backup Unit (Front View) . . . . . . .
H7236-A BBU Enclosure Removal . . . . . . . . . . . . . . .
Front Door (Inside View) . . . . . . . . . . . . . . . . . . . . . .
Rear Door (Inside View) . . . . . . . . . . . . . . . . . . . . . . .
Airflow Sensor (Front View) . . . . . . . . . . . . . . . . . . . .
Temperature Sensor (Front View) . . . . . . . . . . . . . . .
Blower Assembly . . . . . . . . . . . . . . . . . . . . . . . . . . . .
Front Blower . . . . . . . . . . . . . . . . . . . . . . . . . . . . . . .
Rear Blower . . . . . . . . . . . . . . . . . . . . . . . . . . . . . . . .
Blower Assembly Removal (Rear View) . . . . . . . . . . .
Side Panel Removal (Front View) . . . . . . . . . . . . . . . .
XMI Backplane Connector Numbering . . . . . . . . . . . .
Holding VAX 6000 Series Processor Modules . . . . . . .
Inserting the Scalar Processor in an XMI Card Cage .
Inserting the Vector Processor in an XMI Card Cage .
.
.
.
.
.
.
.
.
.
.
.
.
.
.
.
.
.
.
.
.
.
.
.
.
.
.
.
.
.
.
.
.
.
.
.
.
.
.
.
.
.
.
.
.
.
.
.
.
.
.
.
.
.
.
.
.
.
.
.
.
.
.
.
.
.
.
.
.
.
.
.
.
.
.
.
.
.
.
.
.
.
.
.
.
.
.
.
.
.
.
.
.
.
.
.
.
.
.
.
.
.
.
.
.
.
.
.
.
.
.
.
.
.
.
.
.
.
.
.
.
5–34
5–36
5–38
5–39
5–40
5–42
5–44
6–2
6–4
6–6
6–8
6–10
6–12
6–13
6–14
6–16
B–1
C–2
C–4
C–4
VAX 6000 Series Documentation . . . . . . . . . . . . . . . . . . . . . .
VAX 6000 Model Level Documentation . . . . . . . . . . . . . . . . .
Associated Documents . . . . . . . . . . . . . . . . . . . . . . . . . . . . . .
<REFERENCE>(VAX_XXXX) Series System Characteristics .
Field-Replaceable Units . . . . . . . . . . . . . . . . . . . . . . . . . . . . .
XMI Card Cage Assembly Specifications . . . . . . . . . . . . . . . .
XMI Card Cage Cables and Parts . . . . . . . . . . . . . . . . . . . . .
XMI Troubleshooting Checklist . . . . . . . . . . . . . . . . . . . . . . .
XMI Connector Cleaning Supplies . . . . . . . . . . . . . . . . . . . . .
VAXBI Card Cage Assembly Specifications . . . . . . . . . . . . . .
VAXBI Card Cage Cables . . . . . . . . . . . . . . . . . . . . . . . . . . . .
VAXBI Subassemblies and Tools Required . . . . . . . . . . . . . . .
VAXBI Torque Values . . . . . . . . . . . . . . . . . . . . . . . . . . . . . . .
VAXBI Troubleshooting Checklist . . . . . . . . . . . . . . . . . . . . .
xiii
xiv
xiv
1–4
1–10
2–4
2–5
2–22
2–23
3–5
3–5
3–7
3–7
3–22
Tables
1
2
3
1–1
1–2
2–1
2–2
2–3
2–4
3–1
3–2
3–3
3–4
3–5
viii
3–6
4–1
4–2
4–3
4–4
4–5
4–6
5–1
5–2
5–3
5–4
5–5
5–6
5–7
5–8
5–9
5–10
5–11
5–12
6–1
6–2
6–3
6–4
6–5
6–6
A–1
D–1
VAXBI Connector Cleaning Supplies . . . . . . . . . .
System Control Assembly Specifications . . . . . . .
XTC Power Sequencer Specifications . . . . . . . . . .
Control Panel Assembly Specifications . . . . . . . . .
Filter Board Specifications . . . . . . . . . . . . . . . . . .
TOY Clock Battery Specifications . . . . . . . . . . . .
TK Tape Drive Assembly Specifications . . . . . . . .
XMI Side—DC Output Specifications . . . . . . . . . .
VAXBI Side—DC Output Specifications . . . . . . . .
AC Output Specifications . . . . . . . . . . . . . . . . . . .
Power Modules . . . . . . . . . . . . . . . . . . . . . . . . . . .
H7214 Power Regulator Specifications . . . . . . . . .
H7215 Power Regulator Specifications . . . . . . . . .
H7242 Power Regulator Specifications . . . . . . . . .
H7206-B Power and Logic Unit Specifications . . .
H7206-B LEDs . . . . . . . . . . . . . . . . . . . . . . . . . . .
H405 AC Power Controller Specifications . . . . . .
50 Hz Transformer Specifications . . . . . . . . . . . . .
H7236-A Battery Backup Unit Specifications . . . .
Front Cabinet Door and Air Filter Specifications .
Rear Cabinet Door and Air Filter Specifications .
Airflow Sensor Specifications . . . . . . . . . . . . . . . .
Temperature Sensor Specifications . . . . . . . . . . . .
Blower Assembly Specifications . . . . . . . . . . . . . .
Side Panel Specifications . . . . . . . . . . . . . . . . . . .
Cable List . . . . . . . . . . . . . . . . . . . . . . . . . . . . . .
VAX 6000 Platform Differences . . . . . . . . . . . . . .
.
.
.
.
.
.
.
.
.
.
.
.
.
.
.
.
.
.
.
.
.
.
.
.
.
.
.
.
.
.
.
.
.
.
.
.
.
.
.
.
.
.
.
.
.
.
.
.
.
.
.
.
.
.
.
.
.
.
.
.
.
.
.
.
.
.
.
.
.
.
.
.
.
.
.
.
.
.
.
.
.
.
.
.
.
.
.
.
.
.
.
.
.
.
.
.
.
.
.
.
.
.
.
.
.
.
.
.
.
.
.
.
.
.
.
.
.
.
.
.
.
.
.
.
.
.
.
.
.
.
.
.
.
.
.
.
.
.
.
.
.
.
.
.
.
.
.
.
.
.
.
.
.
.
.
.
.
.
.
.
.
.
.
.
.
.
.
.
.
.
.
.
.
.
.
.
.
.
.
.
.
.
.
.
.
.
.
.
.
.
.
.
.
.
.
.
.
.
.
.
.
.
.
.
.
.
.
.
.
.
.
.
.
.
.
.
.
.
.
.
.
.
.
.
.
.
.
.
.
.
.
.
.
.
.
.
.
.
.
.
.
.
.
3–23
4–3
4–9
4–13
4–17
4–17
4–21
5–5
5–5
5–5
5–7
5–9
5–13
5–17
5–21
5–23
5–29
5–33
5–37
6–3
6–5
6–6
6–9
6–11
6–17
A–1
D–1
ix
Preface
Intended Audience
This manual is written for Digital customer service engineers servicing
<REFERENCE>(VAX_XXXX) series systems.
Hardware Described
This manual describes removal and replacement of field-replaceable units
(FRUs) in the H9657-CA/CB/CU cabinet, one of two VAX 6000 platforms.
If you are not sure which platform you are servicing, see Appendix D in
this manual. If you need service information for the other platform, see
VAX 6000–400 Options and Maintenance or VAX 6200/6300 Options and
Maintenance.
Document Structure
The manuals in the <REFERENCE>(VAX_XXXX) documentation set are
designed using structured documentation theory. Each topic has a boldface
indented abstract, to help you use the manual as a reference tool. Other
typical components of a topic include an illustration or example, a chart or
list, and descriptive text.
This manual has six chapters and four appendixes:
•
Chapter 1, Introduction, gives an overview of the <REFERENCE>(6000)
platform, including specifications, field-replaceable units, and location
of major assemblies.
•
Chapter 2, <REFERENCE>(XMI) Card Cage, and Chapter 3,
VAXBI Card Cage, describe the system card cage and the optional I/O
card cage, respectively, and their removal and replacement procedures.
•
Chapter 4, System Control Assembly, presents the subassemblies
housed in the system control assembly area and gives the removal and
replacement instructions for each.
xi
•
Chapter 5, Power Subsystem, discusses each field-replaceable unit
of the power system, its diagnostics, and the removal and replacement
procedure for the unit.
•
Chapter 6, Cabinet and Airflow Subsystem, presents the fieldreplaceable units that are specific to the cabinet and their removal and
replacement instructions.
•
Appendix A, Cable List, lists the cables used in this platform.
•
Appendix B, XMI Backplane Connectors, shows the location and
pin numbering of XMI backplane connectors.
•
Appendix C, Module Handling, details handling requirements for
scalar and vector processor modules.
•
Appendix D, VAX 6000 Platforms, lists the differences between the
two VAX 6000 platforms.
Conventions Used in This Document
The icons shown below are used in illustrations for designating part
placement in <REFERENCE>(vax_xxXX) series systems. A shaded area
in the icon shows the location of the component or part being discussed.
FRONT
xii
REAR
<REFERENCE>(XXX) Documents
There are two sets of documentation: manuals that apply to all VAX 6000
series systems and manuals that are specific to one VAX 6000 model.
Table 1 lists the manuals in the VAX 6000 series documentation set.
Table 1: VAX 6000 Series Documentation
Title
Order Number
Operation
<REFERENCE>(XXX) Owner’s Manual
EK–600EA–OM
<REFERENCE>(XXX) Vector Processor Owner’s Manual
EK–60VAA–OM
<REFERENCE>(v6) Vector Processor Programmer’s Guide
EK–60VAA–PG
Service and Installation
<REFERENCE>(v6) Platform Technical User’s Guide
EK–600EA–TM
<REFERENCE>(XXX) Installation Guide
EK–600EA–IN
<REFERENCE>(v6) Installationsanleitung
EK–600GA–IN
<REFERENCE>(v6) Guide d’installation
EK–600FA–IN
<REFERENCE>(v6) Guia de instalacion
EK–600SA–IN
<REFERENCE>(v6) Platform Service Manual
EK–600EA–MG
Options and Upgrades
VAX 6000: XMI Conversion Manual
EK–650EA–UP
VAX 6000: Installing MS65A Memories
EK–MS65A–UP
VAX 6000: Installing the H7236-A Battery Backup Option
EK–60BBA–IN
VAX 6000: Installing the FV64A Vector Option
EK–60VEA–IN
VAX 6000: Installing the VAXBI Option
EK–60BIA–IN
Manuals specific to models are listed in Table 2.
xiii
Table 2: VAX 6000 Model Level Documentation
Title
Order Number
Models 200/300/400
VAX 6000 Model 300 and 400 Service Manual
EK–624EA–MG
VAX 6000: Installing Model 200/300/400 Processors
EK–6234A–UP
Model 500
<REFERENCE>(MX) Mini-Reference
EK–650EA–HR
<REFERENCE>(MX) Service Manual
EK–650EA–MG
<REFERENCE>(MX) System Technical User’s Guide
EK–650EA–TM
VAX 6000: Installing Model 500 Processors
EK–KA65A–UP
Associated Documents
Table 3 lists other documents that you may find useful.
Table 3: Associated Documents
Title
Order Number
System Hardware Options
VAXBI Expander Cabinet Installation Guide
EK–VBIEA–IN
VAXBI Options Handbook
EB–32255–46
System I/O Options
CIBCA User Guide
EK–CIBCA–UG
CIXCD Interface User Guide
EK–CIXCD–UG
DEC LANcontroller 200 Installation Guide
EK–DEBNI–IN
DEC LANcontroller 400 Installation Guide
EK–DEMNA–IN
InfoServer 100 Installation and Owners Guide
EK–DIS1K–IN
KDB50 Disk Controller User’s Guide
EK–KDB50–UG
xiv
Table 3 (Cont.): Associated Documents
Title
Order Number
System I/O Options
KDM70 Controller User Guide
EK–KDM70–UG
RRD40 Disc Drive Owner’s Manual
EK–RRD40–OM
RA90/RA92 Disk Drive User Guide
EK–ORA90–UG
SA70 Enclosure User Guide
EK–SA70E–UG
Operating System Manuals
Guide to Maintaining a VMS System
AA–LA34A–TE
Guide to Setting Up a VMS System
AA–LA25A–TE
Introduction to VMS System Management
AA–LA24A–TE
ULTRIX–32 Guide to System Exercisers
AA–KS95B–TE
VMS Upgrade and Installation Supplement: VAX 6000 Series
AA–LB36C–TE
VMS Networking Manual
AA–LA48A–TE
VMS System Manager’s Manual
AA–LA00A–TE
VMS VAXcluster Manual
AA–LA27B–TE
Peripherals
HSC Installation Manual
EK–HSCMN–IN
H4000 DIGITAL Ethernet Transceiver Installation Manual
EK–H4000–IN
Installing and Using the VT320 Video Terminal
EK–VT320–UG
RV20 Optical Disk Owner’s Manual
EK–ORV20–OM
SC008 Star Coupler User’s Guide
EK–SC008–UG
TA78 Magnetic Tape Drive User’s Guide
EK–OTA78–UG
TA90 Magnetic Tape Subsystem Owner’s Manual
EK–OTA90–OM
TK70 Streaming Tape Drive Owner’s Manual
EK–OTK70–OM
TU81/TA81 and TU/81 PLUS Subsystem User’s Guide
EK–TUA81–UG
xv
Table 3 (Cont.): Associated Documents
Title
Order Number
VAX Manuals
VAX Architecture Reference Manual
EY–3459E–DP
VAX Systems Hardware Handbook — VAXBI Systems
EB–31692–46
VAX Vector Processing Handbook
EC–H0739–46
xvi
Chapter 1
Introduction
This chapter introduces the <REFERENCE>(VAX_XXXX) series platform
(H9657 cabinet), its specifications, the location of components in the cabinet,
and the field-replaceable unit list. Sections include:
•
System Physical Description
•
System Front View
•
System Rear View
•
Field-Replaceable Units
Introduction
1–1
1.1 System Physical Description
A sample <REFERENCE>(VAX_XXXX) system has a main
cabinet, a console terminal and printer, storage cabinets, an
accessories kit, and a set of documentation.
Figure 1–1: Sample <REFERENCE>(VAX_XXXX) System
SYSTEM
CABINET
OPTIONAL
STORAGE
DEVICE
VT300 SERIES
TERMINAL
LA75
PRINTER
MANUALS
1–2
VAX 6000 Platform Service Manual
msb-0251-90
Figure 1–1 shows a sample system.
•
The main cabinet houses the XMI card cage (which contains the
processors, memories, and I/O adapters), the control panel switches,
status indicators, and restart controls. It may also house any of
these optional components: 12-slot VAXBI channel, console load device,
battery backup unit, and disks.
•
The storage cabinet has local storage and archiving capability.
•
The console terminal and printer are used for console and system
management operations.
•
<REFERENCE>(VAX_XXXX) documentation that ships with the
system includes:
—
<REFERENCE>(VAX_XXXX) Series Installation Guide
—
<REFERENCE>(VAX_XXXX) Series Owner’s Manual
—
<REFERENCE>(VAX_XXXX) Model 500 Mini-Reference (Model
500 systems only)
See the Preface for a complete list of system documentation and
associated documents.
Introduction
1–3
Table 1–1: <REFERENCE>(VAX_XXXX) Series System Characteristics
Physical
cm (in)
Height
154 (60.5)
Width
78 (30.5)
Depth
76 (30.0)
Weight
341 kg (750 lbs)
Environmental
Heat dissipation (max)
5440 Btu/hr (5712 KJ/hr)
Operating temperature
10o to 40o C (50o to 104o F)
Operating humidity
10% to 90% relative humidity
Altitude
Nonoperational
0 to 9.1 km (8000 to 30,000 ft)
Operating
0 to 2.4 km (0 to 8000 ft)
Type
Pressurized, with air moving device
Air mover
Dual backward curved blowers
Air source
Filtered ambient air
Cooling System
1–4
VAX 6000 Platform Service Manual
Table 1–1 (Cont.): <REFERENCE>(VAX_XXXX) Series System Characteristics
Electrical
1.4 kW1
AC power consumption (max)
AC current (max)
Voltage input
60 Hz
8 A (208 V)
50 Hz
4 A (416 V), 4.5 A (380 V)
60 Hz
3-phase 208 V RMS
50 Hz
3-phase 380/416 V RMS
Frequency tolerance
47–63 Hz
Surge current
60 A
1 Not
including single-phase power to disks or battery backup unit.
Introduction
1–5
1.2 System Front View
The control panel and optional console load device are on
the front of the system cabinet, accessible with the doors
closed. With the front door open, customer service engineers
can access the power regulators, <REFERENCE>(XMI) card
cage, the cooling system, and, if present, the VAXBI card
cages, battery backup unit, and disks.
Figure 1–2: System Front View
*
CONSOLE LOAD
DEVICE
CONTROL PANEL
VAXBI CARD
CAGES
*
XMI POWER REGULATORS
VAXBI POWER REGULATORS
XMI CARD CAGE
COOLING SYSTEM
POWER AND
LOGIC BOX
TRANSFORMER
(50 Hz SYSTEMS )
* OPTIONAL
1–6
VAX 6000 Platform Service Manual
BATTERY BACKUP UNIT
DISKS
*
*
msb-0311-90
*
These components are visible from the inside front of the cabinet (see
Figure 1–2 for their location):
•
Control panel
•
XMI power regulators
•
<REFERENCE>(XMI) card cage
•
Cooling system
One of the two blowers is visible from the front of the cabinet.
•
Power and logic unit
•
Transformer (on 50 Hz systems only)
•
Optional components:
Console load device
VAXBI power regulators
Two VAXBI card cages configured as one 12-slot channel
Battery backup unit
Disks
Introduction
1–7
1.3 System Rear View
With the rear door open, customer service engineers can
access the power sequencer module (XTC); the power
regulators; the I/O bulkhead space behind the card cages;
Ethernet and console terminal connectors; cooling system;
power and logic box; battery backup unit and disks, if
present; and the AC power controller.
Figure 1–3: System Rear View
XTC POWER
SEQUENCER MODULE
XMI POWER
REGULATORS
XMI
CARD CAGE
COOLING
SYSTEM
VAXBI POWER
REGULATORS
*
VAXBI
CARD CAGES *
ETHERNET AND
CONSOLE TERMINAL
CONNECTORS
POWER AND
LOGIC BOX
BATTERY
BACKUP UNIT *
DISKS *
AC POWER
CONTROLLER
* OPTIONAL
1–8
VAX 6000 Platform Service Manual
msb-0312-90
These components are visible from the rear of the cabinet (see Figure 1–3):
•
Power sequencer module (XTC) located on the back of the system control
assembly
•
XMI power regulators
•
I/O bulkhead space
The panel covering the <REFERENCE>(XMI) and VAXBI areas is the
I/O bulkhead panel and provides space for additional I/O connections.
•
XMI backplane and cables
•
Ethernet and console terminal connectors
•
Cooling system, with open grid over a blower
•
Power and logic unit
•
AC power controller
•
Optional components:
VAXBI power regulators
VAXBI backplane and cables
Battery backup unit
Disks
Introduction
1–9
1.4 Field-Replaceable Units
Table 1–2 lists the major recommended spares and their part
numbers for a <REFERENCE>(VAX_XXXX) series system.
Table 1–2: Field-Replaceable Units
Part
Number
Processors:
Adapters:
Recommended
Spare
Description
<REFERENCE>(Txxxx)
Y
CPU module (<REFERENCE>(XmP))
T2015
Y
CPU module (KA64A)
T2011-YA
Y
CPU module (KA62B)
T2017
Y
Vector module (FV64A)
T1043
Y
VAXBI adapter (DWMBB/B)
T2018
Y
VAXBI adapter (DWMBB/A)
1
Y
32-Mbyte memory (MS62A)
T2053-BA
Y
32-Mbyte memory (MS65A-BA)
T2053-CA
Y
64-Mbyte memory (MS65A-CA)
T2053-DA
Y
128-Mbyte memory (MS65A-DA)
H9400-AA
N
VAXBI card cage
<REFERENCE>(XMI) 70-24902-02
Card Cage:
N
XMI 14-slot card cage
54-18172-01
Y
XMI daughter card
54-16574-01
Y
Control panel assembly
20-29176-02
Y
XTC power sequencer
TK70
Y
Tape drive
12-19245-02
N
TOY clock battery
20-28997-01
N
TK50/TK70 filter board
H7214
Y
Regulator (+5V, +13.5V)
Memory:
VAXBI Card Cage:
System Control
Assembly:
Power Supply:
1 Not
T2014-B
supported in Model 500 systems.
1–10
VAX 6000 Platform Service Manual
Table 1–2 (Cont.): Field-Replaceable Units
Battery Backup:
Miscellaneous:
Part
Number
Recommended
Spare
Description
H7215
Y
Regulator (+12V, -12V, -5V, -2V)
H7242
Y
Regulator (+3.3V, +13.5V)
H7206-B
Y
Power and logic box
H405-E
N
60 Hz AC power controller
H405-F
N
50 Hz AC power controller
29-28263-01
N
Fan
29-28262-01
N
Battery pack
29-28264-01
N
Enclosure
12-11255-24
N
Air filter, front
12-11255-17
N
Air filter, rear
12-27848-01
N
Blower assembly
12-24701-06
N
H7206-B fan
17-01844-01
Y
Temperature sensor
12-25024-11
N
Airflow sensor
16-28393-01
N
Transformer (50 Hz only)
17-02522-01
N
H7242 inhibit cable
Introduction
1–11
Chapter 2
XMI Card Cage
This chapter describes the XMI card cage. Removal and replacement
procedures are detailed, and configuration restrictions are listed. Sections
include:
•
XMI Card Cage Description
System Use
Specifications
•
Removing the XMI Card Cage
•
Replacing the XMI Card Cage
•
Configuring Modules in Model 300 and 400 Systems
•
Configuring Modules in Model 500 Systems
•
XMI Troubleshooting
XMI Card Cage
2–1
2.1 XMI Card Cage Description
2.1.1 System Use
The XMI card cage provides the high-speed system
bus. Figure 2–1 is a simplified block diagram showing
physical connections between the XMI card cage and other
components in the cabinet.
Figure 2–1: XMI Card Cage Connections
H7215
H7214
CONSOLE
LOAD
DEVICE
H7242
XTC
XMI
VAXBI
CHASSIS
msb-0100A-90
2–2
VAX 6000 Platform Service Manual
The XMI card cage is a 14-slot cage with zero insertion force (ZIF)
connectors. The cage is 3 inches deeper than a VAXBI cage, providing
for larger XMI modules. The backplane area extends over three of the
five connector segments, which leaves two segments for I/O pins. Mounted
in the center rear of the XMI backplane is a daughter card that holds
the central arbiter chip. Four slots in the center of the cage have no I/O
connectors, so XMI I/O adapters cannot be installed in these slots.
For each optional VAXBI channel, there must be an XMI-to-VAXBI adapter.
This adapter (DWMBB) consists of two modules: a DWMBB/A module in
the XMI card cage and a DWMBB/B module in the VAXBI card cage. The
configuration rules are listed in the DWMBB chapter of the VAX 6000 Model
300 and 400 Service Manual and the VAX 6000 Model 500 Service Manual.
See the appropriate manual for the system you are servicing.
XMI Card Cage
2–3
2.1.2 XMI Card Cage Specifications
The XMI card cage has 14 slots and is located in the upper
part of the cabinet. The field-replaceable unit (70-24902-02)
does not include the daughter card.
Figure 2–2: XMI Card Cage
FRONT
XMI CARD CAGE
msb-0140A-90
Table 2–1: XMI Card Cage Assembly Specifications
Parameter
Description
Part Number:
70-24902-02, 14-slot cage with no daughter card
Location:
Upper right front
Dimensions:
12" H x 10 1/2" W x 12 1/4" L
Weight:
29 lbs
Power:
H7214, H7215, and H7242 DC regulators
Service From:
Front and rear of cabinet
2–4
VAX 6000 Platform Service Manual
Table 2–2: XMI Card Cage Cables and Parts
Item
Part Number
Description
Cables:
17-01525-01
XMI to H7214 and H7242
17-01566-01
XMI to J3 of H7215
17-01568-02
XMI to J4 of XTC, 20-pin ribbon
17-01662-01
XMI ground strap
17-02759-01
Fail safe enable cable, XMI to H7236-A
battery backup unit and H405
17-01375-04
15’ DWMBB cables for expander cabinet, from XMI slots 1, 2, 3, and 4 as
needed (segments D and E) to VAXBI
cages 2, 3, 4, and 5 slot 1 (segments D and E). Two per DWMBB.
17-01897-02
7" DWMBB cables, from XMI slot E (segments D and E) to VAXBI cage 1 slot 1
(segments D and E). Two per DWMBB.
17-02521-01
Fail safe enable cable
17-02522-01
H7242 inhibit (Model 300 and 400 systems only)
A2-M1094-10
Includes:
Torque screwdriver
Large Phillips and flat screwdrivers
Small Phillips screw-holding screwdriver or one with magnetic tip
11/32" nutdriver
1/4" nutdriver
Daughter Card
54-18172-01
Clock/arbiter module, mounts on XMI
backplane
Foam Air Seals
74-34536-01
74-34536-03
74-36670-02
Three pieces of foam used for air seals
Tools Required:
VAXBI Tool Kit
Subassemblies:
XMI Card Cage
2–5
2.2 Removing the XMI Card Cage
The XMI card cage is removed from the front of the cabinet
after you disconnect cables from the backplane.
2.2.1 Prepare for Removal
Prepare the system for shutdown. Set up a work space
nearby where you can store the modules and work on the
XMI card cage. Label and disconnect the signal and power
connections.
Figure 2–3: XMI Backplane Cables and Power Connections
9
12
11
7
msb-0703A-90
2–6
VAX 6000 Platform Service Manual
1. Perform an orderly shutdown of the system.
2. Turn the upper key switch on the front control panel to the Off position.
3. Pull the circuit breaker on the AC power controller to the Off position.
The AC power controller is at the bottom rear of the cabinet.
4. Unplug the system.
5. Open the rear cabinet door.
6. Remove the screws and drop the I/O bulkhead tray to expose the card
cages.
CAUTION: You must wear an antistatic wrist strap attached to the
cabinet when you handle any modules.
NOTE: Figure 2–3 shows the end to disconnect for each of the following
cables.
7. Disconnect all I/O adapter cables from the XMI card cage. See
Figure 2–3.
' in
8. Loosen the 5/16 inch nut on the H7215 cable retainer bracket. Swing
the bracket to one side.
9. Disconnect the power supply cable (17-01566-01) from J3 of the H7215
power regulator. See .
)
10. If present, remove the plastic covers over the power harnesses. To do
this, remove the three 5/16 inch nuts that connect each cover to the
back of a regulator.
11. Disconnect the power connections from the H7214 and H7242 power
regulators. (On each regulator, remove the four screws from the leads.)
See .
+?
12. Disconnect the remote sense wires from the H7214 and H7242
regulators (17-01525-01). (Remove connector J4 from the regulator.)
See .
+@
XMI Card Cage
2–7
Figure 2–4: Control/Status Cable
0
-30
00 00
60 00-4
60
0
-50
00
60
H7215 (10 PIN)
1
2-0
52
-02
17 01
A 3
PN v
00 TI 01
Re te r C 1-B
Da ndo 02-0
Ve -245
36
H7242 INHIBIT CABLE
(MODELS 300 AND 400 ONLY)
2–8
VAX 6000 Platform Service Manual
H7214 (12 PIN)
H7206-B
H7242 (12 PIN)
INTERLOCK (2 PIN) TO H7215
msb-0449D-90
13. If this is a Model 300 or 400, remove the H7242 inhibit cable (17-0252201). See Figure 2–4.
14. Disconnect the cable (17-01568-02) to the XTC power sequencer from
J1 at the lower left corner of the card cage. See
in Figure 2–5.
+B
15. Disconnect four wires from the bus bars that go to the system control
assembly: +5V (red); +12V (orange); and two ground connections (brown
and black). Use an 11/32 inch nutdriver. See .
+C
16. Disconnect the ground strap (17-01662-01) from the chassis. Remove
the screw from the bus bar with a large Phillips screwdriver. See .
+D
17. Disconnect the red and black leads from the 17-02521-01 cable. See +E.
18. Disconnect the power supply enable cable (17-02500-01) from J8 at the
lower right corner of the card cage. See .
+F
19. Disconnect the control/status cable from the regulators at the interlock
(H7215) and J2 (H7215), J1 (H7214), and J1 (H7242). See Figure 2–4.
Figure 2–5: XMI Backplane Diagram
17 RED
15
RED
17 BLACK
15
BROWN 15
ORANGE
BLACK 15
14
18
16
msb-0704B-90
XMI Card Cage
2–9
2.2.2 Remove the XMI Card Cage from the Cabinet
Remove all modules from the cage and set them aside, and
then remove the cage from the cabinet.
Figure 2–6: XMI Card Cage
5
FRONT
5
msb-0705-90
2–10
VAX 6000 Platform Service Manual
1. Open the front cabinet door.
2. Remove the clear plastic door in front of the XMI card cage.
CAUTION: You must wear an antistatic wrist strap attached to the
cabinet when you handle any modules. See Appendix C for processor
module handling instructions.
3. If the XMI card cage does not have a module use label, attach one
below the front of the cage and fill it in. This makes returning modules
to their correct slots easier after you install the new card cage.
4. Lift up the levers and hold. Remove the modules from the cage and put
them in ESD boxes.
5. Using a 1/4 inch nutdriver or a large flat screwdriver, remove and save
the four mounting screws (1/4 inch hex head) that fasten the XMI cage
in Figure 2–6.
assembly to the chassis. See
%
6. Pull the cage out of the system cabinet carefully so that you do not
damage the power harnesses or bus bars. Push from the back to ease
the cage out toward the front of the cabinet. This step requires two
persons.
XMI Card Cage
2–11
2.2.3 Remove the Daughter Card
The daughter card must be removed from the XMI cage. It
will be installed on the new XMI cage.
Figure 2–7: XMI Daughter Card
1
msb-0706A-90
2–12
VAX 6000 Platform Service Manual
CAUTION: The daughter card is static sensitive. You must wear an
antistatic wrist strap attached to the cabinet when you handle it.
1. Unscrew and save the three large thumbscrews that hold the daughter
card to the XMI backplane. See
in Figure 2–7.
!
2. Pull the daughter card away from the backplane.
3. Set the daughter card on an antistatic mat.
XMI Card Cage
2–13
2.3 Replacing the XMI Card Cage
Attach the daughter card that you removed from the
defective cage onto the new cage. Install the new cage in
the system cabinet, attach all cables, and put the modules
back into their slots.
2.3.1 Attach the Daughter Card
Install the daughter card that you removed from the
defective cage.
Figure 2–8: XMI Daughter Card
2
msb-0706-90
2–14
VAX 6000 Platform Service Manual
CAUTION: The daughter card is static sensitive. You must wear an
antistatic wrist strap attached to the cabinet when you handle it.
1. Align the daughter card on the backplane.
2. Attach the daughter card with the three thumbscrews.
Figure 2–8.
See
XMI Card Cage
"
in
2–15
2.3.2 Install the Card Cage, Attach the Cables, and Insert
the Modules
Install the new XMI card cage in the system cabinet.
Reattach all the connections on the backplane, install the
nuts attaching the cage to the chassis, and then put the
modules back into their slots.
Figure 2–9: XMI Card Cage
3
msb-0707-90
2–16
VAX 6000 Platform Service Manual
1. Bend back the power harnesses and slide the new card cage (levers up)
into the cabinet. Push from the front and pull from the rear. This step
requires two persons.
2. Use a nutdriver to tighten the four mounting nuts that secure the card
cage assembly to the front of the cabinet. See Figure 2–6.
3. Reattach the power connections. On the H7214 and H7242 regulators,
torque the screws to 27 (+/-5) inch-pounds. See
in Figure 2–9.
#
CAUTION: You must use the 5/16 inch screws. If you use the longer
7/16 inch screws, the power regulators may short out.
4. Reverse Steps 6 through 19 in Section 2.2.1.
NOTE: When replacing the control/status cable, be sure the white dot
on the connector is at the top.
5. Check the module use label for correct placement and install the
modules removed from the defective card cage. See Section 2.4 for
Models 300 and 400 configuration rules or Section 2.5 for Model 500
configuration rules.
6. Replace the clear plastic door in front of the card cage.
7. Turn on system power and check that all nodes pass self-test.
NOTE: See the Verification chapter in the VAX 6000 Series Installation
Guide for complete acceptance instructions.
XMI Card Cage
2–17
2.4 Configuring Modules in Model 300 and 400
Systems
The XMI card cage design, XMI architecture, and processor
model place some restrictions on the use of the slots. Only
XMI modules may be placed in the XMI card cage; installing
any other modules may destroy the modules.
Figure 2–10: Numbering of XMI Slots
XMI CARD CAGE
E
D C B A 9
8
7 6 5 4 3
2
1
msb-0107-89
CAUTION: Never attempt to insert a VAXBI module into an XMI card
cage. The backplane technology for the XMI and VAXBI is similar but
incompatible. Inserting a VAXBI module into an XMI card cage can destroy
the module. Note that VAXBI modules are shorter than XMI modules.
2–18
VAX 6000 Platform Service Manual
An XMI node takes its node number from the slot in which it resides. This
is unlike the VAXBI bus where the node number assignment derives from
node ID plugs inserted into the backplane for each slot.
Figure 2–10 shows the numbering of the slots in the XMI card cage. Slots
are numbered in hexadecimal to correspond to the self-test display.
Figure 2–11 shows the maximum number of processor, memory, and I/O
modules that may be installed in Model 300 and 400 systems. Slots where
a module may not be installed are indicated by the letter N. Installation
in all other slots is permitted.
Figure 2–11: XMI Configuration Rules for Models 300 and 400
SLOT
1
MODULE
LIMIT
PROCESSOR
6 2
MEMORY
8 3
I/O
8 4
E
D C B
A
9
N
N N
8
7
6
5
N N
N
4
3
2
1
msb-0715-90
!
"
#
$
Slot E must contain a module. Slot E contains a DWMBB/A module
when the system has a VAXBI bus.
For a Model 400 system with a vector processor, see configuration rules
in VAX 6000 Models 300 and 400 Service Manual.
The total amount of memory is limited to 512 Mbytes.
Slots 5 through A may not contain I/O modules.
Any problems with the XMI cage or modules are indicated in the first three
lines of the self-test display. The self-test display is explained in the VAX
6000 Models 300 and 400 Service Manual.
XMI Card Cage
2–19
2.5 Configuring Modules in Model 500 Systems
The XMI card cage design, XMI architecture, and processor
model place some restrictions on the use of the slots. Only
XMI modules may be placed in the XMI card cage; installing
any other modules may destroy the modules.
Figure 2–12: Numbering of XMI Slots
XMI CARD CAGE
E
D C B A 9
8
7 6 5 4 3
2
1
msb-0107-89
CAUTION: Never attempt to insert a VAXBI module into an XMI card
cage. The backplane technology for the XMI and VAXBI is similar but
incompatible. Inserting a VAXBI module into an XMI card cage can destroy
the module. Note that VAXBI modules are shorter than XMI modules.
2–20
VAX 6000 Platform Service Manual
An XMI node takes its node number from the slot in which it resides. This
is unlike the VAXBI bus where the node number assignment derives from
node ID plugs inserted into the backplane for each slot.
Figure 2–12 shows the numbering of the slots in the XMI card cage. Slots
are numbered in hexadecimal to correspond to the self-test display.
Figure 2–13 shows the maximum number of processor, memory, and I/O
modules that may be installed in Model 500 systems. Slots where a module
may not be installed are indicated by the letter N. Installation in all other
slots is permitted.
Figure 2–13: XMI Configuration Rules for Model 500
SLOT
1
MODULE
LIMIT
PROCESSOR
6 2
MEMORY
8 3
I/O
8 4
E
D C B
A
9
8
7
N
N
N N
6
5
4
3
2
1
msb-0715A-90
!
"
#
$
Slot E must contain a module. Slot E contains a DWMBB/A module
when the system has a VAXBI bus.
For a system with a vector processor, see configuration rules in VAX
6000 Model 500 Service Manual.
The total amount of memory is limited to 512 Mbytes. Only MS65A
memory is supported.
Slots 6 through 9 may not contain I/O modules.
Any problems with the XMI cage or modules are indicated in the first three
lines of the self-test display. The self-test display is explained in the VAX
6000 Model 500 Service Manual.
XMI Card Cage
2–21
2.6 XMI Troubleshooting
When you install modules in the XMI card cage, several items
need to be checked. Table 2–3 gives a checklist of items to
troubleshoot.
Table 2–3: XMI Troubleshooting Checklist
Symptom
Possible Cause
No power to cages
Clear plastic door not in place or not latched.
Intermittent module response
Poor contact at connector
Loose cabling at the backplane
Power connector reattached with 7/16" screw instead of
5/16" screw
Module does not appear on
self-test results
Loose cabling at the backplane
System not configured correctly.
2–22
VAX 6000 Platform Service Manual
Clear plastic doors cover the XMI and VAXBI card cages. If these doors are
opened when power is still on, a power interlock switch cuts off power from
the regulators to either the VAXBI side or to the XMI side, depending on
the door opened.
Before turning power back on, make sure the clear plastic doors are in place
and latched.
The XMI bus requires a non-memory module in slot E. If this slot is empty,
the bus will shut down.
If you receive intermittent module response, or the module does not show
up on self-test as being present at all, make sure the module is seated
properly, and check the backplane cabling.
Modules may fail self-test because of poor contact at the connector. A
thorough cleaning of the gold pads on the module and of the connector
in the card cage corrects this contact failure. If the connections seem to be
faulty, clean the contact areas of the connector and module. Table 2–4 lists
tools and supplies for connector cleaning.
Table 2–4: XMI Connector Cleaning Supplies
Item
Part
Number
Function
VAXBI tool kit
A2-M1094-10
Maintaining card cages
Paddle wipe handle
47-00116-02
Holding paddle wipes
Paddle wipes
12-26321-01
Cleaning contact area inside ZIF connectors
Gold-wipes™
49-01603-00
Cleaning module connector contact area
Protective goggles
29-16141-10
Eye protection
Nitrile gloves
29-26403-00
Hand protection
™Gold-wipes is a trademark of TEXWIPE.
XMI Card Cage
2–23
Chapter 3
VAXBI Card Cage
This chapter describes the optional VAXBI card cage and its use in
the <REFERENCE>(VAX_XXXX) system.
Removal and replacement
procedures are detailed, and configuration restrictions are listed. Sections
include:
•
VAXBI Card Cage Description
System Use
Specifications
Subassemblies
•
Removing the VAXBI Card Cage
•
Replacing the VAXBI Card Cage
•
VAXBI Expansion and Configuration Rules
•
VAXBI Troubleshooting
VAXBI Card Cage
3–1
3.1 VAXBI Card Cage Description
3.1.1 System Use
The optional VAXBI card cage serves as a second I/O
subsystem of a <REFERENCE>(VAX_XXXX) system. The two
VAXBI card cages provide one 12-slot VAXBI channel. The
interface between the VAXBI bus and the XMI bus is the
DWMBB option. The DWMBB/B module requires one slot
in the VAXBI card cage.
Figure 3–1: VAXBI Card Cage Connections
H7215
XMI
H7214
VAXBI
CHASSIS
I/O DEVICES
msb-0108A-90
3–2
VAX 6000 Platform Service Manual
The <REFERENCE>(VAX_XXXX) system uses the optional VAXBI bus for
input/output. When used, two VAXBI card cages are installed in the
processor cabinet. These two card cages provide one 12-slot VAXBI channel.
A VAXBI expander cabinet can also be added, which can hold up to four
VAXBI cages (four 6-slot channels).
The VAXBI card cage has zero insertion force (ZIF) connectors. The
backplane area extends over two of the five connector segments; the
remaining three segments are used for I/O connections. Installed on the
cage are I/O transition headers.
Each VAXBI bus has its own XMI-to-VAXBI adapter (DWMBB). The
DWMBB/B module of this adapter resides in the VAXBI card cage.
VAXBI Card Cage
3–3
3.1.2 VAXBI Card Cage Specifications
The VAXBI card cage is a 6-slot cage. (The two cages in the
system cabinet are configured as one 12-slot VAXBI channel.)
The VAXBI card cages are located in the upper part of the
cabinet, on the left as you view the system from the front.
The field-replaceable unit (H9400-AA) does not include the
power bus bar assembly, the node ID plugs, the terminator,
and the flexible backplane extension.
Figure 3–2: VAXBI Card Cages
FRONT
VAXBI
CARD CAGES
msb-0141A-90
3–4
VAX 6000 Platform Service Manual
Table 3–1: VAXBI Card Cage Assembly Specifications
Parameter
Description
Part Number
H9400-AA, one 6-slot cage with no terminators or bus bars; includes transition headers
Location:
Upper left front
Dimensions:
12.5" W x 9.5" D x 10" L
Weight:
26 lbs (2-cage assembly)
Power:
One H7215 DC regulator and one H7214 DC regulator supply power to the 2-cage assembly.
Service From:
Front and rear
Table 3–2: VAXBI Card Cage Cables
Part Number
Description
17-01038-01
Flexible backplane extension (FBE) cable connecting the two VAXBI
backplanes in the system cabinet
17-01149-01
Firmware console-enable jumper (on Ethernet adapter slot, slot 6, segment E1)
17-01458-02
VAXBI ground strap
17-01496-01
Ethernet (from slot 6, segment E2, to H7214 (+13.5V) and to Ethernet port)
17-01523-01
VAXBI +/-12V to J3 on H7215
17-01569-01
DWMBB, from slot 1, segment C1, to J11 of H7206-B
17-01897-01
15’ DWMBB cables for expander cabinet, from XMI slots 1, 2, 3, and 4 as
needed (segments D and E) to VAXBI channels 2, 3, 4, and 5 slot 1 (segments D and E). Two per DWMBB.
17-01897-02
7" DWMBB cables, from XMI slot E (segments D and E) to VAXBI cage
2 slot 1 (segments D and E). Two per DWMBB.
VAXBI Card Cage
3–5
3.1.3 VAXBI Card Cage Subassemblies
Table 3–3 lists the part numbers for FRUs of the VAXBI card
cage assembly in the <REFERENCE>(VAX_XXXX) system.
Figure 3–3: VAXBI Card Cage Subassemblies
1
2
3
4
5
6
TRANSITION
HEADER
3–6
NODE ID
PLUG
FLEXIBLE
BACKPLANE
EXTENSION
GIF
TERMINATOR
VAX 6000 Platform Service Manual
7
8
GOM
TERMINATOR
9
10
11
12
msb-0726-90
Table 3–3: VAXBI Subassemblies and Tools Required
Item
Part Number
Description
12-28508-01
+5V/Ground VAXBI bus bars
12-28342-01
-5.2V VAXBI bus bars
12-28345-01
-2V VAXBI bus bars
Ground Bus Jumper
12-28353-01
Bus bar ground strap
Terminators
20-24486-01
Near end (GIF)
20-24487-01
Far end (GOM)
VAXBI Node IDs
12-23701-17
Set of 16
Transition Header
12-22246-01
Three-segment I/O header
Foam Air Seals
74-34536-01
Three pieces of foam used for air seals
Subassemblies:
Bus Bar Assembly
74-34536-02
74-34536-03
Flexible Backplane
Extension
17-01038-01
Electrically connects two VAXBI card cages
to create one 12-slot channel
A2-M1094-10
Includes:
Torque screwdriver
Offset ratchet screwdriver
Large and small Phillips screwdrivers
Small Phillips screw-holding screwdriver
or one with magnetic tip
Flat screwdriver
Tools Required:
VAXBI Tool Kit
Table 3–4: VAXBI Torque Values
Item
Torque Value
(inch-pounds)
Bus bar assembly screws
9 (+/-1)
FBE jackscrews
6 (+/-1)
Transition header screws
6 (+/-1)
H7214 power regulator screws
27 (+/-5)
VAXBI Card Cage
3–7
3.2 Removing the VAXBI Card Cage
The two VAXBI card cages are bolted together and must
be removed as a unit. Remove them from the front of the
cabinet after you disconnect cables from the backplane.
Remove the system control assembly first (see Section 4.2).
3.2.1 Prepare for Removal
Prepare the system for shutdown. Set up a work space
nearby where you can store the modules and work on the
VAXBI card cages. Label and disconnect the signal and
power connections.
Figure 3–4: VAXBI Backplane Cables and Power Connections
11
9
13
8
3–8
msb-0112B-90
VAX 6000 Platform Service Manual
1. Perform an orderly shutdown of the system.
2. Turn the upper key switch on the front control panel to the Off position.
3. Pull the circuit breaker on the AC power controller to the Off position.
4. Unplug the system.
5. Open the front and rear doors.
6. Remove the system control assembly. See Section 4.2 for the removal
procedure.
7. Remove the screws and drop the I/O bulkhead tray to expose the card
cages.
NOTE: Figure 3–4 shows the end to disconnect for each of the following
cables.
8. Remove and label all connectors from segments C, D, and E of the
transition headers. For the CIBCA and KDB50, instead of removing
cables, remove the transition headers from the card cage, since the
I/O segment is a permanent part of the transition header. To do this,
remove the top and bottom screws, and then remove the header. See
in Figure 3–4.
(
9. Loosen the 5/16 inch nut on the H7215 cable retainer bracket. Swing
the bracket to one side. Disconnect the cable (17-01523-01) to the H7215
power regulator. (Remove connector from the regulator.) See .
)
10. If present, remove the plastic covers over the power harnesses. To do
this, remove the three nuts (5/16 inch hex) that connect each cover to
the back of a regulator.
11. Disconnect the harness to the H7214 power regulator. (On the
regulator, remove the four screws that fasten the harness to the
regulator.) See .
+?
12. If the card cage has a DEBNI adapter, disconnect the Ethernet line
(17-01525-01, J2) to the H7214 regulator. Remove connector J4 from
the H7214 regulator. These connections are not shown on Figure 3–4.
13. Disconnect the ground strap from the cage on the right to the chassis
(17-01458-02). See .
+A
VAXBI Card Cage
3–9
3.2.2 Remove the VAXBI Card Cages from the Cabinet
Before removing the cages from the cabinet, remove all
modules and set them aside.
Figure 3–5: VAXBI Card Cages
2
FRONT
2
3–10
VAX 6000 Platform Service Manual
msb-0116B-90
1. Remove the front cabinet door. See Section 6.1.
2. Remove the clear plastic door in front of the VAXBI card cage.
CAUTION: You must wear an antistatic wrist strap attached to the
cabinet when you handle any modules.
3. If the VAXBI card cage does not have a module use label, attach one
below the front of the cage and fill it in. This makes returning modules
to their correct slots easier after you install the new card cage.
4. Lift up the levers to remove modules. Put them in ESD boxes and note
which slots they had been in.
5. Remove and save the four mounting screws (1/4 inch slotted hex) that
in Figure 3–5.
fasten the VAXBI assembly to the chassis. See
%
6. Pull the cages out of the system cabinet carefully so that you do not
damage the power harnesses or bus bars.
VAXBI Card Cage
3–11
3.2.3 Remove the VAXBI Bus Bars and FBE
The VAXBI bus bars and one side of the flexible backplane
extension (FBE) must be removed from the cage that is being
replaced. Do not remove the bus bars and FBE from both
cages.
Figure 3–6: VAXBI Bus Bar Assembly
2
3
4
1
msb-0112A-90
3–12
VAX 6000 Platform Service Manual
1. Remove the ground bus jumper by removing the two nuts (11/32 inch
hex). See
in Figure 3–6.
!
On only the cage that needs to be replaced in the two-cage assembly,
remove these parts in the following order. Use a small Phillips
screwdriver (#6-32 screws).
2. Remove the +5V/Ground bus bar assembly (12-28508-01), 14 screws.
See .
"
3. Remove the -5.2V and -2V bus bars (5 screws into the power cubes).
See .
#
4. Disconnect the +/-12V connector (orange and blue wires). Disconnect
from the backplane of the card cage being removed. See .
$
5. Loosen the jackscrews and pull the FBE straight out. Leave the FBE
attached to the other card cage. See Figure 3–7.
Figure 3–7: VAXBI Flexible Backplane Extension
FLEXIBLE
BACKPLANE
EXTENSION
PIN HOLES
LOCATING
STUD
JACKSCREW
FBE PINS
msb-0713-90
VAXBI Card Cage
3–13
3.2.4 Remove Other VAXBI Parts
Remove the node ID plugs, the terminator, and the mounting
plates from the cage being replaced.
Figure 3–8: VAXBI Backplane Components
GIF
TERMINATOR
2
1
2
3
4
GOM
TERMINATOR
FBE
5
6
7
8
9
10
11
2
12
1
msb-0708-90
3–14
VAX 6000 Platform Service Manual
1. Remove the node ID plugs. See
! in Figure 3–8.
2. Remove the terminator (GOM or GIF) by removing the two slotted
screws. See .
"
3. Remove the side and inner mounting plate so that you can slide the
defective cage away from the remaining cage. For the inside plate,
remove the innermost screws with an offset ratchet screwdriver. See
in Figure 3–9.
#
Figure 3–9: VAXBI Cage Mounting Plates
3
3
msb-0114-89
VAXBI Card Cage
3–15
3.3 Replacing the VAXBI Card Cage
Install the parts removed from the defective card cage and
return the two-cage assembly to the system. Reattach all the
connections on the backplane, install the screws attaching
the cage to the chassis, and then put the modules back into
their slots.
3.3.1 Install VAXBI Parts
Install the terminator, node ID plugs, bus bar assembly, and
FBE removed from the old cage. Attach the side and inner
mounting plates. Finally, install new foam air seals.
Figure 3–10: Installation of Foam Air Seals
4
4
msb-0115A-90
3–16
VAX 6000 Platform Service Manual
1. Check the pins on the FBE and straighten them if necessary. Fold
the flexible cable between the two cages and position the FBE over the
locating studs on the replacement cage (see Figure 3–7). Ease the pins
into the holes and turn the jackscrews one-half to one turn each.
CAUTION: The FBE pins must be properly aligned. A misaligned pin
will buckle when the jackscrews are tightened.
2. Tighten the jackscrews in stages; do not tighten one completely before
tightening the other. Torque the jackscrews to 6 (+/-1) inch-pounds.
3. On the replacement cage, install the parts you removed from the
defective VAXBI card cage:
•
Terminator
•
Node ID plugs
•
Bus bar assembly and ground bus jumper, in the reverse order of
the removal. Torque screws to 9 (+/-1) inch-pounds.
•
Side and inner mounting plates
4. Replace the three foam air seals: the top front of the backplane and the
in Figure 3–10.
bottom surfaces of the cages, back and front. See
$
5. The new cage, the H9400-AA, is shipped with six transition headers
installed. For the slots that are to hold the CIBCA and KDB50 options,
remove the transition headers.
VAXBI Card Cage
3–17
3.3.2 Install the Card Cages in the Cabinet
Replace the card cages and the system control assembly,
attach cables, and replace the bulkhead tray, modules, and
clear door.
Figure 3–11: VAXBI Card Cages
2
FRONT
2
3–18
VAX 6000 Platform Service Manual
msb-0116A-90
1. Slide the VAXBI card cages into the system cabinet taking care not to
damage the power harnesses or bus bars. You will also need to pull the
cages from the back. This step requires two persons.
2. Install the four mounting nuts that secure the VAXBI cage assembly to
the system cabinet. See
in Figure 3–11.
"
3. Reinstall the system control assembly (see Section 4.2 for instructions).
4. Screw on the transition headers containing the CIBCA and KDB50
cables. Tighten the screws in stages: do not tighten one completely
before tightening the other. Torque both screws to 6 (+/-1) inch-pounds,
using the torque screwdriver.
5. Attach the other signal connections in the I/O area.
6. Reattach the power connections.
At the H7214 regulator, torque screws to 27 (+/-5) inch-pounds.
On the bus bars torque screws to 9 (+/-1) inch-pounds.
7. If the card cage has a DEBNI adapter, attach J2 of the Ethernet power
cable to the H7214 regulator. Reattach J4 to the H7214 regulator.
8. Put the I/O bulkhead tray back into place at the rear of the cabinet.
CAUTION: You must wear an antistatic wrist strap attached to the
cabinet when you handle any modules.
9. Insert the modules into the VAXBI card cages.
10. Replace and latch the clear door.
11. Turn on system power and check that all nodes pass self-test.
12. Rehang the front cabinet door.
NOTE: See the Verification chapter in the <REFERENCE>(VAX_XXXX)
Series Installation Guide for complete acceptance instructions.
VAXBI Card Cage
3–19
3.4 VAXBI Expansion and Configuration Rules
The system cabinet has two VAXBI cages configured to
provide one 12-slot VAXBI channel for I/O. Slot 1 holds the
XMI-to-VAXBI adapter module (DWMBB/B), leaving 11 slots
for I/O modules. Four more cages can be installed in a
VAXBI expander cabinet to provide four additional VAXBI
channels, for a total of five VAXBI channels. A maximum of
31 slots is available for I/O adapters.
Figure 3–12: Numbering of VAXBI Slots
12 11 10 9 8 7
6
5 4 3
2
1
msb-0716-90
3–20
VAX 6000 Platform Service Manual
The cage and backplane were designed so that any module or node can
reside in any slot (except slot 1). Since the module that drives the clock
must be in slot 1, that slot is reserved for the DWMBB/B module. (See
Figure 3–12 for the numbering of VAXBI slots.)
VAXBI node numbers derive from node ID plugs that plug into the
backplane. A node, which can be more than one module, is assigned the
node number of the plug that is inserted into the slot of the module with
the VAXBI Corner. Multimodule nodes must be in adjacent slots.
Constraints on adding VAXBI options include:
•
Power requirements for the options
•
Memory latency time needed to access memory
See Digital’s Systems and Options Catalog for VAXBI option configurations
in <REFERENCE>(VAX_XXXX) systems. See Appendix B of the VAXBI
Options Handbook for power requirements of various options.
The
DWMBB/B module requires 6 amps.
VAXBI Card Cage
3–21
3.5 VAXBI Troubleshooting
When you install modules in the VAXBI card cages, several
items need to be checked. Table 3–5 gives a checklist of items
to troubleshoot.
Table 3–5: VAXBI Troubleshooting Checklist
Symptom
Possible Cause
No power to cages
Clear plastic door not in place or not latched.
Intermittent module response
Poor contact at connector
Loose cabling at backplane
Power connector reattached with 7/16" screw instead of
5/16" screw
Module does not appear on selftest results
Loose cabling at backplane
System not configured correctly
Modules display unusual failures after FBE is removed and
replaced
3–22
Check FBE pins for buckling or other damage
VAX 6000 Platform Service Manual
Clear plastic doors cover the VAXBI and XMI card cages. If these doors are
opened when power is still on, a power interlock switch cuts off power from
the regulators to either the VAXBI side or to the XMI side, depending on
the door opened.
Before turning power back on, make sure the clear plastic doors are in place
and latched. You can then push the reset switch on the H7206-B power and
logic unit (see Figure 5–11) to return power to the system.
If you receive intermittent module response, or the module does not show
up on self-test as being present at all, make sure the module is seated
properly, a node ID plug is in place, and the backplane cabling is correct.
Modules may fail self-test because of poor contact at the connector. A
thorough cleaning of the gold pads on the module and of the connector
in the card cage corrects this contact failure. If the connections seem to be
faulty, clean the contact areas of the connector and module. Table 3–6 lists
tools and supplies for connector cleaning.
Table 3–6: VAXBI Connector Cleaning Supplies
Item
Part
Number
Function
VAXBI tool kit
A2-M1094-10
Maintaining card cages
Paddle wipe handle
47-00116-02
Holding paddle wipes
Paddle wipes
12-26321-01
Cleaning contact area inside ZIF connectors
Gold-wipes™
49-01603-00
Cleaning module connector contact area
Protective goggles
29-16141-10
Eye protection
Nitrile gloves
29-26403-00
Hand protection
™Gold-wipes is a trademark of TEXWIPE.
VAXBI Card Cage
3–23
Chapter 4
System Control Assembly
This chapter describes the specifications and maintenance of the system
control assembly and its subassemblies. Sections include:
•
System Control Assembly Specifications
•
System Control Assembly Removal and Replacement
•
XTC Power Sequencer Specifications
•
XTC Removal and Replacement
•
Control Panel Assembly Specifications
•
Control Panel Assembly Removal and Replacement
•
Filter Board and TOY Clock Battery Specifications
•
Filter Board and TOY Clock Battery Removal and Replacement
•
Tape Drive Specifications
•
Tape Drive Removal and Replacement
System Control Assembly
4–1
4.1 System Control Assembly Specifications
The system control assembly is located in the upper left front
corner of the cabinet. It houses the separate FRUs of the
control panel, the XTC, the battery powering the TOY clock,
the filter board, and the optional tape drive.
Figure 4–1: System Control Assembly
SYSTEM
CONTROL ASSEMBLY
FRONT
TAPE DRIVE
ASSEMBLY
(OPTIONAL)
XTC POWER
SEQUENCER
TOY CLOCK
BATTERY
FILTER
BOARD
CONTROL
PANEL
ASSEMBLY
4–2
VAX 6000 Platform Service Manual
msb-0063A-90
Table 4–1: System Control Assembly Specifications
Parameter
Description
Part Number:
70-27867-01
Location:
Upper left front
Dimensions:
11.25" H x 8.5" W x 17.5" D
Weight:
18 lbs, with TK and control panel installed
Signal Cables:
17-01818-01 from the control assembly shield leading to the optional TBK70 adapter’s slot at VAXBI backplane segment D
Service From:
Front and rear of cabinet, front door removed
Tools Required:
Large and small Phillips screwdrivers
Subassemblies:
Control panel assembly (54-16574-01)
XTC power sequencer (20-29176-02)
TOY 3-cell battery (12-19245-02)
Optional TK tape drive (TK70-AA)
TK filter board (54-18547-01 or 20-29887-01)
Diagnostics:
Control panel assembly lights will light when the control assembly is correctly installed.
System Control Assembly
4–3
4.2 System Control Assembly Removal and
Replacement
Working mainly from the front of the cabinet, remove or
replace the system control assembly using large and small
Phillips screwdrivers. The assembly has four screws on
the front of the assembly, two screws on the back of the
assembly, and one cable.
Figure 4–2: System Control Assembly Removal (Rear)
10
7
9
5
10
8
4–4
VAX 6000 Platform Service Manual
msb-0066B-90
REMOVAL
1. Perform an orderly shutdown of the system.
2. Turn the control panel upper key switch to Off.
3. Pull the circuit breaker switch and unplug the system.
4. Open and remove the front door. (See Section 6.1.) Open the rear door.
5. Remove the four power cords (orange, black, red, and brown) at the
XMI backplane end. See
in Figure 4–2.
%
6. Remove the four screws from the corners of the XTC power sequencer
module (see Section 4.4), and lay the XTC down with all its connections
in place.
7. If present, remove signal cable 17-01818-01 from the upper right corner
of the back of the system control assembly. This cable is the control from
the TK to VAXBI backplane segment D, at the slot housing the TBK70
adapter. See .
'
8. Remove cable 17-01816-01 from J2 at the XTC module. See
(.
9. Remove the TOY clock battery backup cable (red and black) from the
XTC module. See .
)
10. Working from the rear of the cabinet, loosen the two #10-32 screws with
a large Phillips screwdriver. See .
+>
System Control Assembly
4–5
Figure 4–3: System Control Assembly Removal (Front)
11
13
11
msb-0064A-90
4–6
VAX 6000 Platform Service Manual
11. Move to the front of the cabinet. Remove the two #10-32 screws on
the left side of the system control assembly using a large Phillips
screwdriver. See
in Figure 4–3. Remove one of the two screws
on the upper right support panel. Loosen the remaining screw.
+?
12. Supporting the system control assembly with one hand, remove the last
loosened screw with your hand.
13. Using both hands, carefully pull the system control assembly forward
and out of the cabinet. See .
+A
REPLACEMENT
1. Install the XTC and the control panel assembly (see Section 4.4 and
Section 4.6).
2. As you guide the control assembly into the front of the cabinet, push
the control assembly all the way to the left. This will align the screws
with their holes in the structure. If you have trouble closing the cabinet
door, check the assembly alignment.
3. Reverse Steps 1 through 10 in the Removal section above.
System Control Assembly
4–7
4.3 XTC Power Sequencer Specifications
The XTC power sequencer is mounted on the back
of the system control assembly.
It is wired to the
<REFERENCE>(XMI) backplane, the console terminal, the
TK tape drive, and the H7214 power regulator.
Figure 4–4: XTC Power Sequencer
XTC POWER
SEQUENCER
REAR
msb-0065A-90
4–8
VAX 6000 Platform Service Manual
Table 4–2: XTC Power Sequencer Specifications
Parameter
Description
Part Number:
54-17243-02 or 20-29176-02
Location:
Upper right rear, mounted on the back of the system control assembly
Dimensions:
2.5" W x 8" H x .06" D
Weight:
Less than 1 lb
Power:
+5V at 0.6 amps
+12V at 1.0 amps
-12V at 0.1 amps
Cables:
Four ribbon cables and one TOY clock battery cable:
12-19245-02 battery cable, J1 connector with red plug end
17-01498-01 XTC to H7206, J3 14-pin connector
17-01567-01 XTC to console port, J5 10-pin connector
17-01568-02 <REFERENCE>(XMI) to XTC, J4 20-pin connector, 56" long
17-01816-01 XTC to control panel, J2 connector
Service From:
Rear of cabinet, door removed
Tools Required:
Large Phillips screwdriver
Subassemblies:
None
Diagnostics:
Power indicator lights on the control panel will light and the control panel key switches will turn when the XTC power sequencer is correctly installed.
System Control Assembly
4–9
4.4 XTC Removal and Replacement
Remove or replace the XTC power sequencer from the rear
of the cabinet.
Figure 4–5: XTC Power Sequencer Removal
XTC
7
9
4–10
11
8
11
11
VAX 6000 Platform Service Manual
6
msb-0066A-90
REMOVAL
1. Perform an orderly shutdown of the system.
2. Turn the control panel upper key switch to Off.
3. Pull the circuit breaker switch.
4. Unplug the system.
5. Open the front and rear doors.
6. Wearing a ground strap, disconnect the 17-01568-02 ribbon cable at
J4, which is a 20-pin connector cable leading to the XMI. See
in
Figure 4–5.
&
7. Disconnect the 17-01498-01 ribbon cable at J3, which is a 14-pin
connector cable leading to the H7206-B power and logic box. See .
'
8. Disconnect the 17-01567-02 cable at J5, which is a 10-pin connector
cable leading to the console port. See .
(
9. Disconnect the 17-01816-01 ribbon cable at J2, which leads to the
control panel on the system control assembly. See .
)
10. Disconnect the 12-19245-02 lead with a red plug end at the J1
connector; the cable leads to the TOY clock battery in the system control
assembly. This connection, not shown on Figure 4–5, is behind the
ribbon cable disconnected from J2 in the previous step.
11. Use a large Phillips screwdriver to remove the four #6-32 screws located
on each corner of the XTC power sequencer. See .
+?
12. Pull the XTC toward you and remove.
REPLACEMENT
•
Reverse Steps 1 through 12 in the Removal section above.
System Control Assembly
4–11
4.5 Control Panel Assembly Specifications
The control panel assembly (54-16574-01) is in the upper left
front of the cabinet.
Figure 4–6: Control Panel Assembly
FRONT
CONTROL PANEL
ASSEMBLY
4–12
VAX 6000 Platform Service Manual
msb-0067A-90
Table 4–3: Control Panel Assembly Specifications
Parameter
Description
Part Number:
54-16574-01
Location:
Front upper left corner
Dimensions:
4.25" W x 2.75" H x 1.75" D
Weight:
3 ounces
Cables:
17-01818-01 cable from the J1 20-pin connector to the assembly bulkhead
Service From:
Front of cabinet, door open
Tools Required:
Large Phillips screwdriver
Subassemblies:
None
Diagnostics:
Control panel assembly lights light when power is turned on by the
control panel key switch.
System Control Assembly
4–13
4.6 Control Panel Assembly Removal and
Replacement
Working from the front of the cabinet, remove the control
panel assembly using a large Phillips screwdriver. The panel
assembly has one cable, 17-01818-01.
Figure 4–7: Control Panel Assembly Removal
6
5
7
msb-0068A-90
4–14
VAX 6000 Platform Service Manual
REMOVAL
1. Conduct an orderly shutdown of the system.
2. Turn the control panel upper key switch to Off.
3. Pull the circuit breaker switch. Unplug the system.
4. Open the front door.
5. Using a large Phillips screwdriver, remove the two #6-32 screws on the
right side of the panel. See
in Figure 4–7.
%
&.
Disconnect cable 17-01818-01 at the J1 20-pin connector. See '.
6. Swing the unit out and to the left, and pull it toward you. See
7.
REPLACEMENT
1. Connect cable 17-01818-01 to J1. The connection is not keyed, but
the cable has a colored stripe. Be sure this stripe is on top when you
reconnect the cable.
2. Place the tabs on the left edge of the control panel in the slots on the
control assembly.
3. With the tabs inserted, swing the module into the opening.
4. Using a large Phillips screwdriver, insert and tighten two #6-32 screws.
5. Close the front door.
System Control Assembly
4–15
4.7 Filter Board and TOY Clock Battery
Specifications
The filter board and TOY clock battery are located on the
inside floor of the control assembly in the upper left front of
the cabinet. The battery is a 3-cell TOY clock battery, part
number 12-19245-02, and it powers the time-of-year clock
on the XTC power sequencer module. The filter board part
number is 54-18547-01 or 20-29887-01.
Figure 4–8: Filter Board and TOY Clock Battery
FRONT
TOY CLOCK
BATTERY
FILTER
BOARD
msb-0071A-90
4–16
VAX 6000 Platform Service Manual
Table 4–4: Filter Board Specifications
Parameter
Description
Part Number:
54-18547-01 or 20-29887-01
Location:
Inside of system control assembly
Dimensions:
3 1/4" x 5 1/4"
Weight:
Less than 1 lb
Service From:
Inside of system control assembly
Tools Required:
Large Phillips screwdriver
Diagnostics:
TK lights
Table 4–5: TOY Clock Battery Specifications
Parameter
Description
Part Number:
12-19245-02
Location:
Inside of system control assembly
Dimensions:
1 3/4" x 1 1/2"
Weight:
Less than 1 lb
Power:
3-cell, 3.75V, .18mA
Cable:
Lead to XTC power sequencer
Service From:
Front of cabinet, door removed
Tools Required:
None
Diagnostics:
Time-of-year clock works
System Control Assembly
4–17
4.8 Filter Board and TOY Clock Battery Removal
and Replacement
To remove or replace the filter board or the 3-cell time-ofyear clock battery, first remove the system control assembly
(see Section 4.2). Then remove the side panel of the system
control assembly.
Figure 4–9: Filter Board and TOY Clock Battery Removal
TOY CLOCK
BATTERY
5
4
3
msb-0091-89
4–18
VAX 6000 Platform Service Manual
REMOVAL OF FILTER BOARD
1. Remove the system control assembly (see Section 4.2) and, if present,
the TK tape drive (see Section 4.10).
2. Using a large screwdriver, unscrew the side panel of the system control
assembly. See
in Figure 4–9.
"
3. Remove the screw from each corner of the filter board, using a large
screwdriver. See .
#
4. If the optional TK tape drive is present, disconnect the power cable
from J7 at the back of the tape drive. See .
$
5. Cut the tiewrap that holds the ferrite bead on the outside of the box.
Remove the filter assembly. See . Working from the inside of the
system control assembly, gently pull the cable through the hole at the
rear of the system control assembly.
%
6. Lift the filter board up and out of the system control assembly.
REPLACEMENT OF FILTER BOARD
•
Reverse Steps 1 through 6 above.
REMOVAL OF TOY CLOCK BATTERY
1. Remove the system control assembly (see Section 4.2).
2. Using a large screwdriver, unscrew the side panel of the system control
in Figure 4–9.
assembly. See
"
3. To remove the battery, disconnect the 2-pin battery lead at J1 on the
XTC power sequencer. Push the battery up and out of the plastic holder,
pulling the lead through the system control assembly shielding.
REPLACEMENT OF TOY CLOCK BATTERY
1. To replace the battery, snap it into the holder and connect the lead at
J1 on the XTC power sequencer.
2. Reverse Steps 1 and 2 above.
System Control Assembly
4–19
4.9 Tape Drive Specifications
The optional TK tape drive is located in the system control
assembly in the upper left front of the cabinet.
Figure 4–10: Tape Drive
FRONT
TK70
TAPE DRIVE
ASSEMBLY
msb-0069A-90
4–20
VAX 6000 Platform Service Manual
Table 4–6: TK Tape Drive Assembly Specifications
Parameter
Description
Part Number:
TK70
Location:
Upper left front, housed in the system control assembly
Dimensions:
5.80" W x 3.38" H x 8.79" D
Weight:
5.13 lbs
Power:
One power cord from the TK filter board
Cable:
One signal cable 17-02833-01 to the system control assembly
Service From:
Front of cabinet, door removed
Tools Required:
None
Subassemblies:
None
Diagnostics:
All three LEDs on TK70 are lit when power-up diagnostic is in progress; tape-in-use LED (yellow) lights to indicate tape is ready for use.
System Control Assembly
4–21
4.10 Tape Drive Removal and Replacement
Working from the front of the cabinet, remove or replace the
tape drive using the captive screw attached to the control
assembly unit on the right. The tape drive has one power
and one signal cable.
Figure 4–11: Tape Drive Removal
newart:msb0070a.ps
4–22
VAX 6000 Platform Service Manual
REMOVAL
1. Turn the control panel upper key switch to Off.
2. Open the front door.
3. Loosen the captive screw. See
# in Figure 4–11.
4. Being careful not to rip the ribbon cable, pull the tape drive out toward
you. See .
$
5. Holding the unit in your hand, disconnect the power cord labeled P1.
See .
%
6. Disconnect the signal cable 17-02833-01 at J7 on the tape drive. See
.
&
REPLACEMENT
•
Reverse Steps 1 through 6 above, being careful not to twist the signal
cable.
•
As you push the unit in, hold the signal cable flush to the left side of
the unit so that the service loop remains untangled and is installed
smoothly. Tuck the end loop in if it protrudes when the tape drive is
installed.
System Control Assembly
4–23
Chapter 5
Power Subsystem
This chapter gives specifications and removal and replacement procedures
for the power modules. Sections include:
•
Power Subsystem Design
•
Power Specifications
•
Power Modules
•
H7214 Power Regulator
•
H7214 Power Regulator Removal and Replacement
•
H7215 Power Regulator
•
H7215 Power Regulator Removal and Replacement
•
H7242 Power Regulator
•
H7242 Power Regulator Removal and Replacement
•
H7206-B Power and Logic Unit
•
H7206-B Power and Logic Unit Removal and Replacement
•
H7206-B Fan Removal and Replacement
•
H405 AC Power Controller
•
H405 AC Power Controller Removal and Replacement
•
50 Hz Transformer
•
50 Hz Transformer Removal and Replacement
•
H7236-A Battery Backup Unit
•
H7236-A Battery Backup Unit Removal and Replacement
Fan Removal and Replacement
Battery Pack Removal
Battery Pack Replacement
Enclosure Removal and Replacement
Power Subsystem
5–1
5.1 Power Subsystem Design
Figure 5–1 is a block diagram of the <REFERENCE>(VAX_
XXXX) power subsystem.
Figure 5–1: Power Subsystem Design
Blower
24V DC
380V AC or 416V AC input power
is reduced to 208V AC with an
optional autotransformer
H405
AC
Power
Con−
trol−
ler
3−Phase
AC
BLOWER FAULT
Fan
24V DC
|
Power
Board
|
|
|
DEC Power Bus
Temperature Sensor
Optional H7236−A BBU
300V DC
−5V 20
−2V
7
+12V
4
−12V 2.5
To XMI
Card Cage
A
A
A
A
H7215
+5V 130 A
H7214
+13.5V 0.5 A
+3.3V
80 A
H7242
+13.5V 0.5 A
|
− − − − − − − − − − − − − − − − − − − − − − − − − − − − − −
300V DC
|
A
A
A
A
H7215
|
+5V 130 A
H7214
|
+13.5V 0.5 A
|
|
To VAXBI
Card Cage
−5V 20
7
−2V
4
+12V
−12V 2.5
|
|
|
5–2
Optional
− − − − − − − − − − − − − − − − − − − − − − − − − − − − − −
VAX 6000 Platform Service Manual
Control Panel Key Switch
H7206−B Power and Logic Unit
XTC
BULK/AC Sense
ON CMD L
+14V DC
+14 V SHUTDOWN
STANDBY CMD L
Logic Board
SYNC A
SYNC B
DEC Power Bus
AIR FAULT
INHIBIT
− − − − − − − − − − − − − − − − − − − − − − −
CH 1 OK
+14V DC
OVERTEMP 1
CH 1 INHIBIT
SYNC A 1
CH 2 OK
+14V DC
CH 2 INHIBIT
SYNC A 2
CH 3 OK
+14V DC
SYNC A 3
CH 3 INHIBIT
CABINET INTERLOCK 1 INHIBIT
− − − − − − − − − − − − − − − − − − − − − − − − − − − − − − − − − − − −
|
CH 4 OK
+14V DC
OVERTEMP 2
CH 4 INHIBIT
SYNC B 4
|
|
|
|
CH 5 OK
+14V DC
|
|
SYNC B 5
CH 5 INHIBIT
CABINET INTERLOCK 2 INHIBIT
|
|
− − − − − − − − − − − − − − − − − − − − − − − − − − − − − − − − − − − −
msb−p377r−90
Power Subsystem
5–3
5.2 Power Specifications
Figure 5–2 shows the physical arrangement of the power
regulators in the cabinet. Table 5–1 and Table 5–2 list the
DC output voltages the power regulators supply to the XMI
and VAXBI card cages. AC output specifications are listed
in Table 5–3.
Figure 5–2: DC Power Regulators in Cabinet (Rear View)
XMI
A
CHANNEL 1
H7215
B
CHANNEL 2
H7214
VAXBI (OPTIONAL)
C
CHANNEL 3
H7242
D
CHANNEL 4
H7215
E
CHANNEL 5
H7214
msb-0073A-90
5–4
VAX 6000 Platform Service Manual
Table 5–1: XMI Side—DC Output Specifications
DC Voltage
Current
For:
From Regulator:
+12V
4A
RS-232 and TK tape drive supply
A
(Channel 1)
-12V
2.5 A
RS-232 supply
A
(Channel 1)
-5V
20 A
ECL logic
A
(Channel 1)
-2V
7A
ECL logic
A
(Channel 1)
+5V
130 A
Logic and memory supply
B
(Channel 2)
+13.5V
0.5 A
Ethernet transceiver B
B
(Channel 2)
+3.3V
80 A
Logic supply
C
(Channel 3)
+13.5V
0.5 A
Ethernet transceiver C
C
(Channel 3)
Table 5–2: VAXBI Side—DC Output Specifications
DC Voltage
1
Current
For:
From Regulator:
4A
RS-232 and tape drive supply
D
(Channel 4)
-12V
2.5 A
RS-232 supply
D
(Channel 4)
-5V
20 A
ECL logic
D
(Channel 4)
-2V
7A
ECL logic
D
(Channel 4)
+5V
130 A
Logic supply
E
(Channel 5)
+13.5V
0.5 A
Ethernet transceiver E
E
(Channel 5)
+12V
1 The
H7206-B power and logic unit supplies 24V DC at 0–4 amps to the blowers and airflow sensor.
Table 5–3: AC Output Specifications
Type
For:
Two unswitched external IEC 320
receptacles fused at 10 amps
Optional in-cabinet disks and BBU
One unswitched internal IEC 320
receptacle fused at 2 amps
Not to be used
Power Subsystem
5–5
5.3 Power Modules
Most of the power modules can be seen from the rear of the
cabinet.
Figure 5–3: Location of Power Modules (Rear View)
H7214, H7215, AND
H7242 POWER
REGULATORS
H7206-B
POWER AND
LOGIC UNIT
H7236-A
BATTERY BACKUP
UNIT (OPTIONAL)
H405-E/F
AC POWER
CONTROLLER
msb-0308-90
5–6
VAX 6000 Platform Service Manual
Power modules are listed in Table 5–4.
Table 5–4: Power Modules
Part
Number
Module
H7214
Power regulator
13
X
X
H7215
Power regulator
13
X
X
H7242
Power regulator
1
X
X
H7206-B
Power and logic unit
1
X
X
H7236-A
Battery backup unit
1
X
X
H405-E
AC power controller
1
X
–
H405-F
AC power controller
1
–
X
16-28393-01
50 Hz transformer
1
–
X
Quantity
60 Hz
System
50 Hz
System
3 Quantity is 2 if there is a VAXBI in the system cabinet
Power Subsystem
5–7
5.4 H7214 Power Regulator
The system has one or two H7214 power regulators. One
supplies power to the <REFERENCE>(XMI) backplane; the
other, if needed, supplies power to the optional VAXBI
backplane. Each power regulator can also supply +13.5V to
an Ethernet transceiver. These regulators are located in the
upper part of the cabinet, along with the H7215 and H7242
regulators.
Figure 5–4: H7214 Power Regulators (Rear View)
REQUIRED
H7214 POWER
REGULATOR
OPTIONAL
H7214 POWER
REGULATOR
msb-0075A-90
5–8
VAX 6000 Platform Service Manual
Table 5–5: H7214 Power Regulator Specifications
Parameter
Description
Part Number:
H7214
Location:
Upper part of cabinet
Dimensions:
6" H x 4.5" W x 12" D
Weight:
8 lbs
Cables for <REFERENCE>(XMI):
17-01497-02 control/status cable, 34-pin connector
17-01446-01 bulk power cable
17-01525-01 remote sense cable
+13.5V output cable, 2-pin connector (part of 17-01496-01 Ethernet cable)
+5V DC and return leads attached to XMI bus bar assembly
Cables for VAXBI:
17-01666-01 control/status cable, 24-pin connector, to H7206B
17-01447-01 bulk power cable to H7206-B
17-01525-01 remote sense cable to VAXBI bus bar
+13.5V output cable, 2-pin connector (part of 17-01496-01 Ethernet cable)
+5V DC and -5V DC leads attached to VAXBI bus bar assembly
Service From:
Front and rear of cabinet, doors open
Tools Required:
Flat and Phillips screwdrivers, 5/16" nutdriver
Diagnostics:
Green LED lights when +5V output is within regulation
The H7214 power regulator develops two regulated DC outputs: +5V used
to power system logic and memory loads, and the +13.5V, available for an
Ethernet transceiver.
Each H7214 has one green LED that is visible from the rear of cabinet.
The LED lights to indicate that the +5V output is properly regulated.
NOTE: The green LED does not indicate the status of the +13.5V Ethernet
output.
The power regulator consists of a single printed circuit board mounted on a
right-angle bracket. The bracket has guiding edges for use when inserting
the regulator into the cabinet.
Power Subsystem
5–9
5.5 H7214 Power Regulator Removal and
Replacement
Remove and replace the H7214 power regulator from the
rear of the cabinet.
WARNING: High voltages are present in the H7214 power regulator.
After power has been removed, wait at least 2 minutes before working
on the unit.
Figure 5–5: H7214 Power Regulator Removal
13
11
8
12
9
10
8
13
5–10
msb-0076A-90
VAX 6000 Platform Service Manual
REMOVAL
1. Perform an orderly shutdown of the system.
2. Turn the upper key switch on the front control panel to Off.
3. Pull the main circuit breaker on the AC power controller to Off.
4. Unplug system power cord; wait 2 minutes for capacitors to discharge.
5. Open the front and rear doors.
6. At the front of the cabinet, disconnect the bulk power cable by releasing
the fastener clip and pulling.
7. At front of cabinet, loosen one captive screw securing regulator.
8. At the rear of the cabinet, use a 5/16 inch nutdriver to remove the three
nuts and the plastic cover. See .
(
)
9. Disconnect the control/status cable. See
in Figure 5–5. On the
XMI side, disconnect cable 17-01497-02 from J1. On the VAXBI side,
disconnect cable 17-01666-01 from J1.
10. Disconnect the 17-01525-01 remote sense cable from J4. See
+>.
11. Disconnect the +13.5V cord (part of 17-01496-01) from J2 (if Ethernet
connection is present). See .
+?
12. Disconnect the bus bar leads by removing the four screws. See
the bus bar leads down into the XMI service area.
13. Using a flat screwdriver, loosen the four slotted screws. See
+@. Work
+A.
14. Support the bottom of the H7214 as you pull it from the cabinet.
REPLACEMENT
•
Reverse Steps 1 through 14 above.
NOTE: Make sure the lugs connecting the bus bar leads do not contact the
sheet metal bracket around the mounting points.
The H7214 ground reference wire is connected to the regulator’s circuit board
and return bus bar by a screw and washer. Make sure the wire is intact
and properly connected. Tuck the wire out of the way when inserting the
regulator into the system.
Power Subsystem
5–11
5.6 H7215 Power Regulator
The system has one or two H7215 power regulators. One
supplies power to the <REFERENCE>(XMI) backplane; the
other, if needed, supplies power to the optional VAXBI
backplane. These regulators are located in the upper part
of the cabinet, along with the H7214 and H7242 power
regulators.
Figure 5–6: H7215 Power Regulators (Rear View)
REQUIRED
H7215 POWER
REGULATOR
OPTIONAL
H7215 POWER
REGULATOR
msb-0077A-90
5–12
VAX 6000 Platform Service Manual
Table 5–6: H7215 Power Regulator Specifications
Parameter
Description
Part Number:
H7215
Location:
Upper part of cabinet
Dimensions:
6" H x 3.5" W x 12" D
Weight:
5 lbs
Cables for XMI:
17-01446-01 bulk power cable from H7206-B, 3-pin connector
17-01497-02 control/status cable from H7206-B, 10-pin connector for signals and 2-pin Mate-N-Lok connector for interlock switch
17-01566-01 power distribution cable to XMI, 32-pin connector
Cables for VAXBI:
17-01447-01 bulk power cable for H7206-B, 3-pin connector
17-01666-01 control/status cable from H7206-B, 10-pin connector for signals and 2-pin Mate-N-Lok connector for the interlock switch
17-01523-01 power distribution cable to VAXBI, 32-pin connector
Service From:
Front and rear of cabinet, doors open
Tools Required:
Flat screwdriver
Diagnostics:
Green LED lights when voltages are in regulation
The H7215 develops four regulated DC output voltages: -5V and -2V
for ECL devices and +12V and -12V for communications devices and the
optional tape drive.
The H7215 has a thermal sensor. If the H7215 overheats on the XMI side,
an OVER TEMP signal is sent to the H7206-B logic board. The H7206-B
will then inhibit all regulator outputs to the XMI. The same is true for the
regulators on the VAXBI side.
Each regulator has a green LED that lights when all four output voltages
are in regulation. The LEDs are visible from the rear of the cabinet.
The power regulator consists of two printed circuit boards mounted on a
right-angle bracket. The bracket has guiding edges for use when inserting
the regulator into the system.
Power Subsystem
5–13
5.7 H7215 Power Regulator Removal and
Replacement
Working mainly from the rear of the cabinet, remove and
replace the H7215 power regulator using a flat screwdriver.
The assembly has three captive screws, one control/status
cable, and two power cables.
WARNING: High voltages are present in the H7215 power regulator.
After power has been removed, wait at least 2 minutes before working
on the unit.
Figure 5–7: H7215 Power Regulator Removal
8
11
7
7
msb-0078A-90
5–14
VAX 6000 Platform Service Manual
REMOVAL
1. Perform an orderly shutdown of the system.
2. Turn the upper key switch on the front control panel to Off.
3. Pull the main circuit breaker on the AC power controller to the Off
position.
4. Unplug the system power cord.
5. Wait 2 minutes for the capacitors to discharge.
6. Open the front and rear doors.
7. Working from the rear of the cabinet, disconnect the control/status cable
by pulling out the 10-pin connector at J2 and the 2-pin Mate-N-Lok
connector at INTERLOCK. See in Figure 5–7. On the XMI side, this
disconnects cable 17-01497-02. On the VAXBI side, this disconnects
cable 17-01666-01.
'
8. Remove the cable retainer and disconnect the power distribution cable
from J3. See . (Note that this 32-pin connector is keyed.) On the
XMI side, this disconnects cable 17-01566-01. On the VAXBI side, this
disconnects cable 17-01523-01.
(
9. At the front of the cabinet, disconnect the bulk power cable from J1.
This cable has a 3-pin Mate-N-Lok connector. On the XMI side, this
disconnects cable 17-01446-01. On the VAXBI side, this disconnects
cable 17-01447-01.
10. At the front of the cabinet, loosen the one captive screw securing the
H7215.
11. At the rear of the cabinet, use a flat screwdriver to loosen the screws
at the top and bottom of the power regulator. See .
+?
12. Support the bottom of the H7215 as you pull it out of the cabinet.
REPLACEMENT
•
Reverse Steps 1 through 12 above.
•
Be sure to position the power regulator on the guide rail when you
insert it into the cage.
•
Note the gray dot on the control/status cable connector. When installing
this cable, make sure the dot is on the top side.
Power Subsystem
5–15
5.8 H7242 Power Regulator
The system has one H7242 power regulator that supplies
power to the <REFERENCE>(XMI) backplane.
This
regulator is located in the upper part of the cabinet, along
with the H7214 and H7215 power regulators.
Figure 5–8: H7242 Power Regulator (Rear View)
H7242
POWER
REGULATOR
msb-0075B-90
5–16
VAX 6000 Platform Service Manual
Table 5–7: H7242 Power Regulator Specifications
Parameter
Description
Part Number:
H7242
Location:
Upper part of cabinet
Dimensions:
6" H x 4.5" W x 12" D
Weight:
8 lbs
Cables for <REFERENCE>(XMI):
17-01497-02 control/status cable, 34-pin connector
17-01446-01 bulk power cable
17-01525-01 remote sense cable
17-02522-01 H7242 inhibit cable (if VAX 6000 Model 300 or 400 system)
+13.5V output cable, 2-pin connector (part of Ethernet cable 17-0149601)
+3.3V DC and return leads attached to XMI bus bar assembly
Service From:
Front and rear of cabinet, doors open
Tools Required:
Flat and Phillips screwdrivers, 5/16" nutdriver
Diagnostics:
Green LED lights when +3.3V output is within regulation
The H7242 power regulator develops two regulated DC outputs: +3.3V,
used to power system logic load, and +13.5V, available for an Ethernet
transceiver.
Each H7242 has one green LED that is visible from the rear of cabinet.
The LED lights to indicate that the +3.3V output is properly regulated.
NOTE: The green LED does not indicate the status of the +13.5V Ethernet
output.
The power regulator consists of a single printed circuit board mounted on a
right-angle bracket. The bracket has guiding edges for use when inserting
the regulator into the cabinet.
Power Subsystem
5–17
5.9 H7242 Power Regulator Removal and
Replacement
Remove or replace the H7242 power regulator from the rear
of the cabinet.
WARNING: High voltages are present in the H7242 power regulator.
After power has been removed, wait at least 2 minutes before working
on the unit.
Figure 5–9: H7242 Power Regulator Removal
13
11
8
12
9
10
8
13
5–18
msb-0076A-90
VAX 6000 Platform Service Manual
REMOVAL
1. Perform an orderly shutdown of the system.
2. Turn the upper key switch on the front control panel to Off.
3. Pull the main circuit breaker on the AC power controller to Off.
4. Unplug system power cord; wait 2 minutes for capacitors to discharge.
5. Open the front and rear doors.
6. At the front of the cabinet, disconnect the bulk power cord by releasing
the fastener clip and pulling. Disconnect cable 17-01446-01 from J3.
7. At front of cabinet, loosen one captive screw securing regulator.
8. At the rear of the cabinet, use a 5/16 inch nutdriver to remove the three
nuts and the plastic cover. See
in Figure 5–9.
(
)
9. Disconnect the control/status cable. See . Disconnect cable 17-0149702 from J1. Disconnect the H7242 inhibit cable (17-02522-01) (Models
300 and 400 only).
10. Disconnect the 17-01525-01 remote sense cable from J4. See
+>.
11. Disconnect the +13.5V cord (part of 17-01496-01) from J2 (if Ethernet
connection is present). See .
+?
12. Disconnect the bus bar leads by removing the four screws. See
the bus bar leads down into the XMI service area.
13. Using a flat screwdriver, loosen the four slotted screws. See
+@. Work
+A.
14. Support the bottom of the H7242 as you pull it from the cabinet.
REPLACEMENT
•
Reverse Steps 1 through 14 above.
NOTE: Make sure the lugs connecting the bus bar leads do not contact the
sheet metal bracket around the mounting points.
The H7242 ground reference wire is connected to the regulator’s circuit board
and return bus bar by a screw and washer. Make sure the wire is intact
and properly connected. Tuck the wire out of the way when inserting the
regulator into the system.
Power Subsystem
5–19
5.10 H7206-B Power and Logic Unit
5.10.1 Specifications
The H7206-B power and logic unit is located in the lower
right rear of the cabinet, just above the H405 AC power
controller.
Figure 5–10: H7206-B Power and Logic Unit (Rear View)
H7206-B POWER
AND LOGIC UNIT
msb-0079A-90
5–20
VAX 6000 Platform Service Manual
Table 5–8: H7206-B Power and Logic Unit Specifications
Parameter
Description
Part Number:
H7206-B
Location:
Lower right rear of cabinet, just above the H405 AC power controller
Dimensions:
5" H x 5" W x 20.5" D
Weight:
13 lbs
Cables:
17-01498-01
17-02475-01
17-02494-01
17-02500-01
17-01569-01
17-01666-01
17-01497-02
17-01447-01
17-01446-01
17-01570-01
17-01501-01
17-02485-01
17-02975-01
Service From:
Rear of cabinet, door open
Tools Required:
Flat and small Phillips screwdrivers
Diagnostics:
AC input and power regulator indicator lights will light
to XTC module
H7206-B J6 to H7206-B bezel
H7206-B J12 to H7206-B bezel
H7206-B to XMI
DWMBB/B to H7206-B power OK signals
control/status to regulators on VAXBI side
control/status to regulators on XMI side
bulk power to regulators on VAXBI side
bulk power to regulators on XMI side
power to front and rear blowers
input from AC power controller
to optional battery backup unit
to optional battery backup unit
The H7206-B power and logic unit contains the fan/power and logic
modules.
The fan/power module functions are:
•
AC to 300V DC conversion
•
24V DC to blowers
•
Control panel key switch interface
The logic module functions are:
•
AC OK and DC OK control for system
•
Battery backup unit control logic
•
Door interlock logic
•
DEC power bus logic
Power Subsystem
5–21
5.10.2 H7206-B Power and Logic Unit Switches and
Indicators
The H7206-B power and logic unit has ten LEDs and one
reset switch, visible from the front of the cabinet.
Figure 5–11: H7206-B Power and Logic Unit Switches and Indicators
newart:msb0080b.ps
5–22
VAX 6000 Platform Service Manual
The power and logic unit consists of an AC to DC rectifier and filter, a fan/
power module, and a logic module. The unit has ten indicator LEDs and
one reset switch.
The nine LEDs in the upper right corner of the H7206-B are explained in
Table 5–9. Refer to Figure 5–11 for LED numbering.
The green +14V bias LED lights to indicate when the bias supply on the
fan/power module is working.
WARNING: When the +14V bias LED is off, do not assume that the bulk
supply is deenergized. This LED does not indicate the presence or absence
of the 300V bulk supply.
Table 5–9: H7206-B LEDs
LED
Color
Meaning
9
Red
Fault (airflow, interlock, overtemperature)
8
Red
XMI-1 module in XMI-2 card cage
7
Red
H7214 or H7242 installed incorrectly
6
Red
VAXBI—H7214 fault
5
Red
VAXBI—H7215 fault
4
Red
XMI—H7242 fault
3
Red
XMI—H7214 fault
2
Red
XMI—H7215 fault
1
Green
+14V logic bias is okay
LEDs 2 through 6 are latched on to indicate regulator faults. Reset these
LEDs by turning the key switch to Off and back to Enable or Standby, or
by pressing the reset switch (see Figure 5–11). LEDs 5 and 6 are always
lit in Standby mode, since the VAXBI side is off in this key position.
The H7206-B LEDs may not indicate problems with regulators if the status
cables are not correctly seated.
Power Subsystem
5–23
5.11 H7206-B Power and Logic Unit Removal and
Replacement
Remove or replace the H7206-B power and logic unit using
a flat screwdriver. The assembly is held in place by six hex
screws. There are 11 cables. If you cannot disconnect some
cables from the front of the cabinet, remove the plenum to
access the connectors (see Section 6.7).
WARNING: High voltages are present in the H7206-B power and
logic unit. After power has been removed, wait at least 2 minutes
before working on the unit.
Figure 5–12: H7206-B Power and Logic Unit Removal (Top View)
7
10
8
9
J6
J3
6
J4
J2
J1
J18 J11
J16
J14
J9
J12
J13
5
FRONT OF
CABINET
5–24
11
12
13
VAX 6000 Platform Service Manual
14
15
msb-0714A-90
REMOVAL
1. Perform an orderly shutdown of the system.
2. Turn the upper key switch on the front control panel to Off.
3. Pull the main circuit breaker on the AC power controller to Off. Unplug
the system power cord. Wait 2 minutes for the capacitors to discharge.
4. Open the front and rear doors.
5. At the front of the cabinet, disconnect the 17-02759-01 cable from J13.
See
in Figure 5–12.
%
6. Working from the front of the cabinet, disconnect the 17-01501-01 AC
input cable from J1. See .
&
'.
Disconnect the 17-01446-01 bulk power cable from J4. See (.
7. Disconnect the 17-01447-01 bulk power cable from J3. See
8.
9. If the system has an H7236-A battery backup unit, disconnect the two
cables (17-02475-01 and 17-02494-01) from the outside of the bezel. See
.
)
+>.
11. Disconnect the 17-02500-01 XMI cable from J18. See +?.
10. Disconnect the 17-01570-01 blower cable from J2. See
12. Disconnect the 17-01569-01 power OK signal cable from J11. See
13. Disconnect the 17-01498-01 XTC cable from J16. See
+A.
+@.
+B.
15. Disconnect the 17-01666-01 control/status cable from J9. See +C.
14. Disconnect the 17-01497-02 control/status cable from J14. See
16. Working from the rear of the cabinet, use a flat screwdriver to remove
the six hex screws from the bezel.
17. Slide the unit out of the cabinet. Be careful not to damage the cables
on the top of the unit.
REPLACEMENT
•
Reverse Steps 1 through 17 above.
•
When reinstalling the unit, make sure the locating tang on the front
end of the unit engages the locating stud on the front shelf.
Power Subsystem
5–25
5.12 H7206-B Fan Removal and Replacement
Remove the H7206-B power and logic unit’s top cover to
access the fan (part number 12-24701-06). There are eight
screws and one cable. Use a small Phillips screwdriver to
remove the fan.
Figure 5–13: H7206-B Fan Removal
3
(Breakaway)
5
msb-0082A-90
5–26
VAX 6000 Platform Service Manual
REMOVAL
1. Remove the power and logic unit from the cabinet (see Section 5.11).
2. Disconnect the cables from J6 and J12 (see Figure 5–12) and remove
the connectors from the rear bezel (use a 3/16 inch nutdriver).
3. Using a Phillips screwdriver, remove the top cover by removing two
screws on the top (see
in Figure 5–13) and two screws in the back.
#
4. Disconnect the fan cable from J8 on the power/fan module by pulling
out the 2-pin connector.
5. Using a small Phillips screwdriver, remove the four screws that attach
the fan to the rear panel of the power and logic unit. See .
%
6. Remove the fan.
REPLACEMENT
•
Reverse Steps 1 through 6 above.
The fan is powered by the same +24V DC used to run the main system
blowers. There is no fault indication if the fan stops.
When the cabinet doors are open, the power and logic unit depends entirely
on its internal fan for cooling. When working on the system, look at the
fan to see if it is operating.
Power Subsystem
5–27
5.13 H405 AC Power Controller
The H405 AC power controller is located in the lower right
rear of the cabinet. The assembly comes in two models: the
H405-E for 60 Hz systems and the H405-F for 50 Hz systems.
Figure 5–14: H405 AC Power Controller (Rear View)
H405 AC POWER
CONTROLLER
msb-0083A-90
5–28
VAX 6000 Platform Service Manual
Table 5–10: H405 AC Power Controller Specifications
Parameter
Description
Part Number:
H405-E (60 Hz)
H405-F (50 Hz)
Location:
Lower right rear corner of cabinet
Dimensions:
12.0 in. H x 7.5 in. W x 15 in. D
Weight:
34 lbs
Cables:
17-01501-01
17-02759-01
17-01815-01
17-01844-01
17-00442-27
Service From:
Rear of cabinet, door open
Tools Required:
Large Phillips and flat screwdrivers
AC input to power and logic unit
DEC power bus to H7206-B power and logic unit
to 50 Hz transformer
to temperature sensor
to optional battery backup unit
In 60 Hz systems, the H405-E AC power controller routes 3-phase, 208V
AC power to the output connector J2, used to connect power to the H7206-B
power and logic unit. For 50 Hz systems, the same output is first routed to
the transformer (part number 16-28393-01) which lowers the phase voltages
to the required input range of the H7206-B.
The H405 AC power controller monitors the state of the cabinet thermostat
mounted at the top of the cabinet. The thermostat is a normally closed
thermal switch. The H405 also monitors the sense switch in the main
circuit breaker. The sense switch is normally closed when the circuit
breaker is in the On position.
If the thermal switch opens (overtemperature condition) or the sense switch
opens (main circuit breaker is Off), the H405 removes power from the
cabinet by opening an internal AC contactor. The battery backup unit,
if present, is disabled by the Fail Safe Enable signal from delivering its
250V DC source to the H7206-B power and logic unit.
Power Subsystem
5–29
5.14 H405 AC Power Controller Removal and
Replacement
Working mainly from the rear of the cabinet, remove or
replace the H405 AC power controller using a large Phillips
screwdriver. The assembly has six captive screws and seven
cables.
Figure 5–15: H405 AC Power Controller Removal
8
FRONT
VIEW
12
13
DO NOT
USE
9
10
7
5–30
REAR
VIEW
11
VAX 6000 Platform Service Manual
msb-0709-90
WARNING: The H405 AC power controller is heavy. Exercise caution when
lifting and moving this unit.
REMOVAL
1. Perform an orderly shutdown of the system.
2. Turn the upper key switch on the front control panel to Off.
3. Pull the main circuit breaker on the AC power controller to Off.
4. Unplug the system power cord.
5. Open the front and rear doors.
6. Wait 2 minutes for the capacitors to discharge.
7. Working from the front of the cabinet, disconnect the 17-01549-01 fail
safe enable cable from J6. See
in Figure 5–15.
'
8. Disconnect the 17-01501-01 AC input cable from J2 by twisting the
black connector ring counterclockwise. If the system has a 50 Hz
transformer, disconnect the 17-01815-01 cable from J2. See .
(
9. Disconnect the 17-02759-01 DEC power bus cable from J1. See
).
10. Disconnect the 17-01844-01 temperature sensor cable from J9. See
11. Disconnect 17-02521-01 from J7. See
+?.
+>.
12. At the rear of the cabinet, use a flat screwdriver to remove the two hex
screws at the top of the subassembly. See .
+@
13. Using a large Phillips screwdriver, remove the six screws that hold the
AC power controller in place. See .
+A
14. Pull the AC power controller toward you and remove it.
REPLACEMENT
•
Reverse Steps 1 through 14 above.
NOTE: Route the 17-01844-01 and 17-01549-01 cables away from the
transformer (50 Hz systems only).
Power Subsystem
5–31
5.15 50 Hz Transformer
A transformer is required for 50 Hz systems.
The
transformer is located on the floor of the cabinet, directly
below the power and logic unit.
Figure 5–16: 50 Hz Transformer (Front View)
TRANSFORMER
(50 Hz SYSTEMS )
msb-0085A-90
5–32
VAX 6000 Platform Service Manual
Table 5–11: 50 Hz Transformer Specifications
Parameter
Description
Part Number:
16-28393-01
Location:
Lower left front of cabinet
Dimensions:
6.5" H x 6" W x 10" D
Weight:
40 lbs
Cables:
18-01815-01 to H405-F AC power controller
17-01501-01 to H7206-B power and logic unit
Service From:
Front of cabinet, door open
Tools Required:
Flat screwdriver
Phillips screwdriver
Power Subsystem
5–33
5.16 50 Hz Transformer Removal and Replacement
Working from the front of the cabinet, remove the
transformer using a flat screwdriver. The transformer has
six screws and two power cables.
Figure 5–17: 50 Hz Transformer Removal
FRONT
INPUT
OUTPUT
380 V
J1
J1
416 V
INPUT
J2
INPUT
J2
380 V
INPUT
J3
208 V
OUTPUT
J3
OUTPUT
416 V
J1
J2
J3
msb-0035A-90
5–34
VAX 6000 Platform Service Manual
WARNING: To avoid high voltage shock, a round, threaded cap is provided
to cover the unused inlet connector.
When replacing, rewiring, or
reconnecting the transformer, make sure the cap is properly installed. The
cap fits onto either the 380V (J2) or the 416V (J1) inlet connector.
WARNING: The 50 Hz transformer is heavy. Exercise caution when lifting
and moving this unit.
REMOVAL
1. Perform an orderly shutdown of the system.
2. Turn the upper key switch on the front control panel to Off.
3. Pull the main circuit breaker on the AC power controller to Off.
4. Unplug the system power cord.
5. Wait 2 minutes for the capacitors to discharge.
6. Open the front door.
7. Use a Phillips screwdriver to remove the six #10-32 screws securing
the sheet metal panel. This panel is located below the power and logic
unit.
8. Disconnect the 17-01815-01 power input cable from J1 (416V) or J2
(380V). See Figure 5–17.
9. Disconnect the 17-01501-01 power output cable from J3.
10. Remove the six screws that attach the transformer to the cabinet rails.
11. Remove the transformer.
REPLACEMENT
•
Reverse Steps 1 through 10 above.
Power Subsystem
5–35
5.17 H7236-A Battery Backup Unit
The optional H7236-A battery backup unit supplies power to
the system upon power failure. It is located in the bottom of
the cabinet.
Figure 5–18: H7236-A Battery Backup Unit (Front View)
BATTERY BACKUP UNIT
msb-0400-89
5–36
VAX 6000 Platform Service Manual
Table 5–12: H7236-A Battery Backup Unit Specifications
Parameter
Description
Part Number:
H7236-A
Location:
Bottom center of cabinet
Dimensions:
10.5" H x 8.75" W x 28.0" D
Weight:
98 lbs
Cables:
17-00442-27 J2 to H405
17-02485-01 BBU to H7206-B 300V
17-02975-01 BBU to H7206-B signal
Service From:
Front and rear of cabinet, doors open
Tools Required:
Phillips screwdriver
When the system detects a power failure, it signals the H7236-A battery
backup unit (BBU). If the power failure lasts less than one second, the
BBU’s ride-through capability enables the system to function as if nothing
has happened. (Disk drives located in the bottom of the cabinet, however,
are shut down upon detection of the power failure.)
If the power failure lasts longer than one second, Power Fail Interrupt is
signaled and the following actions are initiated:
•
The H7236-A supplies full power to the XMI card cage for at least
500 milliseconds while the processors write their cache data back to
memory.
•
If the system has a VAXBI bus, the operating system stores all current
VAXBI processes during the same 500 millisecond period. Power to the
VAXBI card cage is then disabled.
•
The operating system stops.
•
The H7236-A continues to power the XMI card cage so memory is
refreshed and data is held.
If system power returns within 10 minutes, a warm restart is performed.
The operating system continues from the point at which it stopped.
If the power outage is longer than 10 minutes, the H7236-A shuts off to
prevent the battery from draining. Memory data is lost, since memory is
cleared when power is restored.
Power Subsystem
5–37
5.18 H7236-A Battery Backup Unit Removal and
Replacement
The H7236-A battery backup unit has three FRUs: the fan,
the battery pack, and the enclosure.
5.18.1 Fan Removal and Replacement
The fan and fan panel are removed and replaced as a unit.
Figure 5–19: H7236-A Battery Backup Unit (Rear View)
REAR
7
d i g i t a l
TM
ON
AC
H7236-A
SN __________
L1
L2
L3
L4
L5
115
OFF
+
DC OUTPUT
LEVEL "0"
-
msb-0729A-90
5–38
VAX 6000 Platform Service Manual
REMOVAL
1. Perform an orderly shutdown of the system.
2. Turn the upper key switch on the front control panel to Off.
3. Pull the main circuit breaker on the AC power controller to Off.
4. Unplug the system power cord.
5. Wait 2 minutes for the capacitors to discharge.
6. Open the front and rear doors.
' in Figure 5–19.
7. Turn the H7236-A power switch to Off. See
8. Use a Phillips screwdriver to remove the four corner screws from the
in Figure 5–20.
fan panel. See
(
9. Disconnect the 2-pin connector from the electronics module. See
10. Disconnect the ground wire from the fan panel. See
+>.
).
REPLACEMENT
•
Reverse Steps 1 through 10 above.
Figure 5–20: H7236-A BBU Fan Removal
8
9
2-pin connector
(back of plate)
10
Screw for ground
strap (back of plate)
8
msb-0722B-90
Power Subsystem
5–39
5.18.2 Battery Pack Removal
The battery pack weighs 45 pounds. Support the bottom of
the pack when moving it in or out of the enclosure to prevent
it from binding.
Figure 5–21: H7236-A BBU Battery Pack Removal
9
10
11
msb-0722A-90
5–40
VAX 6000 Platform Service Manual
1. Perform an orderly shutdown of the system.
2. Turn the upper key switch on the front control panel to Off.
3. Pull the main circuit breaker on the AC power controller to Off.
4. Unplug the system power cord.
5. Wait 2 minutes for the capacitors to discharge.
6. Open the front and rear doors.
7. Turn the H7236-A power switch to Off. See
8. Remove the fan. See Section 5.18.1.
' in Figure 5–19.
)
9. Disconnect the battery power connector. See
in Figure 5–21.
Disconnecting and connecting the two parts of this connector requires
a great deal of force.
10. Remove the spacer. See
+>.
+?
11. Using the pull tab, pull the battery pack straight out. See . The
battery pack weighs 45 pounds. Support the bottom of the pack when
moving it to ensure that it does not bind. Exercise caution when lifting
and moving this unit.
Power Subsystem
5–41
5.18.3 Battery Pack Replacement
When you replace the battery pack, press the new battery
reset button only if the battery pack is new.
Figure 5–22: H7236-A Battery Backup Unit (Front View)
3a
<enable
3b
LIFE
defeat>
FRONT
msb-0729C-90
5–42
VAX 6000 Platform Service Manual
1. From the front of the cabinet, slide the replacement battery pack into
the enclosure. Support the bottom of the pack to prevent it from
binding.
2. If you are replacing the battery pack you removed in Section 5.18.2, go
to Step 4.
3. If you are installing a new battery pack, do the following (see
Figure 5–22):
# in
a. Set the battery life switch to enable.
b. Press the new battery reset button.
NOTE: The new battery reset button resets the battery aging information
in the EEPROM. Press this button only when you are replacing the
battery pack with a new one. The battery life switch must be in the
Enable position for this button to function.
4. Reverse Steps 1 through 10 in Section 5.18.2.
Power Subsystem
5–43
5.18.4 Enclosure Removal and Replacement
You must remove the battery pack before removing or
replacing the enclosure. The enclosure will slide free of the
cabinet only if the battery pack is first removed.
Figure 5–23: H7236-A BBU Enclosure Removal
REAR
10
Alignment
Brackets
10
msb-0728-90
5–44
VAX 6000 Platform Service Manual
REMOVAL
1. Perform an orderly shutdown of the system.
2. Turn the upper key switch on the front control panel to Off.
3. Pull the main circuit breaker on the AC power controller to Off.
4. Unplug the system power cord.
5. Wait 2 minutes for the capacitors to discharge.
6. Open the front and rear doors.
7. Turn the H7236-A power switch to Off. See Figure 5–19.
8. Remove the fan. See Section 5.18.1.
9. Remove the battery pack. See Section 5.18.2.
+>
10. Use a Phillips screwdriver to remove the alignment brackets. See
in Figure 5–23. Each right-angle alignment bracket has two screws.
Remove the screws that hold the brackets to the enclosure first.
11. Remove the cable connectors at the rear of the enclosure.
Figure 5–19.
See
12. Push the enclosure forward from the rear of the cabinet.
REPLACEMENT
•
Reverse Steps 1 through 12 above.
Power Subsystem
5–45
Chapter 6
Cabinet and Airflow Subsystem
This chapter describes the field-replaceable units of the cabinet and units
that monitor and control the interior environment of the cabinet. Sections
include:
•
Door and Filter Removal and Replacement (Front)
•
Door and Filter Removal and Replacement (Rear)
•
Airflow Sensor Removal and Replacement
•
Temperature Sensor Removal and Replacement
•
Blower Assembly Specifications
•
Blower Assembly, Front and Rear
•
Blower Assembly Removal and Replacement
•
Side Panel Removal
Cabinet and Airflow Subsystem
6–1
6.1 Door and Filter Removal and Replacement
(Front)
Both the front and rear doors have air filters that need to
be replaced periodically. Figure 6–1 shows the inside of the
front door.
Figure 6–1: Front Door (Inside View)
2
1
3
msb-0092A-90
6–2
VAX 6000 Platform Service Manual
Table 6–1: Front Cabinet Door and Air Filter Specifications
Parameter
Description
Front Door:
70-24623-01
Dimensions:
28.25" W x 56" D
Weight:
31 lbs
Air Filters:
12-11255-23 — 17.5" W x 9" D
12-11255-24 — 18.5" W x 12.5" D (air intake)
12-11255-25 — 18.5" W x 10" D
Tools Required:
3/8" and 11/32" nutdrivers
REMOVAL OF DOORS
1. Remove the ground strap, which is attached to the front door, using a
3/8 inch nutdriver. See
in Figure 6–1.
!
2. Pull up the pin in the top hinge and lock in place. See
".
3. Pull up and hold the pin in the bottom hinge as you lift the door up to
remove it from the cabinet. See .
#
REPLACEMENT OF DOORS
1. Put the door into position at the hinges and then release the lock holding
the top pin.
2. Pull up the bottom pin and release it to secure the door.
REMOVAL AND REPLACEMENT OF AIR FILTERS
It is especially important that the filters in the center of the front door and
at the bottom of the rear door be clean. These filters cover the air intake
area.
Three filters are covered with a grill that must be removed to replace the
air filter.
1. Use an 11/32 inch nutdriver to remove the grill.
2. Pull off the old filter and stick on the new one.
3. Reinstall the grills (they protect against electromagnetic interference).
Cabinet and Airflow Subsystem
6–3
6.2 Door and Filter Removal and Replacement
(Rear)
Figure 6–2 shows the inside of the rear door.
Figure 6–2: Rear Door (Inside View)
msb-0093-89
6–4
VAX 6000 Platform Service Manual
Table 6–2: Rear Cabinet Door and Air Filter Specifications
Parameter
Description
Rear Door:
70-24124-01
Dimensions:
28" W x 41.5" D
Weight:
20 lbs
Air Filters:
12-11255-17 — 26" W x 15.5" D (air intake)
12-11255-22 — 22" W x 9.5" D
Tools Required:
3/8" and 11/32" nutdrivers
The rear cabinet door has a pocket for system information.
For the removal and replacement procedures for the rear door and filters,
see Section 6.1.
Cabinet and Airflow Subsystem
6–5
6.3 Airflow Sensor Removal and Replacement
The airflow sensor is mounted inside the cabinet above the
XMI power regulators, to the left of the temperature sensor.
The airflow sensor regulates the two blowers and shuts
down the power regulators if the airflow in the cabinet is
inadequate.
Figure 6–3: Airflow Sensor (Front View)
FRONT
msb-0094A-90
Table 6–3: Airflow Sensor Specifications
Parameter
Description
Part Number:
12-25024-11
Location:
From the front, the sensor is above the outlet grill of the XMI power regulators and to the left of the temperature sensor.
Signal Cable:
17-01570-01, to both blowers and to the H7206-B power and logic unit
Power:
+24V (common to main blowers)
Service From:
Front of the cabinet, doors open
Tools Required:
Large and small Phillips screwdrivers, wire clipper
6–6
VAX 6000 Platform Service Manual
OPERATION
If the airflow sensor detects inadequate airflow, it signals the H7206-B
power and logic unit. After 30 seconds the H7206-B unit asserts the
Interlock Inhibit signals to the XMI and VAXBI power regulators, which
disable the regulators. Red LED number 9 on the H7206-B unit lights.
(See Section 5.10.2.) The AC power is not affected.
Turn the system off at the control panel as you investigate the cause of the
problem. To restart the system, use the front control panel.
REMOVAL
1. Perform an orderly shutdown of the system.
2. Turn the upper key switch on the front control panel to Off.
3. Pull the main circuit breaker on the AC power controller to Off.
4. Unplug the system power cord.
5. Wait 2 minutes for the capacitors to discharge.
6. Open the front and rear doors.
7. Unplug at the connector.
8. Clip and remove the tiewrap around the sensor.
9. Push down on top of the metal bracket to pop out one side so that you
can remove the sensor. Leave the bracket in the grillwork or mark the
exact location so that the new sensor is placed in the same spot.
REPLACEMENT
1. Slip the new sensor in under the bracket and push the end of the bracket
back into the grill.
2. Secure in place with a tiewrap (90-07031-00).
3. Reattach at the connector.
4. Reverse Steps 1 through 6 in the Removal section above.
Cabinet and Airflow Subsystem
6–7
6.4 Temperature Sensor Removal and Replacement
The temperature sensor is mounted inside the cabinet above
the XMI power regulators, to the right of the airflow sensor.
When the system overheats, the sensor signals the H405 AC
power controller to shut down the system.
CAUTION: The leads on the temperature sensor are weak and will
break if not handled properly.
Figure 6–4: Temperature Sensor (Front View)
FRONT
msb-0095A-90
6–8
VAX 6000 Platform Service Manual
Table 6–4: Temperature Sensor Specifications
Parameter
Description
Part Number:
17-01844-01, sensor and cable to J9 on the H405 power controller
Location:
From the front, the sensor is above the outlet grill of the XMI power regulators and to the right of the airflow sensor.
Power:
H405 power controller
Threshold:
75°C (167°F)
Service From:
Inside the rear door
Tools Required:
Small Phillips screwdriver
OPERATION
When the temperature sensor reaches its threshold, it signals the H405
AC power controller to cut off all power. When the sensor cools down, the
power is restored automatically.
REMOVAL
The temperature sensor is permanently attached to the cable that goes to
the power controller.
To remove a temperature sensor:
1. Perform an orderly shutdown of the system.
2. Turn the upper key switch on the front control panel to Off.
3. Pull the main circuit breaker on the AC power controller to Off and
unplug the system power cord.
4. Wait 2 minutes for the capacitors to discharge.
5. Open the front and rear doors.
6. Unplug the cable at J9 on the H405 power controller.
7. Pull the cable up through the system.
8. With a Phillips screwdriver remove the screw from the bracket that
holds the sensor.
REPLACEMENT
Install the new sensor in the same place. Reverse Steps 1 through 8 above.
Cabinet and Airflow Subsystem
6–9
6.5 Blower Assembly Specifications
Two blowers are located in the center of the cabinet, just
below the XMI and VAXBI card cages. The mounting plate
with the four captive screws is part of the blower assembly
(12-27848-01).
Figure 6–5: Blower Assembly
msb-0096-89
6–10
VAX 6000 Platform Service Manual
Table 6–5: Blower Assembly Specifications
Parameter
Description
Part Number:
12-27848-01; two used
Location:
Front and rear of the lower cabinet area
Dimensions:
15" x 15"
Weight:
9 lbs
Power:
+24V
Signal Cable:
17-01570-01, to the H7206-B power and logic unit and to the airflow sensor
Service From:
Front and rear of cabinet, doors open
Tools Required: Large Phillips and 1/4" flat screwdrivers
Each system has two blowers to provide the required airflow within the
cabinet. If the airflow sensor detects inadequate airflow, it signals the
H7206-B power and logic unit. After 30 seconds the H7206-B unit asserts
the Interlock Inhibit signals to the XMI and VAXBI power regulators, which
disable the regulators. Red LED number 9 on the H7206-B unit lights. (See
Section 5.10.2.) The AC power is not affected.
Cabinet and Airflow Subsystem
6–11
6.6 Blower Assembly, Front and Rear
Figure 6–6 and Figure 6–7 show the two blowers, each with
their protective grillwork in place. Although the mounting
of the two units is somewhat different, once you remove the
protective grillwork from the rear blower assembly the same
removal procedures apply to both blowers.
Figure 6–6: Front Blower
FRONT
msb-0097A-90
6–12
VAX 6000 Platform Service Manual
Figure 6–7: Rear Blower
REAR
7
msb-0098A-90
Cabinet and Airflow Subsystem
6–13
6.7 Blower Assembly Removal and Replacement
To remove the rear blower, you must first remove the
protective grillwork.
You do not need to remove the
grillwork from the front blower, as it can be lifted off with
the plenum.
Figure 6–8: Blower Assembly Removal (Rear View)
8c
8b
8a
8b
8c
msb-0099-89
6–14
VAX 6000 Platform Service Manual
REMOVAL
1. Perform an orderly shutdown of the system.
2. Turn the upper key switch on the front control panel to Off.
3. Pull the circuit breaker on the AC power controller to Off.
4. Unplug the system power cord.
5. Wait 2 minutes for the capacitors to discharge.
6. Open the front or rear door to access the blower to be replaced.
7. Loosen the four captive screws and lift off the metal grill in front of the
rear blower. See
in Figure 6–7. Figure 6–8 shows the rear blower
with the metal grill removed.
'
8. Lift the plenum away from the blower (see
( in Figure 6–8):
a. Unplug the power cord and push it through the hole on the left
panel.
b. Remove the two #10-32 screws inside the top panel and one screw
at the left on the panel at the back of the plenum.
c.
Shift the plenum to the left and lift it off from the four screws.
REPLACEMENT
To replace the blower, reverse the steps above. Note the blower has two
metal tabs at the bottom that slide into slots in the cabinet.
Cabinet and Airflow Subsystem
6–15
6.8 Side Panel Removal
The right side panel of the system cabinet is detachable, so
the cabinet can be bolted to an expander cabinet.
Figure 6–9: Side Panel Removal (Front View)
SIDE
PANEL
KEPNUTS
msb-0041-88
6–16
VAX 6000 Platform Service Manual
Table 6–6: Side Panel Specifications
Parameter
Description
Part Number:
70-19485-00
Location:
From the front, the panel on the right side is removable.
Dimensions:
30" W x 57" H x 3/4" D
Weight:
34.25 lbs
Service From:
Right side of cabinet, as viewed from the front
Tools Required:
7/16" socket wrench
For most configurations, expansion will be to the right of the system cabinet.
To prepare for expansion, remove the side panel of the system cabinet as
follows:
1. Open the front and rear doors of the system cabinet and remove the
doors by lifting them off their hinges.
2. Using a 7/16 inch socket wrench, remove the system cabinet’s side panel
by removing the 12 kepnuts (see Figure 6–9). Carefully lift the panel
when removing it so as not to damage the threaded bolts. Do not remove
the bolts.
3. Before attaching another cabinet, make sure the braided RFI shielding
and securing clips are not damaged or missing. Check that any flexible
spring-strip type RFI gaskets are present in all the mounting holes.
The <REFERENCE>(VAX_XXXX) Series Installation Guide describes how
to attach the system cabinet to a VAXBI expander cabinet.
Cabinet and Airflow Subsystem
6–17
Appendix A
Cable List
The following table lists the replaceable cables in the system.
Table A–1: Cable List
Part Number
Qty
Description
17-00442-27
1
H405 to H7236-A BBU
17-01038-01
1
Flexible backplane extension for VAXBI
17-01149-01
1
Firmware console-enable jumper for DEBNI module
17-01375-04
2
15’ DWMBB/A to DWMBB/B connector,
pander cabinet
17-01445-01
1
Power to logic board internal to H7206-B
17-01446-01
1
H7206-B to three regulators’ jumps (XMI side)
17-01447-01
1
H7206-B to two regulators’ jumps (VAXBI side)
17-01458-02
1
VAXBI ground strap
17-01496-01
1
VAXBI to Ethernet port and H7214
17-01497-02
1
H7206-B to <REFERENCE>(XMI) H7215 and H7214, 72 in.
long
17-01498-01
1
XTC to H7206-B signal, 14-pin
17-01501-01
1
H405 to 50 Hz transformer
17-01523-01
1
H7215 regulator to VAXBIs
17-01525-01
3
H7214 regulator to bus bars (+5V remote sense)
17-01566-01
1
H7215 regulator to the XMI
17-01567-01
1
XTC to console port, 10-pin ribbon
17-01568-02
1
<REFERENCE>(XMI) to XTC (XTC power) 20-pin ribbon, 56 in. long
for VAXBI ex-
612V
Cable List
A–1
Table A–1 (Cont.): Cable List
Part Number
Qty
Description
17-01569-01
1
DWMBB/B to H7206-B power OK signals
17-01570-01
1
H7206-B to both blowers and airflow sensor
17-01661-01
3
Jumper assembly (on H7214 regulator output)
17-01662-01
1
<REFERENCE>(XMI) ground strap
17-01666-01
1
H7206-B to VAXBI regulators’ signal, 60 in. long
17-01815-01
2
H405 to transformer cable (240V systems only)
17-01816-01
1
XTC to system control assembly 20- to 26-pin
17-01818-01
1
Control panel assembly to bulkhead
17-01844-01
1
Temperature sensor cable, to H405
17-01897-02
2
7" DWMBB/A to DWMBB/B cables, from XMI slot E
17-02240-03
1
Scalar/vector intermodule VIB cable
17-02475-01
1
H7206-B J6 to H7206-B bezel
17-02485-01
1
H7206-B to H7236-A battery backup unit (300V, external) (optional)
17-02494-01
1
H7206-B J12 to H7206-B bezel
17-02500-01
1
Power supply enable cable
17-02521-01
1
H405 to XMI fail safe enable
17-02522-01
1
H7242 inhibit (VAX 6000 Models 300 and 400)
17-02632-01
1
TK signal cable
17-02759-01
1
H405 to H7206-B fail safe enable cable
17-02833-01
1
TK to system control assembly 26- to 50-pin ribbon
17-02975-01
1
H7206-B to H7236-A BBU
A–2
VAX 6000 Platform Service Manual
Appendix B
XMI Backplane Connectors
Figure B–1 shows the numbering scheme used on the XMI backplane
connectors. Note that the view is from the rear of the backplane.
Figure B–1: XMI Backplane Connector Numbering
1 2 1 2 1 2 1 2 1 2 1 2
D
1
46
E
SLOT
1
2
3
XMI
4
5
2
16
31
01
32
02
47
17
48
18
33
03
49
19
34
04
50
20
35
05
51
21
36
06
22
37
07
53
23
38
08
54
24
39
09
55
25
40
10
56
26
41
11
12
6
52
57
27
42
58
28
43
13
59
29
44
14
30
45
15
60
Numbering for each D & E
section in XMI backplane
msb-0712-90
XMI Backplane Connectors
B–1
Appendix C
Module Handling
This appendix gives detailed instructions on handling scalar and vector
processor modules for VAX 6000 systems. The sections include:
•
Handling Modules
•
Inserting Modules
Module Handling
C–1
C.1 Handling Modules
Handle the processor modules with care. The technology
used on the VAX 6000 series modules is more vulnerable to
static than past technology. Also, these modules have 25 mil
leads to the chips; these leads are very small, close together,
and easily bent.
Figure C–1: Holding VAX 6000 Series Processor Modules
msb-0228-90
C–2
VAX 6000 Platform Service Manual
The VAX 6000 series modules require careful handling. Prepare yourself
and the work area before handling these modules. Roll up your sleeves and
remove any jewelry. Figure C–1 shows the proper way to hold the module.
Follow these handling procedures to avoid damaging the processor modules:
1. Always wear an antistatic wrist strap.
2. Before removing the module from its ESD box, place the box on a clean,
stable surface.
Be sure the box will not slide or fall. Never place the box on the floor.
And be sure no tools, papers, manuals, or anything else that might
damage the module is near it. Some components on this module can
be damaged by a 600-volt static charge; paper, for example, can carry
a charge of 1000 volts.
3. Hold the module only by the edges, as shown in Figure C–1.
Do not hold the module so that your fingers touch any 25 mil devices,
leads, or XMI fingers. Be sure you do not bend the module as you are
holding it.
4. Be sure nothing touches the module surface or any of its components.
If anything touches the module, components or leads can be damaged.
This includes the antistatic wrist strap, clothing, jewelry, cables,
components on other modules, and anything in the work area (such
as tools, manuals, or loose papers).
Module Handling
C–3
C.2 Inserting Modules
Figure C–2: Inserting the Scalar Processor in an XMI Card Cage
msb-0219R-90
Figure C–3: Inserting the Vector Processor in an XMI Card Cage
msb-0372R-90
C–4
VAX 6000 Platform Service Manual
You must take special precautions when moving the processor modules in
or out of the XMI card cage.
1. Be sure, when inserting a module in or removing it from the XMI card
cage, that no part of the module comes in contact with another module
or a cable.
2. When you swap out a module, place it in an ESD box or on an ESD mat
before you install the new module.
If you place the module on an ESD mat, make sure the mat is on a
stable, uncluttered surface, with side 1 of the module facing up (the side
with the heat sinks). Do not put it on the top of the system cabinet. And
never slide the module across any surface. The leads on the components
are fragile and can be damaged by contact with fingers or any surface.
3. Hold the XMI card cage handle while removing or inserting the module.
If it is not held in place, the handle can spring down and damage the
module.
4. When inserting a module in the card cage, grasp it as shown in
Figure C–2 or in Figure C–3, being careful not to touch any 25 mil
devices, and slide it slowly and gently into the slot.
5. Do not attach the repair tag to the module.
Place the repair tag in the plastic bag attached to the bottom of the
ESD box. Allowing the repair tag to come in contact with the module
can cause damage to a component.
Module Handling
C–5
Appendix D
VAX 6000 Platforms
Use Table D–1 to determine which platform you are servicing.
•
If you are servicing the XMI-2 platform, use this manual for removal
and replacement instructions.
•
If you are servicing the XMI-1 platform, see VAX 6000–400 Options
and Maintenance or VAX 6200/6300 VAXserver 6200/6300 Options and
Maintenance.
Table D–1: VAX 6000 Platform Differences
Item
XMI-1 Platform
XMI-2 Platform
Processor
Model 200, 300, or 400
Model 300, 400, or 500
XMI Backplane
XMI-1
XMI-2
Cabinet Number
70-24900-XX
H9657-CA/CB/CU
1
CIXCD, DEMNA, KDM70
XMI I/O Adapters
None
XTC
20-29176-01
20-29176-02
Power Regulators
H7214 (+5V, +5VBB,
+13.5V)
H7215 (+12V, -12V,
-5V, -2V)
H7214 (+5V, +13.5V)
H7215 (+12V, -12V, -5V,
-2V)
H7242 (+3.3V, +13.5V)
Power and Logic Unit
H7206-A
H7206-B
Battery Backup Unit
H7231-N
H7236-A
VAXBI
Required
DWMBA adapter
2 6-slot channels
Optional
DWMBB adapter
1 12-slot channel
Console Load Device
TK50 or TK70
TK70 or NI CDROM
1 Any
XMI I/O adapter may be installed in the XMI-1 backplane.
VAX 6000 Platforms D–1
Index
A
AC power controller
See H405 AC power controller
Air filters, 6–2 to 6–5
removal and replacement, 6–3
specifications, 6–3
Airflow sensor, 6–6 to 6–7
location, 6–6
operation, 6–7
removal, 6–7
replacement, 6–7
specifications, 6–6
Altitude, 1–5
B
Backplane connectors, B–1
Battery aging information, 5–43
Battery backup unit
See H7236-A battery backup unit
location, 1–8
Battery reset, 5–43
Blower assembly, 6–10 to 6–15
front, 6–12
operation, 6–11
rear, 6–13
removal, 6–15
replacement, 6–15
specifications, 6–10 to 6–11
C
Cabinet
doors, 6–2 to 6–5
specifications, 6–3
front door removal, 6–3
front door replacement, 6–3
Cabinet (Cont.)
rear door removal, 6–5
rear door replacement, 6–5
side panel, 6–16 to 6–17
removal, 6–17
specifications, 6–17
Cable list, A–1 to A–2
Configuration rules
VAXBI, 3–20 to 3–21
XMI, Model 500, 2–20 to 2–21
XMI, Models 300 and 400, 2–18
to 2–19
Connector cleaning supplies, 2–23,
3–23
Control panel assembly, 4–12 to
4–15
location, 4–12
removal, 4–14 to 4–15
replacement, 4–14 to 4–15
specifications, 4–12 to 4–13
Control panel location, 1–6
Cooling system
characteristics, 1–5
location, 1–6, 1–8
D
Daughter card, 2–3, 2–4
DWMBB adapter, 2–3, 3–2
E
Electrical specifications, 1–5
F
Field-replaceable units, 1–10 to
1–11
Filter board, 4–16 to 4–19
Index–1
Filter board (Cont.)
location, 4–16
removal, 4–18 to 4–19
replacement, 4–18 to 4–19
H
H405 AC power controller, 5–28 to
5–31
location, 5–28
operation, 5–29
removal, 5–31
replacement, 5–31
specifications, 5–29
H7206-B power and logic unit, 5–20
to 5–25
fan, 5–26 to 5–27
removal, 5–27
replacement, 5–27
location, 5–20
removal, 5–25
replacement, 5–25
specifications, 5–21
switches and indicators, 5–22
H7214 power regulator, 5–8 to 5–11
location, 5–8
operation, 5–9
removal, 5–11
replacement, 5–11
specifications, 5–9
H7215 power regulator, 5–12 to
5–15
location, 5–12
operation, 5–13
overtemperature switch, 6–7
removal, 5–15
replacement, 5–15
specifications, 5–13
H7236-A battery backup unit, 5–36
to 5–45
battery aging information, 5–43
battery pack removal, 5–40 to
5–41
battery pack replacement, 5–42
to 5–43
Index–2
H7236-A battery backup unit (Cont.)
battery reset, 5–43
enclosure removal, 5–45
enclosure replacement, 5–45
fan removal, 5–39
fan replacement, 5–39
location, 1–6, 5–36
new battery reset button, 5–43
operation, 5–37
specifications, 5–37
H7242 power regulator, 5–16 to
5–19
location, 5–16
operation, 5–17
removal, 5–19
replacement, 5–19
specifications, 5–17
Humidity, 1–5
I
I/O bulkhead space
location, 1–8
Interlock Inhibit signals, 6–7, 6–11
M
Module handling, C–1 to C–5
N
New battery reset button, 5–43
P
Platform differences, D–1
Power and logic unit
See H7206-B power and logic unit
Power controller
See H405 AC power controller
Power failure, 5–37
Power regulators
See also H7214, H7215, or H7242
power regulator
location, 1–6, 1–8
Power subsystem, 5–1 to 5–45
Power subsystem (Cont.)
design, 5–2 to 5–3
modules, 5–6 to 5–7
specifications, 5–4 to 5–5
Processor modules
handling, C–2 to C–5
inserting into card cage, C–5
R
<REFERENCE>(XMI) card cage
location, 1–6, 1–8
S
Side panel, 6–16 to 6–17
removal, 6–17
specifications, 6–17
System
dimensions, 1–5
environmental characteristics,
1–5
front view, 1–6 to 1–7
physical characteristics, 1–5
physical description, 1–2 to 1–5
rear view, 1–8 to 1–9
System control assembly, 4–1 to
4–23
removal, 4–4 to 4–7
replacement, 4–4 to 4–7
specifications, 4–2 to 4–3
T
Tape drive, 4–20 to 4–23
location, 1–6, 4–20
removal, 4–22 to 4–23
replacement, 4–22 to 4–23
specifications, 4–20 to 4–21
Temperature
maximum, 1–5
operating, 1–5
Temperature sensor, 6–8 to 6–9
location, 6–8
operation, 6–9
removal, 6–9
Temperature sensor (Cont.)
replacement, 6–9
specifications, 6–9
Torque values, VAXBI, 3–7
TOY clock battery, 4–16 to 4–19
location, 4–16
removal, 4–18 to 4–19
replacement, 4–18 to 4–19
Transformer, 5–32 to 5–35
location, 5–32
removal, 5–35
replacement, 5–35
specifications, 5–33
V
VAXBI card cage, 3–1 to 3–23
description, 3–2 to 3–7
location, 1–6, 1–8
removal, 3–8 to 3–15
replacement, 3–16 to 3–19
specifications, 3–4 to 3–7
subassemblies, 3–6
system use, 3–2 to 3–3
VAXBI configuration rules, 3–20 to
3–21
VAXBI troubleshooting, 3–22 to
3–23
X
XMI-1 platform, D–1
XMI-2 platform, D–1
XMI backplane connectors, B–1
XMI card cage, 2–1 to 2–23
description, 2–2 to 2–5
removal, 2–6 to 2–13
replacement, 2–14 to 2–17
specifications, 2–4 to 2–5
system use, 2–2 to 2–3
XMI configuration rules
Model 500, 2–20 to 2–21
Models 300 and 400, 2–18 to
2–19
XMI troubleshooting, 2–22 to 2–23
XTC power sequencer, 4–8 to 4–11
Index–3
XTC power sequencer (Cont.)
location, 1–8
removal, 4–10 to 4–11
replacement, 4–10 to 4–11
specifications, 4–8 to 4–9
Index–4