1
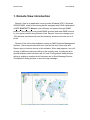
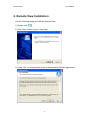
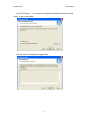
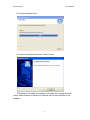
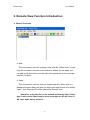
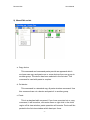
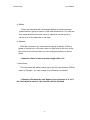
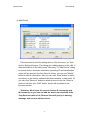
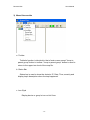
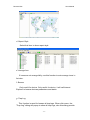
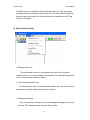
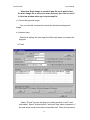
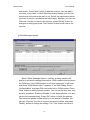
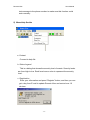
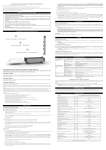
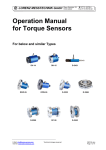
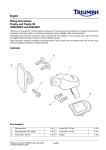
Remote View
User manual
Version: 1.1
Date: 2008.01
Table of Contents
1. Remote View introduction
1
2. Remote View Installation
2
3. Remote View Function Introduction
5
1) Menu-File serials
5
2) Menu-Edit serials
7
3) Menu-View serials
10
4) Menu-Setting Serials
12
5) Menu-Help Serials
14
Remote View
User Manual
1. Remote View introduction
Remote View is an application running under Windows NT4.0, Windows
2000/XP/2003, used for monitoring device equipped with USHA (abstraction
of UPS SNMP/HTTP Adapter) and inSentery on Internet through SNMP
protocol. Therefore you must install SNMP protocol and start SNMP service
in your system before using Remote View. Remote View can manage up to
1024 devices simultaneously and the hierarchy structure can have up to 8
levels.
Remote View is the client software running on NMS (Network Management
System). Users are provided with tree-view and list-view (Icon style and
Report style) to monitor device in this software. When trap happens, icon will
change to different colors according to the severity level, sending email to
special address which has been set in E-mail Configuration dialog window,
calling a cellphone number which has been set in Short Message Service
Configuration dialog window to send the trap message.
-1-
Remote View
User Manual
2. Remote View Installation
Use the following steps to install the Remote View.
1) Double click
2) Click “Next” button to go on next step.
3) Press “Yes” to accept all the items of the preceding License Agreement.
-2-
Remote View
User Manual
4) Click “Browse…” if you want to change the destination folder or click
“Next” to go on next step.
5) Click “Next” to copy the program files.
-3-
Remote View
User Manual
6) Copy the program files.
7) Install successfully and press “Finish” button.
8) Remote View install successfully in program file. In program files
menu, select Remote View and run Remote view to start Remote View
program.
-4-
Remote View
User Manual
3. Remote View Function Introduction
1) Menu-File serials
a. New
This command is used for creating a new map file. When click it, a new
map file is created, and a list view window is added. On this basis, you
can add group and device, and do other edit operations to form a proper
map file you want.
b. Open
This command is used for open an existed map file. When click it, a
standard file-open dialog will pop-up, select one map file and click button
"open", then this map file will be opened by Remote View.
*Attention: only map file can be opened by Remote View. If file's
type is not correct, there may be error messages or AP will close. If
AP close don't worry, restart it.
-5-
Remote View
User Manual
c. Close
Use this command to close a map file. With this command, all list-view
windows will close and tree-view will be blank. If you have created a new
map file or made changes to the existed map file, before close, it will pop
a message box to let decide whether to save.
d. Save
If you create a new file or made changes to the existed file, you can
use this command to save file. If create a new file, a standard file-save
dialog will popup, input file name, file will be saved. If file has existed,
changes will be saved directly.
e. Save as
If you want to save a file by another file name, use this command.
When click this menu, a standard file-save-as dialog will popup, input file
name, then click "save" button, it will be OK.
f. Exit
Use this command to close AP. If you have created a new map file or
made changes to the existed map file, before close, will pop a message
box to let decide whether to save.
-6-
Remote View
User Manual
2) Menu-Edit serials
a. Copy device
This command and command paste provide an approach which
end-user can copy and paste one or more devices from one group to
another group. The device has been selected in the list-view. This
command is used with paste in couples.
b. Cut device
This command is a standard copy & paste windows command. Use
this command can cut a device and paste it to another group.
c. Paste
This is a standard edit command. If you have executed cut or copy
command, it will be active, click main menu or right click in the client
region of list-view window, paste operation will execute. Device will be
pasted to the list-view window which has input focus.
-7-
Remote View
User Manual
d. Delete
These are standard edit commands. Before use this command,
please select a group or device in list view window first. You can use
this command from the main menu or right click on the group or
device icon in the tree-view or list-view.
e. Rename
With this command, you can rename a group or device. Select a
group or device icon, click main menu or right click on the icon in the
tree-view or list view and then you can change the group or device
name.
* Attention: Name's max character length will be 16.
f. Add Group
This command will add a new group to the list-view window. Default
name is "Group1", you can change it by "Rename" command.
* Attention: Because the max depth of tree structure is 8, so if
the total depth is above 8, this function will be disabled.
-8-
Remote View
User Manual
g. Add Device
This command is used for adding device. Click the menu, an "Add
device" dialog will popup. This dialog is for adding device in the LAN. If
there exist device in the LAN, press "Discovery" in "Add Device" dialog
to search device. Devicess information (including IP and identification
name) will be shown in the list. Select a device, you can use "Modify"
button to edit its information. Also you can click "New" button to add a
new device in list control, software will detect whether it really exist. Or
you can click "Remove" button to delete a device in the list. Select a
device in list then click "Add" button, device will be added to the
list-view window.
*Attention: Must input the correct devices R-community and
W-community or you can not add the device successfully. If the
Trap Receiver table is full, Remote View will pop-up a warning
message and can not add the device.
-9-
Remote View
User Manual
3) Menu-View serials
a. Toolbar
Toolbar's function is identical to that of main menu except "Jump to
parent group" button in toolbar. "Jump to parent group" button is used to
return to the upper tree level of the map file.
b. Status Bar
Status bar is used to show the device’s IP, Date, Time, severity and
display trap's description when the trap happened.
c. Icon Style
Display device or group’s icon on list-View.
- 10 -
Remote View
User Manual
d. Report Style
Select this item to show report style.
e. Arrange Icon
If icons are not arrange tidily, use this function to auto arrange icons in
list-view.
f. Browse
Only useful for device. Only useful for device, it will call Internet
Explorer to browse devices parameters and status.
g. Trap Log
This function is used for browse all trap logs. When click menu, the
"Trap Log" dialog will popup to show all trap logs, also this dialog provide
- 11 -
Remote View
User Manual
the filter function to search a specific devices trap log. Trap log dialog
provides backup and delete log function. You can also search a specific
devices trap log by right click on the devices icon and select the "Trap
History" command.
4) Menu-Setting Serials
a. Background color
This command is used to set background color of the list-view
window. The color can be saved to the map file. The default background
color of the list-view window is white.
b. Cancel Background Color
If window's back color is not the default white color, you can use this
command to set the window's back color to white.
c. Background Image
You can use this command to set the background image of list-view
window. The setting can be saved to the map file.
- 12 -
Remote View
User Manual
* Attention: Back image is saved in map file by its path in fact.
So when image file is moved to other directory, you can not see it
in list-view window when you reopen map file.
d. Cancel Background Image
You can use this command to cancel the window's background
image.
e. Autoload map
Select this setting; the last map file will be kept when you restart the
program.
f. E-mail
Select "E-mail" function will pop-up a dialog window to set E-mail
information. Select "Authentication" and input User name, password, if
the mail server must check them to send the mail. Then set mail server
- 13 -
Remote View
User Manual
and sender. Press "New" button to add the receiver. You can add 8
receivers on the table. In New Receivers dialog window, you can set
this receiver will receive the mail or not. Select the trap severity which
you want to receive, and define the mail subject. Besides, you can use
"Remove" function to remove the receiver, press "Modify" button to
change the setting and press "Test" button to send a mail test to the
receiver.
g.Short Message Service
Select “Short Message Service” function, a dialog window will
pop-up to set short message information. GSM modem will auto detect
the COM port. If the GSM modem is not been connected, it will beep
and Show “GSM Modem Not Connected !!” on SMS Dialog. Select
“Authentication” and input PIN code which set in GSM modem. Press
“New” button to add the phone number. You can set the duty time, trap
severity and select “Enable or Disable” in this dialog window. You also
can set the message body. Press “OK” button to finish the settings.
The maximum phone number which you can add is 8. Besides, you
can use “Remove” function to remove the phone number and press
“Modify” button to change the setting. The “Test” button can send a
- 14 -
Remote View
User Manual
test message to the phone number to make sure this function could
work normally.
5) Menu-Help Serials
a. Content
Connect to help file.
b .Status Legend
This is a dialog that shows the severity level of events. Severity levels
are from high to low. Each level uses a color to represent the severity
level.
c. Registration
Enter your information and press "Register" button, and then you can
get a key from E-mail to update Remote View and control over 10
devices.
- 15 -
Remote View
User Manual
d. Enter Key
Enter the key to update Remote View. If the registration is successful,
the "About Remote view" dialog window will display "Limit Device:
1024".
e. About Remote View
To show the version of Remote View and information.
- 16 -