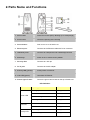
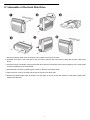
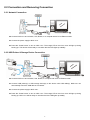
1
1-Bay SATA NAS Server
NAS-7101
User’s Manual
Copyright (C) 2008 PLANET Technology Corp. All rights reserved.
The products and programs described in this User’s Manual are licensed products of PLANET
Technology, This User’s Manual contains proprietary information protected by copyright, and this User’s Manual and all
accompanying hardware, software, and documentation are copyrighted.
No part of this User’s Manual may be copied, photocopied, reproduced, translated, or reduced to any electronic medium or
machine-readable form by any means by electronic or mechanical. Including photocopying, recording, or information
storage and retrieval systems, for any purpose other than the purchaser's personal use, and without the prior express
written permission of PLANET Technology.
Disclaimer
PLANET Technology does not warrant that the hardware will work properly in all environments and applications, and
makes no warranty and representation, either implied or expressed, with respect to the quality, performance,
merchantability, or fitness for a particular purpose.
PLANET has made every effort to ensure that this User’s Manual is accurate; PLANET disclaims liability for any
inaccuracies or omissions that may have occurred.
Information in this User’s Manual is subject to change without notice and does not represent a commitment on the part of
PLANET. PLANET assumes no responsibility for any inaccuracies that may be contained in this User’s Manual. PLANET
makes no commitment to update or keep current the information in this User’s Manual, and reserves the right to make
improvements to this User’s Manual and/or to the products described in this User’s Manual, at any time without notice.
If you find information in this manual that is incorrect, misleading, or incomplete, we would appreciate your comments and
suggestions.
CE mark Warning
There are class A and class B device, In a domestic environment, this product may cause radio interference, in which case
the user may be required to take adequate measures.
Trademarks
The PLANET logo is a trademark of PLANET Technology. This documentation may refer to numerous hardware and
software products by their trade names. In most, if not all cases, these designations are claimed as trademarks or
registered trademarks by their respective companies.
WEEE Regulation
To avoid the potential effects on the environment and human health as a result of the presence of hazardous
substances in electrical and electronic equipment, end users of electrical and electronic equipment should
understand the meaning of the crossed-out wheeled bin symbol. Do not dispose of WEEE as unsorted
municipal waste and have to collect such WEEE separately.
Revision
User’s Manual for PLANET 1-Bay SATA NAS Server
Model: NAS-7101
Rev: 1.0 (April. 2008)
Table of Contents
1.
Introduction ............................................................................................................................................................ 1
1.1 Key Features .................................................................................................................................................... 1
1.2 Package Contents ............................................................................................................................................ 1
2.
Parts Name and Functions .................................................................................................................................... 2
2.1 Assemble of the Hard Disk Drive...................................................................................................................... 3
2.2 Connection and Removing Connection............................................................................................................ 4
2.2.1 Network Connection ................................................................................................................................4
2.2.2 USB Printer & Storage Device Connection .............................................................................................4
2.3 Removing Connection ...................................................................................................................................... 5
2.3.1 Removing USB Mass Storage Devices ...................................................................................................5
2.3.2 Removing USB Printer ............................................................................................................................5
2.3.3 Removing Power connection...................................................................................................................5
3.
Setup Wizard ......................................................................................................................................................... 6
4.
Web-based Management ...................................................................................................................................... 9
4.1 Login ................................................................................................................................................................. 9
4.2 Quick Setup .................................................................................................................................................... 10
4.2.1 Wizard....................................................................................................................................................10
4.2.2 Add User ................................................................................................................................................13
4.2.3 Add Group..............................................................................................................................................14
4.2.4 Add Share ..............................................................................................................................................16
4.3 Users and Groups........................................................................................................................................... 17
4.3.1 User Management .................................................................................................................................17
4.3.2 Group Management...............................................................................................................................18
4.4 File and Print................................................................................................................................................... 18
4.4.1 File Server .............................................................................................................................................18
4.4.2 Share Management ...............................................................................................................................19
4.4.3 Printer Server ........................................................................................................................................20
4.5 System............................................................................................................................................................ 21
4.5.1 LAN Settings..........................................................................................................................................21
4.5.2 Time Settings.........................................................................................................................................22
4.5.3 Turn Off Server ......................................................................................................................................22
4.5.4 Information.............................................................................................................................................23
4.5.5 Disk Usage ............................................................................................................................................23
4.5.6 Error Notification....................................................................................................................................24
4.6 Network Service ............................................................................................................................................. 25
4.6.1 DHCP Server .........................................................................................................................................25
4.6.2 Bonjour Setting ......................................................................................................................................25
4.6.3 TorrentFlux.............................................................................................................................................26
4.7 Maintenance ................................................................................................................................................... 28
4.7.1 Disk Utility ..............................................................................................................................................28
4.7.2 Firmware Upgrade.................................................................................................................................28
4.7.3 Save Configuration ................................................................................................................................29
4.7.4 Restore Configuration............................................................................................................................29
4.7.5 Factory Reset ........................................................................................................................................30
4.7.6 Software Update ....................................................................................................................................30
4.8 Personal Information ...................................................................................................................................... 31
4.8.1 Account ..................................................................................................................................................31
4.8.2 Logout....................................................................................................................................................31
5.
Mapping a Network Drive in Windows XP........................................................................................................... 32
6.
Printer Setup in Windows XP .............................................................................................................................. 34
7.
Mounting SMB Server in Mac OS X .................................................................................................................... 37
8.
Mounting SMB Server in Linux ............................................................................................................................ 40
9.
Network Applications ........................................................................................................................................... 42
9.1 Personal Data Backup.................................................................................................................................... 42
9.2 Network File Sharing ...................................................................................................................................... 42
9.3 FTP Server ..................................................................................................................................................... 43
9.4 Printer Server.................................................................................................................................................. 43
9.5 USB Mass Storage Device ............................................................................................................................. 44
EC Declaration of Conformity ...................................................................................................................................... 49
1. Introduction
Thank you for purchasing NAS-7101. It is a flexible, economical and powerful solution for your network storage
application. The following instructions will help you to learn more about the connections, set-ups, and configurations
of it.
1.1 Key Features
•
The Administrator can Limit the Amount of Available Disk Space Available to Individual Users
•
Aluminum Enclosure with an Internal Cooling Fan for Continuous Operation
•
2 Standard USB 2.0 Port for External USB HDD and Print Server Sharing
•
Supports Windows Utility and Web Base Manage Internet
•
Share Music, Pictures, Movies and Data over Network
•
Supports BT Download
•
Interface: 10/100/1000 Base-TX(Auto MDI/MDI-X), supports auto crossover detection
•
Supports most popular OS including Windows VISTA/XP/2000, Mac OS x v10.2.1 or above, Linux.
1.2 Package Contents
NAS-7101 x 1
Power Adapter x 1
RJ-45 Cable x 1
CD Disk x 1
Quick Installation Guide x 1
NOTE:
1. If any of the above items are missing, please contact your dealer immediately.
2. Using the power supply that is not the one included in NAS-7101 packet will cause damage and void
the warranty for this product.
1
2. Parts Name and Functions
1
Power LED:
Power and access (blue) / Booting-up or reset(orange)
2
Front cover:
Covers the opening of the housing
3
Power button:
Push to turn on or off NAS-7101
4
Ethernet port:
Connects to the Ethernet cable with RJ-45 connector
5
USB host ports:
Connects to USB printers and USB Storage Devices
6
Reset key:
Press 10 sec to restore factory default
7
Security Slot:
Connects to a lock pin
8
DC In jack:
Connects to the AC adapter
9
Activity LED (yellow):
Activity status of Ethernet
10 Link LED (green):
Link status of Ethernet
11 Plastic Upper Frame:
Covers the groove and screws on the top of NAS-7101
LED Definition
LED Name
Operating Status
LED Color
Booting up
Orange
Power ON
Blue
NAS Accessing
Blinking in blue
Resetting
Orange
Linked to the Ethernet
Green
Disconnected from the Ethernet
No signal
Accessing the Ethernet
Orange
Not Accessing
No signal
Power LED
Link LED
Activity LED
2
2.1 Assemble of the Hard Disk Drive
1. Extract the plastic upper frame by sliding it out the gape on the top of the case.
2. Unfasten the screw on the lower part of the front cover. Remove the front cover by lifting the clip with a flat screw
driver.
3. Place the device horizontally; align the hard disk drive with the PCB board. Push slowly and gently to the most inside
until the hard disk drive is firmly seated.
4. Assemble the enclosure by fastening the screws on both top and bottom sides.
5. Attach the front cover to the case and secure the screw on the lower part.
6. Restore the plastic upper frame by sliding it into the gape on the top of the case. Make sure the plastic upper frame
matches the direction.
3
2.2 Connection and Removing Connection
2.2.1 Network Connection
n: Connect NAS-7101 and a Switch, Hub, Router, or a computer with a RJ-45 Ethernet cable.
o: Connect the power supply to NAS-7101.
p: Press the “Power button” to turn on NAS-7101. The orange LED on the front cover will light up during
booting-up. This device will be ready to use when the blue LED lights up steadily.
2.2.2 USB Printer & Storage Device Connection
n: Connect NAS-7101 and a Switch, Hub, Router, or computer with a RJ-45 Ethernet cable.
o: Connect USB printer(s) or USB storage device(s) to this device with USB cable(s). NAS-7101 can
automatically mount the USB devices connected.
p: Connect the power supply to NAS-7101.
q: Press the “Power button” to turn on NAS-7101. The orange LED on the front cover will light up during
booting-up. NAS-7101 will be ready to use when the blue LED lights up steadily.
4
2.3 Removing Connection
2.3.1 Removing USB Mass Storage Devices
NAS-7101 wills auto-mount a USB Storage Device connected to it. But you need to manually unmount the USB
Storage Device before disconnecting it. You can unmount a USB drive by Control Panel > Maintenance > Disk
Utility > clicking “Umount” button.
2.3.2 Removing USB Printer
You have to unmount the printer before disconnecting it. You can unmount a USB printer by Control Panel > File and
Print > Printer Server > Unchecking “Enable” box.
2.3.3 Removing Power connection
Press the “Power button” to turn off NAS-7101, and then remove its connections.
5
3. Setup Wizard
NOTE:
This Setup Wizard is offered by the chipset vendor - STORLINK to make easy to set up NAS-7101.
Insert the bundled CD into the CD-ROM drive to launch the autorun program. Once completed, a welcome menu screen
will appear.
Click the “Setup Wizard” hyperlink; you will see the Setup Wizard dialog box as below. Click “Setup” to continue.
NOTE:
If the welcome screen does not appear, click “Start” at the taskbar. Then, select “Run” and type
“D:\Utility\setup.exe”, assume D is your CD-ROM drive.
Press “Search again” button. Setup Wizard will list all network storage in your LAN environment. Please check next section.
Please select your network storage and press “OK”. User can setup IP address, day and time step by step.
6
Please enter password. Default password is: admin. Then click “OK”.
You can select “Set IP configuration manually” and enter the IP settings. Or select “Automatically obtain an IP address
(DHCP)” when there is a DHCP server in your network.
You may change the time zone, date and time to your network storage and press “Next” to continue.
7
This page shows the new configurations. If it is correct, please press “Save” button and the setting information will be save
to your network storage.
You are about to change the settings. Press “OK” to save new settings. Press “Cancel” if you want to keep current settings.
Click “Exit” button to close Setup Wizard.
8
4. Web-based Management
4.1 Login
Start the web browser on the computer and type the IP address of the NAS-7101. The Default IP: “ http://192.168.0.100 “
The login window of NAS-7101 will appear, Default login username/password is : admin / admin
9
4.2 Quick Setup
4.2.1 Wizard
To setup basic configurations of NAS-7101, follow the diagram below.
1.
Language Setting. Specify the language of this GUI.
2. Password Setting. Click “Next” to skip password change.
10
3. Hostname Setting. This hostname can be seen in My Neighborhood.
4. Internet Protocol Setting. You may specify a stationary IP address/DNS server address or enable the “Obtain IP
address/DNS server address automatically” checkbox, depending on your LAN configuration.
11
5. Time Setting. Adjust date, time, and time zone of your local position. Or select a NTP(Network Time Protocol) server
for automatic time setting and calibration.
6. Wizard Setting Confirmation. Click complete to implement above settings.
12
4.2.2 Add User
To add user support, select the Add User chapter for setting. Please refer to Users and Groups chapter for more detail.
1. Add User. Setup user name and password. Check “Crate Private Folder” box for creating a home directly of this user.
2. User Management. Add/remove this user to/from an existing group.
13
3. Share Permission. Set user permission of each shared directory. Select a share name from the “Access Denied”
column and click “Read Only” or “Writable” to allow user access right. Select a share name from the “Access Granted”
column and click “Remove” to disable user access right from this directory.
4.2.3 Add Group
To add group support, select the Add Group chapter for setting. Please refer to Users and Groups chapter for more detail.
1. Add Group. Set up group name.
14
2. Group Members. Set up group members. Select a user from the “Non- Members” column and click “Add” to categorize
it into this group. Select a user from the “Members” column and click “Remove” to remove this user from this group.
3. Share Permission. Set group permission of each shared directory. Select a share name from the “Access Denied”
column and click “Read Only” or “Writable” to allow group access right. Select a share name from the “Access
Granted” column and click “Remove” to disable group access right from this directory.
15
4.2.4 Add Share
To add a sharing directory, select the Add Share chapter for setting. Please refer to Share Management chapter for more
detail.
1.
Add Share. Set up the directory name.
2.
Windows, FTP access. Set user/group permission of this directory in Microsoft Network and FTP environment. Select
a share name from the “Access Denied” column and click “Read Only” or “Writable” to allow user/group access right.
Select a share name from the “Access Granted” column and click “Remove” to disable user/group access right from
this directory. Check the box “Grant access to all” will enable writable permission of this directory to all
users/groups.
16
3.
NFS Access. Set IP access permissions of this shared directory in Unix-like environment. Input IP Address and click
“Add” to add this IP to the allowed list. Input Subnet (the start of allowed IP address before the slash; the end of
allowed IP address after the slash) and click Add to add this subnet section to the allowed list. Check “Allow to All”
box to enable NFS access of this directory to all users.
4.3 Users and Groups
4.3.1 User Management
All existing users in this system will be shown in this menu. You can create a new user by filling out the form and clicking
the “Save” button. Select an existing user and click “Delete User” button to delete an existing user. Select an existing user
and click “Groups” button to enter Group Management menu. Check “Create Private Folder” box for creating a home
directory of this user.
17
4.3.2 Group Management
All existing groups in this system will be shown in this menu. You can create a new group by filling out the form and clicking
the “Save” button. Select an existing group and click “Delete Group” button to delete an existing group. You can also add
or remove users from an existing group by selecting a group name and clicking the “Members” button.
4.4 File and Print
4.4.1 File Server
Character Set
Select your preferred character set.
Windows Setting
Check “Enable” box to enable Microsoft Network connection
Set Workgroup name for Microsoft Clients to access. You can find this Workgroup name
in My Network Places.
Set Description name for Microsoft Clients to access. You can find this Description name
in My Network Places/Entire Network/Microsoft Windows Network/”Workgroup
18
name”/.
Define Windows Internet Server Name IP address if necessary.
FTP Server Setting
Check “Enable” box to enable FTP server function, with default port 21.
NFS Server Setting
Check “Enable” box to enable NFS server function.
Guest Access Setting
Check “Enable” box to allow users using guest-share directory.
4.4.2 Share Management
Creating Share
Fill out the “Share Name” box, and then click the “Save” button to create a new share
name.
Property Change
You can modify properties of an existing share name. Select a share name in the
“Existing Share” column and click “Windows, FTP Access” or “NFS Access” button to
set or remove read/write permissions of the selected directory.
Delete Share
Check “Delete Share” to delete a specified share name.
Windows and FTP Access
Select a share name from the “Access Denied” column and click “Read Only”
or “Writable” to allow user/group access right. Select a share name from the
“Access Granted” column and click “Remove” to disable user/group access
right from this directory. Check the box “Grant access to all” will enable
writable permission of this directory to all users/groups.
19
NFS Access
Set IP access permissions of this shared directory in Unix-like environment. Input IP Address
and click “Add” to add this IP to the allowed list. Input Subnet (the start of allowed IP address
before the slash; the end of allowed IP address after the slash) and click Add to add this
subnet section to the allowed list. Check “Grant access to all” box to enable NFS access of
this directory to all users.
4.4.3 Printer Server
Check “Enable” box to enable Printer Server function.
Uncheck “Enable” box to unmount a mounted printer.
This device detects the connection of a USB printer automatically. Information of the printer will be shown in the
description.
20
4.5 System
4.5.1 LAN Settings
Hostname
Assign a name to NAS-7101 as the identification within your local area network.
IP Address Setting
Obtain IP Address
Automatically
NAS-7101 obtains an IP address automatically if a DHCP
server is present in the local area network.
Use
Following
Address
IP
Fill in the IP address, subnet mask, and Default gateway
information if they are assigned by your network administrator.
Obtain DNS Server
Address Automatically
NAS-7101 obtains a DNS Server address automatically if a
DHCP server is present in the local area network.
Use Following
Server Address
Fill in the DNS server addresses if they are assigned by your
network administrator.
DNS
21
4.5.2 Time Settings
Set current Date, Time, and Time zone.
Specify a NTP Server if you want to get date and time from Time Server.
Date & Time
Click this option to set time and date manually
Time Zone
Set the time difference from Greenwich Mean Time in the area where the device
is installed.
NTP Server
Select default or type the host name or IP address or domain name of the NTP
server in User Define box.
4.5.3 Turn Off Server
To restart NAS-7101, click the “Restart” button.
To power off NAS-7101, click the “Shutdown” button.
22
4.5.4 Information
Display system information.
4.5.5 Disk Usage
Display HDD usage (total disk size, used disk size) and user’s quota information.
23
4.5.6 Error Notification
Monitoring Service Setting
Disk Usage
If the disk usage reaches 90%, the system will inform the
administrator.
Windows File
Sharing Server
If the SAMBA task goes wrong, the system will inform the
administrator.
FTP Server
If the FTP Server task goes wrong, the system will inform the
administrator.
DHCP Server
If the DHCP Server task goes wrong, the system will inform the
administrator.
Check Interval
You can select hourly or daily inform interval.
Email Notification Setting
Enable
Check this box to enable notification via email.
Error Handling Mail Server
Specify a SMTP server for this device.
Error Handling Email Address
Specify administrator email address.
Pop-up Notification Setting
Enable
Check this box to enable notification via Windows pop-up
messages.
Error
Handling
Pop-up Machines
Specify the IP address of administrator’s PC.
24
4.6 Network Service
4.6.1 DHCP Server
If there is no DHCP server present, this device will automatically turn on its DHCP server function.
4.6.2 Bonjour Setting
If enabled, then the user can listen music that stored in the NAS via iTunes client.
25
4.6.3 TorrentFlux
TorrentFlux is an open source bit torrent client. Check “Enabled” box to perform TorrentFlux. Click “Save” button to save
check box status. Click “Link to bt” button to open TorrentFlux in another browser window. Visit http://www.torrentflux.com/
for more information of this program.
The login window of TorrentFlux will appear, Default login username/password is : mysql / 123456
26
Select a Torrent for upload
Specify the torrent file with which you need download files. You can upload it
from local PC.
URL for the Torrent File
Specify the torrent file with which you need download files. You can upload it
from provide one HTTP/FTP URL for it.
Torrent Search
1.
Enter the keywords you wish to search for in the text field labeled
Torrent Search.
2.
Select the torrent search engine you wish to use from the dropdown list
next to the text box.
3.
Click the Search button.
Torrent Details
View the detailed information of the task.
Run Torrent
Start to run the selected task.
Stop Torrent
Stop the selected task.
Seed Torrent
Download finish
Delete
Delete selected tasks.
27
4.7 Maintenance
4.7.1 Disk Utility
Disk Utility shows device name, type of file system, volume mounted, and disk mount status of the HDD installed in this
device. For a newly attached HDD, formatting is required before any further operation.
Format Button
Press this button to format a specific HDD. It supports EXT3, and FAT32 file
system. Check the encrypt box to allow password protection over the HDD.
Scan Button
Press this button to check disk integrity.
Umount button
This device will automatically mount a USB Storage Device connected to it. But
you need to manually unmount the USB Storage Device before disconnecting it.
Detail Button
If the HDD supports S.M.A.R.T, it will report its health status.
Disk Spin Down Time
Specify the HDD spin down time if there is no access to this device for some while.
4.7.2 Firmware Upgrade
You can perform firmware upgrade with this function by selecting a firmware upgrade file and then clicking the “Start
Upgrade” button. When the upgrade is in progress, all network connection will be stopped. This device will automatically
reboot after the upgrade is completed.
28
4.7.3 Save Configuration
This device can save its current configuration to a local file. The default file name is “config.tar”.
4.7.4 Restore Configuration
You can restore system configuration from a previously saved config file saved by “Save Configuration” function. Specify a
config file and then click the “Restore” button to restore previous settings.
29
4.7.5 Factory Reset
“Factory Reset” resets all configurations to factory defaults. All users, networking, and other configurations will be lost once
the “Factory Reset” button is pressed.
4.7.6 Software Update
Select an installation module and click “Upload” button to install it on this device.
30
4.8 Personal Information
4.8.1 Account
Account is the only section in “Personal Information”. You could change the password of user ‘admin’ and the language of
the GUI. Besides, share list, system disk quota and the percentage of disk used will be shown as well.
4.8.2 Logout
Click Logout to logout off this device.
31
5. Mapping a Network Drive in Windows XP
After mapping a specific folder as a Network Drive, you can access it easily in My Computer.
We will show you an example of this operation in Windows XP. For other operation systems, please refer to the manuals of
their respective manufacturers.
A USB external drive connected to this device will be seen as \\your-hostname\usb1 or \\your-hostname\usb2 in
Windows Explorer. You can also map it with the following steps.
1.
Click Start button in Windows taskbar => Click Search => Click Computer or people => Click A computer on the
network and a new window will appear.
2.
Input the hostname of this device in the Computer Name column, which you set previously in Control Panel > System
> LAN Settings > Hostname chapter; or you can also input the description of this device, which you set previously in
Control Panel > File and Print > File Server > Windows Setting > Description. Click the Search button, and you will
find search results in the right column.
3.
Double click on the computer icon. You can also access this device directly by inputting “\\your-hostname” in the
URL bar of an Explorer window.
4.
Right click on the folder you want to map and select Map Network Drive.
32
5.
A Map Network Drive dialogue box will be shown. Specify a drive letter for the folder chosen and click Finish button
to complete mapping.
6.
A “Connect to Your-Hostname” dialogue box will be shown. Input a username and its password your previously set in
Control Panel > File and Print > Windows and FTP Access. You can enable automatic login process in the future
by checking the “remember my password” box. You will need to input the username and its password again each
time you tried to access this network drive if the “remember my password” box is left unchecked.
7.
The selected folder will now be shown in My Computer. You can then access it like a local hard drive.
33
6. Printer Setup in Windows XP
You can enable access of a network printer to members in the same LAN environment. We will show you an example of
this operation in Windows XP. For other operation systems, please refer to their manuals of respective manufacturers.
Take the installation of EPSON AcuLaser C1100 printer as an example.
1.
Connect the USB printer to NAS7101 with the printer’s USB cable directly. The printer will be automatically detected
by NAS-7101.
2.
Input “\\your-hostname” (default arinas) in the URL bar of an Explorer window. Double click on the “lp” icon.
3.
A dialogue box will pop up. Click Yes to continue.
4.
Another dialogue box will pop up. Click OK to continue.
34
5.
In the Add Printer Wizard window, select the manufacturer and printer model corresponding to the printer connected.
If the manufacturer of the specific model of your printer is not available in the list, click on the “Have Disk…” button to
install its driver from the driver disk provided by the manufacturer.
6.
Insert the driver disk into your local computer. Click the “Browse…” button to select the corresponding INF file in the
driver disk. Click OK to proceed on installation.
7.
Click OK to proceed on installation.
8.
A “Connecting to lp on your-hostname” dialogue box will pop up during the installation process. The installation
process may take several minutes to complete, please wait.
35
9.
When the installation process is complete, a “lp on your-hostname” window will be shown. Now you can print
documents using the printer installed. Each member in the LAN will have to complete above installation before using
this printer.
36
7. Mounting SMB Server in Mac OS X
First, you have to make sure that local Mac and NAS-7101 are in the same LAN environment. Then you can connect to
NAS-7101 using SMB protocol, by inputting a URL starts with “smb://”.
1.
Click on the Apple Menu, and select Location -> Network Preferences.
2.
A Network window will show. Select Built-in Ethernet in the Show: pop-up menu.
3.
Select Using DHCP in the Configure IPv4 pop-up menu.
37
4.
The private IP address acquired from the DHCP server is now displayed in this window. You can find the IP
Addresses of this Mac and of this device are within the same LAN environment.
5.
Select Go -> Connect to Server in the menu bar.
6.
The “Connect To Server” window will be shown. Input smb://NAS-IP, and then click Connect.
7.
A “Connecting to smb://NAS-IP” progress bar will be shown first, followed by the “SMB Mount” window. Select a
folder (ex: admin) in the “Select a share” pop-up menu and then click OK.
38
8.
Input Username and Password in the “SMB/CIFS Filesystem Authentication” window, and then click OK.
9.
If the connection succeeded, you can see the NAS icon in the left column.
10.
Click the symbol by the right side of the NAS icon to unmount this device.
39
8. Mounting SMB Server in Linux
The following operation is performed in Fedora command line environment. The IP address of this device is set to
192.168.0.100 (its default value). Actual scenario of application may vary from case to case.
1.
Using the smbclient command to check the content of the NAS-7101.
2.
Input smbclient -L 192.168.0.100 -U admin after the prompt. The system will prompt you with “Password:”. Input
admin (the default password for user admin) to get a list of directories within the NAS-7101.
3.
Create a folder as the mount point for the NAS-7101.
Input mkdir /mnt/admin after the prompt for mounting of the shared directory “admin”.
Input mkdir /mnt/usb1 after the prompt for mounting of the USB external drive.
4.
Mount the NAS-7101 with mount command.
Fedora 5 and later: Input mount -t cifs -o username=admin //192.168.0.100/ /mnt/admin/ after the prompt to mount
the shared directory.
40
Input mount -t cifs -o username=admin //192.168.0.100/ /mnt/usb1/ after the prompt to mount the USB external
drive.
Fedora 4 and earlier: Input mount -t smbfs -o username=admin //192.168.0.100/ /mnt/admin/ after the prompt.
After the input of the mount command, the system will prompt you with “Password:”. Input the corresponding
password of the user.
5.
Unmount a directory mounted.
Input umount /mnt/admin/ to unmount the shared directory.
Input umount /mnt/usb1/ to unmount the USB external drive.
41
9. Network Applications
9.1 Personal Data Backup
For a single user, you can use NAS-7101 as an external hard drive to store your data via Ethernet connection.
9.2 Network File Sharing
With NAS-7101, a group of people in a LAN environment can share and store files over Ethernet connection. NAS-7101
could work with 10/100/1000 Base-T Ethernet environment.
9.3 FTP Server
NAS-7101 features FTP function. You can access the FTP via a web browser or a FTP client.
1.
If you are in the same LAN of NAS-7101, simply input “ftp://your-account @your-hostname_or_IP address/” in
your browser’s URL bar and press Enter key; or open a connection by your-hostname (or its IP address) with a FTP
client. Login with a set of username and password you set previously to get access to NAS-7101.
2.
If you are accessing NAS-7101 over Internet connection, the router of NAS-7101 will have to set a NAT mapping on
port
21
for
FTP
protocol.
In
the
URL
bar
of
your
browser,
input
“ftp://
your-account@router-hostname_or_router-public-IP” instead. It is recommended to have a static IP address for
the router of the FTP server to enable stable connections.
9.4 Printer Server
Connect a USB printer to NAS-7101 and share this printer to members in the same LAN.
Note: GDI Interface printers are not supported.
9.5 USB Mass Storage Device
Connect your USB Mass Storage Device to NAS-7101. The two USB ports can supply up to 350mA of current in total. If
you would like to connect a USB external HDD to one of the USB host ports, it is recommended to apply external power to
the USB HDD.
NAS-7101 will automatically mount a USB Mass Storage Device connected to it. A USB external drive connected to
NAS-7101 will be seen as \\your-hostname\usb1 or \\your-hostname\usb2 in Windows Explorer. But you need to
manually unmount the USB Mass Storage Device before disconnecting it. You can unmount a USB drive by Control Panel
> Maintenance > Disk Utility > clicking “Umount” button.
EC Declaration of Conformity
For the following equipment:
*Type of Product
*Model Number
: 1-Bay SATA NAS Server
: NAS-7101
* Produced by:
Manufacturer‘s Name : Planet Technology Corp.
Manufacturer‘s Address : 11F, No. 96, Min Chuan Road, Hsin Tien
Taipei, Taiwan, R.O.C.
is herewith confirmed to comply with the requirements set out in the Council Directive on the
Approximation of the Laws of the Member States relating to Electromagnetic Compatibility
(89/336/EEC, 92/31/EEC, 93/68/EEC).
For the evaluation regarding the Electromagnetic Compatibility, the following standards were
applied:
EN 55022
EN 61000-3-2
EN 61000-3-3
EN 55024
IEC 61000-4-2
IEC 61000-4-3
IEC 61000-4-4
IEC 61000-4-5
IEC 61000-4-6
IEC 61000-4-8
IEC 61000-4-11
(2006, Class B)
(2000 + A1: 2001)
(1995 + A1: 2001)
(1998+A1: 2001+A2: 2003)
(1995 + A2: 2000)
(2002)
(1995 + A2: 2001)
(1995 + A1: 2000)
(1996 + A1: 2000)
(1993 + A1: 2000)
(2004 + A1: 2000)
Responsible for marking this declaration if the:
⌧ Manufacturer
Authorized representative established within the EU
Authorized representative established within the EU (if applicable):
Company Name:
Planet Technology Corp.
Company Address:
11F, No.96, Min Chuan Road, Hsin Tien, Taipei, Taiwan, R.O.C
Person responsible for making this declaration
Name, Surname
Position / Title :
Taiwan
Place
John Sung
Product Manager
2nd Apr., 2008
Date
Legal Signature
PLANET TECHNOLOGY CORPORATION
e-mail: [email protected]
http://www.planet.com.tw
11F, No. 96, Min Chuan Road, Hsin Tien, Taipei, Taiwan, R.O.C. Tel:886-2-2219-9518 Fax:886-2-2219-9528