1
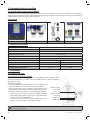
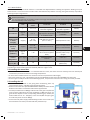
Hydroxynator
Instructions for installation and use
English
EN
NL
ES
PT
More languages on:
www.zodiac-poolcare.com
H0451600.A - 2014/01
•Read this notice carefully before installing, maintaining or repairing this appliance!
•The symbol
indicates important information that you must imperatively take into account to
avoid the risk of damage to persons or the appliance.
•The symbol
indicates useful, informative information.
Warnings
•As part of a continuous improvement process, our products may be modified without prior notice.
•Exclusive use: a pool water treatment system (it must not be used for any other purpose).
•The appliance must be installed by a qualified technician, in compliance with the manufacturer’s
instructions and in compliance with current local standards. The installer is responsible for the
installation of the appliance and compliance with local regulations in matters of installation. Under
no circumstances can the manufacturer be held liable in the event that applicable local installation
standards are not respected.
•It is important that this appliance be handled by skilled and apt persons (physically and mentally)
having received the instructions for use beforehand (by reading these instructions). All persons not
meeting these criteria must not approach the appliance in order to avoid exposure to dangerous
elements.
•If the appliance suffers a malfunction: do not try to repair the appliance yourself, contact your
installer.
•Before working on the appliance, make sure it is powered off and that all equipment connected to
it is powered off.
•Before any connections, make sure that the voltage indicated on the plate on the appliance
corresponds to the mains voltage.
•Eliminating or shunting any safety devices automatically voids the warranty, as does the replacement
of parts using parts not originating from our warehouses.
•Incorrect installation may cause damage to property or serious injuries (possibly causing death).
•Keep the appliance out of the reach of children.
•Only use MagnaPool™ minerals specifically intended for use with the MagnaPool™ hydroxynator.
The use of any other minerals or salts automatically voids the warranty.
1
H0451600.A - EN - 2014-01
Contents
1. Information before installing................................................................................................................... 3
1.1 General delivery terms and conditions ....................................................................................................... 3
1.2 Contents .......................................................................................................................................................... 3
1.3 Technical specifications ................................................................................................................................. 3
2. Installation ....................................................................................................................................................... 3
2.1 Preparing the pool ........................................................................................................................................ 3
2.2 Installing the control box ............................................................................................................................... 4
2.3 Installing the cell ............................................................................................................................................ 4
2.4 Installing the flow controller ......................................................................................................................... 5
2.5 Electric connections ....................................................................................................................................... 5
3. Use....................................................................................................................................................................... 7
3.1 User interface presentation .......................................................................................................................... 7
3.2 Settings ............................................................................................................................................................ 8
3.3 Starting up the treatment ........................................................................................................................... 10
EN
4. Maintenance ................................................................................................................................................. 10
4.1 Cleaning the electrode ................................................................................................................................ 10
4.2 Wintering....................................................................................................................................................... 11
4.3 Recycling ........................................................................................................................................................ 11
5. Troubleshooting .......................................................................................................................................... 11
6. Registering the product............................................................................................................................ 12
H0451600.A - EN - 2014-01
2
1. Information before installing
1.1 General delivery terms and conditions
All equipment, even postage and packing paid, travels at the risks and perils of the recipient. Written reserves should be
made on the transporter’s delivery documents if damage during transport is discovered by the recipient (confirmed by
registered letter to the transporter within 48 hours).
1.2 Contents
MagnaPool™ Control Box
MagnaPool™ Cell
Flow controller kit
Bag of accessories
1.3 Technical specifications
Power supply
Electric power
110-240Vac-50Hz
195W
Protection index
Control box size (l x h x d)
Cell size (l x d)
Weight (control box + cell)
Flow through the cell
Pressure in the cell
Operating water temperature
IP23
31 x 33 x 11 cm
30 x 10 cm
7 Kg
Minimum
5m³/h
/
5 °C
Maximum
18m³/h
2,75 bars
40 °C
2. Installation
2.1 Preparing the pool
2.1.1 Filtration and filtering medium
The MagnaPool™ system is designed to be fully effective when operating with a
correctly sized filtration and which uses the specific Zodiac® Crystal Clear filtering
glass (and not sand).
Filter filling procedure:
• Pour clean water into the filter tank until the side diffusers are
covered in order to break the fall of the filtering medium.
Zodiac® Crystal
• Use a plastic bag to cover the filter’s upper diffuser when
Clear level
filling (to prevent the filtering medium from getting inside it).
«fi
ne» size
• Then pour the filtering medium in the following proportions:
- about 1/4 to 1/3 of the total required weight of Zodiac®
Zodiac® Crystal
Crystal Clear glass medium «large» grain size (1.0/3.0 mm),
Clear level
in order to cover the side diffusers.
«large» size
- about 2/3 to 3/4 of the total required weight with «fine»
Water level
Zodiac® Crystal Clear glass medium (0.5/1.5 mm).
Please refer to the filter and pump installation and user manuals for further information. Consult your Zodiac®
distributor if necessary.
3
H0451600.A - EN - 2014-01
2.1.2 Water balance
It is essential that the pool water balance is controlled and adjusted before installing the appliance. Making sure pool
water balance is correct from the start will reduce the likelihood of problems occurring during the first days of operation
or during the pool usage season.
Even if it is an automatic regulation system, it is essential to carry out regular water analyses to check the water
balance parameters.
The use of the optional pH regulation module is strongly recommended in order to keep the pool pH permanently
and automatically at the correct level.
Unit
Recommended
values
pH
/
7.2 – 7.4
Free chlorine
mg/L or
ppm
0.5 – 2
°f (ppm)
8 – 15
(80 – 150)
°f (ppm)
mg/L or
ppm
TAC
(alkaline levels
or buffer
strength)
TH*
(hardness
level)
Cyanuric acid
(stabiliser)
To increase
To reduce
Test frequency
(in season)
Add pH+ or use
automatic regulation
Increase production of
hydroxynator disinfectant
or use Boost mode
Add pH- or use
automatic regulation
Weekly
Reduce disinfectant
production
Weekly
Add alkalinity corrector
(Alca+ or TAC+)
Add hydrochloric acid
Monthly
10 – 30
(100 – 300)
Add calcium chloride
Add a scale sequestrant
(Calci-) or decarbonate
Monthly
< 30
Add cyanuric acid only
when necessary (Chlor
Stab)
Empty the pool
partially and then top
up again
Quarterly
EN
Mineral
Add MagnaPool™
Leave as is
Quarterly
content
g/L or kg/m³
5
minerals
MagnaPool™
Add metal sequestrant
Metals
mg/L or
Quarterly
±0
/
(Metal Free)
(Cu, Fe, Mn…)
ppm
* Warning, use an analysis kit that measures carbonate hardness (only scale) and not total hardness (or French degrees),
otherwise the measurement would be artificially offset to a higher value.
2.2 Installing the control box
• The control box must be installed in a ventilated technical room, free from all traces of damp, free from stored pool
maintenance products and free from freezing temperatures.
• It must not be installed more than 1.8 metres from the cell (maximum cable length).
• If the box is fixed to a post, a watertight panel must be fixed behind the control box (350x400 mm minimum).
• Fix the support solidly to the wall or the watertight panel, and place the control box on it using the screws provided.
2.3 Installing the cell
• The cell must be installed on the piping after the filtering, after any
measurement sensors, and after eventual heating systems.
• Make sure that the cell is placed HORIZONTALLY. Ideally the water should
flow from the electric connections towards the opposite side.
• Use the provided screw-on fittings to fix the cell to the pipes. For Ø63 mm
pipes, glue them directly to the screw-on fittings. For Ø50 mm pipes, use
glue-on PVC adapters of the corresponding diameter (grey models; the
white models are for 1 ½’’ UK pipes). In the case of Ø63 mm pipes, glue
them directly to the screw-on fittings.
• Connect the cell power supply cable following the wire colour codes (red,
black and blue connectors) and then refit the protective cap.
H0451600.A - EN - 2014-01
4
• The cell must always be the last element placed on the pool return pipe (see diagram).
• It is always recommended to install the cell on a by-pass. This assembly is MANDATORY if the flow rate is
greater than 18 m³/h, to prevent load loss.
• If you install the cell on a by-pass, it is recommended to fit a check valve downstream from the cell as opposed to a manual valve in order to prevent any risk of human error.
• The two red wires can be connected to one or the other red terminals on the electrode.
2.4 Installing the flow controller
The flow controller and its fixture collar (Ø50 mm) must imperatively be installed on the piping close to the cell and
upstream from it. Use the supplied threaded adapter and Teflon tape to install the flow controller on its fixture collar.
• Cell installed on a by-pass: the flow controller must be installed on the cell by-pass between the upstream isolation
valve and the cell itself.
• Cell installed in line: the flow controller must be installed just in front of the cell and after a possible valve.
• Failure to follow these instructions could lead to the destruction of the cell (see §2.3). The manufacturer cannot
be held liable in this case.
• The flow detector has a direction for installation (arrow indicated on it showing the water flow direction). Make
sure it is correctly placed on its fixture collar so that it halts disinfectant production when filtering is stopped
(red «Flow» indicator on showing the absence of flow, see § 5).
2.5 Electric connections
2.5.1 Connecting the control box
The appliance can be connected in several different ways (in compliance with the applicable standards in the country of
installation).
• Preferred connection: the appliance is connected to a permanent power supply separated from the filtering thanks to
the presence of the flow controller (power supply protected by a specific 30 mA ground fault circuit breaker).
• Possible connection: directly coupled to the pool filtering (the appliance is only supplied with power when filtering is
operating).
• Optional connection: the female connector located under the hydroxynator box is designed for the direct connection of
a filtering pump (230Vac-50Hz, maximum consumption 9A). In this case, use the supplied corresponding male connector
(which will allow the hydroxynator programmer to control both filtering and disinfection times).
• When all connections have been completed and all glued assemblies have dried, reconnect the mains power supply to
power on the appliance.
Whichever connection is used, it is mandatory to programme the hydroxynator operating times (called
«Timers») (see §3.2.2).
2.5.2 Connection to an electric roll-on shutter
If the pool is fitted with an electric roll-on shutter, it can be connected to the hydroxynator so that the latter automatically
adapts its disinfectant production when the shutter is closed (see §3.1.2).
• Make sure the appliance is powered off.
• Remove the blue protection cover.
• Remove the 4 fixture screws from the lower module and remove it. The lower part of the electronic card is then visible
(referred to as «PCB» on the diagrams below).
5
H0451600.A - EN - 2014-01
This appliance is compatible with several different types of electric shutter. However, certain systems may not
be compatible. In those cases activate the «Low» mode manually using its specific button on the hydroxynator
control panel (see §3.1.2).
(1) = cell power supply
(2) = flow controller
(3) = shutter connection
(4) = shunt
(5) = ventilator
(6) = 110-240V - 50Hz power supply
Shutter with an end of run dry contact:
(shutter closed = contact closed)
Shunt the left «R/W» and «+15V» terminals (4), then connect the
dry contact from the shutter to the «BLK» and «0V» terminals (3).
Shutter sending a closure signal:
(shutter closed = LV 12-24 V dc)
Connect the earth to the «BLK» terminal and the positive (12-24
Vdc) to the left «R/W» terminal (3).
2.5.3 Connection of an external controller (Automation/Domotics)
The hydroxynator is compatible with some swimming pool remote control systems («automation»).
It has especially been designed to operate on the Zodiac AcquaLink TRi® system.
• Make sure the appliance is powered off.
• Remove the blue protective cover and the lower module (see §2.5.2). If the appliance is already
fitted with a water balance regulation module, carefully disconnect its connection braid before
removing the module.
• Remove the small white cap blocking the hole to pass the «RS485» type connection cable
(available with the accessories) between the hydroxynator and the automation system.
• Pass the «RS485» cable from the automation system through the hole. Place a cable tie on the controller wire to prevent
it from being pulled off.
• Depending on the brand and type of external automation system, complete the following connections for the connection
cable (7):
Zodiac AquaLink TRi®, Jandy AquaLink® and Polaris EOS:
- A Terminal = black wire
- B Terminal = yellow wire
- 0V Terminal = green wire
- POS terminal = red wire
Pentair® Intellitouch:
- A Terminal = yellow wire
- B Terminal = green wire
- 0V Terminal = black wire
- POS terminal = red wire
• Close the hydroxynator box.
• Make sure the automation system is switched off, then power on the hydroxynator.
• Go to the «CONTROLLER» menu on the hydroxynator and select the corresponding model from the list (see §3.2.4). The
default setting is «AQUALINK TRi».
• Switch on the automation system and wait for a few seconds
H0451600.A - EN - 2014-01
6
EN
• If the connection is successful the «‡» symbol will appear in the top right corner of the hydroxynator screen:
• If the connection fails, switch off both the automation system and the hydroxynator, check all the electric
connections and repeat the test. It may be necessary to reinitialise the appliance. To do this press
and
at the same time: the appliance will restart and you will need to set the appliance time. Consult the automation
system user manual if necessary.
• Once the hydroxynator is connected to an automation system it will only be possible to access its menu via its
control panel. The modification of all chlorine production related settings will from now on be managed using
the automation system user interfaces.
3. Use
3.1 User interface presentation
Access the user menu
or return
From the home screen: increase or reduce disinfectant production.
On the user menu: navigation in the menu options and value
changes when a choice is proposed.
Validate a selection
or access a sub-menu
Start or stop disinfectant production
Activate super-production for a total of 24 hours
(blue indicator on)
Blocks disinfectant production at 10% (blue indicator on)
FLOW
POWER
MINERALS
Red indicator showing the absence of flow
Blue indicator showing chlorine production (flashes if an error
message is displayed, see §5)
Orange indicator showing a water conductivity problem (not
enough MagnaPool™ minerals, water too cold, etc...)
If the language displayed on the screen when the hydroxynator is first powered is not appropriate, see §3.2.5.
3.1.1 «Boost» Mode
In certain cases your pool may need higher than normal disinfection (stormy weather, high number of bathers, etc.). The
«Boost» mode is used to quickly increase disinfectant levels.
• Press the
button: «BOOST» is displayed on the screen and 100% production starts.
• When the «Boost» mode is activated, the rated chlorine production settings are temporarily overridden and
the appliance will operate for a total of 24 hours at a 100% production level. The number of days will then depend on the hydroxynator operating times (see §3.2.2).
• The «Boost» mode cannot be started or stopped in the following conditions:
- if the appliance is stopped,
- if the appliance is connected to an automation system (in which case the «Boost» mode will be controlled
from the automation system user interface).
7
H0451600.A - EN - 2014-01
3.1.2 «Low» Mode
If your pool has a covering system (shelter, shutter, cover, etc.), «Low» mode is designed to adapt disinfectant production
to situations where the pool is covered (lower needs).
This mode is also called «Shutter» or «Winter» mode. Its effect is to limit disinfectant production to 10%.
Manual activation (shelter, cover, winter use, etc...):
• Press the
button: «LOW MODE 10%» is displayed on the screen and disinfectant production is reduced to 10%.
button again.
• To stop this mode: press the
Automatic activation (compatible electric roll-on cover):
• Make sure the cover is compatible and connected to the hydroxynator (see §2.5.2).
• «Low» mode will automatically be activated when the shutter is closed.
• «Low» mode will stop as soon as the cover is completely open (after a timer of a few minutes).
«Low» mode cannot be started or stopped in the following conditions:
• if the appliance is stopped,
• if the appliance is connected to an automation system and if it is not connected to a roll-on cover («Low» mode
is then controlled using the automation system user interface).
3.2 Settings
3.2.1 Clock menu
The hydroxynator is fitted with an internal memory. When the appliance is first switched on it is important to
leave it powered on continuously for at least 24 hours in order to initially charge the accumulator (permanent separate power supply or filtering on permanently). Once charged the accumulator has several weeks of autonomy
in the event of a power failure.
• Power on the appliance and wait for the screen start-up sequence to complete.
• Press the
button to access the main menu.
• Use the
and
button to scroll to the «CLOCK» line, then press
• Use the
and
buttons to set the hour, then press
• Use the
and
buttons to set the minutes, then press
return to the main menu.
• Press the
to validate.
to memorise.
to memorise. The appliance will then automatically
button to return to the home screen.
The time is displayed in a 24 hour format.
3.2.2 Programming Menu (Timers)
The hydroxynator has two programmers to control disinfectant production times. These are called «Timers or
«Operating time intervals».
«Timer» programming is used to define the hydroxynator operating times within the filtering system operation
times. The daily operating times must be sufficient to correctly treat the water.
A reminder of the calculation rule (using a single speed filtering pump): the ideal daily filtering time is obtained
by dividing the required pool water temperature (measured in °C) by 2.
Example: for water at 28°C - 28/2 - 14 hours per day
Creating a «Timer»:
• From the home screen, press the
and
• Use the
settings menu.
• Use the
and
button.
button to scroll to the «PROGRAMMING» line, then press
to display the programming
buttons to select the timer to set («TIMER 1» or «TIMER 2»), then press
and
buttons to set the start hour, then press
• Use the
H0451600.A - EN - 2014-01
to memorise.
.
8
EN
• Use the
and
buttons to set the start minutes, then press
• Use the
and
buttons to set the stop hour, then press
and
buttons to set the stop minutes, then press
• Use the
return to the «PROGRAMMING» menu.
to memorise.
to memorise.
to memorise. The appliance will automatically
The «T» symbol is displayed in the upper right hand corner of the LCD
display on the home screen if the programming is valid.
Deleting a «Timer»:
• From the home screen, press the
button.
and
• Use the
settings menu.
button to scroll to the «PROGRAMMING» line, then press
and
• Use the
shown on the screen.
buttons to reach «RAZ TIMERS», then press
to display the programming
. A message confirming the deletion will be
The hydroxynator is fitted with a safety device to prevent disinfectant overproduction. It switches off the appliance after 30 hours of continuous disinfection (no «Timers(s)» memorised and filtering in continuous mode
(manual mode)). Pressing the
button will restart production if necessary.
3.2.3 Troubleshooting Menu
The hydroxynator automatically notifies you of any problems by displaying a message on the screen. To help with
the understanding of these messages the appliance has a troubleshooting assistance menu which gives the meanings and the action to take to solve the problem.
• From the home screen, press the
• Use the
messages.
and
button.
buttons to reach the «TROUBLESHOOTING» line, then press
to display the list of error
and
buttons to select the error message, then press
.
• Use the
• A certain number of suggestions and solutions will automatically be scrolled to explain what to do. On completion of the
automatic scroll, the appliance automatically returns to the «TROUBLESHOOTING» menu.
3.2.4 External Controller menu (Automation/Domotics)
The automation system must imperatively have its settings positioned before the connection is activated (external controller switched off, see §2.5.2).
• From the home screen, press the
• Use the
models.
and
button.
buttons to reach the «EXTERNAL CONTROLLER» line, then press
to display the different
and
buttons to select the version of the external controller used, then press
• Use the
choice. The appliance will then automatically return to the main menu.
to memorise the
button to return to the home screen.
• Press the
• Turn on the automation system and wait for the «‡» symbol to display at the top
right of the hydroxynator home screen, this indicates that the connection was
successful.
By default the hydroxynator is set to be connected to a Zodiac AquaLink TRi® system.
9
H0451600.A - EN - 2014-01
3.2.5 Language Menu
By default the hydroxynator is set to display in French. Seven languages are available: English, French, Spanish,
German, Italian, Dutch and Afrikaans).
• From the home screen, press the
• Use the
and
button.
buttons to scroll to the «LANGUAGES» line, then press
and
buttons to select the required language, then press
• Use the
will then automatically return to the main menu.
to display the list of languages.
to memorise the choice. The appliance
3.3 Starting up the treatment
3.3.1 Adding MagnaPool™ minerals
It is important to add MagnaPool™ minerals following the procedure below before starting up the hydroxynator.
MagnaPool™ minerals must be added to a pool with new water (tap water only, borehole water prohibited).
In the case of installation on an existing pool, the pool must first be emptied and filled with new water (follow
the pool manufacturer’s emptying instructions).
The quantity of MagnaPool™ minerals required to correctly operate the system is 5 g/L (= 5 kg/m³, 5000 ppm or 0.5%), to
obtain this add 6 kg/m³ (because the minerals contain some water).
Pool volume (m³)
20
30
40
45
50
55
60
65
70
80
90
Kg to add
120
180
240
270
300
330
360
390
420
480
540
• Add the MagnaPool™ minerals by directly emptying the bags around the edges of the pool evenly. Put the last planned
bag aside.
• Start up the filtration and the hydroxynator making sure that the latter is set to «Boost» mode (see §3.1.1).
• Gradually pour the contents of the last bag that was put aside directly in front of one of the skimmers, this will «boost»
the hydroxynator start-up.
• Leave the filtration running permanently for 24 hours, then switch it back to normal daily operation.
Filtration must be running when adding the MagnaPool™ minerals.
Always empty the bags completely, do not keep open bags of minerals (sensitive to damp).
3.3.2 Activating the treatment
The MagnaPool™ system is specific, it is therefore important to understand the following steps.
Once poured into the pool water, the MagnaPool™ minerals will turn it slightly milky and harmless foam can also appear at
the surface of the water. This is completely normal and shows the initial hydroxination action of the magnesium contained
in Magnapool™ minerals.
This slightly milky appearance and eventual foam at the surface can last for a few days depending on the type of
pool and the daily filtration cycles used (it is preferable to operate the filtration at least 12 hours per day during
this activation phase).
To facilitate the activation of the MagnaPool™ treatment it is preferable not to bathe during this short period.
Pool cleaners may also have difficulties climbing the pool sides. In this case use them in «bottom only» mode if
they are equipped to do so. They will return to normal operation as soon as the water has become clear again.
From 7 to 10 after the MagnaPool™ minerals have been added the water will become crystal clear and you will benefit
from unequalled clear water and bathing comfort.
It may possibly be necessary to carry out a short filter backwash to eliminate possible debris from the installation operation.
Please refer to the filter pressure indicator and its user manual.
4. Maintenance
4.1 Cleaning the electrode
The appliance is equipped with a smart polarity inversion system designed to prevent the electrode plates from
scaling. However cleaning may be required in regions where the water has high calcium content (so-called «hard»
water).
• Turn off the hydroxynator and the filtering, close the isolation valves, remove the protection cover and disconnect the
cell power cable.
• Unscrew the tightening ring and remove the electrode from the body of the cell. The ring is crenelated thus allowing a
lever to be used in the event of it jamming. Place the electrode in a cleaning solution without immersing the connection
terminals.
H0451600.A - EN - 2014-01
10
EN
• Leave the cleaning solution to dissolve the scale deposit for about 15 minutes. Dispose of the cleaning solution at an
approved waste recycling site, never pour into the rainwater drainage system or into the sewers.
• Rinse the electrode using clean water and refit it into the body of the cell (there is a fail-safe on the alignment).
• Refit the tightening ring, reconnect the cell cable and refit the protective cover. Open the isolation valves and restart
the filtering and the hydroxynator.
• If you do not use a commercially available cleaning solution, you can manufacture it yourself by carefully mixing
1 volume of hydrochloric acid with 9 volumes of water (Warning: always pour the acid into the water and not
the opposite and wear suitable protective equipment!).
• If the water is too hard (high carbonate content, HL>40 °f or 400 ppm), it is possible to change the polarity
inversion cycle times on your hydroxynator to have more effective electrode self-cleaning. Consult your reseller
if you are in this situation (professional access).
4.2 Wintering
The hydroxynator has a protective system to limit disinfectant production under bad operating conditions such as
cold water (winter) or a lack of minerals.
• Active wintering = filtration operating in winter: if the water temperature drops below 10 °C, it is preferable to stop the
appliance. Above this temperature you can leave it running.
• Passive wintering = lower water level and drained piping: leave the electrode dry in its cell with its isolation valves open.
4.3 Recycling
This symbol means that your appliance must not be disposed of as household waste. It will be subject to selective
waste sorting with a view to its reuse, recycling or sale. If it contains substances that are potentially harmful to the
environment, they will be eliminated or neutralised.
Ask your reseller for information about recycling.
5. Troubleshooting
Message
MINERAL LEVEL
(orange indicator
«MINERALS» on)
•
•
Possible causes
Not enough minerals (< 5 g/L)
due to water loss or water (backwash the filter, renewal of dilution,
precipitation, leaks…).
Pool water temperature too cold (<
18 °C, variable).
Carbonate level (Hardness) too high
Electrode too old
Scaled cell
CHECK CELL
•
•
•
INVERSION
This self cleaning cycle is automatic;
this message is not an error code but
just for Information
• Cell power supply cable disconnected
or incorrectly connected
• Internal control box electronic
problem following an external
electric incident
• Filtration pump failure
• Dirty filter and/or skimmer(s)
• Bypass valve(s) closed
• Flow
controller
and/or
cell
disconnected and/or defective
PROD. FAULT
FLOW FAULT
CHECK PUMP
(«Flow» indicator
red)
The messages
are displayed
alternatively every
3 minutes.
11
Solutions
• Add minerals to the pool to maintain the level at 5 g/L.
If you do not know the mineral level or how to test it,
consult your reseller
• Basic production limitation signal if the water is too
cold. Reduce disinfectant production or add minerals
to compensate
• Clean and/or check the filtering system (pump and
filter)
• Check the carbonate level (hardness) and add
carbonate sequestrant if needed (Calci-)
• Replace the electrode
• Clean the cell
Wait for about 10 minutes and chlorine production will
restart at the previous setting selection
• Turn off the appliance (
) and turn off the power
supply to the control box, then check the check all the
wires are correctly connected (power supply, cell…)
• Contact your reseller
• Check the pump, the filter, the skimmer(s), and the bypass valves. Clean them if necessary
• Check the cable connections (cell and flow controller)
• Check that the flow controller is in good working order
(replace it if necessary)
H0451600.A - EN - 2014-01
To cancel the «CHECK CELL» and «PROD. FAULT «, press
for 3 or 4 seconds when the message is displayed.
The other codes are only information messages that disappear automatically when the operating conditions return to their optimum level.
6. Registering the product
Register your product on our website:
- be the first to be informed of new Zodiac® products and special offers,
- help us to constantly improve our product quality.
Australia – New Zealand
Europe, South Africa & Rest of the World
www.zodiac.com.au
www.zodiac-poolcare.com
EN
H0451600.A - EN - 2014-01
12
Zodiac Pool Care Europe - BP 90023 - 49180 St Barthélémy d’Anjou cedex - S.A.S.U. au capital de 517 200 € / SIREN 395 068 679 / RCS PARIS
www.zodiac-poolcare.com
Pour plus de renseignements, merci de contacter votre revendeur.
For further information, please contact your retailer.
ZODIAC® is a registered trademark of Zodiac International, S.A.S.U., used under license.
Votre revendeur / your retailer