1
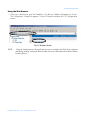
S100 Quick Start Guide
1
Overview
Use this guide to set up your S100, make connections, obtain an IP address, and access the
S100’s online help or Configuration Wizard. The Quick Start guide comprises of a simple
configuration and testing scenario used prior to rack mounting the unit. Quick Start guides
you through the following steps:
•
•
•
•
Connecting your S100 to a local network
Configuring your S100 using Windows HyperTerminal
Setting up and obtaining an IP address
Testing your IP address for functionality
2
Once you’ve completed the above steps, you’ll open the S100’s Configuration Wizard in your
web browser.
3
Requirements
You will need a PC or Workstation, web browser, S100, and a local network connection.
Unpacking Your S100
Verify you have the following items:
•
•
•
•
•
•
•
S100
Power cord
CD-ROM disk (contains online help and optional utilities)
RS-232 Serial port cable
Phone cord
GPS Bullet Antenna and cable (GPS option only)
Antenna Mast and mounting brackets (GPS option only)
NOTE:
5
Keep the packing materials for future use. These materials are custom designed to protect
the S100 during storage and shipping. Use them if you need to return the unit to the
Customer Support.
Connecting the Serial, Network and Power Cords
1. Connect the S100 to your PC using the Serial cable (see Fig.1).
2. Connect the left Ethernet port on the S100 (see Fig. 2) to your LAN using an Ethernet cable. If
only one network connection is being made, you must use the left activated port.
S100 Quick Start.fm – Rev. B – September 2003
1
S100 Quick Start Guide
1
Fig. 1: Connecting Serial and Ethernet cables to the S100
3. Connect the S100 to your power supply using the AC Power cord.
Fig. 2: Connectors on the front panel
NOTE:
2
The two USB ports are not operational.
S100 Quick Start.fm – Rev. B – September 2003
S100 Quick Start Guide
FOR UNITS WITH THE OPTIONAL RUBIDIUM OSCILLATOR:
An external SS X72 cable needs to be attached for proper operation. Facing the rear panel of
the S100, connect the SS X72 cable from the DB15 connector (marked J1) to the DB9 connector.
If your unit has no DB9 connector, there is no rubidium in the S100.
DB-15
Connector
DB-9 Connector (If Rb
oscillator is present)
2
Fig. 3: Where to connect the SS X72 cable if you have a Rubidium oscillator
NOTE:
The following instructions assume you are using Windows OS.
3
1. To Configure the Windows Hyperterminal, click Start->Programs->Accessories->Communications>HyperTerminal.
2. The “Connection Description” dialog screen appears. In the Name field, enter a name. In this
example, it is SyncServer1.
3. Click OK.
4. In the “Connect to” dialog, select the “COM Port” number you are connected to. In this example, COM Port 1 is selected.
5
5. Click OK.
6. In the “COM 1 Port Properties” dialog, enter the following Port Settings:
Port Setting:
Enter:
Bits per
second:
9600
Data bits:
8
Parity:
None
Stop bits:
1
Flow Control:
Hardware
*Terminal
Type:
VT100
* The Terminal Type is set by accessing File>Properties>Settings.
S100 Quick Start.fm – Rev. B – September 2003
3
1
S100 Quick Start Guide
7. Click OK.
1
8. In the Hyperterminal window, select File->Properties. The “Properties” dialog opens. Click the
Settings tab. Verify the Telnet Terminal ID is set at ANSI.
9. Click OK.
NOTE:
When your Hyperterminal is connected and operational, at the bottom of the window you
should see the following:
Setting Up the IP Address
1. Power on the S100 unit. The Linux system boots. Various bootup data scrolls on the Hyperterminal. This may last a few minutes.
NOTE:
The following anomaly occurs when using Hyperterminal in WIN 95: “boot: e” appears
at the prompt interrupting the boot process. Use your backspace key to delete the “e”.
Then press <Enter>. This will continue the bootup process. If using TeraTerm or other
terminal emulation program, this anomaly may not occur.
2. When prompted, at the User ID login, type: root <Enter>. At the Password prompt, type: symmetricom <Enter>.
NOTE:
For security purposes, the root, or superuser, password should immediately be changed
using the password utility. To do this, see Chapter 3 in the S100 User Manual, How to
change the root password.
NOTE:
Keep your newly created password in a safe and secure place. If you should lose it, there
is NO PASSWORD RECOVERY capability with the S100. This means that you will have to
send the S100 back to Symmetricom Customer Support for recovery !
3. The screen displays additional Linux boot-up information. When prompted, enter your Login
name and Password. Type each one and press <Enter>.
syncserv1 login:
Password:
Fig. 4: Login and Command Line
4. A command line appears. Type netconfig and press <Enter>.
4
S100 Quick Start.fm – Rev. B – September 2003
S100 Quick Start Guide
5. The Network Config screen pop-up appears, “Would you like to setup networking?” This
screen should appear as follows:
1
2
Fig. 5: Network Configuration Screen
If your screen does not appear this way, check the settings on your HyperTerminal.
3
6. Select Yes <Enter>
7. Another Network Config screen appears. If you select the DHCP box, setup will automatically
find an IP address. Otherwise, type in your assigned IP address in the appropriate area and
any other information. When completed, press <Enter>.
NOTE:
Most users will use a static IP address. Using the DHCP (Dynamic Host-Configuration
Protocol) is an automatic way to obtain an IP address. However, this IP address may later
be reassigned if it is not used for a period of time, depending on your IT network
guidelines.
8. A command line appears. Type reboot and press <Enter>. The SyncServer reboots, several
Linux boot-up screens appear. The following message appears (if you selected DHCP) confirming an IP address:
5
Fig. 6: DCHP Confirmation Screen
Your S100 Syncserver unit now has an IP address recorded. This IP address will remain
even if there is a sudden power failure or improper shutdown. Use your Password and Login
again when requested as in Step 2 (under Setting Up the IP Address).
S100 Quick Start.fm – Rev. B – September 2003
5
S100 Quick Start Guide
Testing Network Functionality
1
Check the Ethernet connection between the client computer and the SyncServer:
1. Call up the client computer’s command prompt. Use the Windows MS-DOS command prompt.
At the command line, type: IPCONFIG and press <Enter>. Your computer’s IP address appears
.
NOTE:
In Win95, type WINIPCFG instead of IPCONFIG.
2. At the command prompt type a ping command to verify that the SyncServer is visible on the network. Use the IP address for the S100.
Example: ping xxx.xxx.xxx.xxx (where xxx = the IP address of the SyncServer).
3. Press <Enter>. A message indicates the ping command was successful. Four packets were sent
and none were lost. An unsuccessful ping shows lost packets and a Timed Out message. If
there is an affirmative response, the SyncServer is visible to the network.
NOTE:
If there is no response after the ping, troubleshoot and fix the connection problem before
preceding. Problems may include physical network connections or IP addresses.
4. At the Unix prompt, verify the S100’s IP address. At the S100 command line, type IFCONFIG
and press <Enter>.
5. The following result appears:
Fig. 7: IP Confirmation Screen
This IP address should match the previously recorded pinged IP address
6
S100 Quick Start.fm – Rev. B – September 2003
S100 Quick Start Guide
Using the Web Browser
1. Open your web browser, enter the IP address in the browser Address field and press <Enter>.
The Configuration Wizard link appears. Use the Wizard to complete the S100 configuration
process.
2
Fig. 8: Browser Screen
NOTE:
3
Using the Configuration is the quick and easy way to configure the S100. If you configure
and change settings without the Wizard, make sure to save and reboot the S100 for them to
become effective.
5
S100 Quick Start.fm – Rev. B – September 2003
7
1
S100 Quick Start Guide
1
8
S100 Quick Start.fm – Rev. B – September 2003