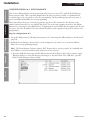
1
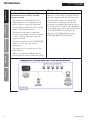
Installation and Operation Manual
AllSync® Master Clock
Ethernet Option
®
Part # PS000007
Rev. 8
June 2011
AllSync Ethernet Option
User Manual
American Time
140 3rd Street South, PO Box 707
Dassel, MN 55325-0707
Phone: 800-328-8996
Fax: 800-789-1882
american-time.com
2
© American Time
AllSync Ethernet Option
User Manual
Table of Contents
Introduction............................................................................................................................................................4
Feature Summaries & Explanations....................................................................................................................4
Installation.............................................................................................................................................................13
System & Network Requirements.....................................................................................................................13
Network Settings..............................................................................................................................................13
Connecting the AllSync Master to the Network...............................................................................................14
Configuring the AllSync Master........................................................................................................................14
Event Manager Operation.................................................................................................................................26
Troubleshooting....................................................................................................................................................30
Appendix................................................................................................................................................................32
Glossary.................................................................................................................................................................34
© American Time
3
Introduction
AllSync Ethernet Option
User Manual
1.Network time synchronization via Ethernet - the AllSync Master can be configured to send or receive
timestamps via internal computer networks or the Public Internet.
2.Remote programming via computers connected via Ethernet - the AllSync Master user interface can be
made available via Windows PC’s connected via internal computer networks or the Public Internet.
3.Event Programming via computer connected via Ethernet - the AllSync Master can be configured to
send or receive programmed events via Windows PC’s connected via internal computer network or the
public internet.
These 3 distinct features can be used independently of each other or together.
The following is a more detailed summary of the features of various configurations possible with the
Ethernet Option:
Feature Summary
Explanation
CONFIGURATION 1: RECEIVE Time
Synchronization via the Internet
• This feature is recommended when the AllSync Master is on a computer network connected to the Public Internet
• This feature requires an internal STATIC IP Address to be set up by the network administrator
• This feature requires access to the Public Internet via port 13 (firewall may require configuration by the network administrator)
The AllSync Master can synchronize its internal
clock to NIST traceable time via the Internet.
Once properly configured and connected to the
Public Internet (through a computer network),
the AllSync Master will query an internet
timeserver once per hour to get the correct time
using the DAYTIME PROTOCOL (RFC867). The time information provided by this
method is directly traceable to UTC (NIST).
Glossary
Appendix
Troubleshooting
Installation
Introduction
The Ethernet Option for the AllSync Master provides 3 main benefits:
4
© American Time
Introduction
AllSync Ethernet Option
User Manual
The AllSync Master can synchronize its internal
clock to any computer acting as a timeserver.
The AllSync Master will query this network
timeserver once per hour to get the “facility
time” using the DAYTIME PROTOCOL
(RFC-867). The time information provided
by this method may not be traceable to UTC
(NIST) and is dependent on the accuracy of the
timeserver computer’s clock.
Troubleshooting
CONFIGURATION 2: RECEIVE Time
Synchronization via a computer on the
internal network of a facility
• This feature is recommended when the AllSync Master is on a computer network
where Public Internet access may not be available or preferred
• This feature does not require access to the Public Internet
• This feature requires an internal STATIC IP Address to be set up by the network administrator
• This feature requires a network timeserver that supports the DAYTIME PROTOCOL (RFC-867).
• This feature allows the network server to be set up as a facility’s “Master” timekeeper
Installation
Explanation
Introduction
Feature Summary
Appendix
Glossary
© American Time
5
AllSync Ethernet Option
User Manual
Feature Summary
Explanation
CONFIGURATION 3: RECEIVE Time
Synchronization via another AllSync Master
• This feature is recommended when multiple AllSync Masters are on a facility’s computer network
• This feature does not require access to the Public Internet
• This feature requires an internal STATIC IP Address to be set up by the network administrator
• This feature requires the Ethernet option on both client and server AllSync Masters.
The AllSync Master can synchronize its internal
clock to that of another AllSync Master on the
internal computer network of a facility or the
Public Internet. Once properly configured and
connected on the network, the AllSync Master
set up as the client will query the time on the
AllSync Master set up as a server. The time
information provided by this method may not
be traceable to UTC (NIST) and is dependent
on the accuracy of the other AllSync Master
operating as a timeserver.
Glossary
Appendix
Troubleshooting
Installation
Introduction
Introduction
6
© American Time
Introduction
AllSync Ethernet Option
User Manual
The AllSync Master can be set up as a
timeserver on the Public Internet, allowing
computers and other devices to retrieve the
current time from the unit remotely. The time
information provided by this method may not
be traceable to UTC (NIST) and is dependent
on the timekeeping and/or time synchronization
of the AllSync Master unit acting as the
timeserver. The AllSync Master uses the
DAYTIME PROTOCOL (RFC-867).
Troubleshooting
CONFIGURATION 4: TRANSMIT Time
Synchronization via the Public Internet
• This feature is recommended when the AllSync Master is on a computer network connected to the Public Internet and it is desired to query the facility time from this AllSync Master via a remote PC or another Master connected to the Internet
• This feature can be used to synchronize the time of one facility to that of another, even if they are not on the same computer network
• This feature requires an internal STATIC IP Address to be set up by the network administrator
• This feature requires access to the Public Internet via port 13 (firewall may require configuration by the network administrator)
Installation
Explanation
Introduction
Feature Summary
Appendix
Glossary
© American Time
7
AllSync Ethernet Option
User Manual
Feature Summary
Explanation
CONFIGURATION 5: TRANSMIT Time
Synchronization via a facility’s internal
computer network
• This feature is recommended when the AllSync Master is on a computer network and it is desired to query the facility time from this AllSync Master via a PC or another Master on the internal network.
• This feature can be used to synchronize the time of one facility or portion of a facility to that of another if they are on the same computer network
• This feature requires an internal STATIC IP Address to be set up by the network administrator
• This feature does not require access to the Public Internet
• When used with another AllSync Master, that unit must also have the Ethernet option
The AllSync Master can be set up as a
timeserver on the facility’s computer network,
allowing computers and other devices on the
same network to retrieve the current time
from the unit over the network. The time
information provided by this method may not
be traceable to UTC (NIST) and is dependent
on the timekeeping and/or time synchronization
of the AllSync Master unit acting as the
timeserver. The AllSync Master uses the
DAYTIME PROTOCOL (RFC-867).
Glossary
Appendix
Troubleshooting
Installation
Introduction
Introduction
8
© American Time
Introduction
AllSync Ethernet Option
User Manual
CONFIGURATION 6: REMOTE
CONTROL via the Public Internet
• This feature is recommended when the AllSync Master is on a computer network connected to the Internet and it is desired to operate the unit in a location remote from the user, outside the facility
• This feature requires an internal STATIC IP Address to be set up by the network administrator
• This feature requires access to the Public Internet via port 8080 (firewall may require configuration by the network administrator)
One or more AllSync Masters can be accessed
remotely from one or more PC’s with the
Remote Control client software loaded. This
is especially helpful when the unit is located
in a utility or communications room that may
not be convenient to access for monitoring and
programming. All menus and most functions of
the AllSync Master can be accessed via Remote
Control.
This feature allows the user to remotely control
the unit from a PC connected to the Internet.
It is not required that the PC be on the same
computer network as the AllSync Master.
This feature requires a PC connected to the Public Internet
This feature requires the PC to be running a Microsoft Windows operating system (Win 98, 2000, NT, XP,and Vista are supported) and the Remote Control client software must be loaded
Appendix
•
•
Troubleshooting
Explanation
Installation
Feature Summary
Glossary
© American Time
9
AllSync Ethernet Option
User Manual
Feature Summary
Explanation
CONFIGURATION 7: REMOTE
CONTROL via a facility’s internal computer
network
• This feature is recommended when the AllSync Master is on a computer network and it is desired to operate the unit in a location remote from the user
• This feature requires an internal STATIC IP Address to be set up by the network administrator
• This feature does not require access to the Public Internet
• This feature requires a PC connected to the network
• This feature requires the PC to be running a Microsoft Windows operating system (Win 98, 2000, NT, XP, and Vista are supported) and the Remote Control client software must be loaded
One or more AllSync Masters can be accessed
remotely from one or more PC’s with the
Remote Control client software loaded. This
is especially helpful when the unit is located
in a utility or communications room that may
not be convenient to access for monitoring and
programming. All menus and most functions of
the AllSync Master can be accessed via Remote
Control.
This feature allows the user to remotely control
the unit from a PC connected to the computer
network of the facility. It is required that the
PC be on the same computer network as the
AllSync Master.
Glossary
Appendix
Troubleshooting
Installation
Introduction
Introduction
10
© American Time
Introduction
AllSync Ethernet Option
User Manual
One or more AllSync Masters can be accessed
remotely from one or more PC’s with the
Event Manager client software loaded. This is
especially helpful when the unit is located in
a utility or communications room that may
not be convenient to access for programming.
The Event Manager software allows for further
flexibility with events and allows for fast, easy
event programming.
This feature requires a PC connected to the Public Internet
This feature requires the PC to be running a Microsoft Windows operating system (Win 98, 2000, NT, XP, and Vista are supported) and the Event Manager client software must be loaded
Appendix
•
•
Troubleshooting
CONFIGURATION 8: EVENT MANAGER
via the Public Internet
• This feature is recommended when the AllSync Master is on a computer network connected to the Internet and it is desired to program the unit in a location remote from the user, outside the facility
• This feature requires an internal STATIC IP Address to be set up by the network administrator
• This feature requires access to the Public Internet via port 40 (firewall may require configuration by the network administrator)
Installation
Explanation
Introduction
Feature Summary
Glossary
© American Time
11
AllSync Ethernet Option
User Manual
Feature Summary
Explanation
CONFIGURATION 9: EVENT MANAGER
via a facility’s internal computer network
• This feature is recommended when the AllSync Master is on a computer network
and it is desired to program the unit in a location remote from the user
• This feature requires an internal STATIC IP Address to be set up by the network administrator
• This feature does not require access to the Public Internet
• This feature requires a PC connected to the network
• This feature requires the PC to be running a Microsoft Windows operating system (Win 98, 2000, NT, XP, and Vista are supported) and the Event Manager client software must be loaded
One or more AllSync Masters can be accessed
remotely from one or more PC’s with the
Event Manager client software loaded. This is
especially helpful when the unit is located in
a utility or communications room that may
not be convenient to access for programming.
The Event Manager software allows for further
flexibility with events and allows for fast, easy
event programming.
Glossary
Appendix
Troubleshooting
Installation
Introduction
Introduction
12
© American Time
Installation
AllSync Ethernet Option
User Manual
System and Network Requirements
To install the Ethernet option, first obtain the following (typically available from your computer or network
administrator):
Static IP Address (fill in below):
2 Gateway IP address for access to the public internet Gateway IP Address (fill in below):
(if access to timekeeping servers on the internet or remote
programming outside the facility’s internal network is desired).
Subnet Mask (fill in below):
4 Master IP address - for a timekeeping server on the computer network or Public Internet (get IP address from
Network Administrator or select from list in Appendix A)
Master IP Address (fill in below):
Glossary
3 Subnet Mask for the computer network the unit will be
connected to.
Appendix
1 Static IP address that this unit will be configured to. Note that the AllSync Master does not support DHCP.
Troubleshooting
Network Settings
Installation
1.AllSync Master(s) configured with the Ethernet option.
2.Ethernet patch cable and/or RJ-45 jack in the vicinity of the AllSync Master unit
3.Ethernet connection to facility’s computer network (unless used via direct connection and Ethernet crossover cable)
4.Public Internet access (not needed for all features and configurations)
5.Static IP address for the AllSync Master
6.If a firewall is enabled, settings which allow traffic on port 13 (Time Synchronization), port 40 (for Event
Manager) and port 8080 (for Remote Programming) for the above static IP address
7.Personal computer or laptop with Microsoft Windows 98, 2000, NT, XP, or Vista. This computer must
have a USB port (*unless the Remote Control client and Event Manager are downloaded via the Internet
or copied by some other method to this computer’s hard disk)
8.Ethernet Connectivity USB drive (provided with Ethernet kit)*
9.NIST client software available on the NIST website - if any personal computers are to be synchronized to
the AllSync Master
Introduction
The Ethernet option has the following requirements:
NOTE: IP addresses are a part of the Transmission Control Protocol/Internet Protocol (TCP/IP) suite of
protocols and will be present on every system that is connected to the Internet.
© American Time
13
Installation
AllSync Ethernet Option
User Manual
Glossary
Appendix
Troubleshooting
Installation
Introduction
Connecting the AllSync Master to the Network
Follow these steps to connect the AllSync Master to the computer network:
1.Install the AllSync Master per the unit’s instruction manual
2.Install an Ethernet jack near the unit and/or run an Ethernet patch cable to the AllSync Master
3.Configure the communication settings (see Network Settings, above) from the AllSync Master’s COMM
menu:
a.Press the PROG button
b.Press 8 for the COMM menu
c.Enter the unlock code of the unit (unless unlock code is disabled)
d.Press 2 to change the communication settings
e.Enter the unit’s static IP address (see “Network Settings”). This is entered as 12 digits - for example,
192.168.1.100 would be entered as 192168001100, followed by OK.
f. In the same fashion, enter the IP address of the timeserver or other Master clock acting as a timeserver
(see “Network Settings”). Note that this server must support the UDP Daytime Protocol (RFC-867) to
allow for transmitting or receiving timestamps. Then press OK.
g.Now enter the Subnet Mask address (see “Network Settings”). The subnet mask number helps to
define the relationship between the host (computers, routers, switches, etc.) and the rest of the network.
h.Finally, enter the Gateway IP address (see “Network Settings”). A gateway IP refers to a device on a
network which sends local network traffic to other networks.
i.Press OK when all addresses have been input
j.Press OK again.
k.Press BACK 2 times to return to the Main Screen.
4.Connect the Ethernet patch cable to the RJ-45 port on the left side of the AllSync Master
5.Verify that the unit is sending and receiving packets:
a.Press the PROG button
b.Press 8 for the COMM menu
c.Enter the unlock code of the unit (unless unlock code is disabled)
d.Press 1 to view the communication status
e.If Ethernet is enabled, the unit will provide an indication on the display. If the unit shows that
Ethernet is disabled, use the BACK key and configure the communication settings again (item 3
above).
f. Press 2 to view the status (packets sent and received). You should see an indication on the unit’s
display with the number of packets transmitted and received. If both these fields show 0, then there
is a problem with the communication settings or the network connection. Be sure to verify the
configuration with your network administrator.
g.Press OK, BACK, BACK to exit this menu and return to the Main Screen.
Configuring the AllSync Master
Configuration 1: RECEIVE Time Synchronization via the Internet
This configuration should be selected if it is desired to synchronize the internal clock of the AllSync Master
to NIST traceable time via the Internet. Once properly configured and connected to the Public Internet
(through a computer network), the AllSync Master will query an Internet timeserver once per hour (during
the 4th minute of each hour) to get the correct time using the DAYTIME PROTOCOL (RFC-867). The
time information provided by this method is directly traceable to UTC (NIST).
14
© American Time
AllSync Ethernet Option
User Manual
Installation
Steps for Configuration 1:
Steps for Configuration 2:
Appendix
Glossary
1.Set up the AllSync master, following the instructions in “Connecting the AllSync Master to the Network”
(page 14)
2.When selecting the Master IP address, choose the address of a Server on the internal network supporting
the UDP Daytime Protocol (RFC-867). The IP address of this server, if available, should be obtained
from the facility’s network administrator. To verify the timestamp from this server matches the format
required by the AllSync Master, perform the following steps:
a.Click Start
b.Click Run
c.Type “cmd” and press OK. You should get a command screen.
d.Type telnet, followed by a space, followed by the IP address of the AllSync Master, followed by a space
and 13. Example: telnet 192.168.1.201 13
e.Verify the the timestamp has the format JJJJJ YR-MO-DA HH:MM:SS TT L H msADV
UTC(NIST) OTM. Refer to Appendix B (page 33) for a detailed description of this timestamp.
3.The unit will automatically retrieve a timestamp from this timeserver every hour during the 4th minute.
However, it is recommended that you test the time synchronization using the following procedure:
a.From the main time screen of the AllSync master, press the ADJ button.
b.Press 2 for Automatic Time Adjustment.
4.Verify the unit receives the timestamp - the unit will display “Ethernet Success” confirming the timestamp
was received.
Troubleshooting
This configuration should be selected if it is desired to synchronize the internal clock of the AllSync Master
to any computer acting as a timeserver. The AllSync Master will query this network timeserver once per
hour to get the “facility time” using the DAYTIME PROTOCOL (RFC-867). The time information
provided by this method may not be traceable to UTC (NIST) and is dependent on the accuracy of the
timeserver computer’s clock.
Installation
Configuration 2: RECEIVE Time Synchronization via a computer on the internal network of a facility
Introduction
1.Set up the AllSync master, following the instructions in “Connecting the AllSync Master to the Network”
(page 14)
2.When selecting the Master IP address, choose the address of a Server on the Internet supporting the UDP
Daytime Protocol (RFC-867). A list of these servers is found in Appendix A (page 32).
3.The unit will automatically retrieve a timestamp from this timeserver every hour during the 4th minute.
However, it is recommended that you test the time synchronization using the following procedure:
a. From the main time screen of the AllSync master, press the ADJ button.
b.Press 2 for Automatic Time Adjustment.
4.Verify the unit receives the timestamp - the unit will display “Ethernet Success” confirming the timestamp
was received.
CONFIGURATION 3: RECEIVE Time Synchronization via another AllSync Master
This configuration should be selected if it is desired to synchronize the internal clock of the AllSync Master
to that of another AllSync Master on the internal computer network of a facility or the Public Internet.
Once properly configured and connected on the network, the AllSync Master set up as the client will query
the time on the AllSync Master set up as a server. The time information provided by this method may not
be traceable to UTC (NIST) and is dependent on the accuracy of the other AllSync Master operating as a
timeserver. This configuration may be useful if the AllSync Master in one building is used as the “Master”
and is the only unit updated either manually or via automatic time synchronization (GPS or Ethernet).
Other AllSync Master units can then be synchronized to it. For this configuration, an Ethernet cross-over
cable can also be used for direct connection of one AllSync Master to another.
© American Time
15
Installation
AllSync Ethernet Option
User Manual
Glossary
Appendix
Troubleshooting
Installation
Introduction
Steps for Configuration 3:
16
1.Set up the AllSync master, following the instructions in “Connecting the AllSync Master to the Network”
(page 14)
2.When selecting the Master IP address, choose the Static IP address of the AllSync Master acting as a
server on the internal network supporting the UDP Daytime Protocol (RFC-867). The IP address of
this AllSync Master “Server” can be obtained by viewing the IP address in the COMM menu. Use
the procedure for changing the communication settings (see “Connecting the AllSync Master to the
Network”), except do not change the addresses entered in the Server - just view and record them.
3.The unit will automatically retrieve a timestamp from the other AllSync Master every hour during the
4th minute. However, it is recommended that you test the time synchronization using the following
procedure:
a.From the main menu of the AllSync master, press the ADJ button.
b.Press 2 for Automatic Time Adjustment.
4.Verify the unit receives the timestamp - the unit will display “Ethernet Success” confirming the timestamp
was received.
CONFIGURATION 4: TRANSMIT Time Synchronization via the Public Internet
This configuration should be selected if it is desired to use the AllSync Master as a timeserver on the Public
Internet, allowing computers and other devices to retrieve the current time from the unit remotely. The
time information provided by this method may not be traceable to UTC (NIST) and is dependent on the
timekeeping and/or time synchronization of the AllSync Master unit acting as the timeserver. The AllSync
Master uses the Daytime Protocol (RFC-867).
Steps for Configuration 4:
1.Set up the AllSync Master, following the instructions in “Connecting the AllSync Master to the Network”
(page 14)
2.If you wish to synchronize the AllSync Master to a timeserver, follow the steps in “Configuration 1”.
This is optional - you can also use the GPS timekeeping option, if available.
3.Test the communication link between the computer you wish to synchronize and the AllSync Master
(Instructions for Windows XP):
a.Click Start
b.Click Run
c.Type “cmd” and press OK. You should get a command screen.
d.Type telnet, followed by a space, followed by the IP address of the AllSync Master, followed by a space
and 13. Example: telnet 192.168.10.211 13
e.Verify you received a timestamp. If not, follow the setup in “Connecting the AllSync Master to the
Network” (page 14)
4.On a computer connected to the public Internet (or internal facility network), install client software
(if not already installed) that supports the UDP Daytime protocol. One such public domain software
program is available from NIST and can be downloaded from the Internet at http://www.boulder.nist.
gov/timefreq/service/its.htm. Refer to the instructions included with the software for configuration. Use
the static IP address of the AllSync Master when configuring this software.
5.Test the client software to ensure the timestamp is received from the AllSync Master. Instructions will
vary depending on the client software. Refer to the instructions included with the software.
© American Time
AllSync Ethernet Option
User Manual
Installation
CONFIGURATION 5: TRANSMIT Time Synchronization via a facility’s internal computer network
Introduction
The AllSync Master can be set up as a timeserver on the facility’s computer network, allowing computers
and other devices on the same network to retrieve the current time from the unit over the network.The
time information provided by this method may not be traceable to UTC (NIST) and is dependent on the
timekeeping and/or time synchronization of the AllSync Master unit acting as the timeserver. The AllSync
Master uses the DAYTIME PROTOCOL (RFC-867).
Steps for Configuration 5:
Appendix
Glossary
One or more AllSync Masters can be accessed remotely from one or more PC’s with the Remote Control
client software loaded. This is especially helpful when the unit is located in a utility or communications
room that may not be convenient to access for monitoring and programming. All menus and most functions
of the AllSync Master can be accessed via Remote Control.
Troubleshooting
CONFIGURATIONS 6 & 7: REMOTE CONTROL
Installation
1.Set up the AllSync Master, following the instructions in “Connecting the AllSync Master to the Network”
(page 14)
2.If you wish to synchronize the AllSync Master to a timeserver, follow the steps in “Configuration 1”.
This is optional - you can also use the GPS timekeeping option, if available.
3.Test the communication link between the computer you wish to synchronize and the AllSync Master
(Instructions for Windows XP):
a.Click Start
b.Click Run
c.Type “cmd” and press OK. You should get a command screen.
d.Type telnet, followed by a space, followed by the IP address of the AllSync Master, followed by a space
and 13. Example: telnet 192.168.10.211 13
e.Verify you received a timestamp. If not, follow the setup in “Connecting the AllSync Master to the
Network” (page 14)
4.On a computer connected to the internal facility network, install client software (if not already installed)
that supports the UDP Daytime protocol. One such public domain software program is available from
NIST and can be downloaded from the Internet at
http://www.boulder.nist.gov/timefreq/service/its.htm. Refer to the instructions included with
the software for configuration. Use the static IP address of the AllSync Master when configuring this
software.
5.Test the client software to ensure the timestamp is received from the AllSync Master. Instructions will
vary depending on the client software. Refer to the instructions included with the software.
This feature allows the user to remotely control the unit from a PC connected to the Internet or the facility’s
internal network. It is not required that the PC be on the same computer network as the AllSync Master if it
is connected to the public Internet. Communication via the Public Internet requires that Port 40 be open to
the Static IP address of the unit and the IP address of the computer being used for remote operation.
© American Time
17
Installation
AllSync Ethernet Option
User Manual
1.Set up the AllSync Master, following the instructions in “Connecting the AllSync Master to the Network”
(page 14)
2.Install the Remote Control client software on the computer(s) you wish to use to remotely access the
AllSync Master:
a.Insert the USB drive that came with the Ethernet kit into the USB port of the computer
Open Windows Explorer or other file manager and navigate to the drive letter of the USB drive, open
file labeled “Remote Control Software Setup”:
b. Run the Setup.exe file by double-clicking it. You will see a Welcome screen - click Next:
Glossary
Appendix
Troubleshooting
Installation
Introduction
Steps for Configuration 6 & 7:
18
© American Time
AllSync Ethernet Option
User Manual
Installation
Introduction
c.Now the Setup will ask you for an installation folder - click Next unless you wish to change the
directory where this program is stored.
Installation
Troubleshooting
Appendix
d.Now the Setup will ask you to confirm the installation - click Next.
Glossary
© American Time
19
Installation
AllSync Ethernet Option
User Manual
f. When the setup program notifies you that installation is complete, click Close.
Glossary
Appendix
Troubleshooting
Installation
Introduction
e.Now the Setup will perform the installation and you should see the following screen:
20
© American Time
AllSync Ethernet Option
User Manual
Installation
4.Enter the IP address of the AllSync Master you wish to operate remotely - in the pulldown box to the left
of the “Connect” button, and then click Connect.
Introduction
3.With installation complete, now you can run the Remote Control client software. Double-click on the
“ATS Remote Controller” icon on your desktop, or click Start, “All Programs”, “ATS”, then “ATS
Remote Control”.
Installation
Troubleshooting
Glossary
6.To operate the AllSync Master remotely, click on the keys represented on the screen by using the mouse
on your computer. You can also use the following keypad shortcuts (NOTE: the Remote Control client
does not support all types of keyboards).
0-9 keys - same on keyboard as keypad
<PREV and NEXT> - use right and left arrow buttons on keyboard
OK - Enter on keyboard
BACK - Backspace or Minus (-) key on keyboard
PROG - Plus (+) on keyboard
MAN - Asterisk (*) on keyboard
Appendix
5.Now the AllSync Master should respond and you should be able to see the main screen of the unit, as it is
displayed on the LCD screen. (Note: The AllSync Master will not connect remotely if not at the main menu
screen of the unit. The IP address entered in the pull down unit may not have a leading 0 as it is listed in
the AllSync unit. For example: The AllSync IP is listed in the communication menu as 192.168.010.230;
however, the pull down box must read 192.168.10.230 and not 192.168.010.230.)
Operate the AllSync Master in the same way you would if you were at the unit. Refer to the Installation
Manual for the AllSync Master for instructions.
7.When done operating the AllSync Master remotely, click on the “Disconnect” button and close the
Remote Control client program. Closing the program can be done by clicking on the X in the upper right
corner or clicking File, Exit using the pulldown menus.
© American Time
21
Installation
AllSync Ethernet Option
User Manual
One or more AllSync Masters can be accessed remotely from one or more PC’s with the Event Manager
client software loaded. This is especially helpful when the unit is located in a utility or communications
room that may not be convenient to access for programming. The Event Manager provides easy entry of
events and additional flexibility for event programming.
This feature allows the user to remotely program the unit from a PC connected to the Internet or the
facility’s internal network. It is not required that the PC be on the same computer network as the AllSync
Master if it is connected to the public Internet. Communication via the Public Internet requires that Port 40
be open to the Static IP address of the unit and the IP address of the computer being used for remote event
programming.
Steps for configuration 8 & 9
1.Set up the AllSync master, following the instructions in “Connecting the AllSync Master to the Network”
(page 14)
2.Install the Event Manager client software on the computer(s) you wish to use to access the AllSync
Master for event programming changes:
Note: The Event Manager Software requires .NET Frameworks to operate correctly. It is included with
the USB drive or may be loaded from the internet for newer versions.
a.Insert the USB drive that came with the Ethernet kit into the USB port drive of the computer. Open
Windows Explorer or other file manager and navigate to the drive letter of the USB drive, open file
labeled “Event Manager Software Setup”:
Glossary
Appendix
Troubleshooting
Installation
Introduction
CONFIGURATIONS 8 & 9: EVENT MANAGER
22
© American Time
AllSync Ethernet Option
User Manual
Installation
b.Run the Setup.exe file by double-clicking it. You will see a Welcome screen - click Next:
Introduction
Installation
Troubleshooting
Appendix
c. Review licensing information and select “I Agree” to continue with installation.
Glossary
© American Time
23
AllSync Ethernet Option
User Manual
d.Now the Setup will ask you for an installation folder - click Next unless you wish to change the
directory where this program is stored.
e.Now the Setup will ask you to confirm the installation - click Next.
Glossary
Appendix
Troubleshooting
Installation
Introduction
Installation
:
24
© American Time
AllSync Ethernet Option
User Manual
Installation
f. Now the Setup will perform the installation and you should see the following screen
Introduction
Installation
Troubleshooting
Appendix
g.When the setup program notifies you that installation is complete, click Close.
Glossary
© American Time
25
AllSync Ethernet Option
User Manual
3.With installation complete, now you can run the Event Manager client software. Double-click on the
“ATS Remote Master” icon on your desktop, or click Start, “All Programs”, “ATS”, then “ATS Remote
Master”.
Glossary
Appendix
Troubleshooting
Installation
Introduction
Installation
4.When done operating the AllSync Master remotely, click on the “Disconnect” button and close the Event
Manager client program. Closing the program can be done by clicking on the X in the upper right corner
or clicking File, Exit using the pull down menus.
Event Manager Operation
The Event Manager operation is similar to most Microsoft Windows based programs. At the top left corner
of the Event Manager window are three pull down menus, for top level operation:
1.File
a.New - The New selection of the file pull down menu opens a new Event Manager page
b.Save - The Save selection of the file pull down menu saves current Event Manager file in defaulted
location with current file name.
c. Save as - The Save as selection of the file pull down menu saves current Event Manager file in selected
location with selected name
d.Exit - The Exit selection of the file pull down menu exits the Event Manager software when selected.
26
© American Time
AllSync Ethernet Option
User Manual
Installation
2.Settings
3.Help
a.About - The help pull down menu identifies information about the software
1.Connect - The Connect button initiates connection to the AllSync Master IP address listed in the bottom
left corner of the window.
2.Disconnect - The Disconnect button disconnects from the connected master listed in the bottom left
corner of the window.
3.Read Events - The Read Events button reads events, schedules and default durations from the connected
AllSync master when pressed. The events from the master will display in the Event Manager event table
when complete.
Troubleshooting
Note: Next to the IP address on the bottom left corner of the window is the communication status
(Connected or Disconnected)
Installation
Below the three top level pull down menus in the upper left corner is the “Network Communication” field.
This field houses four buttons for communication with the AllSync Master:
Introduction
a.Address - The Address refers to the IP address that the Event Manager software will be communicating
with when read events or send events buttons are pressed
Note: Progress is displayed on the bottom middle part of the window while reading or sending events
Note: The Events currently programmed to the AllSync Master will be replaced with events currently
displayed on the Event Manager.
The AllSync Master has two types of events:
Glossary
Note: American Time and Signal recommends after events have been loaded onto the AllSync Master
using this method that the events are sorted by entering the view by dte/time selection of the event menu
(refer to AllSync Operation and Installation Manual).
Appendix
4.Send Events - The Send Events button Sends currently displayed Events, schedules and default durations
to the AllSync Master.
1.Weekday Events - A weekday event occurs regularly on one or more specific day(s).
2.Special Events - A Special event occurs on one or more dates. These date(s) can be one or more fixed
date(s) during the year or one or more floating date(s) depending on the day of the week.
The Event Manager software incorporates a table for both types of events. To change the event view simply
select the type of event you wish to view (weekday or special) in the Event View field. The selected view
then is displayed on the table in the center of the window. Each row in the table is a separate event. The
order that the events fall in is dependent on the column selected. This is done by clicking the gray column
heading of the column of sort interest. The Event Manager software will then sort the events by that selected
column.
Note: The event table is primarily for viewing purposes. Removing or deleting events and sorting them
for viewing purposes by column are the only functions active on the event table.
© American Time
27
Installation
AllSync Ethernet Option
User Manual
To add, change or remove events the Event Record field in the bottom right corner of the window provides
three buttons:
2.Modify- The Modify button is used to change existing events on the event table. To modify an existing
event click the gray box to the left of the event of interest, the event should then be highlighted blue, then
click the modify button. Refer to Installation and Operation Manual and figures below for descriptions of
fields in event windows.
Troubleshooting
Installation
1.Add - The add button is used to add new events to the event table. When it is selected the “Weekday
Event” or “Special Event” window will appear, depending on the view selected in the Event View field.
Refer to Installation and Operation Manual and figures below for descriptions of fields in event windows.
Glossary
1 & 2 A. Event # - the event number in the event window is fixed to the order entered.
1 & 2 B. Hour & PM - the hour box accepts any number but the master will only work correctly for
hours 0-23 (military time - 12am, 1am, 2am...11am, 12pm, 1pm...11pm = 0, 1, 2,...11, 12, 13,...,23).
The PM checkbox converts 1-12 to PM or 13-23 when checked.
Note: On the event table the hour will always be displayed as military time.
1 & 2 C. Minute - the minute box accepts any number but the master will only work correctly for
minutes 1-59.
1 & 2 D. Schedule - the schedule box accepts any number but the master will only work for numbers
inside the schedule range (0-99).
Note: Only one schedule can be assigned to each circuit at one time. However, multiple circuits can be
assigned the same schedule.
1 & 2 E. Weekday(s) - the weekday(s) field has a check box for each day of the week. The checked day(s)
are the days the event will occur. You may use the Clear, M-F and S-S buttons to quickly check and
uncheck multiple boxes for speedy event entry.
1 & 2 F. Duration - the duration pull down box lists all possible event durations. Refer to AllSync
Master Installation and Operation Manual for detailed information on durations.
28
© American Time
AllSync Ethernet Option
User Manual
Installation
Introduction
1 & 2 G. Year, Month and Date - the year, month and Date fill in boxes are specific to the special events
event entry. The Year fill in box accepts any value however the AllSync Master only has a calendar for the
years 2000-2179 and will not operate correctly if outside that range. The AllSync Master also accepts 0
for all years. The Month fill in box has a pull down box to enter the desired month or all months. The
Date fill in box accepts any value, however the AllSync master will not operate correctly for dates out of
range of the selected month(s). The AllSync Master also accepts 0 for all dates.
WARNING: When entering special events the date and weekday fields may both be used but only one
will work. To prevent undetermined operation only make entries in one field or the other.
Note: The Event Manager software does not change the events on the AllSync Master until the Send
button is pressed.
The schedule Assignments field located in the bottom left corner of the window is used for changing circuit
schedules and circuit default durations.
Note: The first row in the “Schedule Assignment” field is used for labeling purposes only. It does not
have any affect on the operation of the AllSync Master. This row is intended for you to label your circuits
in a fashion that makes sense to you (example: “HS 1, HS 2, HS 3, MS 1, MS 2, MS 3” for high school
1, 2 and 3 and Middle school 1, 2 and 3).
Troubleshooting
Note: American Time and signal recommends saving events on your PC to prevent deletion while making
modifications.
Installation
3.Remove - The Remove button deletes the event(s) selected in the event table. To delete an event click
the gray box to the left of the event of interest, the event should then be highlighted blue, and then click
the remove button.
The second row labeled “Schedule” of the Schedule Assignments field is used for changing the schedule
assigned to each circuit labeled above them. To change the schedule simply select the appropriate box and
type in the schedule you wish to assign and press the send button to update the master.
The third row labeled “Duration” of the Schedule Assignments field is used for changing the default
duration assigned to each circuit labeled in the first row. Durations can be 1-9 and < OFF or > ON.
Glossary
Note: The Send button will send all changes on the current event manager software open to the master
when selected.
Note: The Send button will send all changes on the current event manager software open to the master
when selected.
© American Time
29
Troubleshooting
AllSync Ethernet Option
User Manual
1.Check the Ethernet cable connection to the AllSync Master. Make sure the patch cable is securely
connected to the Ethernet RJ-45 port and that it is not damaged. Have the cable tested or connect
another Ethernet device to this cable to confirm proper connection.
2.Check for communication between the AllSync Master and a PC running ATS Remote software. If there
is no communication, check the communication settings and confirm compatibility with the local area
network (discuss with your Network Administrator).
3 Confirm that a PC on the network is able to access the Internet or other devices on the same network
(use a web browser, for example). If the PC cannot access the Internet, then most likely the problem lies
with the connection to the Internet. If the PC cannot access other computers (for example, printers or a
shared network drive), then the network (LAN) server may be down.
4. Change the Master IP address to a different timeserver among those listed in Appendix A. Perhaps the
timeserver that the AllSync Master is attempting to communicate with is down or not responding quickly
enough due to network traffic, etc.
5. Confirm all Network settings (see “Connecting the AllSync Master to the Network” (page 14) and
“Network Settings” (page 13) sections of this manual. Make sure the AllSync Master is configured
properly.
6. Confirm another device or computer on the network is not using the same Static IP address. The
Network Administrator should be able to resolve any conflicts.
If the problem cannot be resolved after following these steps, please call Technical Support at American
Time & Signal Co. at 1-800-328-8996.
Glossary
Appendix
Troubleshooting
Installation
Introduction
If you have trouble connecting the AllSync Master via Ethernet, follow these troubleshooting steps:
30
© American Time
AllSync Ethernet Option
User Manual
User Notes
Introduction
Installation
Troubleshooting
Appendix
Glossary
© American Time
31
AllSync Ethernet Option
User Manual
URL
IP address
Location
nist1-ny.ustiming.org
064.090.182.055
New York City, New York
nist1-nj.ustiming.org
096.047.067.105
Bridgewater, New Jersey
nist1-pa.ustiming.org206.246.122.250
nist1.aol-va.symmetricom.com
064.236.096.053
nist1-chi.ustiming.org
208.066.175.036
nist1.expertsmi.com
173.014.055.009
nist.netservicesgroup.com
064.113.032.005
nisttime.carsoncity.k12.mi.us
066.219.116.140
wwv.nist.gov
024.056.178.140
utcnist.colorado.edu
128.138.140.044
utcnist2.colorado.edu
128.138.188.172
ntp-nist.ldsbc.edu
198.060.073.008
nist1-lv.ustiming.org
064.250.229.100
nist1.aol-ca.symmetricom.com
207.200.081.113
nist1.symmetricom.com
069.025.096.013
nist1-sj.ustiming.org
216.171.124.036
nist1-la.ustiming.org
064.147.116.229
Hatfield, Pennsylvania
Reston, Virginia
Chicago, Illinois
Monroe, Michigan
Southfield, Michigan
Carson City, Michigan
WWV, Fort Collins, Colorado
University of Colorado, Boulder
University of Colorado, Boulder
LDSBC, Salt Lake City, Utah
Las Vegas, Nevada
Mountain View, California
San Jose, California
San Jose, California
Los Angeles, California
nNote: Please reference http:/tf.nist.gov/tf-cgi/servrs.cgi for the latest NIST Internet Time servers list, which includes
the status of each server.
Glossary
Appendix
Troubleshooting
Installation
Introduction
Appendix A: NIST Internet Time
Servers
32
© American Time
AllSync Ethernet Option
User Manual
Appendix B: Daytime Protocol
(RFC-867) Specifications
Introduction
Installation
Troubleshooting
Appendix
Glossary
This protocol is widely used by small computers running MS-DOS and similar operating systems. The
server listens on port 13, and responds to requests in either tcp/ip or udp/ip formats. The standard does not
specify an exact format for the Daytime Protocol, but requires that the time is sent using standard ASCII
characters. NIST chose a time code format similar to the one used by its dial-up Automated Computer
Time Service (ACTS), as shown below:
JJJJJ YR-MO-DA HH:MM:SS TT L H msADV UTC(NIST) OTM
where:
•
JJJJJ is the Modified Julian Date (MJD). The MJD has a starting point of midnight on November 17, 1858. You can obtain the MJD by subtracting exactly 2 400 000.5 days from the Julian Date, which is an integer day number obtained by counting days from the starting point of noon on 1 January 4713 B.C. (Julian Day zero).
•
YR-MO-DA is the date. It shows the last two digits of the year, the month, and the current day of month.
•
HH:MM:SS is the time in hours, minutes, and seconds. The time is always sent as Coordinated Universal Time (UTC). An offset needs to be applied to UTC to obtain local time. For example, Mountain Time in the U. S. is 7 hours behind UTC during Standard Time, and 6 hours behind UTC during Daylight Saving Time.
•
TT is a two digit code (00 to 99) that indicates whether the United States is on Standard Time (ST) or Daylight Saving Time (DST). It also indicates when ST or DST is approaching. This code is set to 00 when ST is in effect, or to 50 when DST is in effect. During the month in which the time change actually occurs, this number will decrement every day until the change occurs. For example, during the month of November, the U.S. changes from DST to ST. On November 1, the number will change from 50 to the actual number of days until the time change. It will decrement by 1 every day until the change occurs at 2 a.m. local time when the value is 1. Likewise, the spring change is at 2 a.m. local time when the value reaches 51.
•
L is a one-digit code that indicates whether a leap second will be added or subtracted at midnight on the last day of the current month. If the code is 0, no leap second will occur this month. If the code is 1, a positive leap second will be added at the end of the month. This means that the last minute of the month will contain 61 seconds instead of 60. If the code is 2, a second will be deleted on the last day of the month. Leap seconds occur at a rate of about one per year. They are used to correct for irregularity in the earth's rotation. The correction is made just before midnight UTC (not local time).
•
H is a health digit that indicates the health of the server. If H = 0, the server is healthy. If H = 1, then the server is operating properly but its time may be in error by up to 5 seconds. This state should change to fully healthy within 10 minutes. If H = 2, then the server is operating properly but its time is known to be wrong by more than 5 seconds. If H = 3, then a hardware or software failure has occurred and the amount of the time error is unknown. If H = 4 the system is operating in a special maintenance mode and both its accuracy and its response time may be degraded. This value is not used for production servers except in special circumstances. The transmitted time will still be correct to within ±1 second in this mode.
•
msADV displays the number of milliseconds that NIST advances the time code to partially compensate for network delays. The advance is currently set to 50.0 milliseconds.
• The label UTC(NIST) is contained in every time code. It indicates that you are receiving Coordinated Universal Time (UTC) from the National Institute of Standards and Technology (NIST).
•
OTM (on-time marker) is an asterisk (*). The time values sent by the time code refer to the arrival time of the OTM. In other words, if the time code says it is 12:45:45, this means it is 12:45:45 when the OTM arrives.
Note: This information is also available on the Internet at:
http://www.nist.gov/pml/div688/grp40/its.cfm
© American Time
33
Appendix
Troubleshooting
Installation
Introduction
Glossary of Terms
AllSync Ethernet Option
User Manual
Client - A computer or other networked device, or a software application, that connects to and requests
information from a server.
Daytime Protocol (RFC-867) - A standard, Internet-based timekeeping specification that calls for a
timestamp to be sent from a timeserver as an ASCII character string containing the current date and time.
This message is sent from the timeserver as a response to any input on port 13. The timeserver closes
the connection as soon as the timestamp is sent. The AllSync Master is capable of sending and receiving
timestamps via UDP port 13 using this protocol.
Ethernet - A very popular technology for networking computers and other devices. This communication
method is used for transmitting and receiving timing signals with the AllSync Master (with Ethernet
Option).
Firewall - A network configuration, usually both hardware and software, that forms a fortress between
networked computers within an organization and those outside the organization. It is commonly used to
protect information such as a network’s e-mail and data files within a physical building or organization site.
Gateway - A network device or network point that acts as an entrance to another network, such as the server
through which computers on a local area network access the Internet.
Gateway IP Address - The address value for the Gateway device on the network (see “Gateway”).
GPS - Global Positioning System, a constellation of satellites operated by the United States Military (US
Naval Observatory) that broadcast precisely timed signals from space. These signals are used for extremely
accurate global navigation as well as the distribution of precise time.
Internet - A worldwide system of computer networks in which any one computer can get information from/
or talk to any other connected computer using the TCP/IP protocols.
Leap Second - A second of time as measured by an atomic clock, added to or omitted from official
timekeeping systems annually to compensate for changes in the rotation of the earth.
Glossary
Master Clock - In a timekeeping or clock system, a device that acts as the source of time. The Master clock
transmits the time to any number of secondary (or slave) clocks.
Master IP Address - The value of an address for a timekeeping server on the local computer network or
Public Internet.
Network - A group of interconnected computers or other electronic devices, capable of transferring data
signals with each other.
NIST - National Institute of Standards and Technology - The Time and Frequency Division, part of
NIST’s Physics Laboratory, maintains the standard for frequency and time interval for the United States and
provides official time to the United States. NIST also maintains timeservers on the Internet, some of which
are listed in Table 1.
Patch Cable - A cable with plugs or terminals on each end of the conductor or conductors used to connect
circuits of equipment together. Patch cables are used to connect an individual computer or other device to a
network. The AllSync Master can be connected to an RJ-45 jack with an Ethernet Patch Cable.
RJ-45 Jack - Short for Registered Jack-45, this is an 8-pin (or 8-wire) modular connector used to attach
data transmission devices to standard telephone wiring. Commonly used in Ethernet data connections and
installed in the AllSync Master for physical connection of the Ethernet port.
Secondary Clock - Also known as a Slave Clock, this is a clock that synchronizes its timekeeping to that of
a connected Master Clock.
Server - A host computer or host device on a network, which shares resources and “serves” data to client
computers or other servers.
34
© American Time
AllSync Ethernet Option
User Manual
Glossary of Terms
Subnet Mask - a number that helps to define the relationship between the host (computers, routers,
switches, etc.) and the rest of the network.
Timeserver - A system or device that acquires the correct time from a local reference clock and/or remote
timeservers and will answer time requests from other systems. See “Server” above.
Installation
Synchronization - The process of bringing 2 clocks or time sources into phase so their difference is zero.
In the case of a timekeeping system, time synchronization takes place between the master clock and all
secondary clocks. In addition, in the case of the Ethernet timekeeping option, the master clock (AllSync
Master) is synchronized to the timeserver so the time output of the master is matched to the NIST time
standard.
Introduction
Static IP Address - An Internet Protocol (network) address permanently assigned to an individual machine,
account, or user.
Timestamp - A time mark or notation that indicates the date and the time.
Troubleshooting
UTC - Universal Coordinated Time - A time-scale that forms the basis of a coordinated distribution of
standard frequencies and time signals throughout the world. It is often referred to as Greenwich Mean Time
(GMT) or Zulu Time (military and aviation).
Appendix
Glossary
© American Time
35