1
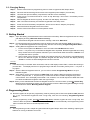
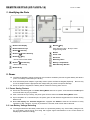
REMOTE KEYPAD (KP-16/KPA-16) 15-OCT-2009 1. Identifying the Parts Backlit LCD Display Backlit Key Backlit Numeric keys Enter KP PIN Code + Key to enter Programming Mode Backlit Arm Key Backlit Backlit Buzzer Home Arm Key 9V DC Jack Key Reserved - Check Control Panel status Mounting Holes Backlit Battery Compartment Disarm Key - Move back one step Wall Mounting Bracket Backlit # Key 2. Power The Remote Keypad is mainly powered by a 3.6V lithium AA battery and has a typical battery life about 3 years. The battery is attached by the factory. A DC 9V 300mA power adaptor is generally used to power the Remote Keypad (Optional). to use an adaptor with the appropriate AC voltage rating to prevent component damage. When AC power is supplied, the battery will be used as a back-up power source. Be sure only 2.1. Power Saving Feature When idle, Remote keypad is in Power Saving Mode and uses no power. It will activate and wake-up for 5 seconds when any key is pressed. After 5 seconds of key inactivity, the power goes off and it returns to Power Saving Mode mode. Upon completion of a command input, the power goes off and Remote Keypad returns to Power Saving Mode mode. Both LCD display and 16-button keypad are equipped with backlit to add the convenience of easy operation in dark. However, if no key is pressed for 5 seconds, both of them will be dimmed. 2.2. Low Battery Voltage Detecting The Keypad will detect the battery status when it is powered by battery only. If the battery voltage is low, the Low battery signal will be sent along with regular signal transmissions to the Control Panel for displaying the status accordingly. 1 2.3. Changing Battery Step 1: Step 2: Step 3: Step 4: Step 5: Step 6: Step 7: Step 8: Step 9: Put the Control Panel to programming menu in order to bypass the KP Tamper alarm. Dismount the Remote Keypad and remove the Keypad’s power adaptor (if connected). Unscrew and open the Battery compartment, and take out the old battery. Press any key 5-6 times and wait for 3 mins to fully discharge. Then insert a new battery into the compartment. Remote Keypad will emit a long beep, and the LCD will display “Welcome!”. After 5 seconds of inactivity, the Remote Keypad will enter sleep mode. Screw and close the battery compartment, and reconnect the AC adaptor (if required). Mount the Remote Keypad back to the surface. Put the Control Panel back to normal operation mode. 3. Getting Started Step 1: Open the battery protected lid and inset a 3.6V lithium AA battery. Remote Keypad will emit one beep with display showing “Welcome! Please Learning” If the Remote Keypad has been learnt-in already, it will show “Welcome!” Step 2: Put Remote Keypad in programming mode by entering KP PIN code (default: 0000), then press * key. The Remote Keypad will emit a long beep, with the LCD showing “Programming Mode Enter..”. Step 3: Adding Remote Keypad into the Control Panel: I. Put the Control panel into Device +/- menu and select the Add Devices sub menu. II. Press * key then 7 key on the Remote Keypad when requested. Remote keypad will emit a long beep. Please refer to the operation manual of your control Panel under the section of Device +/- to complete the learn-in process. III. After Control Panel receives the signal from Remote Keypad, it will send an acknowledgement back to the Remote Keypad. The Remote Keypad will then beep 3 times with display showing “Finish” to confirm the acknowledgement has been received. <NOTE> If a 3 times beep is not heard within 8 seconds, and the LCD display shows “Fail”, it means the learning-in process fails. The display will return to programming mode after 2 seconds; please press * key then 7 key again. Step 4: After the Remote Keypad is learnt-in, you can refer to section Programming Mode to set your Remote Keypad. Step 5: After setting, put the Control Panel into Walk Test mode, hold the Remote Keypad in the desired location, and press the * key then 7 key to confirm this location is within the signal range of the Control Panel. The LCD display shows “Fail”. This, however, is a normal response in Walk Test mode to indicate that Remote Keypad is within the signal range. Step 6: When you are satisfied that the Remote Keypad works in the chosen location, press Disarm Key twice to leave programming mode. You can proceed to mount the Remote Keypad following the steps as described in section Mounting Remote Keypad. 4. Programming Mode Remote keypad can be put into programming mode by entering the KP PIN code (default: 0000) followed by * key. The Remote Keypad will emit a long beep, with the LCD showing “Programming Mode Enter..”. To exit programming mode, press Disarm Key twice, Remote keypad will emit a long beep and returns to Normal Operation mode. Otherwise, Remote keypad will automatically exit Programming mode after 5 minutes and return to Normal Operation mode. <NOTE> The Programming mode is helpful to bypass Remote Keypad Tamper alarm when installing, replacing low batteries or moving to different mount site. 2 When Remote keypad is in Programming mode, it operates as wake-up condition thus will NOT enter Power Saving mode after 5 seconds of inactivity. In Programming mode, the following functions can be enabled by entering the below Set Code: Press * key and then 2 key — to enable Dual-key Panic Alarm function Press * key and then 3 key — to enable Dual-key Fire Alarm function Press * key and then 4 key — to enable Dual-key Medical Alarm function Press * key and then 5 key — to disable all Dual Key function Press * key and then 6 key — to change the KP PIN Code I. II. III. IV. V. When the keypad is under Programming mode, press * key then 6 key, a long beep will be heard with display showing “Enter old Code…” Enter KP PIN Code (default PIN code: 0000) Press # key, Remote Keypad will emit a long beep with display showing “Enter New Code…“ Enter your new 4-digit code. Press # key, Remote Keypad will emit a long beep with display showing “Set Pin Code Finish”. The new PIN code is enabled. <NOTE> Under the PIN code setting menu, after 30 seconds of key inactivity, Remote Keypad will show Set Pin Code Time out for 2 seconds and then return to Programming Mode. Press * key and then 7 key — to transmit Remote Keypad learn signal Press * key and then 8 key — to enable Arm/Home without PIN Code function Press * key and then 9 key — to enable Arm/Home/Disarm with PIN Code function Press * key and then 0 key — to enable Arm/Home/Disarm with KP PIN Code function Press key twice — to leave Programming mode. <NOTE> Please refer to section Operation to find more information about Dual-key function. 5. Mounting Remote Keypad Step 1: Using the 2 holes of the Wall Mounting Bracket as a template, mark off the holes’ positions. Step 2: Drill 2 holes and fix the screws & plugs provided. Step 3: Hook the remote keypad unit (with the front facing you) onto the Wall Mounting Bracket. 6. Tamper Protection respond The Remote Keypad is protected against any attempt to open the lid or to detach the keypad from its mounting surface. The Remote Keypad must hook on the Wall Mounting Bracket normally. Once the Remote Keypad is dismounted from the wall mounting bracket, the Remote Keypad will transmit a tamper alarm signal to Control Panel with the display showing “Tamper Action”. The Control Panel will respond according to your settings. After the Remote Keypad hooks back on the wall mounting bracket, the Remote Keypad will transmit a tamper alarm restore signal to Control Panel with the display showing “Tamper Restore”. The Control Panel will respond according to your settings. Tamper protection is disabled when the Remote Keypad is in programming mode. 3 7. Operation Arm/Home/Disarm with PIN Code: In Programming mode, press * key and then 9 key can enable Arm/Home with PIN Code function (factory default). Enter Arm Mode: Enter any one of Control Panel user code and press Keypad will emit a long beep with display showing “Alarm On”. Enter Home Mode: Enter any one of Control Panel user code and press Remote Keypad will emit 3 beeps with display showing “Home On”. Arm key, the Remote Home Arm key, the Return to Disarm Mode: Enter any one of Control Panel user codes and press the Remote Keypad will emit 2 beeps with display showing “Alarm Off”. Disarm key, Arm/Home without PIN Code: In Programming mode, pressing * key and then 8 key can enable Arm/Home without PIN Code function Enter Arm Mode: Press showing “Alarm On”. Arm key, the Remote Keypad will emit a long beep with display Enter Home Mode: Press showing “Home On”. Home Arm key, the Remote Keypad will emit 3 beeps with display Return to Disarm Mode: Enter any one of Control Panel user code and press Remote Keypad will emit 2 beeps with display showing “Alarm Off”. Disarm key, the Arm/Home/Disarm with KP PIN Code: In Programming mode, press * key and then 0 key can enable Arm/Home with KP PIN Code function (default KP PIN code: 0000). Enter Arm Mode: Enter KP PIN Code and press beep with display showing “Alarm On”. Enter Home Mode: Enter KP PIN Code press 3 beeps with display showing “Home On”. Arm key, the Remote Keypad will emit a long Home Arm key, the Remote Keypad will emit Return to Disarm Mode: Enter KP PIN Code and press emit 2 beeps with display showing “Alarm Off”. Disarm key, the Remote Keypad will General Operation If there is Alarm Memory, the Remote Keypad will emit 5 beeps (depending on Control Panel). Enter Programming mode — Enter KP PIN code and then press * key. Panic Alarm — Press 1 key + 3 key simultaneously (if the function is enabled). Fire Alarm — Press 4 key + 6 key simultaneously (if the function is enabled). Medical Alarm — Press 7 key + 9 key simultaneously (if the function is enabled). Check Control Panel Status — Press key in normal operation mode. <NOTE> While entering KP PIN code, if incorrect codes have been inputed for 4 times, it will inhibit further key presses for 1 minute. When the keypad is connecting to the control panel and reading the data, a “Please wait” meesage will be displayed. Please do not press any key. If connecting and data reading fails, a “try again” message will be displayed. Please try again and re-connect later. 4 3 8. Fault Conditions & Alarm Memory When Remote Keypad is under NORMAL OPERATION MODE, When 4-digit PIN Code is entered and followed by the Arm / Home arm key at a fault situation, it will emit 3 beeps with the display showing “System has Fault Please see Panel. Please go to your Control Panel to check and remove the fault situation; then, you can arm / home arm the system. Or, you can force arm the system with Control Panel. (Please refer to user manual of Control Panel to get more information.) <NOTE> When 4-digit PIN Code is entered and followed by the Disarm key at a fault situation, the Remote Keypad will NOT inform you fault situation. If the Control Panel is under Arm Mode, you CANNOT directly activate Home mode by using Remote keypad. If so, the Remote Keypad will emit 3 beeps, indicating the Control Panel is under Arm Mode. Then another 4 beeps, indicating transmission error. If you would like to change the Arm Mode to Home mode, please disarm the system firstly. If there is alarm memory, when using the Remote Keypad to disarm the system, the LCD screen will display “Alarm Off, Alarm Memory”. Also, when checking the Control Panel status by pressing the key, the LCD screen will display the current arming mode plus Alarm Memory. For example, “Away Arm, Alarm Memory”. 9. Reset Procedure Reset to Factory Default Setting The Remote Keypad can clear all programmed parameters by the following sequence: Step 1: Step 2: Step 3: Step 4: Step 5: Unplug the power cord and remove the battery for the Remote Keypad. Press any of keys few times to full-discharge. Press & hold 3 key while inserting the battery. The Remote Keypad will emit 3 short beeps. Release the 3 key after the 3 beeps; and then a long beep is heard. The LCD screen shows “Welcome! Please Learning” to indicate the reset process is complete. <NOTE> Once System Reset is executed, all the programmed data returns to default value. You have to do the programming again. 5