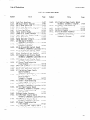
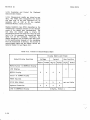
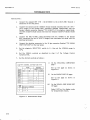
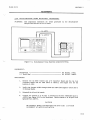
1
About this Manual
We’ve added this manual to the Agilent website in an effort to help you support
your product. This manual is the best copy we could find; it may be incomplete
or contain dated information. If we find a more recent copy in the future, we will
add it to the Agilent website.
Support for Your Product
Agilent no longer sells this product. Our service centers may be able
to perform calibration and repair if necessary, but no other support from
Agilent is available. You will find any other available product information on the
Agilent Test & Measurement website, www.tm.agilent.com.
HP References in this Manual
This manual may contain references to HP or Hewlett-Packard. Please note that
Hewlett-Packard's former test and measurement, semiconductor products and
chemical analysis businesses are now part of Agilent Technologies. We have
made no changes to this manual copy. In other documentation, to reduce
potential confusion, the only change to product numbers and names has been in
the company name prefix: where a product number/name was HP XXXX the
current name/number is now Agilent XXXX. For example, model number
HP8648A is now model number Agilent 8648A.
OPERATION
AND
MODEL
SERVICE
MANUAL
4145A
SEMICONDUCTOR
PARAMETER
ANALYZER
SERIAL
This manual applies
to
serial numbers
prefixed
NUMBERS
instruments
with
2149Jand above.
0 COPYRIGHT:
YOKOGAWA-HEWLETT-PACKARD,
9-1,
TAKAKURA-CHO,
HACHIOJI-SHI,
Manual
Microfiche
Part
TOKYO,
LTD.,
1982
JAPAN
No. 04145-90000
Part
No. 04145-90050
Printed:
AUG.
1984
Table of Contents
Model 4145A
TABLE
Title
Section
Page
Section
Title
Page
GENERAL INFORMATION
I
l-l.
Introduction
1-4.
1-11.
1-13.
1-16.
Description
. .. . . . . . . . . .. .
Specifications
...........
Safety Considerations
. .. .
Instruments
Covered by
Manual . . . . . . . . . . . . . . . .
Options
. . . . . . . . . . .. . . . . ..
Accessories
Supplied
.....
Accessories
Available
....
Warranty Limitation
for
Accessories
...........
l-21.
l-23.
l-25.
l-27.
.............
l-l
1-2
l-3
l-3
1-3
l-4
1-4
l-4
2-l.
2-3.
2-5.
2-6.
2-8.
2-10.
2-12.
2-16.
2-19.
2-21.
2-23.
2-24.
2-26.
Introduction
.............
Initial
Inspection
. .. . . . .
Preparation
for Use . . . . . .
Power Requirements
.......
Line Voltage and Fuse
Selection
.............
Line Frequency Filter
....
Power Cable . . . . . . . . . . . . . .
Operating
Environment
....
Installation
Instructions.
Installation
of Options
907, 908 and 909 . . . . . .
Storage and Shipment . . . . .
Environment
Packaging
. . . . . .. . . . . .. .
. . . . . . . . . . . . e. . .
3-l.
3-3.
3-5.
3-7.
3-10.
3-12.
3-14.
3-16.
3-18.
3-21.
3-23.
3-25.
3-27.
3-29.
3-33.
3-35.
.
Introduction
. . . .. . . .. .. . .
Panel Features
...........
Flexible
Disc Handling
...
CRT Display
..............
Self Test . . . . . . . . . . . . . . . .
Error Messages/Error
Codes
Initial
Control
Setting
..
User-Area
Filing
Operations
............
Arithmetic
Capabilities
..
Source and Measurement
Channels . . . . . . . . . . . . . .
Stimulus/Measurement
Units (SMU) . . . . . . . . . . .
Voltage Sources (Vs) and
Voltage Monitors
(Vm) .
Compliance
. . . . . .. . . .. . . . .
Sweep Measurement
. . . .. .. .
Time Domain Measurement
..
Integration
Time . . . . . . . . .
3-49.
3-51.
l-4
2-l
2-l
2-l
2-l
3-65.
3-67.
2-l
2-l
2-2
2-2
3-69.
3-71.
3-73.
3-75.
2-2
3-77.
3-79.
2-2
2-4
3-81.
2-4
2-4
3-83.
3-85.
3-87.
3-89.
OPERATION
III
3-37.
3-40.
3-42.
3-45.
3-47.
3-53.
3-55.
3-57.
3-59.
3-61.
3-63.
INSTALLATION
II
ii
OF CONTENTS
Auto-Calibration
........
Display Pages ...........
............
Page Control
MENU Page ...............
CHANNEL DEFINITION Page .
SOURCESETUP Page .... ..'.
MEAS & DISP MODE SETUP
Page .................
GRAPHICS PLOT Page ......
LIST DISPLAY Page .......
MATRIX DISPLAY Page .....
SCHMOOPLOT Page ........
AUTO SEQUENCESETUP Page.
OUTPUT SEQUENCESETUP
Page .................
USER FILE CATALOG Page . .
3-30
3-30
3-30
3-30
3-30
3-30
3-31
3-31
3-31
3-31
DIAGNOSTICS Page ........
Softkey
Prompt (SKP) ....
System Messages .........
Time Domain Measurement
Setup ................
DUT Connection
..........
DUT Connection
Using the
16058A ...............
DUT Connection
Using the
Connector
Plate ......
Floating
Measurement
....
Guarding
................
Applications
Package ....
3-31
3-31
3-31
HP-IB Interface
3-74
3-76
3-l
3-2
3-10
3-10
3-12
3-12
3-18
3-95.
3-97.
3-99.
LOCAL Key ...............
HP-IB Control Switch
3-18
3-19
3-21
3-107.
3-109.
3-111.
3-113.
3-21
3-115.
3-23
3-23
3-24
3-26
3-27
3-117.
_1 .-'
3-76
3-80
3-82
3-82
3-83
.........
Connection
to HP-IB .....
HP-IB Status Indicators
.
3-30
OPERATION GUIDE Page ....
3-91.
3-93.
3-101.
3-103.
3-105.
3-27
3-28
3-28
3-30
3-86
3-86
.
3-86
3-86
3-86
....
HP-IB Interface
.........
3-87
Capabilities
HP-IB Control
Modes .....
3-87
HP-GL Control of the CRT 3-87
Remote Program Codes and
Parameter Setting
....
3-88
HP-GL Commands ..........
3-97
Device Clear ............
3-100
Data Output .............
3-101
Service
Request Status
Byte .................
3-102
Programming Guide for
4145A ................
3-104
3-119.
PLOT ....................
PRINT ...................
3-121.
3-123.
3-125.
External
Display
........
Disc Copy ...............
Head Cleaning
...........
3-108
3-110
3-111'
3-112
3-113
__
‘-*we
Model 4145A
Table of Contents
TABLE
L’
Section
Title
3-127.
3-129.
3-131.
3-133.
IV
Page
Protection
againt
Hazardous Voltage
Exceeding
+42V . . . ..d...........
PLOT/PRINT Operations
Using HP-IB Controller
Measurement
Ranges and
Resolution
...........
Resolution
and Format for
Displayed
Data and Data
Output . . . . . . . . . . . . . . .
Section
4-10.
4-11.
4-12.
4-13.
4-14.
L'
Introduction
5-l.
5-3.
5-7.
5-9.
5-11.
5-13.
5-15.
5-17.
5-19.
5-21.
5-23.
5-38.
3-114
5-40.
5-43.
5-46.
5-49.
5-52.
3-116
3-118
5-24.
5-25.
5-26.
5-27.
5-28.
5-29.
5-30.
5-32.
5-53.
. .. . . . . . . . . . .
4-1
Test
5-54.
5-55.
5-56.
5-57.
VI
5-1
5-l
5-l
5-1
5-1
Check and Adjustment
..
DC Power Supply Adjustment
Sample Hold Switch AC
Offset
Adjustment
. . .. .
Demultiplexer
Noise
Rejection
Adjustment
..
D-A Converter
Gain
Adjustment
............
A-D Converter
Gain
Adjustment
. . . . . . . . . . ..
VM Range Adjustment
......
Mass Storage Unit Test . . .
Flexible-disc
Drive Access
5-6
5-8
5-3
5-3
5-3
5-3
5-3
and Focus
5-11
VII
Introduction
.............
Abbreviations
.....O......
Replaceable
Parts List ..*
Ordering
Information
.....
Direct
Mail Order System .
Introduction
. . . .. . . . . . . . .
Manual Changes . . . . . . . . . . .
SERVICE
8-l.
5-18
5-20
5-23
5-23
5-23
5-23
5-24
5-26
5-28
5-30
5-32
5-33
5-34
5-38
5-41
5-43
6-l
6-l
6-l
6-2
6-2
8-24.
8-26.
8-28.
8-30.
8-32.
8-34.
8-36.
7-1
7-l
’
Introduction
.............
Safety Considerations
....
Recommended Test Equipment
Troubleshooting
..........
Repair . . . . . . . . . . . . . . . . . . .
Block,,iDiagram
Discussion
.
Board Level Theory . . . . . . .
Troubleshooting
Guide . . . .
Assembly Removal . . . . . . . . .
Assembly Locations
.......
Al through
A8 Board Removal
Al3 through Al6
Board Removal . . . . . . . . . .
Front Panel Removal . . . . . .
Display
(1345A) Removal . .
Rear Assembly A Removal
All and A12 Board Remova;:
Rear Assembly B Removal . .
FDD and A9 Board Removal .
Al Graphic Display
Control
Board. . . . . . . . . .
8-3.
8-5.
8-7.
8-9.
8-11.
8-13.
8-15.
8-17.
8-18.
8-20.
8-22.
5-13
5-16
5-23
MANUAL CHANGES
7-1.
7-3.
VIII
Page
REPLACEABLE PARTS
6-l.
6-3.
6-5.
6-7.
6-10.
. . . . . 4-27
Introduction
. . .. . . . . . .. . .
Safety Requirement
.......
Equipment.Required
. . . . .. .
Adjustment
Relationships
.
Adjustment
Locations
.....
Initial Operation
Procedure
.............
Basic Operating
Checks . . .
Top Cover Removal . . . . . . . .
Bottom Cover Removal . . . . .
A3 Board Access . . . . . . . . . .
Graphics Display Unit
Intensity
Disc Check . . . . . . . . . . . . . . .
Flexible-disc
Drive Checks
and Adjustments
..a....
Sure Flexible-disc
Drive
Checks and Adjustment
.
MSU DIAGNOSTICS Mode . . . . .
MSU Read Test . . . . . . . . . . . .
MSU Write Test . . . ...*.....
MSU EXERCISER . . . . . . . . . ..e
Drive Belt Tension Check
and Adjustment
. . .. . . . .
Index Timing Check and
Adjustment
. . .. . . . . . . . .
Track Alignment
Check
and Adjustment'........
Track Zero Switch Check
. ..e....e
and Adjustment
Jitter Check and
Adjustment
. . . . . . . . e. . .
Index Detector
Alignment
Check and Adjustment
..
3-114
Equipment Required
. . . . . . . 4-1
Test Record . . . . . . . . . . . . . . 4-l
Calibration
Cycle .* . . . . . . 4-1
Graphics Display
Unit
Intensity
and Focus
Check . . . . . . . . . . . . . . . . . 4-2
Page and Key Function
Check . . . . . . . . . . . . . . . . . 4-4
SMU Accuracy Test . . . . . . . . 4-5
VS Accuracy Test . . . . . . . . . 4-19
VM Accuracy Test . . . . . . . . . 4-22
External
CRT X-Y-Z Output
Check . . . .._............
4-25
HP-IB Interface
4-15.
ADJUSTMENT
Title
5-34.
5-36.
PERFORMANCETEST
4-l.
4-3.
4-5.
4-7.
4-9.
V
OF CONTENTS
8-l
8-l
8-l
8-l
8-l
8-2
8-4
8-6
8-8
8-8
8-9
8-9
8-9 ry
8-10
8-11
8-11
8-12
8-13
8-69
.. .
111
-
Model 4145A
Table of Contents
TABLE
OF CONTENTS
i
‘---I
Title
Section
8-38.
8-40.
8-42.
8-44.
8-46.
Page
A2 Microprocessor
Digital
Control
Board . . . . . . 8-72
A3 SMU Control
and A-D
Converter
Board . . . . . . . . . . . . 8-78
A4 D-A Converter
Board . . . . . . . 8-84
A5 SMU Board . . . . . . . . . . . . . . . . . 8-98
A9 HP-IB and MSU
Control
Board . . . . . . . . . . . . . . 8-111
Title
Section
8-48.
8-50.
8-52.
8-54.
Page
A10 Keyboard and
Display Control
Board . . . . . .
All Switching
Power
Supply Board . . . . . . . ...*....
Al3 SMU Power Source
Board . . . . . . . . . . . . . . . . . . . . . .
A16 Vs/Vm Board . . . . . . . . . . . . . .
8-115
8-120
8-129
8-138
LIST OF TABLES
Number
l-l.
1-2.
1-3.
Title
................
Specifications
Reference
Data ................
..........
Accessories
Supplied
Page
Number
l-5
1-13
1-16
4-12.
4-l 3.
4-14.
3-l.
3-2.
3-3.
3-4.
3-5.
3-6.
3-7.
3-8.
3-9.
3-l 0.
3-l 1.
3-12.
3-13.
4145A Self Test . . . . . . . . . . . . . . .
Error Messages . . . . . . . ..?......
Operational
Error-Codes
. . .. . . .
Self Test Error-Codes
. . . . . .. . .
Arithmetic
Operators
..........
SMU Source Ranges . . . . . . . . . . . . .
Application
Package Setups . . . .
4-T.
4-2.
4-3.
Recommended Test Equipment
....
Source Parameter Changes . . . . . .
Test Limits
for Voltage
Control
Accuracy Test . . . . . . . . . . . . . .
Source Parameter
Changes . . . . . .
Test Limits
for Voltage
Measurement Accuracy Test . .
Source Parameter
Changes . . . . . .
Test Limits
for Current
Measurement Accuracy Test . .
Source Parameter
Changes . . ..e.
Test Limits
for Current
Control
Accuracy Test . . . . . . . . . . . . . .
Test Limits
for SU Accuracy
Test ......................e
Test Limits
for MU Accuracy
Test ..*....................
4-4.
4-5.
4-6.
4-7.
4-8.
4-9.
4-10.
4-11.
HP-IB Interface
Capabilities
..
3-l 2
3-13
3-l 5
3-17
3-19
3-22
3-83
3-87
3-97
3-l 08
3-110
3-l 11
HP-GL Commands . . . . . . . . . . . . . . . .
Recommended HP-IB Plotters
. .. .
Recommended HP-IB Printers
....
Recommended External
Displays
.
3-118
Number of Output/Display
Digits
Page
Test Program
. m 4-29
Controller
Instructions
and
Operator
Response for HP-IB
Interface
Test Program . . . . .
Error Messages for HP-IB
Test Program
.....
4-33
4-35
5-l.
5-5.
5-6.
5-7.
Adjustable
Components . ...+....
Adjustment
Requirements
.......
Check Points and Limits
. . ...*.
Test Point/Trimmer
Capacitor
Combination
. . . . . . . . . . . . . .. .
MSU DIAGNOSTICS Mode . . . . . . . . . .
Message on MSU EXERCISER Page .
MSU EXERCISER Softkey Prompts .
6-l.
List
5-2.
5-3.
5-4.
6-2.
6-3.
of Reference
Designators
and Abbreviations
..........
Manufacturers
Codes ...........
Replaceable
Parts .............
5-2
5-4
5-10
5-14
5-24
5-30
5-31
6-l
6-2
6-3
4-8
4-l 2
7-l.
4-12
4-15
4-15
4-l 8
4-18
4-21
.u
7-2.
8-l.
8-2.
8-3.
8-4.
8-5.
8-6.
4-24
8-7.
iv
HP-IB Interface
Interface
4-A
4-8
Title
Manual Chanqes by Serial
Number .:....l..............
Parts Change Information
......
Hardware-related
Error Codes . .
SMU Status Codes . . . . . . . . . . . . . .
Jumper Settings
List
. . . .. . . . . . . . . . .
7-l
7-27
8-6
8-6
8-19
of Digital
Section
Troubleshooting
Flow Diagrams 8-22
Program Locations
. . . . . . . . . . . . . 8-76
Relationship
between Current
and Range Resistors
. . . . . . . . 8-103
V Monitor
Amplifier
Ranging . . . 8-104
Model 4145A
List of Illustrations
LIST
OF ILLUSTRATIONS
L
Number
l-l.
l-2.
2-l.
2-2.
2-3.
3-l.
3-2.
3-3.
3-4.
3-5.
3-6.
3-7.
3-8.
3-9.
3-10.
L-
I
3-11.
3-12.
3-13.
3-14.
3-15.
3-16.
3-17.
3-18.
3-19.
3-20.
3-21 .
3-22.
3-23.
3-24.
3-25.
3-26.
3-27.
3-28.
3-29.
3-30.
3-31.
3-32.
3-33;
3-34.
3-35.
b’
+”
3-36.
3-37.
Title
Page
Model 4145A and Accessories
Serial
Number Plate ............
Voltage and Fuse Selection
Power Cable Supplied
Rack Mount Kit .................
....
l-l
l-3
2-2
2-3
.....
...........
Contents
of Section
III ........
Front Panel Features
...........
Rear Panel Features
............
Disc Installation
and Removal . .
Useable Display Area ...........
Operator
Adjustment
............
Byte Size of Arithmetic
Expressions
.................
Source and Measurement
Channels
of the 4145A ................
Simplified
Circuit
Diagram of
One of the Four SMUs ........
Specifiable
Voltage/Current
......................
output
Simplified
Circuit
Diagram of Vs
Simplified
Circuit
Diagram of Ym
Voltage/Current
Output
Specified
by the COMPLIANCE .
Staircase
Sweep Output .........
Relationship
Between VARl and
VAR2 ........................
Relationship
Between VARl and
VARl' .......................
Time Domain Measurement
........
Page Control
Keys ..............
Page Flow and the Relationship
.
MENU Page ......................
CHANNEL DEFINITION Page ........
SOURCE SETUP Page ..............
MEAS & DISP MODE SETUP Page ....
GRAPHICS PLOT Page .............
LIST DISPLAY Page ..............
MATRIX DISPLAY Page ............
SCHMOOPLOT Page
AUTO SEQUENCESETUP Page .......
OUTPUT SEQUENCESETUP Page .....
4145A FILE CATALOG Page ........
...............
OPERATION GUIDE Page ...........
DIAGNOSTICS Page ...............
Time Domain Measurement Setup . .
DUT Connection
Using the 1605811.
DUT Connection
Using the
Connector
Plate .............
Example of Guarding
............
Connection
Examples for
Application
Package .........
2-5
3-l
3-2
3-8
3-10
3-11
3-11
3-20
Number
Title
3-38.
3-39.
HP-IB Control
3-40.
3-41.
3-42.
3-43.
3-44.
3-45.
3-46.
3-47.
3-48.
3-49.
Data Output
3-50.
3-51.
Page
Switch ..........
Remote Program Codes and
Parameter Setting
..........
Format
3-86
3-88
3-l 00
............
Status Byte for the 4145A .....
Sample Program 1 ..............
Sample Program 2 ..............
Plot Function
.................
Print Function
................
External
Display
..............
Disc Copy
Head Cleaning
.................
Programs for HP-IB controlled
PLOT Operations
............
Measurement
Ranges and
Resolution
.................
Display/Output
Format .........
3-102
3-105
3-107
3-108
3-110
3-111
3-112
3-l-13
.....................
3-115
3-116
3-119
3-21
3-21
3-22
3-23
3-23
3-23
3-24
3-25
3-26
3-27
3-28
3-29
4-l.
4-2.
4-3.
4-4.
4-5.
4-6.
4-7.
4-8.
4-9.
4-l 0.
4-l 1.
4-12.
4-l 3.
4-14.
3-32
3-34
3-38
4-15.
3-42
4-l 6.
4-17.
3-48
3-54
3-57
Test Pattern
for GDU ..........
GDU Connector
Location
........
Display for Key Function
Check.
Voltage Control
Accuracy Test
Setup ......................
Measurement Setup .............
Voltage Measurement Accuracy
Test Setup .................
Measurement Setup .............
Measurement Setup .............
Measurement Setup .............
SU Accuracy Test Setup ........
Measurement Setup .............
MU Accuracy Test Setup ........
Measurement Setup .............
External
CRT X-Y-Z Output
Check Setup ................
Scope Displays
of X-Y-Z
...........
Output (Example)
HP-IB Interface
Test Setup ....
Program Listing
of HP-IB
Interface
Test
4-2
4-3
4-4
4-5
4-6
4-9
4-10
4-13
4-l 6
4-19
4-21
4-22
4-23
4-25
4-26
4-27
..............
4-30
3-59
3-62
3-66
3-67
3-70
3-71
3-74
3-76
3-80
3-82
3-85
5-l .
5-2.
5-3.
5-4.
5-5.
5-6.
5-7.
5-8.
5-9.
5-l 0.
Test Pattern
for GDU ..........
INTENSITY and FOCUS Locations
.
Connector
Location
............
DC Power Supply Adjustment
Setup ......................
AllR17 Adjustment
.............
5-6
5-6
5-7
5-8
5-9
A5Jl Check ....................
5-10
Check Point Locations
.........
Sample Hold Switch AC Offset
Adjustment
Setup ...........
AC Offset
Adjustment
..........
Check/Adjustment
Point
Locations
..................
5-10
5-11
5-12
5-12
V
~
-_
--
-
_---
__
Model 4145A
List of Illustrations
LIST OF ILLUSTRATIONS
--
Number
5-14.
5-15.
5-16.
5-17.
Title
D-A Converter
Gain Adjustment
Setup . . . . . . . . . . . . . . . . . . . . . . .
Check/Adjustment
Point
Locations
...................
Results from LED Annunciators
..
Check/Adjustment
Point
Locations
. . . . .. . . . . . . . . . . . .
Vm Range Adjustment
Setup . . . . . .
Test Point Locations
. .. . . . . . . . .
Flexible-disc
Drive Access .,...
Component Locations
for MSU
DIAGNOSTICS Mode Setting
....
CRT Display of MSU DIAGNOSTICS
Page . . . . . . . . . . . . . . . . . . . . . . . .
CRT Display of MSU Read Test . . .
CRT Display of MSU Write Test . .
CRT Display fo MSU EXERCISER
Page . . . . . . . . . . . . . . . . . . . . . . . .
Drive Belt Tension Check and
Adjustment
Setup . . . . . . . . . . . .
Index Timing Checks and
Adjustment
..................
R47 Location
. . . . . . . . .. . . . . . . . . .
Track Alignment
Check and
Adjustment
..................
Scope Display of Bursts ^l.......
Check/Adjustment
Point Locations
Track Zero Switch and Adjustment
Setup . . . . . . . . . . . . . . . . . . . . . . .
Scope Display of Track Zero
............
Switch Switching
Check/Adjustment
Point Locations
Jitter
Check and Adjustment
Setup . . . . . . . . . . . . . . . . . . . . . . .
Scope Display of Jitter
........
Check/Adjustment
Point Locations
Index Detector
Alignment
Check
and Adjustment
Setup . . . . . . . .
Index Detector
Alignment
Gap . . .
Check/Adjustment
Point Locations
l
5-18.
5-19.
5-20.
5-21.
5-22.
5-23.
5-24.
5-25.
5-26.
5-27.
5-28.
5-29.
5-30.
5-31.
5-32.
5-33.
5-34.
5-35.
5-36.
5-37.
5-38.
5-39.
5-40.
6-l.
Major Mechanical
Parts
(Exploded View) ..,...,,....,
Page
Number
5-16
8-l.
8-2.
8-3.
5-17
5-18
5-19
5-20
5-22
5-23
5-25
5-25
5-26
5-28
8-4.
8-5.
8-6.
8-7.
8-8.
8-9.
8-10.
8-11.
8-12.
8-13.
8-14.
8-15.
5-30
5-32
8-16.
8-17.
5-33
5-33
5-34
5-35
5-37
5-38
5-39
5-40
5-41
5-42
5-42
8-18.
8-19.
8-20.
8-21.
8-22.
8-23.
8-24.
8-25.
8-26.
5-43
5-44
5-45
6-29
8-27.
8-28.
8-29.
8-30.
8-31.
8-32.
8-33.
8-34.
8-35.
vi
Title
Four Major Sections
of the 4145A
Overall
Block Diagram ..........
Assembly Level Trouble
Isolation
Flow Diagram ................
Assembly Locations
.............
Front Panel Removal ............
1345A Removal ..................
Rear Assembly A Removal ........
All and A12 Board Removal ......
Rear Assembly B Removal ........
A19 Board Assembly .............
FDD and A9 Board Removal .......
Flow Diagram Notes .............
Signature
Analysis
.............
Al Board Troubleshooting
Flow Diagram ................
A2 Board Troubleshooting
Folw Diagram ................
A3 Board Troubleshooting
Flow Diagram ................
A4 Board Troubleshooting
Folw Diagram ................
A9 Board Troubleshooting
Flow Diagram ................
A10 Board Troubleshooting
Flow Diagram ................
Schematic Diagram Note .........
Block Diagram of Al Board ......
Al Graphic Display Control
Board
Assembly Component Locations.
Al Graphic Display Control
Board
Assembly Schematic Diagram . .
Block Diagram of the A2 Board . .
A2 Microprocessor
Digital
Control
Board Assembly
.........
Component Locations
A2 Microprocessor
Digital
Control
Board Assembly
Schematic Diagram ...........
Block Diagram of the.A3 Board . .
A3 SMU Control
and A-D Converter
Board Assembly Component
Locations
...................
A3 SMU Control
and A-D Converter
.Board Assembly Schematic
Diagram .....................
Block Diagram of A4 Board ......
I-V Converter
Output ...........
Analog Switch ..................
A4 D-A Converter
Board Assembly
Component Locations
.........
A4 D-A Converter
Board Assembly
Schematic Diagram ...........
A5 Board Troubleshooting
Flow Diagram ................
Page
8-3
8-5
8-7
8-8
8-9
8-10
8-11
8-12
8-12
8-13
8-13
8-14
8-21
8-25
8-31
8-43
8-53
8-59
8-65
8-68
8-69
8-70
8-71
8-72
8-74
8-75
8-78
8-80
8-81
8-84
8-85
8-85
8-86
8-87
8-88
.&
List of Illustrations
Model 4145A
LIST OF ILLUSTRATIONS
Number
8-36.
8-37.
8-38.
8-39.
8-40.
8-41.
8-42.
8-43.
8-44.
8-45.
8-46.
8-47.
8-48.
8-49.
8-50.
8-51.
8-52.
8-53.
~,
--
8-54.
8-55.
8-56.
8-57.
8-58.
8-59.
8-60.
8-61.
8-62.
8-63.
8-64.
8-65.
8-66.
8-67.
8-68.
Title
Page
Self-Test
Waveform . . . . . . . . . . . . . 8-97
SMU Board Block Diagram . . . . . . . . 8-98
SMU V Mode Operation
. . . . . . . . . . . 8-99
SMU I Mode Operation
. . . . . . . . . . . 8-99
Current
Compliance
in V Mode . . 8-100
V Error Amplifier
. . . . . . . . . . . . . 8-100
Three Control
Modes . . . . . . . . . . . 8-101
Example of Diode Feedback . . . . . 8-102
Power Amplifier
Output Stage . . 8-102
Range Resistors
. . . . . . . . . . . . . . . 8-103
Range Resistor
Circuit
. . . . . . . . 8-104
A5 SMU Board Assembly
Component Locations
. . . . . . . . 8-106
A5 SMU Board Assembly
Schematic Diagram . . . . . . . . . . 8-107
A9 HP-IB and MSU Control
Board
Assembly Component Locations
8-112
A9 HP-IB and MSU Control
Board
Assembly Schematic Diagram . 8-113
Block Diagram of Key Control
. . 8-115
A10 Keyboard and Display Board
Assembly Component Locations
8-116
A10 Keyboard and Display Board
Assembly Component Locations
8-117
All Board Troubleshooting
Flow Diagram ..T............
8-118
Rectifier
Circuit
. . . . . . . . . . . . . 8-120
Switching
Circuit
. . . . . . . . . . . . . 8-120
Power Loss Detection
Circuit
. . 8-121
All Switching
Power Supply
Board Assembly
Component Locations
" . . . . . . . 8-122
All Switching
Power Supply
Board Assembly
Schematic Diagram . . . . . . . . . . 8-123
Al2 Board Troubleshooting
Flow Diagram . . . . . . . . . . . . . . . 8-124
Al2 DC Power Supply Board
Assembly Component Locations
8-126
Al2 DC Power Supply Board
Assembly Schematic Diagram . 8-127
Al3 Board Troubleshooting
Folw Diagram . . . . . . . . . . . . . . . 8-128
Voltage
Change Sequence . . . . . ...8-129
Al3 SMU Power Source'Board
Assembly Component Locations.8-130
Al3 SMU Power Source Board
Assembly Schematic Diagram . 8-131
Al5 Board Troubleshooting
Flow Diagram . . . . . . . . . . . . . . . 8-132
Al5 Floating
Power Supply Board
Assembly Component Locations
8-68
Number
8-69.
8-70.
8-71.
8-72.
8-73.
8-74.
Title
Al5 Floating
Power Supply Board
Assembly Schematic Diagram .
Al6 Board Troubleshooting
Flow Diagram . . . . . . . . . . . . . . .
Vs Block Diagram . . . . . . . . . . . . . .
Vm Block Diagram . . . . . . . . . . . . . .
Al6 Vs/Vm Board Assembly
Component Locations
........
Al6 Vs/Vm Board Assembly
Schematic Diagram . . . . . . . . . .
Page
8-69
8-136
8-138
8-138
8-140
8-141
vii
Model 4145A
SECTION
I
SECTION I
GENERAL INFORMATION
l-l.
INTRODUCTION
l-2.
This
operation
and
service
manual
contains
the information
required
to install,
operate,
test,
adjust,
and
service
the
Hewlett-Packard
Model 4145A
Semiconductor
Parameter
Analyzer.
Figure
l-l
shows the
instrument
and
supplied
accessories.
This
specifications,
section
covers
instrument
identification,
description,
options, accessories,
and other basic information.
l-3.
Listed on the title page of this manual is
a microfiche
part number that can be used to
order 4 x 6 inch microfilm
transparencies
of the
manual.
Each microfiche
contains
up to 60
photo-duplicates
of the manual
pages.
The
microfiche
package
also includes
the latest
manual
changes
supplement
as well as all
pertinent
service notes. To order an additional
manual, use the part number listed on the title
page of this manual.
4145A
04145-61622
required)
-p&+-/y,,
G
04145-61623
04145-61,630
e7
i P-L ==-? lm?-&oC3
Figure l-l.
Model 4145A and Accessories.
SECTION I
l-4.
DESCRIPTION
Hewlet t-Packard
Model
4145A
l-5.
The
Semiconductor
Parameter
Analyzer is a fully
automatic,
high performance,
programmable
test
instrument
designed to measure, analyze, and
graphically display the DC characteristics
of a
wide range of semiconductor
devices, such as
diodes,
bipolar
transistors,
field-effect
transistors,
wafers, ICs, etc. Main applications
include computer-aided
design (CAD) of ICs, new
device
evaluation,
materials
evaluation,
component
selection
for
circuit
design,
incoming/outgoing
inspection,
semiconductor
process control,
quality
control,
and quality
assurance.
It
is
equipped
with
four
programmable
stimulus/measurement
units
@MU), two programmable
voltage source units
(Vs), two voltage monitor units (Vm), a fully
interactive
graphics
removable
display,
flexible-disc
storage, softkeys,
full arithmetic
keyboard, and HP-IB. And it can be used on the
bench or as part of a complete
measurement
system in the laboratory
or on the production
line.
For device stimulation
and characteristics
l-6.
measurement,
the 4145A has eight channels.
Channels 1 through 4 are stimulus/measurement
units (SMU); channels 5 and 6 are voltage source
units (Vs); and channels 7 and _..8 are voltage
monitor units (Vm).
Each SMU channel has three modes of operation:
source/current
monitor
(V), current
voltage
source/voltage
monitor (I), and common (COM).
Source voltage and source current can be held
constant or swept linearly
or logarithmically.
When used as a voltage source/current
monitor
(V mode), each SMU can be programmed
to
output DC voltages from OV to +lOOV over three
ranges--OV to f 19.999V, *2OV to +39.998V, and
+4OV to +lOOV--with a resolution of lmV, 2mV,
When used as a current
and 5mV, respectively.
source/voltage
monitor (I mode), each SMU can
be programmed to output currents from *lpA to
+lOOmA over nine ranges, with a resolution of
resolution
is
1pA max. (current measurement
50fA max.), depending on the current range.
Current
through the sample in V mode and
voltage across the sample in I mode can be
limited to prevent damage to the sample.
The two Vs channels are programmable
voltage
source& Output voltage can be held constant or
linearly
or logarithmically
swept from OV to
f 20V with 1mV resolution.
The voltage sources
are used when many bias and voltage sources are
required.
l-2
Model 4145A
Of the six source channels (four SMUs, two Vs),
any combination
of three can be automatically
swept in a linear or logarithmic
staircase manner
within the range of each channel.
Hold times
from 0 to 650 sec$ds and delay times from 0 to
6.5 seconds
can be programmed.
In a
multi-channel
sweep
setup,
one
channel
functions as the main sweep channel. One of the
other channels can be swept synchronously with
the main channel, while one other channel can be
swept subordinately
to the main channel. SMUs
not swept can be used as constant current or
constant voltage sources.
The two Vm channels
voltages up to +2OV.
are
used
to
measure
1-7.
Measurement
results,
measurement
setups, operator prompts, error messages, and
diagnostics are displayed on a fully interactive,
microprocessor
based
graphics
display.
Measurement
results can be displayed in one of
four modes : graphic, list, matrix, and schmoo.
Front Panel softkeys provide a wide range of
automatic
display control
functions,
such as
AUTO SCALE, STORE, RECALL,
CURSOR,
MARKER, vertical and horizontal
ZOOM, LINE
(two), GRAD, l/GRAD, X intercept, Y intercept,
and INTERPOLATE.
Softkeys are used in all
phases
of
instrument
operation--from
measurement
to
measurement
setup
analysis-and
make overall instrument
operation
quick and easy.
By pressing the PLOT key or PRINT key, the
presently
displayed
screen,
whether
a
measurement
result or measurement
setup, can
be dumped directly
onto an HP-IB compatible
printer/plotter,
providing clear, inexpensive hard
copies. The plot area is user selectable within
the limits
of the printer/plotter,
and if a
multi-pen plotter is used, multi-color
plots can
be made automatically.
All PLOT and PRINT
operations
are done automatically,
without
a
controller.
Also, the 4145A’s display is equipped
with X-Y-Z outputs to allow connection
of a
large-screen graphics display.
The 4145A is fluent in HP-GL (Hewlett- Packard
Graphics Language), permitting
external control
of its display via the HP-IB.
Cursor
and
marker
positioning
is user
controllable
via the front panel, and X-Yl-Y2
coordinates are digitally displayed on the CRT.
Model 4145A
L
The 4145A is equipped with a flexible-disc
l-8.
drive unit that accommodates
a singlesided,
single-density,
13.3cm (5.25 in.), 92K byte disc.
One cleaning disc and five work-discs--each
containing
the necessary
operating
system
software,
four general
purpose measurement
programs, and 36.6K bytes of user area-are
furnished
with
the
4145A.
Up
to
47
measurement
setup programs
or 11 sets of
measurement data, plus auto sequence programs,
can be stored (SAVE) in the user area and
recalled (GET) later.
Additional
discs can be
purchased to increase storage capability,
and the
entire user area of each disc can be quickly
copied.
All instrument
functions are handled by a
l-9.
high speed microprocessor,
under the control of
the operating system software stored on each
furnished
flexible
disc.
Measurement
setup,
display
mode
selection,
graphic
scaling,
diagnostics, operation guide, menu, and catalog
are arranged as individual display pages. Paging
is controlled
by the MENU, PREV, and NEXT
keys.
Instructions,
softkey
labels, and error
messages and codes are displayed on each page.
Also, the 4145A is remotely controllable
via the
HP-IB and the 4145A’s display can be used as an
independent display via the HP-IB.
L’
l-10. Furnished with the 4145A is the 16058A, a
specially designed shielded test fixture
which
connects
to the 4145A’s rear panel.
Eight
different
interchangeable
DUT
boards
are
provided,
allowing
measurement
of diodes;
S-terminal
and 4-terminal
transistors;
8-pin,
lo-pin, and 12-pin devices; and 18-pin and 24-pin
DIP ICs.
The 16058A is equipped
with a
lightshielded
lid to allow stable measurement
of
light-sensitive
devices, such as photo diodes,
photo transistors,
and photo resistors.
Also, to
insure
operator
safety
when
potentially
dangerous voltages are applied to a sample, a
warning will be displayed on the 4145A if the
test fixture lid is open and measurement
will not
be made
until
the
lid
is closed.
For
user-fabricated
test fixtures and jigs, a special
connector, four S-meter triaxial cables, and four
S-meter coaxial cables are also furnished.
SECTION
I
l-l 1. SPECIFICATIONS
1-12. Complete
specifications
of the Model
4145A Semiconductor
Parameter
Analyzer are
given in Table l-l.
These specifications
are the
performance
standards or limits against which
the instrument
is tested.
The test procedures
for the specifications
are covered in Section IV,
Performance
Tests. Table l-2 lists Reference
Data. Reference Data are not specifications
but
are typical characteristics
included as additional
information
for the operator.
When the 4145A
Semiconductor
Parameter
Analyzer
is shipped
from the factory,
it meets the specifications
listed in Table l-l.
1-13.
SAFETY
CONSIDERATIONS
1-14. The
Model
4145A
Semiconductor
Parameter
Analyzer
has been designed
to
conform to the safety requirements
of an IEC
(International
Electromechanical
Committee)
Safety Class I instrument and is shipped from the
factory in a safe condition.
1-15. This
operation
and
service
manual
contains
information,
cautions,
and warnings
which must be followed by the user to ensure
safe operation and to maintain the instrument in
a safe condition.
1-16.
INSTRUMENTS
COVERED
BY MANUAL
1-17. Hewlett-Packard
uses a two-section
nine
character serial number which is stamped on the
serial number plate (Figure 1-2) attached to the
instrument’s rear-panel.
The first four digits and
the letter are the serial prefix and the last five
digits are the suffix.
The letter placed between
the two sections identifies the country where the
instrument
was manufactured.
The prefix is the
same for all identical
instruments;
it changes
only when a change is made to the instrument.
The suffix, however, is assigned sequentially
and
is different
for each instrument.
The contents
of this manual apply to instruments
with the
serial number prefix(es)
listed under SERIAL
NUMBERS on the title page.
Figure l-2.
Serial Number
Plate.
l-3
-,-
SECTION I
Model 4145A
1-18. An instrument
manufactured
after the
printing of this manual may have a serial number
prefix that is not listed on the title page. This
unlisted
serial
number
prefix
indicates
the
instrument
is different
from those described in
this manual. The manual for this new instrument
may be accompanied
by a yellow
Manual
Changes supplement or have a different
manual
part number. This supplement contains “change
information”
that explains how to adapt the
manual to the newer instrument.
1-19. In addition
to change information,
the
supplement
contain
information
for
may
correcting
errors (called Errata) in the manual.
To keep this manual as current and accurate as
possible, Hewlet t-Packard recommends that you
periodically
request the latest Manual Changes
supplement.
The supplement for this manual is
identified
with the manual print date and part
number, both of which appear on the manual’s
title
page.
Complimentary
copies
of the
supplement
are
available
from
HewlettPackard.
If the serial prefix or number of an
instrument is lower than that on the title page of
this manual, see Section VII, Manual Changes.
l-20. For information
concerning
a serial
number prefix that is not listed on the title page
or in the Manual Change supplement, contact the
nearest Hewlett-Packard
office.
-j_
1-21.
OPTIONS
l-22. Options are modifications
to the standard
instrument
that implement
the user’s special
requirements
for minor functional changes. The
4145A has four options :
Option 907 :
Option 908 :
Front Handle Kit.
Furnishes
Carrying
handles
both ends of front-panel.
Rack Frange Kit.
Furnishes
flanges
mounting
for
both
front-panel.
for
for
rack
ends of
Option 909 :
Rack Flange and Front Handle
Kit. Furnishes both front handles
and rack flanges for instrument.
Option 910 :
An extra copy of the Operation
and Service Manual.
Installation
procedures
given in Section II.
for
these
options
l-4
- .--
-.
-
are
l-23.
ACCESSORIES
SUPPLIED
l-24. The
Model
4145A
Semiconductor
Parameter
Analyzer,
along with its furnished
accessories,
is shown in Figure
l-l.
The
Additionally,
a spare fuse (HP Part
No.
21 lo-0015 or 2110-0305) and an Operation and
Service Manual (HP Part No. 04145-90000) are
furnished with the 4145A.
l-25.
ACCESSORIES
AVAILABLE
l-26. The Model 16261A* Software
Disc Set,
containing five software discs, is available when
extra discs are required.
l-27.
Warranty
Limitation
for Accessories
l-28. The
Personality
Board
(P/N:
16058-60003)
and
eight
.
16058-60004
through
16058 - 6O~~~~““furn~~~
with the 16058A Test Fixture
are warranted
against defects in material and workmanship for
a period of three months from the date of
delivery.
During
the
warranty
period,
Hewlett-Packard
Company will, at its option,
either repair or replace components which prove
to be defective.
This warranty does not apply to
defects
resulting
from
improper
use or
inadequate maintenance.
*-/
SECTION I
Model 4145A
Table l-l.
Specifications
(Sheet 1 of 8)
* Specifications
listed below are for the 4145A only.
the 16058A Operation Note.
GENERAL
For 16058A specifications,
refer to
INFORMATION
devices and the
Basic Functions : Measures the DC current through voltage-biased
DC voltage
across current-biased
devices; Arithmetic
calculation;
Displays
measurement
results and calculation
results on a built-in CRT display; graphics
analysis capabilities; storage and recall of measurement setups, measurement data,
and auto-sequence programs.
Source and Measurement
c
Units :
Stimulus/Measurement
Units (SMU) : Four SMU channels.
Each SMU can be
programmed to function as a variable or constant DC voltage source/current
monitor or as a variable or constant DC current source/voltage
monitor.
Each Vs c?an be programmed
Voltage Sources (Vs) : Two Vs channels.
function as a variable or constant DC voltage source.
Voltage
Monitors
(Vm) :
voltages up to +2OV.
Two
Vm
^I SOURCE/MEASUREMENT
channels.
Each
Vm
can
measure
to
DC
FUNCTIONS
Measurement
and output
accuracies
are specified
at 23 O+5 OC after
the
instrument has been allowed to warm up for at least 40 minutes, with AUTO CAL
set to ON, INTEG TIME set to SHORT and referenced to SMU common. Specified
accuracy doubles for operation between 10 OC and 40 ’ C.
Stimulus/Measurements
Units (SMU) : Four SMU channels.
Each SMU measures
current when operating as a voltage source, or measures voltage when operating as
a current source.
Source and measurement
ranges, resolution,
and accuracy
specifications
are given in the tables below.
Accuracy specifications
in the below tables are given as +n% of specified output or
measured value, +n% of range value. 10 is output current (I), Vo is output voltage
w.
Vo 1t age Range
Resolution
+2ov
1mV
+4ov
2mV
+lOOV
5mV
Accuracy
Max. Current
lOOmA
SOlIlA
0.1%+0.05%+0.4fi*Io
2omA
l-5
---
SECTION I
Model 4145A
Table l-l.
I Current
Range
I
Resolution
Wecifications
(Sheet 2 of 8)
Accuracy
I
Max. Voltage
2ov (>SOmA)
I
+lOOmA
lOOnA
+lOmA
1 OpA
+1000l~A
0.3%+(0.1+0.2*Vo/100)%
I
II-IA
I
I
+1 OOuA
I
1 OOnA
I
I
*lOuA
I
1 OnA
I
1oov (62OmA)
111
0.5%+(0.1+0.2*Vo/100)%
111
1%+(0.1+0.2*Vo/100)%+5pA
Setting Resolution
Voltage,
Current,
:
Measurement
Resolution
Ranging :
Automatic.
Current/Voltage
Compliance
Accuracy:
Limiting
Range :
Input Resistance
Capacitive
4*1/2 digits (1mV max.);
4 digits (1pA max.).
Voltage,
Current,
:
4*1/2 digits (1 mV max.);
4 digits (50fA max.).
(Compliance)
:
Current
operating
voltage
operating
limited.
output
from
an SMU
as a voltage source and
output
from
an SMU
as a current source can be
Current,
50pA to maximum allowable output current of
each voltage range; Voltage, OV to maximum allowable
output voltage of each current range.
Current compliance,
accuracy of current source+1 % of range +lOpA;
Voltage compliance, accuracy of voltage source.
Residual Resistance
l-6
4ov (>2OmA)
(Voltage Source/Current
(Current
Source/Voltage
Load : 6 1 OOOpF.
Measurement
Measurement
Mode) : 0.452.
Mode) : Z-101k.
Model 4145A
SECTION I
Table
Voltage
Snecifimtions
(Sheet
3
of 8)
Sources (Vs) : Two Vs channels.
Each Vs can be programmed
to function
as a variable or constant DC voltage source.
Output ranges, resolution,
and
accuracy specifications
are given in the table below.
Output
Voltage
Range
1mV
Output Impedance
Capacitive
0.5% of setting
+lOmV
Current
lOmA
Load : 2 1OOOpF
Voltage
Two Vm channels.
output
are given in the table below.
Resolution
Range
I
I
Input Impedance
Capacitance
Max. Output
: Less than 0.2R
Monitors
(Vm) :
accuracy specifications
Measurement
Accuracy
Resolution
+2ov
Voltage
l-l.
1OOPV
1mV
I
I
I
ranges,
resolution,
and
1
Accuracy
0.5% of reading
+ 1OmV
I
0.2% of reading
+ 1OmV
I
: lMR+ 1%
in Parallel with Output : 150pF+ 10 %
l-7
SECTION
I
Model 4145A
Table
l-l.
Snwifications
SPECIFICATIONS
Withstand
Maximum
Voltage Between
Common
Source Modes (SMUs Only) :
Max.
CHANNELS
Vs, and Vm)
V (voltage source/current
I (current source/voltage
monitor),
monitor), and COM*.
VAR 1, staircase sweep;
VARl’, synchronous (VARl) staircase sweep;
VARZ, subordinate (VARl) staircase sweep;
CONST, constant source (voltage or current).
voltage
is OV and compliance
is 105mA.
Sweep : Output
from each SMU (voltage or current)
and each
can be swept by assigning source function VARl, VARl’, or VARZ.
Number
of Steps : 512
multi-sweep
measurements.
VARl : Main sweep.
in
Linear or logarithmic
Sweep : Staircase
and STOP values-and
single-sweep
measurements,
up to
575
in
in
accordance
with
the
user
specified
sweep in accordance
with the user specified
START
selected LOG step (10, 25, or 50 points per decade).
VAR2
linear
staircase
sweep in accordance
with the user speci: Subordinate
VAR2 source channel output is
fied START, STEP, an NO. OF STEPS values.
incremeneted
one STEP each time the VARl source channel completes one sweep.
VARl’
: Staircase sweep synchronized
with the VARl sweep.
Sweep is made
a user specified, fixed ratio or offset value. VARl’ output is calculated as :
VARl’
VARl’
= a x VARl
= b + VARl
HOLD
TIME
:
0 to
650 seconds,
with
(fixed ratio)
(fixed offset)
where “al* is the user-specified
ratio (from
20.01 to +lO) and ‘lb”
user-specified
offset value. Ratio and offset must be such that the VARl’
channel does not exceed its maximum output limit.
1Oms resolution
(max.).
Accuracy
is the
source
is _+0.5%+9ms.
DELAY
TIME : 0 to 6.5 seconds, lms resolution.
Accuracy
is +O.l%+5xN
for
GRAPHICS and SCHMOO plots and +O.l%+lOxN
for LIST and MATRIX displays.
Where N is the number of measurement
channels used in the measurement.
Output
Sequence :
programmable.
Measurement
The order
Modes : SINGLE,
in
which
REPEAT,
the
source
channels
begin
output
is fully
APPEND
Integration
Time (at each measurement
point) : SHORT,
line frequency,
16.7ms at 60Hz line frequency; LONG,
l-8
Vs
sweep is selectable.
sweep
Linear
Sweep : Staircase
START, STOP, and STEP values.
Log
TO ALL
of 8)
and GND : Less than +42V.
(SMUs Only) :
* : In COM mode, output
Voltage/Current
(voltage)
COMMON
4
Voltage : 1OOV (SMU, guard terminal,
Maximum
Source Functions
(Sheet
3.6ms; MED, 20ms at 50Hz
16 times MED.
Model 4145A
SECTION
Table l-l.
Specifications
DISPLAY
Display
:
CRT.
Electrostatic
minized P-3 1 phosphor.
(Sheet 5 of 8)
FUNCTIONS
focus
and
deflection,
post
Alu-
accelerated.
Screen Size : 16cm (6.25in) diagonal.
Screen Resolution : 2048 x 2048 points.
Display
Characters
and Symbols
: Upper-case
alphabetic
characters,
numerics,
comma
(
)
@
R
O
entered frAm9 th’e iront(W&,l
5 % # y CL k, e7 my I-I, n, P, +, -) *, /, J- 7 A . All are
.
Display Modes : GRAPHICS,
LIST,
GRAPHICS
Display
:
measured parameters
LIST
MATRIX,
SCHMOO,
and TIME
Two-axes
(X-Y)
or three-axes
and USER FUNCTION
calculations.
Display : Used in conjunction
with VARl
ment parameters and USER FUNCTION
results
of the VARl source channel.
DOMAIN.
(Y-Y, -Y2)
plot
of
sweep.
Up to six measurecan be displayed for each step
MATRIX
Display : Used in conjunction
with VARl and VAR2 sweeps. Up to
six columns of sweep-dependent
measurement
results or USER FUNCTION
results can be displayed.
SCHMOO
Display
: Used in conjunction
with
VARl
and VAR2 sweeps.
Sweep-dependent
measurement
results or calculation
results are displayed on
an X-Y-Z graph.
TIME
DOMAIN
Display : Measurement
and calculation
results are displayed
on a two-axes (X-Y) or three-axes
(X-Y, -Y2 ) graph as a function
of time.
VARl sweep is replaced by time.
Parameters
: Initial
Measurement
Interval,
Readings, 5 12.
Wait Time,
0 to 100 seconds (1 Oms resolution);
1Oms to 10 seconds (1 Oms resolution);
Number
of
l-9
I
SECTION I
Model 4145A
TRhle
l-l.
ARITHMETIC
Srwcifimtions
AND
(Sheet
ANALYSIS
G of
8)
FUNCTIONS
expressions
can be entered
Arithmetic
Functions
: Arithmetic
directly from the front panel. Results are displayed on the CRT.
and
executed
Arithmetic
Operators
: +, -, *, /, /- , EXP (Napierian
constant),
(common log), LN (natural log), ** (exponentiation),
ABS (absolute),
(scientific notation), and A (differential
calculation).
Keyboard
Operation
: Arithmetic
expressions
are executed
the EXECUTE key. Results are displayed on the CRT.
by
LOG
EEX
pressing
USER FUNCTION
: Up to two USER FUNCTION
can be defined as arithmetic expressions.
USER FUNCTIONS are executed during measurement
and
the results are displayed with measurement results.
Physical Constants
: Three commonly
used physical constants
are permanently stored in memory.
The stored value of each constant has seven-digit
accuracy but only the five most significant digits are displayed.
q : Electron Charge, 1.6O2189x1O-1g C
k : Boltzmann’s Constant, 1.380662~10 -2 3J/ OK
e : Dielectric Constant of vacuum, 8.854185~10 -12F/m.
Engineering
Units : m (10V3 ), p (lo+ ), n (lo-’
), p (10-12)
Analysis Functions :
plot can be stored and later
Overlay
Graph Comparison
: A GRAPHIC
recalled to obtain an overlay comparison of two measurements.
-A SCHMOO
plot can also be stored, but when the RECALL key is pressed, only the stored
plot is displayed.
Pressing RECALL a second time redisplays the previous
plot. Only one set of data can be stored and scaling information
is not
included.
Auto
Retrieve
Function : Measurement
data obtained
in any display mode
is automatically
redisplayed whenever the display mode is changed. However,
when the value of a measurement
setup parameter
is changed,
all
measurement data is cleared.
MARKER : On a GRAPHICS plot, the MARKER can be moved along a plotted
curve or line. The X, Y1 , and Y2 coordinates at the MARKER location are
digitally displayed on the CRT.
INTERPOLATE
: Allows positioning of the MARKER between two measurement
points.
The X, Y1, and Ye coordinates
at the MARKER
location
are
estimated and digitally displayed on the CRT.
CURSOR : On a GRAPHICS
plot, the CURSOR is two intersecting
and
perpendicular
lines which can be positioned at any point on the graph. There
are two GRAPHICS cursors : LONG and SHORT.
The X, Y 1, and Y2
coordinates at the CURSOR location are digitally displayed on the CRT.
On a SCHMOO plot the CURSOR highlights
the symbol at a measurement
point and only the Z-axis value is digitally displayed on the CRT.
On LIST and MATRIX
l-10
displays the CURSOR is a moveable
pointer
( b ).
Model 4145A
SECTION
T:,hlp
l-l
A--..-
A
A.
_ Snp~ifimtinm
-p----‘-
-
.,*-.....,
fS.hppt
\-
..---
7 nf
,
$2)
_a
.,,
AUTO
SCALE : GRAPHIC
plots can be automatically
resealed
surement, providing optimum display of measurement
results.
after
meas-
ZOOM
Function
(t-t,
+-+ , 3 , $ )
:
Used
in
conjunction
with
the CURSOR on GRAPHIC plots. Expands (+-3, i ) or contracts (+-t, t ) the
graph in the indicated direction and in reference to the CURSOR location.
MOVE WINDOW : Repositions the LONG or SHORT CURSOR to the exact center
of the plot area and moves displayed plots in reference to the CURSOR.
LINE
: Draws a straight
line between
axes intercepts
are digitally displayed,
gradient reciprocal (l/GRAD) values.
MASUREMENT/DISPLAY
SETUP AND
two moveable
cursors.
X and Y
as are the line gradient
(GRAD) and
STORAGE
FUNCTIONS
Measurement/Display
Setup : Interactive
fill-in-the-blank
programming
definitions,
source outputs, and measurement/display
modes.
of
channel
Measurement
Setup Storage
: The existing
measurement
setup can be stored in
the user-area on the flexible disc and recalled later by using the SAVE and GET
keys, respectively.
Measurement
Data Storage : The existing
measurement
the user-area on the flexible disc and recalled later
key, respectively.
results can be stored in
by using the SAVE and GET
Auto-Sequence
Program : A series of different
measurements
can be programmed
for automatic
execution.
The maximum
number of program
steps is 24, and
useable commands are GET, SINGLE, SAVE D, PLOT, PRINT, PAUSE, WAIT, and
PAGE.
Storage
Medium
ible disc.
User-Area
Number
:
5.25
in.
single-sided,
single-density,
soft-sectored
: 92K bytes.
of User Records : 131
Record Allocation
:
Measurement
setup (file type P), 3 records;
Measurement
data (file type D), 12 records;
Auto-sequence
program (file type S), 1 record.
mini
flex-
I
SECTION
I
Model 4145A
Tahla
l-l
GENERAL
Data Input/Output
(Chant
Cnonifinotinnc
Q nf
Q\
SPECIFICATIONS
:
External
CRT Analog
Output
: From 0 to +l Vdc’, X and Y outputs
(in
series with approx. 330R) Z output (in series with approx. 240R), via rear panel
BNC connectors.
Frequency Bandwidth, DC - 2MHz.
External
Plotter/Printer
Output
: Measurement
data and all data appearing on the CRT may be output via the HP-IB to an HP plotter/printer
operated
in the LISTEN ONLY Mode. Output is initiated using the PLOT or PRINT key.
HP-GL Control : The CRT of the 4145A may
Graphics Display Mode via an HP-IB compatible
HP-IB
and Remote-Control
Functions
controller
or other instrument
Hewlett-Packard’s
implementation
be program
Controller.
controlled
in the
: The 4145A may be interfaced
to any HP
having HP-IB interface
capability.
(HP-IB is
of IEEE-488 and ANSI-MC.l.l
standards.)
Self -Test
Function
: At power
ON, the 4145A automatically
verifies
its own
operational status. HP-IB and DIAGNOSTICS page allow Self-Test to be performed
at any time.
Operating
Temperature
Power Requirements
Dimensions
Range:
:
10°C to+40°C;670%
RH(40OC)
Permissible Temperature
Change:51 OC/5 min.;
Maximum Wet-bulb temperature
: 29 OC
199/120/22OV+lO%
: 240V -10% + 5%;
48 - 66Hz; Max. 270VA
: 426W x 235H x 612D (mm) (approx.)
Weight : Approx.
Approx.
27 kg
33kg (incuding
accessories)
Model 4145A
SECTION
Tnhlo
l-9
Rnfnrnnna
nata
REFERENCE
(The following
does it include
(Chant
:
(Response time
‘2)
DATA
information
is reference data only.
Test Fixture specifications.)
Measurement
Time
measurement
1 r\f
+ ranging
It is not guaranteed
time
+ integration
Response Time
: The following
calculation
is applicable
does not change (settling and set-up time + SMU wait time).
I
Current
Range
I Settling
Ranging Time : 4ms - 74ms (depending
Measurement
Settling
Set-Up
Time : (Ranging
and
Time
I
and Set-Up
Time
specifications,
I
where
SMU Wait
time)/1
point
current
Time
nor
range
I
on range)
time must be added.)
Delay
Time
Example : Minimum
measurement
Graphics Display Mode, write
time = 2.7ms + 0.2ms + 3.6ms
time (L5.6ms) must be added.
= 6.5ms.
In the
\
d
I
SECTION
I
Model 4145A
Table l-2.
Reference
Data (Sheet 2 of 3)
STIMULUS/MEASUREMENT
Offset
Current
when operated
as a Voltmeter
Offset
Voltage
when operated
as a Current
UNIT
(SMU)
: 6pA + 2pA x Vo/lOO
Meter : 1OmV + 0.4Q x IO
Noise Characteristics
: (all values typical)
Voltage Source Noise : 0.01% of range (RMS)
Current Source Noise : 0.1% of range+3pA+O.OlpAxCg
(Cg : Guard capacitance in pF)
Voltage Monitor : 0.02% of range (peak-to-peak)
Current Monitor : 0.3% of range + 1OpA
(peak-to-peak)
(RMS)
Output
Overshoot : (all values typical)
Voltage Source Overshoot : 5mV
Current Source Overshoot : 1% or less
Current
Range Switching Transient Noise : (All values typical)
Range Increment : 0.01% of voltage range +lOmV
Range Decrement : When switching
into 1OnA or 1nA range, 1OmV + lOO/(lO +
Cx)mV where Cx = load capacitance
(pF); when switching into
all other ranges, 10mV.
Guard Capacitance
Guard Potential
: 5 7OOpF
Offset
Guard Current
: 1mV (typical)
Induced Potential
Error : 1OORxIg (Ig = guard current)
Voltage Sources (Vs)
Output Noise : 6 mVrms (typical)
Voltage
Monitors (Vm)
Noise Level :
0.3mVp-p at 2V-range (when Integration
LONG), 3mVp-p at 20V range.
REFERENCE
Noise Rejection
Normal
: (Integration
Mode Rejection
DATA
COMMON
time set to MED or LONG.)
: L 60dB (typical)
Common Mode Rejection : (all values typical)
Current Source/Measurement
: 2 lpA/lV
1-14
TO ALL
time
UNITS
is set to MED or
16058-60003
16058-60004
16058-60005
Personality Board
PTFE Blank Board
Socket Board (Transistor)
1
Blank PTFE board for measurement of
high resistance devices.
4145A
SECTION I
Table l-3.
No.
Dimension
Accessories
of Socket (Unit in mm)
on-- -w-w II
II0B-B- - - II
I
16.54
16058-60007 :
Socket Board for 18 pin DIP ICs.
2.54
04
PII11
--w--w- II
no--m---m
0
9
Q-El
1.14
20
lt-
0
5
w
30
-
-.e
HP P/N and Description
16058-60006 :
Socket Board for 24 pin DIP ICs.
2.54
03
Supplied (Sheet 2 of 5)
M
16058-60008 :
Socket Board with two pairs of sockets
for measurement
of axial lead devices
such as diodes.
16058-60009 :
Socket Board with an 8-pin socket.
06
16058-60010 :
Socket Board with a lo-pin
socket.
07
16058-60011 :
Socket Board with a 12-pin socket.
08
1-17
SECTION
I
Model 4145A
Table l-3.
No.
Dimension
Accessories
Supplied (Sheet 3 of 5)
of Socket (Unit in mm)
HP P/N and Description
Cable length : Approx.
115
16058-61600 :
Connect ion Cable
(large-t o-Small) used
for interconnecting
the Personality Board
to the Socket Board. Twelve cables are
furnished.
Cable length : Approx.
115
16058-61601 :
Connect ion Cable
(small-to-small)
used
for
interconnecting
the
Connect ion
Switch to the Socket Board. Eight cables
are furnished.
Cable length : Approx.
115
16058-61602 :
Miniature
Clip Lead
connection
to DUT.
furnished.
09
010
011
used
Eight
for direct
leads are
16058-60100 :
Carrying-case
for all 16058A accessories.
012
Configuration
Description
Connector
Plate (04145-60001)
:
Connector
Plate for measurements
made
without the 16058A. For example, direct
connection for a wafer probe. Dimensions
are given below.
1-18
Model 4145A
SECTION I
Table l-3.
Configuration
Accessories
Supplied (Sheet 4 of 5)
Description
Three-meter
triaxial
(04145-61622):
(m) Cable
Triaxial (m) cable for connection between
the 4145A’s SMU terminals
and the
Connector
Plate.
Cable length is 3m.
Four cables are furnished.
Refer to
Figure 3-35 for the usage.
Three-meter
BNC (m) Cable
(04145-61630):
BNC (m) cable for connection
between
the 4145A’s Vs or Vm terminals and the
Connector
Plate.
Cable length is 3m.
Four cables are furnished.
Refer
to
Figure 3-35 for the usage.
Shorting Connector
(04145-61623)
:
Allows
SMU output voltage to exceed
+42V when the 16058A Test Fixture is not
used.
With
the
Shorting
Connector
connected to the System Cable connector
on the rear panel,
the instrument’s
fixture-lid-open
detector is disabled, and
the
instrument
assumes
a fixturelid-closed condition.
WARNING
A POTENTIAL
SHOCK HAZARD
EXISTS WHEN THE SHORTING
CONNECTOR
IS CONNECTED
TO THE 4145A. DO NOT TOUCH
THE
OUTPUT
TERMINAL
OR
INNER
CONDUCTOR
OF SMU
DURING MEASUREMENT.
_
-3
SECTION
I
Model 4145A
Table l-3.
Accessories
Supplied (Sheet 5 of 5)
Configuration
Description
Software
1
rA %au
Discs (04145-61100) :
Disc set includes 5 Software Discs, Cleaning
Disc
(P/N:
9164-0168),
labels,
and
write-protect
tabs.
If extra
discs are
required,
order the 16261A Software
Disc
Set. It contains 5 software Discs.
Note
Software
purchased
l-20
--
---
discs
cannot
individually.
be
Model 4145A
SECTION
II
SECTION II
INSTALLATION
Z-l.
INTRODUCTION
WARNING
2-2.
This section provides installation
instructions
for
the
Model
4145A
Semiconductor
Parameter
Analyzer.
This section also includes
information
on initial
inspection
and damage
claims, preparation
for using the 4145A, and
packaging, storage, and shipment.
2-3.
INITIAL
IF THE INSTRUMENT
IS TO BE
ENERGIZED
VIA AN
EXTERNAL
AUTOTRANSFORMER
UNIT
FOR
VOLTAGE
REDUCTION,
BE SURE
THAT THE COMMON
TERMINAL
IS
CONNECTED
TO THE
NEUTRAL
POLE OF THE POWER SUPPLY.
INSPECTION
2-8.
2-4.
The
4145A
Semiconductor
Parameter
Analyzer, as shipped from the factory, meets all
the specifications
listed in Table l-l.
Upon
inspect
the shipping
container
for
receipt,
damage. If the shipping container
or cushioning
material is damaged, it should be kept until the
contents of the shipment have been checked for
completeness
and the instrument
has been
checked
mechanically
and electrically.
The
contents of the shipment should be as shown in
Figure l-l.
The procedures
for checking the
general electrical
operation are given in Section
III
(Paragraph
3-10 SELF ,,,TEST)
and
the
procedures
for checking
the 4145A Semiconductor
Parameter
Analyzer
its
against
specifications
are given in Section IV. First, do
the self test.
If the 4145A is electrically
questionable,
then do the Performance
Tests to
determine whether the 4145A has failed or not.
CAUTION
BEFORE TURNING
THE 4145A LINE
SWITCH TO ON, VERIFY THAT THE
INSTRUMENT
IS SET
TO
THE
VOLTAGE
OF THE POWER TO BE
SUPPLIED.
2-9.
Figure 2-l provides instructions
for line
voltage
and fuse selection.
The line voltage
selection switch and the proper fuse are factory
installed for 100 or 120 volts ac operation.
CAUTION
USE PROPER
FUSE
VOLTAGE SELECTED.
If the contents
are incomplete,
if there
is
mechanical damage or defects (scratches, dents,
broken switches,
etc.), or if the performance
does not meet the self test or performance
tests,
notify the nearest Hewlett-Packard
office (see
list at back of this manual).
The HP office will
arrange
for
repair
or replacement
without
waiting for claim settlement.
2-5.
PREPARATION
2-6.
POWER
FOR
Line Voltage and Fuse Selection
FOR
LINE
CAUTION
MAKE SURE THAT
ONLY
FUSES
FOR
THE
REQUIRED
RATED
CURRENT
AND OF THE SPECIFIED
TYPE
ARE
USED
FOR
REPLACEMENT.
THE
USE
OF
MENDED
FUSES
AND
THE
SHORT-CIRCUITING
OF
FUSEHOLDERS MUST BE AVOIDED.
USE
REQUIREMENTS
2-10.
2-7.
The 4145A requires a power source of 100,
120, 220 Volts ac +lO%, or 240 Volts ac +5%-lo%,
48 to 66Hz single phase; power consumption
is
270VA maximum.
LINE
FREQUENCY
FILTER
2-11. To reject the effects
of line-frequency
noise, set the FILTER switch on the rear panel
to the frequency of the ac power source.
2-l
SECTION II
2-12.
Model 4145A
POWER CABLE
the
2-13. To protect
operating
personnel,
National
Electrical
Manufacturer’s
Association
(NEMA) recommends that the instrument
panel
and cabinet be grounded.
The Model 4145A is
equipped with a three-conductor
power cable
which,
when
plugged
into
an appropriate
receptacle,
grounds the instrument.
The offset
pin on the power cable is the ground wire.
To preserve the protection
feature when
the instrument
from a two Contact
outlet, use a three prong to two prong adapter
the
(HP Part
No. 1251-8196) and connect
grounding
tab on the adapter to power line
ground.
CAUTION
2-14.
operating
22ov-
12OV
ircll
12ov*
240vwi
rIoovw
240V
N
Fuse : 2.5A 250V 2,
(HP P/N: 2110-0015)
Figure 2-l.
ENVIRONMENT
may be
to +40 OC.
instrument
may
be
2-l 8. Humidity.
The
operated
in
environments
with
relative
the
humidities
to ‘70% at 40 OC. However,
instrument
should
be
protected
from
temperature
extremes which cause condensation
within the instrument.
2-19.
INSTALLATION
INSTRUCTIONS
12ovIOOV-
Installation
of Options 907, 908 and 909.
2-22. The 4145A can be installed in a rack and
be operated as a component of a measurement
Rack mounting
information
for the
system.
4145A is presented in Figure 2-3.
220V
OPERATION
22ove
OPERATING
The instrument
2-17. Temperature.
operated in temperatures
from +lO°C
2-21.
2-15. Figure 2-2 shows the available
power
cords, which may be used in various countries
including the standard power cord furnished with
the instrument.
HP Part number,
applicable
standards
for power plug, power cord color,
electrical
characteristics
and countries
using
each power cord are listed in the figure.
If
OPERATION
2-16.
2-20. The HP Model 4145A can be operated on
the bench or in a rack mount.
The 4145A is
ready for bench operation as shipped from the
For
bench
operation
a two-leg
factory.
instrument stand is used. For use, the instrument
stands are designed to be pulled towards the
front of instrument.
THE MAINS PLUG MUST ONLY BE
INSERTED
IN A SOCKET OUTLET
PROVIDED
WITH A PROTECTIVE
PROEARTH
CONTACT.
THE
TECTIVE
ACTION
MUST NOT BE
NEGATED
BY THE USE OF AN
EXTENSION CORD (POWER CABLE)
WITHOUT
PROTECTIVE
CONDUCTOR (GROUNDING).
IOOV
assistance is needed for selecting the correct
power cable, contact
the nearest
HewlettPackard off ice.
22ow
OPERATION
ir
240V
12ov-
240vwl TOOV-
Fuse :
1.25A 250V CL
(HP P/N : 2110-0305)
Voltage and Fuse Selection.
OPERATION
SECTION
Model 4145A
OPTION
United
900
4.
Kingdom
OPTION
Zealand
Australia/New
901
/
Neutral
Earth
*
y
Plug:
Cable
Plug : BS 1363A,
250V
Cable
: HP 8120-1351
European
902
Continent
d-
NZSS
198/AS
C112,
: HP 8120-l
369
OPTION
Neutral
3
Line
OPTION
II
250V
U.S./Canada
903
/
Line
Neutral
Earth
Plug:
Cable
Plug : CEE-VII,
250V
Cable
: HP 81201689
Earth
1
NEMA
5-15P,
125V,
: HP 81201378
Line
15A
-1,
OPTION
Any
905*
OPTION
country
Switzerland
906
.c.y
Line
ANeutral
Q
Line
Neutral
Plug:
Cable
OPTION
CEE
: HP
/
-Earth
Earth
Plug:
Cable
22-VI,
250V
8120-1396
Denmark
912
/
Neutral
A
Line
Earth
*
:
SEV 1011.1959-24507
HP 8120-2104
Type
12,
250V
Plug option 905 is frequently
used for
interconnecting
system components
and
peripherals.
NOTE:
Each option number includes a
1 family 1 of cords and connectors
of
and
body
various
materials
plug
configurations
(straight, 90 O etc.)
Plug : DHCR
107, 220V
Cable
: HP 8120-2956
Figure 2-2. Power Cables Supplied
2-3
SECTION
II
Model 4145A
2-23.
STORAGE
AND
2-24.
ENVIRONMENT
2-25. The instrument
in environments
within
SHIPMENT
may be stored or shipped
the following limits:
Storage :
Temperature
•~~~..~~~
-22 OC to +55 OC
(+4 OC to +50 ’ C with discs)
Humidity
Shipment
. . . . . . . . . . . . . . . 8% to 80% (RH)
:
Temperature
****=*** -40 ’ C to +62 ’ C
(-40 OC to +50 ’ C with discs)
l
The instrument
should
be protected
from
temperature
extremes which cause condensation
inside the instrument.
2-26.
PACKAGING
2-2 7. Original
Packaging.
Containers
and
materials
identical
to those used in factory
packaging are available from Hewlett-Packard.
If
the
instrument
is being _-returned
to
Hewlett-Packard
for servicing,
attach
a tag
indicating
the type of service required,
return
address, model number, and full serial number.
Also mark the container
FRAGILE
to assure
careful handling.
In any correspondence,
refer
to the instrument
by model number and full
serial number.
2-28. Other Packaging.
The following
general
instructions
should be used for re-packing
with
commercially
available materials:
a.
Wrap instrument
in heavy
paper
or
plastic.
If shipping to Hewlett-Packard
office
or service
center,
attach
tag
indicating type of service required, return
address, model number,
and full serial
number.
b.
Use
strong
shipping
container.
A
double-wall
carton
made of 350 pound
test material is adequate.
C.
Use enough shock absorbing material (3 to
4 inch
layer)
around
all
sides of
instrument
to provide firm cushion and
prevent
movement
inside
container.
Protect control panel with cardboard.
2-4
d.
Seal shipping container
securely.
e.
Mark shipping
container
ensure careful handling.
FRAGILE
to
f.
In
correspondence,
refer
any
instrument
by model number
and
serial number .
to
full
d
SECTION
Model 4145A
Option
907
Kit
Part Number
Handle Kit
5061-009 1
Front Handle
Trim Strip
X8-32 x 3/8 Screw
@
@
908
Rack Flange Kit
5061-0079
Rack Mount Flange
X8-32 x 318 Screw
@
909
Rack Flange &
Handle Kit
5061-0085
Front handle
Rack Mount Flange
X8-32 x 3/8 Screw
@
@
Figure 2-3.
I
Q’ty
Remarks
5060-990 1
5020-889 8
2510-0195
2
2
6
9.525mm
5020-8864
2510-0193
2
6
9.525mm
5060-990 1
5020-8876
2510-0194
2
2
6
15.875mm
Part Number
Parts Included
1.
Remove adhesive-backed
trim strips
from
side at right
and left
front
instrument.
2.
HANDLE
INSTALLATION
: Attach
front
handle @ to sides at right and left front of
instrument
with
screws
provided
and
attach trim @to handle.
3.
RACK MOUNTING : Attach
rack mount
flange @ to sides at right and left front of
instrument
with screws provided.
4.
HANDLE
AND
RACK
MOUNTING
:
Attach
front
handle @ and rack mount
flange @ together to sides at right and left
front of instrument with screws provided.
5.
When rack mounting
(3 and 4 above),
remove all four feet (lift bar at inner side
of foot, and slide foot toward the bar).
II
@
of
Rack Mount Kit.
2-5
Model 4145A
3-l.
SECTION
III
TO
A
PROTECTIVE
EARTHGROUNDED
SOCKET.
ANY INTERRUPTION
OF
THE
PROTECTIVE
EARTH GROUNDING
WILL CAUSE A
POTENTIAL
SHOCK HAZARD
THAT
COULD
RESULT
IN
SERIOUS
PERSONAL INJURY.
INTRODUCTION
3-2.
This section provides all the information
operate
the
Model
4145A
necessary
to
Semiconductor
Parameter
Analyzer.
Included
are descriptions
of the front and rear panels,
graphics
display,
lamps,
and
connectors;
operating
procedures
and
discussions
on
measuring
techniques
for typical
applications;
and instructions
on the instruments
self-test
function and HP-IB capabilities.
A breakdown of
the contents of this section is given in Figure
3-l. Warnings and cautions are given throughout;
they must be observed to insure operator safety
and continued instrument serviceability.
ONLY
FUSES OF THE REQUIRED
RATED
CURRENT
AND
OF THE
SPECIFIED TYPE SHOULD BE USED.
DO NOT USE REPAIRED
FUSES OR
SHORTED FUSEHOLDERS.
TO DO SO
CAN
CAUSE A SHOCK
OR FIRE
HAZARD.
WARNING
CAUTION
BEFORE
THE
INSTRUMENT
IS
TURNED
ON,
ALL
PROTECTIVE
EARTH
TERMINALS,
EXTENSION
CORDS, AUTO-TRANSFORMERS
AND
THE
DEVICES
CONNECTED
TO
INSTRUMENT
MUST BE CONNECTED
we
BEFORE
THE
INSTRUMENT
IS
TURNED
ON, IT MUST BE SET TO
THE
VOLTAGE
OF THE
POWER
somcx
(MAINS),
0R DAMAGE
~0
THE INSTRUMENT
MAY RESULT.
Basic Operation
(paragraphs 3-3 through
Graphics Display
(paragraphs 3-40 through
3-39)
3-76)
Measurement
Basics
(paragraphs 3-77 through 3-89)
Extended Capabilities
(paragraphs 3-90 through 3-l 26)
*
*
*
*
*
*
HP-IB Capabilities
PLOT Function
PRINT Function
External Display
Disc Copy
Head Cleaning
Figure 3-l.
Contents
of Section
III.
3-l
h ; c c
SECTION III
3-3.
Model 4145A
PANEL
FEATURES
-1
The front and rear panels of the 4145A
3-4.
are briefly
described
in Figures 3-2 and 3-3,
respectively.
Detailed
information
is given
starting in paragraph 3-5.
i/’
-
D
LINE
ON/OFF:
_,
03
Applies ac line power to the instrument
when
set to
the
ON
(I)
position.
Removes ac line power when set to the OFF
(I>
position.
SELF TEST is performed
each time
the instrument
is turned
on.
After SELF TEST is performed,
the start-up
MENU is displayed.
3
CRT
These eight keys are used for measuremen’
setup, parameter
selection,
and functior
selection.
The function
of each softkey i!
defined by the operating
system software
and
changes
depending
on
the
Pagt
displayed.
Softkeys labels are displayed or
the CRT @ in the form of a “softke:
prompt” (SKP). Each time the SKP changes
the functions
of the corresponding
softke!
changes.
Pressing
the EXTN
(extended
displays additional
softkey
functions.
I
description
for each softkey
function
i:
provided in the description
of the page 01
which it appears.
DISPLAY:
Displays all measurement
setups, measurement results, softkey labels, special user
functions,
operator
messages, error codes
and messages, and warnings.
All displays
can be dumped
directly
onto an HP-IB
plotter, without a controller,
by pressing the
PLOT key @ . If an HP-IB controller,
fluent in HP-GL (Hewlett-Packard
Graphics
Language),
is connected,
the CRT can be
used as an independent
graphics
display.
Refer to paragraph
3-103 and 3-107 for
details.
SOFTKEYS :
@
PAGE
- . - _ _ _
- -
- -
- _
- -
Keys:
These three keys control paging on the CR’
2 . Refer
to paragraph
3-40 for z
description of the PAGE concept.
0
MENU : When pressed, returns the displa:
to the start-up menu. Can be usec
anytime
except
during
measure
ment or auto-calibration
or othe
functioning.
Figure 3-2. Front Panel Features
3-2
CONTROL
(Sheet 1 of 6).
---.
Model 414.5A
NEXT:
PREV :
SECTION
Advances the display to the next
Each
time
this
key is
page.
pressed, the instrument
checks the
presently
displayed
page for any
illegal settings,
and if it detects
errors,
it
displays
the
any
corresponding
error message and
does not advance to the next page,
automatically
changes
the
Qr
settings.
STOP :
@
AUTO
Immediately
ments.
These keys start and stop the ASP (Auto
Sequence Program)
listed on the SETUP
AUTO
SEQUENCE
Refer
to
page*
paragraph 3-61 for details on Auto Sequence
Programs.
START/STOP
Returns the display to the previous
Each time
this
key is
page*
pressed, the instrument
checks the
presently
displayed
page for any
illegal settings.
MEASUREMENT
SINGLE:
When this key is pressed, results
of the previous measurement
are
erased from memory,
the new
measurement
is made, and the
results are stored in memory.
REPEAT : When
this
key
is
pressed,
measurement
is repeatedly
made
until STOP is pressed.
Results
of the previous measurement
are
updated during each new measurement.
@
INTEG
TIME
Keys:
These keys are used to select the digital
integration
time.
When MED or LONG
integration
is selected, the integration
time
is an integral number of the line frequency
period,
eliminating
line frequency
noise.
SHORT is the initial control setting.
The
integration
time can be changed at any
time, even during measurement.
SHORT : Measurement
directly
into
integration.
data
is
memory
stored
without
MED :
Integration
time is set to one line
frequency
period.
Sixteen
samples
are
taken
at
each
measurement
point.
LONG:
Integration
time is set to sixteen
line frequency periods. A total of
256 samples are taken at each
measurement
point.
APPEND : Functions
similarly
to
the
SINGLE key except that results
of the previous measurement
are
not erased from memory of the
CRT. Results of a measurement
made using this key are stored in
the remaining
unused portion of
memory and are displayed over
(overlay plot) the previous plot.
Measurement
can be made using
this key until
“Buffer
full” is
displayed.
Figure 3-2.
: Starts the ASP from line 1.
If pressed during the ASP,
the ASP stops immediately.
Once
stopped,
the
ASP
cannot
be continued
from
the stop point.
If
the
ASP contains
a
PAUSE statement,
this key
continues the program from
the line immediately
following the PAUSE statement.
Keys :
These keys start and stop the measurement.
After all measurement
conditions have been
set and the GRAPHICS
PLOT page, LIST
DISPLAY page, MATRIX DISPLAY page, or
SCHMOO
PLOT
is
displayed,
Page
measurement
is started by pressing SINGLE,
REPEAT, or APPEND.
Measurement
can be
stopped by pressing STOP. Measurement
is
a sequential operation consisting of voltage
or current sweep, measure-ment, and storage
of the measurement
result.
measure-
SEQ Key:
CONT:
3
stops the
III
Front Panel Features
(Sheet 2 of 6).
3-3
SECTION
9
III
Model 4145A
HP-IB Status Indicators
and LOCAL
@
Key :
PLOT
and PRINT
BLUE
Key:
Keys
The PLOT key is used to dump whatever is
displayed on the CRT directly onto an HP-IB
without
a
plotter
(e.g.,
HP9872C),
controller.
Plot area can be set from the
4145A’s front panel.
Plotting
starts when
EXECUTE
is pressed.
Pressing PLOT a
second time stops the plot immediately.
more
Refer
to
paragraph
3-117
for
information
on the PLOT function.
The
PRINT key functions similarly to the PLOT
key except that a printer is used instead of
a plotter
and only alphanumeric
data is
output.
If the PRINT key is used to output
the results of a graphic plot, for example,
each
only
the
numeric
value
of
measurement
point is printed.
Refer to
paragraph
3-l 19 for more information
on
the PRINT function.
Figure 3-2.
3-4
Key and GREEN
Key:
These keys are used to access additional
functions.
Additional
key functions
labeled in blue and green.
These four
LED
lamps-SRQ,
LISTEN,
TALK, and REMOTE-indicate
the status of
the 4145A when interfaced
with a controller
via the HP-IB, or connected
directly
to a
The LOCA-L key, when
printer/plotter.
pressed, releases the 4145A from remote
(HP-IB) control and enables control from the
front
panel.
The LOCAL
key does not
function when the instrument
is set to local
lockout by the controller or in the GL mode.
9
BLUE
.
GREEN
Front Panel Features
key
are
This
key
is used
when
entering
comments,
varianames.
bles, and program
Once this key is pressed
(key indicator
lamp on), it
remains
on until
pressed
again. When the CHANNEL
DEFINITION
page is displayed or when a SAVE/GET
operation,
COMMENT
operation or PURGE operation
is being
performed,
the
BLUE key is automatically
set to ON (key indicator
lamp on).
Key : This
key
is used
wher
entering
physical constants
symand certain
special
bols.
It is valid for one
key-in operation
only; that
is, it must be pressed each
time
a green-labeled
key
function is desired.
(Sheet 3 of 6).
Model 4145A
3
ENTER
SECTION III
Key:
1
@
This key is used to enter parameter values,
alphanumeric
characters,
special characters, and unit indicators
displayed on the
Keyboard Input Line (see Figure 3-5) into
the internal display buffer.
When this key is
pressed, data displayed
on the Keyboard
Input Line is moved to the display field
indicated by the field pointer ( ,> and stored
in the display buffer.
Data stored in the
display buffer by the ENTER key can be
recalled (redisplayed
on the Keyboard Input
Line) by pressing the RECALL Key 19 Up
to 60 characters can be entered inQ o the
buffer,
but only 27 characters
can be
displayed at one time. To display the rest
of the buffer contents, use the BACK key or
FORWARD key.
3
EXECUTE
05
3
CURSOR
Control
@,
@
CAL
KEY:
8,
@ DATA
ENTRY
Keys :
Engineering
Unit Keys :
Four engineering
units are available-m
(milli, 10-S ), u (micro, 1O’6 ), n (nano, 10mg ),
1 O-l2 )-for
use with the
and p (pica,
numeric keys @.
0
Arithmetic
Operator
and Function
Keys :
Nine arithmetic
operators and functions are
available-+,
-, *, /, 4-9 a, (,I,
EEX
(scientific
notation)--for
use in arithmetic
calculations.
Five additional
operator and
functions are available with the alphabetic
(blue) keys : w (exponentiation),
LOG,
LN (natural log), EXP (natural base), and
ABS (absolute).
The SPACE key is also
included in this key group.
Field Pointer Control :
Pressing the 0 , c> , 0 , or G key
moves the field pointer
(,)
in the
indicated
direction.
The FAST key
cannot be used for field pointer control.
Long/Short Cursor Control :
Pressing the 0 , 0 , 0 , or 0 key
moves the cursor
in the indicated
direction.
Movement continues until the
key is released. Two direction-keys
can
be pressed simultaneously
to move the
cursor diagonally.
Pressing the FAST
key in conjunction with one or two of the
direction
keys, causes the cursor to
move more rapidly.
AUTO
These keys are used to enter numeric
values,
arithmetic
operators,
and
engineering units. Data entered with these
keys is displayed on the CRT’s Keyboard
Input Line and entered
into the display
buffer by pressing the ENTER key 0 . An
arithmetic
expression
entered with these
keys is executed by pressing the EXECUTE
key.
Keys : -’
These keys control the positioning
of the
field pointer (b) and the long and short
cursors. (They do not control the cursor on
the Keyboard Input Line.)
Dial :
This key enables continuous auto-calibration
of the 4145A. The AUTO CAL function is
set to ON (key indicator lamp on) when the
instrument is turned on. Refer to paragraph
3-37 for details.
Key:
The PURGE and REPACK
commands are available only when the
USER FILE CATALOG is displayed.
Control
This dial controls the marker ( @ or *) on
the GRAPHICS PLOT page. Rotating
the
dial clockwise moves the marker from the
sweep start point to the sweep stop point.
This key executes
GET, SAVE, PRINT,
PLOT, PURGE, and REPACK commands,
and arithmetic
expressions displayed on the
Keyboard Input Line.
Note :
MARKER
@
Numeric
Keys :
These keys-0
through
9 and decimal
point-are
used for entering
measurement
parameter
values and for making quick
arithmetic calculations.
Figure 3-2. Front Panel Features
(Sheet 4 of 6).
3-5
----
--
SECTION III
Model 4145A
EDIT Keys :
INSERT :
These keys are used to edit
on the Keyboard Input Line.
BACK :
FORWARD:
DELETE :
data displayed
Moves the Keyboard
Input
Line cursor
(-)
left
one
position.
If
this
key
is
pressed while the cursor is at
the left-most
position,
the
displayed text will move to
the right.
Moves the Keyboard
Input
Line cursor (- ) right
one
position.
If
this
key
is
pressed while the cursor is at
the right-most
position,
the
displayed text will move to
the left.
RECALL
:
Causes
previous
entries
or
executions to be re-displayed
on the Keyboard Input Line.
CLEAR :
Clears all text
from
Keyboard
Input
Line
returns
the cursor
to
home (left-most)
position.
Causes the character
at the
position of the cursor to be
deleted.
The cursor remains
at the same position and all
text
to the right
of the
deleted character
moves one
position to the left as each
character is deleted.
Figure 3-2.
3-6
Causes the character
at the
position of the cursor and all
text
to the right
of the
cursor
to move right
one
position,
leaving a space at
the position of the cursor and
all0 wing
insertion
of
additional
characters.
To
exit from this mode, press
INSERT a second time.
Front Panel Features
(Sheet 5 of 6).
the
and
the
Model 4145A
D
USER
SECTION
FILE
@
Keys :
These keys are used to store program
data files onto the disc or to recall them.
SAVE :
GET :
or
Used to store the existing
measurement
setup,
measurement
result,
or
auto-sequence
program
onto
the
flexible
disc.
Press
SAVE, enter the file type (P
for a measurement
setup, D
for a measurement
result, S
for
an
auto-sequence
file
name,
and
program),
comment
(if necessary), and
then press EXECUTE 0.
Used to recall a measurement
setup,
measurement
result,
or
auto-sequence
program
from
the flexible
disc.
Press GET, enter the
file
type
(P for a measurement
setup,
D for
a
measurement
result, S for an
auto-sequence
program),
and
file name, and then press
EXECUTE 0.
Figure 3-2.
MEASURING
III
Lamp:
This lamp comes on when the 4145A is
measuring.
When measurement
is completed or when the STOP key is pressed, this
lamp goes off immediately.
@J CRT
Adjustment
:
INTENSITY
determines
the brightness
of
traces
displayed
on the CRT.
FOCUS
adjusts
the
writing
beam
for
sharp,
well-defined
traces.
03
FLEXIBLE
DISC DRIVE:
Accommodates
a 92K byte, single-sided,
single-density,
5-l/4 inch flexible disc, and
functions
as the 4145A’s mass storage unit
(MSU).
The lamp, located
in the upper
left-hand
corner of the drive unit door,
comes on when the 4145A is reading data
from the disc. To open the door, press
firmly on the center of the door until an
audible
click is heard, then release the
door.
Refer
to
paragraph
3-5
for
information
on proper
handling
of the
flexible disc.
Front Panel Features
(Sheet 6 of 6).
3-7
SECTION III
Model 4145A
6
6
D
Voltage Monitor
(Vm) Input Connectors
:
Two female BNC connectors for input to
Vml and Vm2. Used in applications in which
a user-faQricated
test fixture is used. These
connectors
cannot be connected
to the
16058A Test Fixture.
Maximum allowable
input voltage is +2OV de.
3
Voltage Source (Vs) Output
Connectors
:
Two female BNC connectors
for Vsl and
vs2.
Used in applications
in which a
user-fabricated
test fixture is used. These
connectors
cannot be connected
to the
16058A Test Fixture.
Maximum
output
voltage is +2OV dc.
3
SMU Output
Connectors:
Four triaxial connectors for SMUl through
4. Can be connected to the 16058A Test
Fixture or to a user-fabricated
test fixture.
Each connector outputs or measures up to
+lOOV or *lOOmA.
@
COM (COMMON)-GROUND
:
Common (+) and Ground (A) for floating
and grounded measurements.
The common
terminal
is
tied
directly
to
the
outer-conductor
of the Vm @ , Vs @ , and
SMU @ connectors; the ground terminal is
tied directly to the instrument chassis. For
grounded
measurements,
these terminals
must be interconnected
using the shortingbar. For floating measurements,
disconnect
the shorting-bar.
WARNING
A POTENTIAL
SHOCK HAZARD
MAY EXIST WHEN COMMON IS
NOT CONNECTED
TO GROUND
~;ES;;G-BAR
DISCO NDO
NOT,
REGARDLESS OF THE OUTPUT
VOLTAGE,
TOUCH
THE
COMMON
TERMINAL
OR
OUTER CONDUCTOR
OF THE
SMU, Vs, OR Vm CONNECTORS
DURING
A FLOATING
MEASUREMENT
(SHORTING-BAR
DISCONNECTED).
Figure 3-3. Rear Panel Features (Sheet 1 of 2).
3-8
Terminals
Model 4145A
@
FILTER
SECTION III
Switch:
@
This switch determines
the measurement
integration
time, to reduce the effects of
line-frequency
noise. Set this switch to the
frequency of the ac power source.
@
System Cable Connector
:
3‘7
LINE
LINE
SELECTOR
Input Receptacle
AC power
receptacle.
010
Switches
HP-IB
:
cable is connected
to
Refer to paragraph 2-5.
Control
this
Switch :
This switch sets the 4145A’s HP-IB address
(0 - 30), data output format (COMMA or
CR/LF), and interface
capability
(EOI ON
or OFF).
Specific
information
on this
switch is given in paragraph 3-97.
WARNING
WHEN
THE
SHORTINGTERMINATION
IS CONNECTED
TO
THE
SYSTEM
CABLE
CONNECTOR,
THE
4145 A’S
PROTECTIVE
CIRCUIT
IS
DISABLED.
VOLTAGES AT THE
SMU AND Vs OUTPUTS
CAN
REACH
+lOOV
AND
-+2ov,
RESPECTIVELY.
DO
NOT
TOUCH THE POINT OR POINTS
AT WHICH
THE%.* SMU’S
OR
VOLTAGE
SOURCES
ARE
CONNECTED.
VOLTAGE
These switches select the appropriate
ac
operating voltage.
Selectable voltages are
lOOV/12OV+lO% and 22OVklO% / 24OV+5%
-10% (48 - 66Hz). Refer to paragraph 2-5.
@
Twenty-four
pin
connector
for
interconnection
between
the
16058A
Test
Fixture and the 4145A. Vsl, Vs2, Vml, Vm2,
and the
fixture-lid-open
detector
are
connected
to this connector.
When the
16058A is not used, this connector should be
terminated
with
the
furnished
shorting-termination
if voltages exceeding
+42V are to be output.
LINE
011
HP-IB Connector
:
Twenty-four
pin connector;
connects the
4145A to the HP-IB for remote operations.
Also used to connect a printer/plotter.
@
External
CRT Output
Connectors
:
Three BNC (f) connectors for connection
to an external
X-Y-Z display.
Refer to
paragraph 3-l 2 1.
FUSE Holder :
The 4145A’s power-line
in this holder.
fuse is installed
lOOV/12OV operation :
2.5AT, 250V (HP P/N : 2110-0015)
2OOV/24OV operation :
1.25AT, 250V (HP P/N : 2110-0305)
Figure 3-3. Rear Panel Features (Sheet 2 of 2).
3-9
SECTION III
3-5.
Model 4145A
FLEXIBLE
DISC HANDLING
CAUTION
3-6.
Five work-discs
and one head-cleaning
disc are furnished
with
the 4145A.
Each
work-disc contains the required operating system
software,
four general
purpose measurement
setups,
and
33.5K
bytes
of user
area.
Installation
and removal procedures for the disc
are shown in Figure 3-4. Precautions on handling
and storing the flexible discs are given below.
1.
DO NOT INSERT ANYTHING
OTHER
THAN FLEXIBLE
DISCS INTO THE
DISC DRIVE.
Note
Use only the discs furnished
4145A.
When not in use, each disc should be placed
in its own outer jacket.
Exposed areas of
the disc should be completely
covered by
the jacket.
2.
Store discs in an upright
stack or pile discs.
position.
3.
Store discs in a clean, dry, fireproof
cabinet.
Do not expose to direct sunlight,
extremes of temperature
or humidity,
or
magnetic fields.
3-7.
Do not touch the exposed surface of the disc.
5.
Do not apply strong
pressure
to the
protective
jacket.
When labelling a disc,
use a felt-tip
pen. Do not use a pencil or
ball-point pen.
6.
Do not bend the discs.
DISPLAY
3-9.
Useable display area on the CRT is shown
in Figure 3-5. Operator adjustments are given in
Figure 3-6.
-‘.
(a)
Push firmly
release.
and
(d)
Push the door
until clicks.
(b)
(c)
Door opens.
Carefully
insert or
remove the
disc.
Note:
Fully insert
the disc into the disc drive before closing the disc drive door.
Figure 3-4. Disc Installation
3-10
the
3-8.
The 4145A is equipped with the HP Model
For complete
infor1345A Digital
Display.
mation
on the 1345A, refer to the 1345A
Operation and Service Manual, included in this
binder.
Do not
4.
CRT
with
and Removal.
Model 4145A
SECTION III
The CRT
the figure.
is sectioned into five areas, as shown in
Description for each area is as follows :
01
Page Display Area :
The instrument’s various pages are displayed in
this area. When the PLOT key is pressed, only
this area is output to the plotter.
02
Command Display Area :
The SAVE, GET, PLOT, PRINT, PURGE and
REPACK commands are displayed in this area.
03
Keyboard Input Line :
All keyboard (front panel) entries are displayed
in this area.
Up to 60 characters
can be
entered but only 27 can be displayed.
To edit
the displayed
characters,
use the BACK,
FORWARD, DELETE and INSERT keys. When
the RECALL key is pressed, the previous entry
is re-displayed.
04
System Message Line :
Displays instructions,
error messages, and error
codes.
When the instrument
is turned on,
instrument status is displayed.
05
Softkey Prompt Display Area :
Displays Softkey Prompts (SKP).
05
Note
@ , 0,
and @
the CLEAR key.
are erased by pressing
Figure 3-5. Useable Display Area.
CRT intensity
and focus
sm.all flat-tip screwdriver.)
adjustment.
(1)
Turn on the 4145A. The MENU
displayed on the CRT.
(2)
Press the EXTN softkey
(3)
Press the GDU TEST softkey.
as shown in the figure.
(4)
Adjust INTENSITY
@
(each line has a different
(0)
(5)
Adjust
FOCUS @ until
displayed trace are sharp.
(6)
Press the MENU key.
Figure 3-6. Operator
(Requires
a
page will
be
and the DIAG softkey.
Display
will .be
until all three lines
intensity) are visible.
the corners
of the
Adjustment.
3-l 1
-
_.
_--
y-------x
.
--
---
-7
- -
SECTION
3-10.
III
SELF
Model 4145A
3-l ‘2. ERROR
TEST
3-11. The 4145A is equipped with an automatic
self-diagnostic
function
that is initiated
each
time the instrument
is turned on to confirm
basic
normal
operation
of the instrument’s
functions.
The SELF TEST can also be initiated
from the DIAGNOSTICS
page or via the HP-IB.
When SELF TEST is performed
at instrument
turn-on,
the five tests listed in Table 3-l are
automatically
performed.
If the instrument
is
operating
normally,
the MENU page will be
displayed when the SELF TEST is completed.
If
an error is detected,
an error code will be
displayed
on the CRT.
When SELF TEST is
initiated from the DIAGNOSTICS page or via the
HP-IB, only two tests are performed
(MPU test
and SMU test). If the instrument
fails the SELF
TEST, contact
the nearest
Hewlett-Packard
Service Office (see list at back of this manual).
Table 3-l.
I
MPU test
I GDU test
I MSU test
I HP-IB test
I
SMU test
3-12
CODES
3-13. Error
messages
and error
codes are
displayed on the System Message Line of the
CRT
whenever
an
illegal
operation
or
out-of-range
measurement
is made, or whenever
an internal
circuit
fails.
Error messages and
error codes related
to operator
errors
(not
instrument
failure) are listed in Table 3-2 and
codes related
3-3,
respectively.
Error
to
instrument
failure are listed in Table 3-4. If the
instrument
displays one of the error codes listed
in Table 3-4, contact
the nearest
HewlettPackard Sales/Service Office.
Note
One of the error codes listed in Table
3-4 may be displayed if the instrument
is turned
on after
experiencing
an
extreme
change
of
ambient
temperature.
In this case, allow the
instrument
to fully warm up (ignore
the displayed
error code), and then
turn it off and on one time.
4145A SELF TEST
Description
Test Name
I
MESSAGES/ERROR
I
I
Checks the basic functions of the MPU (Microprocessor
Unit) by checking
four ROMs (Read-Only
Memory)
and sixteen
RAMS (Randam-Access
Memory).
I
Checks the functions
I
Checks the MSU (Mass Storage Unit : Flexible
I
Checks all HP-IB interface
capabilities.
Checks the basic functions
of the four SMUs.
I
of the GDU (Graphics
Display Unit).
Disc Drive and Disc).
1
I
-
Model 4145A
SECTION III
Table 3-2. Error Messages (Sheet 1 of 2)
Corrective
Meaning
Error Message
Action
No source
name
An SMU that has been assigned
a source mode (COM, V, or I)
has not been assigned a
corresponding V or I source
name.
If the source mode is COM or V, enter a
source name in the V column; if the
source mode is I, enter a source name
in the I column.
Duplicate
name
Two or more channels have the
same name.
Re-assign
Illegal
function
VARl, VARl’, or VAR2 is specified more than once.
Specify VARl,
once.
VARl and VARl’ are not in the
same source mode.
Set VARl and VARl’ to the same source
mode.
Number of steps for VARl
exceeds 512.
Change the value of START/STOP
An attempt was made to input
a value that is outside
specified limits.
Enter a value that is within
limits.
No name
No name is entered in the
NAME field on the MEAS/DISP
MODE SETUP page.
Select a name from those displayed
the softkey prompt area.
No monitor
channel
No monitor channel name is
entered in the NAME field on
the MEAS/DISP MODE SETUP
page, or the name entered in
the NAME field cannot be
used as a monitor channel
name.
Select a monitor channel name from
those displayed in the softkey prompt
area.
Illegal
setup
LOG Sweep : START and STdP
(Display)
(MIN and MAX)
values have
different
SiqS.
Change one of the signs.
Current value is too high
because source mode has
been changed from V to I.
Change the current
INTERVAL or NO. OF RDNGS
for a time domain measurement
is set to 0.
Enter correct value :
Up to 10s for INTERVAL
for NO. OF RDNGS.
Duplications
SEQUENCE
Rearrange
Overflow
Buffer full
on the OUTPUT
SETUP page.
Measurement data exceeds the
capacity of the data buffer.
the channel names.
VARl’,
and VAR2 only
or STEP.
specified
in
_
(I) value setting.
and from 1 to 512
the output sequence.
Data buffer
points for a
(depends on
used, VAR2
APPEND is
capacity is 512 measurement
single sweep, or up to 575
the number of monitor channels
steps and the number of times
used) in other cases.
3-13
SECTION III
Model 4145A
Table 3-2. Error Messages (Sheet 2 of 2)
Error Message
Syntax error
Corrective
Meaning
An illegal name was entered
a GET or SAVE command.
in
Action
The first character of a file name must be
alphabetic, and all succeeding characters must
be alphanumeric.
PLOT area is not specified,
contains one or more alphabetic characters, or is missing coordinate delimiters
(comma or space).
Re-enter
Illegal file type.
Use P, D, or S for the file type.
Auto calibration
minutes.
PLOT area correctly.
is performed
Busy
Auto calibration
formed.
No data
PRINT Key was pressed with no
measurement data in the data
buffer.
Perform
Printer/
Plotter is
not
connected
No printer or plotter is connetted to the instrument,
or
the printer or plotter is not
set to LISTEN.
Connect the printer
Not
compatible
The discs used in the copy
operation havedif f erent system labels, or one of the
discs is not a 4145A useable
disc.
Copy cannot be performed.
Close the
fixture lid
output
disabled,
close the
fixture lid
is being per-
the
The fixture lid is open at the
start of a measurement in which
_ the output voltage may exceed
+42V or lid is open during the
User Mode (See Fig. 39).
The fixture lid was opened
during a measurement in which
the output voltage may exceed
+42V.
every 5
a measurement.
or plotter.
Close the lid or change the setup. Make
sure the system cable is properly connetted.
Close the fixture lid and make the measurement again. Do not open the fixture lid
during measurement.
Make sure the
system cable is properly connected.
Emergency
Output was shut down to prevent SMU damage.
Make sure the setup and all connections
are correct.
Recovered
from power
down
Indicates that there was a momentary power loss.
When a power loss occurs during measurePress MEAment, output is shut down.
SUREMENT key to continue the measurement.
Step overflow
NO OF STEPS for VARl
exceeds 512.
Change START value,
STEP value.
Disabled
function
A disabled softkey
pressed.
The softkey cannot be used in the
existing measurement setup.
3-14
was
STOP value, or
Model 4145A
SECTION III
Table 3-3.
Operational
Error-Codes
(Sheet 1 of 2)
Meaning
Display
Error
EOl
Arithmetic
operator
(-, +, /, *) or parenthesis
is required.
Error
E02
EXECUTE
Line.
was pressed with
Error
E03
Object buffer
Error
E04
Improper
Error
E05
User function
an arithmetic
Error
E06
No variable
Error
E0’7
Arithmetic
Error
E08
Too many signs or parentheses.
Error
E09
Constant
Error
101
Stack Register
Error
102
Improper
Error
103
Insufficient
Error
MO2
Disc is not inserted
Error
MO3
The disc is write
Error
MO4
Illegal
Error
MO5
The file name specified in the SAVE command
for the specified file type.
Error
MO6
Number
of total files exceeds 96.
Error
MO7
Number
of total records
Error
MO8
User area may be lost.
Error
Ml9
The disc was not initialized
Error
ZOl
The program
specified
by the
GET command
in the auto-sequence
program contains an error.
Press CONT to perform the next step of the
auto-sequence
program.
Error
202
The SINGLE command can be executed from the GRAPHICS, MATRIX,
LIST, or SCHMOO page only. Press CONT to perform the next step of
the auto-sequence
program.
Error
203
PLOT or PRINT was performed
by the auto-sequence
program but no
printer/plotter
is connected to the 4145A or the printer/plotter
is not set
to LISTEN.
Press CONT to perform the next step of the auto- sequence
program.
no executable
text
on the Keyboard
Input
overflow.
d (delta) operation.
is used in the expression.
expression.)
or constant
expression
following
(User function
an arithmetic
contains an undefined
cannot
be used in
operator.
variable.
value is too large.
overflow.
calculation
was attempted.
For example,
the divisor is zero.
d data.
or is not correctly
inserted.
protected.
file name or file type.
has already
been reserved
exceeds 131.
Copy immediately
onto another
disc.
for the 4145A.
3-15
Model 4145A
SECTION III
Table 3-3. Operational
Error-Codes
Meaning
Display
Error
204
Data Errors
(Sheet 2 of 2)
The test fixture lid is open during an auto-sequence program in which
the output voltage may exceed +42V. Press CONT to perform the
next step of the auto- sequence program.
Depending on the number of channels used in the measurement,
six 2-digit
numbers are displayed,
in the format
shown
whenever the measurement cannot be performed correctly.
Error
DXX
up to
below,
XX XX XX XX XX
Here, XX is a 2-digit number which represents channel status. The
left-to-right
order in which the 2-digit error codes appear corresponds
to the order in which the channels are assigned on the MEAS/DISP
MODE SETUP page. Also, the number of 2-digit error codes that
appear is identical
to the number
of channels
used in the
measurement.
The left digit of XX is hexadecimal
and must be
converted into a 4-digit binary number, as described below. The right
digit is decimal and requires no conversion.
Also, zero means no error.
--xx
1:
2:
3:
7:
8:
..,
-’
Stack register overflow
Calculation error
Insufficient
data for d measurement
Undefined user-function
INTERVAL
in a time domain measurement
is too short.
Complete measurement
data cannot be stored before the
next measurement begins.
Convert hexadecimal
LIIII
LL
L
number into binary.
A/D converter saturated.
Oscillation
Other channel has reached compliance limit.
This channel has reached compliance limit.
Channel correspondence
GRAPHICS
is shown below :
PLOT :
Error
DXX
X axis
xx
Yl axis
xx
Y2 axis
LIST DISPLAY :
Error
MATRIX
DISPLAY,
DXX
1st
SCHMOO
Error DXX
3-16
XX
2nd
XX
3rd
PLOT :
XX
4th
XX
5th
XX
6th
Model 4145A
SECTION III
Table 3-4. Hardware-Related
Error-Codes
Display
I
I
Meaning
Error
PO1 - PO4
One of the four ROMs (Read Only Memory)
Error
PO5-P20
One of the sixteen
properly.
I
RAMS (Ramdom
Error
P21
MPU’s (Microprocessor
Error
MO8-Ml8
MSU (Mass Storage Unit : Flexible
properly.
Try another disc.
Error
A01
SMU controller
CHAN
(! ! ! DOWN ! ! !)
CHAN
(XX,XX,XX,XX)
Access Memory)
Unit) peripheral
is not functioning
is not functioning
circuit
properly.
is not functioning
is not functioning
Disc and drive)
properly.
is not functioning
properly.
SMU itself is not functioning
properly.
and error code. Refer to Fig. 3-20.)
(XX
indicates
the
SMU number
Note
If a momentary
the instrument,
power loss occurs, the 4145A’s display may go blank.
wait a few seconds, and then turn on the instrument.
To recover,
turn off
Note
The 4145A will function
properly
even though error M 13 or M 14 is displayed.
3-17
SECTION III
3-14.
INITIAL
Model 4145A
CONTROL
SETTINGS
3-15. To facilitate
operation, the instrument
is
automatically
set to the following initial control
settings each time it is turned on :
Three types
user-area :
Internal
CRT
.............e.......
Program
l
Note
Each
flexible
disc
contains
four
different
application
programs,
of
which
GENL
is one.
Refer
to
paragraph
3-87 for details
on the
furnished applications programs.
All data stored on the disc is retained; that is,
the disc is not erased when the instrument
is
turned off.
3-l 6. USER-AREA
FILING
OPERATIONS
3-17. The 4145A uses a 5.25 inch, single-sided,
single-density
flexible
disc as the storage
medium for its MSU (mass storage unit). Each of
the five work-discs
furnished with the 4145A
contains
the
necessary
operating
system
software,
four general
purpose measurement
programs, and enough user area for 131 records.
Up to 96 files can be stored in the user-area.
Note
A record is the minimum
unit for
storage on the disc. A file consists of
1, 3, or 12 records, depending on the
file type.
3-18
be stored
in
the
2.
Measurement data files-file
type D :
Specifying file type D in the SAVE command
reserves 12 records on the disc and stores
the measurement
setup and measurement
results
(GRAPHICS,
LIST, nwnux,
or
SCHMOO)
at
the
reserved
12-record
location.
3.
Auto-sequence program files-file
type S :
Specifying file type S in the SAVE command
reserves 1 record on the disc and stores the
existing
auto-sequence
program
at the
reserved l-record location.
MENU
Page
**=**** GENL
(see note)
previously
PLOT Area ........................
specified
(for external plotter)
values
Measurement
can
Measurement program files-file
type P :
Specifying file type P in the SAVE command
reserves 3 records on the disc and stores the
existing
measurement
setup
(channel
assignments,
parameter
settings,
graphic
scaling,
output
sequence,
etc.) at the
reserved S-record location.
Setup :
Display
files
1.
Front Panel Controls :
MEASUREMENT keys .~~~~~~.OFF
AUTO SEQ key . . . . . . . . . . . . . . . . . OFF
INTEG TIME keys •~~.~~~~~~~.
SHORT
PLOT/PRINT
keys •~~~~~~..~.~
OFF
AUTO CAL key . . . . . . . . . . . . . . . . ON
BLUE key . . . . . . . . . . . . . . . . . . . . . . . . . OFF
of
For more information
on file types, number of
records used, etc., refer to Figure 3-30, 4145A
FILE CATALOG
Page.
Four filing operations-SAVE,
GET, PURGE, and
REPACK-can
be performed
from the front
panel. Each is described below :
SAVE :
Used to store the existing
measurement
setup (except INTEG TIME, AUTO CAL, and
functions),
the
existing
sof tkey
output
sequence
auto-sequence
program,
setup, or the measurement
results.
SAVE
when
the
disc
is
cannot
be used
Before
saving
a
write-protected.
measurement
setup, a page check must be
performed (refer to para. 3-44). To SAVE a
file, press the SAVE key (SAVE will appear
on the Keyboard Input Line of the CRT) and
input the file type (P, D, or S) and file
name. The file name can contain up to six
characters,
of which the first
must be
alphabetic
and the last five must be
alphanumeric.
J
GET :
Used to recall user-stored
files from the
disc. GET cannot be used to recall any of
the furnished
measurement
programs.
To
GET a file from the user-area of the disc,
press the GET key (GET will appear on the
Keyboard Input Line of the CRT) and input
the file type (P, D, or S) and file name.
d
*
‘4
PTFE